
Для подключения файловой системы удаленного сервера в качестве сетевого диска в Windows можно использовать защищенный протокол SSH (вместо стандартного SMB/samba). Это удобно, когда нужно сделать файлы на удаленном SSH сервере доступными для локальной работы без использования дополнительных FTP/SFTP подключений. Для монтирования удаленных файловых систем в Windows можно использовать клиент SSHFS-Win. Этот клиент позволяет прозрачно подключать каталоги с удаленных компьютеров по протоколу SSHFS (основан на протоколе передачи SFTP, SSH File Transfer Protocol).
Можно скачать MSI установщик SSHFS-Win вручную или установить его через встроенный пакетный менеджер WinGet:
winget install SSHFS-Win.SSHFS-Win
Теперь можно смонтировать удаленную папку в виде сетевого диска прямо из проводника File Windows. Щелкните правой мышкой по значку Этот компьютер и выберите Подключить сетевой диск. Здесь нужно выбрать букву диска, которую нужно назначить и указать UNC путь к удаленной директории в формате:
\\prefix\\user@host[!PORT][\\PATH]
User
– учетная запись для аутентификации на удаленном SSH хосте
Host
– имя/IP адрес хоста
В качестве префикса нужно указать один из следующих значений:
-
sshfs
– подключиться в домашний каталог пользователя (в случае Windows это каталог профиля пользователя). Дополнительно указать относительный путь к людому каталогу в профиле пользователя. -
sshfs.r
– подключиться к корневой папке системы (в случае Windows это будет корень системного диска) -
sshfs.k
– подключиться в домашний каталог пользователя. Для аутентификации использовать SSH ключ в %USERPROFILE%/.ssh/id_rsa -
sshfs.kr
– подключиться к корневой директории с SSH ключом
Например, для монтирования каталога
C:\PS
с удаленного Windows хоста (на котором настроен SSH сервер), введите такой UNC путь:
\\sshfs.r\[email protected]\ps
При подключении появится запрос пароля удаленного пользователя для аутентификации (пароль можно сохранить в диспетчере учетных записей Windows).
После этого в проводнике Windows появится отдельной сетевой диск, подключенный по SSHFS.
Также можно подключить сетевой диск из командной строки с помощью стандартной команды
net use
.
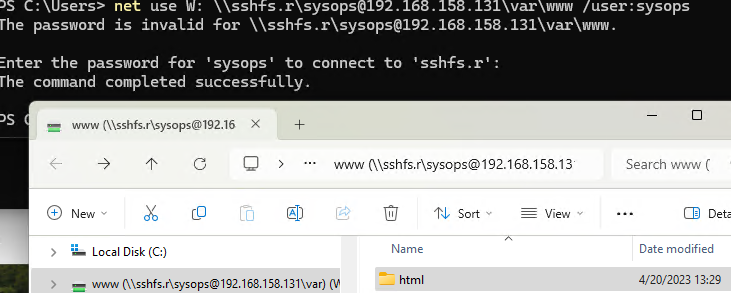
Следующая команда смонтирует каталог
/var/www
на Linux сервере в качестве сетевого диска Windows:
net use W: \\sshfs.r\[email protected]\var\www /user:sysops
Смонтировать локальную папку с Windows хоста:
net use m: \\sshfs.r\[email protected]\ps /user:administrator
При подключении нужно будет ввести пароль пользователя.
Подключенный таким образом сетевой диск будет существовать только до следующей перезагрузки компьютера. Чтобы автоматически переподключать диск при входе пользователя, в команду нужно добавить опцию
/persistent:yes
Чтобы не вводить пароль пользователя для подключения, можно сохранить пароль в Windows Credential Manager с помощью:
cmdkey /add:192.168.158.13 /user:sysops /pass:Passw0rdd1
Одновременно через провайдера WinFsp.Np может быть подключено несколько сетевых папок. Вывести список подключенных дисков:
net use
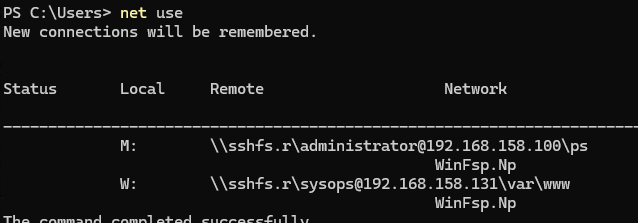
Удалить один из дисков:
net use M: /delete
В команде net use можно указывать пароль и в открытом виде, но безопаснее будет настроить монтирование удаленной папки с помощью аутентификации по SSH ключу.
Сгенерируйте SSH ключи в Windows с помощью утилиты
ssh-keygen
согласно мануалу по ссылке (не указывайте пароль для защиты закрытого ключа). Добавьте открытый ключ из файла .pub в файл
authorized_keys
(или
administrators_authorized_keys
) на удаленном SSH сервере.
Для автоматического подключения сетевого диска по SSH с аутентификацией по ключу при входе в Windows, можно создать задание планировщика которое будет запускать такой PowerShell скрипт:
$rUser = "administator"
$rHost = "m-fs01.winitpro.ru"
$remoteDir = "\Install"
$Drive = "M:"
$privSSHKey = "C:\secret\m-fs01-id_rsa"
cd  'C:\Program Files\SSHFS-Win\bin\'
$mountcmd = ".\sshfs-win.exe svc \sshfs.k\$rUser@$rHost$remoteDir $Drive -IdentityFile=$privSSHKey"
Invoke-Expression $mountcmd
Можно использовать графический клиент для создания подключений сетевых дисков по SSH. Самым простым и удобным является SSHFS-Win-Manager. Клиент
SSHFS-Win-Manager
позволяет создать несколько SSHFS подключений к удаленным файловым системам. Поддерживает аутентификацию, как по паролю так и ключу.

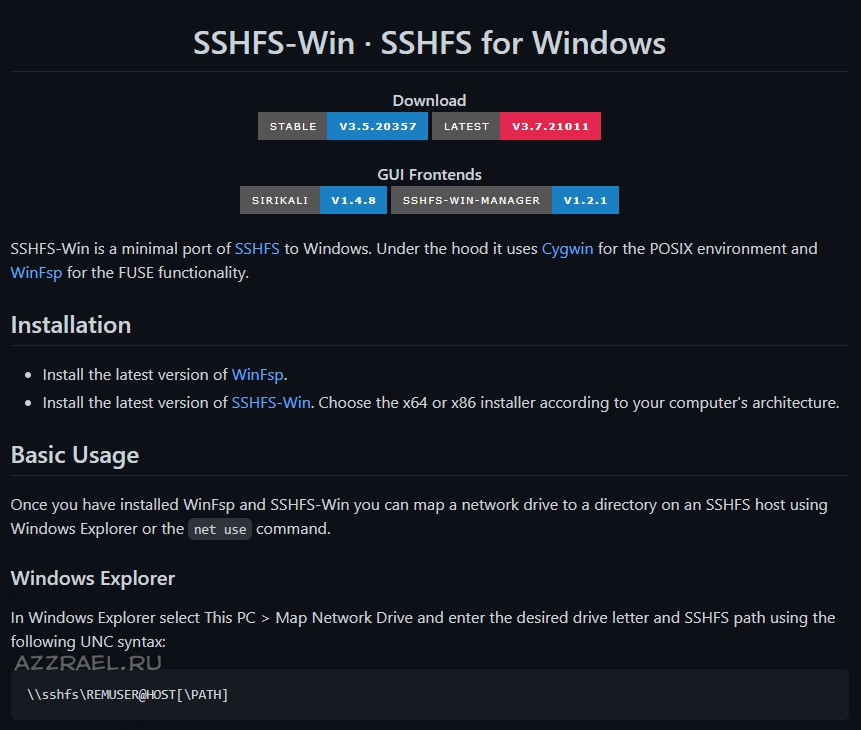
SSHFS-Win · SSHFS for Windows
Download
GUI Frontends
SSHFS-Win is a minimal port of SSHFS to Windows. Under the hood it uses Cygwin for the POSIX environment and WinFsp for the FUSE functionality.
Installation
- Install the latest version of WinFsp.
- Install the latest version of SSHFS-Win. Choose the x64 or x86 installer according to your computer’s architecture.
Both can also be easily installed with WinGet:
winget install SSHFS-Win.SSHFS-Win
Basic Usage
Once you have installed WinFsp and SSHFS-Win you can map a network drive to a directory on an SSHFS host using Windows Explorer or the net use command.
Windows Explorer
In Windows Explorer select This PC > Map Network Drive and enter the desired drive letter and SSHFS path using the following UNC syntax:
\\sshfs\REMUSER@HOST[\PATH]
The first time you map a particular SSHFS path you will be prompted for the SSHFS username and password. You may choose to save these credentials with the Windows Credential Manager in which case you will not be prompted again.
In order to unmap the drive, right-click on the drive icon in Windows Explorer and select Disconnect.

Command Line
You can map a network drive from the command line using the net use command:
> net use X: \\sshfs\billziss@mac2018.local
The password is invalid for \\sshfs\billziss@mac2018.local.

Enter the user name for 'sshfs': billziss
Enter the password for sshfs:
The command completed successfully.
You can list your net use drives:
$ net use
New connections will be remembered.


Status       Local     Remote                    Network

-------------------------------------------------------------------------------
             X:        \\sshfs\billziss@mac2018.local
                                                WinFsp.Np
The command completed successfully.
Finally you can unmap the drive as follows:
$ net use X: /delete
X: was deleted successfully.
UNC Syntax
The complete UNC syntax is as follows:
\\sshfs\[LOCUSER=]REMUSER@HOST[!PORT][\PATH]
\\sshfs.r\[LOCUSER=]REMUSER@HOST[!PORT][\PATH]
\\sshfs.k\[LOCUSER=]REMUSER@HOST[!PORT][\PATH]
\\sshfs.kr\[LOCUSER=]REMUSER@HOST[!PORT][\PATH]
REMUSERis the remote user (i.e. the user on the SSHFS host whose credentials are being used for access).HOSTis the SSHFS host.PORTis the remote port on the SSHFS host (optional; default is 22).PATHis the remote path. This is interpreted as follows:- The
sshfsprefix maps toHOST:~REMUSER/PATHon the SSHFS host (i.e. relative toREMUSER‘s home directory). - The
sshfs.rprefix maps toHOST:/PATHon the SSHFS host (i.e. relative to theHOST‘s root directory). - The
sshfs.kprefix maps toHOST:~REMUSER/PATHand uses the ssh key in%USERPROFILE%/.ssh/id_rsa(where%USERPROFILE%is the home directory of the local Windows user). To specify a different specific key, define an alias of the HOST with the specific private ssh key you want to use in the ssh config. BEWARE: only keys without a pass phrase are supported. - The
sshfs.krprefix maps toHOST:/PATHand uses the ssh key in%USERPROFILE%/.ssh/id_rsa. To specify a different specific key, define an alias of the HOST with the specific private ssh key you want to use in the ssh config. BEWARE: only keys without a pass phrase are supported.
- The
LOCUSERis the local Windows user (optional;USERNAMEorDOMAIN+USERNAMEformat).- Please note that this functionality is rarely necessary with latest versions of WinFsp.
GUI front ends
There are currently 2 GUI front ends for SSHFS-Win: SiriKali and SSHFS-Win-Manager.
SiriKali
SiriKali is a GUI front end for SSHFS-Win (and other file systems). Instructions on setting up SiriKali for SSHFS-Win can be found at this link. Please report problems with SiriKali in its issues page.
SiriKali supports:
- Password authentication.
- Public key authentication.
- Key Agents and KeePass 2.
SSHFS-Win-Manager
SSHFS-Win-Manager is a new GUI front end specifically for SSHFS-Win with a user-friendly and intuitive interface. SSHFS-Win-Manager integrates well with Windows and can be closed to the system tray. Please report problems with SSHFS-Win-Manager in its issues page.
SSHFS-Win-Manager supports:
- Password authentication.
- Public key authentication.
Using Jump Hosts
sshfs-win itself does not currently support ssh tunneling, but something similar can be achieved using the built-in openSSH of windows.
-
use openSSH t create a local port forward through the jump host to the target
ssh -L <origin port of jump connection>:<target of tunnel>:<port of target to target> <adress of tunnel jump host>All standard settings of the ssh config may be used in this step.
Reference example ssh config:
create the file C:\Users\<UserName>\.ssh\config and/or add the following lines: Host <jump host alias> Hostname <adress of jump host> User <user name at jump host> IdentityFile <path to private key for login to the jump host, may have a pass phrase> IdentitesOnly yes -
connect to the target server using the following
\\sshfs\REMUSER@localhost!<origin port of jump connection>or similar.
Advanced Usage
It is possible to use the sshfs-win.exe and sshfs.exe programs directly for advanced usage scenarios. Both programs can be found in the bin subdirectory of the SSHFS-Win installation (usually \Program Files\SSHFS-Win\bin).
The sshfs-win.exe program is useful to launch sshfs.exe from a cmd.exe prompt (sshfs-win cmd) or to launch sshfs.exe under the control of the WinFsp Launcher (sshfs-win svc). The sshfs-win.exe program SHOULD NOT be used from Cygwin. The sshfs-win.exe program has the following usage:
usage: sshfs-win cmd SSHFS_COMMAND_LINE
    SSHFS_COMMAND_LINE  command line to pass to sshfs

usage: sshfs-win svc PREFIX X: [LOCUSER] [SSHFS_OPTIONS]
    PREFIX              Windows UNC prefix (note single backslash)
                        \sshfs[.SUFFIX]\[LOCUSER=]REMUSER@HOST[!PORT][\PATH]
                        sshfs: remote user home dir
                        sshfs.r: remote root dir
                        sshfs.k: remote user home dir with key authentication
                        sshfs.kr: remote root dir with key authentication
    LOCUSER             local user (DOMAIN+USERNAME)
    REMUSER             remote user
    HOST                remote host
    PORT                remote port
    PATH                remote path (relative to remote home or root)
    X:                  mount drive
    SSHFS_OPTIONS       additional options to pass to SSHFS
The sshfs.exe program can be used with an existing Cygwin installation, but it requires prior installation of FUSE for Cygwin on that Cygwin installation. FUSE for Cygwin is included with WinFsp and can be installed on a Cygwin installation by executing the command:
$ sh "$(cat /proc/registry32/HKEY_LOCAL_MACHINE/SOFTWARE/WinFsp/InstallDir | tr -d '\0')"/opt/cygfuse/install.sh
FUSE for Cygwin installed.
Passing options to sshfs for mapped network drives
When using mapped network drives created in Windows Explorer or using «net use», you can’t directly pass options to sshfs. You can, however, pass them via a registry patch. When you then map a network drive or use «net use», the options are automatically passed in the background. Registry patches for common issues below are provided and serve as an example.
Preventing timeouts
A connection will timeout after some minutes when nothing is transferred. To prevent this, pass e.g. «-o ServerAliveInterval=30» as SSHFS_OPTIONS. A keep-alive request is sent every 30 seconds.
Map network drive or «net use»: Use the provided «ServerAliveInterval.reg» registry patch.
Setting looser permissions for new files and directories
On a shared file server, the default permissions for new files created may be too strict and prevent others from reading and writing them. To set looser permissions, pass e.g. «-o create_file_umask=0117,create_dir_umask=0007» as SSHFS_OPTIONS. This will allow owner/group read and write permissions on new files and owner/group read, write and execute permissions on new directories.
Map network drive or «net use»: Use the provided «GroupReadWrite.reg» registry patch.
Project Organization
This is a simple project:
sshfsis a submodule pointing to the original SSHFS project.sshfs-win.cis a simple wrapper around the sshfs program that is used to implement the «Map Network Drive» functionality.sshfs-win.wxsis a the Wix file that describes the SSHFS-Win installer.patchesis a directory with a couple of simple patches over SSHFS.Makefiledrives the overall process of building SSHFS-Win and packaging it into an MSI.
Building
In order to build SSHFS-Win you will need Cygwin and the following Cygwin packages:
- gcc-core
- git
- libglib2.0-devel
- make
- meson
- patch
You will also need:
-
FUSE for Cygwin. It is included with WinFsp and can be installed on a Cygwin installation by executing the command:
$ sh "$(cat /proc/registry32/HKEY_LOCAL_MACHINE/SOFTWARE/WinFsp/InstallDir | tr -d '\0')"/opt/cygfuse/install.sh FUSE for Cygwin installed. -
Wix toolset. This is a native Windows package that is used to build the SSHFS-Win MSI installer.
To build:
- Open a Cygwin prompt.
- Change directory to the sshfs-win repository.
- Issue
make. - The sshfs-win repository includes the upstream SSHFS project as a submodule; if you have not already done so, you must initialize it with
git submodule update --init sshfs.
License
SSHFS-Win uses the same license as SSHFS, which is GPLv2+. It interfaces with WinFsp which is GPLv3 with a FLOSS exception.
It also packages the following components:
- Cygwin: LGPLv3
- GLib2: LGPLv2
- SSH: «all components are under a BSD licence, or a licence more free than that»
Learn to leverage SSH Filesystem (SSHFS) on Microsoft Windows devices with this comprehensive guide. While our previous blog covered SSHFS usage on MacOS, this article shifts the spotlight to Windows. Discover the power of SSHFS for seamlessly mounting remote drives from Windows, Linux machines, and top cloud platforms like Amazon Web Services (AWS), Microsoft Azure, and Google Cloud. With SSHFS, data transmission occurs via the secure SSH protocol, utilizing TCP connection over port 22 to ensure dependable and efficient data transfer. Elevate your cross-device and cross-cloud file management with SSHFS.
Introduction
SSHFS uses the SSH protocol to mount a filesystem over SSH. This method is a quick and easy to get a filesystem up and running since most modern computers have SSH enabled by default. In order to use SSHFS on Microsoft Windows we are going to use SSHFS-Win which is an SSHFS port to Windows which uses Cygwin for the POSIX environment and WinFsp for FUSE functionality.
Installation
In order to use SSHFS on Windows we need to install the following packages:
-
WinFsp
-
SSHFS-Win
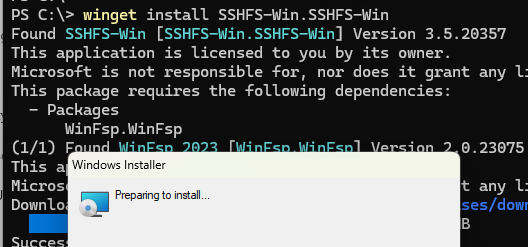
We can use the Windows Package Manager (winget) to easily install both packages from the Windows Terminal.
If you are unsure if you have the Windows Package Manager installed I have a blog post that goes over the verification, installation, and usage of winget. Before we install these packages let’s learn more about them using the winget show command after which we can use winget install.
WinFsp
WinFsp is a tool that allows developers and software engineers to to write their own file systems (Windows drives) as user mode programs and without Windows kernel programming knowledge. WinFsp is similar to FUSE (Filesystem in Userspace) for Linux and other UNIX-like systems.
winget show -e --id "WinFsp.WinFsp"
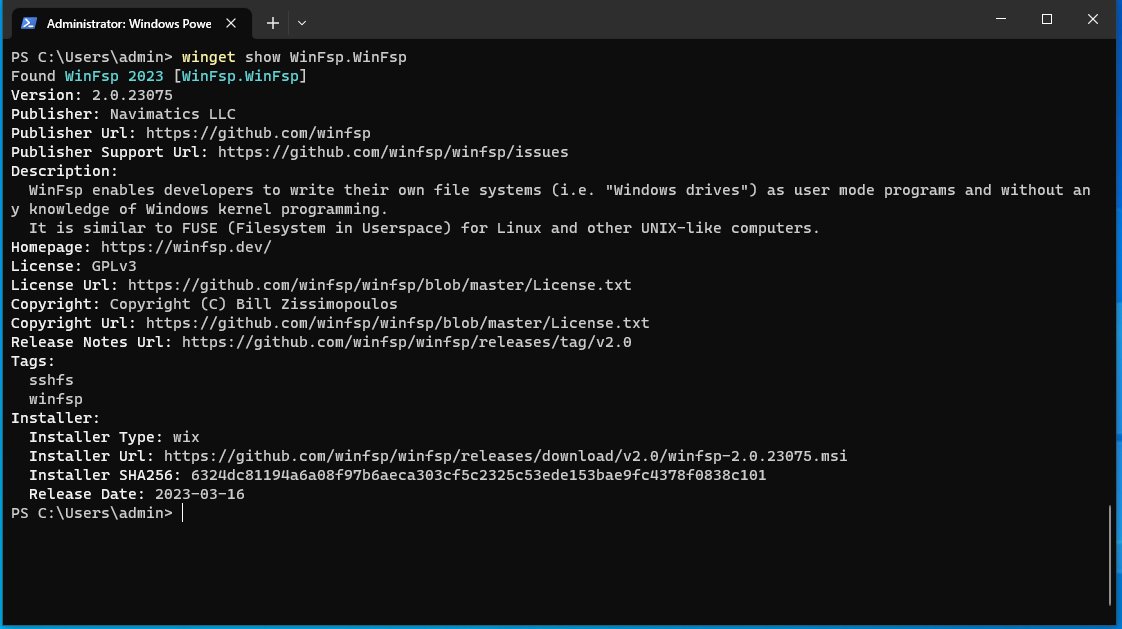
winget show WinFsp.WinFsp output
We can install the WinFsp.WinFsp package using the winget install command.
winget install -e --id "WinFsp.WinFsp"

winget install WinFsp.WinFsp output
Once WinFsp is installed we can proceed to installing SSHFS-Win.
SSHFS-Win
SSHFS-Win is a port of SSHFS to Windows as we learned in the introduction SSHFS-Win uses Cygwin and WinFsp. Let’s inspect the sshfs-win package using the winget show command.

winget show SSHFS-Win.SSHFS-Win output
We can install the SSHFS-Win.SSHFS-Win package using the winget install command.
winget install -e --id "SSHFS-Win.SSHFS-Win"

winget install SSHFS-Win.SSHFS-Win output
Once we’ve installed the WinFsp and SSHFS-Win packages we can proceed to use SSHFS to mount an external drive over SSH.
Mount an SSHFS Drive on Windows
Mounting an SSHFS drive on Windows is as simple as mapping a drive using Windows Explorer or a PowerShell terminal.
Adding an SSHFS Drive with Windows Explorer
In order to mount an SSHFS drive through Windows Explorer open Windows Explorer and right click This PC > Map network drive

Select This PC > Map network drive in Windows Explorer
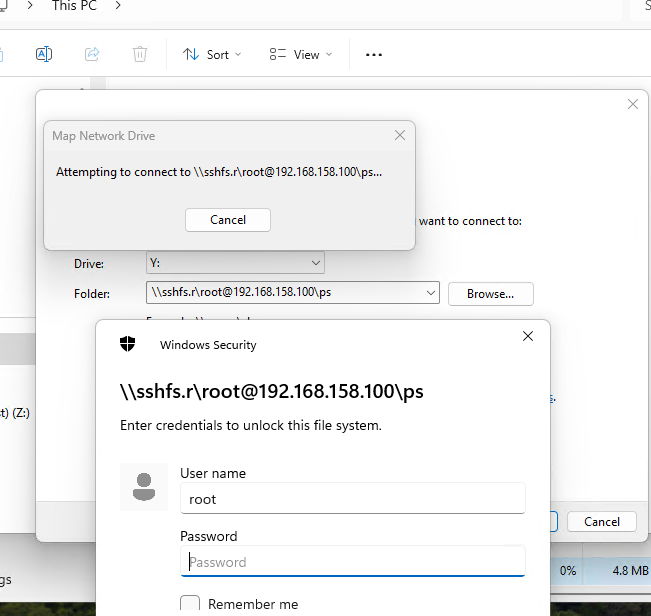
After this a Windows dialog will appear, in this window we need to specify the Drive to mount to as well as the external SSHFS Folder. In order to do so we need the username, host, and remote directory to mount.

Specify the Drive & remote SSHFS Folder to mount
We may be asked to provide a password when connecting to the remote machine.

Windows Security password prompt when connecting
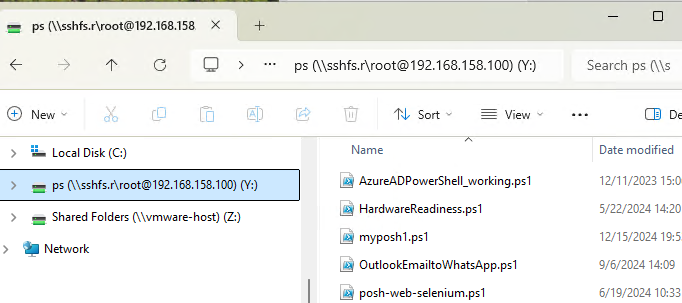
Once successfully mounted we’ll be able to see the newly mounted drive in Windows Explorer.

Mounted SSHFS drive in Windows Explorer
We have just successfully demonstrated mounting an SSHFS Drive using Windows Explorer, this drive is mounted over an SSH connection, awesome!
Adding an SSHFS Drive with PowerShell
In addition to mounting an SSHFS drive with Windows Explorer we can use do so through a PowerShell terminal with the net use command.
net use X: \\sshfs\gothburz@172.16.186.163/sshfs
Be sure to change the username@host/path string to correspond with your own environment.
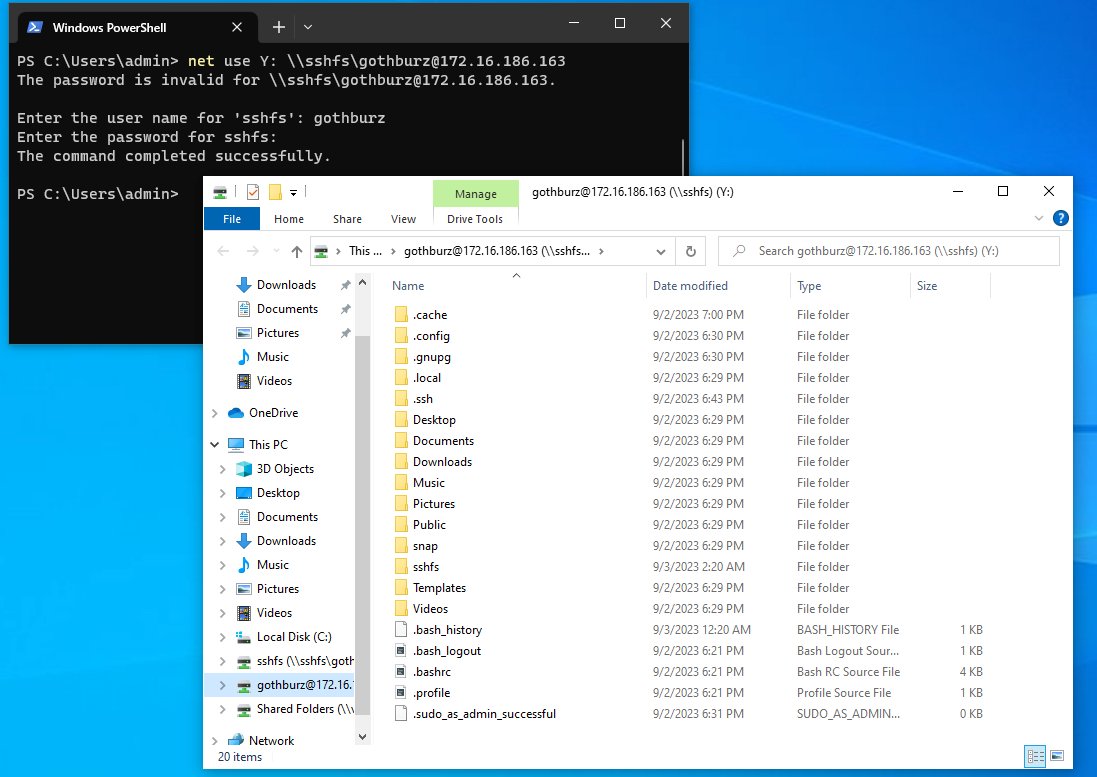
Mounting an SSHFS drive using the net use command

Confirming SSHFS drive mount with the ls command
When using the net use command to mount an SSHFS drive, you may be asked to enter a password to authenticate to the remote host. Once successfully mounted you’ll see a new Windows Explorer pop up with your newly mounted drive, fantastic!
If you you’d like to unmount the drive with net use you can use the following command along with the drive letter.

Using net use to delete a drive
Conclusion
In conclusion, this comprehensive guide highlights the usage of the SSH Filesystem (SSHFS) on Microsoft Windows devices. While our previous blog delved into SSHFS usage on MacOS, this article has provided a detailed exploration of leveraging SSHFS on Windows systems. By harnessing the capabilities of SSHFS, users can experience the seamless and convenient mounting of remote drives from a variety of sources, including Windows, Linux machines, and leading cloud platforms such as Amazon Web Services (AWS), Microsoft Azure, and Google Cloud.
I hope you found this article insightful, if you need any help using SSHFS on Windows feel free to message me on social media and see you in the next post. 
Сегодня расскажу как смонтировать папку (например, с сайтами) из Debian в Windows 10 по SSH (SFTP) с удобным включением/выключением. Под нужным пользователем (www-data) с нужными правами.
Ниже длинное вступление о том как и зачем мне это нужно. Его можно промотать.
Те кто читал мои посты в блоге и видел видосики на канале знают что в основном я занимаюсь разработкой своих сайтов на WordPress, Yii, Laravel. Основной инструмент — PhpStorm. Боевые проекты хостятся на разных вдсках в основном это FastVPS и RuWEB. Везде Debian + Nginx и везде более менее стандартный конфиг (с поправкой на версии и нагрузку кажого из проектов). Всего порядка десяка вдсок.
Разработка и бэкапы на локальной машине под Windows 10, где крутится усредненный аналог боевой конфиги в VirtualBox. Т.е. дев сервер сейчас это Debian 10 + Nginx 1.15.
Разработка и деплой на rsync
Со всех вдсок sh скрипт с помощью
ssh + rsync + mysqldump собирает текущие версии проектов и в итоге на дев инстансте всегда актуальные данные любого из проектов. На деве ведется разработка, тестирование, минификация, обфускация и т.д.После чего тем же скриптом изменения деплоятся на прод, на конкретную вдску. Git используется только на деве.
Я знаю про Docker 
Эта схема не тренд, а мой личный велосипед. Логичнее было все это хозяйство контейнезировать и деплоить через гит. Однако некоторые проекты контейнезировать без потерь крайне сложно, а городить разные инфраструктуры при работе в одни руки не эффективно. Мой велосипед вполне успешно работает уже много лет, но есть одна проблема, над которой я бьюсь столько же лет сколько велосипед существует.
Проблема на самом деле в PhpStorm
В PhpStorm когда вы создаете проект из ранее созданных файлов ( Create New Project from Existing Files ) у вас есть по сути два выбора — файлы проекта расположены локально или удаленно. Если создать проект из удаленных файлов, то PhpStorm будет скачивать их все на локальный диск для индексации. А при изменении закачивать их обратно на удаленный сервер (например по SFTP). Это не проблема, когда разработка идет на одном компьютере.
Разработка на разных компах, в разных сетях
Однако я работаю сразу на 3х — стационарный десктоп под Windows 10, два ноутбука. Один ноут используется дома (нравится мне менять места и позы во время работы), второй используется реже — вне дома. И в этом случае возникает сложность синхронизации локальных проектов одного и того же удаленного проекта. Особенно если это проекты с множеством мелких файлов. Например Laravel c Laravel Mix. Короче жуткая головная боль.
Монтирование папки из Debian все бы решило
Куда проще если бы можно было подмонтировать удаленную папку сайта и создавать проект в PhpStorm как с локальными файлами. В Ubuntu это делается элементарно, а вот под виндой все на порядок сложнее.
Вариант с Samba
В принципе дома у меня работала схема с Samba сервером на дев виртуалке под юзером www-data. Но если работать с дев сервером с улицы (через проброс портов через роутер) и если домашний ip динамический, то возникает несколько сложностей — нужно каждый раз менять ip, пробрасывать порт в роутере ещё и на самбу (лишняя уязвимость), перемонтировать диски. Короче хотелось так чтобы как в Ubuntu. И выход нашелся.
Монтирование папки из Linux (Debian) в Windows по SFTP
Для монтирования папки из Linux в Window 10 по SFTP я использую связку billziss-gh/winfsp + billziss-gh/sshfs-win . WinFSP — это порт https://github.com/libfuse/sshfs под винду. А sshfs — это как раз та сетевая файловая система что используется в Ubuntu для монтирования по SFTP. Как я и хотел.
Итак ставим сначала WinFSP, затем SSHFS-Win. Сразу после перезагрузки диски папки можно будет легко монтировать прямо из проводника Windows 10. См. картинку.
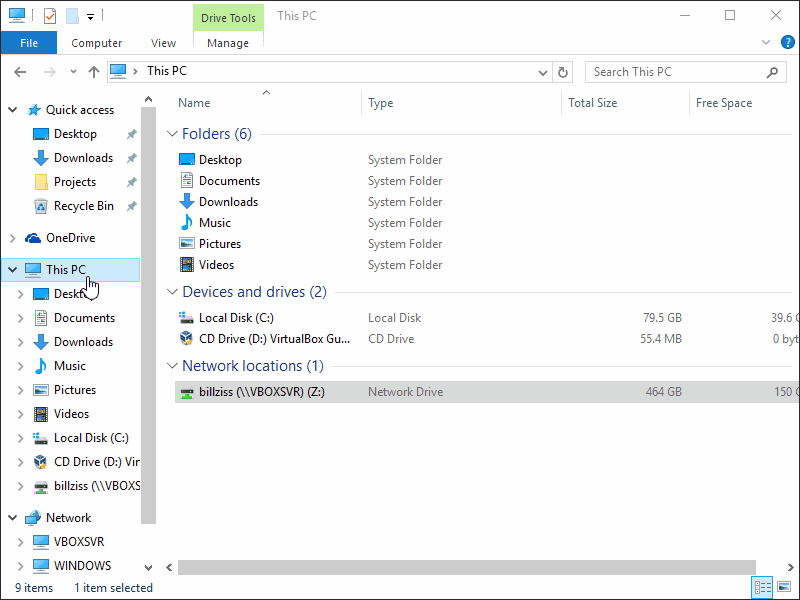
Монтирование папки через проводник в SSHFS-Win
Однако в моем случае это не решило проблему.
Нестандартные порты SSH при монтировании
При монтировании папки через проводник вы можете указать путь до папки на сервере, но не можете указать порт SSH, если ssh висит не на 22. Это можно сделать в командной строке
|
net use Z: \\sshfs\[LOCUSER=]REMUSER@HOST[!PORT][\PATH] |
Но тогда:
- проводник, а соотв. и PhpStorm не увидит примонтированный диск
- логин/пароль придется вводить каждый раз.
Есть ощущение что это все можно решить если глубоко погрязнуть в скрипты настройки SSHFS-Win, однако здесь есть и два GUI это SiriKali и SSHFS-Win-Manager .
SiriKali мне жутко не понравился, а вот SSHFS-Win-Manager прижился. Собственно его использование решает почти все проблемы для монтирования дисков из Linux в Windows 10 по SFTP. Я напишу о его настройке чуть ниже. Однако в моем случае просто монтирования было не достаточно.
SSHFS-Win проблемы с юзером и правами на новые папки и файлы
Я ведь все эту чехарду устроил ради разработки и мне нужно чтобы работа на подмонтированном диске была из под юзера
www—data юзер www-data по умолчанию не имеет доступа к консоли и под ним нельзя примонтировать диск. Также SSHFS-Win создает НОВЫЕ папки и файлы с правами 0700 (для уже созданных не меняет), а мне надо чтобы было 0755 на папки и 0644 на файлы.
Разрешаю монтирование под www-data
Это самое сомнительное решение. Во всей этой схеме. Однако для виртуалки за роутером я решил что сойдет.
|
sudo passwd www—data # задаем пароль для www-data |
И в файле
/etc/passwd правлю строку:
|
www—data:x:33:33:www—data:/home:/bin/bash |
Обрати внимание что я сменил и папку юзера на ту, которую буду монтировать. Перезагружаю виртуалку и все — под www-data можно логиниться и монтировать диски.
Права на вновь создаваемые папки и файлы под SSHFS-Win
Для задания нужных прав у WinFSP есть опции
create_file_umask и
create_dir_umask . Их можно использовать в командной строке, однако проще в SSHFS-Win-Manager . Смотри картинки ниже.
Настройки SSHFS-Win-Manager
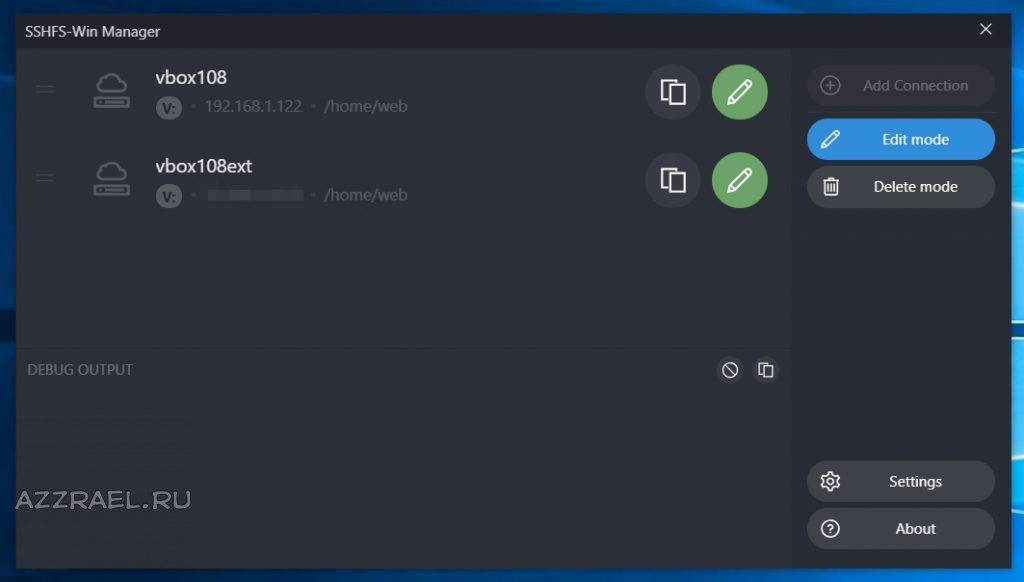
Здесь я создал два диска с одной буквой. Все эти маунты ведут на одну и туже виртуалку VirtualBox. Но один на внутренний IP, а второй через внешний динамический IP (через роутер с проброшенными портами на 80, 443 и ssh). Т.е. дома я монтирую верхний вариант и проброс в роутере могу вообще закрыть. А если работаю вне дома, то монтирую нижний. При этом для PhpStorm это всегда один и тотже локальный диск V. Невероятно удобно.

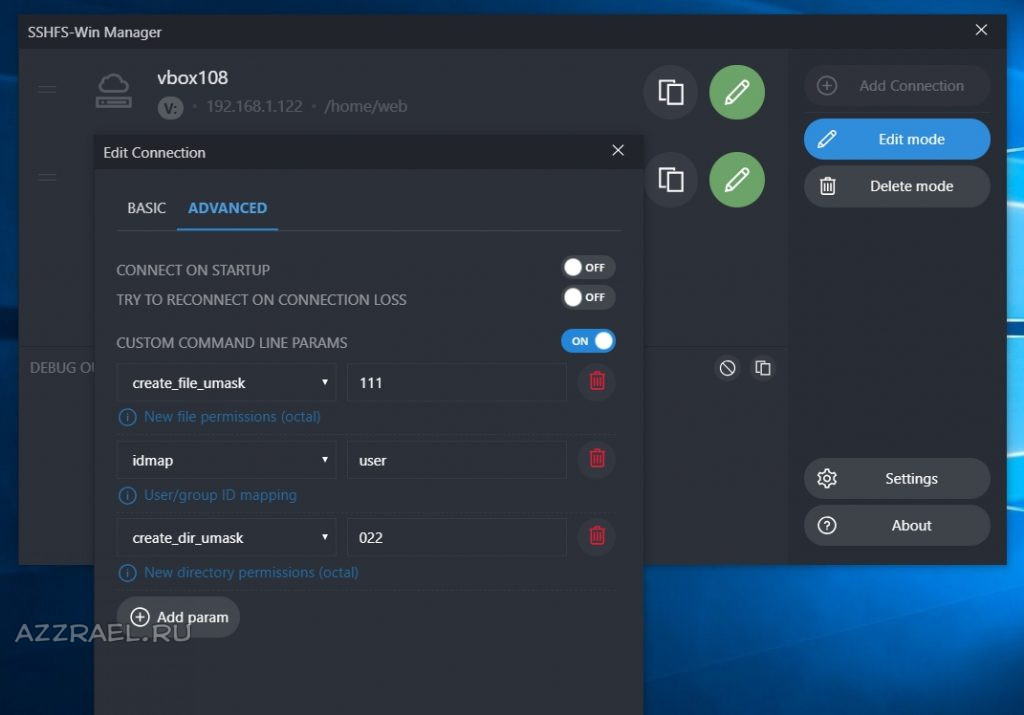
На этой картинки расширенные настройки, которые позволяют выставить нужные мне права (0755 / 0644). Если тебе нужны другие права гугли “permission umask ”.
На данный момент схема хорошо работает. На 4G Laravel проект под PhpStorm индексируется на 20-30 секунд, что более чем приемлемо. Если есть что дополнить или вопросы — пиши комменты (могут отлетать в премодерацию — это норма, я одобрю и отвечу). Также я есть в Телеграм.
SSHFS-Win Manager
SSHFS-Win Manager is an easy-to-use, secure file transfer software that helps users transfer files quickly and securely between Windows and Linux-based systems. SSHFS-Win Manager allows users to mount a remote Linux file server as a local drive on their Windows computer, providing a secure, convenient way to access files stored on the remote server. The software is designed to be user-friendly and easy to set up, making it ideal for home, small business, or enterprise users.
SFTP SSHFS-Win Manager provides an easy-to-use graphical user interface for managing and mounting remote file systems.
Features:
• Secure File Transfer: SSHFS-Win Manager provides secure file transfer between Windows and Linux-based systems, allowing users to access files stored on the remote server.
• Easy Setup: SSHFS-Win Manager is designed to be user-friendly, making it easy to set up and use.
• Mount Remote Drives: SSHFS-Win Manager allows users to mount remote Linux file servers as local drives on their Windows computer.
• Remote Access: SSHFS-Win Manager provides users with secure remote access to files stored on the remote server.
• Automation: SSHFS-Win Manager can be used to automate file transfers, making it easier and faster to access files stored on the remote server.
• Multi-Platform Support: SSHFS-Win Manager supports Windows, Linux, and MacOS, allowing users to access files on all platforms.
• Real-Time Updates: SSHFS-Win Manager provides real-time updates on the status of file transfers and remote drives.
• File Synchronization: SSHFS-Win Manager can be used to synchronize files between Windows and Linux-based systems, making it easier to keep files up to date.
• Encryption: SSHFS-Win Manager provides encryption for data in transit and at rest, protecting files from unauthorized access.
• Remote Administration: SSHFS-Win Manager provides administrators with the ability to manage and monitor file transfers and remote drives from a remote location.
• User Management: SSHFS-Win Manager provides user management features, allowing administrators to control who can access files stored on the remote server.
Conclusion
SSHFS-Win Manager is an easy-to-use, secure file transfer software that helps users transfer files quickly and securely between Windows and Linux-based systems. SSHFS-Win Manager allows users to mount a remote Linux file server as a local drive on their Windows computer, providing a secure, convenient way to access files stored on the remote server. The software is designed to be user-friendly and easy to set up, making it ideal for home, small business, or enterprise users.
The SSHFS-Win Manager software requires the following technical requirements:
• Operating System: Windows 7 or higher
• Processor: Intel or AMD with 1 GHz or higher
• RAM: 512 MB or higher
• Hard disk: 20 MB or higher
• Network: Ethernet or 802.11b/g/n
• File System: NTFS or FAT32
• SSH Server: OpenSSH or Dropbear
• SSH Client: PuTTY or WinSCP