
Built-in SSH X11 forwarding in PowerShell or Windows Command Prompt
- Running X410 on HiDPI Screens
- Selecting a Keyboard Layout
- Automatically Start X410 on Login
- Command-Line Switches
- Adding your own X-Window bitmap or TrueType fonts to X410
- Enabling indirect GLX / OpenGL
- X11 forwarding over SSH
- Built-in SSH X11 forwarding in PowerShell or Windows Command Prompt
- Enabling SSH X11 forwarding in Visual Studio Code for remote development
- Enabling the new UI in IntelliJ IDEA running on WSL or over SSH X11 forwarding
- Add yourself to Hyper-V Administrators group and freely use Hyper-V related commands without becoming a full system administrator
- How to install ‘X410 (Version 3)’ from Microsoft Store
Troubleshooting
- Testing DISPLAY environment variable
- X410 Known Issues and Workarounds
- Fixing «javaldx: Could not find a Java Runtime Environment!» for LibreOffice in Ubuntu/WSL2
- Firefox tabs are crashing in WSL. Now what?
- Using X410 with WSL2
- Where should I add my DISPLAY environment variable in WSL?
- Sharing D-Bus among WSL2 Consoles
- Directly opening Linux GUI apps from Windows batch files
- Pin a Linux GUI app to Start or Taskbar
- Why you should uninstall screen savers and lockers in WSL
- Protecting X410 Public Access for WSL2 via Windows Defender Firewall
- X410 vs. WSLg
- Disabling WSLg (or using it together with X410)
Windowed Apps Mode
- Enable systemd and simplify running Linux apps like Windows apps in Ubuntu GUI style
- Running WSL2 Linux GUI apps like Windows apps in Ubuntu themes and colors
- Opening a genuine Linux terminal emulator directly from File Explorer
- Opening Firefox in WSL2 without Windows default title bar
- Setting the Theme for Linux GUI Apps (Windowed Apps Mode)
- Get your sidekick for easily managing and launching Linux GUI apps (WSL)
Floating Desktop Mode
- Enable systemd in WSL2 and have the best Ubuntu GUI desktop experience!
- Running Ubuntu Desktop in WSL2
- Creating a Windows Shortcut for Linux GUI Desktop (WSL)
- Customizing Xfce Desktop for Ubuntu (WSL)
- Running Xfce Desktop on Kali Linux (WSL)
- Installing Pantheon Desktop on Ubuntu (WSL)
Tips and Tricks
- Enabling sound in WSL / Ubuntu — Let It Sing!
- Sharing Windows fonts with WSL
- Using X410 with Hyper-V virtual machines
- Adding entries to Windows registry for VSOCK connections in Hyper-V virtual machines
- Quick Testing Hyper-V VSOCK Support in X410
- Opening Ubuntu Desktop in Hyper-V VM on X410 over VSOCK
- Using X410 with Docker Desktop for Windows
- Launching Linux GUI apps from the Docker Console in Token2Shell (Store App)
- Sharing Windows fonts with Docker containers
Windows 10 version 1809 or later has a built-in SSH client. It’s a portable version of OpenSSH client built for Windows and has options for X11 forwarding. However, that X11 forwarding options didn’t work in earlier versions.
Fortunately, if you’re using version 8.1p1 or later of the built-in SSH client, you can finally use it for X11 forwarding. The following steps show how you can use the X11 forwarding with the built-in SSH client in Windows and X410.
Run X410
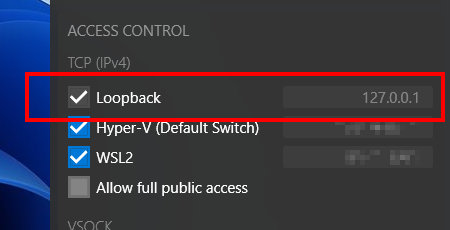
X410 is always listening on 127.0.0.1 (also known as localhost). Since that address can also be used for X11 forwarding in the built-in SSH client, you don’t need to configure anything in X410; you just need to make sure X410 is running.
Check your built-in SSH client version
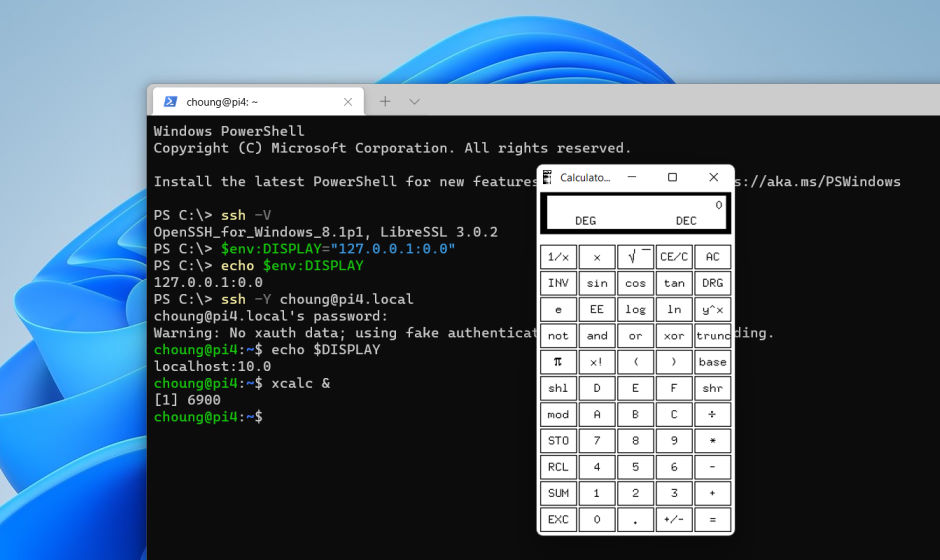
C:\> ssh -V
OpenSSH_for_Windows_8.1p1, LibreSSL 3.0.2
If you have an older version, you can try installing the latest version as described below:
https://github.com/PowerShell/Win32-OpenSSH/wiki#installation
Set DISPLAY environment variable for Windows
If you’re using X410 in its default display number setting which is set to 0, you can use the following examples as is. However, if you changed the display number via X410 command-line switches, you need to adjust the appending display number; 127.0.0.1:<display_number>.0. For example, if the display number is changed to 1, you should set the DISPLAY environment variable to 127.0.0.1:1.0 (you can also omit the last .0 and just use 127.0.0.1:1).
Windows Command Prompt |
PowerShell |
|---|---|
|
|
If you want to check the DISPLAY environment variable, you can use echo command. |
|
|
|
If you want to permanently add the DISPLAY environment variable to Windows, you can setx command:
setx DISPLAY "127.0.0.1:0.0"Please note that executing setx command prepares the environment variable for the future PowerShell or Windows Command Prompt sessions. Hence, if you’ve executed setx command in a Windows Terminal tab, you need to start a new instance of Windows Terminal in order to access the DISPLAY environment variable (just opening another tab in Windows Terminal will *not* work).
Start the built-in SSH client with -Y option
There is also a -X option for X11 forwarding. But that option cannot be used with X410.
ssh -Y <your_user_id>@<server_address>Once you’re connected to your server, you can check if X11 forwarding is ready for your Linux GUI apps by checking the DISPLAY environment variable with echo command; executing echo $DISPLAY should show localhost:10.0 or similar instead of a blank line.
Please note that the DISPLAY environment variable on your server is automatically set by the SSH server. It doesn’t need to be the same as the DISPLAY environment variable that you set in Windows, and you must *not* try to manually override it.
Share This Story, Choose Your Platform!
Page load link
Go to Top
- IT
- Cancel
Статья взята отсюда —>> http://blog.kansoftware.ru/?p=239 (И немного отредактирована)
Итак, чтобы PuTTY могла форвардить иксовые окошки на Windows, ее необходимо настроить следующим образом:
Session > пишем имя хоста.
Connection > SSH > X11 > включаем «Enable X11 forwarding» и пишем в X display location : localhost:0.0
Connection > SSH > включаем «Enable compression» (для медленных соединений очень полезная вещь).
Сохраняем сессию в Session.
Настройка Putty на этом закончена. Далее нам понадобиться программа для отрисовки всей перенаправленной графики. Для этого качаем http://sourceforge.net/projects/xming/ и устанавливаем ее. В процессе установки можете отменить установку ssh клиента, так как у нас уже есть Putty. После установки просто запускаем Xming и все, никакой конфигурации можно не делать. Он будем спокойно висеть в трее.
Завершающим шагом будем настройка форвардинга на сервере. Логинимся и идем редактировать /etc/ssh/sshd_config. Ищем и раскоментируем строку:
#X11Forwarding yes
Сохраняем и перезапускаем sshd:
# /etc/init.d/ssh restart
Проверяем определена или нет глобальная переменная DISPLAY. Смотрится командой env.
Если не установлена то делаем следующее:
$ DISPLAY=localhost:10.0
$ export DISPLAY
На этом вся настройка закончена. Теперь осталось зайти с помощью Putty на ssh (с включенyыми ранее параметрами и запущенным Xming) и запустить любую иксовую программу.

Разве что ленивый не писал про ssh и несмотря на это, данный протокол и его возможности не перестают меня восхищать. Здесь я хочу поделиться исключительно своим опытом использования сего замечательного инструмента в своих задачах (При этом активно применяю его даже при разработке на Windows).
Поскольку я программист, то инструментарий ssh часто нужен мне в разработке и для личных нужд. Самые частые задачи, которые я выполняю с его помощью (по частоте использования):
- Удалённый доступ — логично, ведь для этого он и предназначался.
- Монтирование папок по сети — очень удобно для работы с кодом на удалённой машине.
- Удалённое выполнение команд — нечастая, но используемая мной операция. Удобно получать выхлоп команды в канал другой команды на текущей машине.
- Запуск графических приложений на удалённой машине.
- Проксирование трафика — способ перенаправления трафика. Этакий быстрый и простой аналог VPN.
- Обратный ssh — использую для проброса портов к системам, находящимися за NAT, когда лень настраивать firewall.
Далее вкратце разберу каждый пункт, и особенно пути эффективного и простого использования под Windows.
Конфигурирование рабочей машины
Забавно, что в различных примерах использования ssh, этот важнейший момент обходят стороной, хотя, как по мне — он ключевой. Приведу вполне живой пример, того, как я делаю первичную настройку сервера под себя.
После того как я выбрал и заказал себе сервер VPS, у меня в панели создания сервера появляется логин и пароль, и как это не удивительно — логин root.

Результат создания сервера
Первое, что нужно сделать прямо сразу после создания сервера: отключить логин по руту, настроить фаервол и проковырять в нём дырочку для корректной работы ssh. В идеале отключить логин по паролю и оставить только логин по ключу.
Когда-то я уже делал хороший гайд в наш Справочник о первичной настройке Ubuntu 18.04. Вся информация актуальна и применима к Ubuntu 20.04. Подробно расписывать, что я делаю — не буду, но дам небольшие пояснения.
ssh remotehost #заранее прописал ip сервера в /etc/hosts
adduser dlinyj #добавляем нового пользователя
usermod -aG sudo dlinyj #добавляем пользователя в группу sudo
Обращаю внимание, что я создаю пользователя такого же, как и на локальной машине, и поэтому — далее по тексту его не указываю. Если у вас пользователь отличается от того, что на сервере, то логиниться нужно через user@remotehost.
Далее необходимо отключить логин пользователя root. Это очень важно, потому что, в конце концов, методом перебора сервер рано или поздно будет взломан.
nano /etc/ssh/sshd_config
Находим строчку, содержащую PermitRootLogin, и меняем её на состояние no.
PermitRootLogin noПосле этого перезапускаем ssh-сервис.
service sshd reloadОбязательно рекомендую проверить, что вы больше не можете зайти под рутом с тем же паролем, и эти изменения успешно применились.
После чего проверяю успешность подключения от своего аккаунта dlinyj, и затем копирую ключи. Логин по ключам имеет две цели: не вводить пароль каждый раз вручную, и просто отключить логин по паролю. Ключи перебрать значительно сложнее, чем пароль по словарям. Главное — не забыть сгенерировать пару ключей командой ssh-keygen. Можно сделать сложные ключи, а можно более простые. Тут уж дело вкуса, а я особо не заморачиваюсь и просто запускаю данную команду.
ssh-keygenПосле успешной генерации пары ключей: публичного и приватного, копируем публичный ключ с помощью следующей команды:
ssh-copy-id remotehostПроверяем логин. Введя ssh remotehost — мы должны сразу зайти на удалённый сервер с текущим логином.
После чего можно и вовсе отключить логин по паролю. Если вы единолично используете сервер, то это лучший вариант. Меня пугает ситуация, что если я потеряю приватный ключ, то попасть на сервер будет проблематично, но не сказать об этом нельзя.
Снова редактируем файл:
sudo nano /etc/ssh/sshd_config
Находим строку PasswordAuthentication, раскомментируем её и ставим no. Всё, перезапускаем ssh сервис командой sudo service sshd reload и наслаждаемся жизнью. Также настоятельно рекомендую настроить фаервол, согласно мануалу.
В заключении главы хочу порекомендовать внимательно посмотреть на все возможные настройки sshd, которые кроются в конфигурационном файле. Можно ограничить время сессии, количество подключений и многое другое.
Мои основные применения ssh
Итак, пробегусь по основным применениям ssh, кроме банального удалённого доступа.
▍ Удалённое выполнение команд
Простейший пример — это выполнить и записать команду сразу после адреса удалённого хоста.
Например:
ssh remotehost cat /etc/passwd | grep dlinyjВернётся следующая строка:
dlinyj:x:1000:1000:,,,:/home/dlinyj:/bin/bashОбратите внимание, что grep выполнился уже на стороне машины, с которой мы делали запрос. Это можно увидеть, если добавить вывод, например, ip-адреса:
ssh remotehost cat /etc/passwd | grep dlinyj;ip a
dlinyj:x:1000:1000:,,,:/home/dlinyj:/bin/bash
...
2: enp6s0: <BROADCAST,MULTICAST,UP,LOWER_UP> mtu 1500 qdisc fq_codel state UP group default qlen 1000
    link/ether 00:**:**:**:**:** brd ff:ff:ff:ff:ff:ff
    inet 192.168.**.**/24 brd 192.168.**.** scope global dynamic noprefixroute enp6s0
       valid_lft 378sec preferred_lft 378sec
...
Если мы хотим, чтобы цепочка команд была выполнена на стороне хоста, то следует брать команды в кавычки.
ssh remotehost "cat /etc/passwd | grep dlinyj;ip a"
dlinyj:x:1000:1000:,,,:/home/dlinyj:/bin/bash
...
2: eth0: <BROADCAST,MULTICAST,UP,LOWER_UP> mtu 1500 qdisc mq state UP group default qlen 1000
    link/ether 00:**:**:**:**:** brd ff:ff:ff:ff:ff:ff
    inet ***.***.***.***/** scope global eth0
       valid_lft forever preferred_lft forever
При этом бывает удобно использовать как первый, так и второй вариант. При первом варианте удобно получать выхлоп в свои скрипты, а при втором — делать что-то большое на удалённом сервере.
▍ Копирование файлов «на» и «с» удалённого хоста
В линуксе достаточно банальная операция копирования по протоколу scp, которая осуществляется с помощью команды scp. Данная программа используется точно так же, как и команда cp, с той особенностью, что надо указывать адрес удалённого сервера. Пример использования:
$ touch testfile
$ scp testfile remotehost:~/
testfile                      100%    0     0.0KB/s   00:00
$ ssh remotehost ls testfile
testfile
Здесь я создал файл, затем скопировал его на удалённый хост (в домашнюю папку), и после, проверил его существование. Аналогично можно копировать и в обратном направлении.
▍ Монтирование удалённых папок
Для меня это является чуть ли не самой часто используемой функцией. Даже научился через тернии использовать её в Windows. Монтирование папок с удалённого хоста чаще всего использую для разработки на удалённом сервере, особенно если он какой-то отличный от x86 архитектуры. Да, Visual Studio Code умеет работать по ssh, но мне этот функционал не понравился. Плюс, не на каждый удалённый хост можно поставить дополнительные пакеты, чтобы работало всё гладко и там был поиск по файлам внутри студии. Когда программа большая (например, исходники Android) — поиск по файлам бывает очень нужен.
Очень удобно работать с удалённой папкой локально, будто бы она находится здесь и сейчас. Единственное, чего мне не хватает в этом функционале — это корректная работа inotify для отслеживания изменений файлов на удалённой машине. С такими примонтированными папками можно творить потрясающие штуки. Например, я организовывал взаимодействие двух сервисов, данные которых обменивались через примонтированные по ssh каталоги. Единственное, что не удалось — отслеживать изменения файлов, выполненные удалённой машиной. Тут пришлось изобретать другие схемы синхронизации.
Для того чтобы монтировать удалённые папки, нужно установить приложение sshfs.
sudo apt install sshfsТеперь можно сделать монтирование удалённой папки. Для этого нужно указать локальную точку монтирования и путь к удалённой папке. Например, смонтируем папку home удалённого сервера — в папку ~/home локальной машины:
mkdir ~/home
sshfs remotehost:/home/dlinyj/ ~/home
В том, что монтирование прошло успешно, можно убедиться командой mount:
mount
....
remotehost:/home/dlinyj/ on /home/dlinyj/home type fuse.sshfs (rw,nosuid,nodev,relatime,user_id=1000,group_id=1000)
Убедимся, что папка не пуста:
ls -la ~/home/
итого 40
drwxr-xr-x  1 dlinyj dlinyj 4096 июл 11 23:49 .
drwxr-xr-x 28 dlinyj dlinyj 4096 июл 12 00:01 ..
-rw-------  1 dlinyj dlinyj  983 июл 11 23:46 .bash_history
-rw-r--r--  1 dlinyj dlinyj  220 июл 10 21:40 .bash_logout
-rw-r--r--  1 dlinyj dlinyj 3771 июл 10 21:40 .bashrc
drwx------  1 dlinyj dlinyj 4096 июл 10 21:44 .cache
drwxrwxr-x  1 dlinyj dlinyj 4096 июл 10 22:39 .local
-rw-r--r--  1 dlinyj dlinyj  807 июл 10 21:40 .profile
drwx------  1 dlinyj dlinyj 4096 июл 10 23:25 .ssh
-rw-r--r--  1 dlinyj dlinyj    0 июл 10 21:41 .sudo_as_admin_successful
-rw-------  1 dlinyj dlinyj   57 июл 11 23:49 .Xauthority
Это самый крутой инструмент ssh, который приводит меня в полнейший восторг. Если бы можно было монтировать под Windows удалённые папки из Linux-машин, то было бы просто великолепно. Хотя и это тоже возможно сделать без особых проблем.
▍ Запуск удалённых графических приложений
Это называется X11 Forwarding, и для того чтобы продемонстрировать данный функционал, необходимо настроить ssh-демон. Снова на удалённом сервере редактируем файл sshd_config:
nano /etc/ssh/sshd_config
Находим там строку X11Forwarding, раскомментируем её и ставим значение yes:
X11Forwarding yes
И после — не забываем перезапустить сервис sshd.
service sshd reloadЧтобы показать работу «проброски окошек» — нужно на чистый сервер без «иксов», установить хоть какие-нибудь X-приложения. Для этого я выполнил:
sudo apt install x11-apps
Это легковесный пример графических приложений, который для своей установки не требует много места. Отключаемся от удалённого сервера комбинацией клавиш ctrl-d (deattach) и подключаемся уже с опцией -X:
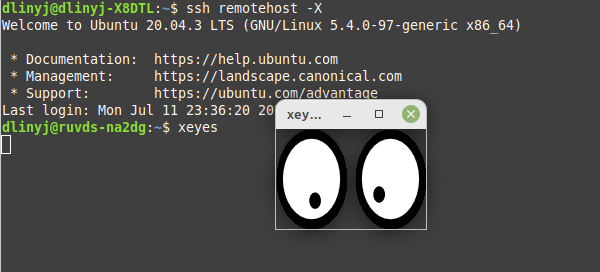
Глазки удалённого сервера следят за вашей мышкой
Как видно, графические приложения удалённого сервера прекрасно взаимодействуют с мышью.
Но к сожалению — не всё так радужно. Конечно, можно весь оконный менеджер так запустить, и оно будет работать, но будет дико тормозить. Обычно подобный запуск я использую исключительно для того, чтобы посмотреть какие-то графики, картинки, или глянуть последнюю вкладку в браузере на удалённом сервере. Последний раз, когда пробовал пробрасывать окошко логического анализатора — пользоваться этим было практически невозможно. Для полноценной работы всё же лучше использовать RDP.
▍ Проксирование трафика
Не могу сказать, что часто использую данный функционал, но несколько раз он меня выручал. Он особенно полезен, если нужно пропустить трафик через удалённый сервер, а морочиться с настройкой нормального VPN нет времени или желания. Этакий туннель для бедных.
Если посмотреть все мануалы про то, как проксировать трафик, то там приводится просто команда ssh, но совершенно не рассказывается о том, как настроить демона. При этом команда выполнится, но фокуса не произойдёт. Поэтому начну с главного — как разрешить проксирование. Для этого снова редактируем наш многострадальный файл конфигурирования демона ssh.
Находим там следующую строку, раскомментируем её и приводим к виду:
AllowTcpForwarding yes
Сохраняем файл и перезапускаем демон. После этого можно создать канал прокси к нашему серверу следующей командой:
ssh -D 8888 remoteserver
Где 8888 — локальный порт для прокси. Всё, теперь с данным прокси можно настроить и браузер. Пример настройки для firefox:
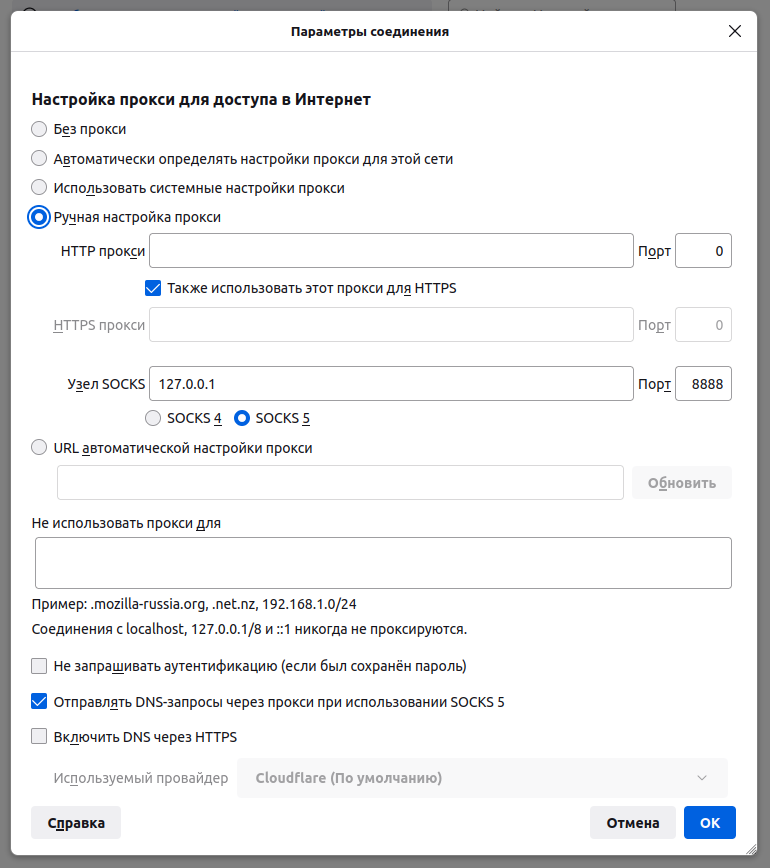
С хромом — ещё проще. Достаточно запустить его из командной строки:
google-chrome --proxy-server="socks5://localhost:8888Если теперь перейти на сайт myip.ru, то там будет отображаться адрес вашего сервера:

Тут адрес вашего сервера
Таким образом, проксирование успешно работает. Отмечу, что это не такой уж и экзотический способ. Для смартфонов есть даже всякие приложения, которые умеют проксировать весь трафик мобильного устройства.
▍ Обратный ssh
Эта опция прям редко-редко мной использовалась, но были случаи, когда реально выручала. Суть такова — ваш домашний компьютер, либо какое другое устройство под управлением *nix находится за NAT и у вас нет выделенного IP. Есть множество решений этой проблемы, но, как по мне, идеальным решением будет обратный ssh. Со мной многие не согласятся и будут даже правы, но для меня это простой и понятный путь. Не агитирую.
Создаётся ssh соединение, по которому с удалённого сервера можно будет подключиться к вашему домашнему ПК. Итак, с домашнего ПК необходимо выполнить следующую инструкцию:
ssh -R 5544:localhost:22 remotehostОпция R говорит перенаправлять порт удалённого хоста на указанный порт локального компьютера. Выполняем её и у нас будет поднято ssh-соединение до удалённого сервера. Если теперь подключиться к удалённому серверу, например, с работы, то можно получить доступ к домашней машине следующей командой:
ssh localhost -p 5544Вжух, и вы на своей домашней машине, вне зависимости от того, где она находится.
Особенность в том, что на домашнем компе надо держать активную сессию и плюс — данные не сжимаются. Поэтому немного модифицируем инструкцию, чтобы всё работало быстрее.
ssh -fCNR 5544:localhost:22 remotehost-fвыполняет команду ssh в фоновом режиме, однако, если закрыть окно терминала — сессия прервётся (используйте nohup),-Cсжатие данных,-Nне выполнять удалённые инструкции.
Если хочется, чтобы можно было подключиться извне, то нужно на удалённом хосте тоже сделать перенаправление портов. Делается следующей командой и выполняется на хосте:
ssh -fCNL *: 1234: localhost: 8888 localhost -fФон.-CСжатие.-NНе выполнять инструкции.-LПеренаправляет порт на локальной машине (клиенте) на указанный порт, указанной удалённой машины.
Всё. Проковыриваете дырку в фаерволе для порта 1234 и из внешнего мира можно подключиться к вашему домашнему компьютеру, просто подключившись к remotehost по порту 1234.
Из недостатков способа можно отметить то, что сессия рвётся по таймауту, и если вдруг произошло отключение (плохой интернет), то связи больше не будет. Но специально для нас придумали autossh. Параметры такие же, как и у ssh, только он восстанавливает соединение после разрыва. Подробнее можно прочитать тут.
А как же Windows?
Ох, ОС Windows — это моя личная боль, при использовании ssh. Всем хороша операционная система, но плохо совместима с linux. На одной работе локальные компьютеры были под Windows, а разработка велась на удалённом сервере под Linux. При этом установить linux локально запрещала политика компании, как и ставить какой-либо иной софт, кроме разрешённого скромного списка. И эта личная боль (и опыт), решение которой я хочу изложить в этой части статьи.
Из широко распространённых инструментов можно отметить консольный клиент putty, который я использую для удалённого администрирования и WinSCP — для копирования файлов. С программой копирования по протоколу SCP всё более-менее понятно — это обычный командер. Единственное, что мне в ней не нравится, что если сессия рвётся по таймауту, то приходится заново создавать подключение, а это долго и раздражает. Да и в целом — я не нахожу её особо удобной, поэтому следует рассказать об альтернативных путях.
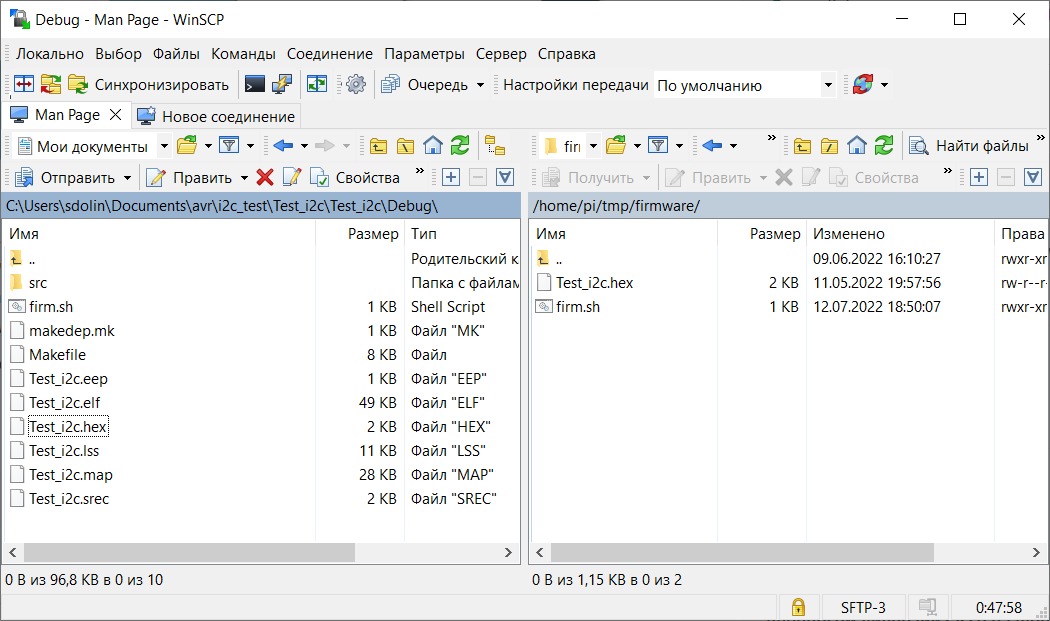
Копирование прошивки на малину.
Вот putty не так прост, как кажется на первый взгляд. Для меня эта программа — эталон удобства, и порой даже думаю поставить её под linux, хотя это и оверкилл. Программа позволяет делать практически все операции, описанные выше, кроме монтирования папок и копирования файлов: проксирование, проброс иксов, обратный ssh. Расскажу то, чем пользуюсь я (кроме банального удалённого доступа) — это проброс X11 на локальную машину.
▍ Проброс X11 в Windows
Поскольку Windows не имеет собственного Windows X-сервера, его следует предварительно установить. Есть несколько программ для этого. В своих решениях я использую VcXsrv Windows X Server. После установки запускаем и не забываем установить номер дисплея равный нулю:
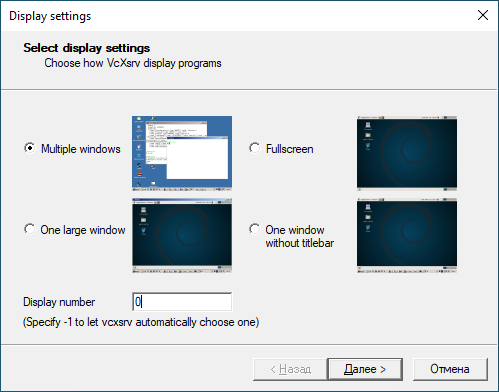
Далее всё по умолчанию, разве что стоит отключить opengl:
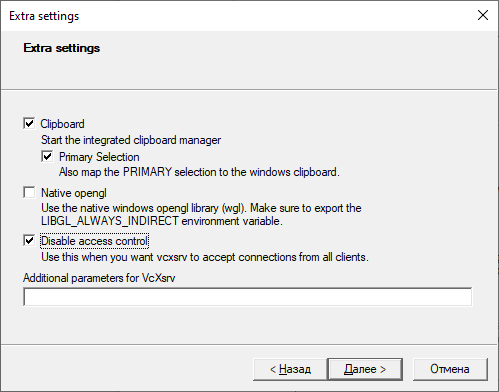
Щёлкаем далее и готово.
В putty необходимо разрешить перенаправление иксов. В сессии, которую вы создали и сохранили для вашего удалённого сервера необходимо пойти в настройки, и найти вкладку X11, и там включить X11-перенаправление. В моём случае это выглядит так:

Всё, теперь можно посмотреть на глазки, следящие за курсором, но уже в Windows.
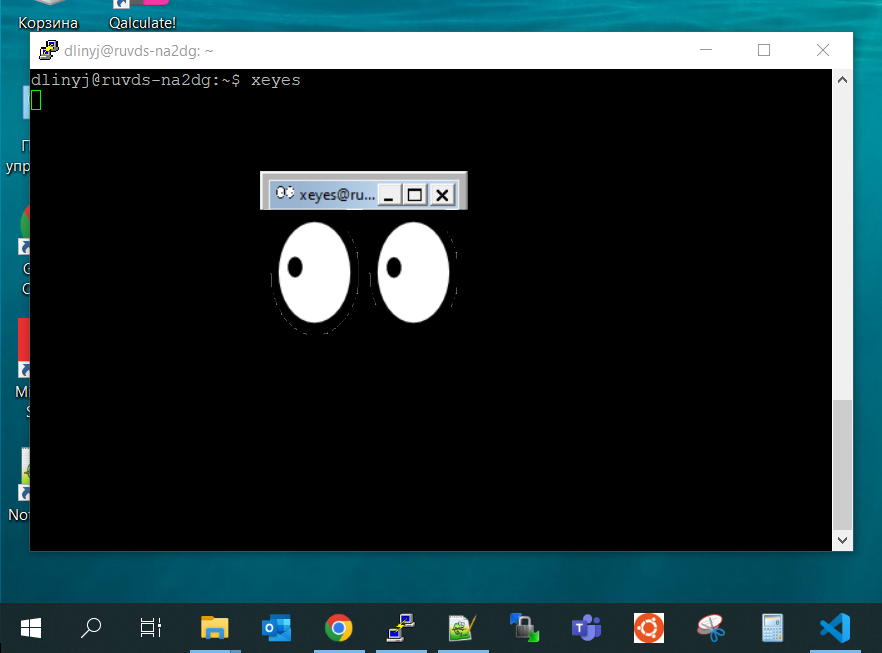
Глазки следят за курсором в Windows.
▍ Когда хочется POSIX в Windows
Конечно, всё это хорошо, но когда привыкаешь к магии и простоте консольных команд копирования, удалённого выполнения и прочего, то в Windows всего этого не хватает. Поэтому я долго искал какие-то более-менее вменяемые альтернативы. Главное — отказаться от WinSCP. Простейшей, и вполне удобной альтернативой оказался Cygwin. По сути, это коллекция инструментов GNU, которые обеспечивают функциональность, аналогично дистрибутиву Linux для Windows. Пока нормально не допилили wsl (Windows Subsystem for Linux) — долгое время я пользовался им. В сути, всё то же самое, что я выше описал для Linux, разве что это обычные exe-файлы, и работают под Windows: ssh, scp, ssh-keygen, ssh-copy-id. Работает всё, кроме удалённого монтирования папок, как я не пытался разрешить эту проблему и как не искал пакеты — так и не понял, как это можно сделать.
Как по мне, это самое простое и быстрое решение, потому что разворачивать wsl немного сложнее, чем просто скачать и запустить инсталлятор Cygwin.
▍ Путь настоящего джедая — Windows Subsystem for Linux
Если исключить установку linux на виртуальную машину, и шаринг папок по сети, то один из немногих известных мне (вменяемых) способов монтирования папок по ssh — использование подсистемы линукс для виндоус. Можно посмотреть следующий мануал и ужаснуться того, как же сложно это делается.
Но на самом деле, на Windows 11 wsl уже совсем хорошо и просто работает, без особых танцев с бубном и перенаправлением видео на программу X Server. На Windows 10 я ставил Ubuntu из магазина приложений, потом запускал какую-то команду в PowerShell, чтобы активировать wsl и получал готовый linux.
Это решение хорошо тем, что оно мгновенно запускается. Консоль linux запускается также быстро, как PowerShell или cmd. Также оно имеет доступ ко всем данным на жёстких дисках из коробки. Единственный нюанс — нельзя по сети монтировать папки в папки, принадлежащие ОС Windows.
Поэтому я монтирую папки в wsl, и там уже запускаю Visual Studio Code, скармливаю ей локальную папку и работаю в ней. Студия ругается на то, что я запускаю её под wsl. Для работы X11 в Windows 10 (в Windows 11 починили), точно также как для удалённого сервера надо устанавливать программу VcXsrv. Для того чтобы окна корректно открывались, нужно в машине wsl прописать адрес удалённого сервера X Windows (можно её сразу добавить в .bashrc):
export DISPLAY=$(awk '/nameserver / {print $2; exit}' /etc/resolv.conf 2>/dev/null):0Понимаю, что это может показаться очень сложным, но я так привык к удобству удалённых папок, что один раз в этом разобраться — точно стоит того. На данный момент при работе не возникает никаких проблем, когда понимаешь: что, почему и зачем нужно.
Вот, для примера точно так же монтирую удалённую папку home в wsl, и затем открываю её в Visual Studio Code:
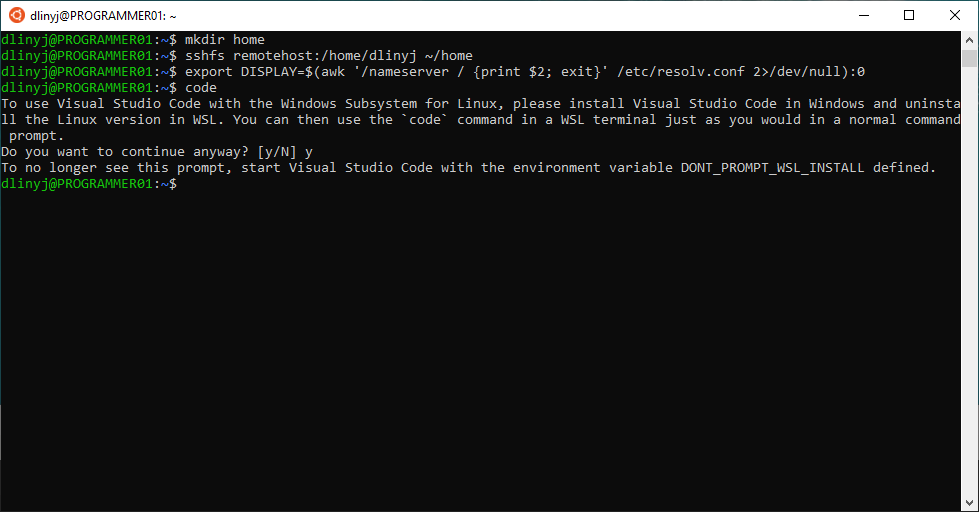
Монтирование удалённой папки и перенаправление дисплея
После чего можно успешно всё открыть в VS Code.
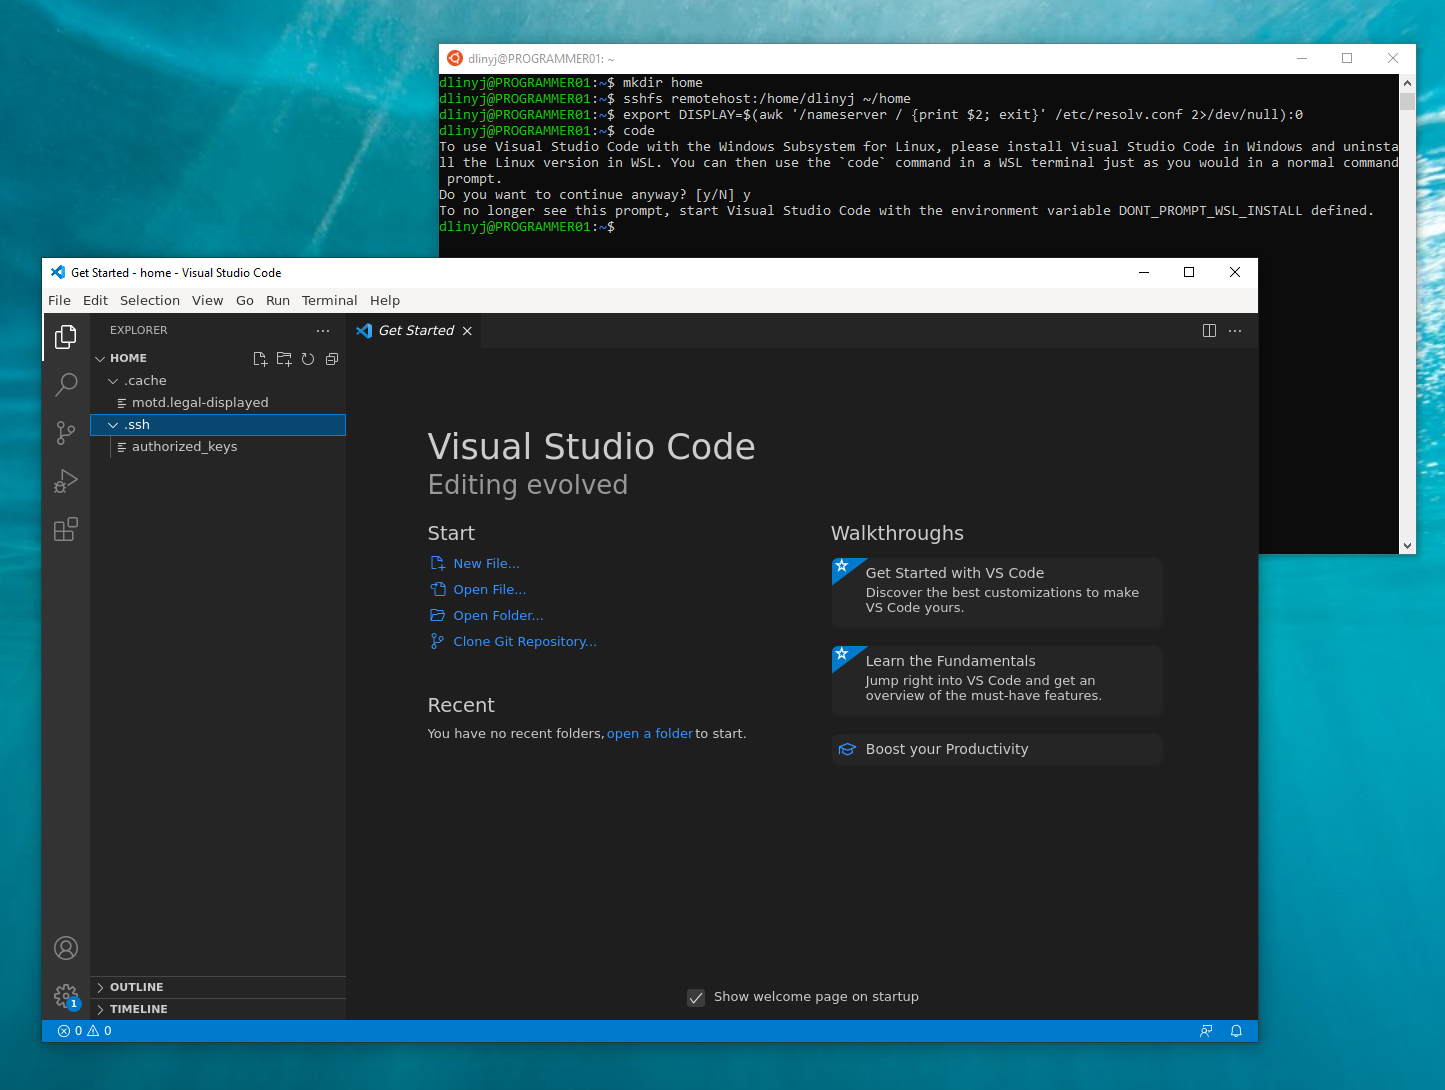
Успешно открытая Visual Studio Code с удалённой папкой
Заключение
Ssh — это основной инструмент системного разработчика, администратора и даже продвинутого пользователя. Очень классный, простой, а главное — эффективный инструмент, который может решать массу задач.
Для меня самой большой болью было подружить Windows и ssh. Дружба эта — плохая, как воды и масла, но всё же, мне удаётся достаточно комфортно работать по ssh и под операционной системой Windows.
Ссылки
- Прекрасная статья использования ssh в примерах. И её русский перевод на хабре. Единственное на что хочу обратить внимание, что там опущено то, как конфигурировать демона, и без корректной настройки на стороне сервера это работать не будет.
- Пример создания обратного ssh-тунеля, в картинках, как почему, зачем.
- Достаточно объёмный, и в той же мере бесполезный мануал по разворачиванию wsl. Но есть несколько полезных моментов, которые оттуда для себя почерпнул.

Introduction
Picture this: you’re working remotely on your Windows machine and need to connect to a Linux machine to run some graphical applications. The catch is, you need to do so securely and have the ability to view the application’s user interface on your Windows desktop. Sounds like a tall order, doesn’t it? Fear not, because in this article, we’ll explore a powerful solution that combines the security of SSH with the convenience of X11 forwarding: *Windows SSH with X11 forwarding*.
Get ready to dive deep into the world of secure remote graphical access!
Understanding the Basics of Windows SSH with X11 Forwarding
Before we get started, let’s make sure we’re clear on the key concepts involved in this process:
1. SSH: Secure Shell (SSH) is a cryptographic network protocol used primarily for secure communication over unsecure networks.
2. X11 forwarding: This refers to the routing of an X Window System display from one computer (typically a Linux machine) to another computer (in our case, a Windows machine).
So, when we talk about Windows SSH with X11 forwarding, we’re essentially discussing how to establish a secure connection between a Windows client and a Linux server to launch and interact with graphical applications remotely.
Prerequisites and Preparation
To set up Windows SSH with X11 forwarding, you’ll need the following tools and resources:
1. A Windows machine with an SSH client installed. If you’re using Windows 10 or later, you can enable the built-in OpenSSH client from the “Optional Features” menu.
2. A Linux server with an SSH server and X11 server installed.
3. An X11 server for Windows, such as VcXsrv or Xming, which will allow you to display the graphical output from the Linux server on your Windows desktop.
Once you have these components in place, you’re ready to proceed.
Configuring Your Environment for Windows SSH with X11 Forwarding
To get started, follow these steps:
1. Install the X11 server on your Windows machine: Download and install your preferred X11 server software, such as VcXsrv or Xming.
2. Configure the SSH client on Windows: Open the *Settings* app, search for “Optional Features,” and ensure that the OpenSSH client is installed. If not, add it from the list of available features.
3. Enable X11 forwarding on the Linux server: Open the SSH server configuration file (typically located at `/etc/ssh/sshd_config`). Look for the line containing `X11Forwarding`, and set it to “yes”:
“`
X11Forwarding yes
“`
Save and close the file, then restart the SSH server to apply the changes.
4. Verify that the DISPLAY environment variable is set: Log into the Linux server and check the value of the DISPLAY environment variable using the `echo $DISPLAY` command. If it’s empty, configure it manually by adding the following line to the `.bashrc` or `.bash_profile` file in your home directory:
“`
export DISPLAY=:0.0
“`
Save and close the file, then run `source .bashrc` or `source .bash_profile` to apply the changes.
Connecting to the Linux Server via SSH with X11 Forwarding
With everything set up, it’s time to establish the secure connection and launch a graphical application:
1. Start the X11 server on your Windows machine: Launch the X11 server software (e.g., VcXsrv or Xming) and follow any necessary configuration steps.
2. Initiate the SSH connection with X11 forwarding enabled: Open a command prompt or PowerShell window, and run the following command, replacing “ with your Linux server username and “ with the server’s IP address or hostname:
“`
ssh -X @
“`
3. Launch a graphical application: Once connected, you can launch a graphical application on the Linux server by running its command from the SSH session. For example, to open the Gedit text editor, run `gedit &`.
The graphical application should appear on your Windows desktop, allowing you to interact with it as if it were running locally.
Optimizing Performance and Security
Now that you’re up and running with Windows SSH and X11 forwarding, it’s worth considering some best practices for performance and security:
1. Use compression: Enable data compression in your SSH connection by adding the `-C` flag to the command:
“`
ssh -X -C @
“`
2. Limit X11 access: You can restrict the scope of X11 forwarding to specific users or groups by modifying the `AllowUsers` or `AllowGroups` directives in the `/etc/ssh/sshd_config` file.
3. Use key-based authentication: To enhance security and simplify the login process, consider setting up public key authentication for your SSH connections.
Conclusion
With Windows SSH and X11 forwarding at your disposal, you now have the power to securely access and control graphical applications on remote Linux servers directly from your Windows desktop. This powerful technique is invaluable for developers, administrators, and other IT professionals working in heterogeneous environments.
Armed with this knowledge, the possibilities are endless. Whether you’re managing a complex network or just dabbling in cross-platform development, Windows SSH with X11 forwarding is an essential skill to master. So go forth, dear reader, and embrace the wonders of secure remote graphical access!
No, Windows 11 Does NOT Ruin Gaming Performance (Don’t Disable VBS)
How to SSH into Windows from Windows (and copy files remotely)
This Windows 11 build is LEAKED! (21380)
How can one establish an SSH connection with X11 forwarding enabled?
To establish an SSH connection with X11 forwarding enabled, you need to use the `-X` option when connecting via the command line. The Secure Shell (SSH) protocol allows for secure remote access to a server, and X11 forwarding grants the ability to run graphical applications on the remote server while displaying the user interface on the client machine.
Here are the steps to enable X11 forwarding:
1. Install an X server: First, ensure that you have an X server software installed on your local machine. Examples of such software are Xming for Windows, XQuartz for macOS, or the native X server on Linux systems.
2. Enable X11 forwarding on the server: Check if the server configuration file `/etc/ssh/sshd_config` contains the line `X11Forwarding yes`. If not, add it and restart the SSH service on the server.
3. Establish the SSH connection with X11 forwarding: From the command line on your local machine, use the following command:
“`
ssh -X username@remote-server-address
“`
Replace `username` with your user account on the remote server, and `remote-server-address` with the server’s IP address or domain name.
Once the connection is established, you can run graphical applications on the remote server, and they will be displayed on your local machine.
Note: If you want to use X11 forwarding over a more untrusted network or if extra security is needed, you can use the `-Y` option instead:
“`
ssh -Y username@remote-server-address
“`
The `-Y` option enables “trusted” X11 forwarding, which provides additional security checks to help prevent malicious applications from accessing sensitive data on your local machine.
How can I activate X11 forwarding on Windows 10?
To activate X11 forwarding on Windows 10 in the context of Secure Shell (SSH), follow these steps:
1. Download and install the X server: You need an X server to display the graphical output from the remote system. A popular choice is Xming. Download it from the official website (https://sourceforge.net/projects/xming/) and install it on your Windows 10 machine.
2. Install an SSH client with X11 support: Next, you need an SSH client that supports X11 forwarding. PuTTY is a widely-used SSH client, and it offers X11 forwarding capabilities. Download PuTTY from the official website (https://www.chiark.greenend.org.uk/~sgtatham/putty/latest.html) and install it on your Windows 10 machine.
3. Configure PuTTY for X11 forwarding: Launch PuTTY and enter the remote system’s hostname or IP address in the “Host Name (or IP address)” field. In the left-hand category menu, navigate to “Connection” > “SSH” > “X11”. Check the box labeled “Enable X11 forwarding.” By default, PuTTY will use the “localhost:0” as the display location, which should work in most cases. If you need to use a different display location, you can set it in the “X display location” field. Save your settings by going back to the “Session” category and clicking “Save.”
4. Start Xming: Before starting your SSH connection, launch Xming on your Windows 10 machine. It will run in the background, waiting for connections from the SSH client.
5. Connect to the remote system: In PuTTY, click the “Open” button to connect to the remote system. You will be prompted to enter your login credentials for the remote system. Once connected, the X11 forwarding will be enabled, and you can run graphical applications on the remote system.
With these steps completed, you should be able to use X11 forwarding over SSH on your Windows 10 system. Remember that the graphical applications you run on the remote system will be displayed on your local Windows 10 machine through the X server, Xming.
How can I activate X11 forwarding on Windows 10?
To activate X11 forwarding on Windows 10 in the context of Secure Shell, follow these steps:
1. Install an X server: Download and install an X server on your Windows 10 machine, such as Xming or VcXsrv. These are popular options for enabling X11 forwarding.
2. Configure the X server: Launch the X server application and set the display number to “0.” Make sure that the server listens on all available network interfaces. Save the settings and start the X server.
3. Install an SSH client with X11 support: Download and install an SSH client that supports X11 forwarding, such as PuTTY or MobaXterm.
4. Enable X11 forwarding in the SSH client: In the SSH client settings, navigate to the “Connection > SSH > X11” submenu. Check the box next to “Enable X11 forwarding” and enter the Display value as “localhost:0.0”.
5. Connect to the remote server: Enter the remote server’s address, username, and password. If using PuTTY, click “Open” to establish the SSH connection. If using MobaXterm, click “OK” and then double-click the session to connect.
Once connected, you should now be able to run X11 applications on the remote server, with the graphical output forwarded to your Windows 10 machine.
Remember to configure your remote server to allow X11 forwarding. You may need to edit the /etc/ssh/sshd_config file to include “X11Forwarding yes” and restart the SSH service on the server.
How can I activate X11 forwarding using PuTTY on Windows?
To activate X11 forwarding using PuTTY on Windows, follow these simple steps:
1. Download and install PuTTY: If you haven’t already, download PuTTY from the official website (https://www.putty.org/) and install it on your Windows machine.
2. Launch PuTTY: Open the PuTTY application on your computer.
3. Enter your server’s details: In the ‘Host Name (or IP address)’ field, enter your server’s IP address or hostname. Make sure the connection type is set to ‘SSH’ and the port is usually set to ’22’, unless configured differently on your server.
4. Enable X11 forwarding: On the left pane, navigate to ‘Connection’ > ‘SSH’ > ‘X11’. Check the box next to ‘Enable X11 forwarding’.
5. Configure X display location (optional): By default, PuTTY will use the ‘localhost:0’ value for the ‘X display location’ field. If you have a different X server running on your Windows machine or want to use a specific display, modify this value accordingly.
6. Save your settings (optional): To save your settings for future use, go back to the ‘Session’ category in the left pane, enter a name for your session in the ‘Saved Sessions’ field, and click ‘Save’.
7. Open the SSH connection: Click ‘Open’ at the bottom of the screen to establish an SSH connection with X11 forwarding enabled. You may be prompted to enter your server username and password to log in.
8. Install and start an X server (if not done): Ensure you have an X server, such as VcXsrv or Xming, installed and running on your Windows machine to receive the forwarded graphical interface.
What are the essential steps to set up X11 forwarding for Windows SSH in the context of {topic}?
In the context of Secure Shell, setting up X11 forwarding for Windows SSH involves several essential steps. Here, I’ll outline these steps with bold emphasis on the most important parts.
1. Install an X server: To enable X11 forwarding, you need to have an X server installed on your Windows machine. Some popular options include Xming and VcXsrv.
2. Install an SSH client: You will also need an SSH client to connect to the remote system. One of the most widely used SSH clients for Windows is PuTTY.
3. Configure X server: After installing the X server, start it and configure it to accept incoming connections. For Xming, launch the software and make sure “No Access Control” is selected in the settings. For VcXsrv, start the program with ‘-ac’ flag or select “Disable Access Control” during configuration.
4. Enable X11 forwarding in SSH client: In PuTTY, navigate to “Connection > SSH > X11” in the configuration menu. Check the box ‘Enable X11 forwarding’ and enter ‘localhost:0’ as the X display location.
5. Connect to the remote system: Enter the hostname or IP address of the remote system and click ‘Open’. On successful connection, provide your username and password to authenticate.
6. Verify X11 forwarding: After logging in to the remote system, you can confirm the X11 forwarding by running ‘`echo $DISPLAY`’. It should return something like ‘localhost:10.0’.
7. Test X11 applications: Once X11 forwarding is enabled and working, you can run GUI-based applications on the remote system, and they will be displayed on your local Windows machine. To test this, simply execute an X11 application, such as ‘`xclock`’, and verify that the corresponding window appears on your local screen.
By following these essential steps, you can successfully set up X11 forwarding for Windows SSH in the context of Secure Shell.
How do you troubleshoot common issues related to X11 forwarding on Windows SSH within the framework of {topic}?
In the context of Secure Shell, troubleshooting common issues related to X11 forwarding on Windows SSH involves several key steps. Below are some important aspects to consider when addressing these issues:
1. Check if X11 forwarding is enabled on the server: Ensure that the SSH server has X11 forwarding enabled in its configuration file (usually /etc/ssh/sshd_config). Look for the line “X11Forwarding yes” and uncomment or add it if necessary. Restart the SSH server after making changes to the configuration file.
2. Verify the DISPLAY variable: On the remote system, check the DISPLAY environment variable to ensure it’s set correctly. The variable should be set to ‘localhost:10.0’ or something similar. Adjust the variable value if needed.
3. Use an X server on your Windows machine: In order to use X11 forwarding on a Windows SSH client, you will need to install an X server on your Windows machine. Popular choices include XMing and VcXsrv. Make sure the X server is running before initiating the SSH connection with X11 forwarding.
4. Enable X11 forwarding on the client-side: When using an SSH client like PuTTY, make sure to enable X11 forwarding in the settings. In PuTTY, go to the Connection > SSH > X11 section, and check the “Enable X11 forwarding” option. Additionally, provide the correct X display location (e.g., ‘localhost:0.0’).
5. Check for firewalls or network restrictions: Firewalls or network policies might block the necessary ports for X11 forwarding to work. Ensure that TCP port 6000 (the default port for X displays) and the port used by your SSH server are allowed through any firewalls or network restrictions.
6. Test X11 forwarding: To test if X11 forwarding is working correctly, run an X application (such as xclock or xeyes) on the remote system. If the application launches successfully and displays on your Windows machine, then X11 forwarding is functioning properly.
By addressing these key elements, you can effectively troubleshoot common issues related to X11 forwarding on Windows SSH within the framework of Secure Shell.
Which third-party applications are most effective for enabling Windows SSH with X11 forwarding in relation to {topic}?
In the context of Secure Shell, there are several effective third-party applications for enabling Windows SSH with X11 forwarding. Some of the most popular options are:
1. Putty – Putty is a widely-used, open-source SSH and Telnet client that supports X11 forwarding. It can be installed on Windows to enable secure access to remote Linux machines and display its graphical interface.
2. Xming – Xming is an X Server for Windows that provides X11 forwarding support when working with an SSH client like Putty. By running Xming alongside Putty, you can access remote Linux machines and display their graphical interface on your Windows machine.
3. MobaXterm – MobaXterm is a powerful and feature-rich application that combines an SSH client, X server, and terminal emulator in one package. This all-in-one solution enables X11 forwarding by default and makes it easy to work with remote Linux servers from a Windows environment.
4. Cygwin – Cygwin is a software suite that provides a large collection of Unix-like tools and applications for Windows, including the OpenSSH client. By installing Cygwin and an X server like Xming or Cygwin/X, you can enable X11 forwarding and access remote Linux machines from Windows.
5. Windows Subsystem for Linux (WSL) – WSL is a compatibility layer designed by Microsoft that allows you to run Linux distributions natively on Windows 10. With WSL and an X server, you can use the built-in OpenSSH client to enable X11 forwarding and work with remote Linux systems seamlessly.
When using any of these third-party applications, remember to configure the SSH client to enable X11 forwarding and set the correct display settings for the X server to ensure successful connections to remote Linux systems.
What are the key security considerations when implementing Windows SSH with X11 forwarding within the scope of {topic}?
When implementing Windows SSH with X11 forwarding within the scope of secure shell, the key security considerations are as follows:
1. Use SSH keys for authentication: Instead of using password-based authentication, it’s more secure to use SSH keys which are harder to guess and thus less vulnerable to brute force attacks.
2. Disable root login: Disabling direct login as the “root” user limits the chances of unauthorized access, as attackers would first have to gain access to a regular user account and then escalate their privileges.
3. Update your SSH server regularly: Stay updated with the latest security patches for your SSH server (such as OpenSSH) to minimize potential vulnerabilities.
4. Use a strong encryption algorithm: Choose a strong and proven encryption algorithm such as AES or ChaCha20 to protect your data during transmission.
5. Limit allowed X11 clients: Restrict the allowed applications that can be forwarded through X11 to minimize the possibility of an attacker leveraging insecure applications.
6. Enable X11 security extensions (e.g., XSECURITY): Enhance the security of X11 forwarding by enabling security extensions like XSECURITY, which provide access controls for X11 clients.
7. Use SSH jump hosts or bastion hosts: Implement an extra layer of security by forcing SSH connections to pass through a secure intermediate server before connecting to the target server.
8. Monitor and log SSH activity: Keep a close eye on your server’s SSH activity by monitoring and logging all connections to identify any suspicious behavior or unauthorized access attempts.
9. Implement network-level security measures: Incorporate additional network security measures such as firewalls and intrusion prevention systems to further protect your server from potential threats.
10. Use multi-factor authentication (MFA): Implement MFA to add an extra layer of security, ensuring that authorized users must provide multiple forms of identification before gaining access.
Can you provide any specific use cases or examples showcasing the benefits of utilizing Windows SSH with X11 forwarding in the context of {topic}?
Secure Shell (SSH) is a powerful tool for securely accessing remote servers and managing network services. One of its useful features is X11 forwarding, which allows you to run graphical applications on a remote server and display them locally on your Windows machine. In the context of SSH, using X11 forwarding with Windows has several key benefits that can enhance your workflow and improve productivity.
Some specific use cases showcasing the benefits of utilizing Windows SSH with X11 forwarding are:
1. Remote application development: Developers working on applications that require a graphical interface can use X11 forwarding to run the application remotely while still interacting with it on their local Windows machine. This allows developers to work in their preferred environment without needing to set up additional resources or transfer files between systems.
2. Remote system administration: System administrators can use X11 forwarding to manage graphical tools on remote servers, such as network monitoring software or configuration utilities. By running these tools remotely through an SSH session with X11 forwarding enabled, administrators can securely access critical systems without exposing them to potential security risks.
3. Collaboration with team members: X11 forwarding enables multiple users to view and interact with the same graphical application simultaneously. This can be particularly useful when collaborating on projects that involve complex data visualization or require real-time interaction, such as design reviews or debugging sessions.
4. Accessing specialized hardware or software: Some organizations have specific hardware or software resources that may not be available on local machines. With X11 forwarding, users can remotely access these resources on a shared server and use them just as if they were installed locally.
5. Running platform-specific software: Some software applications are only available for specific platforms, such as Linux or macOS. Users who primarily work on a Windows machine can utilize X11 forwarding to access these platform-specific applications remotely through a secure SSH connection.
In conclusion, Windows SSH with X11 forwarding offers a versatile and secure way of accessing and interacting with graphical applications on remote servers. It enables developers, system administrators, and other users to work more efficiently and collaborate effectively across different platforms and environments.
Post Views: 1,414
In this post I want to show how you can enable X11 forwarding by using PuTTY and the Xming X Server for Windows.
In order to use X11 forwarding, an X11 server needs to be installed on the client (in my case Windows here). Therefore you can use several X11 servers available for Windows, I will use here the Xming X Server which you download under https://sourceforge.net/projects/xming/.
X11 forwarding is supported by the SSH protocol that enables users to run graphical applications on a remote server and interact with them by using their local display and I/O devices.
- Introduction
- SSH Server Configuration
- Prerequisites
- Install Xming Server on Windows
- Display settings
- Testing X11 Forwarding by using the GParted tool
- Understanding the X11 DISPLAY environment variable and how X11 Forwarding works?
- How does X11 Forwarding work in detail?
- X.Org Server
- Links
Introduction
The X Window System (X11, or simply X) is a windowing system for bitmap displays, common on Unix-like operating systems.
X provides the basic framework for a GUI environment: drawing and moving windows on the display device and interacting with a mouse and keyboard. X does not mandate the user interface – this is handled by individual programs. As such, the visual styling of X-based environments varies greatly; different programs may present radically different interfaces.
X originated as part of Project Athena at Massachusetts Institute of Technology (MIT) in 1984. The X protocol has been at version 11 (hence “X11”) since September 1987. The X.Org Foundation leads the X project, with the current reference implementation, X.Org Server, available as free and open-source software under the MIT License and similar permissive licenses.
Source: https://en.wikipedia.org/wiki/X_Window_System
SSH Server Configuration
X11 Forwarding is by default enabled on most SSH servers. Below for example is the default configuration on Linux Enterprise Server 15 under /etc/ssh/sshd_config.
X11Forwarding yes
Specifies whether X11 forwarding is permitted. The default is yes. Note that disabling X11 forwarding does not improve security in any way, as users can always install their own forwarders.X11UseLocalhost yes
Specifies whether sshd should bind the X11 forwarding server to the loopback address or to the wildcard address. By default, sshd binds the forwarding server to the loopback address and sets the hostname part of the DISPLAY environment variable to localhost. This prevents remote hosts from connecting to the proxy display. However, some older X11 clients might not function with this configuration. X11UseLocalhost can be set to no to specify that the forwarding server should be bound to the wildcard address. The argument must be yes or no. The default is yes.
The X server is listening on the loopback address for incoming request from X clients (GUI applications running on the server).
Prerequisites
When you will try to use X11 forwarding before you have configured X11 forwarding in PuTTY and running a X11 server on Windows, you will run into the following error.
Gtk-Warning: cannot open display:
Enable X11 forwarding in PuTTY by checking the Enable X11 forwarding and for the authentication protocol leave the MIT-MAGIC-COOKIE-1 protocol as already selected by default under the sessions SSH -> Auth -> X11 forwarding settings as shown below.
The X display location below is by default localhost:0 which you normally don’t have to enter here, just in case you have some issues, you can set it explicitly here.
The MIT-MAGIC-COOKIE-1 authorization protocol was developed by the Massachusetts Institute of Technology (MIT). A magic cookie is a long, randomly generated binary password. At server startup, the magic cookie is created for the server and the user who started the system. On every connection attempt, the user’s client sends the magic cookie to the server as part of the connection packet. This magic cookie is compared with the server’s magic cookie. The connection is allowed if the magic cookies match, or denied if they do not match.
Source: https://docs.oracle.com/cd/E19620-01/805-3921/security-4/index.html
When now trying again after enabled X11 forwarding in PuTTY but without a local running X11 server on your client computer, you will encounter the following additional error message.
PuTTY X11 proxy: unable to connect to forward X server: Network error: Connection refused
So we first need to install a X server on Windows as shown below.
Install Xming Server on Windows
Xming is the leading X Window System Server for Microsoft Windows. It is fully featured, small and fast, simple to install and because it is standalone native Microsoft Windows, easily made portable (not needing a machine-specific installation).
Source: https://sourceforge.net/projects/xming/
You can download the Xming server under the link above.
By default Normal PuTTY Link SSH client is checked which will also install the PuTTY client. Because I had already PuTTY installed I will not install the SSH client here.
Display settings
After the installation you can adjust some settings by using the XLaunch tool as shown below.
Click through the wizard with Next.
Testing X11 Forwarding by using the GParted tool
Now it works and the applications GUI will be forwarded (proxied) to my local running Xming X server on Windows which will finally display the GUI application on my Windows computer.
Understanding the X11 DISPLAY environment variable and how X11 Forwarding works?
An X Display is generally made up of at least one screen, keyboard, and pointer device. In this context, a screen is not a physical monitor, rather a virtual canvas which can read raw graphical data. In practice a single screen can be made up of multiple monitors and other virtual displays.
The X Display is managed by the X server.
X Client Programs use the $DISPLAY environment variable, which looks like hostname:display_number.screen_number, to determine which X Display to connect to. An X Program can derive a tcp or unix socket from this value to form a connection to the display through the X Server. Once the connection is accepted, the X Server forwards the connection to the requested screen.
Source: https://goteleport.com/blog/x11-forwarding/
Below the content of the DISPLAY environment variable when a user logs in by using SSH from remote with PuTTY.
Xorg listens on port 6000+n, where n is the display number. This connection type can be disabled with the -nolisten option (see the Xserver(1) man page for details).
Source: https://www.x.org/archive/X11R6.8.0/doc/Xorg.1.html
Below the content of the DISPLAY environment variable when a user logs in locally directly to the console of the server.
On most platforms, the Local connection type is a UNIX-domain socket (also used below). On some System V platforms, the local connection types also include STREAMS pipes, named pipes, and some other mechanisms.
Source: https://www.x.org/archive/X11R6.8.0/doc/Xorg.1.html
To demonstrate the use of the TCP/IP sockets and UNIX-domain sockets by the X server, I will use below the ss (socket statistics) tool.
First I will list the DISPLAY environment variable and TCP/IP sockets for the remote SSH connection (X11 forwarding) initiated by PuTTY :
echo $DISPLAY
ss -a -n -t
In the output you can see that the X server is listening here for this remote session on TCP/IP IPv4 and IPv6 on port 6010. The display number for this remote session is 10 as seen in the output of the DISPLAY environment variable.
Note!
Xorg listens on port 6000+n, where n is the display number.Source: https://www.x.org/archive/X11R6.8.0/doc/Xorg.1.html
Then I will list the UNIX domain sockets (IPC) for the local console connection directly on the server itself by using:
ss -x -a | grep X11


Display All TCP Sockets
# ss -t -a

Display All UDP Sockets
# ss -u -a

Display All RAW Sockets
# ss -w -a

Display All UNIX Sockets
# ss -x -a
Processes on the same host can communicate via UNIX domain sockets (IPC).
How does X11 Forwarding work in detail?
X11 Forwarding follows the same model as X11, but the X Client to X Server connection gets tunneled through an SSH Channel. In order to achieve this flow, the SSH Server proxies the remote X Client connection to the SSH Client, and the SSH Client proxies it to the user’s X Server.
The article below will dig deep and explains great about how X11 Forwarding works in detail.
Source: https://goteleport.com/blog/x11-forwarding/
X.Org Server
X.Org Server is the free and open-source implementation of the X Window System (X11) display server stewarded by the X.Org Foundation.
The X.Org Server runs on many free-software Unix-like operating systems, including being adopted for use by most Linux distributions and BSD variants. It is also the X server for the Solaris operating system. X.Org is also available in the repositories of Minix 3.
Source: https://en.wikipedia.org/wiki/X.Org_Server
Links
PuTTY
https://www.putty.org/Xming X Server for Windows
https://sourceforge.net/projects/xming/X Window System Protocol
https://www.x.org/releases/X11R7.7/doc/xproto/x11protocol.htmlX.Org project
https://www.x.org/wiki/X.Org Server
https://en.wikipedia.org/wiki/X.Org_ServerX.Org Foundation
https://en.wikipedia.org/wiki/X.Org_FoundationHow does X11 Forwarding work?
https://goteleport.com/blog/x11-forwarding/