
SSH-ключи для авторизации — это простой и надежный способ получения доступа к удаленному узлу. В статье мы рассмотрим процесс настройки SSH-авторизации по ключу, а также покажем способы устранения некоторых известных ошибок.
Что такое SSH-ключ
Аббревиатура SSH означает Secure Shell, что дословно переводится как «безопасная оболочка». Если говорить точнее, SSH — это защищенный сетевой протокол с проверкой подлинности и шифрованием. Он используется для передачи файлов, управления сетью и удаленного доступа к операционной системе. Аббревиатура SSH также используется для описания набора инструментов, используемых для взаимодействия с одноименным протоколом.
Подключение через SSH можно просто охарактеризовать как подключение к командной строке удаленного узла. То есть любые команды, которые будут вводиться в терминал на основной машине, будут работать так же, будто вы вводите их напрямую на удаленном узле, сидя с клавиатурой около него.
Так как SSH работает по системе «клиент-сервер», обязательное условие для работы этого протокола — наличие на удаленном узле демона SSH. Демон SSH — это ПО, которое прослушивает определенный сетевой порт и при прохождении аутентификации другим узлом создает необходимую среду для работы с ним.
В свою очередь на локальной машине должно быть установлено соответствующее ПО — SSH-клиент. Он взаимодействует с удаленным хостом и передает ему необходимые данные, которые нужны для прохождения аутентификации.
Пользователи Linux могут установить OpenSSH с помощью команды:
sudo apt-get install sshВ некоторых ОС компоненты OpenSSH можно установить отдельно для клиента openssh-client и отдельно для сервера openssh-server.
Структура ключа
Можно сказать, что определение «SSH-ключ» составное, так как на самом деле это два ключа — открытый и закрытый. На узле A создаются и хранятся оба ключа, а на узел B передается только копия публичного SSH-ключа, что позволяет подключаться к узлу B с узла A.
Ключи могут быть сгенерированы с помощью различных алгоритмов, которые поддерживает текущая версия протокола SSH. Например, если использован тип шифрования RSA, то файлы будут именоваться следующим образом:
- id_rsa — закрытый ключ,
- id_rsa.pub — публичный (открытый) ключ.
В чем же разница открытого и закрытого ключа?
Открытые и закрытые SSH-ключи
Открытый (он же публичный) ключ используется для шифрования данных при обращении к удаленному узлу. Проще говоря, это набор символов, при помощи которых мы шифруем информацию. Он доступен всем. Не стоит бояться того, что открытый ключ может попасть в чужие руки, так как наличие одного лишь публичного SSH-ключа не дает злоумышленнику никаких преимуществ. Открытый SSH-ключ хранится на удаленном узле.
Закрытый (приватный) SSH-ключ — это ключ к данным. Он расшифровывает сами сообщения. Хранится он на устройстве, которое будет подключаться к удаленному узлу (на котором находится открытый ключ). Приватный ключ ни в коем случае нельзя передавать в чужие руки, в том числе через мессенджеры или файлообменники, во избежание утечки информации и персональных данных. Также рекомендуем сразу установить пароль на закрытый ключ, чтобы обеспечить ему дополнительную защиту.
Как работает SSH-авторизация?
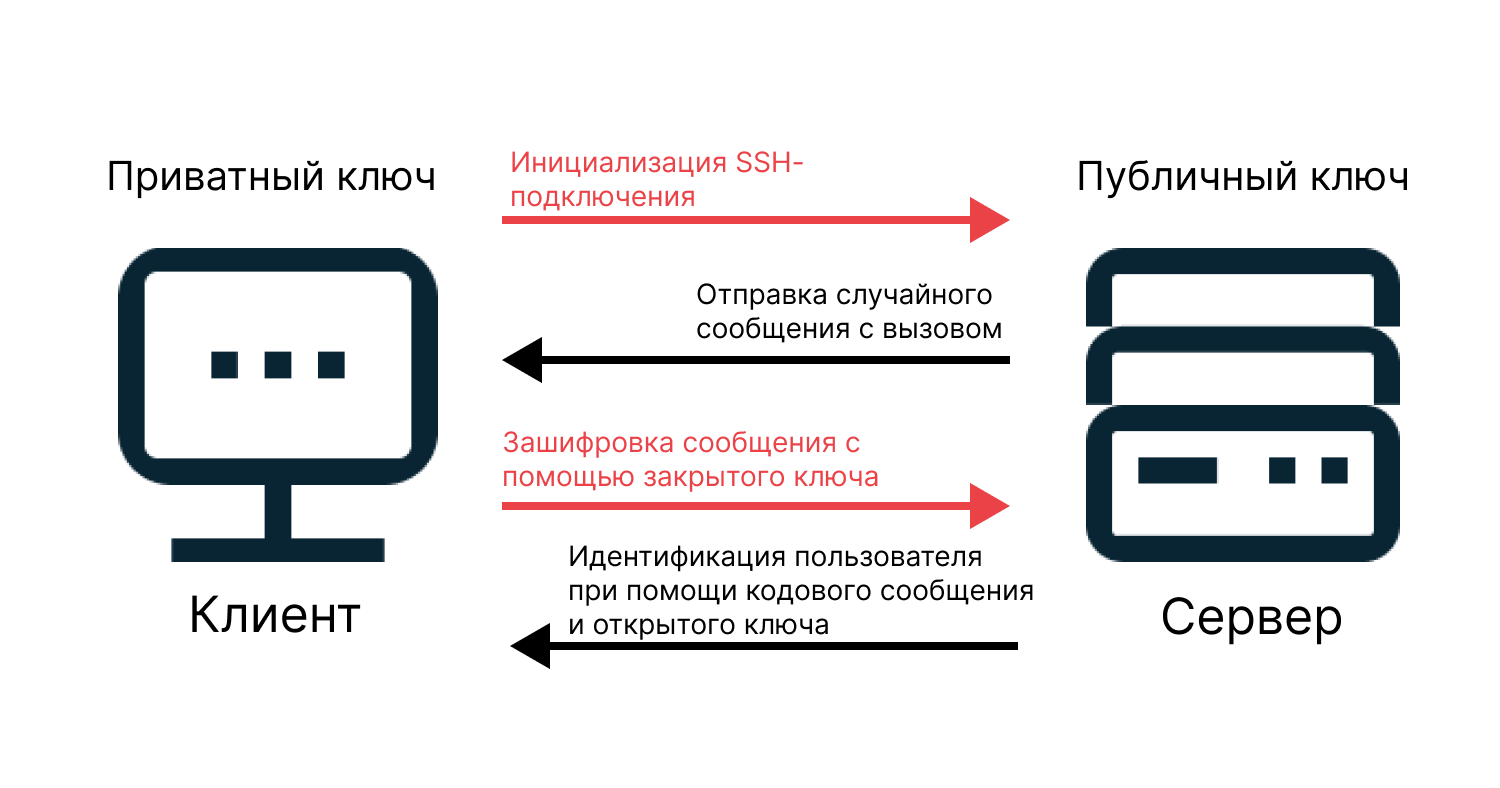
Давайте представим, что Selectel — это сервер, а вы — клиент. Вы хотите подключиться к нам с использованием SSH-ключа. Предварительно вы уже создали пару ключей и передали публичный ключ нам. Алгоритм взаимодействия будет следующим:
- Вы должны изъявить свое желание подключиться к нам, то есть отправить запрос на подключение по TCP-порту.
- В случае установки TCP-соединения мы обмениваемся информацией о версиях наших SSH-протоколов. С помощью этой информации можно понять, какую именно конфигурацию (версию протоколов и алгоритмы работы) использовать. Самостоятельно узнать версию OpenSSH можно с помощью команды ssh -V.
- После согласования мы (сервер) направляем вам (клиенту) открытый ключ. Теперь уже вы решаете, доверять такому ключу или нет. В случае положительного ответа мы с вами генерируем сеансовый ключ, который будет использоваться для симметричного шифрования канала. Этот ключ существует, только пока существует канал (текущая сессия).
- Теперь следует аутентифицировать вас. Для этого вы отсылаете нам свой открытый ключ. Мы, в свою очередь, сверяем его со своим списком открытых SSH-ключей. Если совпадение найдено, мы генерируем случайное число, шифруем его открытым ключом и отправляем обратно. Вы как клиент расшифровываете сообщение закрытым ключом и отправляете полученные данные нам. В случае совпадения присланного числа с первоначальным аутентификация признается успешной.
Поздравляем! Теперь вам открыт доступ на сервер.
Типы ключей SSH
Как вы уже знаете, существуют два основных типа ключей — открытый и закрытый. Но также ключи можно разделить по типу шифрования.
Если мы введем в терминал команду ssh-keygen ?, то увидим справку, где у параметра -t указаны алгоритмы, которые можно использовать в данной системе:
~# ssh-keygen ?
…
[-t dsa | ecdsa | ecdsa-sk | ed25519 | ed25519-sk | rsa]RSA. По умолчанию ssh-keygen использует в качестве параметра -t именно RSA, так как этот алгоритм обеспечивает наилучшую совместимость из всех, но требует большего размера ключа для обеспечения достаточной безопасности. Длина ключа по умолчанию составляет 3072 бит, но вы можете самостоятельно задать его размер от 1024 до 16384 бит с помощью опции -b команды ssh-keygen.
Имейте в виду, что, чем больше ключ, тем больше вычислительных мощностей и трафика будут задействовать устройства. Поэтому если вам нужна усиленная защита и для этого вы хотите увеличить длину ключа RSA, возможно, вам стоит рассмотреть алгоритмы на основе эллиптических кривых. При таких условиях они будут работать быстрее.
DSA. Это криптографический алгоритм с использованием открытого ключа для создания электронной подписи, но не для шифрования. Это значит, что только один узел сможет подписать сообщение, а другие смогут только проверить на корректность. Алгоритм основан на вычислительной сложности взятия логарифмов в конечных полях. Алгоритм DSA по сравнению с RSA показывает лучшие показатели при генерации подписи, но уступает по времени при ее проверке. Также отметим, что максимальная длина ключа данного типа — 1024 бит. Это не самый безопасный показатель для защиты от взлома.
ECDSA. Это реализация схемы цифровой подписи, основанная на использовании эллиптических кривых и модульной арифметики. Производительность данного алгоритма быстрее, чем у алгоритма RSA, так как для обеспечения шифрования требуются ключи гораздо меньшего размера. Однако у него есть минус: он более уязвим перед взломом с помощью квантовых вычислений, чем RSA.
ED25519. Это схема подписи на эллиптической кривой, которая обеспечивает лучшую безопасность, чем ECDSA и DSA, и хорошую производительность. Ее главное преимущество — это скорость. Однако данный алгоритм поддерживается только в версиях от OpenSSH 6.5.
ECDSA-SK и ED25519-SK — те же ECDSA и ED25519, но поддерживающие аппаратный аутентификатор. Данные алгоритмы появились не так давно в версии OpenSSH 8.2. Они позволяют реализовать двухфакторную аутентификацию с помощью устройств, которые поддерживают протокол FIDO/U2F. Существует множество разновидностей физической аутентификации, например USB-токен, или другие виды устройств, подключаемые к оборудованию с помощью Bluetooth или NFC.
Создание SSH-ключа
Параметры утилиты ssh-keygen
В Linux для создания SSH-ключей используется команда ssh-keygen. Далее приведены наиболее популярные параметры для этой команды и их описание.
-C comment
Создание нового комментария. Например, одной из самых известных команд является добавление комментария с информацией о том, кто, на какой машине и когда создал ключ:
ssh-keygen -C "$(whoami)@$(uname -n)-$(date -I)"-p
Если указать данный параметр при вводе ssh-keygen, то вам будет предложено изменить старую секретную фразу на новую. Ввод команды будет выглядеть следующим образом:
ssh-keygen -pТакже вы можете задать все параметры для изменения секретной фразы сразу:
ssh-keygen -p [-P old_passphrase] [-N new_passphrase] [-f keyfile]-t type
Задает тип создаваемого ключа. Чтобы узнать какие типы доступны для вашей версии, введите:
ssh-keygen -t ?-v
Подробный режим. ssh-keygen будет печатать отладочные сообщения о ходе выполнения. Несколько опций -v увеличивают степень подробности информации (максимум 3).
Генерация SSH-ключей в Linux
Процесс создания SSH-ключей на базе Linux очень прост. Вам необходимо лишь указать некоторые параметры, которые мы опишем далее.
Мы будем создавать ключ RSA. При вводе команды ssh-keygen опцию -t RSA можно не указывать явно, так как RSA является алгоритмом по умолчанию.
~# ssh-keygen
Generating public/private RSA key pair.
Enter file in which to save the key (/root/.ssh/id_rsa):
В последней строке вам предлагается выбрать путь, куда будут сохранены ключи. Если оставить поле пустым, будут созданы файлы с именами id_rsa.pub и id_rsa.
Enter passphrase (empty for no passphrase):В данной строке предлагается создать кодовую фразу. Если оставите строку пустой, дополнительной защиты не будет.
С одной стороны, не вводить кодовую фразу опасно. Если закрытый ключ попадет в руки злоумышленников, то у них может появиться доступ к серверу. В то же время, если вы введете кодовую фразу, в будущем это может доставить вам неудобства. Пароль придется вводить каждый раз при использовании SSH-подключения с этим ключом. Поэтому использование кодовой фразы остается на ваше усмотрение.
Как мы упоминали ранее, кодовую фразу можно будет установить (или заменить) самостоятельно, введя ssh-keygen -p, когда ключ уже будет создан.
Your identification has been saved in /root/.ssh/id_rsa
Your public key has been saved in /root/.ssh/id_rsa.pub
The key fingerprint is:
SHA256:Uh6CVy4Voz0/70Am8j+hXOLBV21l4rMmiMLG5BTz3cE root@trexclient
The key's randomart image is:
+---[RSA 3072]----+
|    	=. . 	|
| 	.o* .  E . o|
|	. =+*. . + + |
| 	.o=.+. o =  |
| 	*o.S.=o . o |
|  	*+=+=o. o  |
| 	. +.*...o   |
|    	+..o 	|
|      	...	|
+----[SHA256]-----+
Созданные файлы хранятся в директории /home/*SystemName*/.ssh/.
Генерация SSH-ключей в Windows с помощью Putty
Если вы хотите создать SSH-ключи на базе ОС Windows, самым популярным решением для этого будет использование программного обеспечения Putty. Скачать его можно с официального сайта по ссылке (актуальная версия на момент написания статьи — Putty 0.78). После установки программы вам будет доступно несколько .exe файлов.
Для создания SSH-ключей откройте puttygen.exe, выберите необходимый тип ключа и задайте его размер. Мы будем использовать RSA с длиной 3072.

Далее нажмите Генерировать и водите мышкой по экрану в свободной зоне до тех пор, пока генерация SSH-ключей не будет завершена. Это необходимо делать для того, чтобы задать псевдослучайность при создании ключей.
После генерации ключа вы можете вписать комментарий и кодовую фразу.
Далее необходимо сохранить на диск открытый и закрытый SSH-ключи, для этого нажмите на соответствующие кнопки в окне программы. Вы можете самостоятельно выбрать путь, куда сохранять данные ключи.
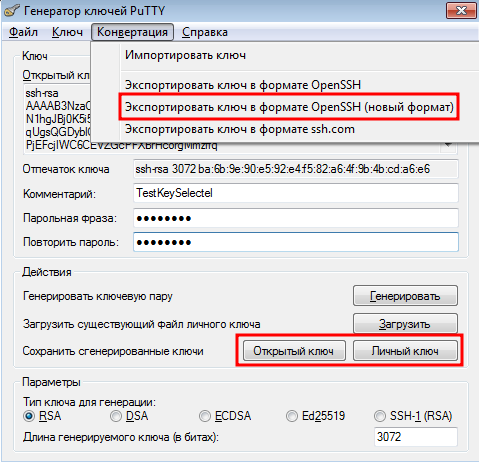
Putty сохраняет закрытые ключи с разрешением .ppk. Это означает, что такой ключ можно будет использовать только с Putty. Чтобы сохранить секретный ключ в формате, пригодном для OpenSSH, нужно во вкладке Конвертация выбрать пункт «Экспортировать ключ в формате OpenSSH (новый формат)» и указать расположение нового файла (старый формат при конвертации из .pkk в OpenSSH не сохраняет некоторые поля — например, комментарий).
Генерация SSH-ключей в Windows с помощью OpenSSH
Не так давно в ОС Windows добавили возможность использования инструментов OpenSSH. Пакет добавлен в ОС, начиная с Windows 10 и Windows Server 2019.
Установить клиент OpenSSH можно с помощью следующей команды в PowerShell:
Add-WindowsCapability -Online -Name OpenSSH.ClientИли же с помощью графического интерфейса: Параметры → Приложения → Дополнительные возможности → Добавить компонент. В списке предложенных компонентов необходимо найти Клиент OpenSSH и нажать кнопку Установить.
Проверить статус компонента можно командой:
Get-WindowsCapability -Online | ? Name -like 'OpenSSH.Client*'Если в ответе команды статус Installed, то загрузка выполнена успешно.
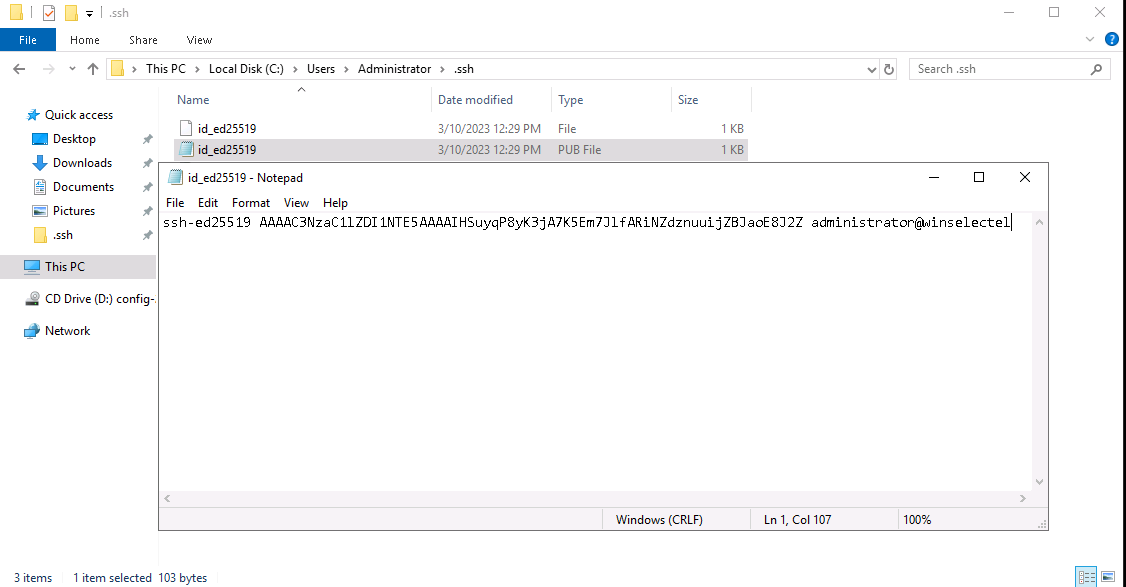
Генерация SSH-ключей происходит таким же образом, как и в ОС Linux, с помощью ssh-keygen:
PS C:\Users\Administrator> ssh-keygen -t ed25519
Generating public/private ed25519 key pair.
Enter file in which to save the key (C:\Users\Administrator/.ssh/id_ed25519):
Created directory 'C:\Users\Administrator/.ssh'.
Enter passphrase (empty for no passphrase):
Enter same passphrase again:
Your identification has been saved in C:\Users\Administrator/.ssh/id_ed25519.
Your public key has been saved in C:\Users\Administrator/.ssh/id_ed25519.pub.
The key fingerprint is:
SHA256:1qBO0MIgYM+A80G1zZgUzW4QCYHKNuLgwaIR77sY2/U administrator@winselectel
The key's randomart image is:
+--[ED25519 256]--+
|===+=*       	|
|*.=+oBo      	|
|+= +Bo+ .    	|
|**o  oo. o   	|
|Ooo  .o S .  	|
|.o.  o .     	|
|.  .. .      	|
| =.. .       	|
|o o.  E      	|
+----[SHA256]-----+
Созданные ключи можно найти в папке C:\Users\Administrator\.ssh, если она не была изменена при генерации.
Копирование открытого ключа на сервер
Ниже мы рассмотрим общий вариант копирования открытого SSH-ключа на сервер.
Копирование при помощи SSH-Copy-ID
Этот метод подойдет тем, чья ОС поддерживает команду SSH-Copy-ID, и удаленный сервер имеет доступ по SSH без ключа. Если это не так, попробуйте использовать второй или третий способ.
Синтаксис команды выглядит следующим образом:
-# ssh-copy-id username@remote_hostОбратите внимание на последние строки вывода:
-# ssh-copy-id root@5.159.102.80
/usr/bin/ssh-copy-id: INFO: Source of key(s) to be installed: "/root/.ssh/id_rsa.pub"
The authenticity of host '5.159.102.80 (5.159.102.80)' can't be established.
ED25519 key fingerprint is SHA256:KSvVyjbijk+LQ7n3cEQd94qcyIcTDfaED+jRFzBBPGM.
This key is not known by any other names
Are you sure you want to continue connecting (yes/no/[fingerprint])?
Наш клиент запрашивает разрешение на продолжение подключения к удаленному узлу, так как встречает его впервые. Необходимо ввести yes. После успешного подключения ключи будут добавлены и мы увидим соответствующий вывод:
/usr/bin/ssh-copy-id: INFO: attempting to log in with the new key(s), to filter out any that are already installed
/usr/bin/ssh-copy-id: INFO: 1 key(s) remain to be installed -- if you are prompted now it is to install the new keys
root@5.159.102.80's password:

Number of key(s) added: 1

Now try logging into the machine, with:   "ssh 'root@5.159.102.80'"
and check to make sure that only the key(s) you wanted were added.
Чтобы проверить, действительно ли скопировался открытый ключ, найдем искомый файл authorized_keys на удаленном узле и посмотрим его содержимое, так как именно в него добавляются открытые SSH-ключи.
~# cat /root/.ssh/authorized_keys
ssh-rsa AAAAB3NzaC1yc2EAAAADAQABAAABgQCoQ/EcDWqYKTKCLkd3gZcz98+wRSCTNVNmLUUF6HqWsl105sBX6vep4/xe6cc6zcYSCgFgcKGEK8h2QNIzw+DmdH2Ujxn6AaEkaNBS0b4AGMJSYREqCh6tRpTwBF1VVV5usLMQLz9/eh7HVhorCsHB6bdxk+M2sJOHxX1ikynnwc2cRs12uY/mWMfdLi6S1Q76NmgcfR/ICjyxXUcM3FlmUUsyzQJVyq7+pPr5ahodJw0LRKe3hRNPdQIiXOlNXn1tX7oIxcN9wZ5VR4ZwMORwNBZymZA3oS2Kr27cHvvIhwtEC92ouxd3ue1H8mBmexzbwW6S9Qom0pLiEclK4zRrKmmAWLgHV/2I7nzH6n3V+RFGttW3EOTKTI6n48tnKx7RKaM0qBpzqSAxanNaW3NRvrs++NSjb2LnZoLFoSf9YPLB6YrI6cO08vkWbesc/DWHic3BYPPEaj0rekj5dLJip+acdJw0AiG3dzwfw4ppmcv7zuQpanJYntpmLHoQV4E= root@trexclient
Как мы видим, публичный SSH-ключ клиента был успешно добавлен на сервер.
Примечание. Если на удаленном узле вы используете не стандартный порт в качестве порта для подключения по SSH, а любой другой, то необходимо при вводе команды ssh-copy-id указать дополнительные параметры:
ssh-copy-id ‘-p *port* username@remote_host’После внесенных изменений необходимо перезапустить службы SSH.
sudo service ssh restart (для Ubuntu / Debian / Mint Linux)
sudo service sshd restart (для CentOS / RHEL / Fedora Linux)
Копирование ключа при помощи SSH
Этот метод подойдет тем, чья клиентская машина не поддерживает команду SSH-Copy-ID, но сервер имеет доступ по SSH.
В таком случае вы можете воспользоваться командой:
cat ~/.ssh/id_rsa.pub | ssh username@remote_host "mkdir -p ~/.ssh && cat >> ~/.ssh/authorized_keys"Она включает следующие переменные:
- cat ~/.ssh/id_rsa.pub — вывод содержимого файла id_rsa.pub,
- ssh username@remote_host — подключение к удаленному серверу,
- «mkdir -p ~/.ssh && cat >> ~/.ssh/authorized_keys» — проверка наличия директории /.ssh и перенаправление вывода первой команды в файл authorized_keys.
Чтобы проверить, действительно ли скопировался открытый ключ, нужно вновь отыскать файл authorized_keys на удаленном узле и посмотреть его содержимое.
~# cat /root/.ssh/authorized_keysПосле внесенных изменений необходимо перезапустить службы SSH.
sudo service ssh restart (для Ubuntu / Debian / Mint Linux)
sudo service sshd restart (для CentOS / RHEL / Fedora Linux)
Копирование пользователем вручную
Данный метод следует использовать тем, у кого нет SSH-доступа на удаленный сервер. В этом случае необходимо найти файл id_rsa.pub (при использовании Linux) или public (при использовании Windows) на клиентской машине, открыть его и скопировать все содержимое. Через консоль Linux это можно сделать, используя команду cat:
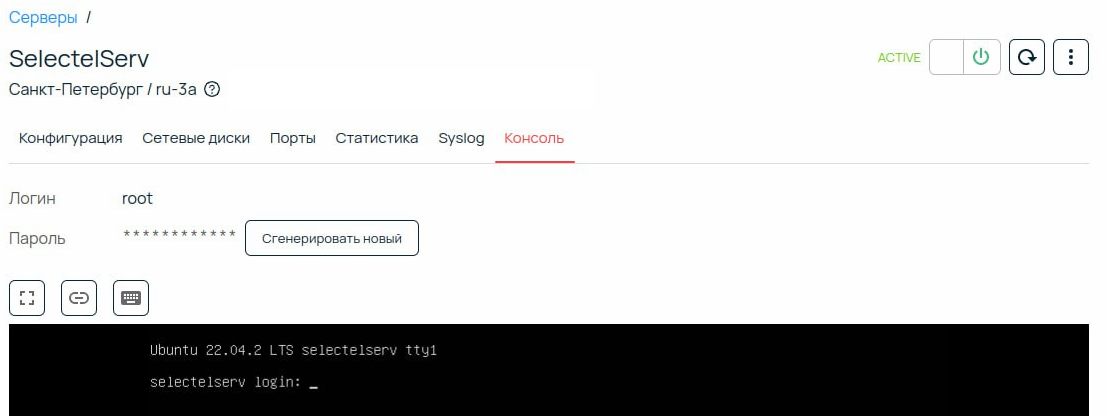
cat ~/.ssh/id_rsa.pubЗатем следует любым доступным способом подключиться к удаленному серверу, куда необходимо скопировать открытый SSH-ключ. В нашем случае это будет консольный доступ к облачному (виртуальному) серверу через панель Selectel.
Найдя все тот же файл authorized_keys, необходимо просто вставить в него то, что мы скопировали из файла id_rsa.pub на клиентской машине ранее. В случае, если вы генерировали SSH-ключи в ОС Windows с помощью Putty, необходимо так же скопировать публичный ключ в файл authorized_keys. Либо вы можете открыть консоль и использовать команду для загрузки ключа:
echo *Text* >> ~/.ssh/authorized_keysГде *Text* — это скопированные вами данные из id_rsa.pub.
После внесенных изменений необходимо перезапустить службы SSH.
sudo service ssh restart (для Ubuntu / Debian / Mint Linux)
sudo service sshd restart (для CentOS / RHEL / Fedora Linux)
Использование SSH-ключей
Настройка аутентификации на сервере с помощью SSH-ключей из ОС Linux
Чтобы воспользоваться подключением по SSH с помощью ключей, необходимо из-под клиентской машины, на которой мы создавали ключи, ввести команду:
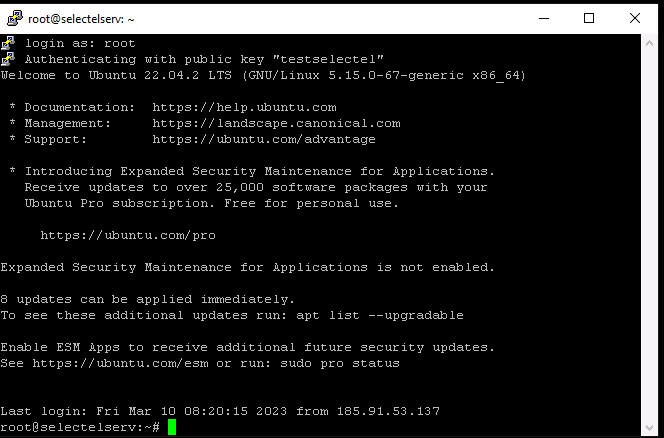
~# ssh username@remote_host

root@trexclient:~# ssh root@5.159.102.80
Welcome to Ubuntu 22.04.2 LTS (GNU/Linux 5.15.0-60-generic x86_64)

 * Documentation:  https://help.ubuntu.com
 * Management: 	https://landscape.canonical.com
 * Support:    	https://ubuntu.com/advantage

 * Introducing Expanded Security Maintenance for Applications.
   Receive updates to over 25,000 software packages with your
   Ubuntu Pro subscription. Free for personal use.

 	https://ubuntu.com/pro

Expanded Security Maintenance for Applications is not enabled.

0 updates can be applied immediately.

Enable ESM Apps to receive additional future security updates.
See https://ubuntu.com/esm or run: sudo pro status


Last login: Sun Mar  5 12:31:34 2023 from 152.89.133.14
root@selectelserv:~#
Если имя пользователя на локальной машине и удаленном узле совпадают, можно сократить вводимую команду до:
~# ssh remote_hostНастройка аутентификации на сервере с помощью SSH-ключей из ОС Windows
Ранее мы уже скопировали на удаленный узел открытый SSH-ключ, сгенерированный с помощью Putty. Теперь необходимо произвести подключение.
Для этого откройте putty.exe и введите IP-адрес удаленного узла и порт для подключения, а также проверьте, что в качестве типа подключения выбран SSH.
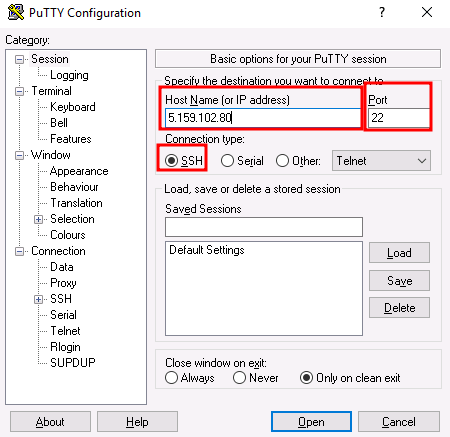
Далее пройдите по пути, указанному на скриншоте (Connection → SSH → Auth → Credentials):
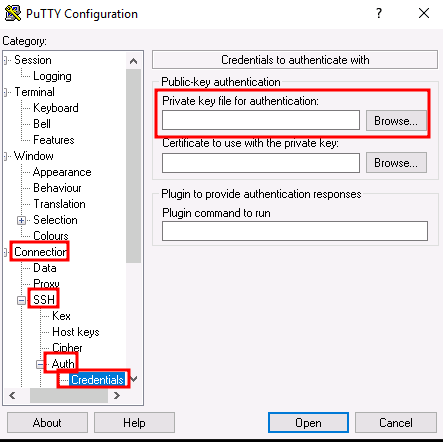
В поле Private key file for authentication вставьте ссылку на приватный ключ, который необходимо использовать в данном подключении, и нажмите Open.
Перед вами откроется окно, в котором нужно ввести логин пользователя удаленного узла. В нашем случае — учетная запись root.
Подключение из ОС Windows с помощью OpenSSH аналогично подключению по SSH на сервере Linux:
C:\Users\Administrator> ssh hostname@remote_host Если при генерации SSH-ключей была создана секретная фраза, то удаленный хост запросит ее подтверждение:
Enter passphrase for key 'C:\Users\Administrator/.ssh/id_ed25519':Выполнение одной команды на удаленном узле
Если вам необходимо ввести лишь одну команду, можно не создавать целый сеанс, а ввести нужную команду после ssh hostname@remote_host.
ssh hostname@remote_host commandТехнически сессия все-таки создается, и происходит аутентификация на основе введенных данных. Затем передается нужная команда command, и сеанс сразу же закрывается. Поэтому визуально кажется, что мы просто передали команду на удаленный узел.
Отпечаток SSH-ключа
Каждая пара SSH-ключей использует один криптографический отпечаток. Его можно использовать для идентификации ключей.
~# ssh-keygen -l
Enter file in which the key is (/root/.ssh/id_rsa):
Здесь вы можете оставить поле пустым, если автоматически выбран нужный вам ключ. Если это не так, введите местоположение интересующего вас файла. После этого на экран будет выведена подобная запись (длина ключа, отпечаток ключа, пользователь и хост, для которого был создан ключ, используемый алгоритм шифрования):
3072 SHA256:UxyIzKj93YXoldmfyP5K4/uKkHTu9UoG0nK9e93q57g root@trexclient (RSA)Смена порта SSH
Дополнительной защитой доступа к вашему серверу может быть смена стандартного порта, на котором работает SSH. Перед сменой порта подключения необходимо открыть этот порт в файрволе с помощью команды:
sudo ufw allow *port*Теперь приступим к изменению порта. В первую очередь, находясь на удаленном узле, необходимо открыть файл sshd_config:
sudo nano /etc/ssh/sshd_configВнутри этого файла найдите строку Port и укажите там свое значение, например, 4312.
Port 4312После этого необходимо перезагрузить демон SSH:
sudo service ssh restart (для Ubuntu / Debian / Mint Linux)
sudo service sshd restart (для CentOS / RHEL / Fedora Linux)
Теперь при подключении к этому удаленному узлу необходимо указывать новый порт для подключения по SSH с помощью ключа -p:
ssh -p 4312 hostname@remote_hostЕсли вы хотите, чтобы -p 4312 не нужно было вводить каждый раз, можно изменить файл конфигурации SSH на локальной машине следующим образом:
nano ~/.ssh/config
Host *alias_name*
HostName *remote_host*
Port *port*
User *username*
Теперь при подключении к удаленному узлу с помощью команды ssh *AliasName* порт будет выбран автоматически согласно соответствующей записи в /config.
Проброс авторизации
Проброс авторизации — это аутентификация на другом сервере через сервер, к которому вы подключены, используя ключ на вашем локальном компьютере. Иными словами, мы с узла A подключаемся к узлу B, а узел B, используя данные узла A, присоединяется с их помощью к узлу C.
На первом узле мы ввели команду подключения с ключом -A, тем самым подключились к узлу host_B.
ssh -A root@*host_B*На узле host_B мы ввели следующую команду и присоединились к узлу host_C под учетными данными первого узла.
root@host_B:~# ssh root@*host_C*Таким образом, вы можете подключаться по SSH через промежуточное устройство к любому другому устройству, к которому разрешен доступ с помощью вашего SSH-ключа.
Увеличение времени простоя
Время ожидания подключения может истечь — придется подключаться к системе заново. Чтобы этого избежать, настройте конфигурацию так, чтобы удаленный узел проверял активное SSH-соединение, отправляя клиенту echo-запросы каждые ServerAliveInterval секунд. Если клиент не ответит на запрос ServerAliveCountMax раз, то соединение будет разорвано.
Данные изменения нужно внести в конфигурацию файла /etc/ssh/sshd_config на сервере.
ServerAliveInterval *count*
ServerAliveCountMax *count*
Отключение проверки пароля
Ранее мы с вами настроили доступ по SSH с использованием SSH-ключей, но альтернативный вход по паролю по-прежнему включен. Чтобы обезопасить себя от возможного брутфорса (взлома пароля простым перебором), необходимо отключить возможность такого входа. Для этого на сервере нам необходимо открыть на редактирование файл конфигурации SSH под названием sshd_config:
sudo nano /etc/ssh/sshd_configВ нем найдем строку PasswordAuthentication, изменим ее значение с yes на no и сохраним изменения.
PasswordAuthentication noДля того, чтобы изменения вступили в силу, следует перезагрузить службу SSH:
sudo service ssh restart (для Ubuntu / Debian / Mint Linux)
sudo service sshd restart (для CentOS / RHEL / Fedora Linux)
Теперь ваш сервер не будет рассматривать в качестве возможного варианта подключения по SSH использование пароля.
Больше материалов про SSH
Устранение неполадок
Ключ игнорируется сервером
В редких случаях бывает, что вы настроили все корректно, но не можете подключиться к серверу с использованием SSH-ключей. По следующему выводу можно подумать, что сервер не видит ключ:
Permission denied (publickey).Вероятнее всего, сервер SSH считает, что установлены неподходящие разрешения к некоторым каталогам. Для решения этой проблемы следует изменить права доступа.
Настройка удаленного узла
Полный доступ к папке .ssh только владельцу, остальным — полный запрет:
chmod rwx------ ~/.sshПрава на запись и чтение для файла authorized_keys только владельцу, остальным — полный запрет:
chmod rw------- ~/.ssh/authorized_keysОтмена записи группой и остальными пользователями:
chmod go-w ~/Настройка локальной машины
Полный доступ к папке .ssh только владельцу, остальным — полный запрет:
chmod rwx------ ~/.sshПрава на запись и чтение для файла ключа только владельцу, остальным — полный запрет:
chmod rw------- ~/.ssh/*key*После применения этих политик ошибка должна исчезнуть.
Зашифрованный домашний каталог
Если у вас есть зашифрованный домашний каталог, то SSH не сможет получить доступ к файлу authorized_keys, пока вы не пройдете аутентификацию. Поэтому SSH по умолчанию будет использовать вход по паролю. Чтобы решить эту проблему, создайте папку вне домашнего каталога с именем /etc/ssh/*username*. Этот каталог должен иметь права доступа rwxr-xr-x и принадлежать пользователю. Переместите в него файл authorized_keys (authorized_keys должен иметь права доступа rw-r—r— и принадлежать пользователю).
Затем отредактируйте файл /etc/ssh/sshd_config и добавьте в него запись:
AuthorizedKeysFile /etc/ssh/%u/authorized_keysПерезагрузите службу SSH.
sudo service ssh restart (для Ubuntu / Debian / Mint Linux)
sudo service sshd restart (для CentOS / RHEL / Fedora Linux)
При следующем подключении по SSH вам не нужно будет вводить пароль.
Анализ логов подключения
При возникновении ошибок во время подключения вы можете проанализировать файл /var/log/auth.log, в котором будут указаны все попытки подключения к системе, а также механизмы, использованные для аутентификации.
Также детальную информацию о подключении можно получить с помощью опций -v, -vv или -vvv. Чем больше ключей -v (но не более 3), тем подробнее будет лог.
ssh -vvv hostname@remote_hostВызов справки
Подробное описание команды (ее параметров, значений и так далее) вы можете найти в документации, которая вызывается командой man. Например:
man ssh
man sshd
Заключение
В тексте мы рассмотрели создание и авторизацию с помощью SSH-ключей на базе ОС Linux и Windows, а также разобрали некоторые ошибки, которые могут возникать при использовании такого способа авторизации. Использование SSH-ключей не только упрощает способ авторизации, но и увеличивает степень защиты вашего сервера.
Configure SSH Passwordless Login from Windows to Linux
Setting up SSH passwordless login allows you to connect from your Windows machine to a Linux server securely without typing your password every time. This is particularly useful for automation, scripting, or regular remote management tasks.
Step 1: Check and Install OpenSSH Client
-
Open PowerShell with administrative privileges:
- Press Win + S, type
PowerShell, right-click on Windows PowerShell, and select Run as Administrator.
- Press Win + S, type
-
Check if OpenSSH Client is installed:
Get-WindowsCapability -Online | Where-Object Name -like '*OpenSSH.Client*'
Enter fullscreen mode
Exit fullscreen mode
If it shows State : NotPresent, install it:
Add-WindowsCapability -Online -Name OpenSSH.Client~~~~0.0.1.0
Enter fullscreen mode
Exit fullscreen mode
Step 2: Generate an SSH Key Pair on Windows
- Open Command Prompt or PowerShell. Both tools can execute the
ssh-keygencommand; choose the one you’re more comfortable with or have easy access to. - Run the SSH key generation command:
ssh-keygen -t rsa -b 4096
Enter fullscreen mode
Exit fullscreen mode
This command generates a secure 4096-bit RSA key, which is recommended for modern usage due to its robust security against brute-force attacks.
-
When prompted:
- Save the key to the default location (e.g.,
C:\Users\YourUsername\.ssh\id_rsa) by pressing Enter. - Leave the passphrase empty for passwordless login (press Enter twice).
- Save the key to the default location (e.g.,
-
Example output:
   Generating public/private rsa key pair.
   Enter file in which to save the key (C:\Users\YourUsername\.ssh\id_rsa):
   Enter passphrase (empty for no passphrase):
   Enter same passphrase again:
   Your identification has been saved in C:\Users\YourUsername\.ssh\id_rsa
   Your public key has been saved in C:\Users\YourUsername\.ssh\id_rsa.pub
Enter fullscreen mode
Exit fullscreen mode
Step 3: Copy the SSH Public Key to the Linux Server
To enable passwordless login, your public key must be on the Linux server.
- Use the following command in PowerShell to append the public key directly to the
authorized_keysfile on the Linux server:
type $env:USERPROFILE\.ssh\id_rsa.pub | ssh username@hostname-or-ip "mkdir -p .ssh && chmod 700 .ssh && cat >> .ssh/authorized_keys && chmod 600 .ssh/authorized_keys"
Enter fullscreen mode
Exit fullscreen mode
Replace:
-
usernamewith your Linux username. -
hostname-or-ipwith the IP address or hostname of your Linux server.
- Ensure the correct permissions for the
.sshdirectory andauthorized_keysfile are applied as part of the above command.
Step 4: Test the Passwordless SSH Connection
From your Windows machine, test the connection:
- Open Command Prompt or PowerShell.
- Run the SSH command:
ssh username@hostname-or-ip
Enter fullscreen mode
Exit fullscreen mode
You should log in without being prompted for a password.
Troubleshooting
If the connection still prompts for a password:
- Verify the SSH key is correctly copied to the Linux server:
cat ~/.ssh/authorized_keys
Enter fullscreen mode
Exit fullscreen mode
Ensure it contains the public key from your Windows machine.
-
Check SSH server permissions and configuration:
- Ensure
~/.sshhas700permissions andauthorized_keyshas600. - Restart the SSH service on Linux:
sudo systemctl restart sshd - Ensure
-
Check firewall or network configurations:
- Ensure port 22 (the default SSH port) is open on the Linux server.
- Verify there are no IP-based restrictions preventing your connection.
- For cloud environments, confirm that the security group or network rules allow SSH access.
-
Enable debugging during SSH login:
ssh -vvv username@hostname-or-ip
Enter fullscreen mode
Exit fullscreen mode
Analyze the output for errors.
Conclusion
Configuring SSH passwordless login from Windows to Linux improves efficiency and security for remote connections. By setting up SSH keys, you eliminate the need for passwords while maintaining secure access. This setup is particularly useful for frequent logins, automated scripts, and system management.
Feel free to leave a comment if you encounter any issues or have tips to share! 😊
Шаг 1: Установите OpenSSH в Windows
OpenSSH – это инструмент командной строки, который можно использовать для подключения к Linux-серверу через SSH. Проверьте, установлен ли OpenSSH на вашем компьютере Windows. Если нет, выполните следующие действия:
Откройте «Параметры» Windows.

Нажмите на «Приложения».
Выберите «Дополнительные компоненты».
Выберите «OpenSSH-клиент».
Шаг 2: Генерация ключа SSH
Чтобы получить доступ к серверу через SSH-ключ, сначала нужно создать пару ключей. Это можно сделать в командной строке Windows. Для этого выполните следующие действия:
Откройте командную строку Windows.
Введите следующую команду:
ssh-keygen -t rsaПройдите по всем шагам генерации ключей.

По умолчанию созданный ключ будет находиться в папке пользователя Windows в директории .ssh. Название файла начинается с id_rsa.
Шаг 3: Добавление публичного ключа на сервер
После того, как ключи созданы, необходимо добавить публичный ключ на сервер. Для этого выполните следующие действия:
Скопируйте содержимое файла с расширением .pub, который находится в папке .ssh в директории пользователя Windows.

Войдите на сервер через SSH, используя пароль аутентификации который был отправлен вам на почту после активации VPS сервера.
Создайте файл authorized_keys в директории .ssh на сервере, если его еще нет. Вы можете сделать это с помощью следующей команды:
mkdir -p ~/.ssh && touch ~/.ssh/authorized_keysОткройте файл authorized_keys для редактирования:
nano ~/.ssh/authorized_keysВставьте содержимое публичного ключа в файл authorized_keys.
Сохраните и закройте файл.
Шаг 4: Подключение к серверу через SSH-ключ
Теперь вы можете подключаться к серверу через SSH-ключ. Для этого выполните следующие действия:
Откройте командную строку Windows.
Введите следующую команду, заменив user на имя пользователя сервера и server_address на IP-адрес сервера:
ssh user@server_address -i ~/.ssh/id_rsaНажмите Enter.
Если все настроено правильно, вы должны будете подключиться к серверу без запроса пароля.

Поздравляем! Теперь у вас есть доступ к Linux-серверу через SSH-ключ.
Примечания.
1. При генерации пары ключей можно не вводить пароль, просто нажимать Enter на вопросах:
Enter passphrase (empty for no passphrase):
Enter same passphrase again:
и тогда авторизация на сервере будет проходить без пароля.
2. Что бы отключить авторизацию по паролю и оставить настроенную авторизацию только по ключу в конфигурационном файле ssh /etc/ssh/sshd_config на сервере нужно включить следующие команды:
PubkeyAuthentication yes
AuthorizedKeysFile      .ssh/authorized_keys .ssh/authorized_keys2
PasswordAuthentication no
и выполнить рестарт OpenSSH сервера командой:
/etc/init.d/ssh restartВ итоге подключение к Linux серверу по SSH используя пару логин-пароль больше будет не доступным, при попытке подключиться используя логин и пароль вы будете получать сообщение:
no supported authentication methods server sent publickey
не поддерживаемый метод аутентификации, openssh серверу нужен публичный ключ.
Securely Accessing Your Linux Server from Windows using SSH Keys
Peviously i wrote about how i revived my old dead iMac with an ubuntu fresh install and also about how i setup barrierKVM for free so i could share one mouse and keyboard between them and also copy from clipboard to clipboard. In this article, you would set up SSH key-based authentication for accessing your Linux server from a Windows client. This method enhances security by eliminating the need for password-based logins.
So lets get started!
Prerequisites:
- A Windows client machine with an SSH client. Windows 10 and 11 include OpenSSH client by default. You can access it through PowerShell or Command Prompt.
- A Linux server with OpenSSH server installed and running.
Steps:
1. Generating an SSH Key Pair on Your Windows Client:
-
Open PowerShell or Command Prompt as administrator.
-
Check for existing SSH keys:
Get-ChildItem -Path $env:USERPROFILE\.ssh
If files named
id_rsaandid_rsa.pubexist, you already have a key pair. -
Generate a new key pair (if needed):
ssh-keygen -t rsa -b 4096 -f $env:USERPROFILE\.ssh\id_rsa
This creates a 4096-bit RSA key pair. You can customize the file path if desired.
-
Secure your key (optional):
You’ll be prompted to set a passphrase. This adds an extra layer of security. -
Your public key (
id_rsa.pub) is now ready to be copied.Get-Content -Path $env:USERPROFILE\.ssh\id_rsa.pub | Set-Clipboard
This copies the contents of the public key to your clipboard for easy pasting.
2. Configuring Your Linux Server:
-
Open a terminal session on your Linux server and log in as the user you want to grant access to.
-
Navigate to the SSH directory (create it if it doesn’t exist):
-
Create or edit the
authorized_keysfile: -
Paste the contents of your Windows client’s
id_rsa.pubinto this file. (You copied it to your clipboard in the previous step). -
Save and close
authorized_keys(Ctrl+X, Y, Enter in nano). -
Set appropriate permissions (important!):
chmod 700 ~/.ssh
chmod 600 ~/.ssh/authorized_keys
This ensures only the owner can access the .ssh directory and its contents.
3. Connecting to Your Linux Server:
a. From your Windows PowerShell or Command Prompt, run:
powershell ssh -i $env:USERPROFILE\.ssh\id_rsa username@linux_server_ip
Replace username with your Linux username and linux_server_ip with the IP address or hostname of your server.

;
b. If prompted, enter your SSH key passphrase.
c. You should now be logged into your Linux server!
finally, this is one little detail most people leave out: you might run into an error like below if you dont purge openssh-server from your linux server before trying to connect.
Before openssh-server purge:

purge openssh-server and reinstall it before you try to connect.
sudo apt-get purge openssh-server
sudo apt-get install openssh-server
After Purge and install:

Troubleshooting:
- Ensure OpenSSH Server is running on your Linux server (check with
sudo systemctl status ssh). - Verify firewall rules on the Linux server allow SSH connections (port 22). You might need to configure this if you have a firewall enabled.
- Double-check that the permissions on the
.sshdirectory andauthorized_keysfile are correct on the Linux server. - If you are using a passphrase and get authentication errors, make sure you are entering it correctly.
Additional Notes:
- For added security, consider disabling password-based authentication on your Linux server after setting up SSH keys. This can usually be done by modifying the SSH server configuration file (
/etc/ssh/sshd_config). - You can use this same process to connect to different user accounts on the Linux server by specifying the correct username in the
sshcommand. - This guide focuses on using the default SSH port (22). If your server uses a different port, specify it using the
-pflag with thesshcommand.
By following these steps, you’ve successfully configured secure, key-based SSH access to your Linux server from your Windows client, improving the security of your remote administration tasks.
17 May 2022
🔖
windows
linux
intermediate
tutorials
security
integration
devops
💬 EN
Table of Contents
- Generate a new Linux-style keypair
- 1: Install Linux-like software onto your Windows machine
- 2: Generate a Linux-style private key file
- Secure your private key with a passphrase
- 3: Admire your new keypair
- 4: Back up your new keypair
- Give a sysadmin your public key
- Test your Linux key against a Linux server
- You’re done! (Maybe.)
- Make a Windows-friendly copy of the Linux-style private key
- 1: Install WinSCP onto your computer
- 2: Make a Windows-friendly key
- 3: Admire your new keypair
- 4: Back up your new keypair
- Test your Windows key against a Linux server
- You’re probably done now
- Changing the secret passphrase on your private keys
- 1: Re-passphrase your Linux-style private key
- 2: Re-passphrase your Windows-style private key
- 3: Test your keys again
- 4: Back up your new passphrase and private keys
- Advanced PuTTYgen pro tip
- Migrating your keys to a new computer
- 1: Lay the groundwork
- 2: Import your Linux-style private key
- Test your Linux-style private key
- 2: Import your Windows-style private key
- Test your Windows-style private key
- 3: Import your Linux-style public key
- On naming things
SSH and SFTP are protocols typically used for “remoting into” a server running the Linux operating system, much like you might use the “Remote Desktop” protocol to remotely operate a Windows machine.
Although it can be authenticated into by username and password, many Linux servers force you to SSH/SFTP into them with a username and “key.”
- The Linux server will already have a copy of your “public key” on file (because you’ll have e-mailed it ahead of time to the server’s system administrator).
- It’ll be your job to keep a copy of your “private key” on the desktop computer from which you’ll be SSH’ing/SFTP’ing into the Linux machine.
Together, these are known as a “keypair.”
In this article, we’ll covering making a “keypair” if you don’t yet have one, and using it to SSH/SFTP into a Linux server, when your desktop computer runs Windows.
Generate a new Linux-style keypair
The first thing you’ll want to do is generate a “private key” file and a corresponding “public key” file, which together are known as a “keypair.”
Back in the day, most people who were remotely accessing Linux servers over SSH/SFTP were already typing at the command prompt of a computer running Linux. This is still the case for many Linux system administrators. Therefore, the tooling that people find most familiar for generating a “keypair” runs on Linux.
To ensure that people who really know what they’re doing with SSH/SFTP, like Linux system administrators, can help troubleshoot any problems you encounter when generating and using keypairs, a best practice is to use Linux-like software to initiate the generation of your keypair, even if you intend to use it from a Windows machine.
1: Install Linux-like software onto your Windows machine
Install some sort of sofware onto your Windows desktop that comes with the ability to run the Linux-style program named “ssh-keygen” at a command terminal.
Two great pieces of free software for Windows computers that give you a nice assortment of Linux-style commands like “ssh-keygen” are:
- Windows Subsystem for Linux, a.k.a. “WSL”, accompanied by some sort of Linux installation obtained from the Microsoft Store.
- (Coming soon, hopefully: my tutorial about how exactly to do that.)
- The “Git Bash” terminal included in Git for Windows. When installed with its default settings, it runs in a mini-Linux-like environment called mingw
The rest of these instructions will proceed with the presumption that you’re using WSL and a Linux OS installed into it, because Linux-style private keys generated with Git Bash can be a bit finicky when imported into PuTTYgen to turn them into Windows-style private keys.
Greek to you? That sentence will make more sense after you’ve followed all of the instructions.
2: Generate a Linux-style private key file
Open up a WSL Linux command prompt and run the following Linux command, with a few edits:
ssh-keygen -f ~/.ssh/id_rsa -C "some_human_description@some_computer_description"
- I’d replace “
some_human_description” with “katiekodes.” - I’d replace “
some_computer_description” with the phrase “desktopcomputer.”
So I’d be executing:
ssh-keygen -f ~/.ssh/id_rsa -C "katiekodes@desktopcomputer"
The part after -C is just a comment that will show up when you send your public key to a Linux server’s system administrator.
You probably won’t be the only person who’s ever sent them a public key, so doing them a favor and putting in a comment briefly describing who you are, and what kind of computer you keep the corresponding private key on, is handy when they’re wading through everyone’s files.
For example, if you ever tell them that you generated a new keypair, and ask them to make it so that your old keys can’t be used to access the server, it’ll really help for you to have put a comment into your public key that identifies which key you’re talking about.
Secure your private key with a passphrase
When asked, “Enter passphrase (empty for no passphrase),” and again when asked, “Enter passphrase again,” type some sort of secret passphrase only you will ever know.
You’ll be typing it frequently if you work with servers over SSH/SFTP a lot, so it’s fine for it to be long but easy to type (like a sentence joking about how annoying all these steps were).
See the “correct horse battery staple” principle from the cartoon XKCD to learn more about why I recommend this.
Make it something brand new, though.
The purpose of the secret passphrase is to keep someone who steals files from your desktop’s hard drive, or sits down at your computer, from easily getting into our servers as if they were you.
There are probably more people who can do that than you think. Is this computer owned by your employer?
Congratulations, half of the computer-support technicians at the tech desk likely have “admin rights” to your computer, able to read the contents of any file on your computer that they’d like to read.
If you passphrase-protect your private key file (which will be sitting around on your desktop computer as an ordinary file), then even if someone steals a copy of it, they can’t actually use it to log into a server as if they were you unless they also know the passphrase.
Be sure to save this passphrase into a secure password manager like LastPass and to label it well so that you can find it later.
3: Admire your new keypair
With Windows File Explorer, open the following folder:
\\wsl$\your_linux_operating_system_name\home\your_wsl_username\.ssh
(Be sure to swap out “your_linux_operating_system_name” and “your_wsl_username” as appropriate.)
You can open this folder in Windows explorer by opening the Windows Start Menu, starting to type “\\wsl$\”, and hitting “Enter.” Then navigate through the subdirectories by double-clicking on them until you find the one above, just like you might if you were exploring your “C:\” drive’s files.
Validate that these two files exist:
- id_rsa
- This is your new Linux-style private key.
- Don’t ever share the contents of this file with anyone.
- id_rsa.pub
- This is your new Linux-style public key.
- The contents of this file are safe to e-mail to other people.
4: Back up your new keypair
Open up both of these files in Windows Notepad, copy their contents to your clipboard, and save them both into a secure password manager like LastPass.
Don’t skip this important step with a password manager. It’s crucial for accident recovery and for setting up a new desktop computer if you get yours replaced.
Be careful not to accidentally Save the “id_rsa” file when you have it open in Notepad for copying its contents.
Saving the file with a Windows-based text editor with its “permissions” in a way that make it impossible to use for actual “ssh” operations performed within your WSL Linux environment.
Give a sysadmin your public key
Email a copy of the file ending in “.pub” to the system administrator of the Linux server you’d like to be able to remote into.
If they don’t already know which Linux servers you’d like to be able to remote into, and as what Linux usernames on those Linux servers, let them know.
Test your Linux key against a Linux server
In your WSL Linux command prompt, run the following Linux command, substituting the location of your Linux-style private key file, the Linux username you’re trying to log into the server as, and the Linux server’s address on the internet as appropriate:
ssh the_linux_server_username_you_need_to_log_in_as@the_linux_server_domain_name_or_ip_address
The first time you connect to a given server, your Linux environment might ask if you’re sure that the server’s fingerprint is really valid.
If it’s an internal server that your company maintains, you’re probably safe to just say “yes.”
That said, you’re welcome to ask the server’s sysadmin what the legitimate fingerprint is if you’re really skeptical & cautious.
If you did everything correctly on your machine, and if the Linux server’s system administrator has correctly put your public key into the server, then you should be prompted to enter the secret passphrase you chose for your key when you secured it. This is to prove that it’s really you sitting at your computer right now.
Once you type your passphrase and press Enter, your command prompt should look a little different, saying something like:
linux_username@server_name:/some/directory/path/<> $
To confirm that you’re no longer running commands against your local WSL Linux environment, and instead are running them on a remote Linux server, try executing a Linux command like:
You should you should see output that reminds you of the remote Linux server, like:
To log out of the remote Linux server and return to running commands against your own WSL Linux command line, execute the following command:
You’re done! (Maybe.)
Congratulations, you are now able to SSH into a Linux server from a Windows computer!
That said, you might have a few other things you’re interested in doing, which is what the rest of the sections in this article will cover.
Make a Windows-friendly copy of the Linux-style private key
If you enjoy using point-and-click Windows software like WinSCP for SSH and SFTP, you’ll also want to do a few more things.
1: Install WinSCP onto your computer
Install WinSCP, which is free and comes with a crucial piece of software called “PuTTYgen” onto your Windows desktop.
2: Make a Windows-friendly key
- Open WinSCP, and in the “Login” box that pops up upon opening, click the “Tools” button at the bottom left of the popup.
- From the menu that appears, click “Run PuTTYgen.”
- In the menu bar of the popup that appears titled “PuTTY Key Generator,” click “Conversions” and then click “Import key” below it.
- Use the Windows Explorer file-browser popup that appears titled “Load private key” to find the Linux-style private key file you just generated and click “Open.”
- If you used the instructions above, the private key file’s location on your hard drive should be something like this (be sure to swap out “
your_linux_operating_system_name” and “your_wsl_username” as appropriate):\\wsl$\your_linux_operating_system_name\home\your_wsl_username\.ssh\id_rsa
- If you used the instructions above, the private key file’s location on your hard drive should be something like this (be sure to swap out “
- If you get a “
Couldn't load private key” error, here are two troubleshooting ideas:- Uninstall WinSCP (and the PuTTy & PuTTYgen versions that its installer put onto your computer) and start over from scratch with a fresh WinSCP download. They fix bugs all the time.
- If that fails, go see the “advanced pro tip” under “changing the secret passphrase on your private keys” section of this article. Sometimes that works. (Particularly with passphrase-protected Linux-style private keys generated by Git Bash instead of by WSL.)
- When prompted “Enter passphrase for key,” prove that it’s really you sitting at your computer right now by typing the secret passphrase you made up earlier, and then click “OK.
- Confirm that the “Key passphrase:” & “Confirm passphrase:” text boxes aren’t blank. (PuTTYgen should have filled them in for you based on the passphrase you just typed in.)
- Click the button labeled “Save private key”.
- In the “File name:” text box of the Windows Explorer file-browser popup that appears titled “Save private key as,” give it the following filename (be sure to swap out “
your_linux_operating_system_name” and “your_wsl_username” as appropriate):\\wsl$\your_linux_operating_system_name\home\your_wsl_username\.ssh\id_rsa.ppk- Be careful not to accidentally overwrite the file called “id_rsa” without a file extension. Make sure this new file has a “.ppk” file extension.
- Honestly, you could save it anywhere on your hard drive and give it any filename you like, but hey, you might as well save it near near your Linux-style keys with a similar naming pattern.
- You can close PuTTYGen (the popup that appears titled “PuTTY Key Generator”) now.
3: Admire your new keypair
With Windows File Explorer, open the following folder:
\\wsl$\your_linux_operating_system_name\home\your_wsl_username\.ssh
(Be sure to swap out “your_linux_operating_system_name” and “your_wsl_username” as appropriate.)
Validate that this third file now also exists:
- id_rsa.ppk
- This is your new Windows-style private key.
- Don’t ever share the contents of this file with anyone.
4: Back up your new keypair
Open up this third files in Windows Notepad, copy its contents to your clipboard, and save it into a secure password manager like LastPass.
Don’t skip this important step with a password manager. It’s crucial for accident recovery and for setting up a new desktop computer if you get yours replaced.
Test your Windows key against a Linux server
- Open WinSCP, and in white area at the top of the “Login” box that pops up upon opening, click the “New Site” icon.
- At right, in the “Session” area, put “
the_linux_server_domain_name_or_ip_address” (modifying as appropriate) into “Host name”, “the_linux_server_username_you_need_to_log_in_as” into “User name”, and then click the “Advanced” button, and at left under “SSH,” click “Authentication.” - At right, click the three dots in the box under “Private key file” and choose your Windows-style private key file that ends in “
.ppk”.- If you were following these instructions, it lives somewhere like this (be sure to swap out “
your_linux_operating_system_name” and “your_wsl_username” as appropriate):\\wsl$\your_linux_operating_system_name\home\your_wsl_username\.ssh\id_rsa.ppk
- If you were following these instructions, it lives somewhere like this (be sure to swap out “
- Click “OK” to close the advanced popup.
- Click the “Login” button.
- You should get prompted for your secret passphrase to prove that it’s really you sitting at your computer right now.
- And then you should get SFTP’ed into the server!
- To SSH into the server, click Commands followed by Open in PuTTY.
- In the terminal window that pops up, type your secret passphrase again.
- You should now be SSH’ed into the server and able to run commands like “pwd”!</li>
- Execute the
exitcommand to close your PuTTY session.
You’re probably done now
OK, a few more tricks below…
Changing the secret passphrase on your private keys
If you ever decide that you hate the secret passphrase you came up with to protect your private keys, or if you forgot to set a secret passphrase at all when you generated it, it’s pretty easy to change or add a private key’s secret passphrase.
1: Re-passphrase your Linux-style private key
Open up a WSL Linux command prompt and run the following Linux command, with a few edits:
ssh-keygen -f ~/.ssh/id_rsa -C "some_human_description@some_computer_description" -p
- I’d replace “
some_human_description” with “katiekodes.” - I’d replace “
some_computer_description” with the phrase “desktopcomputer.”
So I’d be executing:
ssh-keygen -f ~/.ssh/id_rsa -C "katiekodes@desktopcomputer" -p
Note that this is just a “ -p” added to the end of the same command originally used to generate a Linux-style keypair.
You’ll be prompted for your old passphrase and for a new passphrase you’d like to use instead. Once you’re done, the “id_rsa” file (your Linux-style private key file) will be passphrase-protected with your new private key.
2: Re-passphrase your Windows-style private key
To edit the passphrase on your Windows-style private key file (“id_rsa.ppk”) to match, there’s probably some way of doing it directly, but just as easy is to simply delete the “id_rsa.ppk” file altogether and re-generate it from the new version of the “id_rsa” file.
To re-generate it, just follow the original PuTTYgen instructions for making a Windows-style private key file out of a Linux-style private key file.
3: Test your keys again
- Re-test logging into a server with the “
ssh” Linux command from a WSL Linux command prompt.- Make sure that you get prompted for your new passphrase.
- Re-test logging into a server with WinSCP.
- Make sure that you get prompted for your new passphrase.
4: Back up your new passphrase and private keys
Be sure to update your secure password manager (e.g. LastPass) notes with:
- the latest version of your passphrase
- the latest contents of your Linux-style private key file (“id_rsa“)
- (Remember, be careful not to accidentally save it if you open it in a Windows-based text editor)
- the latest contents of your Windows-style private key file (“id_rsa.ppk“)
You shouldn’t need to do anything with the latest contents of your Linux-style public key file (“id_rsa.pub“).
Whatever your public key already was (and that you sent to server sysadmins) should still be completely compatible with the changes you just made to your private keys.
Advanced PuTTYgen pro tip
Sometimes, when PuTTYgen doesn’t like your Linux-style private key while generating a Windows-style private key (when you click “open” after choosing the “id_rsa” file, it says “Couldn’t load private key“), you can do this:
- Change the Linux-style passphrase to nothing at all, using this technique.
- Now try generating your Windows-style private key file in PuTTYgen from the un-passphrase-protected “id_rsa” Linux-style private key file with the directions above.
- Note that you’ll have to enter a passphrase to protect your Windows-style private key file manually into the “Key passphrase:” & “Confirm passphrase:” text boxes, instead of PuTTYgen figuring it out for you from the Linux-style passphrase, since you won’t be working with a passphrase.
- Test that your Windows-style private key file gets you into servers with WinSCP, and that you get prompted for a passphrase when you try to log into a server through WinSCP.
- Change the Linux-style passphrase back from nothing to an actual passphrase, using this technique.
- Test that you can still “
ssh” into servers from your WSL Linux command line as described above, and that you get prompted for a passphrase when you do.
Honestly, though, don’t try this until you’re sure that you have WinSCP, PuTTY, & PuTTYgen up-to-date.
They seem to have fixed a lot in recent versions, and you probably won’t have to do this if you’re on the latest versions.
That said, you can’t install WSL into Windows without admin rights to your computer, whereas you definitely can install Git Bash into Windows without admin rights to your computer.
Git Bash’s version of “ssh-keygen,” as of the time this article was written, seems to generate Linux-style private keys that PuTTYgen – even modern versions – can’t import properly if they’re password-protected.
So this workaround can be useful for getting yourself going if the only thing you have available to you for running “ssh-keygen” is Git Bash.
(As to where your key files will actually live if using Git Bash’s “ssh-keygen” against these instructions, you should know that the Linux-style “home folder” of “~” in Git Bash is a shorthand for the Git Bash folder “/c/Users/your_windows_username,” which is the Windows folder “C:\Users\your_windows_username\”. Git Bash doesn’t create a separate, deciated “Linux user home folder” like WSL does at “\\wsl$\...”. Git Bash just uses your Windows user folder as its “Linux” home folder.)
Migrating your keys to a new computer
These directions are also handy for editing the contents of your “id_rsa,” “id_rsa.ppk,” and “id_rsa.pub” files, to fix them, if you accidentally overwrote them with something you didn’t mean to overwrite them with
Only in that scenario, you might have some backspacing-out of garbage to do when you open the files in a text editor like VIM or Notepad.
Also, don’t forget that “id_rsa” can only be safely edited in a Linux text editor like VIM. (The “.ppk” and “.pub” files can be edited any text editor software you like.)
1: Lay the groundwork
When you get your new computer, open your WSL Linux command line.
Check if your WSL Linux main user’s home directory already has a “.ssh” folder:
If not, create it:
2: Import your Linux-style private key
Create a new file and open it for editing with the following command:
Sadly, if you try to create or edit “id_rsa with, say, Windows Notepad, it’ll mess up the Linux-style file permissions of that file. Any attempt to run the “ssh” command will yell at you for not having proper file permissions for the file containing your Linux-style private key.
The contents of the file should be empty, as this should be a new computer and you should have just created this file.
- Type “i” when inside the VIM editor to go into “insert mode” where you can type.
- Copy the contents of your Linux-style private key from your secure password manager (e.g. LastPass) onto your clipboard. Don’t copy excess whitespace.
- Right-click into the VIM editor’s blank space to paste the contents of your clipboard into the editor.
- Hit “esc” to exit “insert mode” and go back to the VIM editor’s command mode.
- To save and exit VIM and return to your WSL Linux command line, type the following: “
:wq” followed by “enter”.
You can validate that you got the contents of your Linux-style private key into the “id_rsa” file with the following command:
You’re not quite done yet.
Linux’s “ssh” command is going to yell at you for the permissions of this file, seeing as it’s a private key, so next, run this Linux command:
chmod g-r,o-r ~/.ssh/id_rsa
You can verify that the file’s permissions are now “-rw------” at the far left of the output that you see from running this Linux command:
Now your Linux-style private key is ready to use.
Test your Linux-style private key
Now that you’ve imported your Linux-style private key onto your new computer, test executing the “ssh” command from within your new computer’s WSL Linux command prompt the way you did when you first generated the key.
2: Import your Windows-style private key
Create a new “id_rsa.ppk” file and open it for editing.
It doesn’t matter if you use VIM like above, or if you use Windows Notepad.
- If you use a Linux command like VIM, you’ll be saving it to a Linux-style filepath of “
~/.ssh/id_rsa.ppk”. - If you use a point-and-click Windows text editor like Notepad or Notepad++, you’ll be saving it to a Windows-style filepath like this (be sure to swap out “
your_linux_operating_system_name” and “your_wsl_username” as appropriate):\\wsl$\your_linux_operating_system_name\home\your_wsl_username\.ssh\id_rsa.ppk
Either way, copy the contents of your Windows-style private key from your secure password manager onto your clipboard. Don’t copy excess whitespace.
Then paste it into the text editor and save your work.
Now your Windows-style private key is also ready to use.
Forget to save a copy of your Windows-style private key into your password manager?
If you managed to migrate your Linux-style private key to the new computer, no worries.
Just generate a new Windows-style one from the Linux-style one like the very first time you generated the Windows-style one.
Test your Windows-style private key
Now that you’ve imported your Windows-style private key onto your new computer, test connecting to a server with WinSCP the way you did when you first generated the key.
If this is a new computer, you might have to freshly install WinSCP and set up all of your favorite servers all over again.
3: Import your Linux-style public key
Create a new “id_rsa.pub” file and open it for editing.
It doesn’t matter if you use VIM like above, or if you use Windows Notepad.
- If you use a Linux command like VIM, you’ll be saving it to a Linux-style filepath of “
~/.ssh/id_rsa.pub”. - If you use a point-and-click Windows text editor like Notepad or Notepad++, you’ll be saving it to a Windows-style filepath like this (be sure to swap out “
your_linux_operating_system_name” and “your_wsl_username” as appropriate):\\wsl$\your_linux_operating_system_name\home\your_wsl_username\.ssh\id_rsa.pub
Either way, copy the contents of your public key from your secure password manager onto your clipboard. Don’t copy excess whitespace.
Then paste it into the text editor and save your work.
Honestly, you don’t even need to keep a copy of your public key on your computer.
Some people just find it handy to have it saved on their desktop computer near the private keys it accompanies.
On naming things
Power user who wants different keypairs for different work contexts? Cool!
You don’t have to follow the folder-and-file standards I’ve used in this example when it comes to the plaintext files that hold copies of:
- your Linux-style private key
- your Windows-style private key
- your Linux-style public key
You have my blessing to name these files anything you want, and to put them anywhere on your computer that you want.
That’s one reason I included an “-f” parameter, as in “-f ~/.ssh/id_rsa,” in my example calls to “ssh-keygen”. Just change the Linux filepath “~/.ssh/id_rsa” to something else.
If you want to store them under the Windows C:\example\my_keys instead of \\wsl$\your_linux_operating_system_name\home\your_wsl_username\.ssh, cool. In WSL, that’d be your /mnt/c/example/my_keys folder instead of your ~/.ssh folder.
Just make sure that you don’t try to rename or move a Linux-style private key file from Windows.
Instead, you’ll want to move and rename files within WSL with Linux commands.
Otherwise, calls to “ssh” might yell at you about the permissions settings of that your Linux-style private key file not being “-rw------”.
If you want to invoke the WSL “ssh” command against some sort of custom private key filepath instead of “~/.ssh/id_rsa,” just give it an “-i” flag like this:
ssh -i "/mnt/c/example/my_keys/my_day_job_private_key.txt" username_on_server@server_domain_or_ip
Actually, now that I think about it, you might have issues with /mnt/c-style paths … I’m not sure it’s possible to get the default setup of WSL to let any files stored on things like your “C drive” be in “-rw------” mode in Linux.
Maybe if you want to use the WSL “ssh” command rather than sticking to WinSCP and such, you might have to keep a copy of your Linux-style private key somewhere under “\\wsl$\your_linux_operating_system_name\.”
Let me know in the comments what you find when you try it.