
Provide feedback
Saved searches
Use saved searches to filter your results more quickly
Sign up
This page is about PuTTYgen on Windows. For the Linux version, see here.
PuTTYgen is an key generator tool for creating SSH keys for PuTTY. It is analogous to the ssh-keygen tool used in some other SSH implementations.
The basic function is to create public and private key pairs. PuTTY stores keys in its own format in .ppk files. However, the tool can also convert keys to and from other formats.
PuTTYgen.exe on Windows is a graphical tool. A command-line version is available for Linux.
PuTTYgen download and install
PuTTYgen is normally installed as part of the normal PuTTY .msi package installation. There is no need for a separate PuTTYgen download. Download the PuTTY installation package. For detailed installation instructions, see PuTTY installation instructions.
Running PuTTYgen
Go to Windows Start menu → All Programs → PuTTY → PuTTYgen.

Creating a new key pair for authentication
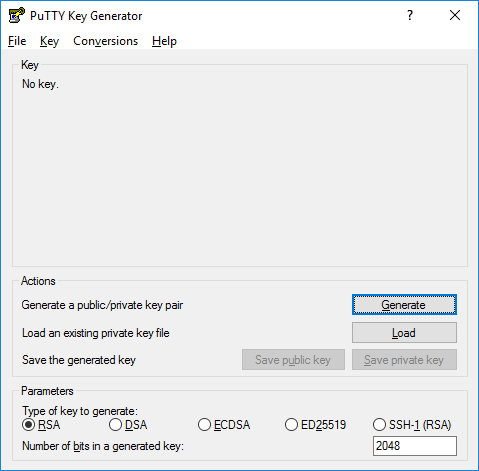
To create a new key pair, select the type of key to generate from the bottom of the screen (using SSH-2 RSA with 2048 bit key size is good for most people; another good well-known alternative is ECDSA).
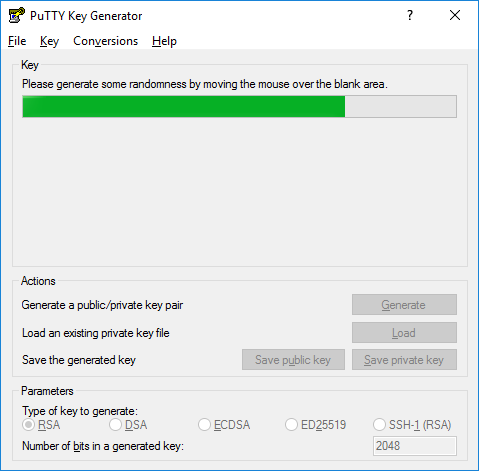
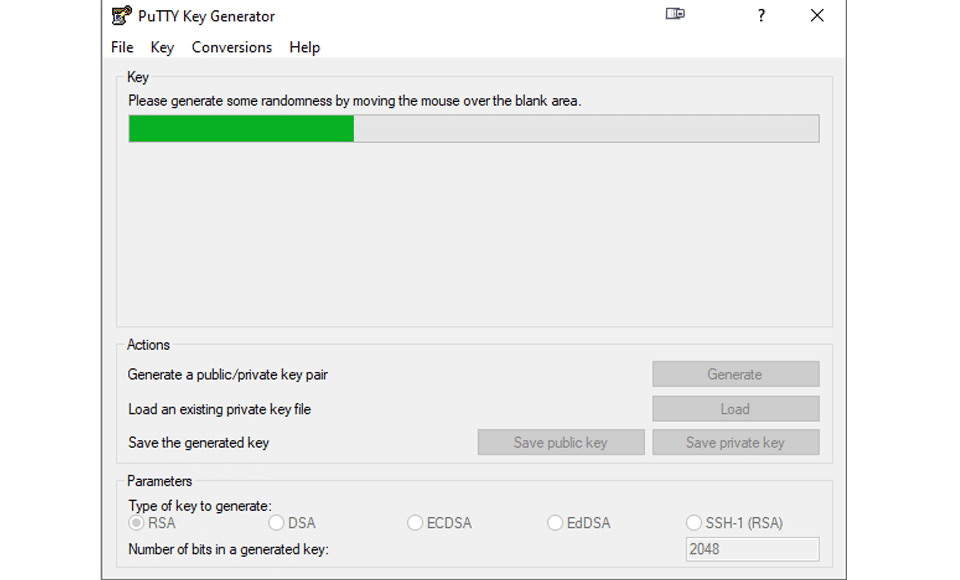
Then click Generate, and start moving the mouse within the Window. Putty uses mouse movements to collect randomness. The exact way you are going to move your mouse cannot be predicted by an external attacker. You may need to move the mouse for some time, depending on the size of your key. As you move it, the green progress bar should advance.
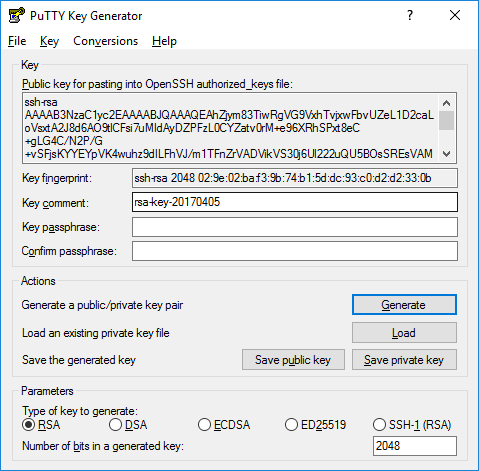
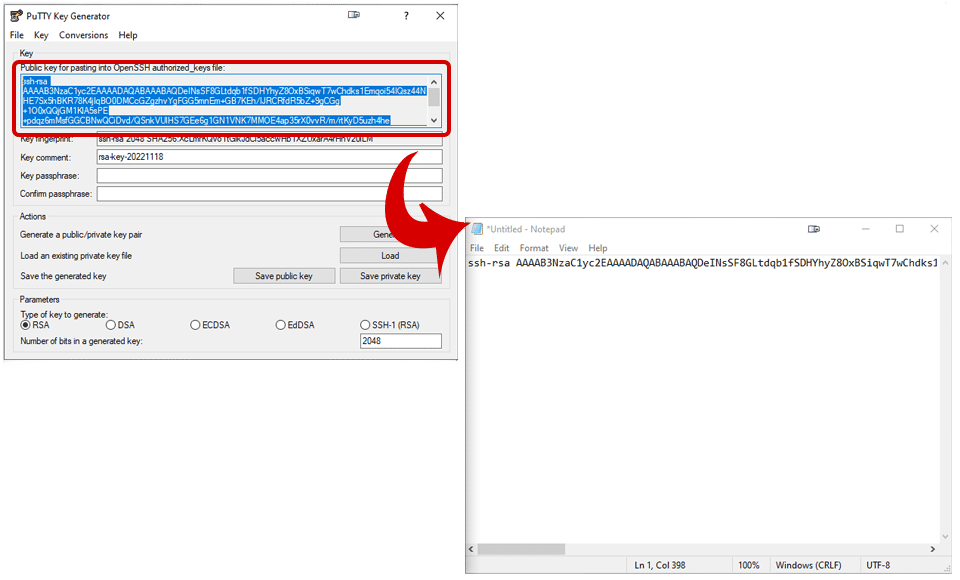
Once the progress bar becomes full, the actual key generation computation takes place. This may take from several seconds to several minutes. When complete, the public key should appear in the Window. You can now specify a passphrase for the key.
You should save at least the private key by clicking Save private key. It may be advisable to also save the public key, though it can be later regenerated by loading the private key (by clicking Load).
We strongly recommended using a passphrase be for private key files intended for interactive use. If keys are needed for automation (e.g., with WinSCP, then they may be left without a passphrase.
With both Tectia SSH and OpenSSH servers, access to an account is granted by adding the public key to a ~/.ssh/authorized_keys file on the server.
To install the public key, Log into the server, edit the authorized_keys file with your favorite editor, and cut-and-paste the public key output by the above command to the authorized_keys file. Save the file. Configure PuTTY to use your private key file (here keyfile.ppk). Then test if login works. See configuring public key authentication for PuTTY.
Managing SSH keys
In larger organizations, the number of SSH keys on servers and clients can easily grow to tens of thousands, in some cases to millions of keys. In large quantities, SSH keys can become a massive security risk and they can violate compliance requirements.
Universal SSH Key Manager can manage PuTTY keys in addition to OpenSSH and Tectia keys. It works with legacy keys on traditional servers as well as dynamic and keyless elastic environments in the cloud. Any larger organization should ensure they have proper provisioning and termination processes for SSH keys as part of their Identify and Access Management (IAM) practice.
 Changing the passphase of a key

It is recommended that all SSH keys be regenerated and changed periodically. The Universal SSH Key Manager can automate this. Just changing the passphrase is no substitute, but it is better than nothing. These instructions can also be used to add a passphrase to a key that was created without one.
To change the passphrase, click on Load to load an existing key, then enter a new passphrase, and click Save private key to save the private key with the new passphrase. Be sure to properly destroy and wipe the old key file. Creating a new file with a new passphrase will not help if the old file remains available.
Videos illustrating use of PuTTYgen
Using PuTTYgen to generate an SSH key
Using PuTTYgen to generate an SSH key
How to set up PuTTY SSH keys for passwordless logins using Pagent
How to setup PuTTY SSH keys for passwordsless logins using Pagent
Generate private and public keys to connect via SSH»
PuTTYgen is one of the most popular key generator tool used for creating SSH keys for PuTTY and it is also called as PuTTy Key Generator. It is similar to the SSH-Keygen tool accessed in some SSH implementations. It is a small and efficient program to generate RSA and DSA keys for access to the OpenSSH “authorized-keys” file. It is one of the components of PuTTY and can automatically install with the Telnet client. In addition to, it also incorporate in other third-party software like WinSCP.
To generate keys click on Generate and then move your mouse until the loading bar is full.

Then you can Save the public and the private keys.

Features
The basic function of this tool is to create private and public key pairs. It stores keys in its own specific format i.e. .ppk files but it can able to convert keys to & from other file formats. The graphical tool on Windows is PuTTYgen.exe and the command line version is also available for Linux. PuTTYgen is usually installed as the part of the PuTTY.msi installation package so you do not require any separate PuTTygen download.
PuTTYgen is licensed as freeware for PC or laptop with Windows 32 bit and 64 bit operating system. It is in ssh clients category and is available to all software users as a free download.
| Share |
| Give a rating |
|
(8 votes, average: 4.00 out of 5) Loading… |
| Author |
|
Simon Tatham
|
| Last Updated On |
| April 5, 2019 |
| Runs on |
| Windows 10 / Windows 8 / Windows 7 / Windows Vista / XP |
| Total downloads |
| 4,701 |
| License |
|
Free |
| File size |
| 2,81 MB |
| Filename |
|
putty-0.70-installer.msi |
Learn to easily make SSH key pairs using either PuTTy or the OpenSSH Client on Windows 10 or 11.

Don’t let SSH keys confuse you. They are nothing more than two strings of text that match up together. You will need to generate them multiple times throughout your career, and the process is very simple. If you are working on Windows, this guide will be specifically for you. By the end, you will have two different methods for generating SSH keys on Windows.
Using PuTTy To Generate an SSH Key
PuTTy is one of the most popular SSH clients for Windows. We use it as our primary terminal, so we like to generate SSH Keys using it. The process isn’t complicated, but some procedures aren’t entirely intuitive.
Download Putty
- You can install the complete PuTTy package, or if you want to generate an SSH key without installing the client, download puttygen.exe from the “Alternative binary files” list.
Open the PuTTy Key Generator (puttygen.exe)
- Either open the puttygen.exe file you downloaded or search for puttygen by hitting the windows key if you installed the complete PuTTy package.
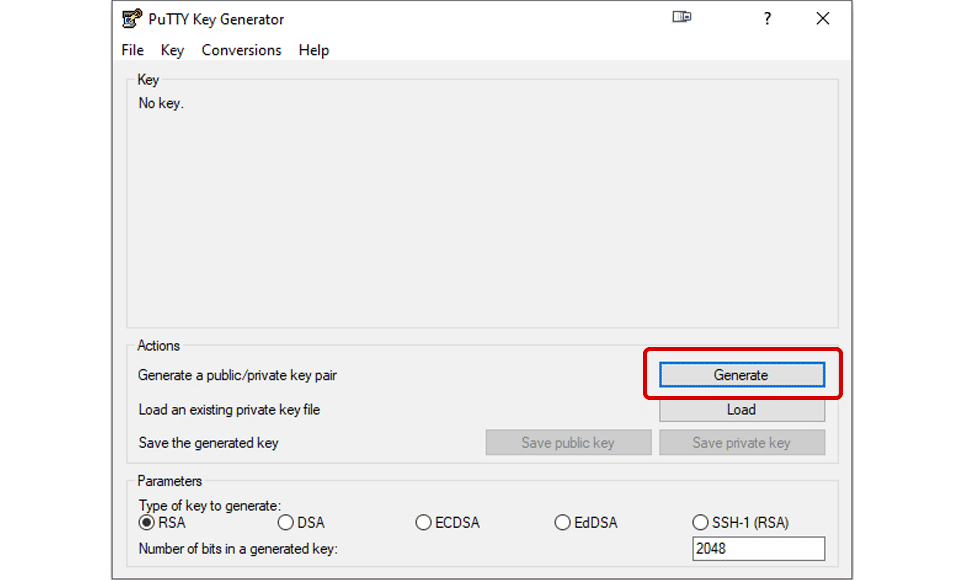
Click Generate
Before clicking generate, you can choose your key type at the bottom under Parameters. Your choices are RSA, DSA, ECDSA, EdDSA, and SSH-1 (RSA).
- Once Generate is clicked, move your mouse around randomly in the box above the button. A green progress bar will begin to fill.
Save the Public Key
- Once the key is generated, select and copy the Public key from the top text box. Open notepad, paste the key, and save it with any filename you like, [FILENAME].pub is a good standard to use.
Save the Private Key
- At the top, click on Conversions and then Export OpenSSH key. When asked to save the key without a passphrase, click Yes. Save the file in a [FILENAME].pk format or any other format you wish.

Your public and private key filenames and extensions can be anything you like. These are just simple text files. Make sure to distinguish your private and public keys, however.
Using OpenSSH To Generate an SSH Key
Another way to create an SSH key is to use the ssh-keygen command part of the built-in Windows OpenSSH client.
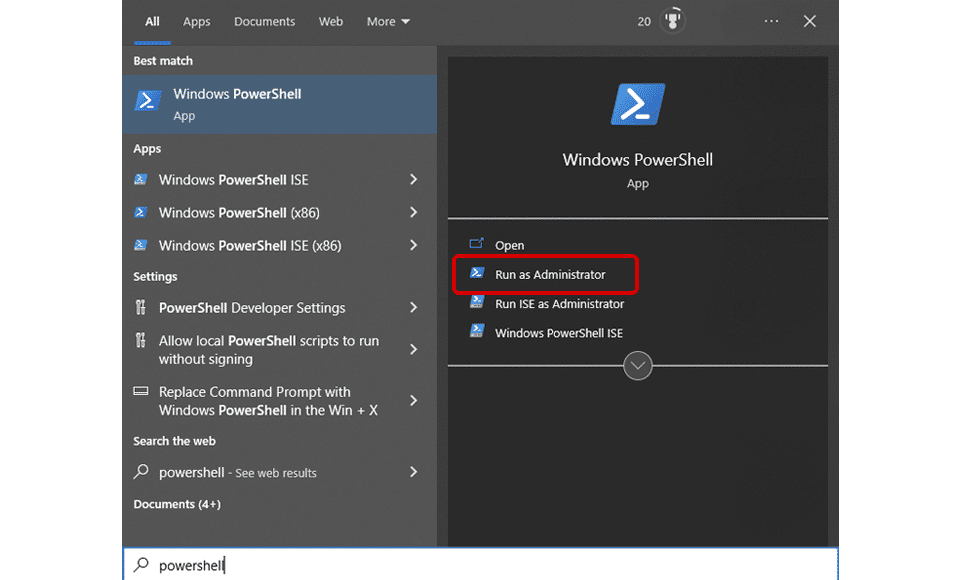
Open Powershell
- Hit the Windows key and search for “Powershell.” Right-click and click Run as administrator.
Type ssh-keygen
- The keygen utility will allow you to name your key file. You can name it anything you want or leave it blank for the default “id_rsa” value. When asked for a passphrase, you can leave that blank and hit Enter.
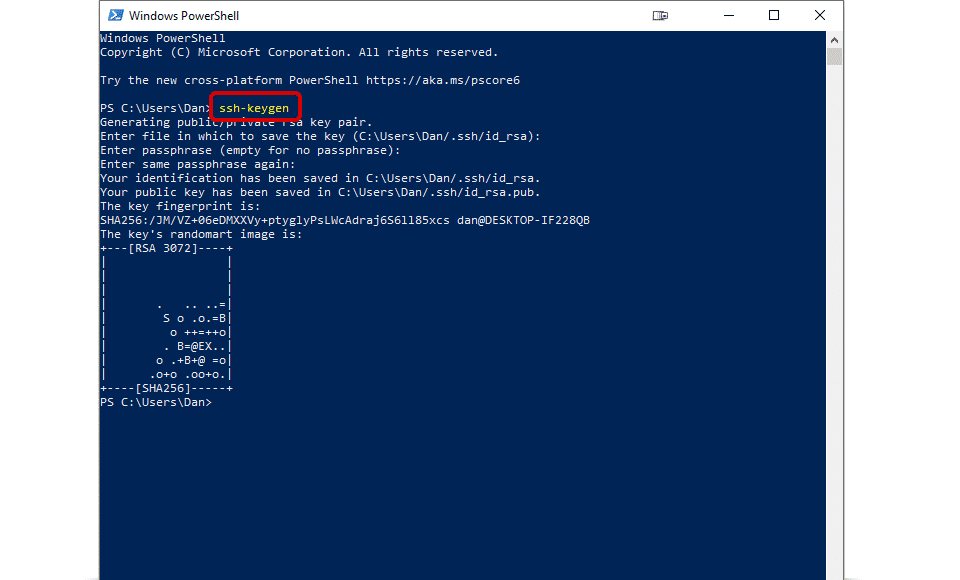
Find your keys
- Once complete, navigate to C:\Users\[USER]\.ssh, and you should see two files. The file with the .pub extension is your public key, and the file with no extension is your private key.
Help ‘ssh-keygen’ is not recognized
If you get an error similar to the following:
The term ‘ssh-keygen’ is not recognized as the name of a cmdlet function, script file, or operable program.
or
‘ssh-keygen’ is not recognized as an internal or external command
You need to ensure the OpenSSH client is enabled for your Windows installation. Follow these steps to get it fixed.
- Hit the Windows Key.
- Type and Click on “Apps & Features“.
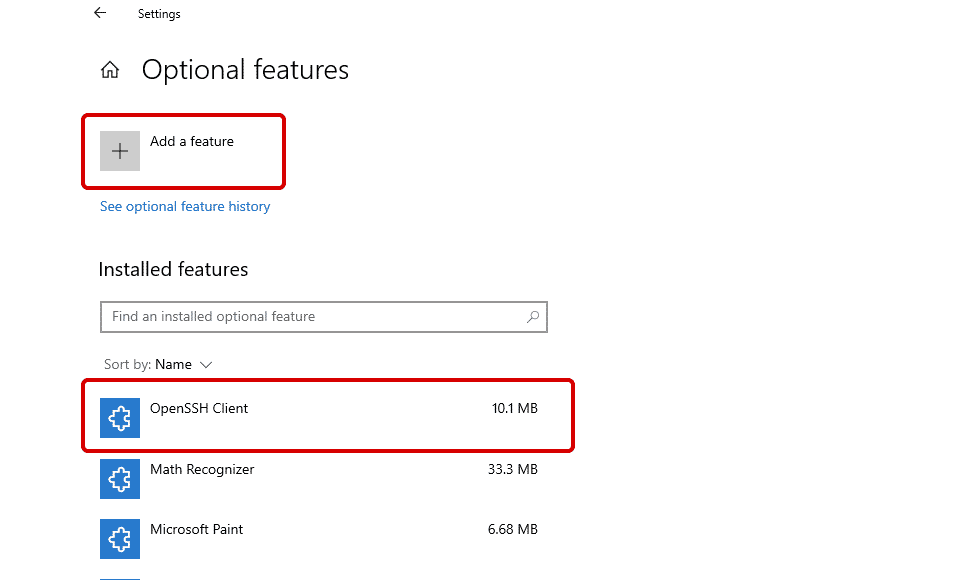
- Click Optional features.
- Click Add a feature.
- Search and Select “OpenSSH Client“.
- Click Install.
The ssh-keygen command should now be available in your command prompt and PowerShell terminal.
If ssh-keygen is still not available, perform a restart.
How to Use SSH Keys
Once generated, using SSH keys is very simple. The public key is the key you will give public systems you will be connecting to. The private key will remain on your computer and match the public keys. You can imagine it as if the public key is a padlock you put on a gym locker, and you keep the key that opens it in your pocket. You are the only one with that key, so only you can open the padlock.
Let’s look at an example when connecting to a Digital Ocean droplet using PuTTy.
You will be asked to provide an SSH Key when creating your Digital Ocean droplet. This is the public key you generated above. Copy and paste this key in the prompt when asked.
When connecting to your new server in PuTTy, enter your server information. Under the Connection->SSH->Auth section, find the Private key file for authentication prompt, click Browse and navigate to the private key file that corresponds to the public key you provided DigitalOceans.
Wrapping Up
We hope you now have a better understanding of SSH keys and how to generate them on Windows. You can use either the PuTTy or OpenSSH Client method make sure to keep your private and public key filenames distinct. Good Luck!
For more useful Windows guides, check out our Windows Section.
SSH — это сетевой протокол прикладного уровня, необходимый для обеспечения безопасного подключения, а после и управления операционной системой. Через него можно удаленно выполнять команды в терминале компьютера. Создать удаленное подключение к серверу через SSH можно с помощью паролей или SSH-ключей. В данной статье мы рассмотрим, как создать ключи в операционной системе Windows.
SSH-ключ в Windows — это один из способов безопасного подключения к удаленному серверу. Преимущество данного метода подключения — это отсутствие возможности взлома, как это происходит с паролем.
Для подключения создаются два SSH-ключа:
- Публичный — ключ, хранящийся на сервере в определенном каталоге. Это комбинация символов, которая шифрует данные при обращении к серверу.
- Приватный — зашифрованный ключ, который располагается на компьютере клиента. Он отвечает за расшифровку полученных данных. При его генерации можно добавить пароль для дополнительной защиты.
Для корректной и полной работы SSH—ключей необходимо будет отключить аутентификацию по паролю.
После создания SSH-ключей в Windows и из сохранении на сервер, при подключении к серверу будет происходить их проверка. Если публичный ключ соответствует приватному, то подключение выполнится.
Существует два варианта генерации SSH-ключей в Windows. Первый — использование OpenSSH клиента, второй — использование клиента PuTTY. Ниже опишем инструкции по созданию ключей, используя и первый, и второй вариант. В качестве операционной системы будет использоваться Windows 10.
Создать VDS
OpenSSH клиент
- Для начала нужно проверить установлен ли OpenSSH клиент на Windows 10. Для этого зайдем в «Параметры», а после перейдем во вкладку «Приложения». Далее нажимаем на ссылку «Дополнительные компоненты», как показано на картинке ниже.
В открывшемся окне в строку поиска вводим «Клиент OpenSSH». Если в списке он будет найден, то можно сразу приступать к генерации ключей. Если же он отсутствует, то нужно нажать на кнопку «Добавить компонент», а после найти его и выбрать среди всех доступных, используя строку поиска. Далее останется нажать кнопку «Установить» снизу слева и можно переходить ко второму шагу.
- Теперь нужно открыть командную строку. Для этого открываем диалоговое окно «Выполнить» (комбинация клавиш Win+R), вводим в строку
cmdи нажимаем кнопку «ОК».
- В открывшемся окне вводим команду:
ssh-keygenПосле этого запустится процесс генерации.
В первую очередь пользователю будет предложено ввести путь к папке, в которой будут храниться ключи. Чтобы оставить вариант по умолчанию (.../.ssh/id_rsa), предложенный системой, нужно нажать клавишу «Enter».
Далее пользователю будет предложено ввести ключевое слово к ключу. Чтобы пропустить этот шаг, нажмите также клавишу «Enter» 2 раза.
- Проверим, что все ключи успешно сгенерированы. Для этого переходим в соответствующий каталог на своем компьютере. У нас это
/.ssh/id_rsa, так как мы оставили все по умолчанию.
Как видно по картинке выше, ключи сгенерированы успешно.
Переходим к варианту их создания с помощью клиента PuTTY.
PuTTY
Клиент PuTTY был популярным, когда OpenSSH отсутствовал в Windows. Но и сейчас его не перестают использовать. Он находится в свободном доступе на официальном сайте разработчика. Рассмотрим ниже подробную инструкцию по генерации SSH-ключей на Windows 10 в PuTTY.
- Для начала необходимо скачать архив клиента PuTTY с официального сайта.
- После его нужно будет разархивировать и запустить файл
puttygen.exeот имени администратора. - В открывшемся окне выбираем классический и повсеместно использующийся тип ключа для генерации — RSA. Длину оставляем 2048 бит и нажимаем кнопку «Генерировать».
- Во время генерации нужно водить курсором по серой области внутри окна до заполнения зеленой полоски. Это позволит улучшить защищенность генерируемого ключа, благодаря созданию псевдослучайности.
- После успешной генерации нужно сохранить публичный и приватный ключ на компьютере. Для этого создадим папку на диске.
Ключи успешно созданы и сохранены на локальной машине. На этом этапе их генерация закончена.
Заключение
В данной инструкции были рассмотрены два варианта создания SSH-ключей в Windows. Для подключения к серверу нужно скопировать в него созданный публичный ключ. При попытке соединиться с сервером будет происходить проверка публичного ключа на стороне сервера с приватным на стороне клиента. Если вы пользуетесь облачными серверами Timeweb Cloud, то можете добавить сгенерированный публичный ключ в разделе «SSH-ключи» в панели управления.