
В Windows 10 и Windows Server 2019 появился встроенный SSH клиент, который вы можете использовать для подключения к *Nix серверам, ESXi хостам и другим устройствам по защищенному протоколу, вместо Putty, MTPuTTY или других сторонних SSH клиентов. Встроенный SSH клиент Windows основан на порте OpenSSH и предустановлен в ОС, начиная с Windows 10 1809.
Содержание:
- Установка клиента OpenSSH в Windows 10
- Как использовать SSH клиенте в Windows 10?
- SCP: копирование файлов из/в Windows через SSH
Установка клиента OpenSSH в Windows 10
Клиент OpenSSH входит в состав Features on Demand Windows 10 (как и RSAT). Клиент SSH установлен по умолчанию в Windows Server 2019 и Windows 10 1809 и более новых билдах.
Проверьте, что SSH клиент установлен:
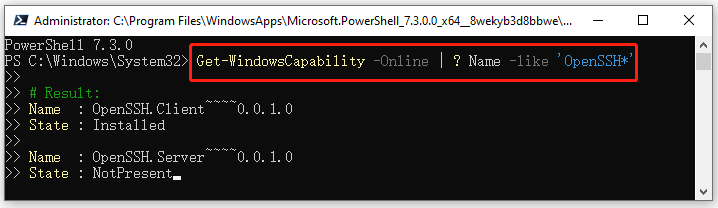
Get-WindowsCapability -Online | ? Name -like 'OpenSSH.Client*'

В нашем примере клиент OpenSSH установлен (статус: State: Installed).
Если SSH клиент отсутствует (State: Not Present), его можно установить:
- С помощью команды PowerShell:
Add-WindowsCapability -Online -Name OpenSSH.Client* - С помощью DISM:
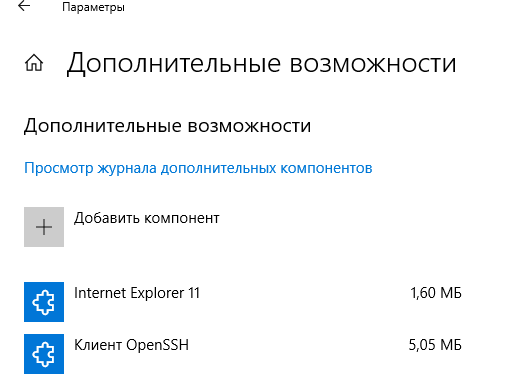
dism /Online /Add-Capability /CapabilityName:OpenSSH.Client~~~~0.0.1.0 - Через Параметры -> Приложения -> Дополнительные возможности -> Добавить компонент. Найдите в списке Клиент OpenSSH и нажмите кнопку Установить.
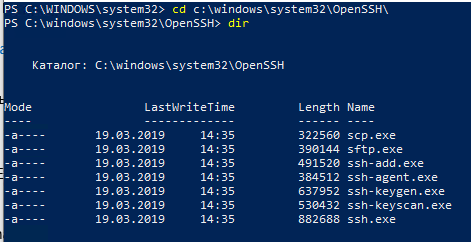
]Бинарные файлы OpenSSH находятся в каталоге c:\windows\system32\OpenSSH\.
- ssh.exe – это исполняемый файл клиента SSH;
- scp.exe – утилита для копирования файлов в SSH сессии;
- ssh-keygen.exe – утилита для генерации ключей аутентификации;
- ssh-agent.exe – используется для управления ключами;
- ssh-add.exe – добавление ключа в базу ssh-агента.
Вы можете установить OpenSSH и в предыдущих версиях Windows – просто скачайте и установите Win32-OpenSSH с GitHub (есть пример в статье “Настройка SSH FTP в Windows”).
Как использовать SSH клиенте в Windows 10?
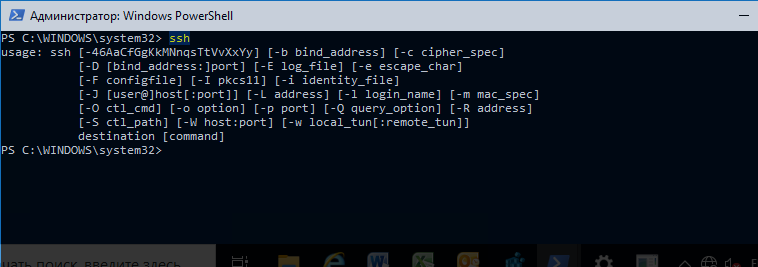
Чтобы запустить SSH клиент, запустите командную строку
PowerShell
или
cmd.exe
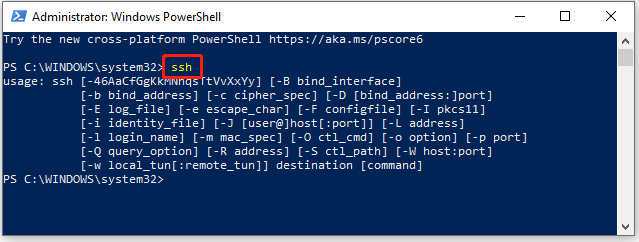
. Выведите доступные параметры и синтаксис утилиты ssh.exe, набрав команду:
ssh
usage: ssh [-46AaCfGgKkMNnqsTtVvXxYy] [-b bind_address] [-c cipher_spec]
[-D [bind_address:]port] [-E log_file] [-e escape_char]
[-F configfile] [-I pkcs11] [-i identity_file]
[-J [user@]host[:port]] [-L address] [-l login_name] [-m mac_spec]
[-O ctl_cmd] [-o option] [-p port] [-Q query_option] [-R address]
[-S ctl_path] [-W host:port] [-w local_tun[:remote_tun]]
destination [command]
Для подключения к удаленному серверу по SSH используется команда:
ssh username@host
Если SSH сервер запущен на нестандартном порту, отличном от TCP/22, можно указать номер порта:
ssh username@host -p port
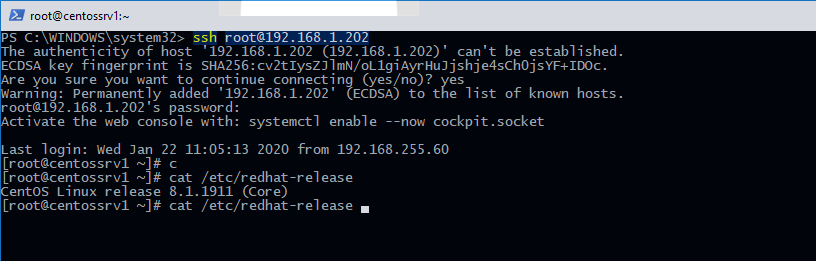
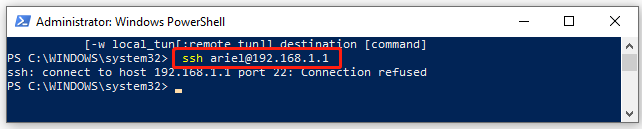
Например, чтобы подключиться к Linux хосту с IP адресом 192.168.1.202 под root, выполните:
ssh [email protected]
При первом подключении появится запрос на добавление ключа хоста в доверенные, наберите yes -> Enter (при этом отпечаток ключа хоста добавляется в файл C:\Users\username\.ssh\known_hosts).
Затем появится запрос пароля указанной учетной записи, укажите пароль root, после чего должна открытся консоль удаленного Linux сервера (в моем примере на удаленном сервере установлен CentOS 8).
С помощью SSH вы можете подключаться не только к *Nix подобным ОС, но и к Windows. В одной из предыдущих статей мы показали, как настроить OpenSSH сервер на Windows 10 и подключиться к нему с другого компьютера Windows с помощью SSH клиента.
Если вы используете SSH аутентификацию по RSA ключам (см. пример с настройкой SSH аутентификации по ключам в Windows), вы можете указать путь к файлу с закрытым ключом в клиенте SSH так:
ssh [email protected] -i "C:\Users\username\.ssh\id_rsa"
Также вы можете добавить ваш закрытый ключ в SSH-Agent. Сначала нужно включить службу ssh-agent и настроить ее автозапуск:
set-service ssh-agent StartupType ‘Automatic’
Start-Service ssh-agent
Добавим ваш закрытый ключ в базу ssh-agent:
ssh-add "C:\Users\username\.ssh\id_rsa"
Теперь вы можете подключиться к серверу по SSH без указания пути к RSA ключу, он будет использоваться автоматически. Пароль для подключения не запрашивается (если только вы не защитили ваш RSA ключ отдельным паролем):
ssh [email protected]
Еще несколько полезных аргументов SSH:
-
-C
– сжимать трафик между клиентом и сервером (полезно на медленных и нестабильных подключениях); -
-v
– вывод подробной информации обо всех действия клиента ssh; -
-R
/
-L
– можно использовать для проброса портов через SSH туннель.
SCP: копирование файлов из/в Windows через SSH
С помощью утилиты scp.exe, которая входит в состав пакета клиента SSH, вы можете скопировать файл с вашего компьютера на SSH сервер:
scp.exe "E:\ISO\CentOS-8.1.1911-x86_64.iso" [email protected]:/home

Можно рекурсивно скопировать все содержимое каталога:
scp -r E:\ISO\ [email protected]:/home
И наоборот, вы можете скопировать файл с удаленного сервера на ваш компьютер:
scp.exe [email protected]:/home/CentOS-8.1.1911-x86_64.iso e:\tmp
Если вы настроите аутентификацию по RSA ключам, то при копировании файлов не будет появляться запрос на ввод пароля для подключения к SSH серверу. Это удобно, когда вам нужно настроить автоматическое копирование файлов по расписанию.
Итак, теперь вы можете прямо из Windows 10 подключаться к SSH серверам, копировать файлы с помощью scp без установки сторонних приложений и утилит.
-
Home
-
Partition Magic
- PowerShell SSH: How to Install SSH PowerShell on Windows 10/11
By Ariel | Follow |
Last Updated
A lot of users are confused about the PowerShell SSH topic. In this post, MiniTool will explain SSH PowerShell and remoting access in detail. It also helps you install SSH PowerShell on Windows 10/11
Overview of PowerShell SSH
Before you set up the SSH from PowerShell, let’s have an overall understanding of the following questions.
What Is SSH
SSH (Secure Shell) is a remote administration protocol that allows you to control and modify your servers over the internet. It is also a cryptographic network protocol that allows you to use network services safely even through an unsecured network. This is because it can create a secure connection to the shell on another computer.
With the SSH client, you can build communications from the remote server in an encrypted manner. For example, you can build a remote connection between Windows and Linux via SSH and transfer files between them. In addition, you can take full use of SSH clients like PuTTY on Windows.
What Does PowerShell SSH Mean
When it comes to managing a remote server or network service, the most common way is to use SSH in Windows PowerShell as an SSH client. This is because PowerShell comes with a built-in SSH client that allows you to connect securely to a remote server even through an unsecured network.
On Windows 10 v1809 and higher, the PowerShell SSH client is enabled by default. That’s to say, you can connect to a remote device via the PowerShell SSH command tool. But there are some prerequisites to using Windows SSH PowerShell.
Can I Use Windows PowerShell SSH
Can I use Windows PowerShell SSH? The answer depends on whether your computer has met the prerequisites. To use SSH in Windows PowerShell, make sure that you have:
- Windows 10 v1809 and higher version (If you don’t know how to update Windows, you can refer to this post “How to Install Windows Updates with PowerShell”.)
- PowerShell v6 and higher (To update PowerShell, read this post “How to Update PowerShell Version to v7.2.5 for Windows 10/11”.)
- Open port 22 in your Firewall
If you don’t know how to use SSH Windows PowerShell, you can refer to the tutorial below:
Step 1. Type PowerShell in the search box, and then right-click the Windows PowerShell and select Run as administrator. Then click on Yes to confirm it.
Step 2. In the elevated PowerShell window, type ssh and press Enter to access Windows SSH PowerShell.
Step 3. With the SSH client opened, you can connect to a remote server or network device with the following PowerShell SSH command.
ssh <username>@<host_ip_address>
For example, the command should be ssh [email protected] in my case.
Tips:
If you don’t know the IP address of your host, you can refer to this post. Alternatively, you can use the hostname instead of the IP address. If you don’t supply the username, then it will use your local user account.
Step 4. If the SSH client is running on a different port rather than the default port 22, you can run the following command to change the port number.
ssh <username>@<host_ip_address> -P <port_number>
How to Install SSH PowerShell on Windows 10/11
As mentioned above, the SSH client has been installed and enabled by default on Windows 10 v1809 and higher, but the SSH server isn’t. So, you need to install the OpenSSH server first and then configure the SSH server. Here’s how:
Tips:
For remote connection, make sure you have installed PowerShell v6 or higher on the computer. Here we take PowerShell v7.3.0 for example.
Step 1. Install OpenSSH Server with PowerShell.
1. Open the elevated PowerShell command as we explained above, type the following command, and hit Enter to check if the OpenSSH server is installed.
Get-WindowsCapability -Online | ? Name -like ‘OpenSSH*’
2. If not installed, run the following command to enable the OpenSSH server in PowerShell.
Add-WindowsCapability -Online -Name OpenSSH.Server~~~~0.0.1.0
3. Run the following command to start the OpenSSH server.
Start-Service sshd
Step 2. Configure the SSH server on Windows.
In addition, you need to configure the SSH server so that you can use more PowerShell SSH commands on remote computers.
- Navigate to the sshd_config file located at $env:ProgramDatassh and open it with Notepad.
- In the configuration file, remove the “#” before the line PasswordAuthentication yes to make sure the password authentication is enabled.
- Add “Subsystem powershell c:/progra~1/powershell/7/pwsh.exe -sshs -NoLogo -NoProfile” in the configuration file to create the SSH subsystem on the remote computer. Then press Ctrl + S keys to save the changes.
- Run the Restart-service sshd command in PowerShell to load the new configuration file.
After finishing all the above steps, you should get the PowerShell SSH server installed on Windows 10/11 and you can connect to it using PowerShell.
Further reading: If you enter some issues like file system corruption and low disk space on Windows 10/11, don’t worry. MiniTool Partition Wizard can help you fix them easily by checking file system errors, extending/resizing partitions, analyzing disk space, upgrading to a larger hard disk, etc.
About The Author
Position: Columnist
Ariel has been working as a highly professional computer-relevant technology editor at MiniTool for many years. She has a strong passion for researching all knowledge related to the computer’s disk, partition, and Windows OS. Up till now, she has finished thousands of articles covering a broad range of topics and helped lots of users fix various problems. She focuses on the fields of disk management, OS backup, and PDF editing and provides her readers with insightful and informative content.
This post is a short note on how to use SSH with Windows Powershell. I will quickly describe three ways: OpenSSH, Posh-SSH and Putty. I found a few blog posts about how to use SSH with Powershell and most of them are referring Posh-SSH. Posh-SSH is nice, but I think OpenSSH is much easier to use because it works the same way as the ssh command in linux.
Note: Since Windows 11, SSH is pre-installed, so you can use “ssh remoteClient” without installing anything extra. If ssh is not available on your system, continue reading.
Open SSH for Powershell
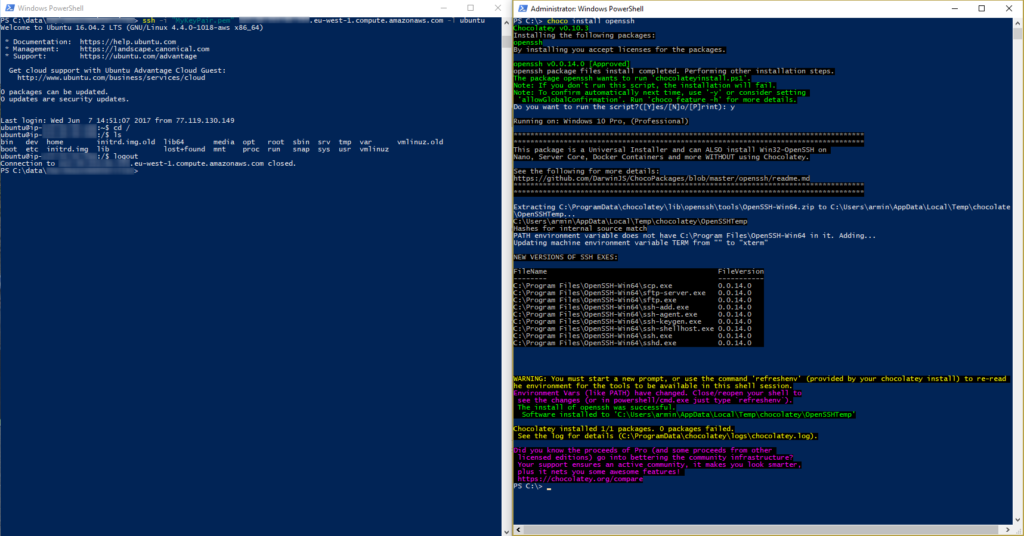
If chocolatey is not yet installed, you must at first install it. Run the Powershell as administrator and execute:
Set-ExecutionPolicy Unrestricted
iwr https://chocolatey.org/install.ps1 -UseBasicParsing | iex
If chocolatey is already installed, run the Powershell as administrator and execute the following command to install OpenSSH, to reload the environment variables and to connect to a client:
choco install openssh                # installs open ssh
refreshenv                           # reloads the environment variables
ssh remoteClient -i "MyKeyPair.pem"  # connects to remoteClient via ssh
Posh-SSH Powershell module
Posh-SSH is a module for Powershell that can also be used for SSH connections. Install it via the Package manager (as administrator) and then you can establish a connection. All that can be done with the following commands:
Install-Module Posh-SSH                                   # installs the posh-ssh module
Get-Command -Module Posh-SSH                              # shows all posh-ssh commandlets
New-SSHSession myclient -KeyFile "c:\data\MyKeyPair.pem"  # connect to my client with the give keyfile
Invoke-SSHCommandStream "ifconfig" -SessionId 0           # send ifconfig to the ssh session with id 0
Invoke-SSHCommand -SessionId 0 -Command "ifconfig"        # send ifconfig to the ssh session with id 0
Invoke-SSHCommand -SessionId 0 -Command "logout"          # send logout to the ssh session with id 0
Remove-SSHSession 0
Putty and the Powershell
The third way I want to show here is to use Putty inside of the Powershell. Install Putty via chocolatey and then you can use plink to run Putty commands (if you don’t want to use the Putty GUI). The installation plus establishing a connection can be done via:
choco install putty
plink -ssh myclient
Additional information
The Universal Openssh Installer: https://github.com/DarwinJS/ChocoPackages/tree/master/openssh
Posh-SSH: https://github.com/darkoperator/Posh-SSH
Chocolatey – Package management for Windows: https://arminreiter.com/2017/01/chocolatey-package-management-windows/
Do you need to manage a remote server or network device? Then you are probably using SSH to connect and manage them. The SSH protocol allows you to connect securely to a remote device over an unsecured network (internet). To use SSH most people use an SSH client tool, like Putty. But did you know that PowerShell has a built-in SSH Client?
The PowerShell SSH client is enabled by default in Windows 10 1809 and higher. This means that you now easily can connect to any remote device from your favorite command-line tool.
We can also use SSH in PowerShell to manage another Windows machine remotely, but you will need to use PowerShell 6 or higher to run the SSH server.
The most common way to use SSH in PowerShell is as an SSH Client. Assuming that you keep your Windows up-to-date you should have SSH enabled by default. You can simply check it by opening PowerShell and type the following command:
# type ssh and press enter
ssh

# Result:
usage: ssh [-46AaCfGgKkMNnqsTtVvXxYy] [-B bind_interface]
           [-b bind_address] [-c cipher_spec] [-D [bind_address:]port]
           [-E log_file] [-e escape_char] [-F configfile] [-I pkcs11]
           [-i identity_file] [-J [user@]host[:port]] [-L address]
           [-l login_name] [-m mac_spec] [-O ctl_cmd] [-o option] [-p port]
           [-Q query_option] [-R address] [-S ctl_path] [-W host:port]
           [-w local_tun[:remote_tun]] destination [command]
With PowerShell open you can connect to a remote server or network device with a single command:
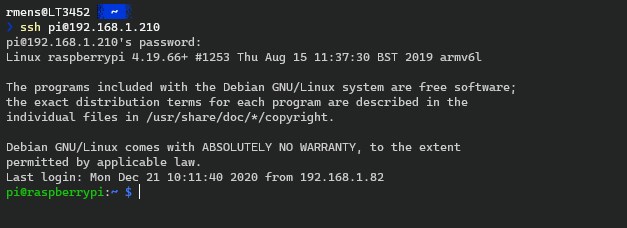
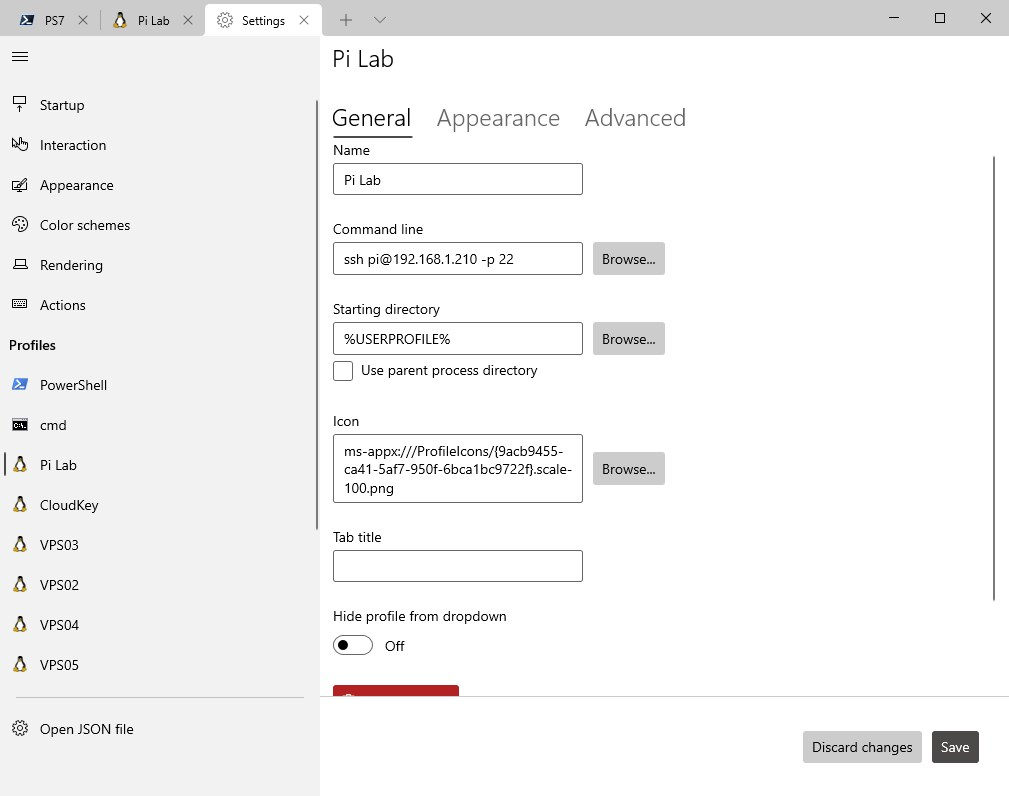
ssh <username>@<host_ip_address>

# For example:
ssh pi@192.168.1.210
You can also use the hostname instead of the IP Address. If you don’t supply a username then your local user account will be used.
When you press enter your will need to enter the password of the SSH user. When you connect to a device for the first time you will need to accept the host’s key. Just press enter or type yes.
If you have SSH running on a different port than the default port 22, then you can change the port number with the -P flag:
ssh <username>@<host_ip_address> -P <port_number>

# For example
ssh pi@192.168.1.210 -P 1022
PowerShell SSH Keygen
Some remote servers or services only allow SSH access with the use of an SSH key. You will need to generate a local SSH key and upload the key to the server (or services) so it can verify you and create a secure connection.
The SSH Key exists out of a private and public key. You will need to keep the private key on your local machine (and make sure that you keep it to yourself) and the public key is uploaded to the server.
PowerShell has a built-in SSH keygen that you can use to generate a new key. Type the following command to generate a key:
ssh-keygen -t Ed25519

# Result
Generating public/private Ed25519 key pair.
Enter file in which to save the key (C:\Users\lazyadmin/.ssh/id_ed25519): <press enter>

# It will ask for apassphrase, you can leave it empty - see below for more details
Enter passphrase (empty for no passphrase):
Enter same passphrase again:

# Generated key
Your identification has been saved in C:\Users\lazyadmin/.ssh/id_ed25519.
Your public key has been saved in C:\Users\lazyadmin/.ssh/id_ed25519.pub.
The key fingerprint is:
SHA256:1232131+ASdi123SscvBbwn9Qfxj0 lazyadmin@lab01
The key's randomart image is:
+--[ED25519 256]--+
| .o .            |
|..o+ .           |
|o..o .   o       |
|+..# o .         |
|=.+ =...S.       |
|.+.C.+. + E      |
|. *o@OO O. .     |
| = O*o  .        |
|. +++.           |
+----[SHA256]-----+
The option -t Ed25519 is a newer algorithm that is used to create the key. On legacy systems, this may not be supported. You can then use the older RSA encryption system.
ssh-keygen -b 4096 -t RSA
The keys are stored in your user profile. The path is displayed in the output, but generally, they are saved in the following location:
%userprofile%\.ssh
SSH Keygen passphrase
During the creation of the ssh key, you will be asked to enter a passphrase or to leave it empty (default). The passphrase is used to encrypt the local key. This way you can securely store the local key. If anybody gets access to the key, then they can’t use it without the passphrase.
But before you use the passphrase there is one important thing you need to keep in mind. You will need to enter the passphrase every time you use the SSH key. Most of the time the SSH key is used in automation, like GitHub services for example. In those use-cases is the use of a passphrase is not an option.
PowerShell Remote Connection with SSH
We can also use SSH in PowerShell to establish a remote connection to another computer or server. This can be between Windows computers or Windows-Linux and vice versa.
Creating a PowerShell remoting session between two Windows machines was already possible with WinRM. But you can now also use SSH to create the connection. The advantage of SSH is that you can use it on Windows, Linux, and macOS.
You will need PowerShell 6 or higher to use SSH for remote connections between Windows and Linux machines. I am using PowerShell 7 in the examples below.
Install OpenSSH Server
The first step is to install the OpenSSH server on your Windows computer. As mentioned, the SSH client is now installed and enabled by default. But the SSH server isn’t.
You can check if the OpenSSH server is installed with the cmdlet below:
Get-WindowsCapability -Online | ? Name -like 'OpenSSH*'

# Result:
Name  : OpenSSH.Client~~~~0.0.1.0
State : Installed

Name  : OpenSSH.Server~~~~0.0.1.0
State : NotPresent
As you can see is the OpenSSH server is not present. We can install/enable it with PowerShell:
Add-WindowsCapability -Online -Name OpenSSH.Server~~~~0.0.1.0
The next step is to start the OpenSSH server. Because it’s a service we can set to start automatically:
# Start the sshd service
Start-Service sshd

# Set the service to automatic start
Set-Service sshd -StartupType Automatic
Configure the SSH Server
We need to edit the SSHD configuration file so we can authenticate with a password and use PowerShell on the remote machine.
If we don’t configure the SSH server then we can only use basic commands on the remote machine (Windows Shell Prompt).
To fully use all PowerShell cmdlets we will need to configure the SSH Server to add PowerShell as a subsystem.
The SSHD configuration file is stored in the programdata folder. Because we already have PowerShell open, we will use it to open the configuration file:
# Change the directory to the programdata folder> ssh
cd $env:ProgramData\ssh

# Open the configuration file in notepad
PS C:\ProgramData\ssh> notepad .\sshd_config
In the configuration file remove the # before the line PasswordAuthentication yes and add the following line in the configuration file. (the location doesn’t really matter, but I added below the “# override default of no subsystems” part)
Subsystem powershell c:/progra~1/powershell/7/pwsh.exe -sshs -NoLogo -NoProfile
Restart the SSHD service to load the new configuration file:
Restart-service sshd
SSH Remoting with PowerShell
With the SSH server installed on our server, we can now connect to it using PowerShell on our client. We can use the same cmdlet as with WinRM remoting, the difference is in the hostname vs computer name.
- New-PSSession
- Enter-PSSession
- Invoke-Command
If you use New-PSSession -Computername then the WinRM protocol will be used. When you use the parameter -hostname instead, then SSH will be used.
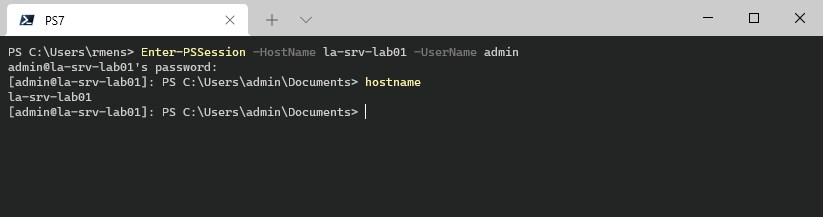
You can start a new PowerShell remoting session as followed:
# Directly open a remoting session
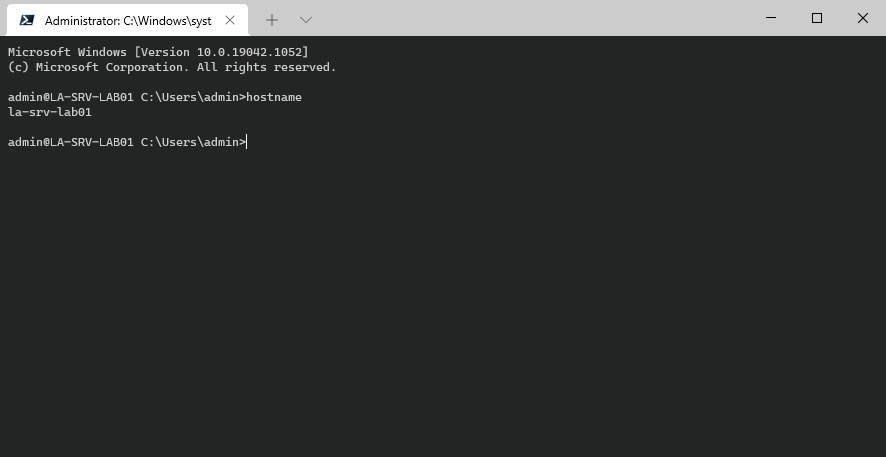
Enter-PSSession -HostName la-srv-lab01 -UserName admin
# Create a new session
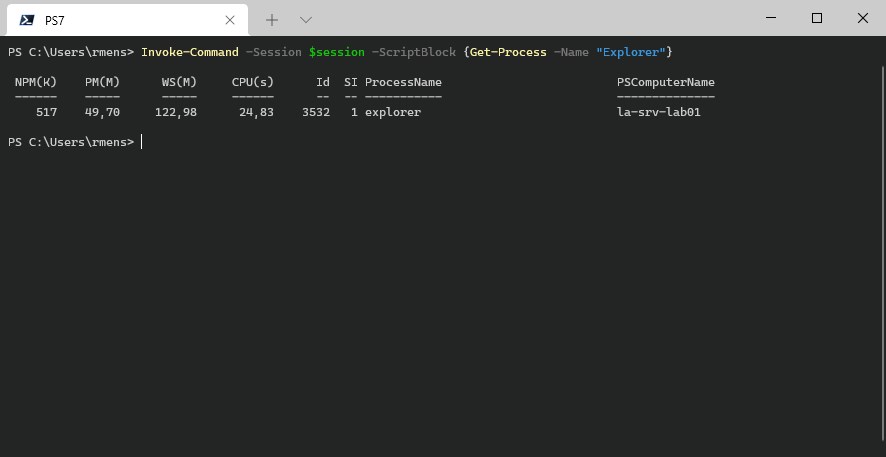
$session = New-PSSession -HostName la-srv-lab01 -UserName admin
# Invoke a command on the remote machine
Invoke-Command -Session $session -ScriptBlock {Get-Process -Name "Explorer"}
# Result:
NPM(K) PM(M) WS(M) CPU(s) Id SI ProcessName PSComputerName
------ ----- ----- ------ -- -- ----------- -------------
517 49,78 122,99 24,83 3532 1 explorer la-srv-lab01
Also, note that we use the parameter -Username instead of -Credentials as with the WinRM method.
We can run remote PowerShell commands with the Invoke-Command cmdlet or open the PowerShell on the server with Enter-PSSession.
Managing multiple SSH Connections
The advantage of tools like Putty is that you can manage and save your SSH connections. This allows you to easily reconnect to servers or network devices that you use often.
With Windows Terminal you can achieve the same thing. The new Windows Terminal allows you to easily store different connections and use different command line interfaces.
If you want to know more about Winows Terminal then make sure you read this article where I explain all the details about this powerful terminal.
Wrapping Up
Using SSH with PowerShell is really convenient and eliminate the need for an extra tool (SSH Client). Personall I use PowerShell a lot, so when I need to check or do something on a server it’s super easy to quickly connect to it from my PowerShell window.
I hope you found this article useful, if you have any questions, then just drop a comment below.
Once upon a time, you were limited in the kind of computers you could connect to with Windows PowerShell using PowerShell Remoting. Since PowerShell Remoting only supported the WsMan provider, your chances of connecting to computers running Linux, for example, were nil. Back in 2015 though, Microsoft introduced support for SSH in Windows bringing forth tons of potential and finally allowing you to use SSH and PowerShell together.
In this article, we’re going to dive in and see how to set up Windows’ SSH client and how you can leverage SSH and PowerShell Remoting.
This SSH and PowerShell post is part of the #PS7Now blog series. Be sure to check out all of the other contributors in this series at the bottom of this post.
Before You Start
This article will be a walkthrough tutorial. If you intend to follow along, be sure you meet the following prerequisites:
- Windows 10 – All examples will use Windows 10 Build 1903. The example will be in the same domain as the remote Windows Server.
- PowerShell v6+ installed on Windows 10 – All examples will use PowerShell 7 RC2.
- A remote SSH server – All examples will use a Windows Server SSH machine. If you’re connecting to a Linux machine, you can skip the server setup steps.
- TCP port 22 available on the remote server
SSH Client (Windows 10) Setup
Before you open up a PowerShell console, you’ll first need to perform a few one-time tasks to get SSH and PowerShell working together to make sure Windows 10 can connect to a remote SSH server.
Add the OpenSSH Folder to the PATH environment variable
OpenSSH comes pre-installed on Windows 10 but sometimes needs a little help to work with PowerShell Remoting. If you’ve already tried to use Enter-PSSession, for example, to connect to a remote SSH system and came across the error below, you need to ensure the path to the OpenSSH executable (ssh.exe) in the PATH environment variable.
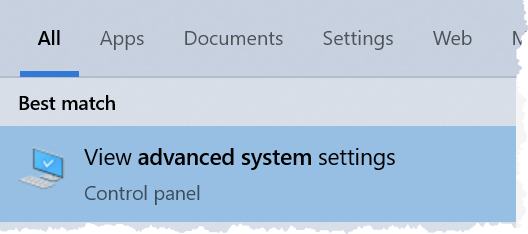
Enter-PSSession : An error has occurred which PowerShell cannot handle. A remote session might have ended.To add the OpenSSH folder path to the PATH environment variable, click on the Start button and search for advanced system settings then click on View Advanced System Settings as shown below.
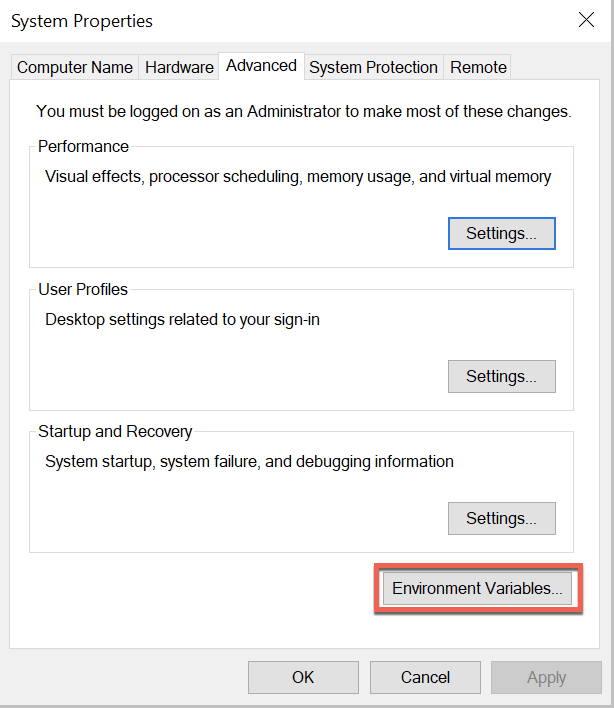
When the System Properties window comes up, click on the Environment Variables button.
In the Environment Variables window, under System variables, select Path and click Edit.
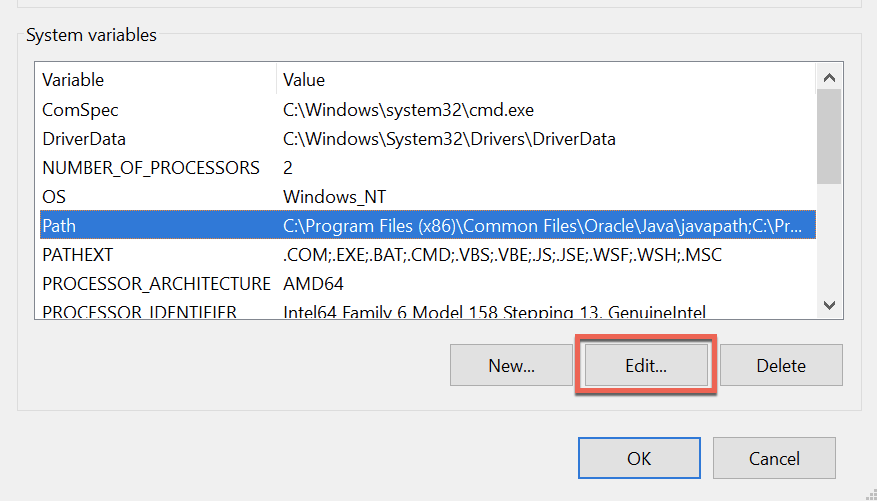
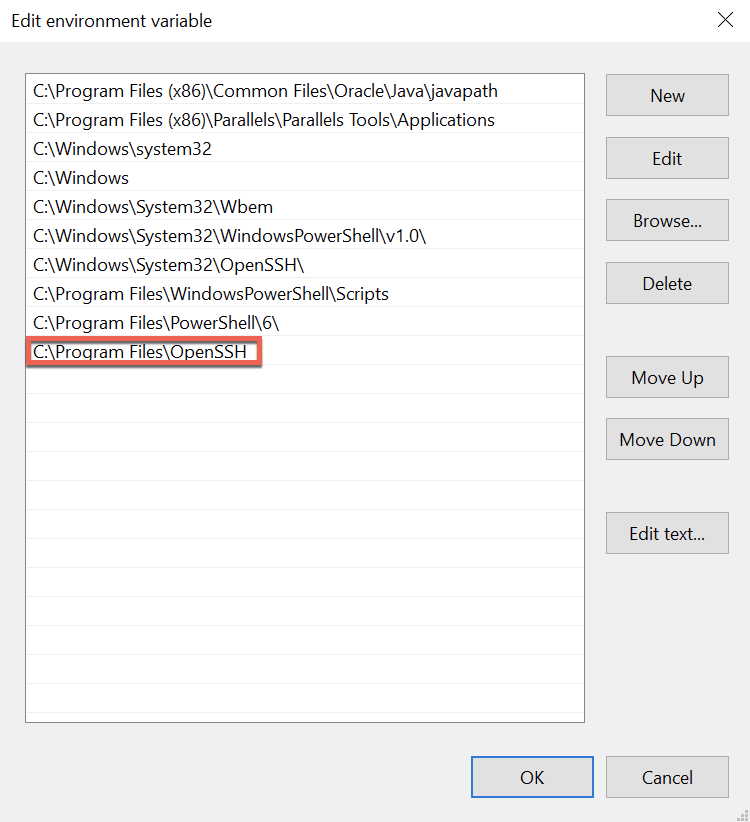
In the Edit Environment Variable window, click New then enter the path where the ssh.exe executable resides. For this tutorial, the path is C:\Program Files\OpenSSH as shown below. Once input, click OK twice to save the new value.
Specify the SSH Subsystem
You’ll now need to specify the SSH subsystem for PowerShell to call on when connecting via SSH on the remote Windows Server. If you don’t tell PowerShell what subsystem to use, you’ll inevitably get the following error:
Enter-PSSession : The background process reported an error with the following message: The SSH client session has ended with error message: subsystem request failed on channel 0.
Note that if you’re not connecting to a Windows Server machine, you will not need to perform these steps.
On the remote Windows Server, open the C:\ProgramData\ssh\ssh_config file. Scroll down to the override default of no subsystems section of the ssh_config file. The section will look like the screenshot below.
Below the existing Subsystem line, add the PowerShell subsystem using the line below:
Subsystem powershell pwsh.exe -sshs -NoLogo -NoProfileNow save the ssh_config file and restart the sshd Windows service on the remote Windows server as shown below.
Get-Service -Name sshd | Restart-ServiceOnce the service restarts, you should now be able to connect via SSH and PowerShell.
Connecting via PowerShell and SSH
Now that the configuration is complete, it’s time to test out PowerShell Remoting.
First, attempt to enter an interactive session by using the Enter-PSSession cmdlet. Unlike what you may be used to, you will not use the ComputerName parameter. Instead, you’ll use the HostName parameter to specify the remote computer.
By default, PowerShell Remoting still uses WsMan. To override the default, use the SSHTransport parameter to indicate you’d like to connect via SSH and PowerShell.
When you attempt to connect for the first time with a username and password, you’ll need to create an SSH private key. To do so, you’ll be prompted as you can see below. When you’re prompted, type ‘y’ to accept.

You’ll then be prompted for the password of the user you’re currently logged in with.
Note that in this example the Windows 10 client and Windows Server SSH server are in the same Active Directory domain. By default, PowerShell Remoting will attempt to authenticate with the logged on user. You can also use the
Credentialparameter to specify a different username and password.
After providing the password, you should then be at a familiar PowerShell Remoting prompt.

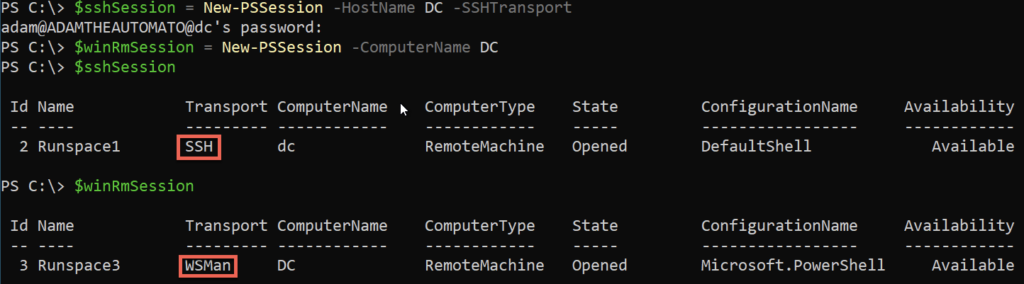
Now exit out of the session with exit and then try out New-PSSession. Notice below using the same HostName and SSHTransport parameters as before, the Transport now shows up as SSH.
You are also still able to use WsMan as the transport protocol too using the ComputerName parameter without using the SSHTransport parameter.
You aren’t required to use a username and password for SSH. You could instead use a private key file and use the
KeyFilePathparameter to provide the location.
Don’t forget to clean up your open sessions with Get-PSSession | Remove-PSSession!
Summary
You should now know how to get both Windows 10 and Windows Server set up to use SSH with PowerShell Remoting. Once configured, the only difference between using WsMan as the transport protocol and SSH is a couple of parameters!
If you’d like to learn more about PowerShell and SSH, be sure to check out PowerShell Remoting over SSH Microsoft documentation article.
#PS7Now Contributors
This post was part of a series on PowerShell 7 by the fine contributors you see below. Be sure to check out their posts and see what they’re up to on their blogs!
| Author | Blog | |
|---|---|---|
| Josh King | @WindosNZ | https://toastit.dev/ |
| Adam Bertram | @adbertram | https://adamtheautomator.com/ |
| Jonathan Medd | @jonathanmedd | |
| Thomas Lee | @doctordns | https://tfl09.blogspot.com/ |
| Prateek Singh | @singhprateik | https://ridicurious.com |
| Dave Carroll | @thedavecarroll | https://powershell.anovelidea.org/ |
| Dan Franciscus | @dan_franciscus | https://winsysblog.com/ |
| Jeff Hicks | @jeffhicks | https://jdhitsolutions.com |
| Josh Duffney | @joshduffney | http://duffney.io/ |
| Mike Kanakos | @MikeKanakos | https://www.networkadm.in/ |
| Tommy Maynard | @thetommymaynard | https://tommymaynard.com// |