Если вы установили SSD накопитель, а он не обеспечивает заявленных скоростей или со временем ваш SSD стал медленно работать, обычно можно разобраться с причинами и исправить ситуацию.
В этой инструкции подробно о возможных причинах низкой скорости чтения и записи SSD при использовании в Windows 10, 8.1 и Windows 7 и действиях, которые можно предпринять, чтобы исправить ситуацию к лучшему.
- Причины медленной работы SSD
- Как исправить проблему
- Видео инструкция
Возможные причины медленной работы диска SSD
Среди основных причин, по которым твердотельный накопитель (SSD) может работать медленно изначально либо со временем можно отнести:
- Малое количество свободного места на диске.
- Отключенная функция TRIM.
- Неоптимальная прошивка SSD (старая версия с изъянами).
- Проблемы с подключением накопителя.
- Драйверы материнской платы, режим IDE вместо AHCI.
- Малый объём оперативной памяти компьютера или ноутбука.
- Стороннее ПО, в том числе вредоносное, влияющее на общую производительность компьютера или активно обменивающееся данными с диском.
Это не все возможные причины, например, у начинающих пользователей, впервые столкнувшихся с дисками SSD, медленная скорость может оказаться скорее субъективным ощущением, чем реальным фактом, например:
- Пользователь видел результаты тестов скорости чтения/записи различных PCI-e NVMe накопителей и ожидает такого же от своего, возможно даже SATA (где скорость будет примерно в 5 раз ниже) диска. А программы проверки скорости SSD показывают неутешительные числа. Но, бывает, что они соответствуют нормальным числам для этого накопителя.
- Кому-то может показаться странным, что при копировании больших файлов изначально со скоростью всё в порядке, но через несколько секунд она снижается. На самом деле это также может быть нормальным поведением диска при записи данных большого объема после заполнения буфера.
- Если один SSD разбит на несколько разделов (например, на диски C и D), то при переносе данных с одного раздела на другой скорость будет заметно ниже, чем при переносе в рамках одного раздела или между двумя физическими SSD, поскольку одновременно выполняются два типа операций (и чтение и запись) на одном диске, к примеру для переноса 100 Гб диску необходимо прочитать 100 Гб и записать столько же (при переносе в рамках одного раздела, фактического переписывания не происходит, а при отдельных физических дисках каждый из них выполняет отдельную операцию).
Что делать, если SSD стал медленно работать
А теперь рассмотрим возможные решения для каждого из пунктов частых причин рассматриваемой в статье проблемы.
Освободите место на диске
Начнём с первого пункта, связанного с малым количеством свободного пространства на диске, что особенно характерно для SSD небольшого объёма. В идеале иметь не менее 10% свободного места на накопителе (при этом рекомендации остаются теми же и для объёмных накопителей), чтобы исключить деградацию скорости записи и чтения, а также продлить срок его службы.
Возможные действия, чтобы решить проблему:
- Очистить диск от ненужных файлов
- Перенести большие файлы, к которым не требуется постоянный быстрый доступ на обычный жесткий диск при его наличии.
- Отключить гибернацию, что высвободит объем на диске, примерно соответствующий объёму оперативной памяти (но при этом вы не сможете ею пользоваться, также будет отключена функция «Быстрый запуск» в Windows 10, впрочем, скорее всего, это будет незаметным).
Убедитесь, что функция TRIM включена
На всякий случай проверьте, включена ли функция TRIM (очищает свободные блоки и помечает их как неиспользуемые) в Windows, для этого:
- Запустите командную строку от имени администратора (как это сделать).
- Введите команду
fsutil behavior query DisableDeleteNotify
и нажмите Enter.
- Если в результате выполнения команды вы видите, что DisableDeleteNotify = 0 (Отключено), это означает, что TRIM включён и наоборот (нет, я не ошибся, всё именно так).
- Если окажется, что TRIM отключен, введите команду
fsutil behavior set DisableDeleteNotify 0
а после её выполнения перезагрузите компьютер.
Подробнее на тему: Как включить TRIM для SSD в Windows и проверить, включена ли эта функция.
Обновите прошивку вашего SSD накопителя при наличии обновлений
Случается, что первоначально поставляемая с диском прошивка не является оптимальной и в дальнейшем производитель её исправляет. Стоит проверить, доступна ли обновленная версия прошивки для вашего SSD.

Сделать это лучше всего с помощью фирменных утилит от производителя, которые после определения модели вашего накопителя при подключении к интернету отобразят наличие новой прошивки (Firmware), предложат скачать и установить её. Список программ от наиболее распространенных производителей вы найдете в статье Программы для SSD дисков.
Проверьте подключение диска
К проблемам подключения диска, способных влиять на скорость его работы можно отнести:
- Неплотное подключение (в том числе со стороны материнской платы ПК), окисленные контакты, неисправный SATA кабель (последняя причина достаточно распространена, чтобы попробовать выполнить подключение с помощью другого кабеля), проблемы с разъёмом SATA на материнской плате или самом диске, проблемы с разъёмом M.2
- Если проблема возникла с SATA SSD на настольном компьютере, а к одному SATA-контроллеру подключен не только этот диск, но и другие жесткие диски и, возможно, приводы компакт-дисков, это также может влиять. Можно проверить, изменится ли ситуация, если физически отключить все другие диски (выключив компьютер и вынув кабели SATA и питания из них).
- Если для подключения SSD к ноутбуку используется оптибей (адаптер вместо привода DVD), причиной медленной работы может оказаться и он. Простой способ проверки — подключение SSD напрямую (можно к ПК, при наличии).
Установите драйверы чипсета и SATA с официального сайта производителя материнской платы ПК или ноутбука, включите режим AHCI
В последнее время, когда Windows 10, 8.1 и Windows 7 сами «заботятся» об установке драйверов оборудования, мало кто вручную устанавливает драйверы чипсета, контроллеров SATA и других устройств. Однако это лучше сделать.
Зайдите на официальный сайт производителя вашей материнской платы (если это ПК) или ноутбука, найдите в разделе «Поддержка» (Support) загрузки для вашей модели устройства и загрузите драйверы чипсета, SATA и, возможно, других устройств (драйверы могут обозначаться как SATA/RAID/AHCI). Если у вас установлена Windows 10, а на официальном сайте драйверы только для предыдущих версий системы, обычно они исправно работают и устанавливаются.
Дополнительно, проверьте режим работы дисков в BIOS/UEFI и, если для них включен режим IDE, включите AHCI. Подробно: Как включить AHCI в Windows 10 (актуально и для предыдущих версий системы).
Выполните оптимизацию диска SSD
Попробуйте выполнить оптимизацию SSD средствами Windows 10. Не беспокойтесь: в этой версии системы для твердотельных накопителей операция выполняется иначе чем дефрагментация для обычных жестких дисков.
Необходимые шаги:
- В Windows 10 можно просто ввести «Оптимизация дисков» в поиске на панели задач, запустить найденный элемент и перейти к 3-му шагу. Еще один способ: в проводнике нажмите правой кнопкой мыши по диску и выберите пункт «Свойства». Перейдите на вкладку «Сервис».
- Нажмите кнопку «Оптимизировать».
- Выберите диск, который нужно проверить и нажмите «Оптимизировать».
- Дождитесь окончания процесса оптимизации.
Дополнительные методы решения
Среди дополнительных вещей, которые можно попробовать:
- Включить схему электропитания «Максимальная производительность», либо в дополнительных параметрах схемы электропитания отключить энергосбережение для PCI Express (для NVMe накопителей).
- Если вы отключали кэширование записи на SSD (в свойствах диска в диспетчера устройств), либо отключали службы, такие как SuperFetch, попробуйте снова их включить.
- Проверьте, изменяется ли скорость работы диска сразу после перезагрузки компьютера. Если после перезагрузки (через Пуск — Перезагрузка) он работает нормально, а после завершения работы и последующего включения — нет, попробуйте отключить быстрый запуск.
- Проверьте компьютер на наличие вредоносных программ, если в фоновом режиме работают программы, постоянно обращающиеся к дискам (например, торрент-клиенты), попробуйте выйти из них и посмотреть, изменит ли это ситуацию.
Видео
И в завершение ещё два момента: если в Оптимизации дисков, ваш SSD отображается как жесткий диск, запустите командную строку от администратора и выполните команду
winsat formal -V
Второе — редко, но случается, что пользователи приобретают поддельные SSD из всем известных интернет-магазинов с низкими ценами.
You’ve come to the right place if you have SSD slow write speed issues and other random errors with your SSD. In the following guide, you will learn more about the causes of SSD slowdowns and some easy and quick solutions.
First, let’s figure out why our SSDs get slowly gradually.
It’s time to replace an old SSD with a faster and better-performance SSD.
Why SSD Gets Slow
Many users report getting speed issues, such as the «Samsung SSD slow write speed» issue. Solid-state drives, or SSDs, have become very popular recently thanks to advancements in integrated circuit technology and the performance changes they can make to your computer. However, SSD slow write speeds are a huge issue affecting old or 100% filled drives.
Running SSD performance tests regularly can help us find the errors in time. The following are potential reasons why Windows 10/11 or other operating systems may have slow SSD performance:
- Low RAM
- AHCI mode is disabled
- PC settings are incorrect
- SSD space runs out entirely
- A virus has infected your files in the SSD
- The boot sequence is incorrectly configured
- The TRIM command is missing or disabled
- The BIOS/firmware of your device or drive is outdated
Now that you know the leading causes of SDD slow write speeds, you can refer to the article’s next section to learn how to test SSD write speed and fix the slowdowns.
See Also:
How to Test SSD Write Speed
You can verify your suspicions using Command Prompt if you believe that your computer is running slowly as a result of SSD slow write speeds. However, you will need to type a few lines of commands, which can be challenging if you’re a beginner.
Using a third-party app for speed testing is much easier if you are unfamiliar with the commands. EaseUS Partition Master is one of many programs that worked the best in my experience.
The «Disk Mark» feature of EaseUS Partition Master makes it easy to check SSD write speeds. Even if you are a beginner, you can navigate and effectively use it to manage your drives with its user-friendly interface.
Follow the steps below to learn how to check SSD write speed:
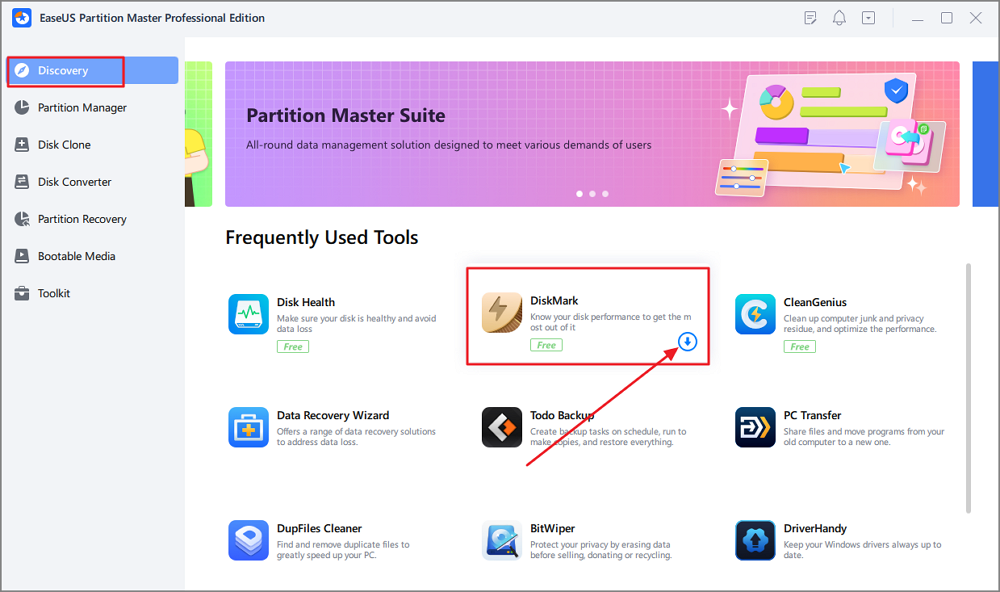
Step 1. Launch EaseUS Partition Master. And click the download button to activate the «DiskMark» feature under the «Discovery» section.
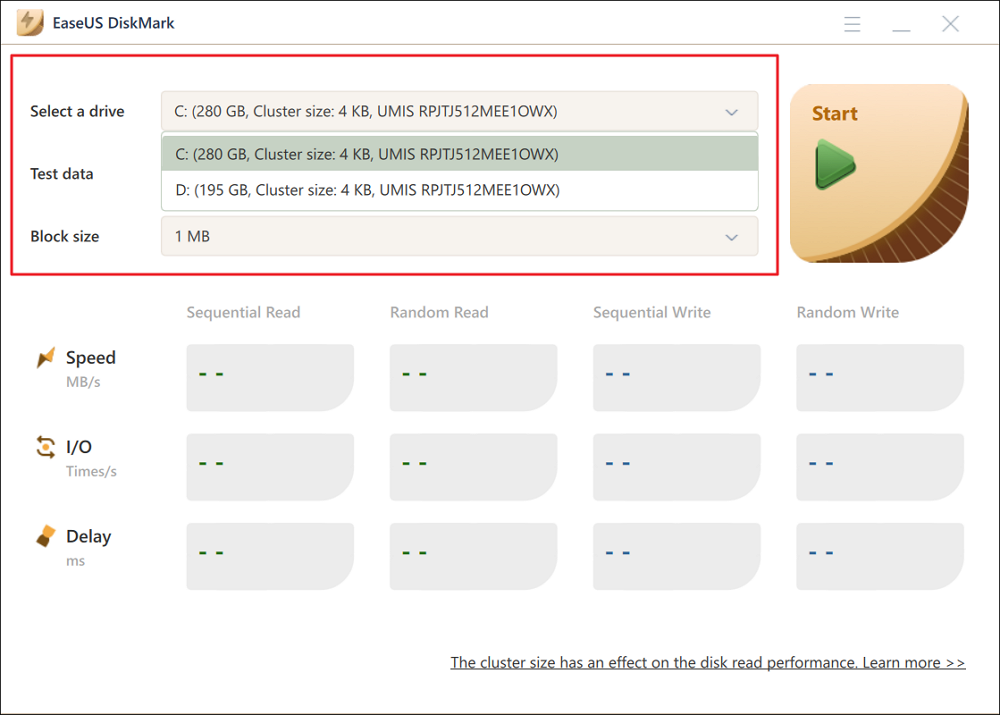
Step 2. Click on the drop-down box to choose the target drive, test data, and block size.
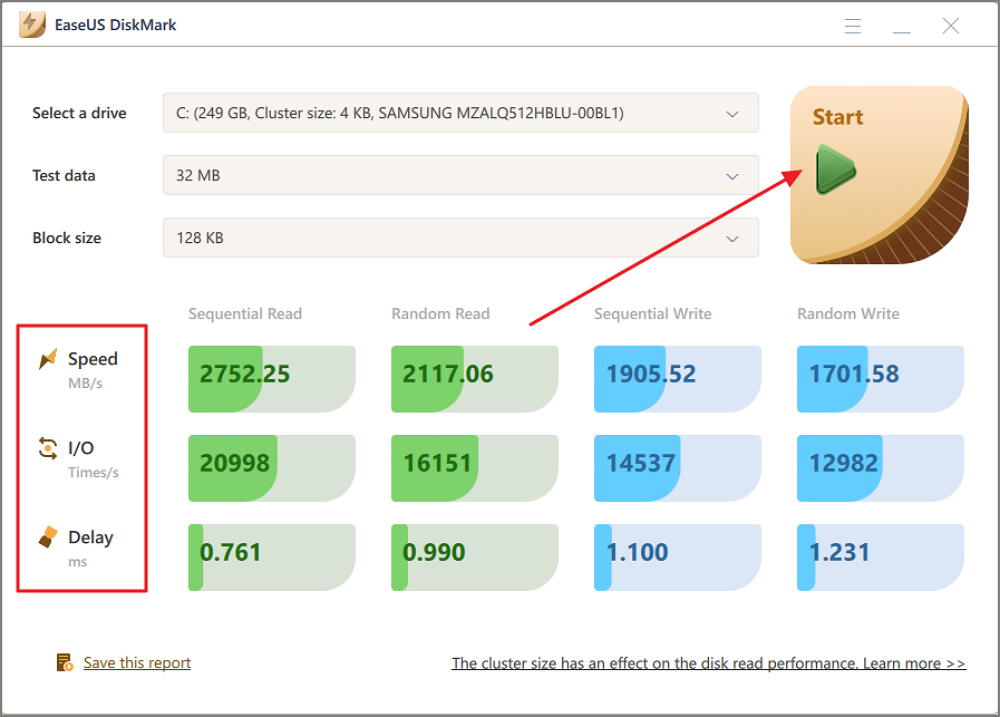
Step 3. Once everything is configured, click «Start» to begin the disk test. Then, you can see the Sequential or Random read/write speed, I/O, and Delay data.
The software is excellent at identifying and fixing SSD speed problems with a few easy clicks. In addition, the quick partition feature enables you to speed up computer performance if you have partitions or low disk space issues.
It’s time to replace an old SSD with a faster and better-performance SSD.
EaseUS Partition Master is your one-stop solution to identify any drive issues and find a solution. The app also lets you immediately check for file system errors and bad sectors, then correct them to get your problematic device back to working properly.
So, what are you waiting for? Download it and use it now.
How to Fix SSD Slow Write Speed on Windows 10/11 — Ten Fixes
It’s time to look into how to address the problems you found with your SSD speeds. The 10 fixes are listed below:
- Fix 1. 4K Align the Slow SSD
- Fix 2. Make Sure the TRIM Command Is Running
- Fix 3. Enable AHCI Mode
- Fix 4. Disable Onboard VGA
- Fix 5. Choose a High-Performance Mode
- Fix 6. Update the Firmware of the SSD
- Fix 7. Configure Correct Boot Order
- Fix 8. Free Up Hard Drive Space
- Fix 9. Check Your SATA Port
- Fix 10. Check Your SATA Cable
Note: If you know the precise issue affecting your SSD write speed, you can skip to that fix and see how to proceed. If not, try going through each individually to see if it works.
Fix 1. 4K Align the Slow SSD
Too many fragments on your SSD will slow it down, so the first way to fix the SSD slow issue is to 4K Align your SSD to improve its performance. EaseUS Partition Master allows you to speed up your SSD with the 4K Alignment feature.
Here is how to:
Step 1. Go to «Toolkit» and choose «4K Alignment».
Step 2. Select the disk you want to align. Click the «Start» button.
And this solution is also suitable to fix Windows 10 slow after clone. If you are interested in this topic, click the link:
To efficiently fix your slow SSD, try EaseUS Partition Master now. And this tool can also help to improve SSD read and write speed.
Fix 2. Make Sure the TRIM Command Is Running
If the TRIM command is not running in your system, your SSD has a high chance of having slow write speeds. Check below for the steps for running the TRIM command on your system.
Step 1. Open the «Command Prompt» as an administrator.
Step 2. Now type the «fsutil behavior query DisableDeleteNotify» command and press «Enter.» 0, as a result, means the TRIM is running, and 1 means it is disabled.
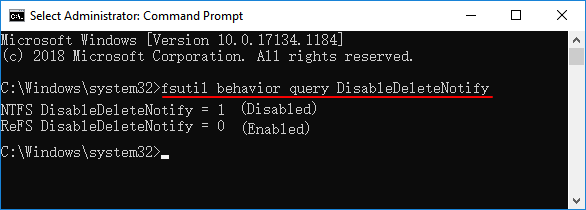
Step 3. If you get «1» as a result, type «fsutil behavior set DisableDeleteNotify 0» and hit «Enter.»
You have successfully enabled the TRIM command on your device.
Fix 3. Enable AHCI Mode
The primary advantage of AHCI, or Advanced Host Controller Interface, is that it allows SSDs to operate faster than those operating in Integrated Drive Electronics (IDE) mode. So, you need to enable it for higher SDD write speeds.
Here’s how you can do it using the Command Prompt:
Step 1. Run «Command Prompt» as an administrator.
Step 2. Type «bcdedit /set {current} safeboot minimal» and press «Enter.»
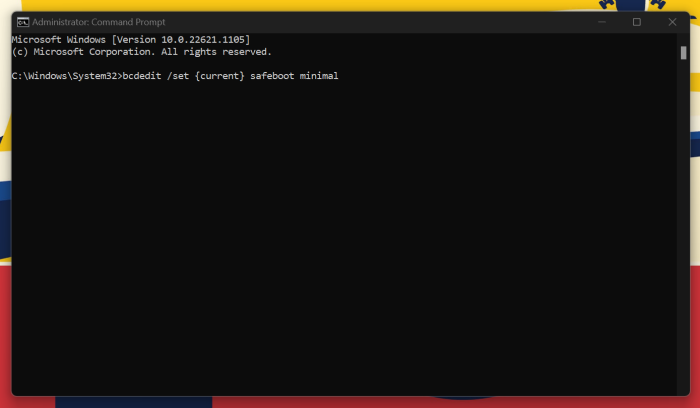
Step 3. In BIOS, enable the «AHCI» mode.
Step 4. Now exit the BIOS after saving the changes you have made.
Step 5. Now enter the «bcdedit /deletevalue {current} safeboot» command in the safe mode of the Command Prompt terminal.
Step 6. Restart your system for automatic AHCI installation.
You may also like:
Fix 4. Disable Onboard VGA
Another potential reason your SSD write speed is slow is that your onboard VGA is enabled. So, to resolve this problem, adhere to the instructions below.
Step 1. Open the «BIOS» on your computer after restarting it.

Step 2. Go to the «Advance BIOS» section and search for «Onboard VGA.»
Step 3. Choose «Disable.»
Fix 5. Choose a High-Performance Mode
Your SSD may not work properly if it is not getting sufficient power. So, you must choose a high-performance mode to run the SSD at its best capacity.
Step 1. In the «Start» menu and search «power.»
Step 2. Choose the «Power and Sleep» option.
Step 3. Now choose the «Additional power Settings» option.
Step 4. Choose the «Power mode» option and select «Best Performance.»
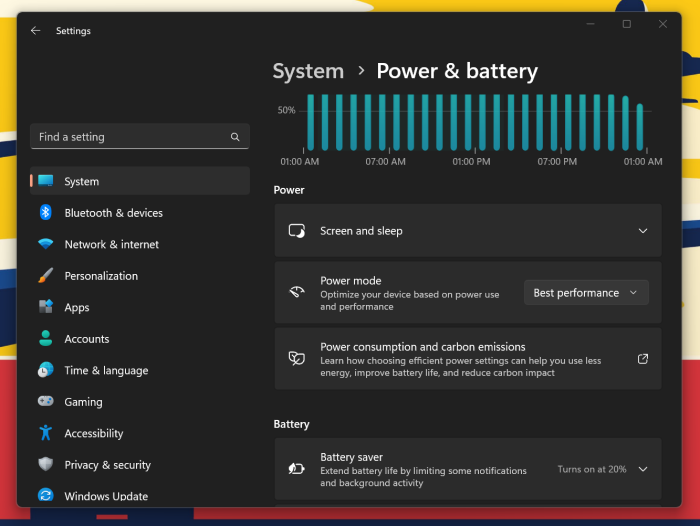
Fix 6. Update the Firmware of the SSD
Is your SSD’s firmware up-to-date? As new bugs and issues can be found and fixed, updating the firmware on your SSD is essential.
The firmware can be updated to enhance SSD performance. To do this, you must first determine the exact SSD’s firmware version and then go to the manufacturer’s website to download the updated firmware.
Fix 7. Configure Correct Boot Order
An incorrectly configured boot sequence may also cause a slow SSD drive. The computer will operate slowly if the hard drive receives priority over the SSD. Follow the steps given below to configure the correct boot order.
Step 1. Restart and open the «BIOS» on your device.
Step 2. Select «System Configuration» and then «Boot Options.»
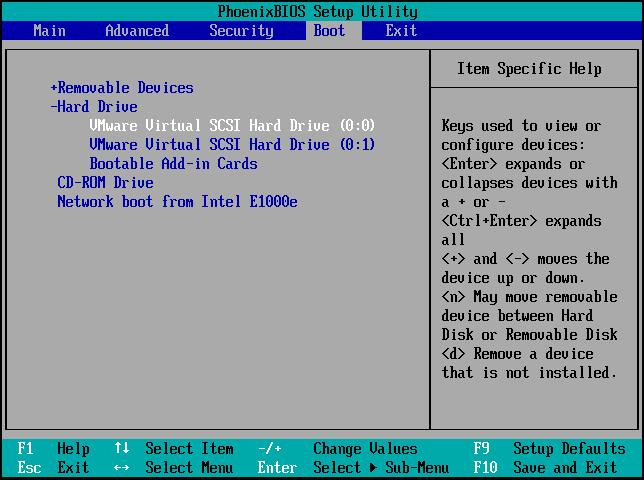
Step 3. Now you can make desired changes to the boot order.
Fix 8. Free Up Space on SSD
Clutter on your drive will undoubtedly slow down the SSD write speed. Be at ease, though! It is very simple to make it work with the EaseUS Partition Master tool.
You can follow the link below to learn how to free up hard drive space.
How to Free Up Hard Drive Space in Windows 10/11 [Step-by-Step Guide]
If you don’t have room on your computer for new applications or games, or if the clutter on your hard drive is driving you crazy, you’re not alone.
Fix 9. Check Your SATA Port
Nowadays, SATA 3Gbps/SATA 6Gbps ports are on most motherboards. The port’s speed heavily influences the performance of your SSD. Because it can be challenging to recognize the SATA Port, you should consult the motherboard’s manual to do so.
An Intel SATA controller is typically found on motherboards built with Intel chipsets. The fastest should be labeled and always use it for the best speeds.
- Notice:
- M.2 SSDs are also becoming a thing, offering the best performance with the NVME standard. So, make sure your motherboard supports it.
Fix 10. Check Your SATA Cable
The SATA cable’s condition, whether torn or of poor quality, will impact the SSD’s write speed. Check to see if the cable is in good condition, and only buy a SATA cable from a reputable manufacturer.
Also, ensure the cable is slotted correctly and you don’t have a loose connection. You can also re-seat the cable to get the best fit.
Hopefully, the ten solutions provided above have solved your problem.
Conclusion
An SSD’s slow writing speed can be very annoying when using your computer to play games or complete essential tasks. Additionally, if you do not resolve this problem quickly, your SSD may become irreparably corrupted, meaning you would lose all of your data.
Therefore, be sure to check the status of your SSD regularly. You can use EaseUS Partition Master to easily check the SSD’s speed and even speed up slow SSDs by downloading it. Except for Samsung and Sandisk, this tool is compatible with other brands’ SSDs, such as fixing Toshiba SSD slow write speed. If you want to fix your SDD’s slow write speeds, you can use the solutions provided in this article. The following video shows you how to check SSD speed.

SSD Slow Write Speed FAQs
With the ten fantastic solutions offered in the article, fixing the SSD’s slow write speed has become simpler and easier.
Hopefully, you can get your SSD functioning properly using the solutions offered. Check the FAQs below if you still have questions about the SSD’s slow write speed.
1. What is a good SSD write speed?
How quickly a file can be written to the drive is measured as write speed. A standard SDD could read and write at 200 — 500 MB/s; some can even get up to thousands of MB/s. So, anything above 300 MB/s is a great speed to be at.
2. Why is my disk writing so slow?
Your disk writing may be slow for several reasons, including low RAM, outdated BIOS firmware, low disk space, a virus-infected disk, and disabled TRIM command. Using a third-party tool like EaseUS Partition Master, you can quickly identify and resolve the SSD writing speed issue.
3. How do I fix slow write speed on SSD?
Check whether the SSD has enough space before fixing the slow write speed issue. Then see if your computer has the TRIM command enabled or not. You can also check the SATA connection or cable and download the latest firmware or drivers for your PC and SSD.
A Solid State Drive (SSD) can greatly slow down due to multiple reasons, as is evident with every mechanical device. However, sometimes the SSD doesn’t really slow down on its own but an issue related to an external factor is causing this to happen. Let’s take a look at the reasons and their solutions that lead to a visible slowdown in the SSD’s performance in Windows 10.
Recommended Act
ST Cleaner is one of the best system optimizer and system cleaner in town. It helps:
- Optimize as well as clean up the System Cache
- Clean up tons of Junk Data
- Clean up Internet junk to optimize its speed
- Sweep clean Software junks to optimize their performance
Get ST Cleaner NOW!
This software adheres to Clean Software Association Guidelines
Solution 1: Disable Onboard VGA
Many users have reported that the painfully slow performance of the SSD simply vanished once they disabled the onboard VGA feature of their computer. This resulted in a decrease of the system boot-up time upto 15 seconds. Here is what you need to do.
- Reboot your computer and open BIOS.
- Navigate to the Advanced BIOS section.
- Search for Onboard VGA.
- Now select the Disable option.
Note: The exact titles for the options and the procedure to navigate as well as disable them will vary from one motherboard to another. However, with a little bit of intelligent exploration, you can easily make your way through and do the trick. Don’t worry nothing wrong will happen so long as you don’t change a value that is critical. And even if you suspect that you’ve made a change which you shouldn’t have, there is always an option to restore BIOS to its default values to bail you out on such occasions.
Solution 2: Configure Boot Sequence
Another reason the SSD drive is slow is that the bootup sequence is incorrectly configured as a hard drive on top priority means it will take a lot longer for it to fetch and loads the operating system.
- Restart your computer and boot into BIOS.
- Change the boot sequence of HDD and SSD. (First priority should be given to SSD).
Solution 3: Update BIOS
Another more common reason for the poor performance of a SSD in Windows is due to an outdated BIOS. To fix this issue, simply update BIOS. You can download the latest version of BIOS from the website of your computer’s manufacturer. The updated BIOS will include compatibility for new hardware, improved cache functions and other user-friendly hardware tweaks as well.
Solution 4: Check the SATA Port
Most motherboards these days have SATA 3Gbps/ SATA 6Gbps ports. The speed of the port bears heavily on the SSD’s performance. It isn’t that simple to identify the SATA Port, hence you should refer to the motherboard’s manual in order to correctly determine it. Usually, motherboards built on Intel chipsets contain an Intel SATA controller. This controller specifically has the highest speed. So the boot device should be connected to this one. Also note that the first SATA port has the highest speed, as claimed by most technical blogs.
Solution 5: Check the SATA Cable
Another reason the SSD performance is not meeting your expectations is that the SATA cable is either defective or of a poor quality make. Therefore, be sure to always purchase a SATA cable from a well-known manufacturer.
Solution 6: AHCI Mode is Disabled
The AHCI Mode helps bring the best out of the SSD. If this mode is disabled, the computer can encounter crashes or even see the notorious blue screen of death.
To fix it, simply go to BIOS Settings, look for the OnChip SATA Type and set it to AHCI.
Solution 7: Update Firmware of the SSD
Just like any other piece of software that acts as the eyes and the minds of the hardware, the firmware of the SSD is surely not an exception. That’s why manufacturers release patches and updates on a periodic basis. Remember to keep checking for a firmware update, or else you could be toying with an eventuality as extreme as complete performance disaster.
Solution 8: TRIM Command Doesn’t Exist or is Disabled
The TRIM command is absolute for stable performance of SSD. Make sure the SSD supports TRIM and it is enabled on your Windows 10 computer.
- Open Command Prompt as an administrator.
- Type in fsutil behavior query DisableDeleteNotify and press Enter.
- If you get 0 as a result, it means TRIM is already enabled, but if you get a 1 it isn’t.
- Enable TRIM in by executing the following command:
fsutil behavior set DisableDeleteNotify 0
Solution 9: SSD Needs Optimization
The SSD accumulates junk just like the rest of the computer. You need to optimize it from time to time to restore it to its original spick and span shape. Windows 10 enables you to do so very easily.
- Search for Disk Cleanup in the Start menu.
- Perform the Disk Cleanup process for the SSD to rid if of all the junk.
- Now search for defrag and open Defragment and Optimize Drives.
- Perform defragmentation for the SSD drive by selecting it and clicking the Optimize button.
Solution 10: The SSD Is Almost Full
As a rule of thumb, the SSD needs to be at least 20 percent empty so as to perform at optimal speeds. Unfortunately, most users do not know about this fact and they keep on piling their personal data (in addition to the OS) on the same SSD, which literally bogs it down big time. So be sure to always create a separate partition for the OS and don’t save anything else on it come what may.
Solution 11: Go For the High Power Plan
Most of us keep our computer/ laptop at Balanced Power. The setting is easy to change and can be adjusted by typing in Power in the Search area of Windows 10 taskbar. Though the SSD doesn’t actually run fast due to the High Power plan, it is strongly suggested to select this plan if there are other devices sharing power such as the GPUs.
Solution 12: Format the SSD
If you’re using a pre-used SSD for installing the OS, it will perform a lot slower than what you’d expect from it. In such a case, format the SSD before you begin the installation.
Right-click the Solid State Drive (SSD) and select Format, or type in format /q in Command Prompt and execute this command.
Solution 13: RAM is Low
Quite possibly, it’s the RAM rather than the SSD which is causing the trouble. The RAM might have ‘fallen’ to a very low level which would have led to a decrease in the cache size and adversely impacted the SSD’s performance.
Remember to add a minimum of 4GB of RAM for decent performance of the system if you plan to use Windows 10. And if you will be using heavy duty software programs, then 8GB is a must have!
Solution 14: Erase the SSD Contents
After excessive usage of the SSD, it will get slow no matter what you try. Therefore secure erase everything saved on it from time to time by backing up your data to another disk. If you do not have ‘secure erase’ feature enabled on the disk then use a third-party software to achieve the same results.
We hope these solutions helped you out with your quest for getting the most out of your SSD. Have a good day!
Raza Ali Kazmi
Raza Ali Kazmi works as an editor and technology content writer at Sorcim Technologies (Pvt) Ltd. He loves to pen down articles on a wide array of technology related topics and has also been diligently testing software solutions on Windows & Mac platforms. If you have any question about the content, you can message me or the company’s support team.
People choose SSD mostly because it starts up a computer quickly (even in a few seconds). However, problems may occur and slow down the speed of SSD. This MiniTool post will discuss the issue: SSD running slow on Windows 10 and give you several easy methods to speed up your SSD and improve its performance.
SSD, short for solid-state drive, is a storage device that appears and has become popular in recent years. It adopts integrated circuit assemblies (typically flash memory) to help people store data for good. The most important reason that drives people to use SSD is its fast speed (especially fast startup).
Find Your SSD Slow on Windows 10
Nevertheless, it’s easy for you to find SSD slow on Windows 10 or other operating systems. Why does this happen? How to speed up SSD? In the following paragraphs, I will demonstrate the possible solutions to speed up a slow SSD yourself.
SSD Running Slow
By adopting an SSD, your computer should boot up and run quickly. That’s why a large number of Windows users decide to get an SSD. However, problems like SSD drive running slow may arise during usage. An important reason why your SSD drive becomes slow is the improper boot sequence – if the hard drive (not SSD) is set as the first boot device, you’ll experience an obvious decrease in the fetching and loading speed.
There are 2 situations of SSD running slow on Windows:
- SSD runs slow (SSD suddenly slow): the write performance of the solid-state drive will be decreased dramatically if you fill your SSD to near-capacity or something is wrong with the SSD. This happens frequently when the SSD is used as the second storage.
- SSD boots slow: if you’re using the SSD as the main drive, the bootup speed is supposed to be faster than that of a traditional hard drive. However, you may feel an obvious decrease in the PC boot time if the SSD gets into trouble. Besides, sometimes, users may find the computer slow after SSD installation directly.
Why Is My SSD So Slow
In this section, I will mainly focus on the possible causes of the problem – SSD slowing down.
Cause 1: filling the drive. This means the space on your SSD is just about to run out. You can go to check the capacity and used space of your SSD.
Cause 2: the TRIM command doesn’t exist or has been disabled. The TRIM command is necessary for the stable performance of an SSD; if it is disabled, you’ll get a poor-performance SSD.
Cause 3: AHCI mode is disabled. This mode is very essential for you to get the best out of the SSD; if it’s not enabled, your SSD will run slow.
Cause 4: Onboard VGA is enabled. The VGA feature will greatly affect the boot speed of your computer.
Cause 5: the boot sequence is incorrectly configured. If your computer boots from a hard drive instead of an SSD, it will run slowly.
Cause 6: the computer or SSD is infected with a virus. It is well known that a virus can make your drive and computer very slow.
Cause 7: the BIOS/firmware is outdated. If the BIOS or firmware is outdated, it will also lead to the poor performance of an SSD.
Cause 8: SATA port or cable is in trouble. If there’s something wrong with the connection port and cable, the speed will naturally be affected.
Cause 9: RAM is low. If your RAM is at a very low level, the cache size will be decreased; then, it will cause the SSD to slow down.
Cause 10: PC settings are improper. There are also chances that your SSD is in good condition but it runs slow on Windows 10 since the computer is not set to the best for SSD.
Note:
When finding SSD slow down, data security should be your priority; the slow speed can be a sign of a damaged drive. Taking that into consideration, I advise you to back up existing data and recover lost data from SSD first before you try to speed up SSD.
SSD Data Backup
Certainly, the most direct way to back up SSD data is copying existing data from SSD and pasting them to another drive. You can back up data to the Cloud or by using reliable backup software. Here we recommend MiniTool ShadowMaker. This is a handy tool that simplifies the process of backup and provides multiple types of files to back up, including files, folders, systems, and drivers.
Step 1: Download and install MiniTool ShadowMaker.
MiniTool ShadowMaker TrialClick to Download100%Clean & Safe
Step 2: Launch the software and click Backup.
Step 3: Choose the data you want to back up by clicking the SOURCE button, and then click DESTINATION choice to select where you want to back them up.
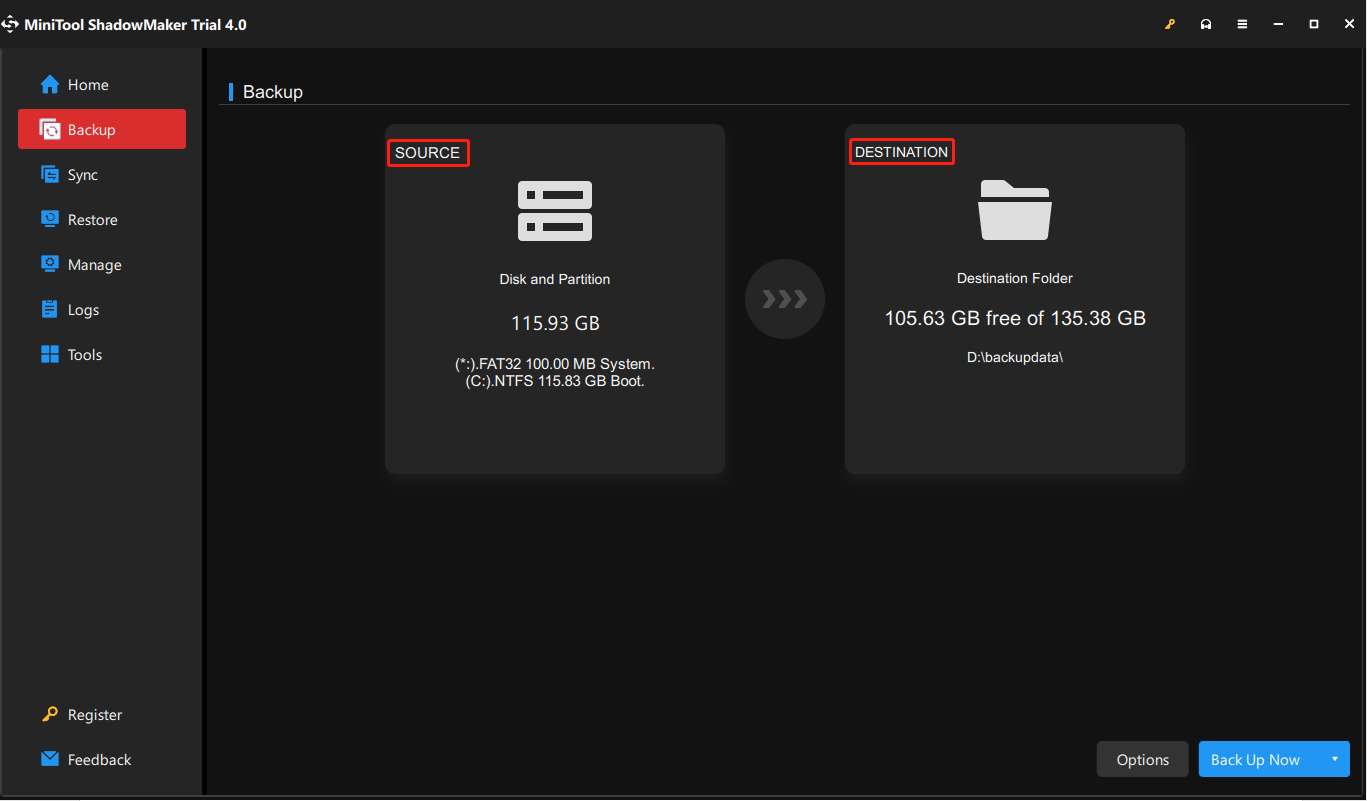
Step 4: Click Back Up Now to start the backup process.
SSD Data Recovery
MiniTool Power Data Recovery, a free data recovery software, works well with all Windows operating systems and storage devices and gives support for many file types. With a clean operation interface and high efficiency of data restoration, MiniTool Power Data Recovery can be your first choice. You can follow this tutorial to perform an SSD data recovery.
Step 1: Download and install MiniTool Power Data Recovery.
MiniTool Power Data Recovery FreeClick to Download100%Clean & Safe
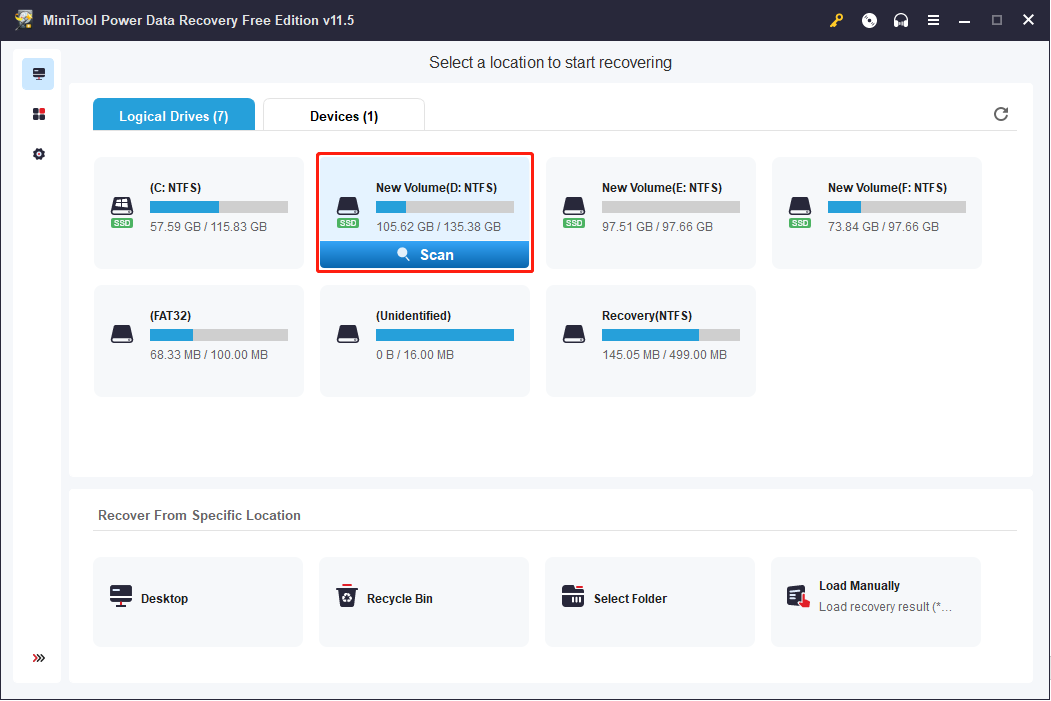
Step 2: Double-click on the software to launch it and enter the main interface.
Tips:
If the target SSD includes only one partition or it becomes RAW suddenly (the partitions are lost), you should select the Devices instead and scan the SSD.
Step 3: Select a certain partition to scan on SSD.
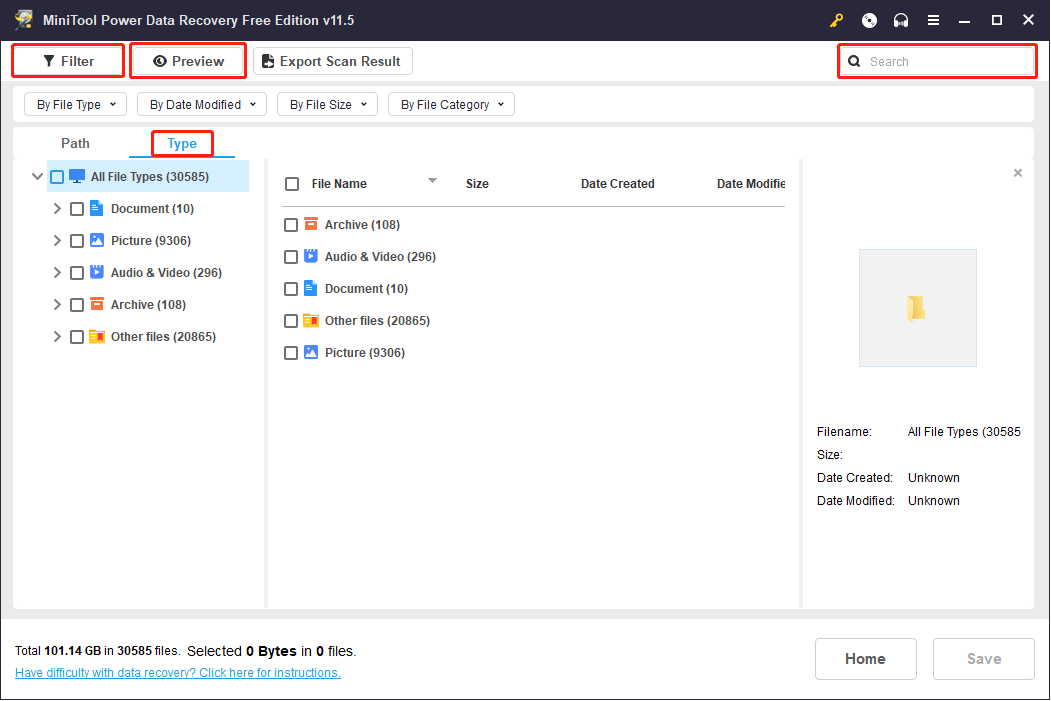
Step 4: Wait until the scan process ends, browse the result page to find your wanted files. You can filter files or folders by Filter and Type functions, check your required files by the Preview function, and locate wanted files by the Search function.
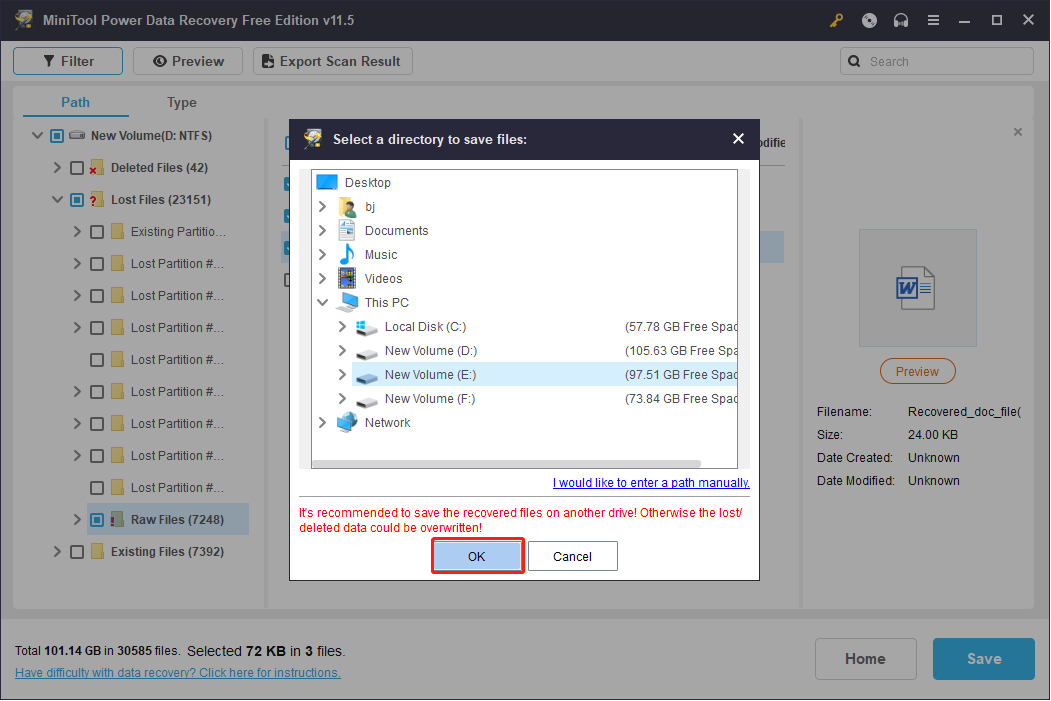
Step 5: Click the Save button and choose an appropriate path to restore your data.
How to Speed Up SSD
It’s easy to find your SSD becomes slow when running on a Windows 10 computer. Users want to speed it up in every possible way but they don’t know how. In this section, several methods are provided to help you optimize SSD for faster speed on Windows. Please try them one by one until you find one that works.
Accordingly, the methods are divided into three types. Considering different situations, you can choose different methods to speed up your SSD. Please go on the following content.
Speed up my SSD Windows 10 when the space is running out
Method 1: Delete unnecessary files and folders from SSD
Method 2: Disable Hibernation
Hibernation is enabled by default in computers. But enabled hibernation will reserve some disk space for its file, which is about 75% space of the installed RAM in your computer. So when your computer doesn’t have enough space, you can disable it to free up your computer.
Step 1: Press Win + R to open the Run window.
Step 2: Type cmd and press Ctrl + Shift + Enter to run Command Prompt as administrator.
Step 3: Type powercfg -h off and hit Enter.

If this is not the reason for slowing down your SSD, please move on to the next part.
Speed up Windows 10 Boot Speed
Method 1: Disable Onboard VGA
According to the feedback from Windows 10 users who suffered a long boot time delay, the Onboard VGA feature is responsible for slowing the SSD speed down. It is said disabled Onboard VGA can reduce 20-25 seconds of boot time.
How to disable it:
Step 1: Restart your computer and boot it into BIOS settings.
Step 2: Find the Advanced BIOS Features/Advanced Chipset Features section.
Step 3: Look for Onboard VGA feature and disable it.
Step 4: Exit BIOS and click Yes to save changes.
Notice: the exact titles for the options vary from one motherboard to another.
Method 2: Adjust the Boot Sequence
If the order of the boot device is not configured correctly, you will also find SSD slow on Windows 10 startup. In this case, you need to change the boot sequence to give priority to SSD by following the steps:
Step 1: Reboot your PC and enter BIOS.
Step 2: Navigate to Advanced BIOS.
Step 3: Access Hard Disk Boot Priority.
Step 4: Choose SSD as the First Boot Device by using the up and down arrows.
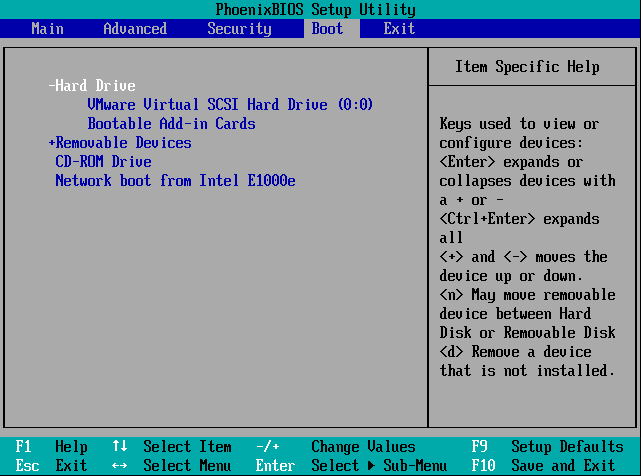
Step 5: Press F10 and Enter to exit BIOS and save changes.
Method 3: Update Firmware of the SSD
You may find your SSD becomes slow due to its outdated firmware. Firmware is important in keeping SSD performance in stable and efficient status. Thus, you need to check its updating from time to time. you can follow the next steps to update your SSD.
Step 1: Press Win + X and select Device Manager.
Step 2: Select Disk drives choice and right-click on your SSD.
Step 3: Select Update driver.
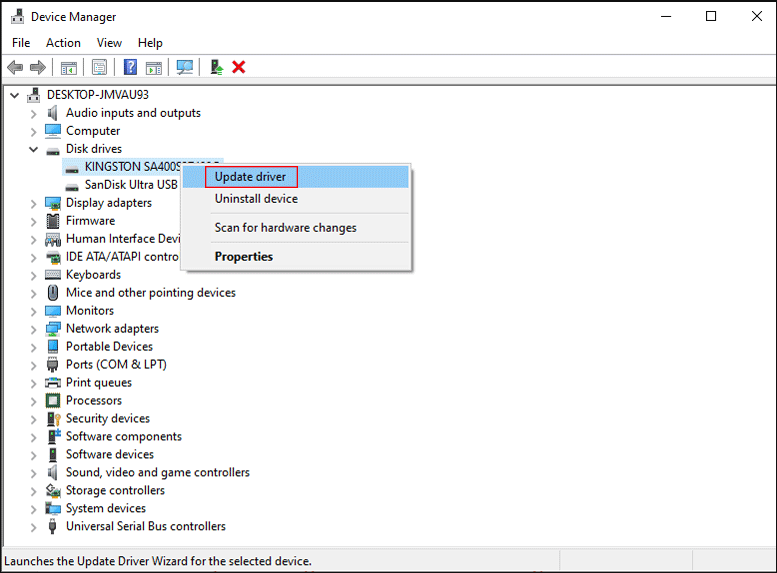
Step 4: Choose Search automatically for drivers to let it update.
After the process ends, you can check whether your issue is solved or not.
Method 4: Check for Defective Hardware
You should try to disconnect all the unnecessary hardware from your PC and see whether the speed of the SSD can be improved.
- VGA card
- USB device
- Sound card
- DVD-ROM
- Etc.
If one of the hardware connected to the PC is damaged or can’t be recognized, the operating system will keep searching for its cache to get the relevant driver. That’s why SSD becomes slow.
Speed up Windows 10 Running Speed
Method 1: Check SATA Port & Cable
The speed of different SATA controllers is different: 3Gbps or 6Gbps. This has a close relation to the performance speed of SSD. You can go to the motherboard’s manual to determine your SATA port. Besides, ensure the quality of your SATA cable because a defective or poor cable will affect SSD’s performance as well. Please connect the SSD to the first SATA port since it has the highest speed.
Tips:
For the motherboards built on Intel chipsets, there will be an Intel SATA controller with a super-high speed. You’d better connect the boot device to this controller. After that, you should go to check whether your SATA cable is broken or encounters poor connection problems.
Method 2: Enable AHCI Mode
AHCI, an abbreviation of Advanced Host Controller Interface, specified the register-level interface of Serial ATA host controllers in a non-implementation-specific manner. This specification shows the system memory structure that exchanges data between the host system memory and an attached storage device. You can enable the AHCI to speed up your computer.
Step 1: Reboot your PC.
Step 2: Enter BIOS Settings.
Step 3: Look for the OnChip SATA Type option or anything similar.
Step 4: Enable the AHCI mode.
Method 3: Check TRIM Support
The TRIM command enables SSD to erase blocks of data that are no longer used. This operation can ensure the stable operation of computers, and avoid slowing down the writing speed of computers in future use. Therefore, we need to check whether TRIM runs properly.
Step 1: Press Win + R to open the Run window.
Step 2: Input cmd and press Ctrl + Shift + Enter to run Command Prompt as administrator.
Step 3: Type fsutil behavior query DisableDeleteNotify and hit Enter.
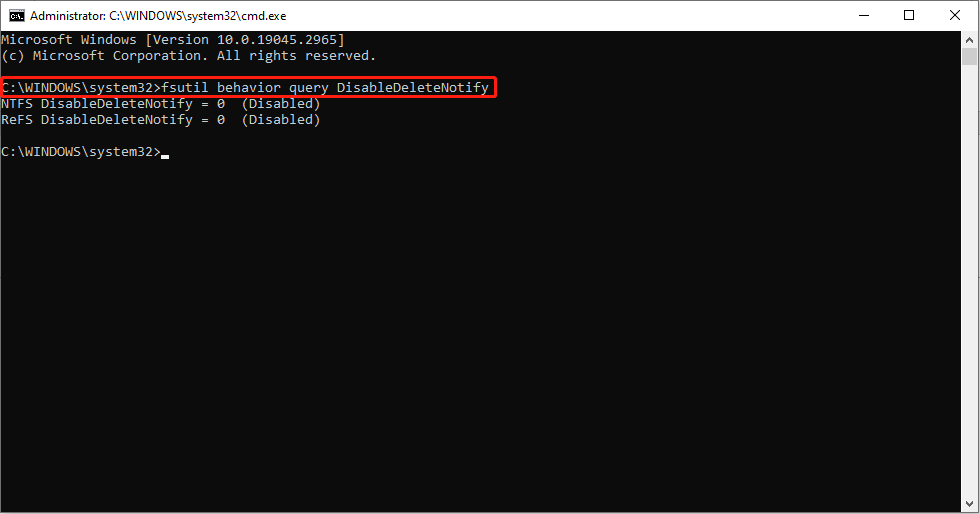
If it is 0, TRIM is enabled. If it sets to 1, TRIM is disabled so you need to type fsutil behavior set DisableDeleteNotify 0 and hit Enter to enable it.
Method 4: Optimize Drives
Step 1: Open Windows Search.
Step 2: Type Defragment and Optimize Drives and hit Enter.
Step 3: Select your SSD and click Optimize.
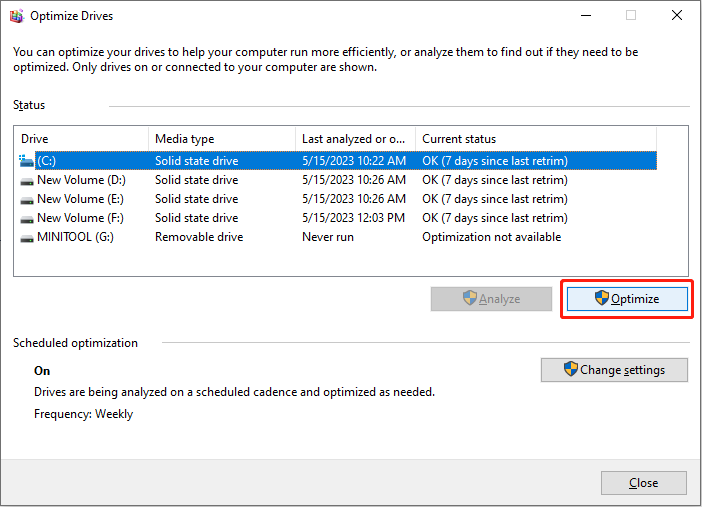
Tips:
Windows runs different optimization methods on HDD and SSD. For hard drives, Windows will optimize them by defragmenting the disk, while for SSDs by running TRIM. We don’t recommend that you defragment your SSD, as this will not optimize performance, but will cause wear and tear.
Method 5: Choose High Power Plan
Compared with the Balanced power plan, High performance power plan uses more energy to provide better performance for your computer.
Step 1: Press Win + I to open the Settings window.
Step 2: Navigate to System > Power & sleep > Additional power settings.
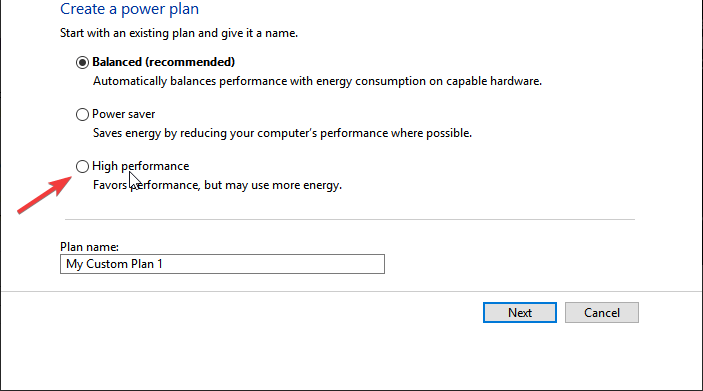
Step 3: Select Create a power plan in the left pane.
Step 4: Choose High Performance and follow the instructions to complete.
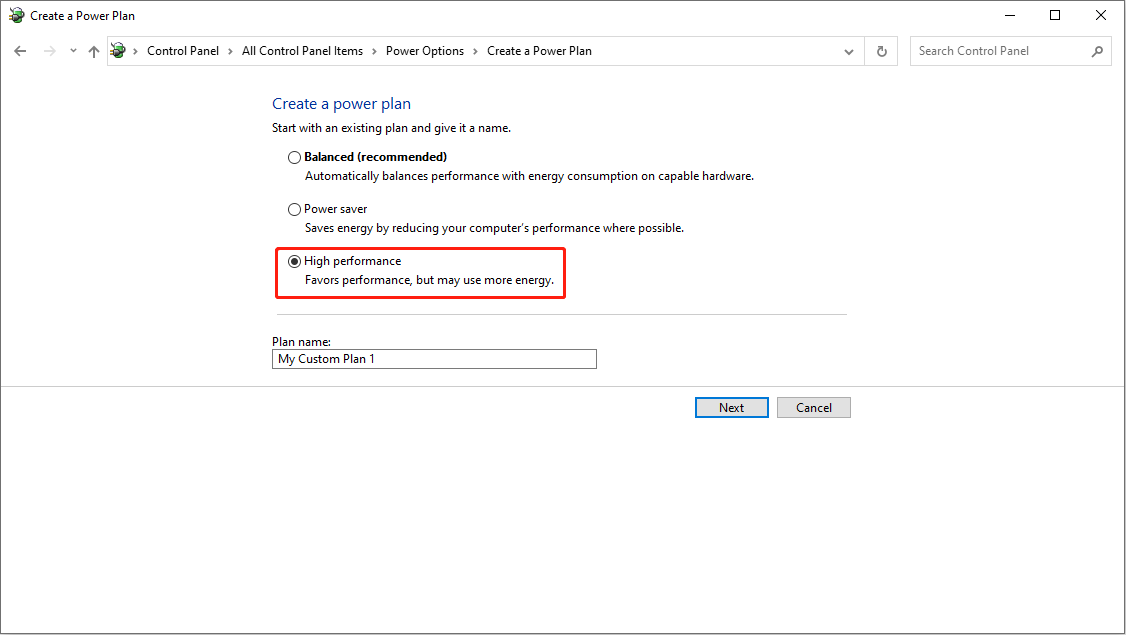
For more methods to speed up Windows 10, you can read this passage: How to speed up your Windows 10?
Last Words
To sum up, your SSD may become slow all of a sudden due to various reasons. When that happens to you, you should first back up or rescue your data (at least the important data) since the SSD may corrupt at any time.
After that, you ought to try the methods mentioned in the previous part to try to troubleshoot SSD slow on Windows 10 effectively. If you have any questions about using MiniTool software, please contact us via [email protected].
The standard hard disk drive (HDD) has been the predominant computer storage device for a long time due to its high storage capacity and low cost. The solid-state drive (SSD) is another storage solution slowly replacing most hard disk drives.
SSDs use flash memory to deliver significant performance gains compared to mechanical hard drives. Since SSDs do not have small moving parts prone to failure, they offer nearly every computer user a wide range of cost-effective benefits.
However, SSDs can greatly slow down for various reasons over time. If you are in this situation and your SSD is slow, look at the solutions listed below.
Why is my SSD so slow?
There are various reasons your SSD might run too slow. One major cause is the lack of driver optimization. This feature runs the TRIM command on your SSD and helps to keep it in top shape.
Another known cause is the wrong boot order setting. Lastly, if you have onboard VGA enabled, it can lead to slow speed on your SSD.
➡️Some of the error variations in this case include:
- Slow SSD write speed
- SSD slow to read
- Slow SSD boot
- SSD slow to delete files
- SSD slow to open programs
- Slow SSD in Windows 11
- SSD running slow in Windows 7
You may be encountering one or more of these. But fret not! The solutions listed here will work in all these cases.
?How do I fix a slow SSD?
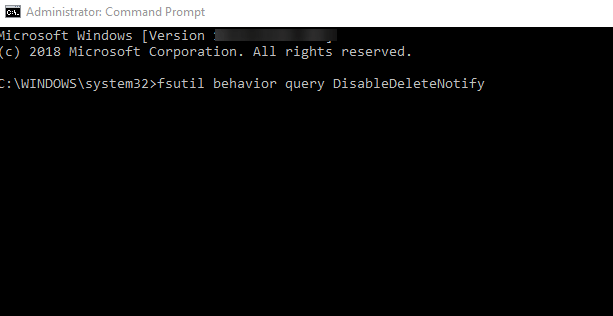
1. Check the TRIM command
-
1. Click Start, and in the search bar, type cmd.
-
2. Right-click Command Prompt and click Run as Administrator.
-
3. Type the command below and press Enter:
fsutil behavior query DisableDeleteNotify -
4. If you get 0, it means TRIM is already enabled. If you get 1, please make sure you follow the next steps.
-
5. Type this command:
fsutil behavior set DisableDeleteNotify 0
The first workaround that solves the slow SSD issue is to enable the TRIM command on your PC only by using the Command Prompt tool, as displayed in the steps below.
2. Optimize drivers
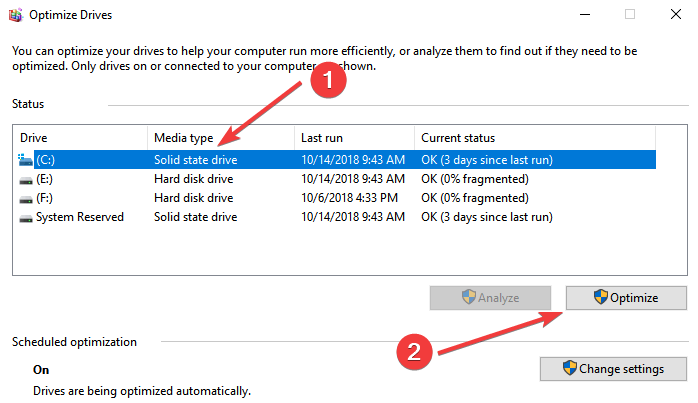
- Click Start, and in the search bar, type Defragment and Optimize Drives.
- Click Defragment and Optimize Drives.
- Highlight your SSD and click on Optimize.
With Windows 10, Microsoft added the Optimize Drives feature, which runs the TRIM command on your SSD. So please check whether Windows is optimizing your SSD.
The best optimization for drivers is to run their latest version. If you want to update all drivers on your computer, you should use Outbyte Driver Updater, a software that has a database of over 18 million driver files.
⇒ Get Outbyte Driver Updater
3. Check that AHCI Mode is enabled
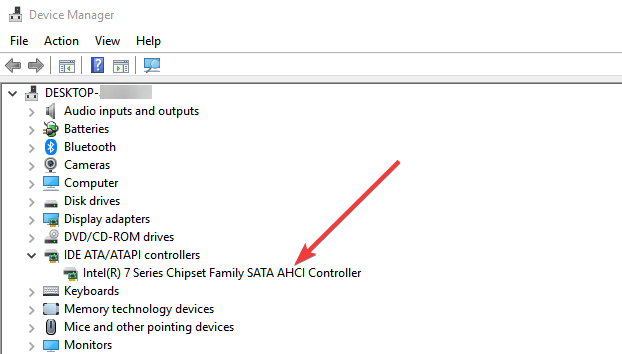
- Open Device Manager.
- Expand the IDE ATA / ATAPI Controllers.
- If you see AHCI Controller in the list, you have it enabled. You will likely have AHCI disabled on your computer if you see only ATA and IDE words.
AHCI Mode plays a significant role in maintaining the high performance of your SSD and preventing it from running slow. If this mode is disabled, the computer can encounter crashes or even see the famous but unwanted blue screen of death.
If AHCI is disabled and you want to enable it on Windows 10, here is what you need to do:
- Go to these keys and set the value named Start to 0:
HKEY_LOCAL_MACHINE\SYSTEM\CurrentControlSet\Services\iaStorVHKEY_LOCAL_MACHINE\SYSTEM\CurrentControlSet\Services\iaStorAVC\StartOverrideHKEY_LOCAL_MACHINE\SYSTEM\CurrentControlSet\Services\storahciHKEY_LOCAL_MACHINE\SYSTEM\CurrentControlSet\Services\storahci\StartOverride - Restart your computer and go to UEFI/BIOS firmware settings to enable AHCI mode. After you save and exit, restart your computer once more.
4. Disable onboard VGA
- Restart your computer and open BIOS.
- Navigate to the Advanced BIOS section.
- Search for Onboard VGA.
- Select the Disable option.
Many users have reported that once they disabled the Onboard VGA feature, they managed to solve their problem.
5. Configure Boot order
- Restart your computer and boot into BIOS.
- Change the boot sequence of HDD and SSD by giving first to SSD.
Another reason why the SSD drive is slow could be that the boot sequence is incorrectly configured. If the top priority to boot up is set to hard drive, the fetch and load time for the operating system from an external source will take more time than usual.
6. Check the SATA port
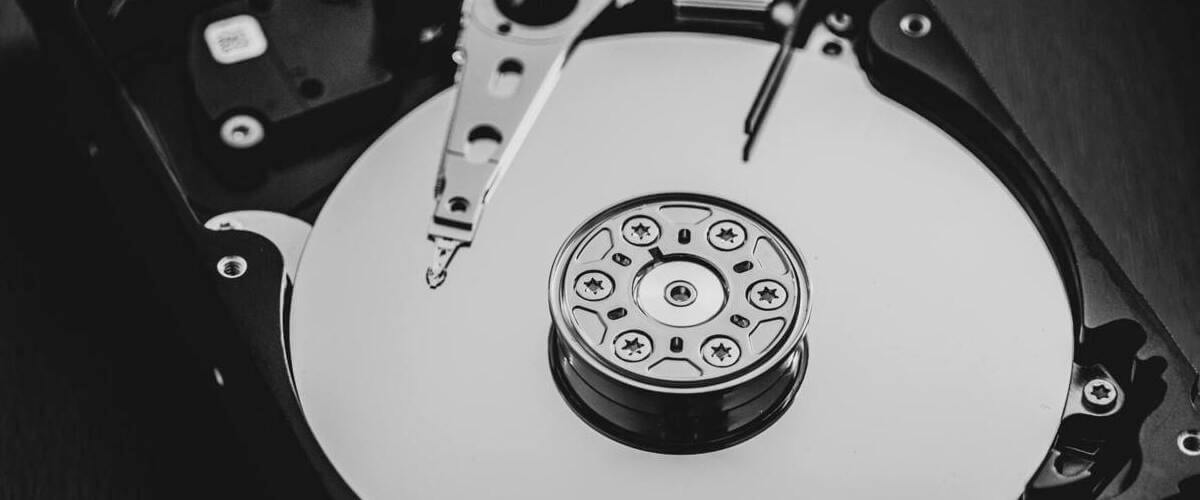
Many motherboards come with two different SATA controllers: some are SATA 3Gbps, and some are SATA 6Gbps. Make sure you use SATA 6Gbps for connecting your SSD.
In this respect, you should refer to the motherboard’s manual to determine it correctly. Moreover, motherboards built on Intel chipsets come with the Intel SATA controller.
Make sure you use the Intel controller to connect your SSD, as most of the low-speed issues occur from using a non-Intel controller on a motherboard built on an Intel chipset.
Also, note that the first SATA port has the highest speed, as most tech-savvy users claim.
7. Verify the SATA cable
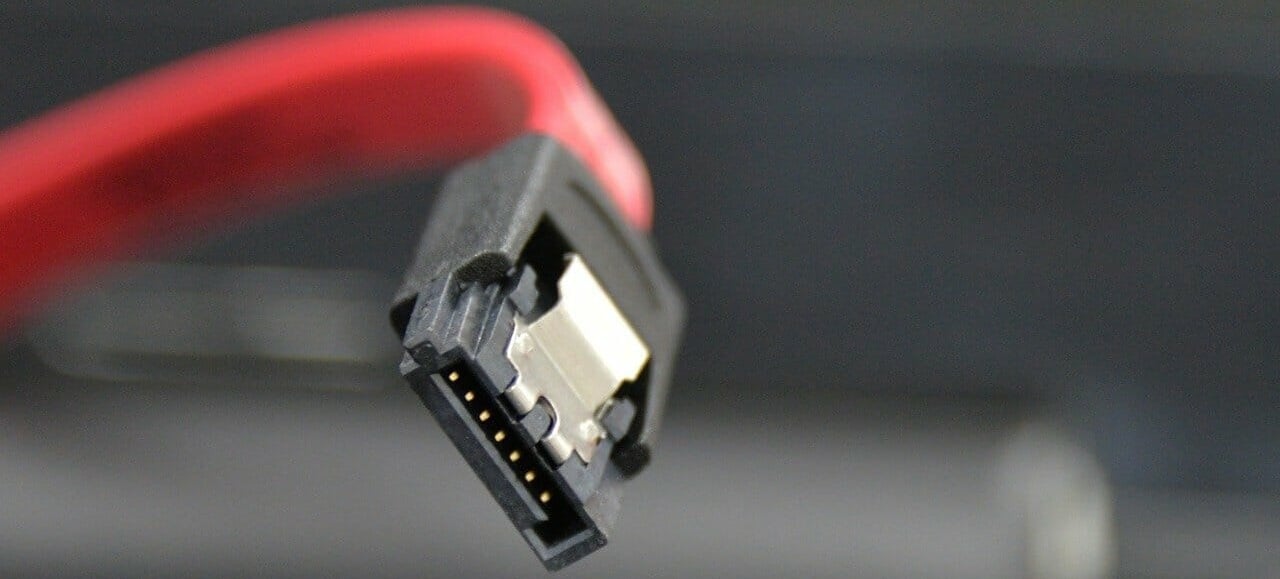
For better SSD performance, ensure that the cables are not defective or of poor quality and that it is well hooked up to the SATA port. Thus, a good tip is always to purchase a SATA cable from a well-known manufacturer.
- May 2025 Patch Tuesday finally brings Recall & other AI features to Copilot+ PCs
- Microsoft releases Windows 10 (KB5058379/ KB5058392 / KB5058383/ KB5058387) May 2025 Patch Tuesday
- Microsoft releases Windows 11 (KB5058411, KB5058405) May 2025 Patch Tuesday
8. Update your firmware
Just like every other computer hardware you own, updating the firmware on your SSD is vital as new bugs and problems get identified and resolved. If you’re using a Samsung SSD, you can find firmware updates on the Samsung Magician software.
This may also improve your SSD’s performance, drive stability, or improve compatibility with your system.
To check if you need to update the firmware, you must first identify the exact firmware on your SSD and then go on the manufacturer’s website to check if newer firmware exists for your SSD. If so, you will have to follow the instructions for updating.
9. Optimize your SSD
- In the Start menu, search for Disk Cleanup.
- Select the SSD drive and click OK to launch the process.
- Delete the detected junk files.
- In the Start menu, search for defrag and open Defragment and Optimize Drives.
- Select the SSD drive and click the Optimize button.
The SSD accumulates junk just like the rest of your computer over time. Thus, you need to optimize it from time to time to bring it to its original shape.
In Windows 10, you can do that easily by yourself by following the instructions below or using third-party software in this respect.
10. Choose the High Power Plan
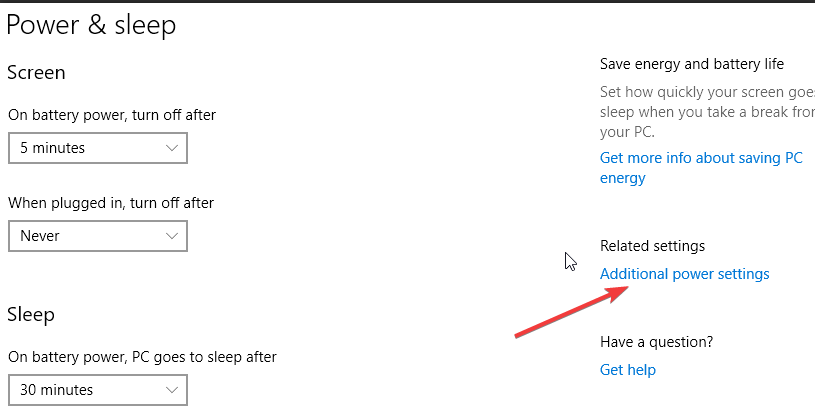
- In the Start menu, search for power and click on Power & Sleep settings.
- Select Additional power settings on the right side.
- Click on Create a Power Plan on the left and select High Performance.
When you choose the Balanced Power Plan, your SSD will not receive the full power it needs to run at its best capacity, leading to slow transfer, read, and write speed.
How can I fix a slow SSD on Windows 11?
Fixing a slow SSD on Windows 11 is pretty simple. Foremost, you can try to optimize your drivers with the built-in feature.
Also, you can change your power plan to high performance to release full power for your SSD. You can also try all other fixes in this guide, as they work for Windows 10 and 11.
Do SSDs get slower as they age?
SSDs do not get slower because of age. Instead, other factors make the memory run slow.
One of them is filling your SSD to the maximum or near-maximum capacity. This reduces its write time, thereby affecting its overall performance.
Some other known factors are wrong PC settings and lack of optimization. So, you don’t have anything to worry about when your SSD age.
We hope this article helped you, and you now get to see improved SSD performance. You might also be interested in our guide on how to check the SSD health in Windows 11.
Similarly, if you need a list of the best SSD management software, check our guide for the excellent options today.
Let us know if you can get your SSD back up to speed in the comments below.


