
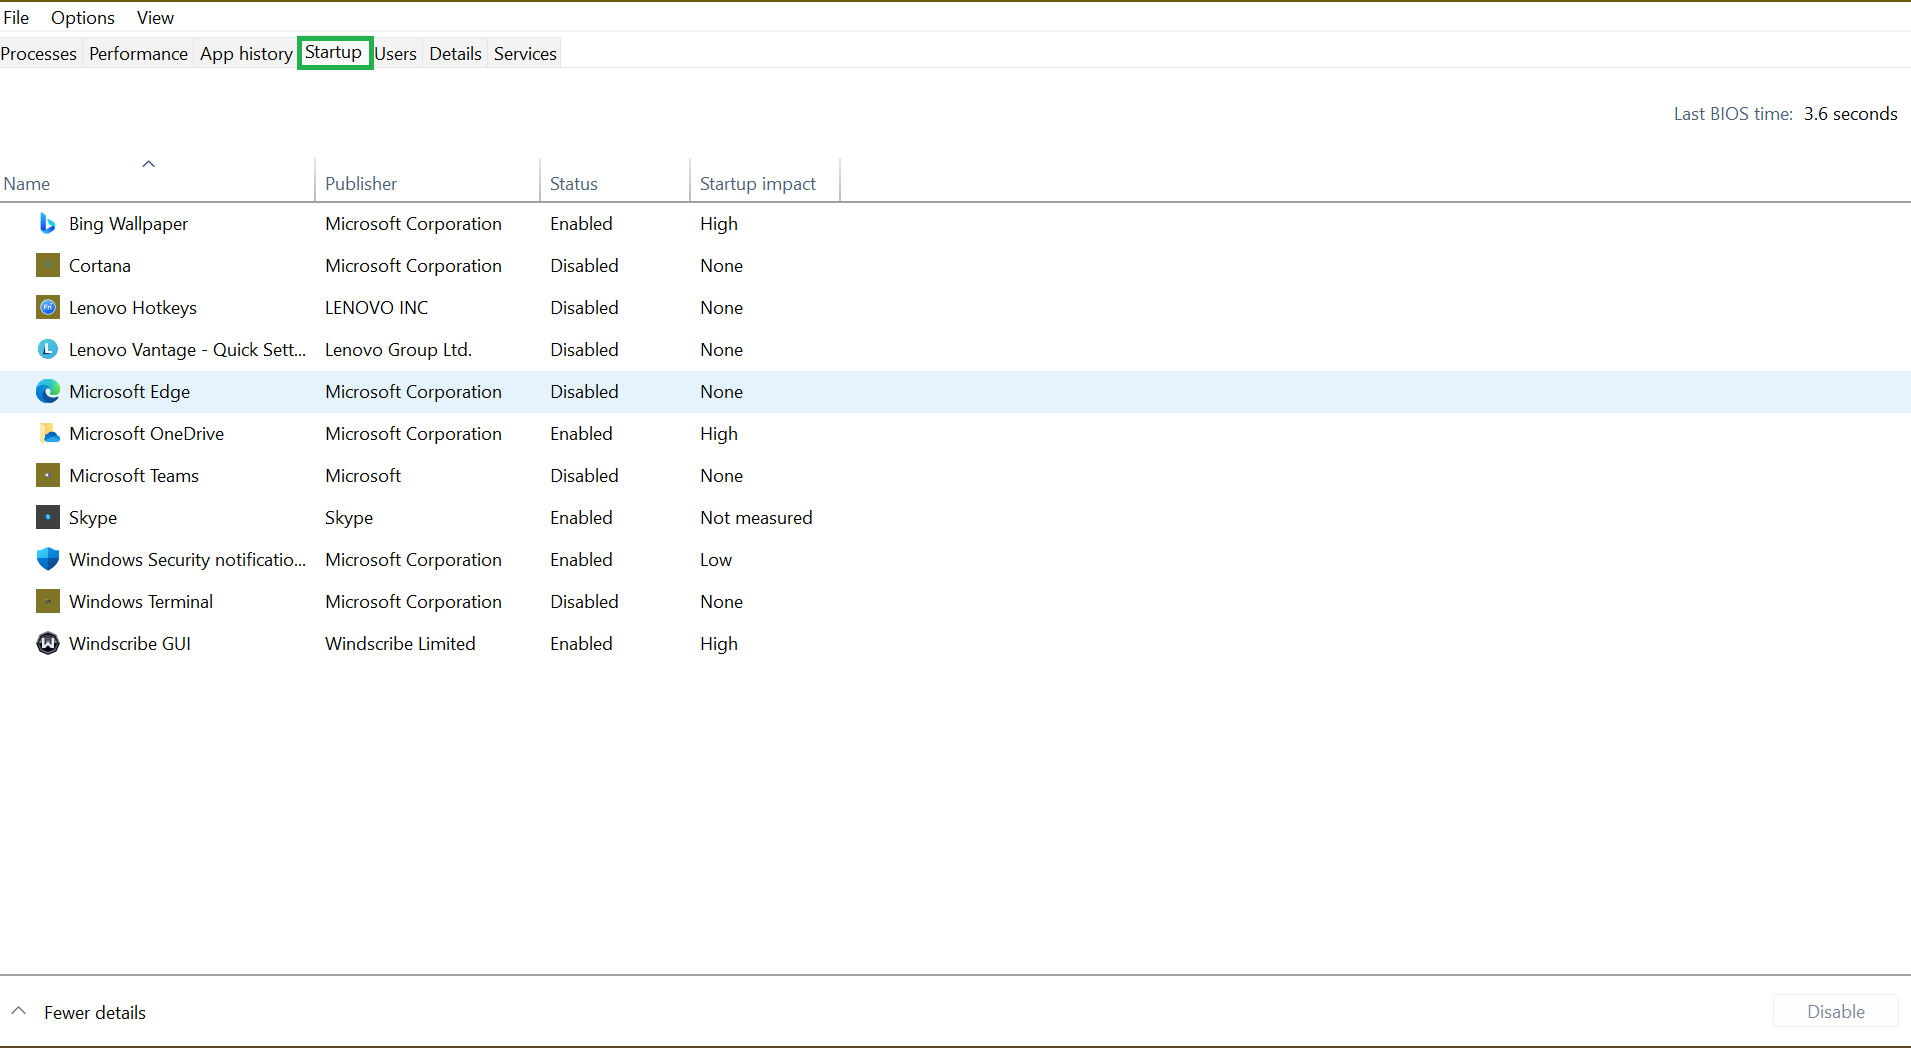
SSD Mini Tweaker
для Windows
SSD Mini Tweaker — небольшая программа для настройки и оптимизации Вашей операционки для работы с твердотельным накопителем SSD. Такие накопители для хранения данных используют твердотельную память, эмулируя жёсткий диск. Преимуществом SSD является быстрый доступ к данным за счет отсутствия необходимости перемещения головок (как в HDD), что сказывается на скорости загрузки системы, запуска приложений, чтения и записи данных.
Однако у SSD-накопителей есть и существенный недостаток — ограниченное число циклов записи. Обычная флэш-память в среднем выдерживает до 500 000 операций стирания и записи в одну и ту же ячейку. Так вот назначение SSD Mini Tweaker как раз и состоит в снижении обращения системы к SSD-диску для его более продолжительной работы.
Тут Вы сможете отключать и включать разнообразные функции и службы системы, такие как Trim, Superfetch, Prefetcher, дефрагментация, индексирование, оставлять ядро системы в памяти, увеличивать размер кэша системы, не создавать файл Layout.ini и другие. Все действия производятся простой установкой (или снятием) метки с соответствующего пункта.
В целом, SSD Mini Tweaker действительно полезный инструмент, который пригодится всем владельцам SDD-накопителей, а также и тем, кто только планирует его установить и перенести систему с обычного жесткого диска.
Что нового в SSD Mini Tweaker 2.10?
- Полная совместимость с Windows 11.
- Совместимость с Windows Server 2019 и выше.
- Изменение внешнего вида информационных окон.
ТОП-сегодня раздела «Настройка, оптимизация»
CCleaner 6.35.11488
CCleaner — популярное приложение для оптимизации ПК, чистки реестра и удаления различного…
MSI Afterburner 4.6.5
MSI Afterburner — настоящая находка для истинного оверклокера, с помощью которой можно…
Mem Reduct 3.5
Mem Reduct — небольшая портативная утилита, которая позволяет высвободить до 25% используемой…
Process Hacker 2.39.124
Process Hacker — мощное приложение для полного контроля над задачами, процессами и службами, с…
CCleaner Portable 6.35.11488
CCleaner Portable — портативная (переносная, не требующая инсталляции на компьютер) версия утилиты CCleaner для чистки системного мусора…
Отзывы о программе SSD Mini Tweaker
ВладТопор про SSD Mini Tweaker 2.9 [15-12-2020]
LENIN INC Wishmaster System намного лучше и удобнее. Кроме того, он показывает SMART.
5 | 18 | Ответить
SlavWar про SSD Mini Tweaker 2.8 [18-10-2019]
как можно доверять каким то твикерам свой диск?
9 | 30 | Ответить
Alex в ответ SlavWar про SSD Mini Tweaker 2.9 [24-04-2020]
Не доверяй.
12 | 7 | Ответить
Владимир в ответ SlavWar про SSD Mini Tweaker 2.9 [22-01-2021]
Пользовалься версией 2.1 в течение 9 лет. За это время износ SSD составил всего 5%.
Год назад купил новый ноутбук с новым SSD, а SSD-твиккер забыл установить, в результате всего за 1 год износ SSD составил 6%. При этом частые зависания ноутбука стали нормой. Тут я и вспомнил про SSD-твиккер. Сегодня установил, но уже новую версию 2.9. Посмотрю как будет работать ноут и что будет с износом SSD. Если будет все нормально как и раньше, то в этом будет заслуга SSD — твиккера.
11 | 19 | Ответить
Георгий про SSD Mini Tweaker 2.8 [07-04-2019]
Программа хороша проверенно на SSD диске Kingstone a400 всё гуд, выше бред написан
14 | 9 | Ответить
Николай в ответ Георгий про SSD Mini Tweaker 2.9 [01-02-2020]
что ты выставлял в этой программе ?
15 | 77 | Ответить
Александр про SSD Mini Tweaker 2.8 [14-12-2018]
Не могу загрузить, ни один браузер не загружает, с предупреждением что там вирус, как загрузить то?
9 | 18 | Ответить
Алексадр в ответ Александр про SSD Mini Tweaker 2.8 [19-01-2019]
Такая же байда антивир сразу удаляет прогу!
9 | 11 | Ответить
Sergey про SSD Mini Tweaker 2.8 [28-08-2018]
После скачивания приложения, любая антивирусная защита (Kaspersky, Dr.Web, ESET NOD, Avast, 360 Total Security), даже Windows Defender, сообщают что SSD Mini Tweaker 2.8 имеет встроенный Троянский код и компьютер может быть заражен. Воровать личные данные у пользователей, ну как минимум не красиво. Ждем ЧИСТУЮ версию SSD Mini Tweaker 2.9. Я привык доверять антивирусам, не рекомендую скачивать данную версию программы.
23 | 46 | Ответить
Table of contents
- Why Is SSD Faster than HDD?
- Useful Methods to Optimize SSD Windows 10/11
- Method 1: Disable startup programs
- Method 2: Disable fast startup
- Method 3: Confirm TRIM is enabled
- Method 4: Make sure the SSD firmware is up to date
- Method 5: Turn on write caching
- Method 6: Schedule SSD optimization
- Method 7: Set your power plan to high performance
- Method 8: Enable AHCI mode
- Method 9: Disable indexing service/Windows search
- Conclusion
- FAQs
Solid state drives (SSDs) have numerous benefits. However, one drawback is that their performance might deteriorate with time and become slower than their initial state. But there are several measures you can take to optimize SSD for better performance. In this article, we’ll look at practical ways to speed up your SSD using SSD optimization methods. Let’s begin.
Why Is SSD Faster than HDD?
Unlike an HDD, which requires track seeking and latency time to read data, an SSD can retrieve and read data directly from any flash memory location.
It basically takes under 0.1ms (random access time) for an SSD to read data. That’s almost no time at all.
This fast response makes it more favorable than the traditional HDD. This means you can open and run applications on your PC at lightning speed.
That said, SSDs are also affected by wear and tear, and it’s usually advisable to back up your data regularly to the cloud for safekeeping.
Related: SSD vs HDD: What’s the Difference and What to Choose?
Useful Methods to Optimize SSD Windows 10/11
First things first. Make sure to use the SSD as the boot or system disk (the disk containing Windows OS). That way, you’ll have quicker boot time and increased system running speed.
On top of that, if you’re still using Windows 10, we highly suggest upgrading to Windows 11, as it’s one of the most advanced operating systems today.
Apart from offering a wonderful experience, this system has plenty of features to optimize SSD, such as the TRIM command.
Below are SSD tweaks to ensure your SSD performs optimally:
Method 1: Disable startup programs
Your PC’s boot time
is affected by the startup programs set to run when you turn on your machine. Luckily, the startup application manager shows which programs are most slowing down the startup process.
Often, the programs you install add themselves to the startup process and automatically start every time you boot your PC.
The good news is that you can quickly access the Startup applications manager in the Task Manager and disable these programs.
Here’s how:
- Use the
Ctrl + Shift + Esckeyboard shortcuts to bring up Task Manager. Alternatively, pressCtrl + Alt + Deleteand select Task Manager.
- From the Task Manager’s interface, switch to the Startup tab to see a list of startup programs and their impact on your computer’s startup. You may want to disable all applications with a High impact.
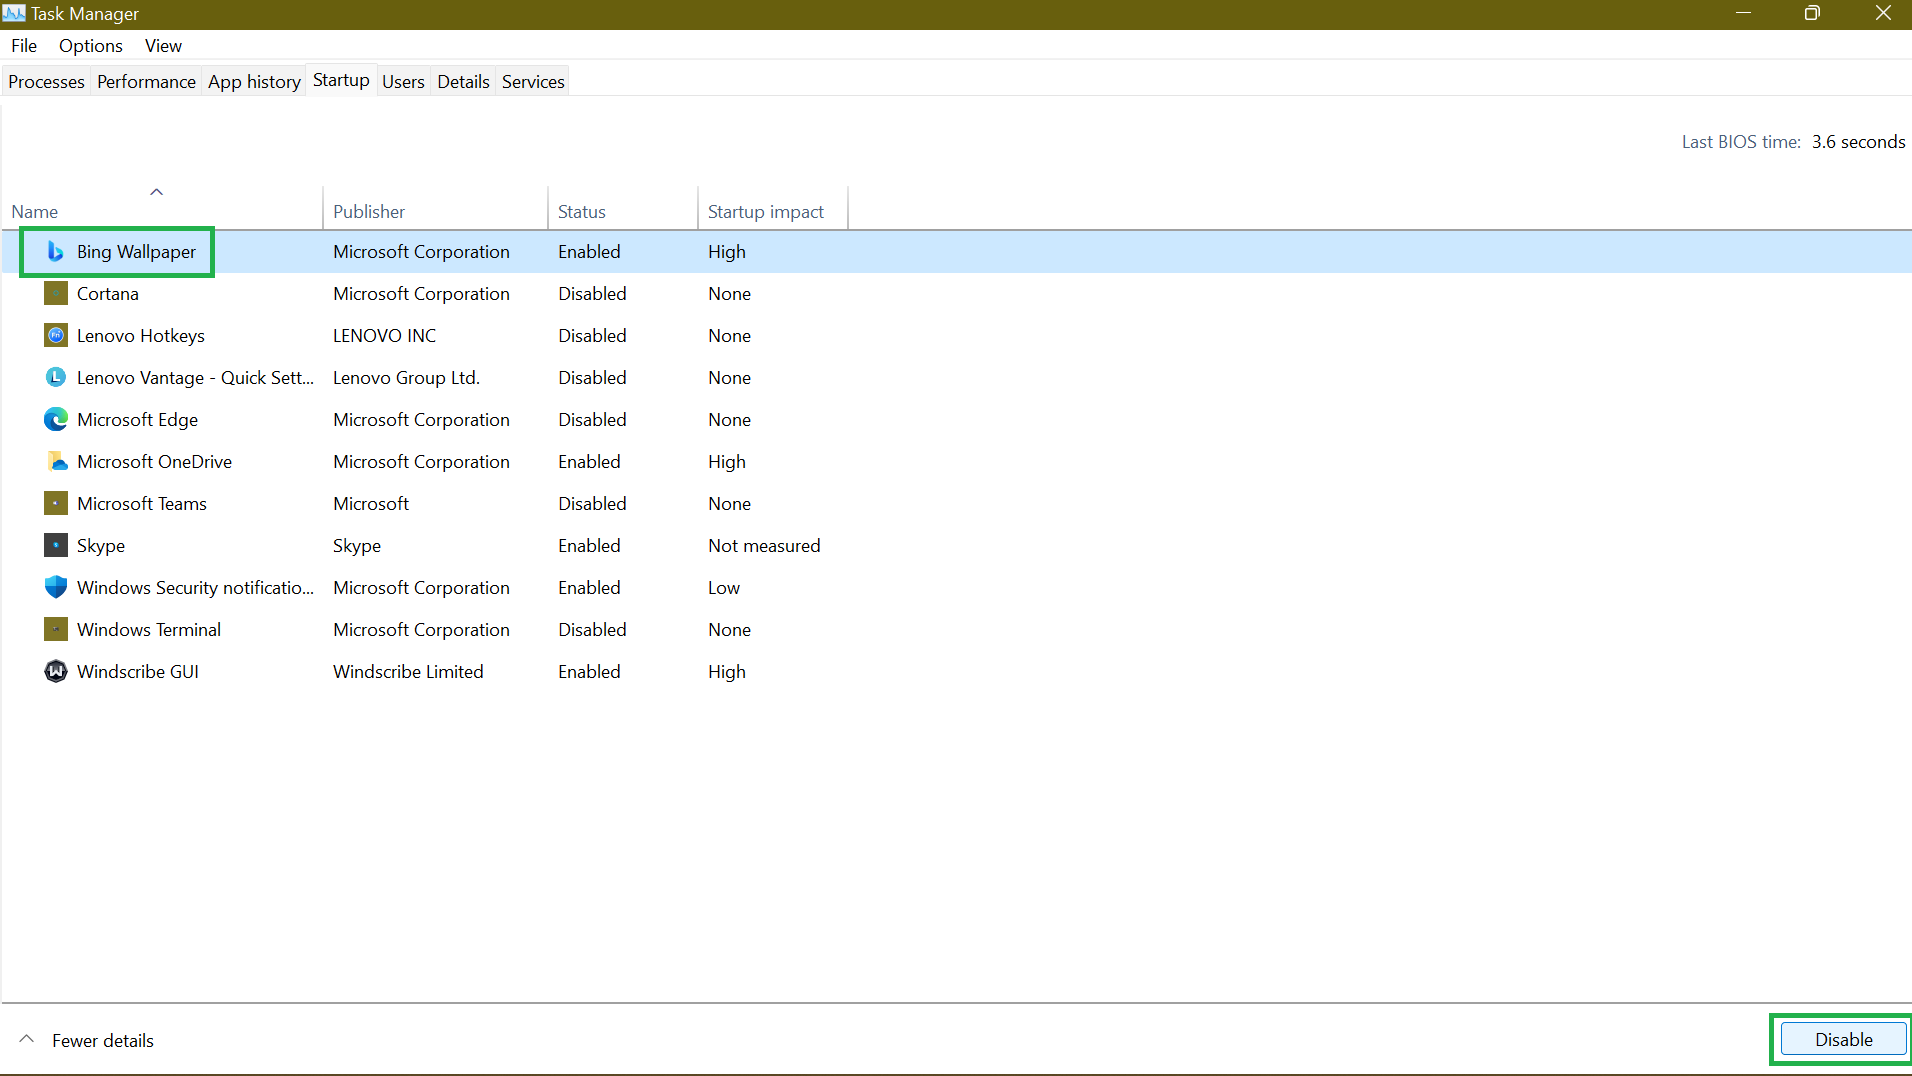
- To disable a program, select it and click Disable at the far-right bottom section of the page.
That said, disabling some programs can limit their functionality. Applications like OneDrive or Google Drive need to run at startup to keep your files synced.
Thus, you want to enable them to sync your files in the background automatically.
Related: Quick Tips: How to Disable Startup Programs in Windows 10
Method 2: Disable fast startup
Another SSD optimization method is the Fast Startup . This feature was solely designed to accelerate the boot process, particularly for machines with SSDs. So, you might be wondering, why disable it? An SSD is so fast that the time gained by enabling a fast startup is almost insignificant. In fact, disabling this feature may allow your Windows computer to get a clean full reboot. While disabling Windows Fast Startup may not have a big impact, it could be useful.
- Access the Control Panel from your Start Menu.
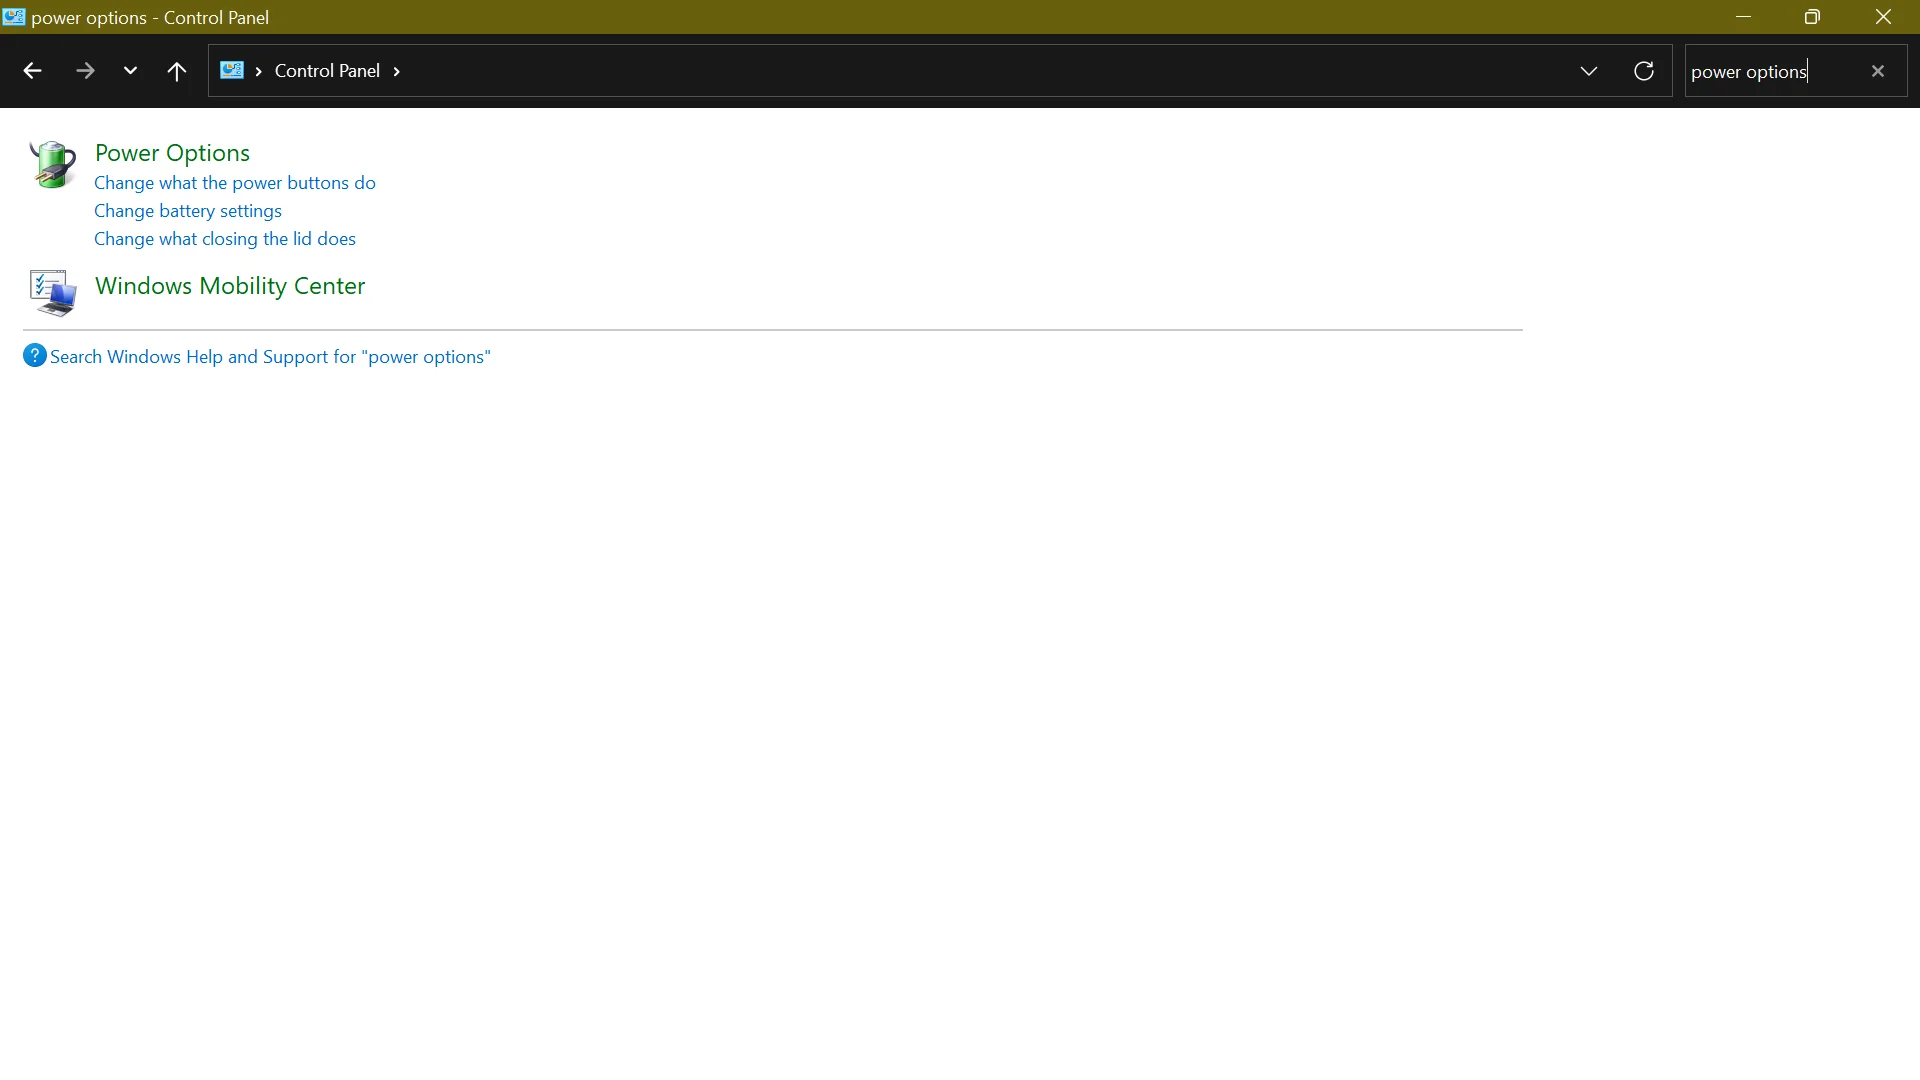
- Open Power Options and click Choose what the power button does.
- If the Shut-down settings option is grayed out, click Change settings that are currently unavailable.

- Uncheck the Turn on fast start-up (recommended) box and click on Save changes.
Download Auslogics SSD Optimizer
Your safe and effective SSD performance guard, the app will optimize data placement on your solid-state drive, help clear disk space, monitor drive health and extend its service life.
Method 3: Confirm TRIM is enabled
TRIM ensures that the SSD wipes data from blocks no longer in use. Doing so reduces the write speed and helps maintain optimum performance throughout the SSD’s lifespan.
TRIM should be enabled by default on your Windows 10/11 machine. However, sometimes that’s not the case. That’s why it’s worth checking and ensuring that it’s functioning.
To do so, perform the following steps:
- Hit the
Windows Keyon your keyboard and typeCMD. On the right sidebar, select Run as administrator.
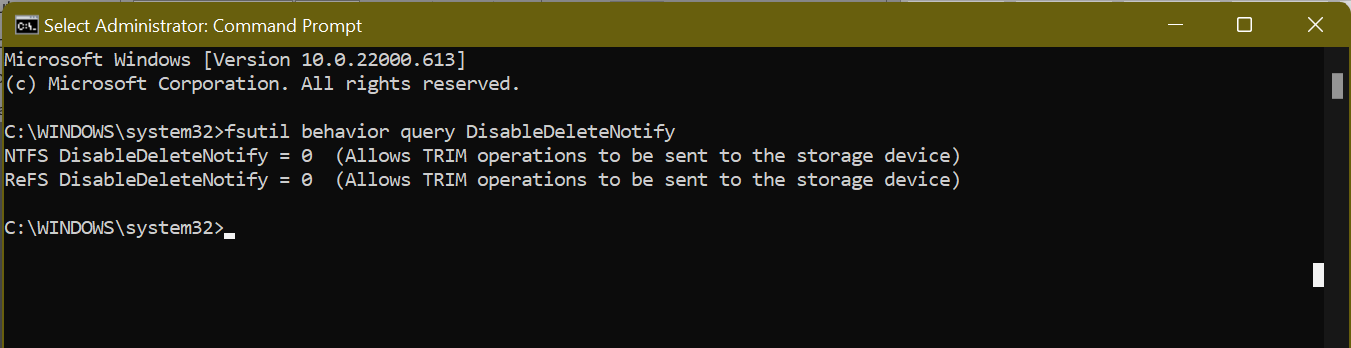
- Next, execute the command
fsutil behavior query DisableDeleteNotify. If it is set to “0”, TRIM is enabled. If it is set to “1”, TRIM is disabled, and you need to enable it.
Method 4: Make sure the SSD firmware is up to date
The SSD can only run efficiently if the SSD firmware stays updated. Unfortunately, the process isn’t automated; you must do it manually. Nonetheless, it’s not a complex process. All you have to do is visit your SSD’s manufacturer’s website and find the available SSD firmware upgrades. Usually, you’ll find a step-by-step guide there on how to update your SSD firmware and help you optimize your SSD .
Related: What is BIOS on a Computer: Everything You Need to Know
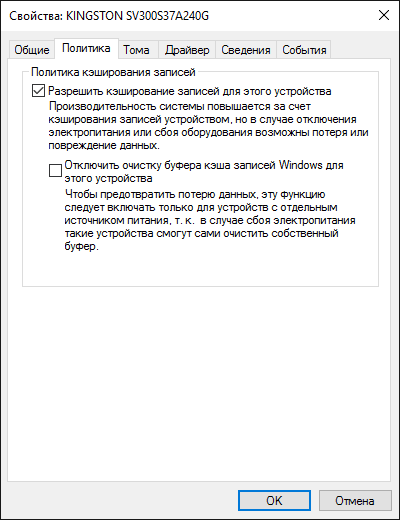
Method 5: Turn on write caching
Enabling
write caching may not always be the best idea. And that’s because, in case of a power outage or device malfunction, it might result in data corruption or loss. Therefore, use this feature with caution.
If you want SSD optimization in Windows 10 , follow these steps to enable write caching:
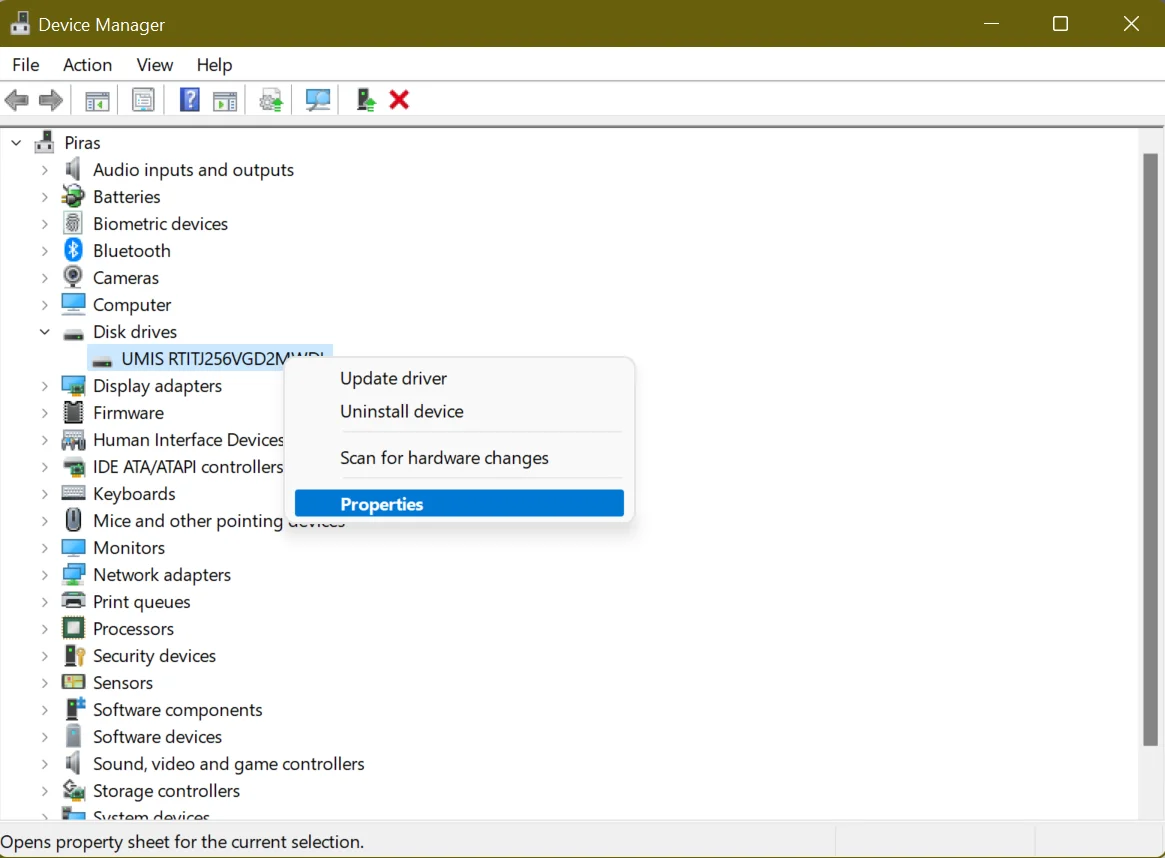
- Right-click your Start Menu or press the
Windows + Xkey combination and select Device Manager. - Locate Disk Drives, expand it, and open Properties. Alternatively, double-click your SSD to open its properties window.
- On the next screen, go to the Policies tab and find the Write-Caching Policy section.
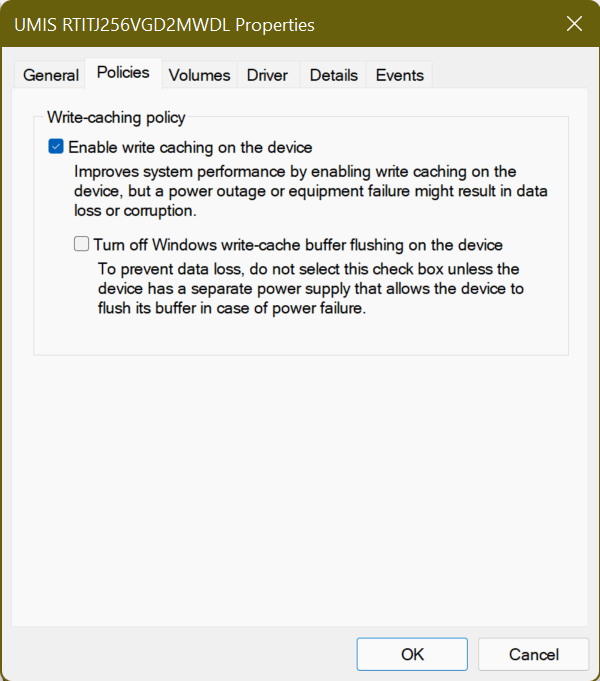
- Under it, you’ll see an option labeled Enable write caching on the device. Check the box next to it and select OK.
Now, use your SSD as you normally would and check for performance behaviors. If it’s improved, keep the option on. If not, follow the process and disable it.
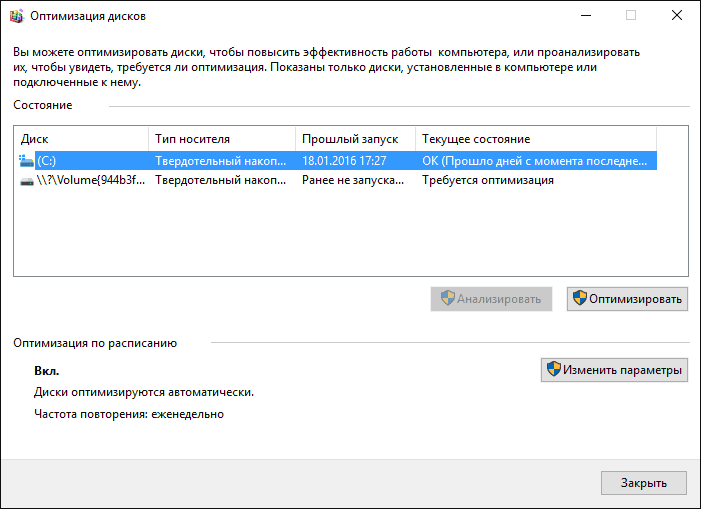
Method 6: Schedule SSD optimization
You may have noticed that modern computers using SSDs don’t have the option to defragment an SSD. On Windows 10 and Windows 11, you can only “Optimize” your drives. Defragmenting a drive ensures that large files are stored in one contiguous section of a hard disk for faster access. It’s applicable for mechanical drives with a long wait time of around 15ms. So, every time a file is fragmented, you lose 15ms as it tries to find the next one. Over time, this can add up, resulting in longer read times. That’s not the case with SSDs since the seek time is approximately 0.1 ms. This speed and the fact that SSDs move data already on your disk to other areas on the disk, usually storing them in a temporary position first, means there’s no performance advantage of defragmentation.
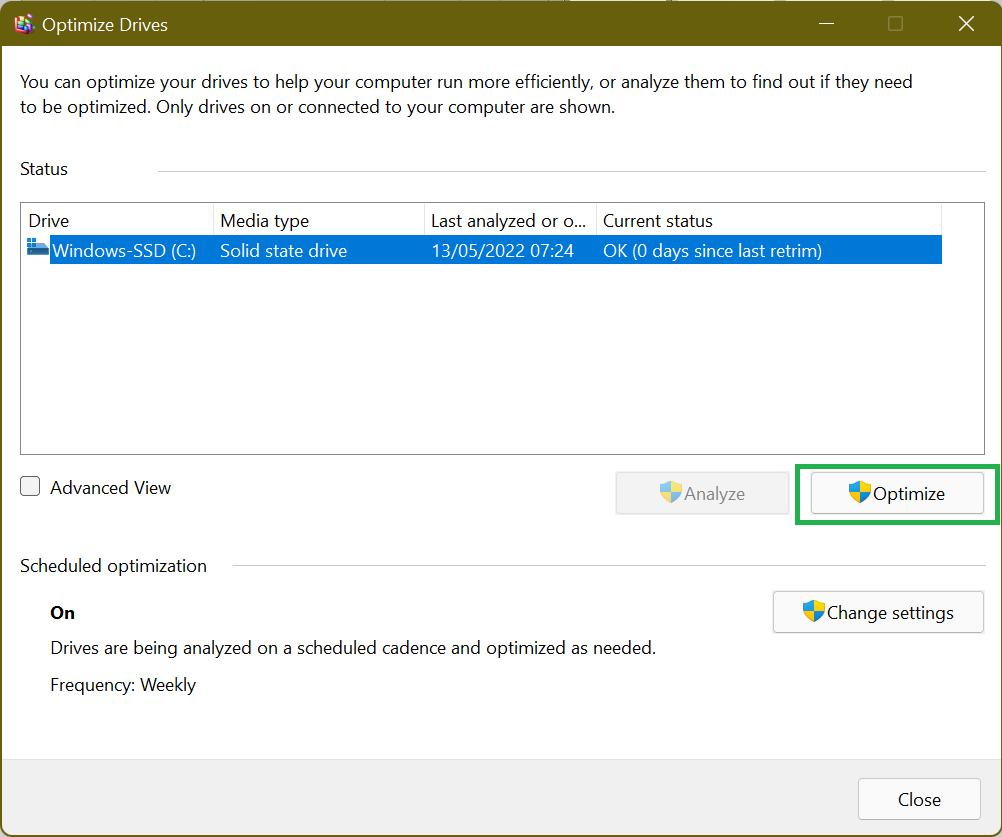
But Windows already knows this. No wonder there isn’t an option to defrag your SSD on modern versions of Windows. In its place is the option to Optimize your SSD.
Among other things, the process will retrim the SSD , which forces the deletion of data no longer deemed necessary, a task usually handled by TRIM.
Therefore, ensure you regularly configure a schedule to allow Windows 10 SSD optimization , thus keeping its performance optimal.
Download Auslogics BoostSpeed to Optimize SSD
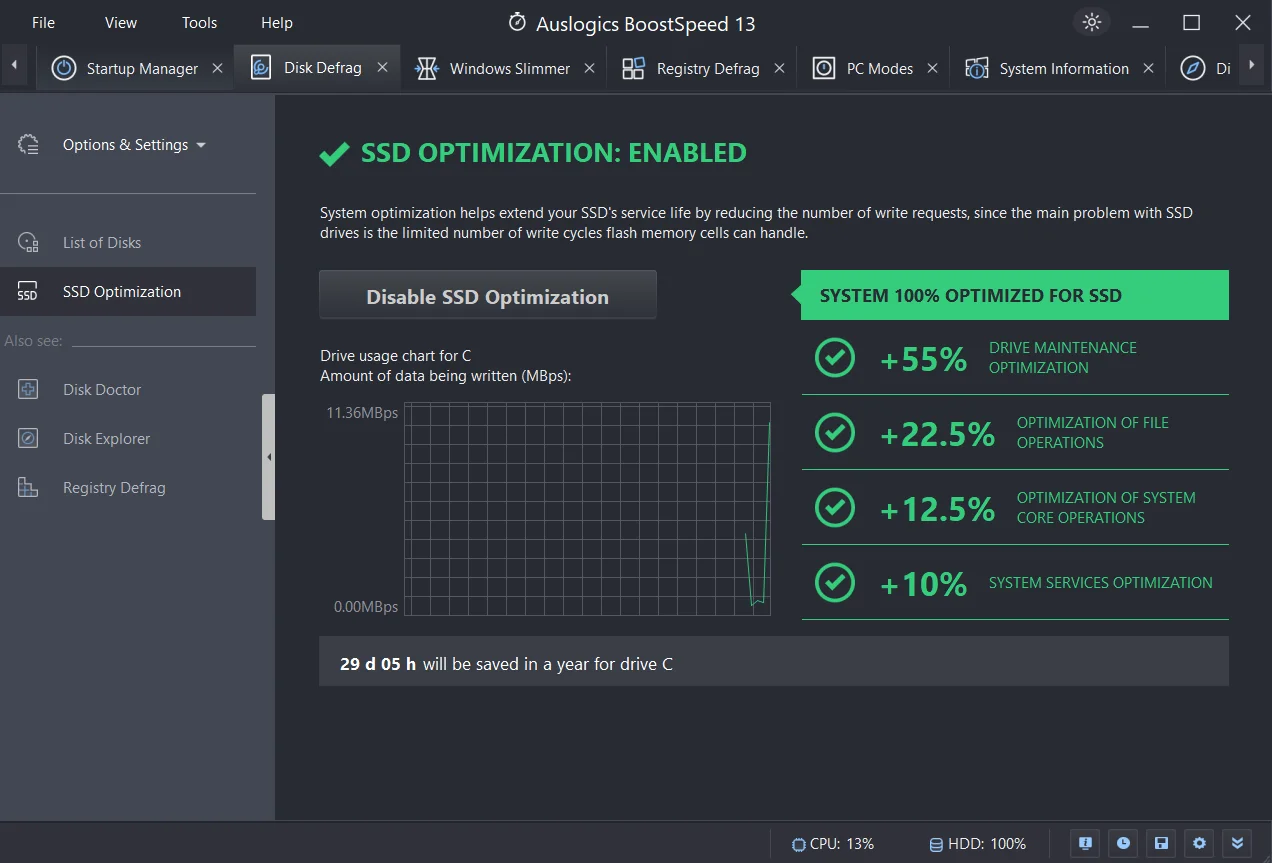
While Windows performs the necessary optimization on your SSD, it doesn’t always resolve speed-reducing issues like junk files, corrupt keys, invalid registry entries, or duplicate files. That’s where a tool such as Auslogics BoostSpeed comes in.
The program automatically scans and detects PC junk like unused error logs, web browser cache, user temporary files, etc.
It then deletes them, reclaiming the much-needed space on your SSD. By freeing up this space, your SSD can perform much better than when it’s almost out of space.
Additionally, BoostSpeed checks your registry and fixes anything damaged or corrupt.
As you are aware, your registry is crucial to your system’s core functioning, and if there are corrupt keys or invalid entries, you might start experiencing system glitches or even crashes.
Generally, BoostSpeed identifies issues that slow down your computer’s performance, tweak non-optimal system settings, and ultimately enhance your PC’s operations.
Download Auslogics BoostSpeed
Your one-stop PC maintenance and optimization tool, this program will clean, speed up, repair and tweak your system to ensure maximum speed and efficiency.
Related: Speed Up Slow Computer: Auslogics BoostSpeed 13
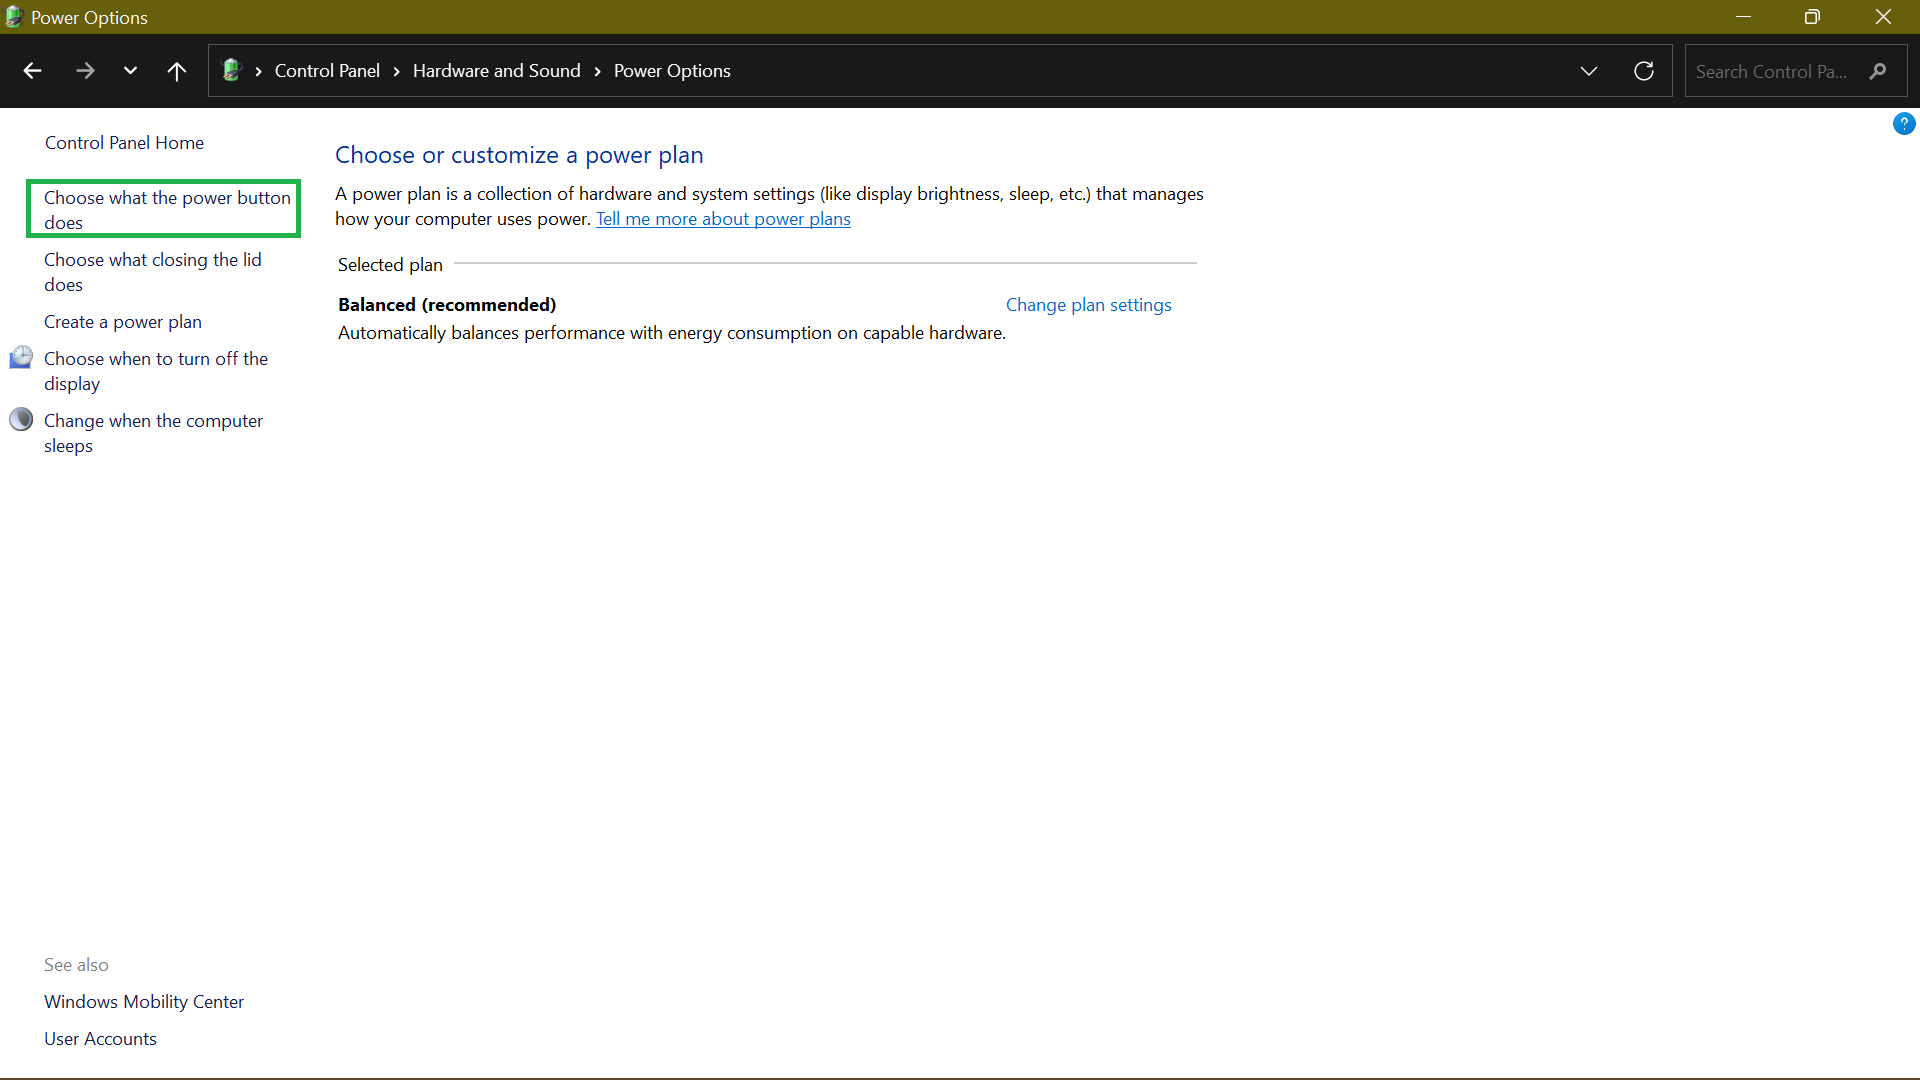
Method 7: Set your power plan to high performance
By default, Windows sets your system to the Balanced power plan, which automatically kills power to your drives when they aren’t in use. This is useful for laptops, as it helps prolong battery life.
Switching to High Performance means the drives remain powered on all the time and will eliminate the lag you notice after your PC has been idle for a while.
To change the power options:
- You’ll need to access the Control Panel via the Start Menu.
- Once there, locate Power Options from Settings. A quick way to do that is to use the search function. Simply type
power optionsin the Search Control Panel text field and select Power Options. - Choose the High Performance option to speed up your system’s performance. However, this power plan will consume more energy, and your battery may drain faster.
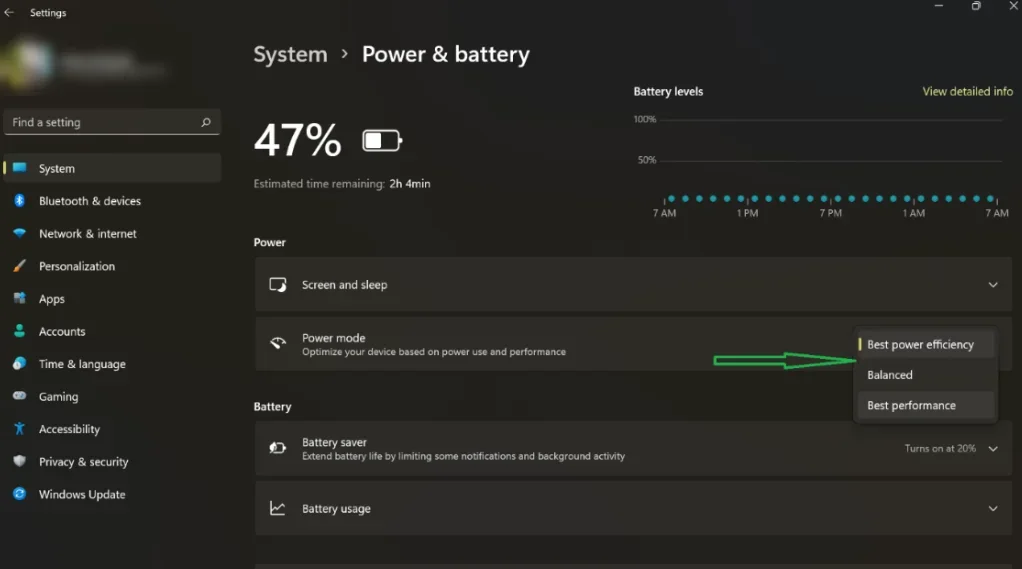
- On a Windows 11 machine, click on the battery icon at the far right corner of your taskbar and select the battery icon on the window that pops up. On the Settings page, click the drop-down menu next to Power mode and choose Best Performance.
There you have it! These SSD tweaks will ensure your Windows 10/11 PC boosts faster and runs efficiently every time you use it.
Method 8: Enable AHCI mode
AHCI is usually confused with IDE mode. The IDE mode is designed to help you easily add and remove hardware components but comes with a speed penalty.
On the other hand, AHCI or advanced host controller interface uses a more streamlined approach that doesn’t require too much overhead, making your computer faster overall.
Setting the SATA controller to run in AHCI Mode ensures your SSD performs better.
If you want to optimize your SSD, switch from IDE mode to AHCI in your BIOS. However, you must do this before installing your Windows OS.
Otherwise, your PC will fail to boot properly. It will only force you to format Windows and reinstall it in the correct mode.
Then again, enabling the AHCI mode on a Windows install that is in IDE mode is possible. And for this, you need to access the registry. Here’s how:
- Launch the Run menu by pressing the
Windows + Rshortcut. - Input
regeditand pressEnterto launch the Registry Editor. - Then go to HKEY_LOCAL_MACHINE\System\CurrentControlSet\services\iaStorV and change the reg_dword start value from 3 to 0.
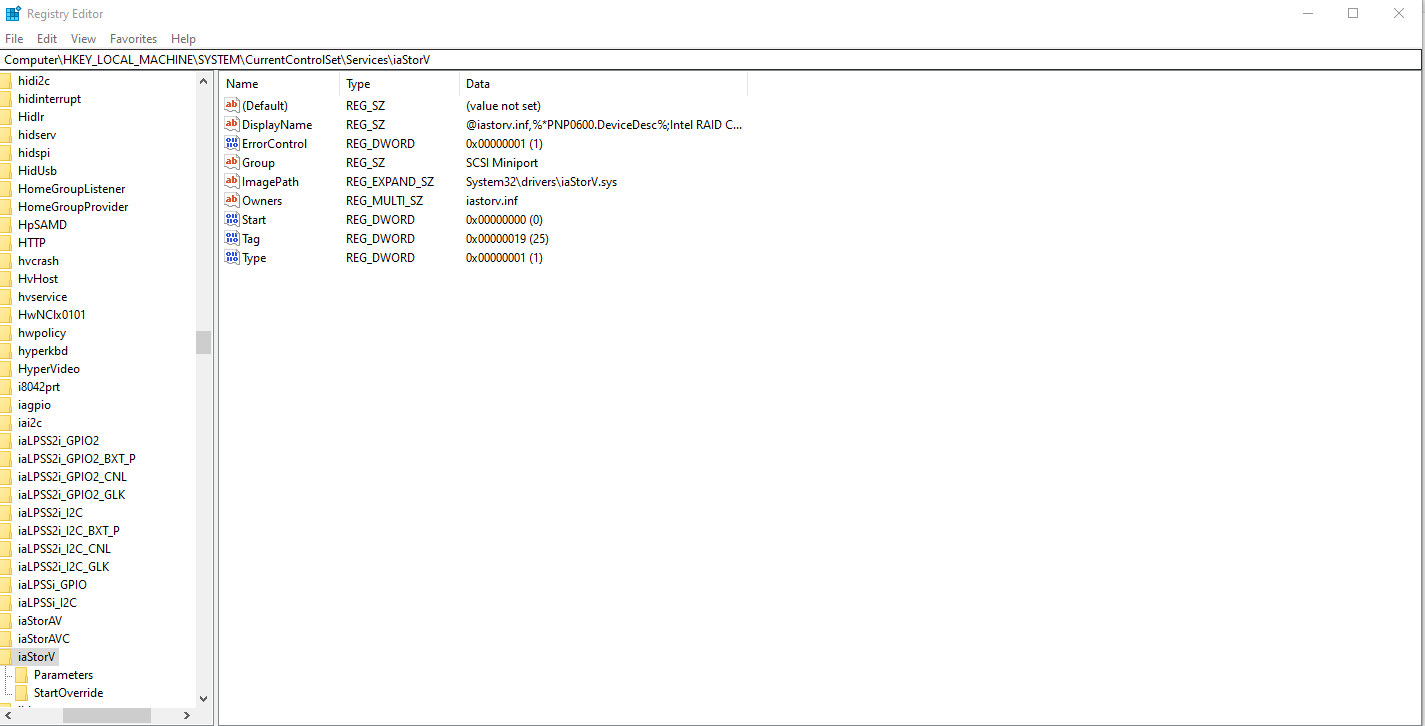
- Next, access this location: HKEY_LOCAL_MACHINE\System\CurrentControlSet\services\msahci and change the reg_dword start value to 0.
- Once done with these two changes, restart your computer and enter the BIOS mode.
- Now, switch from the IDE mode to AHCI.
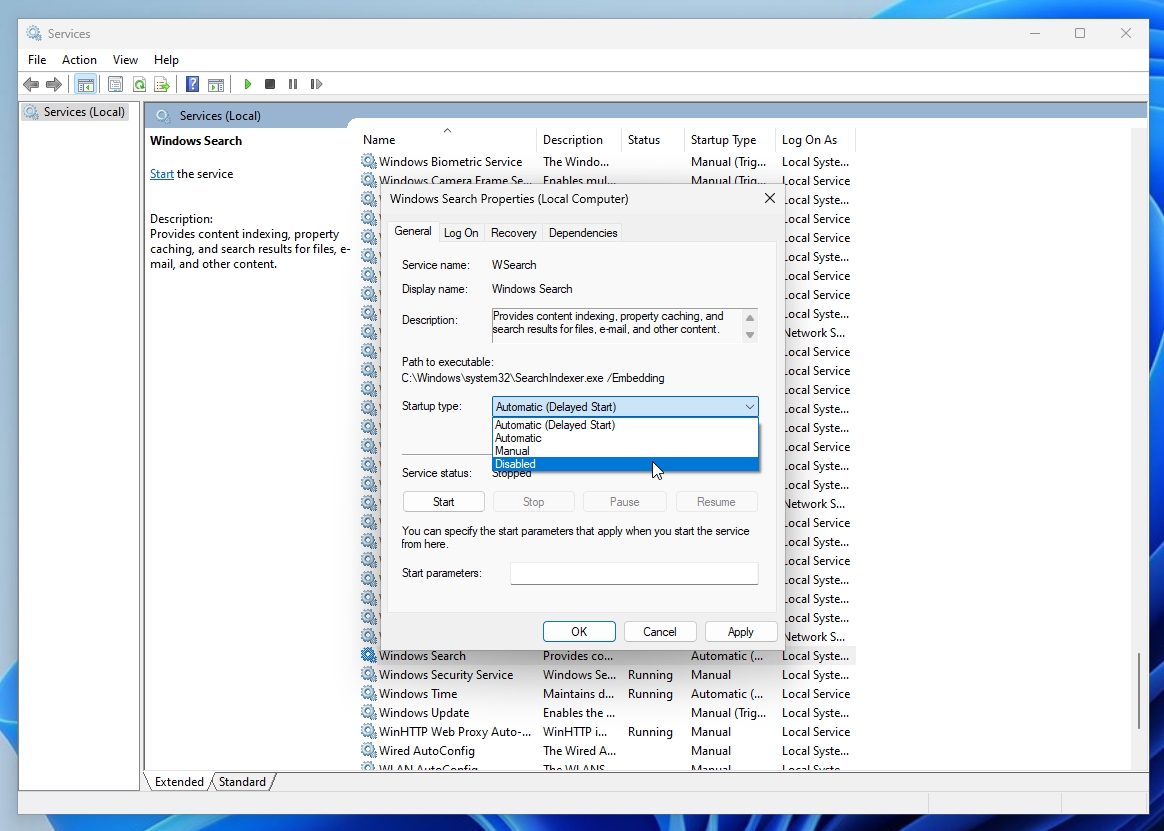
Method 9: Disable indexing service/Windows search
When searching, Windows checks all your disks when looking for documents. This means every bit of data on your computer is being read multiple times as it searches. Because of its design, an SSD can only be written several times before it starts deteriorating in performance and dies, making indexing your search process even more important. By disabling the indexing service, Windows is prevented from writing data over an existing file. This means you can significantly increase your drive’s life span without reducing speed. So, how do you disable the indexing service?
- Press
WindowsKey + Rto launch and open a Run box. - Type
services.msc. - Find Windows Search and right-click on it.
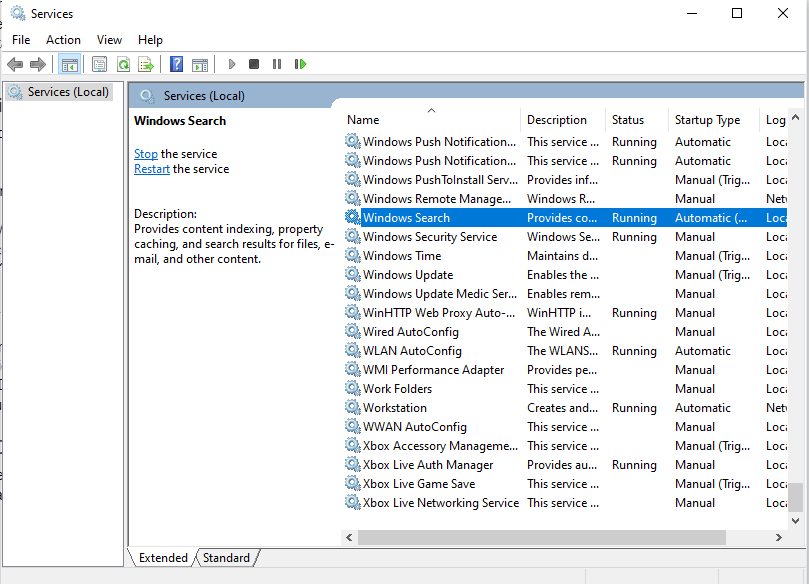
- Select Properties and click Stop.
- Change the Startup type to Disabled.
- Click OK and restart your PC.
Conclusion
You can use the SSD optimization methods discussed in this guide to improve your Pc performance. Although SSDs offer outstanding speed, remember they are not immune to deterioration. So you need to regularly backup your data
.
By implementing the suggested SSD optimization techniques, you can ultimately unlock the potential of your SSD and experience a faster, more effective computing experience.
FAQs
How to improve SSD performance?
You can improve SSD speed by updating the SSD firmware, ensuring the most recent drivers are loaded, turning on TRIM, turning off pointless background processes, and not using the SSD to its maximum capacity.
Do SSDs need defragmentation?
If you defrag SSD like an HDD, it won’t improve your computer performance. That’s because SSDs operate differently from HDDs. After all, they access data electronically, not physically, like HDDs.
You can use software like Auslogics BoostSpeed’s Disk Defrag to optimize SSDs because it uses a unique algorithm to optimize your system.
Should SSDs be optimized?
Yes. SSDs can benefit from SSD optimization. This includes turning on TRIM, turning off disk indexing, changing power options, and configuring the operating system to work best with SSDs.
You can check out Auslogics BoostSpeed to defrag your SSD in a way that improves your system’s performance.
What does SSD optimization do?
SSD optimization involves implementing different methods to increase the SSD’s performance and lifespan.
Typically, it involves turning on TRIM, stopping pointless background programs, tweaking power options, and setting up the operating system to take advantage of the SSD’s features best.
Поговорим о том, как настроить SSD для Windows 10. Начну просто: в большинстве случаев какой-либо настройки и оптимизации твердотельных накопителей для новой ОС не нужно. Более того, со слов сотрудников поддержки Microsoft, самостоятельные попытки оптимизации могут навредить как работе системы, так и самого диска. На всякий случай, для случайно зашедших: Что такое SSD и в чем его преимущества.
Однако, некоторые нюансы все-таки следует учесть, а заодно и прояснить вещи, связанные с тем, как в Windows 10 работают SSD диски, о них и поговорим. В последнем разделе статьи также присутствует информация более общего характера (но полезная), имеющая отношение к работе твердотельных накопителей на аппаратном уровне и применимая и к другим версиям ОС.
Сразу после выхода Windows 10, в Интернете появилось множество инструкций по оптимизации SSD, подавляющее большинство из которых представляют собой копии руководств к предыдущим версиям ОС, без учета (и, по всей видимости, попыток разобраться в них) появившихся изменений: например, продолжают писать, что нужно запустить WinSAT для того, чтобы система определила SSD или отключить автоматическую дефрагментацию (оптимизацию) по умолчанию включенную для таких накопителей в Windows 10.
Настройки Windows 10 для SSD накопителей по умолчанию
Windows 10 по умолчанию настроена на максимальную производительность для твердотельных дисков (с точки зрения Microsoft, которая близка точке зрения производителей SSD), при этом она определяет их автоматически (без запуска WinSAT) и применяет соответствующие настройки, каким-либо образом инициировать это не требуется.
А теперь по пунктам о том, как именно Windows 10 оптимизирует работу SSD при их обнаружении.
- Отключает дефрагментацию (об этом будет далее).
- Отключает функцию ReadyBoot.
- Использует Superfetch/Prefetch — функция, которая изменилась со времен Windows 7 и не требует отключения для SSD в Windows 10.
- Оптимизирует питание твердотельного накопителя.
- Функция TRIM по умолчанию включена для SSD.
Что осталось неизменным в настройках по умолчанию и вызывает разногласия в части необходимости настройки при работе с SSD: индексирование файлов, защита системы (точки восстановления и история файлов), кэширование записей для SSD и очистка буфера кэша записей, об этом — после интересной информации об автоматической дефрагментации.
Дефрагментация и оптимизация SSD в Windows 10
Многие заметили, что по умолчанию автоматическая оптимизация (в предыдущих версиях ОС — дефрагментация) включена для SSD в Windows 10 и кто-то кинулся отключать ее, кто-то изучать происходящее при процессе.
В общих чертах — Windows 10 не выполняет дефрагментацию SSD, а оптимизирует его, выполняя очистку блоков посредством TRIM (или, вернее, Retrim), что не вредно, а даже полезно для твердотельных накопителей. На всякий случай, проверьте, определила ли Windows 10 ваш диск как SSD и включила ли TRIM.
Некоторые написали объемные статьи на тему того, как работает оптимизация SSD в Windows 10. Процитирую часть такой статьи (только самые важные для понимания части) от Скотта Хансельмана (Scott Hanselman):
Я покопался поглубже и поговорил с командой разработчиков, работающих над реализацией накопителей в Windows, и этот пост написан в полном соответствии с тем, что они ответили на вопрос.
Оптимизация накопителей (в Windows 10) производит дефрагментацию SSD раз в месяц, если включено теневое копирование тома (защита системы). Это связано с влиянием фрагментации SSD на производительность. Здесь имеет место неправильное представление о том, что фрагментация не является проблемой для SSD — если SSD будет сильно фрагментирован, вы можете достичь максимальной фрагментации, когда метаданные не смогут представлять больше фрагментов файлов, что приведет к ошибкам при попытках записи или увеличения размера файла. Кроме этого, большее количество фрагментов файлов означает необходимость обработать большее количество метаданных для чтения/записи файла, что приводит к потерям производительности.
Что касается Retrim, эта команда выполняется по расписанию и необходима в связи с тем, каким образом выполняется команда TRIM в файловых системах. Выполнение команды происходит асинхронно в файловой системе. Когда файл удаляется или место освобождается другим образом, файловая система ставит запрос на TRIM в очередь. В связи с ограничениями на пиковую нагрузку, эта очередь может достигнуть максимального количества запросов TRIM, в результате чего последующие будут проигнорированы. В дальнейшем, оптимизация накопителей Windows автоматически выполняет Retrim для очистки блоков.
Подводя итог:
- Дефрагментация выполняется только если включена защита системы (точки восстановления, история файлов использующие VSS).
- Оптимизация дисков используется для того, чтобы пометить неиспользуемые блоки на SSD, которые не были помечены при работе TRIM.
- Дефрагментация для SSD может быть нужна и при необходимости автоматически применяется. При этом (это уже из другого источника) для твердотельных накопителей используется иной алгоритм дефрагментации по сравнению с HDD.
Тем не менее, если вы хотите, можно отключить дефрагментацию SSD в Windows 10.
Какие функции отключить для SSD и нужно ли это
Любой, кто задавался вопросом настройки SSD для Windows, встречал советы, связанные с отключением SuperFetch и Prefetch, отключением файла подкачки или его переносом на другой диск, отключением защиты системы, гибернации и индексирования содержимого диска, переносом папок, временных файлов и прочего на другие диски, отключением кэширования записи на диск.
Часть этих советов пришли еще из Windows XP и 7 и не применимы к Windows 10 и Windows 8 и к новым SSD (отключение SuperFetch, кэширования записи). Большая же часть этих советов действительно способна уменьшить количество данных, записываемых на диск (а у SSD имеется ограничение по общему количеству записанных данных за весь срок службы), что в теории приводит к продлению срока его службы. Но: путем потери производительности, удобств при работе с системой, а в некоторых случаях и к сбоям.
Здесь отмечу, что несмотря на то, что срок службы SSD считается меньшим, чем у HDD, с большой вероятностью купленный сегодня твердотельный накопитель средней цены при обычном использовании (игры, работа, интернет) в современной ОС и при наличии резервной емкости (для отсутствия потери производительности и продления срока службы стоит держать 10-15 процентов места на SSD свободными и это один из советов, который является актуальным и верным) прослужит дольше, чем вам требуется (т.е. будет заменен в итоге на более современный и емкий). На скриншоте ниже — мой SSD, срок использования год. Обратите внимание на графу «Всего записано», гарантия 300 Tb.
А теперь по пунктам о различных способах оптимизации работы SSD в Windows 10 и целесообразности их использования. Отмечу еще раз: эти настройки могут лишь незначительно увеличить срок службы, но не улучшат производительность.
Примечание: такой способ оптимизации, как установка программ на HDD при наличии SSD я рассматривать не стану, так как тогда не ясно, зачем вообще приобретался твердотельный накопитель — не для быстрого ли запуска и работы этих программ?
Отключение файла подкачки
Самый частый совет — отключить файл подкачки (виртуальную память) Windows или перенести его на другой диск. Второй вариант послужит причиной падения производительности, так как вместо быстрого SSD и оперативной памяти будет использоваться медленный HDD.
Первый вариант (отключение файла подкачки) — очень спорный. Действительно, компьютеры с 8 и более Гб оперативной памяти во многих задачах могут работать с отключенным файлом подкачки (но некоторые программы могут не запуститься или обнаруживать сбои при работе, например, из продуктов Adobe), тем самым сохраняется резерв твердотельного накопителя (происходит меньше операций записи).
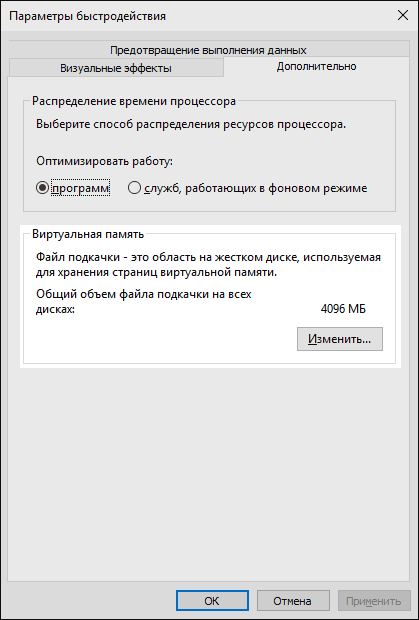
Одновременно с этим, нужно учитывать, что в Windows файл подкачки используется именно таким образом, чтобы обращаться к нему как можно меньше, в зависимости от размера доступной оперативной памяти. По официальной информации Microsoft соотношение чтения к записи для файла подкачки при обычном использовании составляет 40:1, т.е. значительного количества операций записи не происходит.
Тут же стоит добавить, что производители SSD, такие как Intel, Samsung рекомендуют оставлять файл подкачки включенным. И еще одно примечание: некоторые тесты (двухлетней давности, правда) показывают, что отключение файла подкачки для непроизводительных дешевых SSD может приводить к повышению их производительности. См. Как отключить файл подкачки Windows, если вдруг все-таки решите попробовать.
Отключение гибернации
Следующая возможная настройка — отключение гибернации, которая также используется для функции быстрого запуска Windows 10. Файл hiberfil.sys, записываемый на диск при выключении (или переводе в режим гибернации) компьютера или ноутбука и используемый для последующего быстрого запуска занимает несколько гигабайт на накопителе (примерно равный занятому объему оперативной памяти на компьютере).
Для ноутбуков отключение гибернации, особенно если она используется (например, автоматически включается через некоторое время после закрытия крышки ноутбука) может быть нецелесообразным и привести к неудобствам (необходимость выключать и включать ноутбук) и снижению времени автономной работы (быстрый запуск и гибернация позволяют сэкономить заряд по сравнению с обычным включением).
Для ПК отключение гибернации может иметь смысл, если требуется сократить объем данных, записываемых на SSD при условии, что функция быстрой загрузки вам не требуется. Есть также способ оставить быструю загрузку, но отключить гибернацию, сократив размер файла hiberfil.sys в два раза. Подробнее об этом: Гибернация Windows 10.
Защита системы
Автоматически создаваемые Windows 10 точки восстановления, а также История файлов при включении соответствующей функции, разумеется, записываются на диск. В случае SSD некоторые рекомендуют отключить защиту системы.
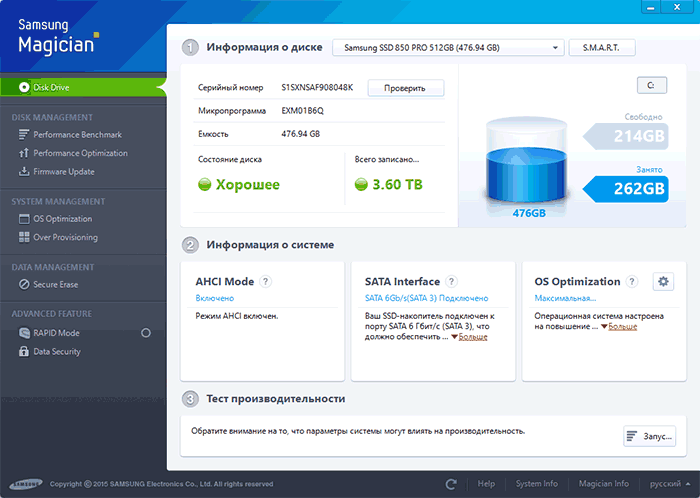
Среди некоторых — Samsung, рекомендующая сделать это и в своей утилите Samsung Magician и в официальном руководстве по работе с SSD. При этом указывается, что резервное копирование может вызывать выполнение большого количества фоновых процессов и снижение производительности, хотя по факту защита системы работает лишь при внесении изменений в систему и во время простоя компьютера.
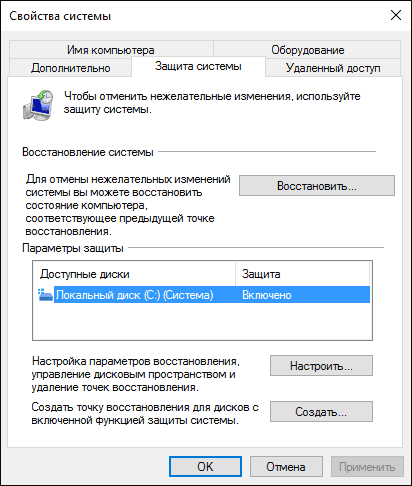
Intel для своих SSD такого не рекомендует. Так же, как и Microsoft не рекомендует выключать защиту системы. И я бы не стал: значительное число читателей этого сайта могли бы исправить проблемы с компьютером в разы быстрее, если бы у них была включена защита Windows 10.
Подробнее о включении, выключении и проверки состояния защиты системы в статье Точки восстановления Windows 10.
Перенос файлов и папок на другие диски HDD
Еще один из предлагаемых вариантов оптимизации работы SSD — перенос пользовательских папок и файлов, временных файлов и других компонентов на обычный жесткий диск. Как и в предыдущих случаях, это может сократить количество записываемых данных с одновременным снижением производительности (при переносе места хранения временных файлов и кэша) или удобства при использовании (например, при создании миниатюр фотографий из пользовательских папок, перенесенных на HDD).
Однако, при наличии отдельного емкого HDD в системе может иметь смысл хранить действительно объемные медиа-файлы (фильмы, музыка, какие-то ресурсы, архивы), к которым не нужен частый доступ именно на нем, высвобождая тем самым место на SSD и продлевая срок службы.
Superfetch и Prefetch, индексация содержимого дисков, кэширование записей и очистка буфера кэша записей
С этими функциями есть некоторые неясности, разные производители дают разные рекомендации, с которыми, думаю, следует ознакомиться на официальных сайтах.
По информации Microsoft, Superfetch и Prefetch успешно используются и для SSD, сами функции претерпели изменение и работают иначе в Windows 10 (и в Windows  при использовании твердотельных накопителей. А вот Samsung считает, что эта функция не используется SSD-накопителями. См. Как отключить Superfetch.
Про буфер кэша записи в целом рекомендации сводятся к «оставить включенным», а вот по очистке буфера кэша разнится. Даже в рамках одного производителя: в Samsung Magician рекомендуется отключить буфер кэша записи, а на их же официальном сайте по поводу этого сказано, что рекомендуется держать его включенным.
Ну а насчет индексирования содержимого дисков и службы поиска я даже не знаю, что написать. Поиск в Windows — очень эффективная и полезная вещь для работы, однако, даже в Windows 10, где кнопка поиска на виду, им почти никто не пользуется, по привычке выискивая нужные элементы в меню пуск и многоуровневых папках. В контексте же оптимизации SSD отключение индексации содержимого диска не является особенно эффективным — это больше операции чтения, чем записи.
Общие принципы оптимизации работы SSD в Windows
До этого момента речь в основном шла об относительной бесполезности ручных настроек SSD в Windows 10. Однако есть некоторые нюансы, в равной степени применимые ко всем маркам твердотельных накопителей и версиям ОС:
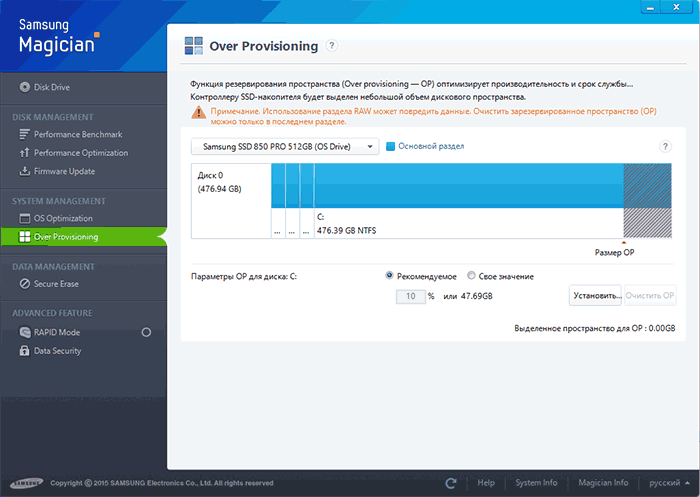
- Для улучшения характеристик и срока службы SSD полезно иметь на нем около 10-15 процентов свободного места. Связано это с особенностями хранения информации на твердотельных накопителях. Все утилиты производителей (Samsung, Intel, OCZ и др.) для настройки SSD имеют опцию выделения этого места «Over Provisioning». При использовании функции, на диске создается скрытый пустой раздел, который как раз и обеспечивает наличие свободного пространства в нужном количестве.

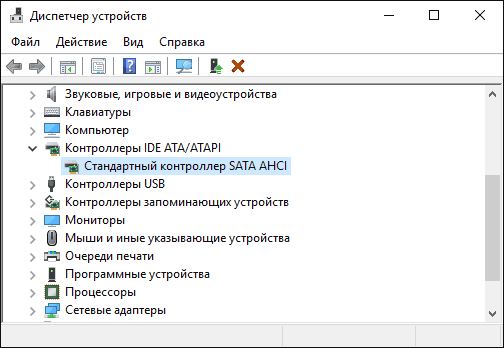
- Убедитесь, что ваш SSD работает в режиме AHCI. В режиме IDE часть функций, влияющих на производительность и срок службы не работают. См. Как включить режим AHCI в Windows 10. Посмотреть текущий режим работы можно в диспетчере устройств.

- Не критично, но: при установке SSD на ПК рекомендуется подключать его к портам SATA 3 6 Гб/сек, не использующих сторонних чипов. На многих материнских платах присутствуют SATA-порты чипсета (Intel или AMD) и дополнительные порты на сторонних контроллерах. Подключать лучше к первым. Информацию о том, какие из портов являются «родными» можно найти в документах к материнской плате, по нумерации (подписи на плате) они являются первыми и обычно отличаются по цвету.
- Иногда заглядывайте на сайт производителя вашего накопителя или используйте фирменную программу для проверки обновления прошивки SSD. В некоторых случаях новые прошивки заметно (в лучшую сторону) сказываются на работе накопителя.
Пожалуй, пока все. Общий итог статьи: ничего делать с твердотельным накопителем в Windows 10 в общем-то не нужно без явной на то необходимости. Если вы только что приобрели SSD, то возможно вам будет интересна и полезна инструкция Как перенести Windows с HDD на SSD. Однако, более уместной в данном случае, на мой взгляд, будет чистая установка системы.
When solid-state drives (SSDs) first went mainstream in the PC market, they offered a significant improvement in performance over legacy hard disk drives (HDDs). Over the years, they have become the default choice for primary storage on consumer laptops and desktops, so we all enjoy the benefits of fast transfer speeds and silent operation.
However, as with nearly all the major components inside our computers, there are ways to ensure you’re getting optimal SSD performance and the fastest load speeds overall. Here are our favorites.
Adjust Your Power Plan
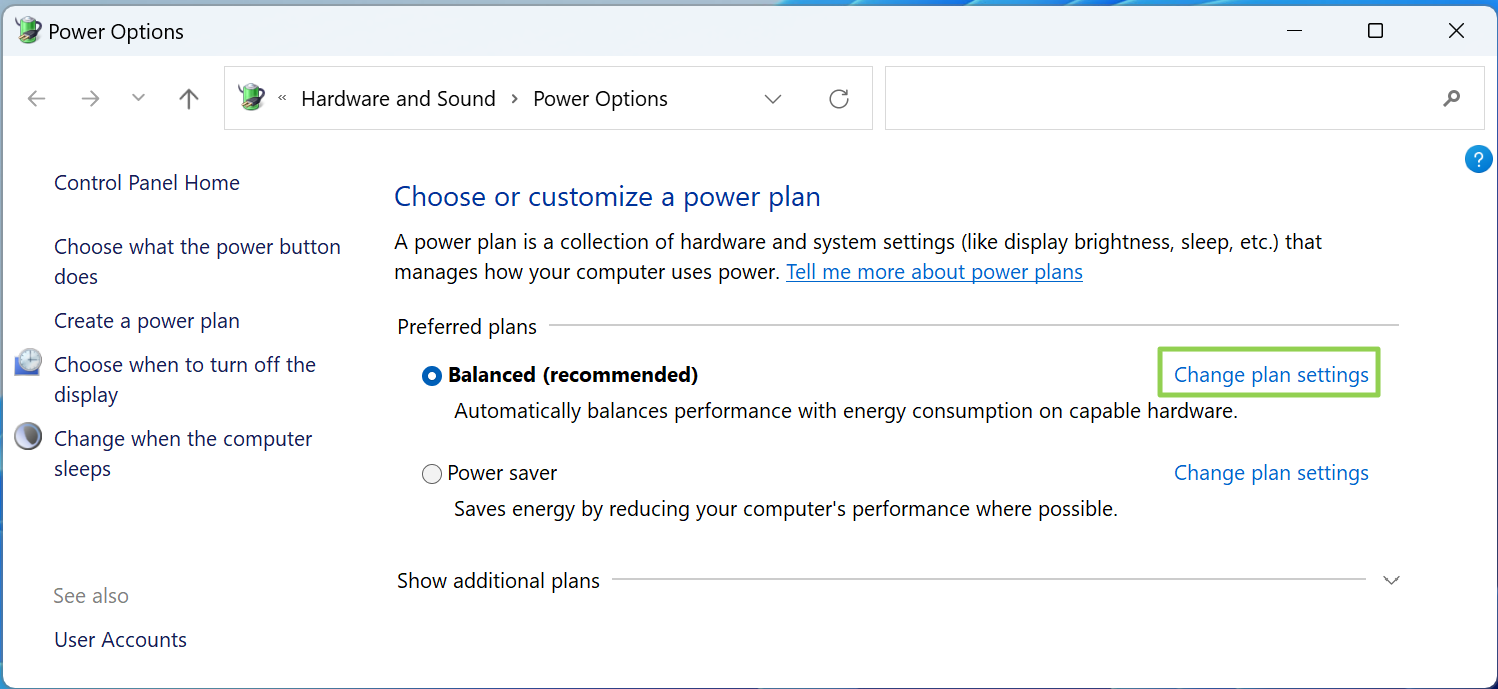
1. Type «Choose a power plan» into the search box and click the top result.
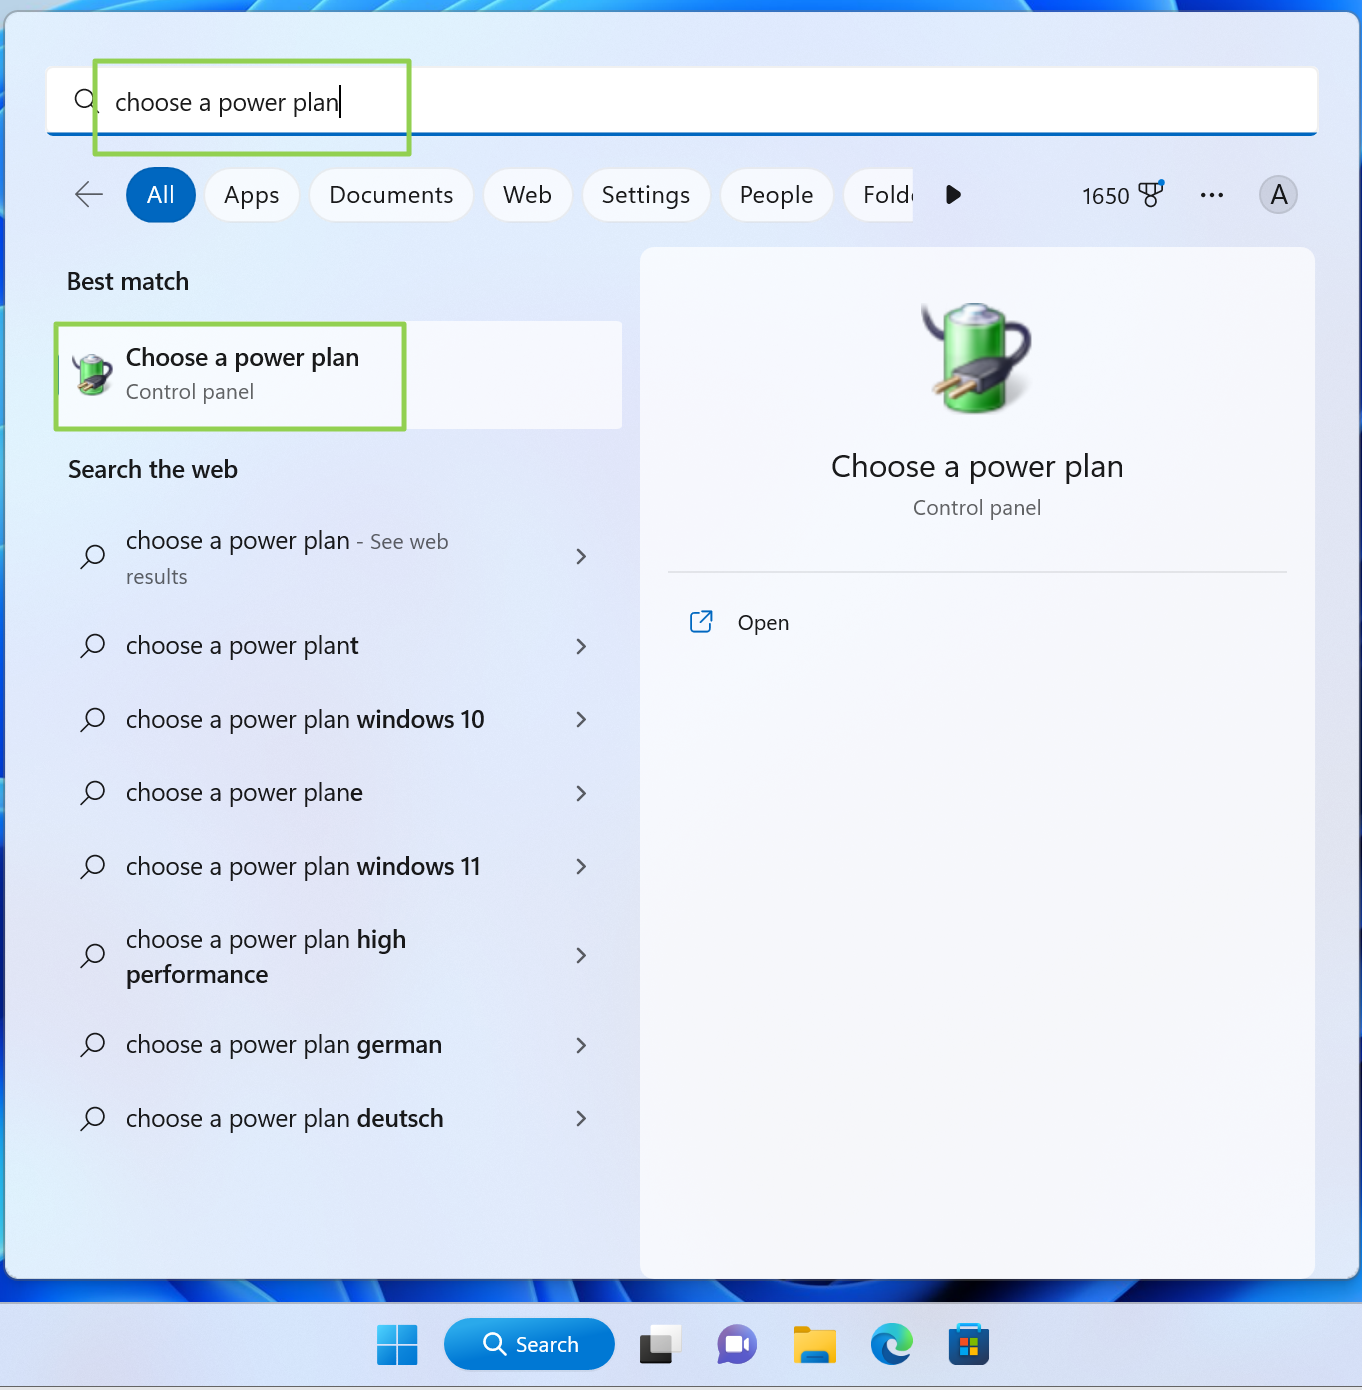
2. Click «Change plan settings» beside your chosen power plan.
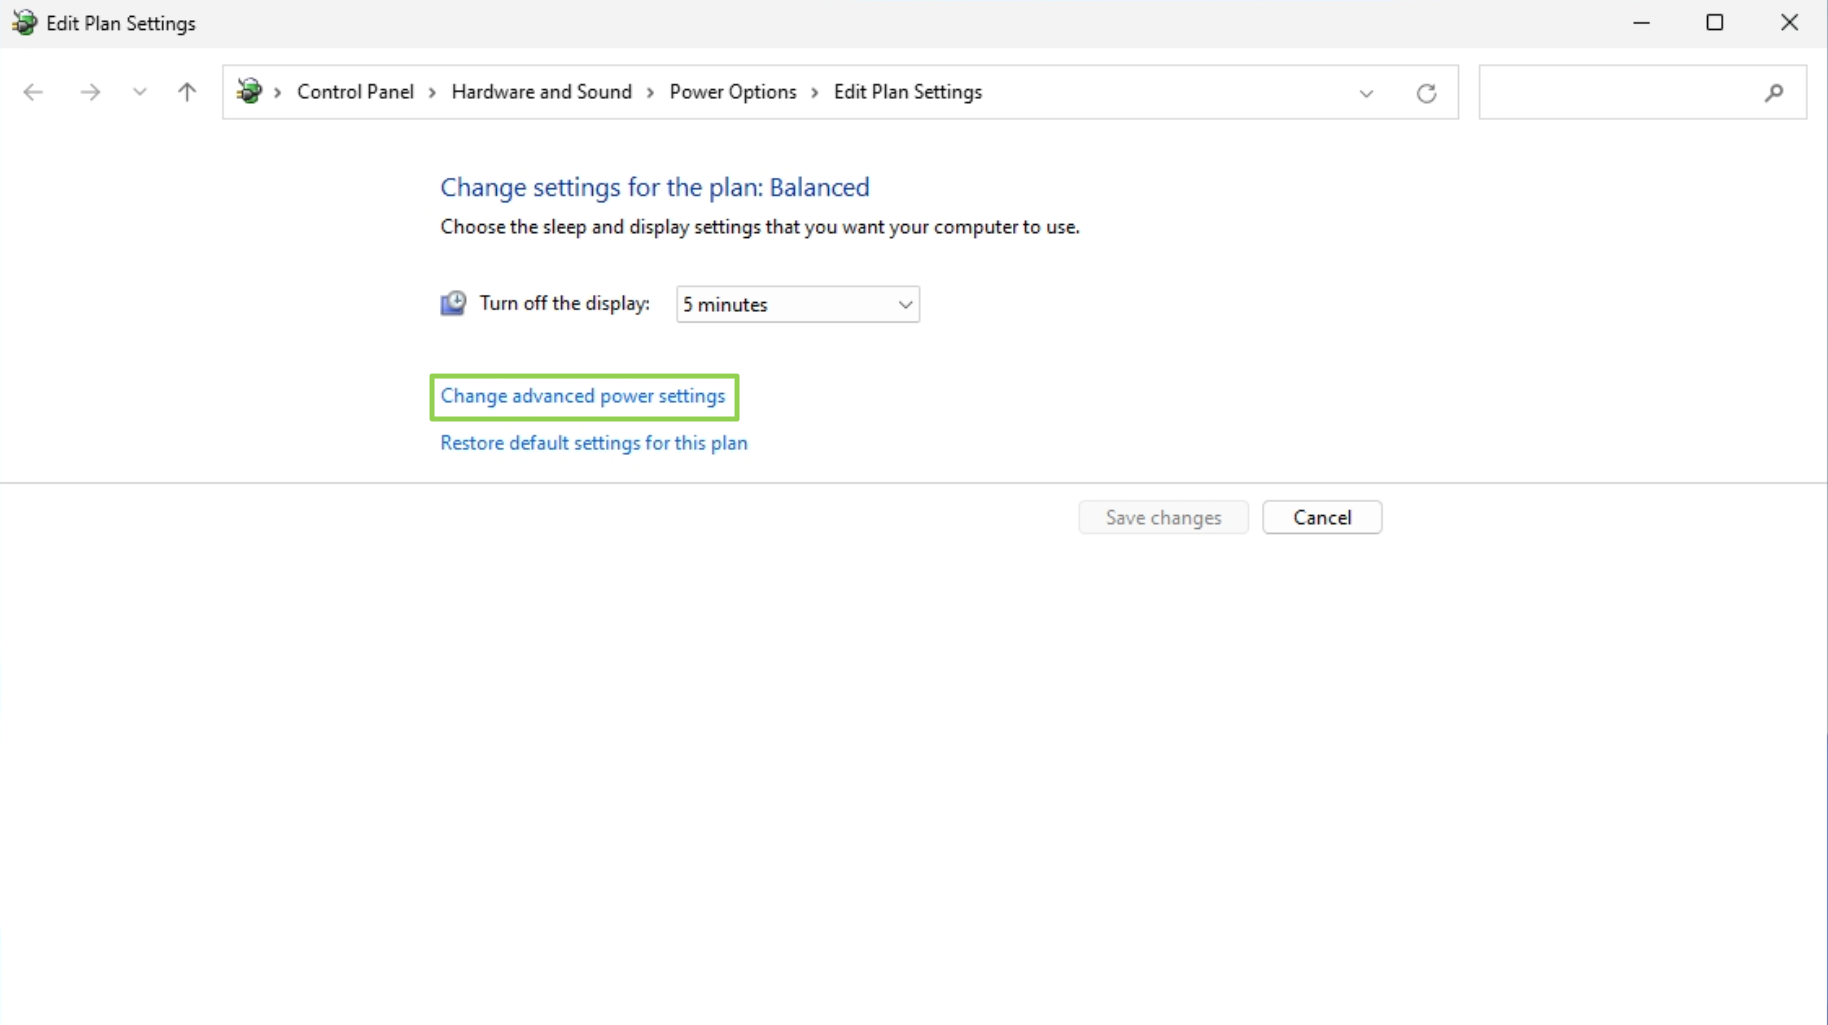
3. Click «Change advanced power settings»
4. Set «Turn hard disk after» to zero.
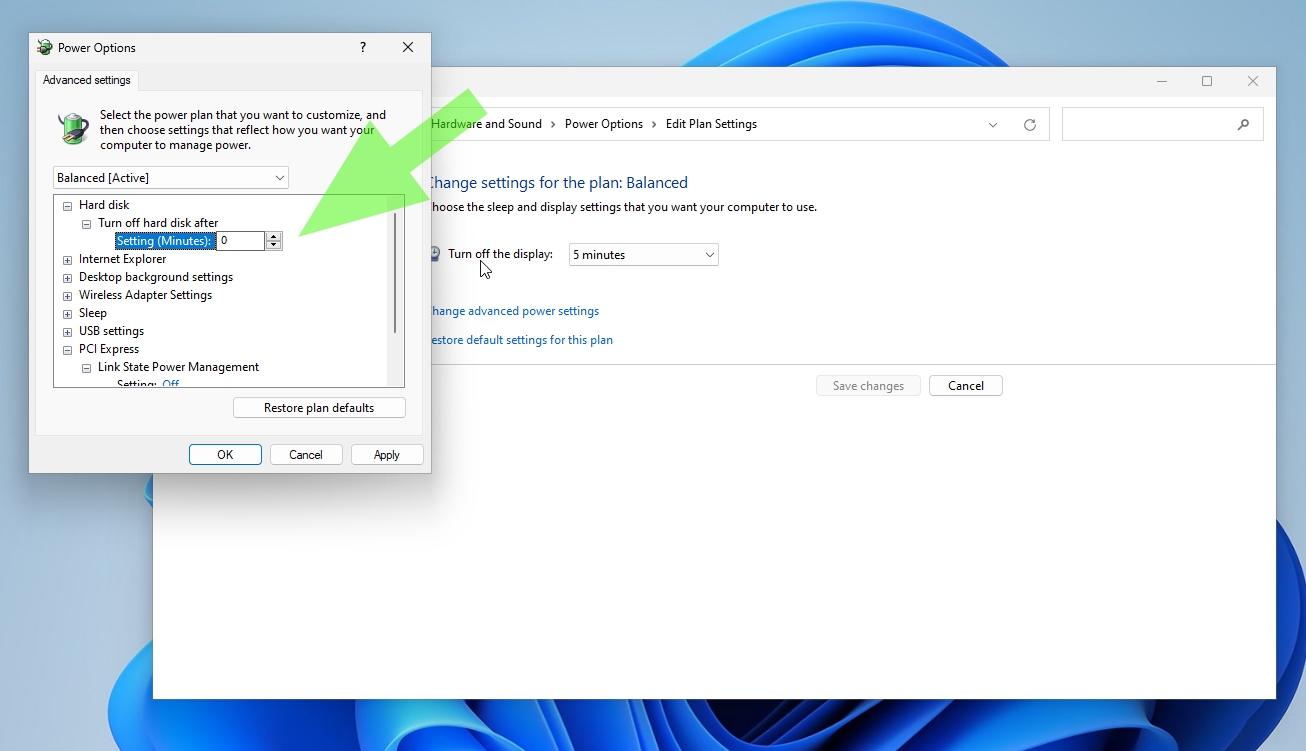
This setting prevents your SSD from going to sleep, which saves you from having to wait an extra second or two for it to wake up.
Get Tom’s Hardware’s best news and in-depth reviews, straight to your inbox.
5. Change the setting from «Maximum power savings to «Off» under PCI Express and Link State Power Management.
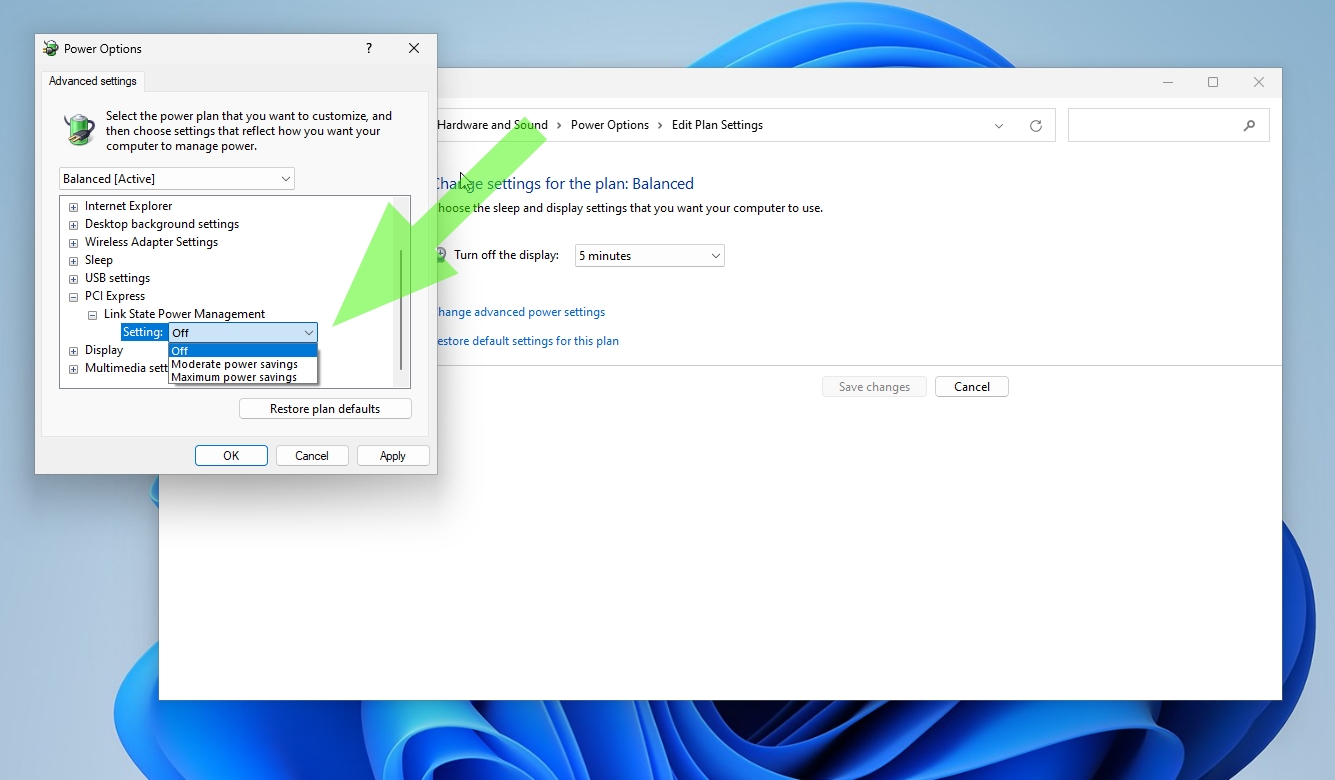
This setting will prevent the PCIe bus from downclocking, which robs a bit of performance from your SSD. The PC consumes more power when the setting is off but it minimizes latency. If you’re a desktop PC user, you’re probably safe turning this setting off and reaping the performance benefits. The «Moderate» setting is likely a good balance between power savings and performance for laptop users.
Enable Write Caching
1. Type «Device Manager» into the search box and launch the utility
2. Scroll down to Disk drives, right-click on your SSD, and select Properties.

3. Select the «Policies» tab and make sure that write caching is enabled.
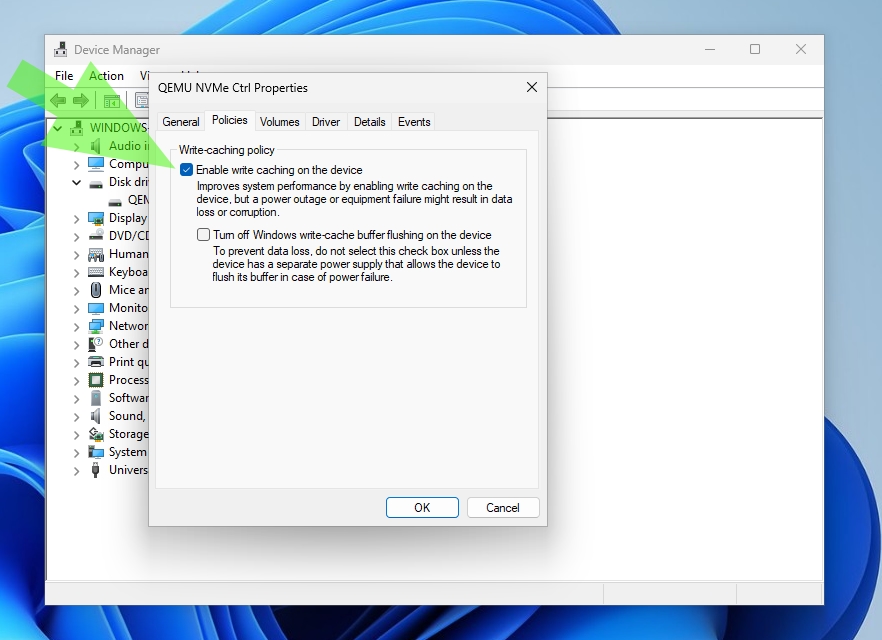
Windows warns that enabling this feature could result in data loss during a power outage, but the speed at which SSDs operate makes this possibility extremely remote. In addition, this warning mainly applies to older, slower HDDs. However, proceed with caution if you are uncomfortable with enabling this feature.
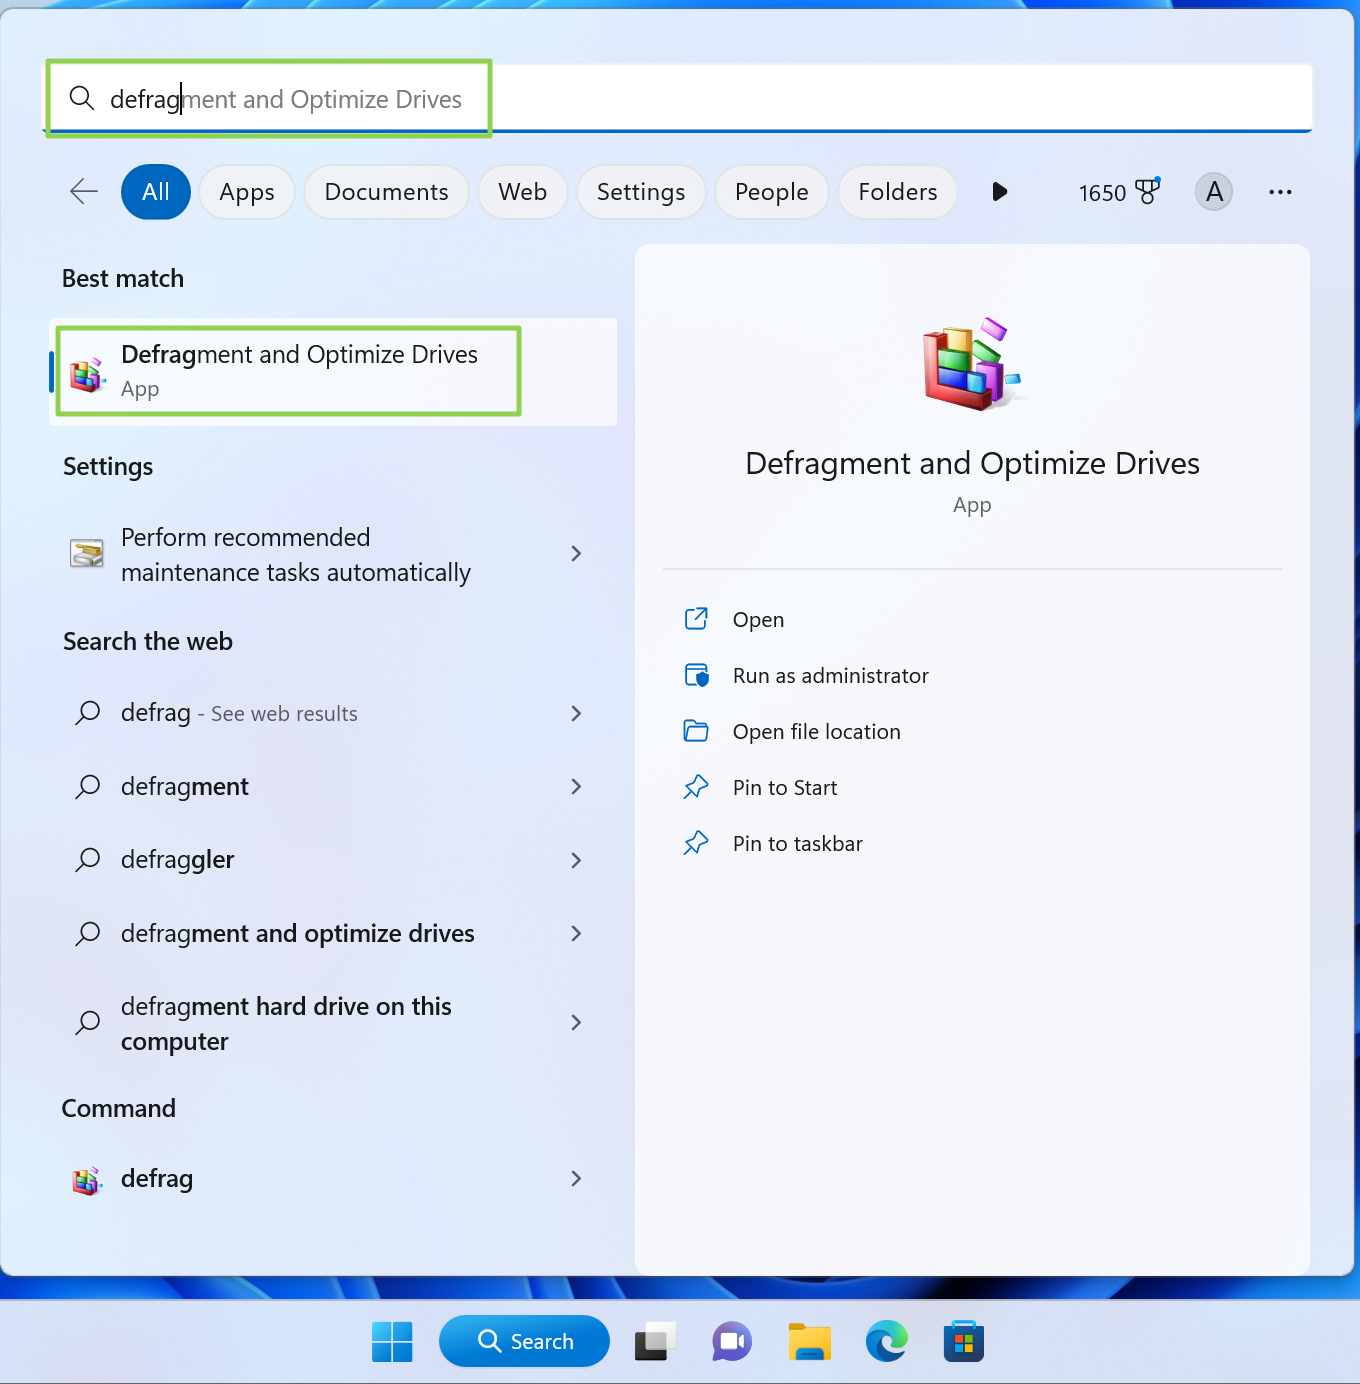
Optimize Your SSD on a Schedule
SSDs operate differently than HDDs, as their outright speed makes traditional defragging an unnecessary operation. However, when files are deleted from an SSD, a trim function is necessary to mark those blocks for future use. That’s where the Defragment and Optimize utility comes into play.
1. Search for “Defrag” and click Defragment and Optimize.
2. Click the Change settings button
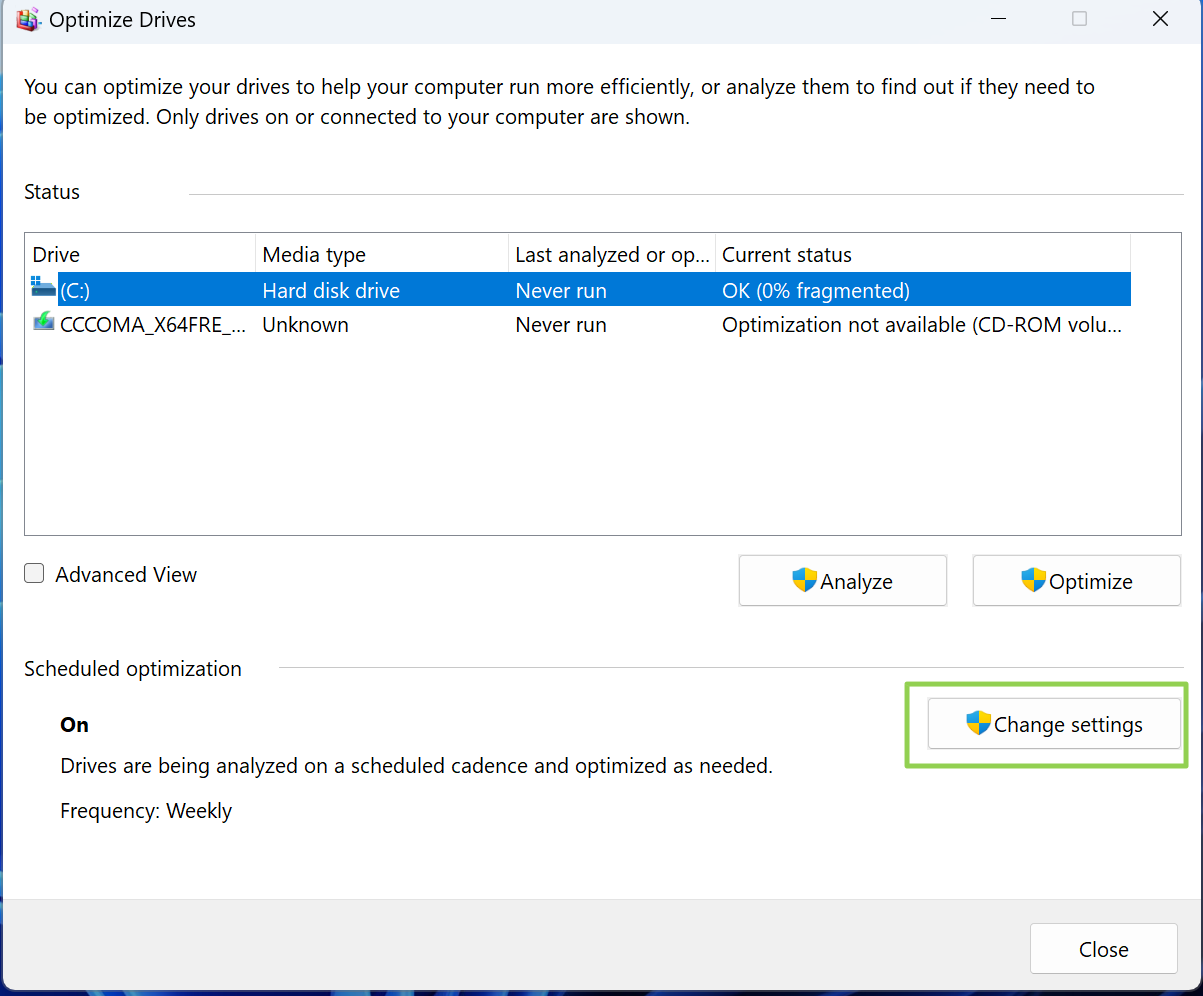
3. Set how often you want Windows 11 to optimize your SSD. By default, Windows 11 chooses “Weekly,” but you can set the utility to optimize daily or (not recommended
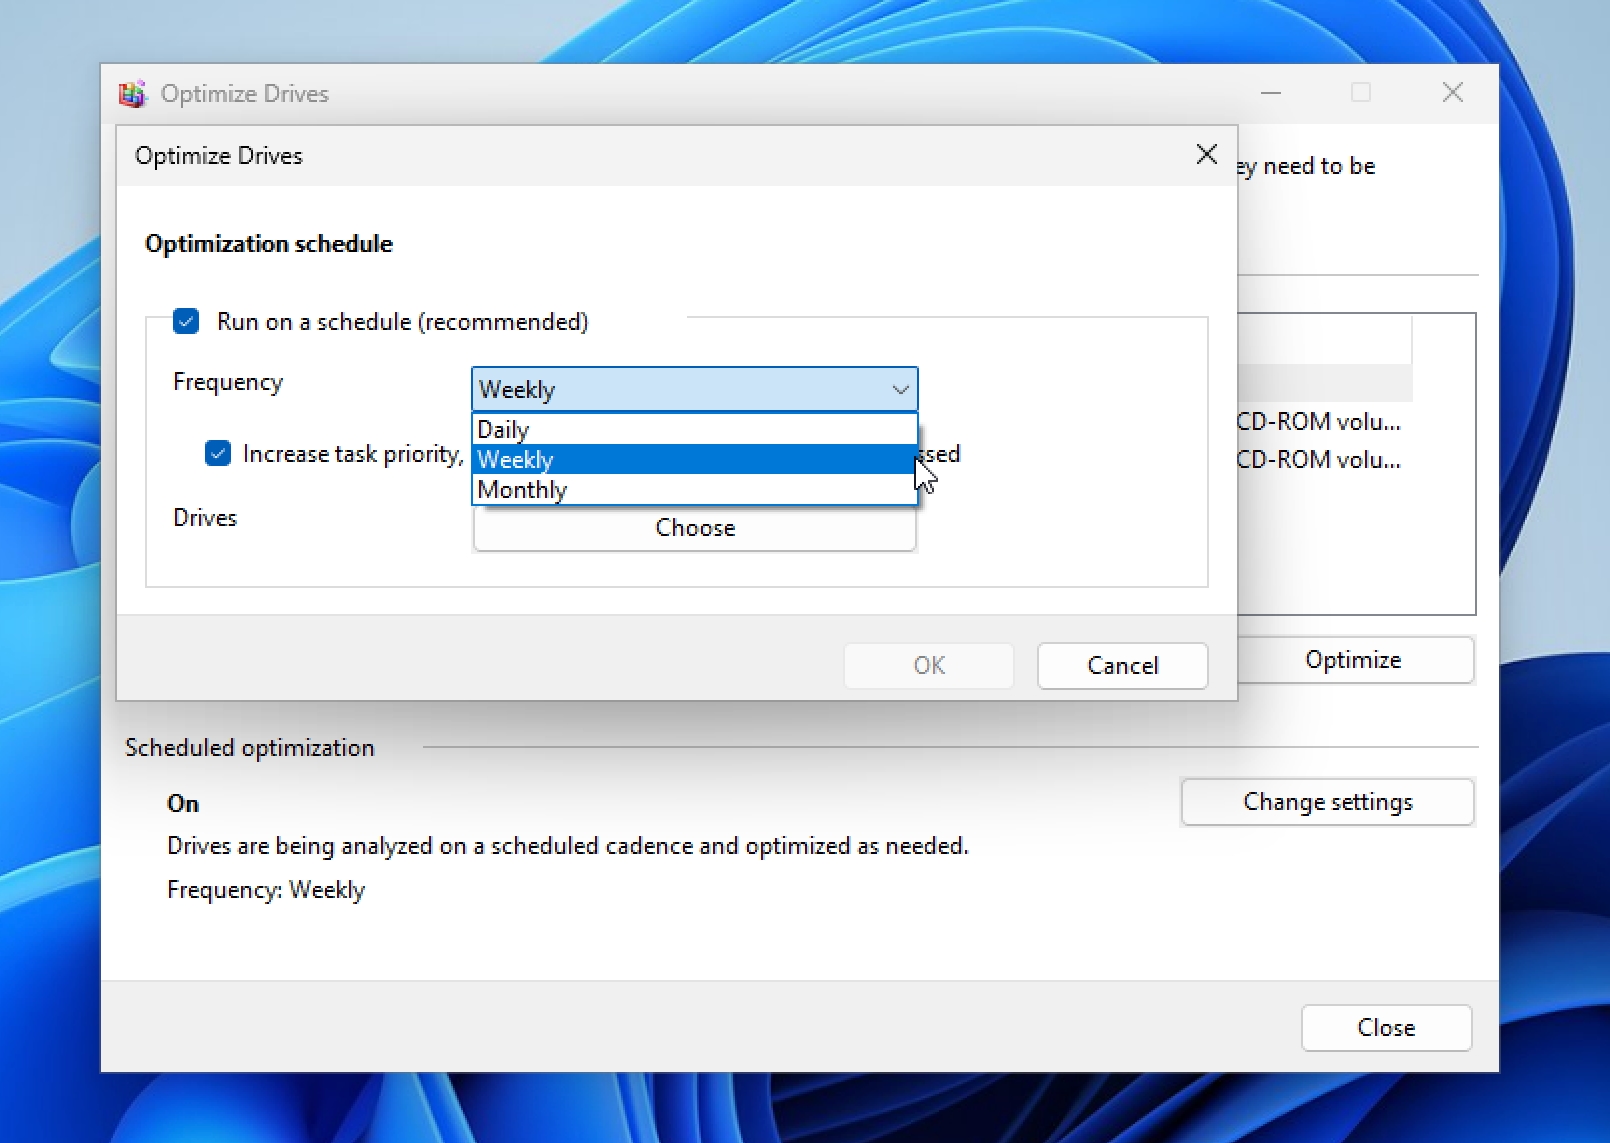
When Windows “optimizes” an SSD, it retrims the blocks, informing the drive which areas should be considered empty and ready to write new data to. An SSD that contains many untrimmed blocks can lead to reduced overall performance, making such weekly (or daily) maintenance regimens a good idea.
Disable the Windows Search Indexer
Windows 11 includes the Search Indexer using a process called SearchIndexer.exe running in the background. The Search Indexer is constantly analyzing files and media on your computer so that the results are available nearly instantaneously when you perform a search. However, this process also consumes CPU and RAM cycles, which is unnecessary when your SSD is fast enough to find the files without an index.
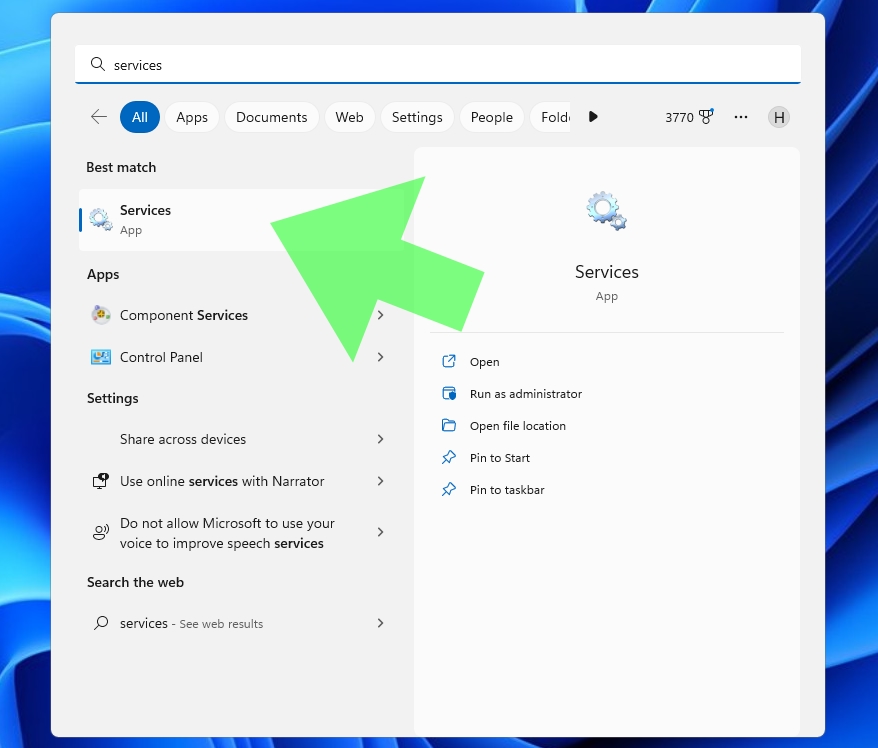
1. Search for “services” to bring up the Services app.
2. Double click on the Windows Search service to open it.
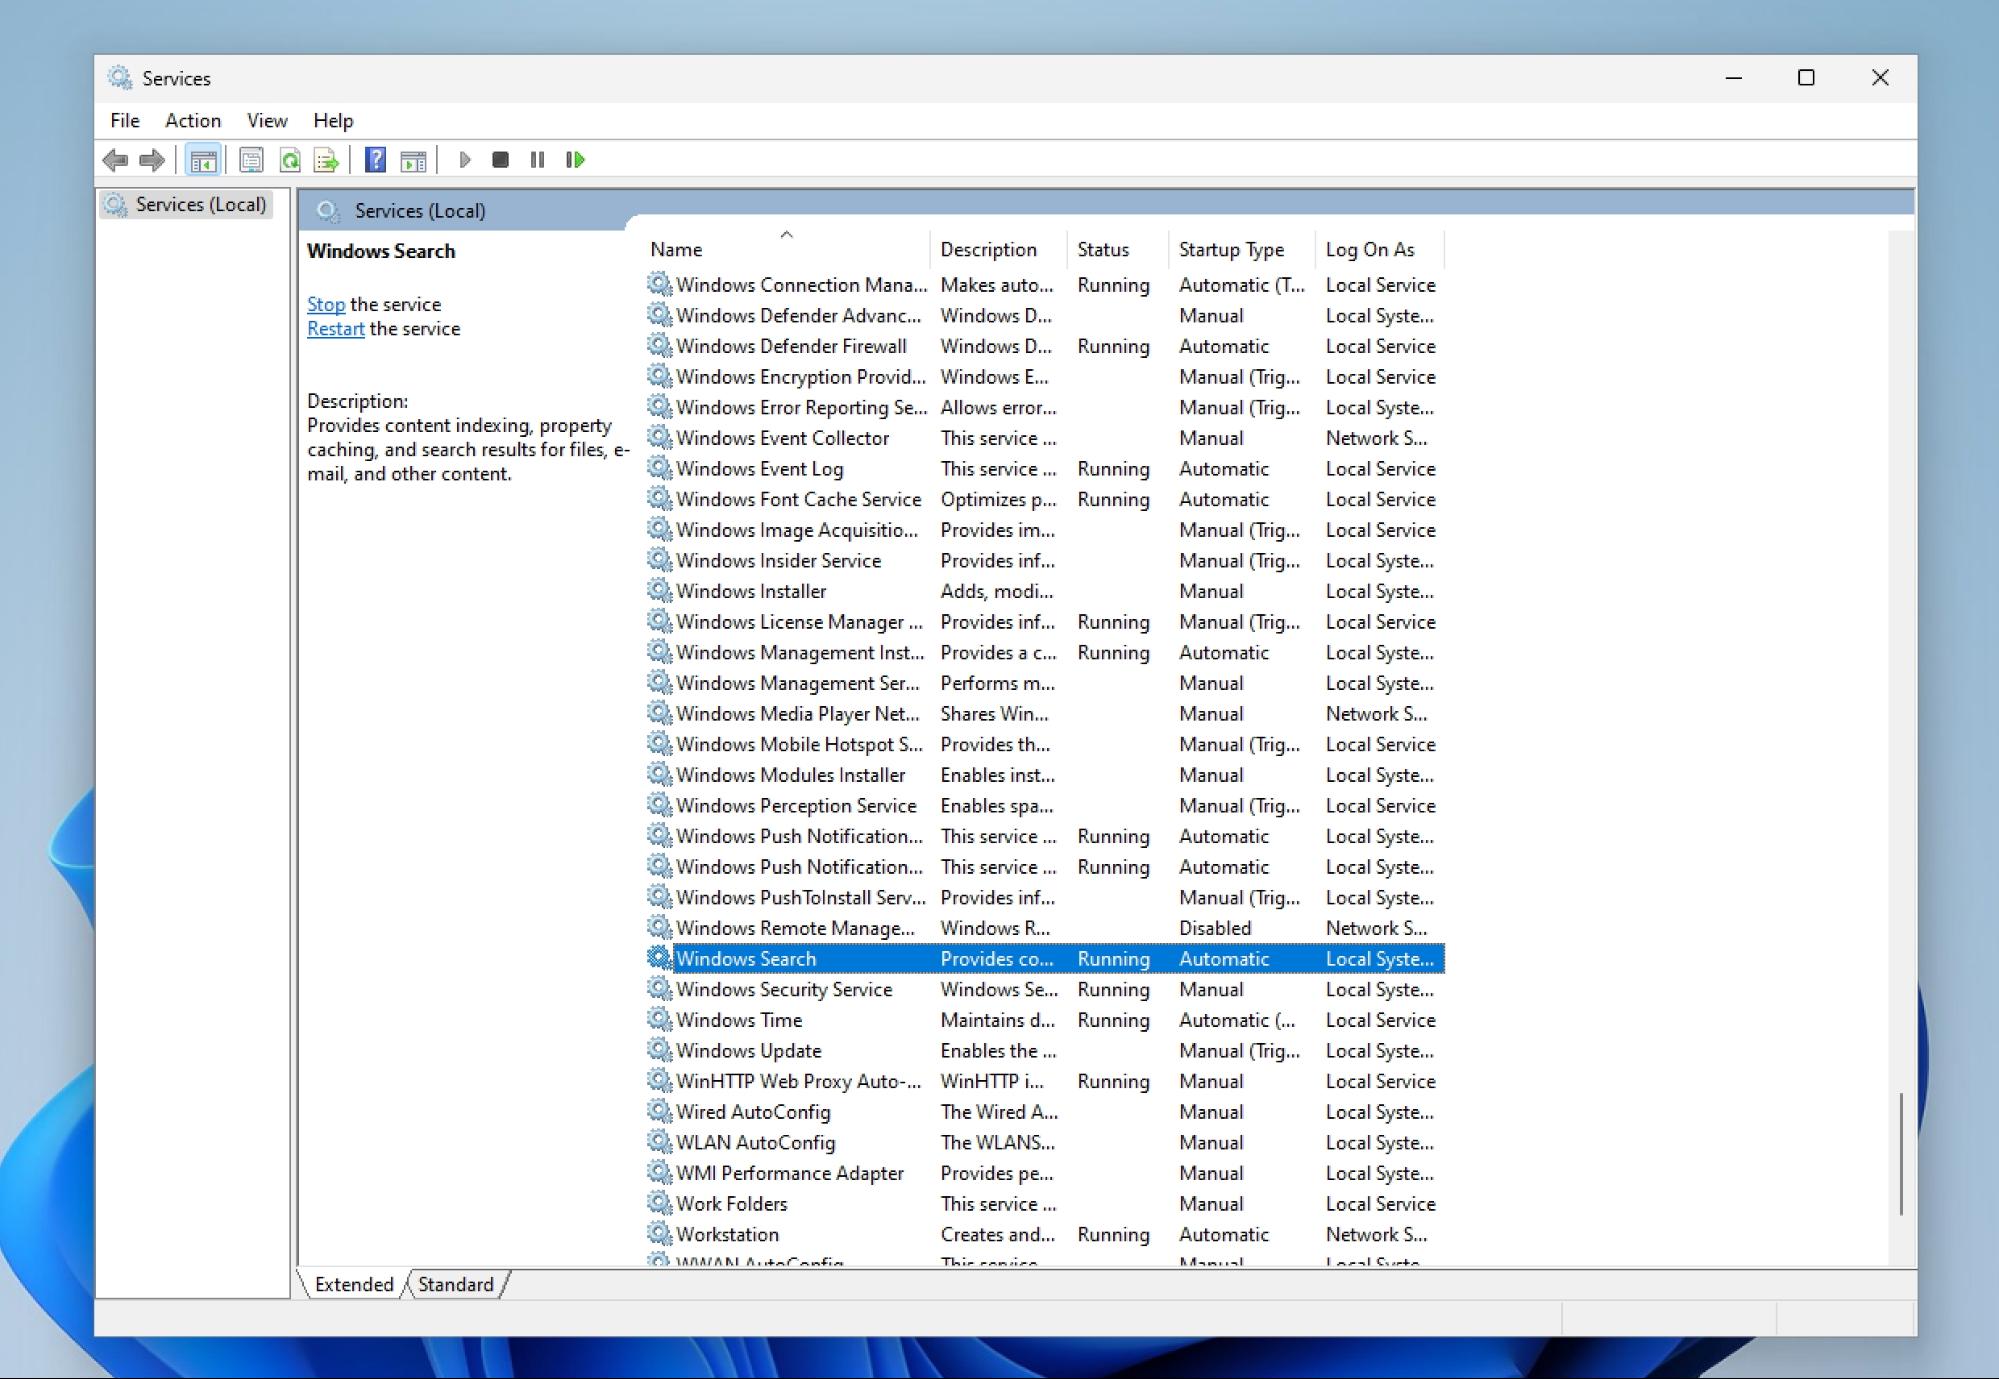
3. The Service status will likely show as Running, so you can click the Stop button to end it immediately.
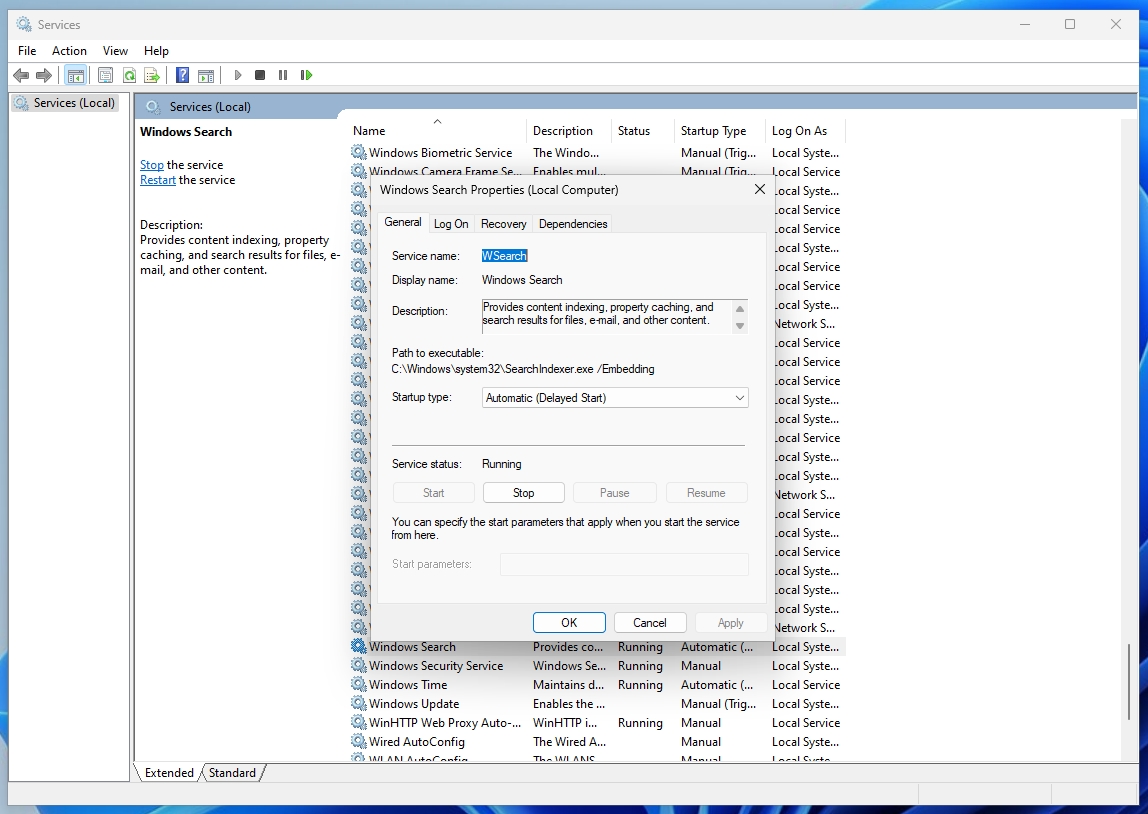
4. Select Disabled Under Startup type and click Apply to prevent it from running on each subsequent boot into Windows.
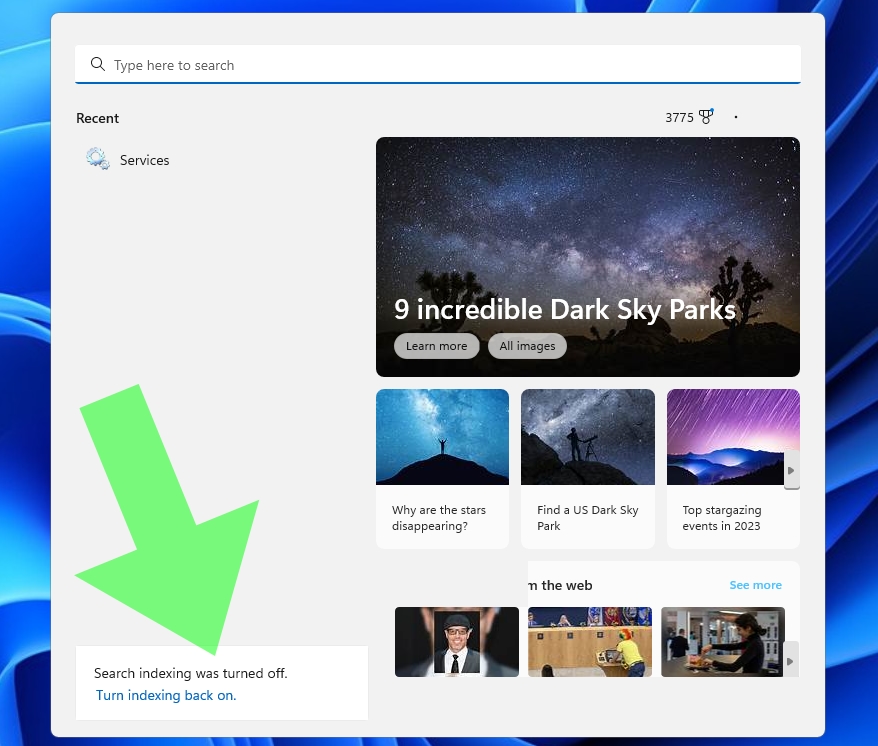
You’ll now notice that when you perform a search, a little warning message in the bottom left corner of the window stating, “Search indexing was turned off,” and it gives you the option to turn it back on.
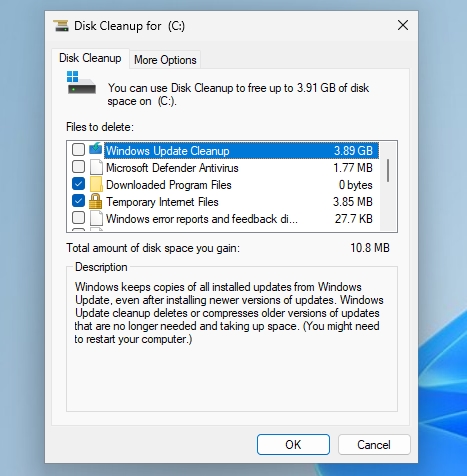
The Disk Cleanup tool scans your system to uncover unnecessary files that can be safely deleted. SSDs tend to slow down in performance as they fill up, so ensuring that you “take out the trash” is an excellent way to maintain your drive’s health.
1. Search for “disk cleanup” to open the utility
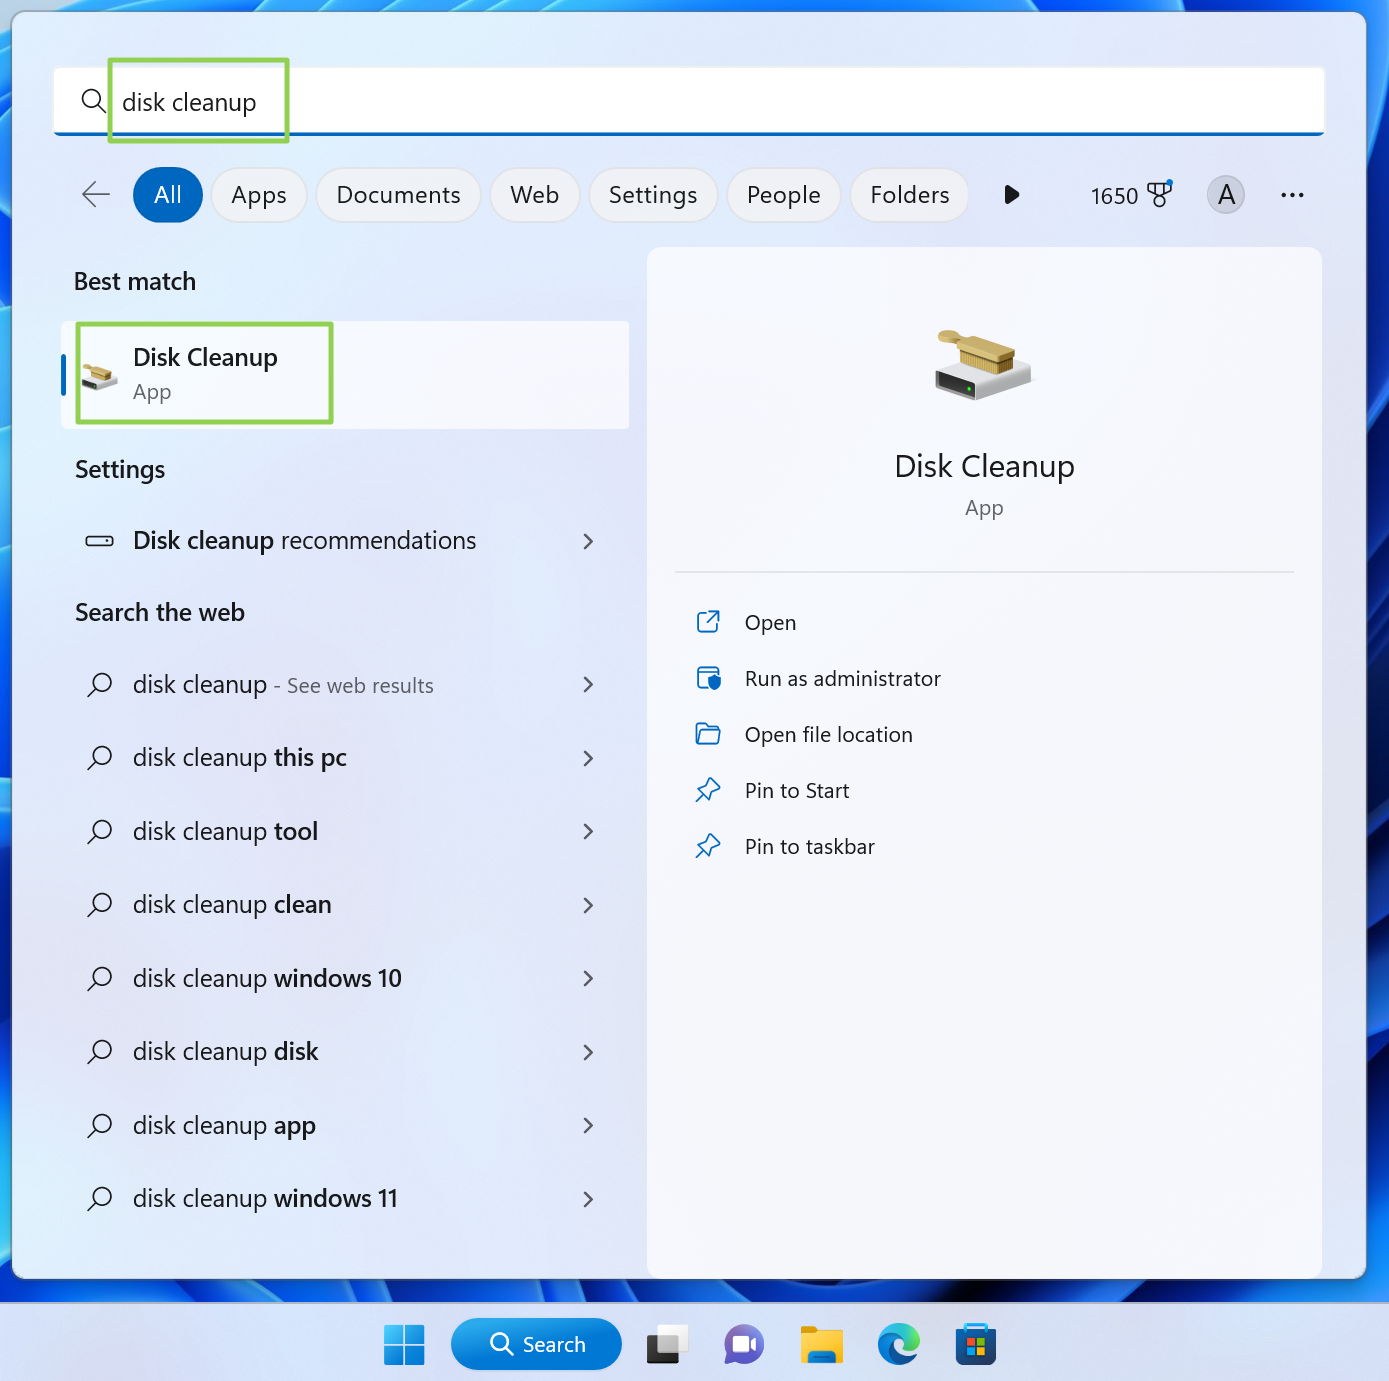
2. Click Clean up system files. The system will include all the types of data you can clean up after a brief scan.
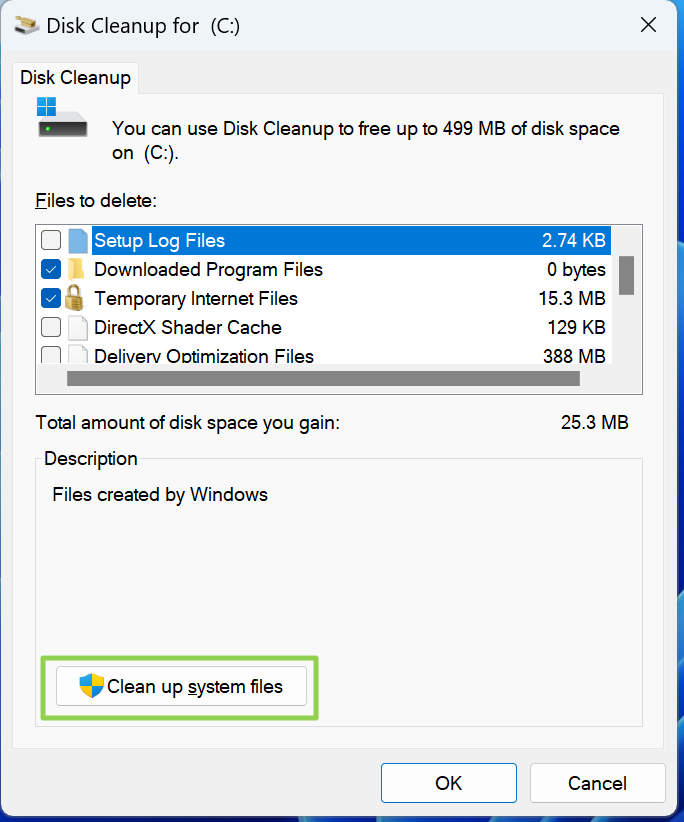
3. Choose data types to delete, including Windows Update files, Temporary Internet Files, device driver packages, and your Recycle Bin. The screenshot above shows that I have nearly 4GB that can be recovered by performing a Windows Update Cleanup.
Disable Hibernation (on desktop PCs)
Hibernation is beneficial for laptops, as it saves your current computer state without consuming power. While this is great for a laptop running on battery power, desktop PCs are always plugged in and don’t necessarily require this feature.
The hibernation file consumes a significant chunk of SSD space (40 percent of your installed RAM by default). Unless you have a ton of free space on your SSD, you can disable the hibernation file and get back several GB.
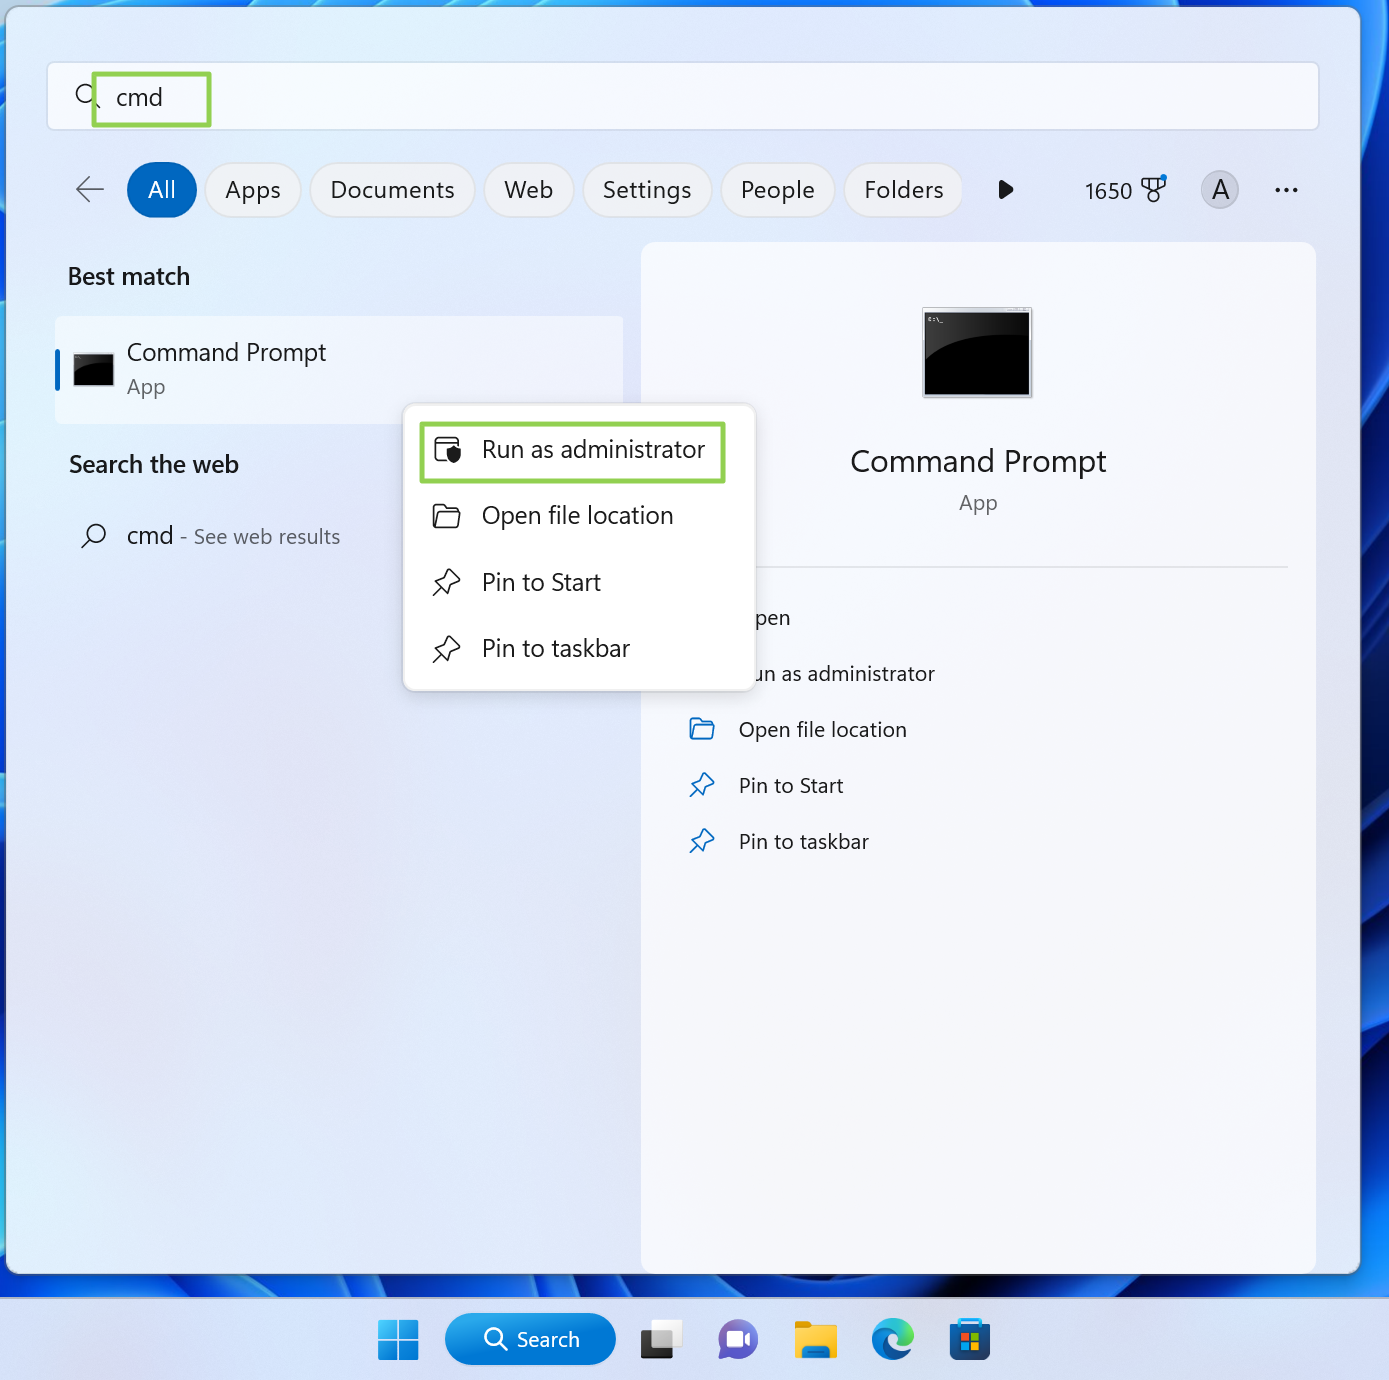
1. Open the Windows Command Prompt as an Administrator. You can do it by searching for “cmd,” right clicking and selecting “Run as administrator.”
2. Type «powercfg -h off» without the quotes and press Enter.
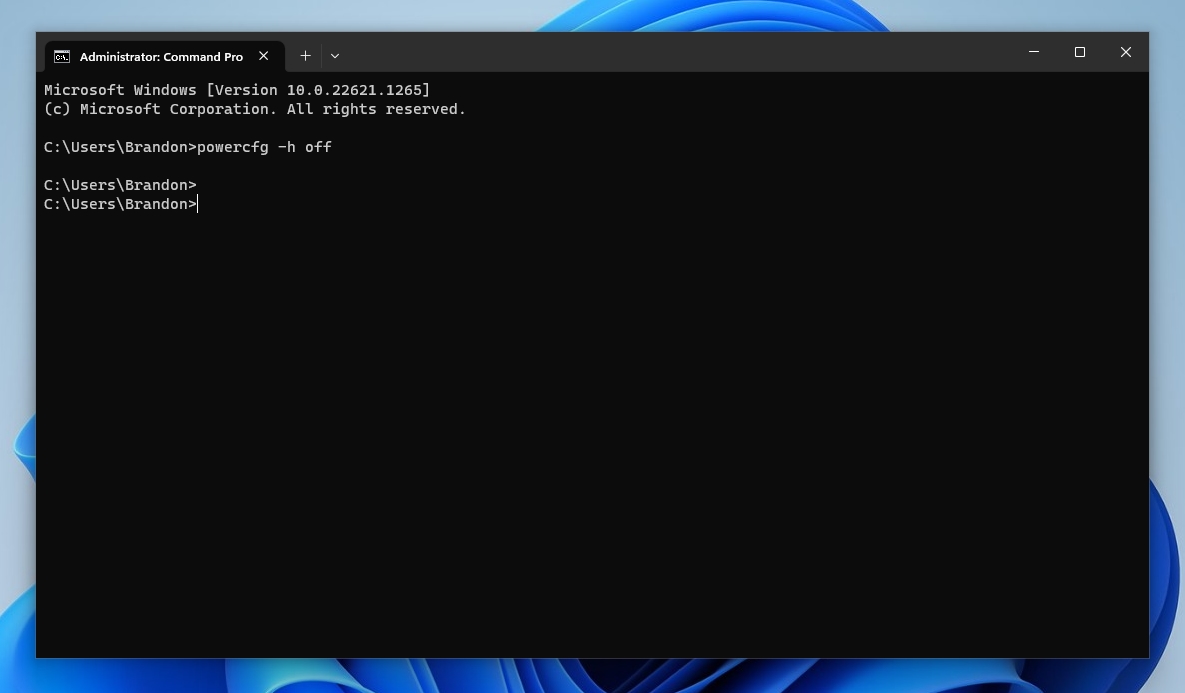
This will disable the hibernation file if it is currently enabled on your system.
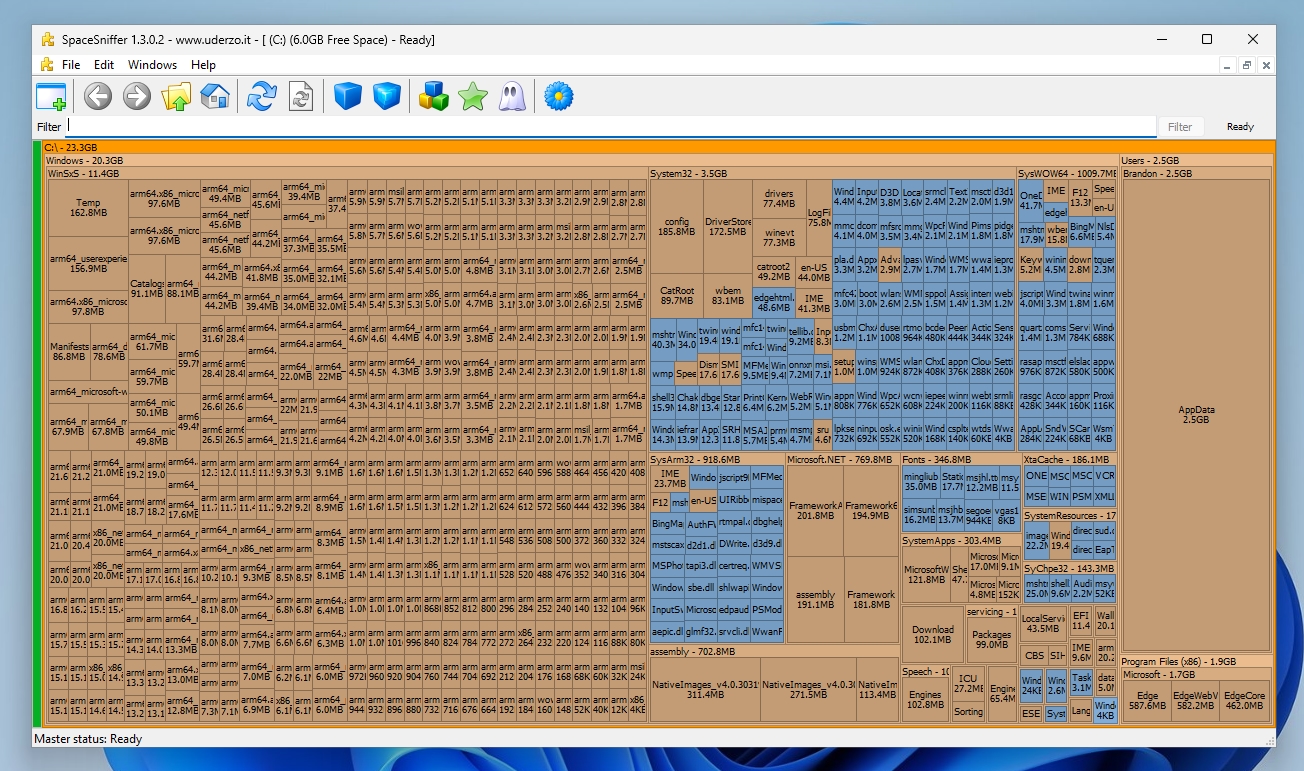
Use SpaceSniffer to free up space
SSDs tend to lose performance as they fill up with large amounts of data. One way to keep your SSD in tip-top shape is to remove large, unnecessary files from the drive.
Apps like SpaceSniffer will scan your SSD and give you an easy-to-decipher map that shows which files are taking up the most space. You can get detailed information on the files, find their exact file path and even delete them right from the app if you desire.
Install the Latest Firmware Update for Your SSD
Although SSD firmware updates don’t typically arrive regularly like graphics card drivers, they can sometimes provide performance updates or squash existing bugs. One notable example is the 5B2QGXA7 firmware for Samsung 980 Pro SSDs. The 5B2QGXA7 firmware resolves an issue where a 980 Pro’s health status could rapidly deteriorate, eventually leading to an SSD that reverts to read-only mode (rendering the SSD unusable).
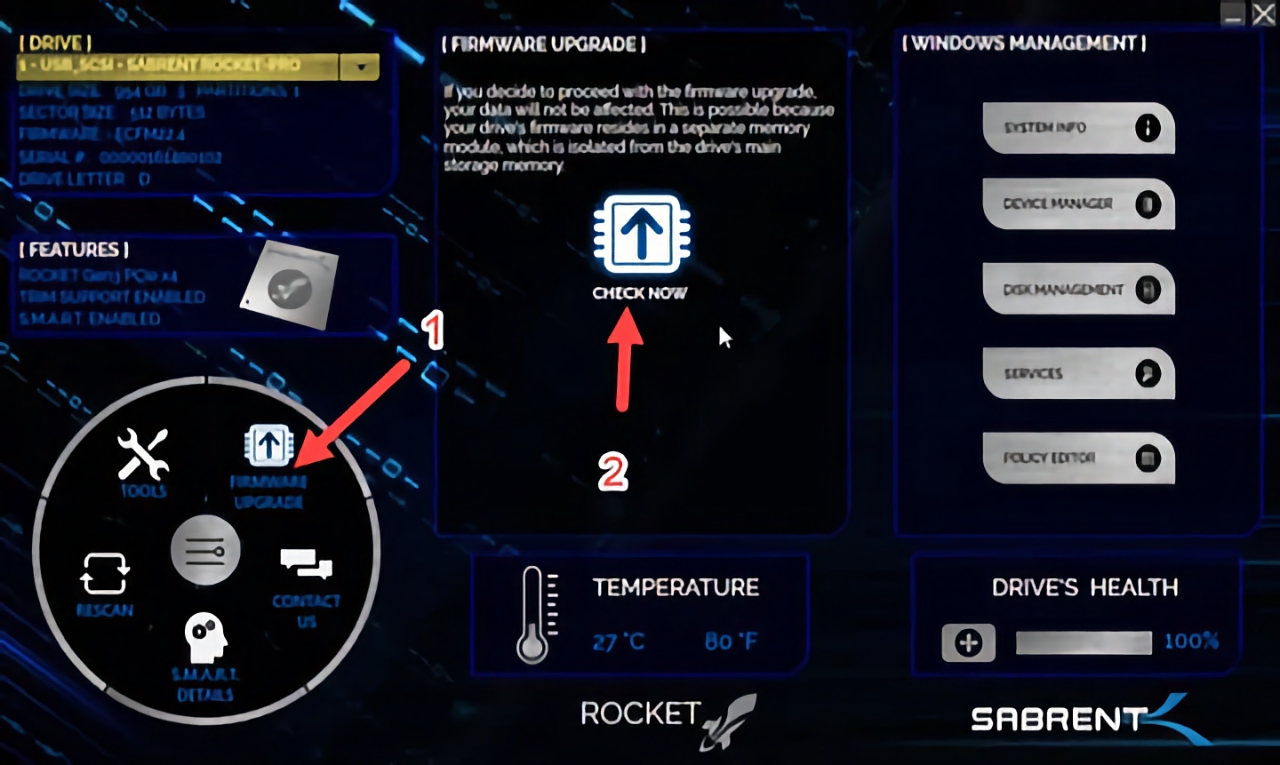
Some companies like Samsung and Western Digital provide easy-to-use utilities that allow you to update the firmware on the SSD. For Samsung SSDs, you can download the Samsung Magician app, while Western Digital has the Western Digital Dashboard. Another example is the Sabrent Rocket Panel for that manufacturer’s SSDs. If your SSD maker doesn’t provide an all-encompassing GUI, you can go to their support page to download and apply firmware updates manually.
You are here:
Home » Freeware » 10 Free Tools To Tweak And Optimize SSD On Windows 10
There are plenty of users who have installed Windows OS on SSD. A friend of mine recently asked me to suggest a good SSD optimization software for Windows operating system. As I am primarily using HDDs on my desktop and laptops, I decided to search the web for good free SSD optimization tools.
A quick web search revealed that almost every SSD manufacturer offers free tool to manage and optimize solid state drive. Although these official tools don’t support SSDs from other manufacturers, they include plenty of options optimize SSD as well as Windows operating for optimal performance. For instance, the Samsung SSD Magician offers more features and options to optimize SSD and Windows OS than any other third-party paid software.
In no particular order, following are the free tools available to manage and optimize SSDs on Windows 7, Windows 8.1 and Windows 10.
Corsair SSD Toolbox
As the name indicates, Corsair SSD Toolbox helps you manage and optimize solid state drives by Corsair. With the Toolbox, you can view the real-time temperature, model and serial number of installed SSD(s).

Additionally, the tool can be used to update SSD firmware as well. Visit the following page to download the newest version of Corsair SSD Toolbox for Windows.
Download Corsair SSD Toolbox
Intel SSD Toolbox
SSD Toolbox by Intel can be used to view drive information (model number, serial number), estimated drive life remaining, optimize the performance, update the firmware, and tune Windows operating system for optimal SSD performance.

Download Intel SSD Toolbox
Crucial Storage Executive Tool
Crucial Storage Executive tool is designed to help Crucial SSD users update their SSD to latest firmware, reset the drive’s encryption password, and view overall health of the drive.
The tool is compatible with Crucial M500, M550, MX100, MX200, and BX100 SSDs installed on PC’s running Windows 7, Windows 8/8.1 and Windows 10.
Download Crucial Storage Executive Tool
Samsung SSD Magician
This tool is probably the best in the lot but is compatible with a handful of Samsung SSD models only. It supports Samsung SSD 840, 830, 840 EVO, 840 PRO, and 470 series only.

The OS optimization tool allows you optimize the SSD for maximum performance, maximum capacity and maximum reliability. The user interface of the software is also easy-to-navigate and use.
Download Samsung SSD Magician
SanDisk SSD Dashboard
Just like other tools, SanDisk SSD Dashboard allows you view model and serial number of the drive, update the firmware version, and view current condition of drive health and fastest speed supported by the drive.

The tool also shows performance graphs and allows you run the TRIM command to free up some space on the drive. SanDisk SSD Dashboard tool also allows you create bootable USB of the software to update the firmware without booting into Windows.
Download SanDisk SSD Dashboard
Transcend SSD Scope
Apart from getting detailed SSD information, you can use SSD Scope to update the firmware, securely erase SSD, perform diagnostic scan, enable TRIM, view SSD health and clone feature to move Windows operating system as well as data from an old drive to new one.

Download Transcend SSD Scope
Toshiba SSD Utilities
As with the case of other tools in its class, Toshiba SSD Utilities supports SSDs manufactured only by Toshiba. SSD Utilities is useful to view drive information, improve the performance, update drive firmware, and securely erase the drive.
Download Toshiba SSD Utilities
ADATA SSD Toolbox
Users who are using SSD(s) from ADATA can use this SSD Toolbox to view drive information, optimize the drive, update the firmware, diagnose, and securely erase the drive. Full list of supported SSDs can be found on the download page.

Download ADATA SSD Toolbox
SSD Tweaker Free
Although the free version of SSD Tweaker offers very less options and settings, you can use the same to optimize Windows prefetcher, indexing service, disable date stamping, and boot tracing.

Download SSD Tweaker Free
Kingston SSD Toolbox
SSD Toolbox from Kingston allows you monitor drive health, update drive firmware, erase data securely, and view drive information data.
The tool supports sandforce-based Kinston SSDs installed in AHCI mode.
Download Kingston SSD Toolbox