
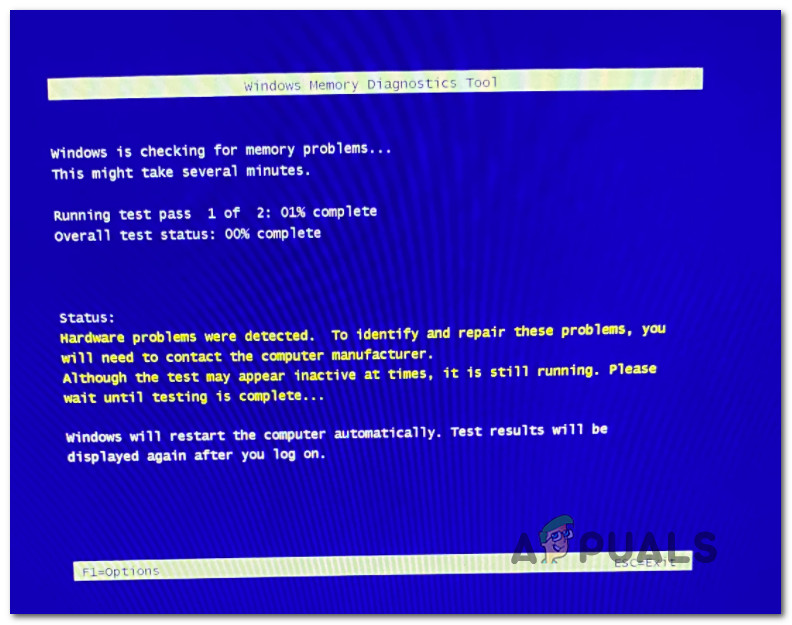
From hardware troubleshooters to command prompt-based utilities, Microsoft provides a bundle of features in Windows OS to fix various issues. One such ingenious tool is the Windows Memory Diagnostic tool, which detects various memory-related problems and fixes them.
Out of the long list of memory issues the tool can address, there is a common error message, ‘Hardware problems were detected’ that users encounter sometimes. This error can occur due to a bad RAM module or other problems like corrupted system files, overclocked components, etc. Let’s read further to understand more about this error message.
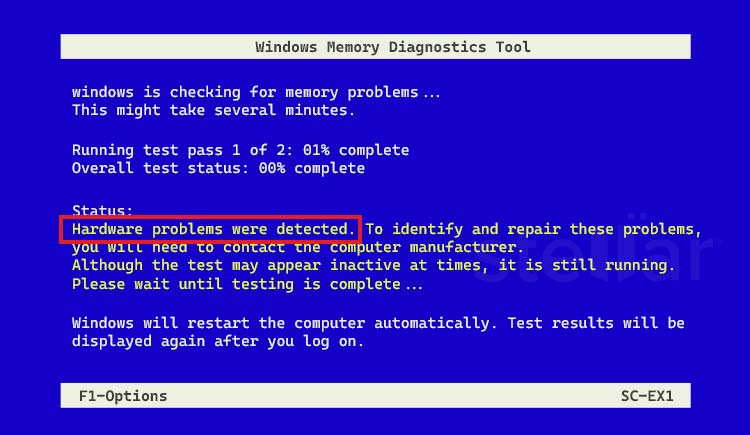
While running the Windows memory diagnostic tool, if a memory-related issue is encountered, your system shows the ‘hardware problems were detected’ error message. The error message usually indicates a bad or damaged memory module. Other reasons behind this error message could be –
- Corrupted drivers
- Corrupted system files
- Overclocking causing overheating
- Failing hardware like PSU or Motherboard
Methods to Fix the ‘Hardware Problems Were Detected’ Error Message
The Windows Memory Diagnostic ‘hardware problems were detected’ error message is an annoying issue that hinders our work and in rare cases, prevents us from accessing our data. In this section, we will look at some methods to resolve it.
Quick Fixes –
Before moving on to the methods to get rid of the Windows Memory Diagnostic ‘hardware problems were detected’ error message, let’s look at some quick fixes.
- Check for hardware connections and damage to cables.
- If you have overclocked any components like CPU or GPU, disable the overclocking and return them to their default settings.
- If there are any pending device drivers or OS updates available, install them.
- Now, restart your computer and re-run the Windows Memory Diagnostic tool to see if the error is resolved.
Main Methods –
If the quick fixes mentioned above provide no resolution for the ‘hardware problems were detected’ error, proceed with the methods explained below.
Method 1: Run the Hardware Troubleshooter
The built-in Windows hardware troubleshooter is used to scan for any hardware-related issues. If you can boot your computer while still receiving the ‘hardware problems were detected’ error message, then you can run the Hardware troubleshooter via CMD. For this, you will have to open the command prompt with administrator privileges and then execute the command. Simply follow the steps listed below –
- Open a command prompt (administrator) instance and type the following command – msdt.exe -id DeviceDiagnostic.
- Press Enter to execute the command.
- It will open the hardware and device troubleshooter window. Click on Next.
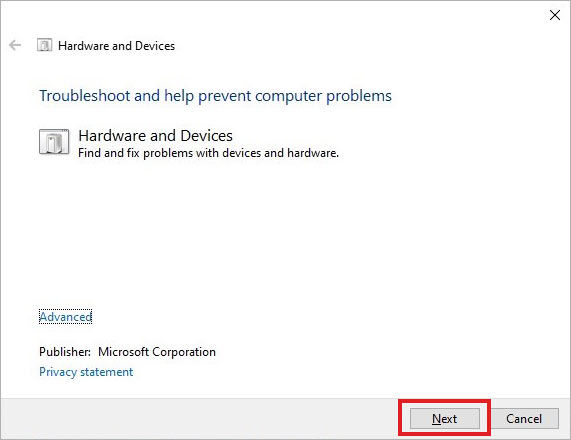
- The tool will look for any hardware issues and report them back. Follow the instructions as displayed by the wizard.
- After the process, restart your computer to see if the issue is resolved.
Note – If you are unable to boot the computer normally, reboot your computer and press and hold the F8 key to enter WinRE. Once inside, navigate to CMD and execute the above-mentioned command.
Method 2: Check the Memory Modules
If the hardware troubleshooter could not find any issue, an error with the RAM stick/s could be causing the “hardware problems were detected” error message.
In such a scenario, power off your computer and check the RAM sticks for any damaged pins or other damage. Ensure that they are seated properly on the motherboard.
Once these checks are done, power ON the computer and follow the steps below to run the MemTest86 tool. It is a freeware used to test memory modules for errors or failures. Here’s what to do –
- Open your web browser and download MemTest86.
- To run MemTest86, you will first need to create a media creation tool. Follow the instructions to do this.
- Run Memtest86 by following the instructions as per the manual.
Memtest86 will scan the memory modules for any malfunctions or errors and bring them out. You can then take appropriate steps to fix the underlying issue. However, if this tool doesn’t show any errors, there might be missing, damaged, or corrupted system files. To fix that, you will need to do a clean installation of Windows OS. You can learn about it in the next method.
Pro Tip
The Windows Memory Diagnostic ‘Hardware problems were detected’ error message can occur due to corrupted or missing system files. This corruption can cause frequent system crashes, leading to an unbootable computer and an inaccessible hard drive. You can fix such severe issues by performing a clean installation of Windows OS.
However, while performing a clean boot, the wizard removes all the installed apps and stored files to give the computer a fresh start. Hence, doing so might cause data loss. Therefore, before proceeding with this, you will have to recover your data.
To recover your data from an unbootable computer, you can take the help of a professional data recovery software like Stellar Data Recovery Professional and save yourself from a difficult data loss scenario. Follow our detailed guide on how to recover data from an unbootable computer.
Method 3: Clean Install Windows OS
As corrupted system files can cause various issues, replacing them with healthy equivalents becomes necessary. Doing a clean install of Windows OS on your computer will remove everything from your PC and install the OS from scratch.
Once you have recovered all your data from the unbootable computer, reinstall Windows OS on your computer.
‘Hardware Problems Were Detected’ Error Message Resolved
While running the Windows Memory Diagnostic tool, you might run into a strange ‘hardware problems were detected’ error message. This error message is a result of various reasons, such as faulty hardware, corrupted system files and more. If you have encountered this error message recently, run the hardware troubleshooter to get to the bottom of it and quickly resolve any minor issues. Apart from the methods explained above, you can also try resetting CMOS to fix this issue.
FAQs
What to do if the Windows Memory Diagnostic tool shows the ‘hardware problems were detected’ error message?
Disabling overclocked components or running the hardware troubleshooter can help you resolve the error message.
How do I fix hardware issues related to RAM?
You can try plugging the RAM stick in another slot to see if the hardware issue is resolved. If you still face RAM-related issues, it means your RAM stick is at fault. Replace it with a new one.
How do I know if my RAM is failing?
There are various tools like Memtest86 or Windows Memory diagnostic tool to check whether your RAM is failing.
Was this article helpful?
YES3
NO
Some Windows users are reporting that upon running the Windows Memory Diagnostics Tool, the utility concludes that there’s an underlying issue affecting a hardware component (Hardware problems were detected). This type of error is reported on every recent Windows version and is often accompanied by random restarts and computer freezes.
After investigating this issue extensively, it turns out that there are several different underlying scenarios that might be causing this particular error code. Here’s a shortlist of potential culprits that might be responsible for this issue:
- Common hardware driver issue – If you see this error message because a non-essential hardware component is forced to run with a partially incompatible driver, you should be able to take care of the issue by running the Hardware and Devices Troubleshooter and applying the recommended fix.
- Overclocking makes the system unstable – If you recently overclocked the frequencies and voltages of some of your components, keep in mind that the Windows Memory Diagnostic tool can pick up on this and trigger the error to warn you that your components are at risk of overheating. Try reverting back to the default frequencies and voltages (or at least tone them down) and see if the error goes away.
- System file corruption – It’s not uncommon to face this type of issue due to some kind of system file corruption that is affecting memory management. If the issue is software-related, you should be able to fix it by performing a repair install or clean install procedure on your Windows installation.
- Failing RAM stick – If you’re unfortunate enough to be experiencing a failing RAM stick, this error message is typically the first sign that you’ll need to look for a replacement. But before you order one, take the time to deploy a Memtest scan and monitor the temperatures with HWMonitor to confirm your suspicions (hopefully not).
- Different failing hardware components – As it turns out, a failing RAM is not the only hardware component that might trigger this type of error with the Windows Memory Diagnostic tool. The issue can also be rooted to your motherboard or even your PSU. Because of this, the best course of action at this point is to take your PC to a certified technician for advanced investigations.
Now that we went over every potential scenario that might trigger the ‘Hardware Problems Were Detected‘ error, here’s a short list of fixes that other affected users have successfully used to get to the bottom of this issue.
Run the Hardware and Devices Troubleshooter
Before you try any of the other fixes below, you should start by checking if your Windows installation is not capable of pinpointing and fixing the issue by itself. If the error message is triggered by a non-essential component, running the Hardware and Devices Troubleshooter might allow you to discover which component is responsible.
Note: The Hardware and Device Troubleshooter contains a selection of automated fixes that can be auto-applied in case a familiar scenario is identified. Most of these fixes will fix issues related to file corruption and bad drivers. They’ll obviously not be effective in a situation where there’s something physically wrong with your hardware.
If you haven’t tried running the Windows Hardware and Devices Troubleshooter yet, follow the instructions below for step by step instructions on how to do this:
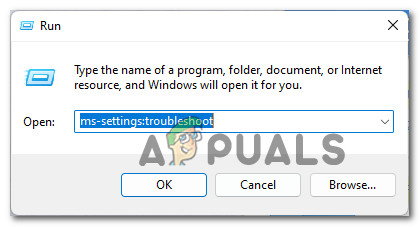
- Press Windows key + R to open up a Run dialog box. Inside the text box that just appeared, type ‘ms-settings:troubleshoot’ and press Enter to open up the Hardware and Device Troubleshooter.

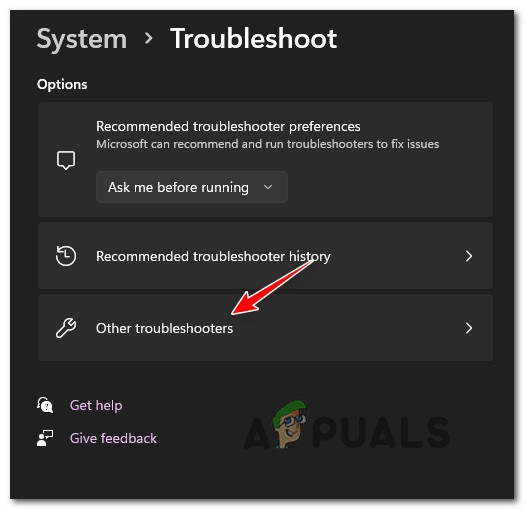
Accessing the Troubleshoot menu - Once you’re inside the Troubleshooting tab, click on Other troubleshooters from the menu on the right-hand pane.

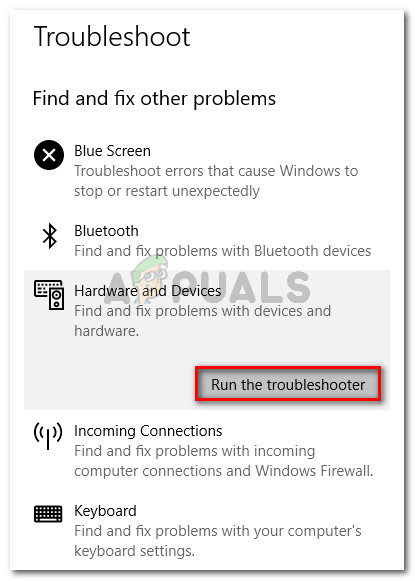
Accessing the Other Troubleshooters tab - Next, scroll down through the list of available options and click on the Run the troubleshooter button associated with Hardware and Devices.

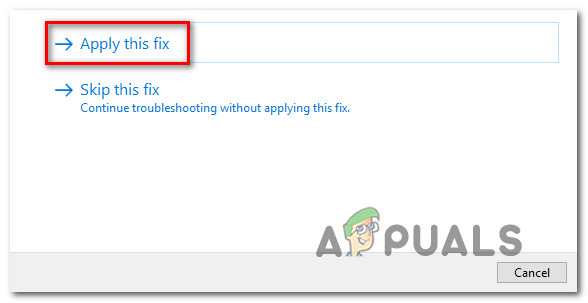
Click on Run the Troubleshooter - Once the troubleshooter has started, wait patiently until the investigation phase is complete. In case a viable repair strategy is identified, you’ll be presented with a window where you can click on Apply this fix to auto-apply the repair strategy.

Apply the recommended fix - Once the fix has been successfully applied, reboot your PC before running the Windows Memory Diagnostic tool once again and seeing if the problem is now fixed.
In case the same kind of issue is still occurring, move down to the next potential fix below.
Disable Overclocked frequencies
Another potential cause that might be producing this issue and that is often overlooked is a situation where you previously overclocked GPU, CPU, or RAM frequencies and adjusted the voltages in a way that makes your PC unstable.
If you are currently using overclocked frequencies higher than what your system deems as safe, you can expect the Windows Memory Diagnostic tool to trigger the Hardware problems were detected.
Even if there’s no damage affecting the overclocked components, your system will throw this error to warn you against component overheating.
You can test if this is the source of the error message by temporarily disabling (or at least reducing) the overclocked frequencies and voltages. For the best results, return every overclocked frequency and voltage to their default values.

Once you’ve returned to your BIOS / UEFI settings and reverted the overclocked frequencies back to their default values, reboot normally and run the Windows Memory Diagnostic tool once again to see if the problem is now fixed.
In case the same kind of issue is still occurring or this scenario is not applicable (no component is overclocked), move down to the next potential fix below.
Check for Failing RAM with MemTest86
This particular error message is often times associated with a memory fault. If none of the methods above have brought you close to potential culprits, you should also take the time to test your RAM stick/s and see if there’s an issue with them that’s forcing the Windows Memory Diagnostic tool to trigger the ‘Hardware problems were detected’ error.
In case you are using a dual-channel RAM setup, start troubleshooting by taking out just one stick and see if the error stops occurring.
Additionally, you should use a utility like Memtest to verify the integrity of your RAM stick/s.
Important: If your RAM is currently overclocked, we recommend reverting any voltage overclocked frequency and use a utility like HWMonitor to keep an eye on your temperatures while running a stress test.
In case running a Memtest job on your RAM has revealed an underlying issue with your memory, you have little else to do than look for a replacement.
If the investigations you just didn’t reveal an underlying issue with your RAM, move down to the next potential fix below.
Perform a clean install or repair install
As it turns out, this particular issue can also be caused by some type of system file corruption that is affecting the Windows Memory Diagnostic tool or an associated kernel dependency.
For this particular case (where the issue is actually caused by a corrupted dependency), the best course of action is to replace every system file component with a healthy equivalent.
You can do this by clean installing your operating system, or you can go for a repair install (in-place repair) operation.
The main advantage of going for a repair install operation is that you will be spared from having to reinstall everything – this procedure will only touch system components, allowing you to keep personal files, data and even applications that are currently stored on the OS drive.
But keep in mind that the procedure of repair installing will be a bit different depending on which Windows version you’re currently using:
- Repair install (in-place repair) on Windows 10
- Repair install (in-place repair) on Windows 11
Take PC to a Certified Technician
If none of the methods above have proven to be effective in your particular case, the only thing you can do at this point is to take it to a certified PC technician so they can perform some advanced checks and pinpoint the hardware component that is causing the error.
In reality, there are a lot of other scenarios that might cause the Windows Memory Diagnostic tool to throw the ‘Hardware problems were detected’ error.
It’s not uncommon to see this error when the PSU used is not strong enough to supply electricity to every component or you can be dealing with some kind of motherboard issue.
These types of tests can only be performed in a specialized shop.
Существует вероятность того, что это сообщение об ошибке является ложноположительным, поэтому рекомендуется убедиться, что оно реально. Вот как это сделать.
Используя инструмент диагностики памяти Windows, вы можете диагностировать проблемы с памятью на вашем компьютере под управлением Windows. Если есть проблема, он вернет ошибку. Одна из распространенных ошибок диагностики памяти Windows, с которой вы можете столкнуться, — это «Обнаружены проблемы с оборудованием; обратитесь к производителю», после чего появляется диалоговое окно «У вас проблема с памятью».
Эта ошибка может быть ложным срабатыванием. Вы также можете подтвердить то же самое, используя сторонний инструмент диагностики памяти. В случае аппаратной проблемы вам может потребоваться заменить карту памяти или отремонтировать слот памяти, если это возможно.
Эта ошибка часто возникает после появления синего экрана смерти (BSOD) или проблем с зависанием системы. Причина ошибки может быть разной, в том числе неисправные слоты памяти и карты памяти. Это также может быть ложное срабатывание из-за сбоя ОС Windows.
Неправильный разгон может вызвать аппаратные проблемы. Хотя более быстрая оперативная память может помочь вам добиться хорошей производительности, перед применением настроек важно учитывать аппаратные ограничения.
Если вы разогнали оперативную память, попробуйте снизить частоты и посмотреть, исчезнет ли ошибка. Делайте это до тех пор, пока не найдете безопасную частоту или не сбросите ее до заводских настроек по умолчанию.
Если вы не уверены в частотах памяти по умолчанию, попробуйте выполнить сброс BIOS. Загрузите настройки BIOS по умолчанию, которые должны сбросить частоты ОЗУ до заводских значений по умолчанию. Подробные инструкции см. в руководстве производителя материнской платы.
Встроенное средство устранения неполадок оборудования Windows может сканировать проблемы, связанные с оборудованием, и даже попытаться выполнить ремонт, если это возможно. Если вы еще не пробовали, запустите средство устранения неполадок оборудования с помощью командной строки, чтобы решить проблему.
Обратите внимание, что это устаревшее средство устранения неполадок, и вы можете не найти его в версии Windows 11 новее, чем 22H2.
Чтобы запустить средство устранения неполадок оборудования Windows:
Если вы работаете с несколькими картами памяти, извлеките все карты памяти и протрите карту, чтобы удалить пыль и мусор. Перезагрузите компьютер и проверьте наличие улучшений.
Все еще не работает? Удалите все карты памяти, кроме одной, и перезагрузите компьютер, чтобы проверить, устранена ли ошибка. Если нет, повторите процедуру со всеми планками по отдельности, чтобы определить и обнаружить неисправную карту памяти. Если вы обнаружите неисправный модуль памяти, вы можете получить замену или потребовать гарантию, если таковая имеется.
Если проблема не устранена, проверьте слоты памяти (ОЗУ) на предмет неисправности. Вставьте карту памяти в один из слотов и перезагрузите компьютер. Если ошибки нет, проверьте другие слоты и проверьте, можете ли вы найти неисправный слот.
Если вы определите, что причиной проблемы стал неисправный слот оперативной памяти, его ремонт будет утомительным. Во-первых, слоты оперативной памяти не так легко доступны, как карты памяти. Во-вторых, чтобы заменить слот, вам нужно будет найти запасную, но совместимую материнскую плату с рабочими слотами, а затем припаять соединения к материнской плате.
Если ремонт слотов невозможен, единственный вариант — замена материнской платы. В зависимости от конфигурации вашей системы это может оказаться дорогостоящим решением. Или вы можете продолжать использовать систему, не задействуя неисправный слот памяти, хотя и с пониженной производительностью.
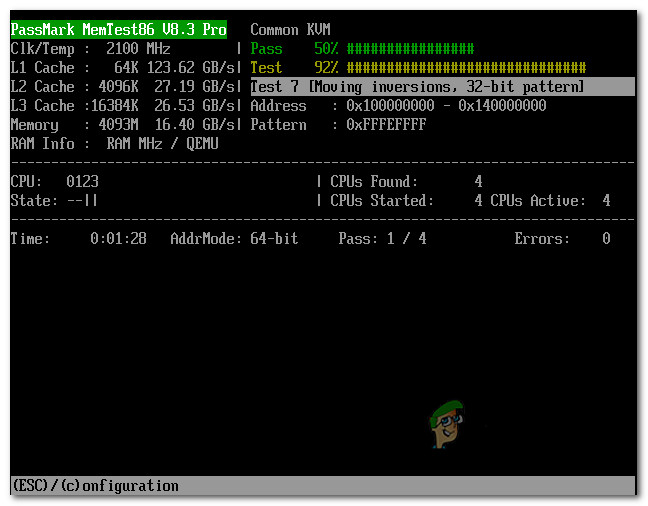
Если средство устранения неполадок не может обнаружить какую-либо проблему, вы можете выполнить тест памяти с помощью утилиты MemTest86+. Это инструмент тестирования памяти с открытым исходным кодом, позволяющий проверить наличие сбоев в памяти вашего компьютера.
MemTest86+ — это загрузочная утилита, которую нельзя использовать из Windows. Чтобы проверить оперативную память с помощью Memetst86+, вам понадобится USB-накопитель. Вы можете использовать установщик Windows Memtest86+, чтобы создать загрузочный диск и загрузиться с него.
На момент написания этой статьи Memtest86+ не был совместим с безопасной загрузкой Windows. Итак, вам нужно отключить безопасную загрузку, чтобы использовать утилиту.
Чтобы выполнить тест памяти с помощью Memtest86+:
Если во время тестирования обнаружена ошибка, скорее всего, это неисправность оперативной памяти и, возможно, потребуется ее замена. Но на всякий случай обязательно протестируйте каждую оперативную память отдельно, чтобы найти лишнюю.
Если сбои системы, синие экраны BSoD или иные проблемы при работе Windows 10, 8.1 или Windows 7 наводят вас на мысли о том, что имеются какие-либо проблемы с оперативной памятью компьютера, может иметь смысл выполнить её проверку, а начать можно со встроенного средства диагностики проверки памяти Windows.
В этой инструкции подробно о способах запустить средство проверки памяти средствами Windows, причём даже в тех случаях, когда вход в систему невозможен, а также о возможных вариантах действий в случае, если в результате теста средство диагностики памяти сообщает о том, что были обнаружены проблемы оборудования. На схожую тему: Устранение неполадок Windows 10.
- Способы запуска средства проверки памяти
- Использование средства и просмотр результатов
- Обнаружены проблемы оборудования в средстве диагностики памяти
- Видео инструкция
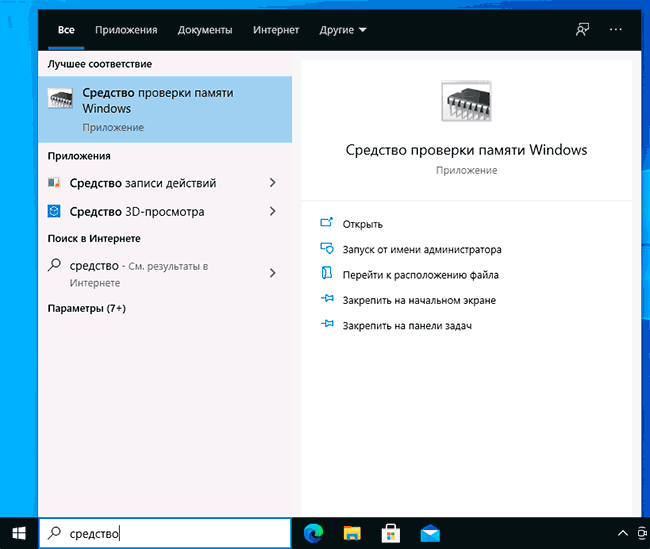
Как запустить средство проверки памяти в Windows 10 и предыдущих версиях системы
В случае, если операционная система запускается, вход в неё и работа возможны, вы можете использовать один из следующих вариантов запуска средства проверки памяти:
- Найти нужный пункт в разделе «Средства администрирования Windows» меню «Пуск».
- Нажать клавиши Win+R на клавиатуре, ввести mdsched.exe и нажать Enter.

- Открыть панель управления, выбрать пункт «Администрирование» и запустить «Средство проверки памяти Windows».
- Использовать поиск в панели задач Windows 10, начав вводить «Средство проверки памяти». Или встроенные средства поиска в предыдущих версиях ОС.

- Вручную запустить файл C:\Windows\System32\MdSched.exe

Если же ситуация осложняется тем, что Windows не запускается, вход в неё невозможен, либо сразу после него происходят сбои, можно использовать следующие способы запуска средства диагностики оперативной памяти:
- Загрузить компьютер или ноутбук с загрузочной флешки с Windows 10 или другой версией Windows, можно и с загрузочного диска. На экране программы установки нажать клавиши Shift+F10 (Shift+Fn+F10 на некоторых ноутбуках), ввести mdsexe в открывшейся командной строке и нажать Enter. После выбора в утилите проверки пункта «Выполнить перезагрузку и проверку», загружайте компьютер не с флешки, а с обычного загрузочного HDD или SSD.

- Средство проверки памяти можно запустить из среды восстановления Windows 10 — нажав кнопку «Дополнительные параметры» на синем экране с ошибкой или, находясь на экране блокировки Windows 10 (с выбором имени пользователя) нажать по изображенной справа внизу кнопке «Питания», а затем, удерживая Shift, нажать «Перезагрузка». В среде восстановления выбираем «Поиск и устранение неисправностей» — «Дополнительные параметры» — «Командная строка». А в ней, как и в предыдущем случае используем команду mdsched.exe.

- Если у вас есть подготовленный диск восстановления Windows, запуск можно осуществить, загрузившись с него.


Использование средства проверки памяти Windows и просмотр результатов

После запуска средства проверки памяти вам будет предложено перезагрузить компьютер, после согласия, процесс будет выглядеть следующим образом:
- Начнётся проверка оперативной памяти, которая может занять продолжительное время. Может показаться, что средство диагностики зависло: на всякий случай подождите в такой ситуации 5-10 минут. Если же действительно произошло зависание, не исключено что есть проблемы с оборудованием, вероятно — с оперативной памятью, но не обязательно.

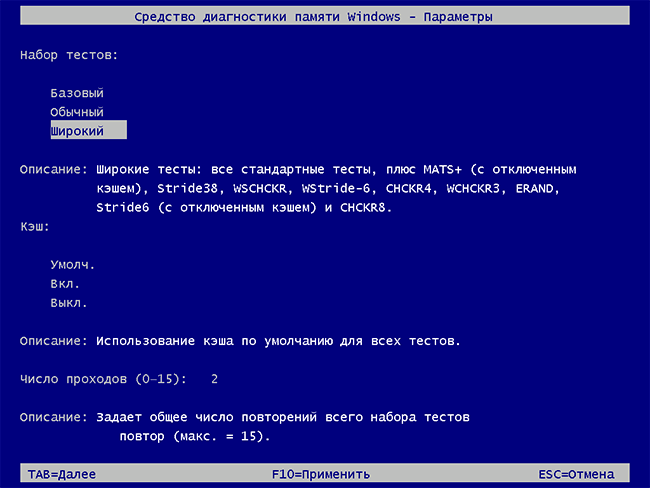
- Если в ходе проверки нажать клавишу F1 (или Fn+F1, если F1 не срабатывает), вы попадёте в настройки средства диагностики памяти Windows. Здесь можно выбрать набор тестов (по умолчанию — обычный), использование кэша, и число проходов. Переключение между разделами настроек выполняется клавишей Tab, изменение параметров — стрелками и вводом цифр (для числа проходов), применение параметров — клавишей F10. После изменения настроек тест перезапускается.
- В ходе проверки вы будете видеть информацию вида «Неполадки пока не обнаружены» или «Были обнаружены проблемы оборудования».
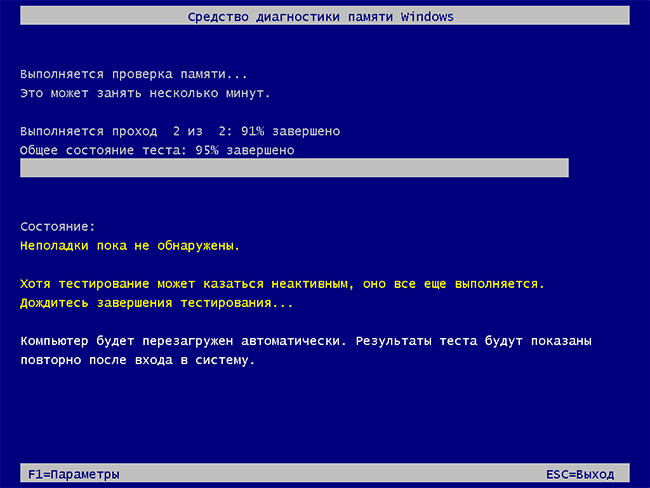
После завершения проверки компьютер будет автоматически перезагружен. Дальнейшие шаги — просмотр результатов.
- После перезагрузки в случае Windows 10 вы можете увидеть уведомление в области уведомлений, сообщающее о результате проверки памяти. Но оно отображается не всегда.
- Можно зайти в просмотр событий, для этого нажимаем Win+R, вводим eventvwr.msc и нажимаем Enter. Там открываем раздел «Журналы Windows» — «Система», находим пункты, где в столбце «Источник» указано MemoryDiagnostics-Results и просматриваем результаты.


Учитывайте, что ошибки, «вылеты», синие экраны и зависания не всегда связаны с проблемами оперативной памяти: если средство диагностики показывает, что всё в порядке, есть и иные возможные причины: отключенный файл подкачки, проблемы с HDD или SSD (или с их подключением, например — неисправный кабель), сторонние антивирусы или, наоборот, вредоносные программы, неправильная работа драйверов оборудования.
Что делать, если были обнаружены проблемы оборудования в средстве диагностики памяти
К сожалению, средство диагностики не сообщает о том, какие именно проблемы были обнаружены в ходе проверки, а лишь рекомендует обратиться к производителю оборудования. Что можно сделать:
- Отключить любые опции ускорения памяти (изменение частоты, таймингов и другие) при наличии соответствующих опций в БИОС или ПО производителя материнской платы или ноутбука.
- Попробовать проверить планки памяти по одной, в других слотах на материнской плате для того, чтобы выяснить, появляются ли проблемы только с одним конкретным модулем памяти или в одном конкретном разъеме.
- Использовать другие утилиты для проверки оперативной памяти при необходимости.
- Прочитать документацию к материнской плате ПК — возможно, это какая-то несовместимость с памятью с конкретными характеристиками (если вы недавно добавили новые модули памяти или только что самостоятельно собрали компьютер).
- Иногда может помочь обновление БИОС.
Видео инструкция
Если вы разобрались, чем была вызвана именно ваша проблема, буду благодарен комментарию к статье: возможно, для кого-то он окажется полезным.