
Remote Server Administration Tools (RSAT) Background
The Remote Server Management Tools have been with Windows Server since Windows Server 2000. These tools enable the remote management of Server Roles and Features and were later released as part of a separate installation package called Remote Server Administration Tools that could be installed on the server and client/professional versions of the Windows operation system.
The following tools are included as part of the installation:
- SMTP Server Tools
- Hyper-V Management Tools
- Hyper-V Module for Windows PowerShell
- Hyper-V GUI Management Tools
- Windows Server Update Services Tools
- API and PowerShell cmdlets
- User Interface Management Console
- Active Directory Users and Computers Snap-in
- Active Directory Sites and Services Snap-in
- Active Directory Domains and Trusts Snap-in
- Active Directory Administrative Center Snap-in
- ADSI Edit Snap-in
- Active Directory Schema Snap-in (Not Registered)
- Active Directory Command Line Tools
- Active Directory Module for Windows PowerShell
- IIS Management Tools
- IIS Management Console
- IIS Management Compatibility
Prerequisites for installing Remote Server Administration Tools (RSAT)
You will require a Windows Server 2012 computer with the “Graphical Management Tools and Infrastructure” installed to install the Remote Server Administration Tools (RSAT) using the Server Manager graphical user interface.
Instructions for installing Remote Server Administration Tools (RSAT)
To install the Remote Server Administration Tools (RSAT) on Windows Server 2012 please follow these instructions.
- On the Windows Server 2012 open Server Manager. If Server Manager does not start by default press the “Windows + R” keys, Type “ServerManager” in the “Open” field and press “Enter” or click the OK button.

- On the Server Manager main windows Click “Add roles and features”.
- In the “Add Roles and Features Wizard” under “Installation Type” check the “Role-based or feature-based installation” radio button and click “Next”
- In the “Add Roles and Features Wizard” under “Server Selection” check the “Select a server from the server pool” radio button, select the server you want to install the Remote Server Administration Tools (RSAT) on and click “Next”
- In the “Add Roles and Features Wizard” under “Server Roles” click “Next”
- In the “Add Roles and Features Wizard” under “Features” scroll down and check the “Remote Server Administration Tools” check box. Click “Next”.
- In the “Add Roles and Features Wizard” at the “Confirmation” page click “Install” to begin the installation of the Remote Server Administration Tools (RSAT)
- The installation of the Remote Server Administration Tools (RSAT) will begin and the progress will be displayed. You may be required to restart the server after the Remote Server Administration Tools (RSAT) installation is complete.


RSAT (Remote Server Administration Tool) is a free suite of tools to manage Windows Servers remotely.
What is RSAT, and How Does it Help Administrators?
IT administrators can remotely manage Windows Server roles and features using Remote Server Administration Tools (RSAT) from a computer running Windows 10, Windows 8.1, Windows 8, or Windows 7.
It is a client-based management solution that enables administrators to control Windows servers remotely. Administrators may complete most routine administrative duties using its suite of tools.
RSAT allows administrators to handle every part of Windows Server roles and features from the command prompt and the graphical user interface (GUI).
RSAT makes administrators’ jobs easier from various perspectives, including remotely managing servers and users, automating operations, and finding and fixing bottlenecks.
RSAT has tools for controlling Windows services, accessing files and directories, and managing roles and features. There are numerous purposes for using RSAT, including managing users, installing programs, monitoring and configuring servers, and installing and configuring software.
In addition to the above, it controls Active Directory, Group Policy, DNS, file servers, and printers. RSAT also helps to maintain user accounts and groups as well. Additionally, it enables remote virtual private server (VPS) management.
Benefits of Using RSAT
Administrators require the RSAT toolkit to manage servers and services remotely. There are numerous causes for this, but the most frequent one is that administrators must be able to handle servers spread across various continents. Particularly when it comes to cloud-based services, this is crucial.
RSAT is also necessary for administrators to administer servers that are utilized internally, such as intranet or e-commerce websites.
Businesses may use RSAT for a variety of reasons. One of the critical causes is that RSAT makes it simple and convenient for administrators to do server and other support tasks remotely. Because of the centralized administration it offers, administrators can control several servers from a single user interface.
As they even enable server performance monitoring through server log viewing, these RSAT tools are crucial for system administrators.
List of Tools Included in RSAT
The RSAT tools available in Windows 10 and 11 to perform various administrative activities are listed below.
- Active Directory Domain Services and Lightweight Directory Services Tools
- BitLocker Drive Encryption Administration Utilities
- Active Directory Certificate Services Tools
- DHCP Server Tools
- DNS Server Tools
- Failover Clustering Tools
- File Services Tools
- Group Policy Management Tools
- IP Address Management (IPAM) Client
- Data Center Bridging LLDP Tools
- Network Controller Management Tools
- Network Load Balancing Tools
- Remote Access Management Tools
- Remote Desktop Services Tools
- Server Manager
- Shielded VM Tools
- Storage Migration Service Management Tools
- Storage Replica Module for Windows PowerShell
- System Insights Module for Windows PowerShell
- Volume Activation Tools (KMS server console)
- Windows Server Update Services Tools.
The following sections will look at how to install RSAT using the GUI (graphical user interface), DISM (Deployment Image Servicing and Management), and PowerShell command line.
Installing RSAT Using GUI
The GUI method of installing RSAT is the most frequently utilized by businesses because of its easiness and user-friendly.
RSAT is now a part of Windows 10’s “Features on Demand,” starting with the October 2018 Update.
If you have Windows 10 October 2018 Update or later, there is no need to download and install RSAT tools. You only need to activate it by taking the following actions:
Please note: You need to download and install RSAT using this link if you have an earlier version of Windows 10 (before October 2018).
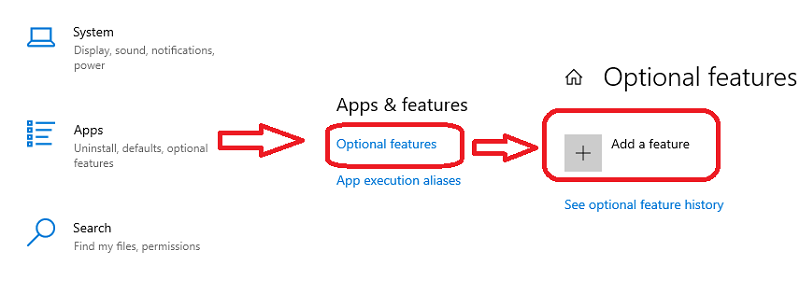
To access the RSAT tools in Windows 10 and Windows 11, navigate (as shown in Picture 1) to – Settings – > Apps -> Optional Features -> Click Add a feature as shown:
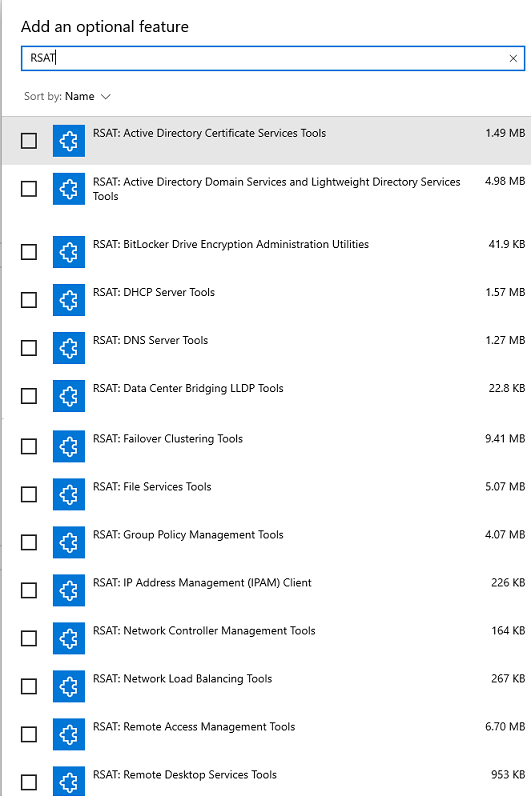
After clicking on the add feature option, you will get the search box where you can type RSAT and see all RSAT tools, as shown below in Picture 2.
You can select the RSAT tool as per your requirement, which will be installed in your system.
After completing the above process, the Administrative Tools folder appears on the Start menu.
You may also type “Tools” into the taskbar’s search box to find Windows Administrative Tools or access the path “Control Panel\System and Security\Administrative Tools ” in the windows browser to see the list of RSAT tools installed.
Installing RSAT on Windows 8
If you’re running Windows 8.1, you may download the RSAT tools you need from Microsoft, depending on your system architecture (x64 or x86), and install them by following the onscreen instructions.
All of RSAT’s tools are automatically enabled once the installation is complete.
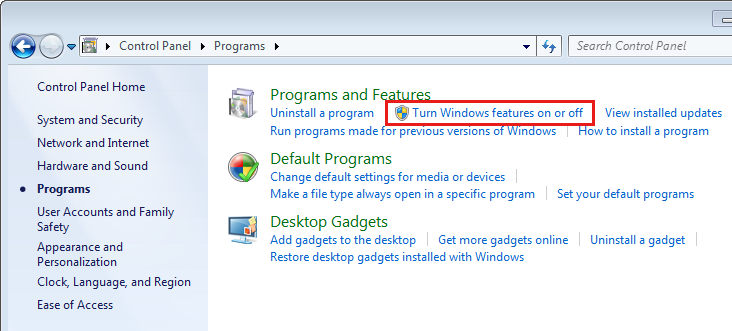
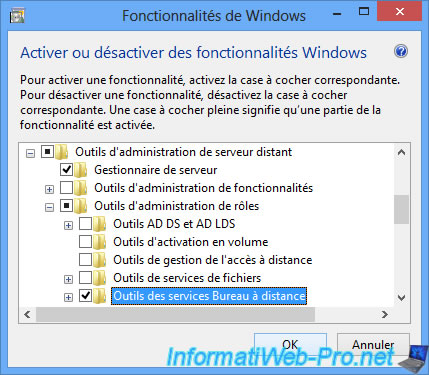
If you wish to disable a specific utility, go to the “Turn Windows Features on or off” option in the program section of the control panel, as shown in the picture below.
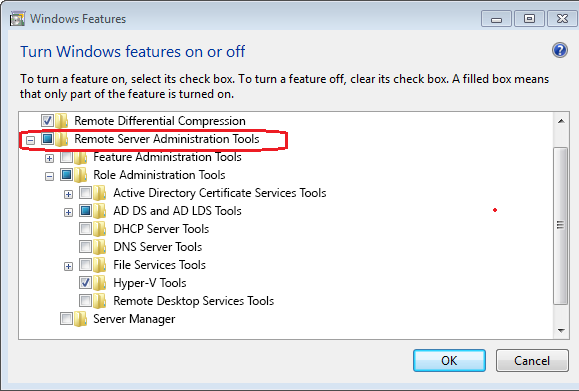
As illustrated in the picture below, locate the Remote Server Administration Tools option, expand it, and deselect the check box next to any RSAT tools you don’t wish to use.
Installing RSAT on Windows 7 & Windows Vista
On a Windows 7 computer or Vista, you must download and run the installation package. Additionally, Service Pack 1 is necessary to enable RSAT tools. Windows 7 no longer receives support from Microsoft.
After the installation, you must activate Remote Server Administration Tools in the Control Panel by selecting Turn Windows features on or off, as indicated in the picture below.

Then, as seen below, you must check the box next to the tool you want in the RSAT section.

Installing RSAT on Windows Servers
No additional packages need to be downloaded to install RSAT on Windows 2008, 2008 R2, 2012, 2012 R2, 2016, and 2022 servers.
To enable RSAT in Windows 2008 and Windows Server 2008 R2, navigate to the Add Features Wizard -> Choose Features option -> and expand Remote Server Administration Tools.
While for other remaining server editions, go to Add Roles and Features Wizard -> Choose Features option -> and expand Remote Server Administration Tools to choose the tools you need to install, as seen in the picture below.

The above section shows how to install and enable RSAT tools through the GUI method.
In the following section, we will see how to do it through DSIM (Deployment Image Servicing and Management).
Installing RSAT Using DSIM
A command-line program in Windows called Deployment Image Servicing and Management (DISM.exe) is used to maintain a virtual hard disc or a Windows image (.wim) (.vhd or .vhdx).
Please download and install the Windows Assessment and Deployment Kit if your PC requires a different version of DISM.
It can be executed via the command prompt and is, by default, found in the c:\windows\system32 folder of every Windows system.
The DISM command comes in-built into all Windows operating systems and can be executed using PowerShell or a command prompt.
Run the command below from the command prompt to use DISM to check the status of the RSAT-installed tools.
dism /online /get-capabilityinfo /capabilityname:Rsat.ActiveDirectory.DS-LDS.Tools~~~~0.0.1.0Following the execution of this command, a window displaying the installed RSAT tools will appear as shown below:
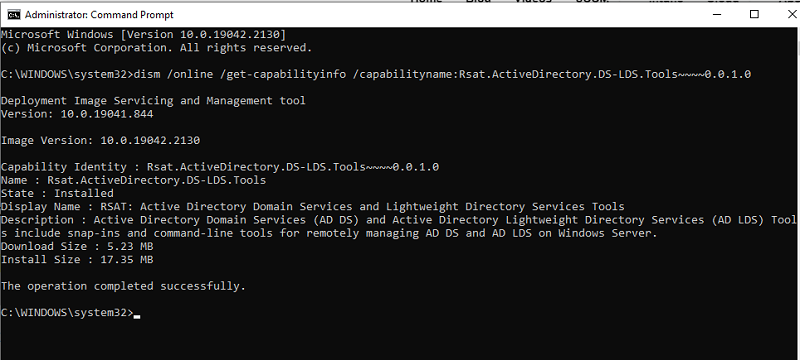
DISM’s primary function is to service and prepare Windows images and is not frequently used for RSAT installation.
Powershell’s command prompt is an alternative to DISM, which is covered in the section below.
Installing RSAT Using PowerShell
Beginning with Windows 7 Service Pack 1 and Windows Server 2008 R2 Service Pack 1, Windows PowerShell is pre-installed on every version of Windows.
Through the Windows PowerShell command prompt (cmdlet), specialized RSAT tools can be installed and enabled.
Let’s look at how to use it in the below section:
You will obtain the PowerShell command prompt if you type the word “PowerShell” at the command prompt.
Enter the following command at the PowerShell prompt to check the RSAT tools currently installed on your Windows system.
Get-WindowsCapability -Name RSAT* -Online | Select-Object -Property DisplayName, StateThe above command will provide a list of all installed and accessible RSAT tools, as seen in the picture below. As it is visible that only Active Directory Domain Services and Server Manager are installed in the below-mentioned picture.

To install a specific RSAT tool, you need to use the command:
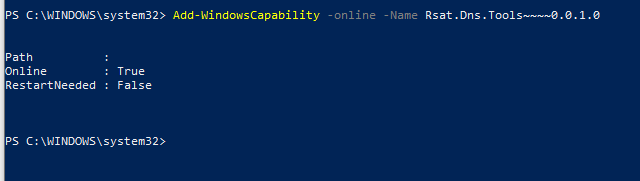
Add-WindowsCapability For example, if you want to install DNS (Domain Name Server), then you need to run
Add-WindowsCapability –online –Name Rsat.Dns.Tools~~~~0.0.1.0Following that, DNS installation will begin, as shown below.

After finishing the above command, a window stating that a restart is not required will appear, as shown below:
Run the following command to install all RSAT tools at once:
Get-WindowsCapability -Name RSAT* -Online | Add-WindowsCapability –OnlineIf you want to install only the missing RSAT tools all at once, then you can run the below command
Get-WindowsCapability -Name RSAT* -Online | where State -EQ NotPresent | Add-WindowsCapability –OnlineThe following is the list of commands to install specific RSAT utilities:
Add-WindowsCapability -Online -Name Rsat.FileServices.Tools~~~~0.0.1.0
Add-WindowsCapability -Online -Name Rsat.GroupPolicy.Management.Tools~~~~0.0.1.0
Add-WindowsCapability -Online -Name Rsat.IPAM.Client.Tools~~~~0.0.1.0
Add-WindowsCapability -Online -Name Rsat.LLDP.Tools~~~~0.0.1.0
Add-WindowsCapability -Online -Name Rsat.NetworkController.Tools~~~~0.0.1.0
Add-WindowsCapability -Online -Name Rsat.NetworkLoadBalancing.Tools~~~~0.0.1.0
Add-WindowsCapability -Online -Name Rsat.BitLocker.Recovery.Tools~~~~0.0.1.0
Add-WindowsCapability -Online -Name Rsat.CertificateServices.Tools~~~~0.0.1.0
Add-WindowsCapability -Online -Name Rsat.DHCP.Tools~~~~0.0.1.0
Add-WindowsCapability -Online -Name Rsat.FailoverCluster.Management.Tools~~~~0.0.1.0
Add-WindowsCapability -Online -Name Rsat.RemoteAccess.Management.Tools~~~~0.0.1.0
Add-WindowsCapability -Online -Name Rsat.RemoteDesktop.Services.Tools~~~~0.0.1.0
Add-WindowsCapability -Online -Name Rsat.ServerManager.Tools~~~~0.0.1.0
Add-WindowsCapability -Online -Name Rsat.Shielded.VM.Tools~~~~0.0.1.0
Add-WindowsCapability -Online -Name Rsat.StorageMigrationService.Management.Tools~~~~0.0.1.0
Add-WindowsCapability -Online -Name Rsat.StorageReplica.Tools~~~~0.0.1.0
Add-WindowsCapability -Online -Name Rsat.SystemInsights.Management.Tools~~~~0.0.1.0
Add-WindowsCapability -Online -Name Rsat.VolumeActivation.Tools~~~~0.0.1.0
Add-WindowsCapability -Online -Name Rsat.WSUS.Tools~~~~0.0.1.0
Points to Remember
- Admins must install RSAT tools having administrator rights.
- RSAT cannot be installed on Windows Home, Standard, or Education editions. Only Windows Professional or Enterprise editions support the installation of RSAT.
- Before installing the latest RSAT, uninstall all previous versions of the Administration Tools Pack.
- If you installed RSAT but don’t see all tools, then make sure the Active Directory Users and Computers path are set to %SystemRoot%system32dsa.msc. Ensure your PC has the most recent Windows updates installed if the target is accurate.
- If RSAT is not getting installed, then turn Windows Firewall ON or OFF under Services and recheck. If the machine doesn’t have the most recent Windows updates, RSAT may not install or perform as needed.
- RSAT problems have occasionally been fixed by deleting all associated files and erasing any previous RSAT.
Final Words
Without the need for Windows domain controllers, RSAT is one of the many flexible features that Microsoft offers administrators to manage Windows Infrastructure remotely.
Because of its adaptability, RSAT can be implemented in various ways. Regardless of whether you employ the GUI, the DISM command, or PowerShell.
Next, you can check out how to set up system environment variables in Windows.
Появление системы Windows Server 2012 внесло множество изменений в возможности виртуализации: обновленный гипервизор Hyper-V, виртуализация рабочих станций с помощью нового механизма Remote Desktop Services, и многое другое. Помимо реализации новых возможностей, разработчики Microsoft внесли ряд изменений в рекомендации по работе с системой Server 2012
.
Начиная с системы Windows Server 2008, вы могли использовать режим Server Core (подробно описанный в статье «Windows Server 2012 Installation Options»(http://windowsitpro.com/windows-server-2012/windows-server-2012-installation-options)) для установки системы Windows Server без локального графического интерфейса. Однако этот режим был предусмотрен только для определенных ролей инфраструктуры. Система Server 2012 изменила ситуацию. Server Core – режим установки, применяемый в системе Server 2012 по умолчанию, причем не только для серверов с ролями инфраструктуры.
В системе Server 2012 режим Server Core ориентирован на обслуживание рабочих нагрузок приложений, таких как SQL Server. Вы можете в любой момент добавить или удалить графический интерфейс, а также инфраструктуру и инструменты управления. В результате благодаря системе Server 2012 еще больше серверов с графическим интерфейсом — Server with a GUI (новое название режима установки Full Installation) — будет заменено на серверы в режиме Server Core. В целом, вероятно, вам следует изменить подход к управлению окружением Windows.
Развитие графических средств управления
Чтобы рассмотреть развитие в перспективе, я оглядываюсь назад, на свою первую работу, связанную с компьютерами. Я был системным администратором систем VAX/VMS, но в действительности подразумевалось, что я менял ленты, используемые для резервного копирования, и предоставлял распечатки разработчикам. Я управлял серверами, сидя в серверной, где видеотерминал был подключен к каждому устройству. Позднее мы внедрили протокол TCP, и я мог находиться на своем рабочем месте и подключаться непосредственно к каждому серверу с помощью команды telnet. Когда мы получили серверы Windows, я управлял ими аналогичным образом. У меня в серверной были монитор и клавиатура, которые я мог использовать для подключения к серверу через устройство KVM. И в дальнейшем, когда на первый план вышли протокол RDP и удаленное администрирование, я прямо со своего рабочего места устанавливал подключение RDP к серверу. Тем не менее, во всех случаях я одновременно эффективно управлял только одним сервером — и управлял им локально.
Поскольку количество серверных единиц быстро увеличивается, принцип единовременного управления только одним сервером в реальности становится неприменим. А наметившаяся тенденция активного использования режима Server Core делает неприменимым локальное управление через графический интерфейс. Таким образом, нам придется изменить подход к управлению серверами.
Удаленное управление (я имею в виду не RDP-подключение к серверу, а скорее рабочие инструменты управления на вашей рабочей станции, которые подключаются к серверу) стало возможным начиная с системы Windows Server 2008 R2. Точнее, возможным оно стало и до появления Server 2008 R2, однако использовать его было проблематично.
В системе Server 2008 R2 инструмент Server Manager наконец позволил нам удаленно подключаться серверу и управлять им (при условии, что на сервере было разрешено удаленное управление). Вы можете установить пакет Windows 7 Remote Server Administration Tools (RSAT) на свою рабочую станцию Windows 7, запустить Server Manager и удаленно управлять операционной системой Server 2008 R2. Хотя такой подход обеспечивает одновременное соединение только с одним удаленным сервером (см. экран 1) и не годится для управления несколькими серверами. Кроме того, вам, возможно, стоит принять во внимание другие типы приложений, требующие, чтобы средства управления запускались локально на сервере приложений, и не поддерживающие режим Server Core. Однако большинство приложений перешли на модель с удаленными средствами управления или на администрирование, полностью построенное на веб-технологиях.

|
| Экран 1. Удаленное управление операционной системой Server 2008 R2 |
Инструменты удаленного управления важны и по другой причине. Новые графические инструменты управления эффективны, но на практике обычно нежелательно, чтобы они запускались на серверах, так как эти инструменты расходуют ресурсы, которые следовало бы предоставить службам операционной системы. Куда лучше развернуть графический интерфейс в операционной системе рабочей станции и использовать минимальный сетевой трафик в процессе выборки информации и выполнения задач.
Графическое управление множеством серверов
Система Server 2012 располагает всеми возможностями для удаленного управления множеством серверов благодаря полностью переработанному диспетчеру Server Manager. Одна из причин преобразования Server Manager заключалась в необходимости совместить одновременное управление несколькими серверами. На экране 2 показан диспетчер Server Manager, запущенный на машине с операционной системой Windows 8 и установленным пакетом Windows 8 Remote Server Administration Tools (RSAT). Разработчики Microsoft предлагают вам управлять системой Server 2012 именно так, и на самом деле вам самим стоит стремиться именно к такой схеме управления.
Управляйте множеством серверов. Если рассматривать вариант, при котором все ваши серверы работают в режиме Server Core, то концепция «управлять несколькими серверами как одним» должна выглядеть довольно привлекательно. На экране 2 начальная информационная панель не только показывает состояние сервера: диспетчер Server Manager автоматически обнаруживает роли, установленные на управляемых серверах, и создает отдельные группы. Таким образом, вы можете оценить состояние служб Microsoft IIS, Hyper-V и Active Directory (AD). Вы можете даже создавать собственные группы серверов — в моем примере это группа Test Servers. Можно щелкнуть мышью по любой области (экране 2 выделено красным цветом) и увидеть подробности. Например, щелкните по выделенным красным элементам Best Practice Analyzer (BPA), чтобы узнать, с какими службами есть проблемы и в чем они заключаются (да, анализатор BPA интегрирован с Server Manager). В дальнейшем все неисправные службы на различных серверах могут быть перезапущены одним щелчком мыши.
|
|
| Экран 2. Server Manager на машине с Windows 8 и RSAT |
Есть одно различие между диспетчером Server Manager, запущенным в клиентской системе Windows 8, и Server Manager, запущенным локально в системе Server 2012: наличие узла навигации Local Server в системе Server 2012, см. экран 3. Через рабочую область Local Server вы можете выполнять настройки таких основных элементов, как имя сервера и IP-адрес (под основными я имею в виду элементы, которые вы настраиваете на сервере один раз после установки и больше не меняете). Поэтому элементы рабочей области Local Server недоступны через механизмы удаленного управления диспетчера Server Manager, так как считается, что для них не требуется постоянное управление. Я думаю, что в будущем ситуация изменится. Удаленное управление активировано в системе Server 2012 по умолчанию — не надо ничего настраивать вручную. Это не означает, что у вас по умолчанию есть возможность подключения к серверу по протоколу RDP, но вы можете запустить диспетчер Server Manager и (при условии, что имеются соответствующие права) удаленно управлять сервером.
|
|
| Экран 3. Узел навигации Local Server в системе Server 2012 |
Вы можете добавить серверы в диспетчер Server Manager, выбрав Add Servers в меню Manage. Замечу, что с помощью диспетчера Server Manager вы также можете управлять серверами Server 2008 и Server 2008 R2. Единственное требование заключается в том, что пакет Windows Management Framework (WMF) 3.0 должен быть установлен в системах Server 2008 и Server 2008 R2. Вы можете загрузить пакет Windows Management Framework (http://www.microsoft.com/en-us/download/details.aspx?id=34595) из Интернета, но сначала убедитесь, что на сервере развернут компонент. NET Framework 4.0 (http://www.microsoft.com/en-us/download/details.aspx?id=17851), иначе пакет WMF 3.0 не будет установлен корректно.
Как только вы добавляете новые серверы к диспетчеру Server Manager, он опрашивает их, обнаруживает различные роли инфраструктуры и закрепляет эти роли в соответствующих областях навигации диспетчера Server Manager. Серверы располагаются в рабочих областях узла All Servers. Также предусмотрена возможность создания собственных групп серверов, таких как группа Test Servers, показанная на экране 3.
Сделайте информацию видимой. Щелкните правой кнопкой мыши по серверу (или серверам) и выберите пункт Start Performance Counters из контекстного меню (экран 4), который активирует сбор данных о производительности с конечного сервера. Вы можете получить доступ к данным удаленно через диспетчер Server Manager и просмотреть ключевые метрики производительности, такие как использование ресурса памяти и процессора. Вы можете даже настроить диспетчер Server Manager таким образом, чтобы он выдавал предупреждение, если загрузка процессора достигла определенного уровня или объем свободной памяти стал ниже определенного уровня. Обязательно изучите другие механизмы работы с удаленным сервером: полный доступ к оснастке Computer Management, RDP, Windows PowerShell, объединение сетевых интерфейсов (NIC Teaming), перезагрузка и многие другие. Эти механизмы дополняют набор стандартных инструментов, доступных из меню Server Manager Tools, которое содержит знакомые оснастки, такие как Active Directory Users and Computers, Hyper-V Manager и другие.
|
|
| Экран 4. Настройка сбора данных о серверах |
Важным изменением в диспетчере Server Manager в системе Server 2012 стало появление возможности удаленно добавлять и удалять роли и компоненты. Чтобы это сделать, выберите пункт Add or Remove Roles and Features из меню Manage. Если вы выполняете установку на основе ролей или установку служб Remote Desktop Services, следующим шагом будет выбор сервера, на котором вы хотите выполнить операцию добавления/удаления (экран 5).
|
|
| Экран 5. Удаленное добавление ролей |
Необходимо отметить, что у служб RDS есть собственная основанная на сценариях методика развертывания, доступная через диспетчер Server Manager и позволяющая развернуть полноценные окружения RDS на сотнях серверов c помощью одного мастера и нескольких щелчков мыши.
Об этой возможности важно знать следующее.
1.Вы можете выбрать только один сервер за один раз для операции добавления/удаления. Если вы хотите добавить или удалить роли/компоненты на нескольких серверах, необходимо использовать команды PowerShell. Например:
Invoke-Command -ScriptBlock {Install-WindowsFeature –Name XPS-Viewer} -ComputerName server1,server2,server3
2.Вы не можете выполнять операцию добавления/удаления на серверах Server 2008 и Server 2008 R2. Несмотря на то, что есть возможность удаленного управления такими серверами, данная функция не распространяется на механизм добавления/удаления ролей/компонентов, так как его не поддерживает основная операционная система.
3.Обратите внимание при изучении экрана 5, что помимо добавления/удаления роли/компонента на сервере, вы можете выбрать виртуальный жесткий диск для автономного управления, а также назначить виртуальный жесткий диск для автономного управления из оболочки PowerShell в ходе автоматизированного процесса настройки.
Управляйте ролями и компонентами. Помимо отображения информации (такой как производительность, события, результаты анализа BPA и установленные компоненты) от управляемых служб, диспетчер Server Manager также управляет ключевыми аспектами базовой операционной системы, включая определенные роли и компоненты. Яркий пример – компонент Storage. Диспетчер Server Manager не только отображает дисковые тома в системе и позволяет вам настраивать такие функции как устранение дублирования данных, но и дает возможность управлять пространствами хранения, интерфейсами iSCSI, NFS и расширенными настройками общих ресурсов. Настройки некоторых ролей, таких как Remote Desktop Services и IP Address Management, отображаются через диспетчер Server Manager.
Общий вопрос относительно диспетчера Server Manager звучит так: «Каким образом можно передавать настройки Server Manager между пользователями или компьютерами?» Все серверы и пользовательские группы серверов, контролируемые экземпляром диспетчера Server Manager, хранятся в конфигурационном XML-файле. Поэтому существует возможность передавать эти настройки (которые хранятся в файле \%appdata %\Microsoft\Windows\ServerManager\ServerList.xml) между пользователями и компьютерами.
Однако в начале статьи я упоминал о том, что экземпляры системы Server 2012 должны работать в режиме Server Core, в котором нет графического интерфейса и никакой инфраструктуры управления, доступной локально. Как в таком случае использовать диспетчер Server Manager? Диспетчер Server Manager используется на вашей рабочей станции Windows 8. Диспетчер Server Manager, а также основная масса средств администрирования системы Server 2012 входят в состав пакета RSAT, доступного как в 32-разрядной, так и в 64-разрядной версиях (http://www.microsoft.com/en-us/download/details.aspx?id=28972).
После установки инструментов в системе Windows 8 вы активируете их с помощью приложения Programs and Features в панели Control Panel. Используйте функцию Turn Windows features on or off и активируйте диспетчер Server Manager в узле RSAT (см. экран 6). Из этого диалогового окна вы можете активировать другие роли и средства администрирования компонентов.
|
|
| Экран 6. Установка средств управления в системе Windows 8 |
После установки диспетчера Server Manager на рабочую станцию Windows 8 вы сможете ощутить состояние нирваны, сопровождающее процесс управления системой Server 2012 или ее развертывания. Все серверы Server 2012 работают в режиме Server Core, а их удаленное управление осуществляет экземпляр диспетчера Server Manager, запущенный в системе Windows 8.
Пакет RSAT для серверов Server 2012 доступен только для системы Windows 8. Данный пакет не поддерживает работу в системе Windows 7 и более ранних клиентских операционных системах. Подход остался неизменным по сравнению с предыдущими версиями серверов Windows. Пакет RSAT для серверов Server 2008 R2 работал только в системе Windows 7, пакет RSAT для Server 2008 функционировал только в Windows Vista, а пакет Administration Tools Pack для систем Windows Server 2003 R2 работал исключительно в системе Windows XP. Идея понятна?
Итак, что же делать, если в вашей организации не используется система Windows 8, и даже отдел ИТ не может внедрить ее? Я рекомендую настроить узел Remote Desktop Session Host с системой Server 2012 и опубликовать диспетчер Server Manager. Тогда администраторы, использующие операционные системы Windows 7, RT Windows или платформы, созданные не компанией Microsoft (по сути, любые системы, поддерживающие публикацию приложений по протоколу RDP), cмогут запускать опубликованное приложение. При этом будет создаваться впечатление, что приложение выполняется локально на компьютере, так как оно органично интегрируется с клиентской системой.
Удаленное управление с помощью PowerShell
До этого момента мы рассматривали новые удаленные графические инструменты управления. Однако в самых больших окружениях, где идет речь о настоящей автоматизации, вам не нужен графический интерфейс. Там необходимо использовать интерфейс командной строки (CLI) и сценарии. И для окружений Windows действительно нет более мощного решения, чем оболочка языка PowerShell, который объединяет среду для написания сценариев и CLI. Язык PowerShell — объектно-ориентированный, он позволяет передавать возвращенные одной командой объекты (а не простые строки) на вход другой команде. Такой подход обеспечивает большие возможности часто при использовании минимального объема кода, благодаря тому, что идет обработка исходного объекта.
Каждый механизм системы Server 2012 представлен в оболочке PowerShell с помощью более 2400 составных команд (собственные команды PowerShell) только для базовой операционной системы. На практике множество параметров (таких как виртуализация сети с помощью Hyper-V и расширенные настройки Storage Space) доступны только через оболочку PowerShell и не представлены в графических инструментах управления операционных систем. Для обеспечения возможности удаленного управления сервером оболочка PowerShell интегрируется с механизмом Windows Remote Management. Версия PowerShell 3.0 (входящая в состав системы Server 2012 и устанавливаемая в составе пакета WMF 3.0 для систем Server 2008 и Server 2008 R2) предоставляет мощные механизмы управления потоками операций, которые позволяют инициировать задачи в удаленных системах, без необходимости постоянно поддерживать соединение.
Почти все продукты Microsoft, а также большинство решений, которые интегрируются с системами Windows, включая решения от аппаратных партнеров, таких как Cisco и NetApp, поддерживают оболочку PowerShell. Это означает, что с помощью PowerShell можно управлять не только системой Windows, но и всей инфраструктурой ИТ.
Первое знакомство с оболочкой PowerShell выходит за рамки данной статьи. Однако я хочу обратить ваше внимание на несколько подходов, которые помогут вам быстрее освоиться.
- Используйте редактор сценариев Windows PowerShell Integrated Scripting Environment (ISE). В нем применяется функция IntelliSense, которая помогает завершать имена команд и параметров, по мере того как вы их вводите. В редакторе ISE также есть область команд, которая позволяет искать команды. Область команд предлагает заполнить форму, в которой перечислены все доступные параметры и указано, какие из параметров являются обязательными, и создает команды для вас.
- Служба Active Directory Administrative Center неявно использует оболочку PowerShell. В окне PowerShell Command отображаются команды, отвечающие за действия, выполняемые из графического интерфейса. Это означает, что вы могли бы выполнить ряд действий в графическом интерфейсе, а затем добавить команды PowerShell в свои сценарии.
- Если вы экспериментируете, используйте преимущества параметра WhatIf. Команда WhatIf показывает ожидаемый результат выполнения, не внося при этом изменений.
Методика удаленного управления
Новый диспетчер Server Manager в системе Server 2012 действительно помогает организациям перейти к использованию методики удаленного управления, позволяя управлять несколькими машинами одновременно. Для многих отделов ИТ все еще может быть непросто уйти от подключения к каждому серверу по RDP и «локального» управления ими. Однако, поскольку все больше серверов использует режим Server Core, как только преимущества одновременного управления множеством серверов из диспетчера Server Manager станут очевидны, произойдет глобальный сдвиг в подходе к управлению, тем более что диспетчер Server Manager версии 2012 также предусматривает управление серверами Server 2008 и Server 2008 R2. Конечно, приложения все еще должны работать на серверах, чтобы поддерживать удаленное управление, и это требование становится все более распространенным, по мере добавления поддержки режима Server Core. И не забывайте об оболочке PowerShell, которая действительно является первым помощником администратора.
If you want to manage your RDS infrastructure remotely, simply install the RSAT tools compatible with your client version of Windows (7, 8, 8.1, …).
To learn how to download and install these RSAT tools, follow our tutorial : Remote Server Administration Tools (RSAT)
- Installation of RSAT tools
- Server Manager
- Remote management of user access licenses (CALs)
- Remote management of the RD gateway
1. Installation of RSAT tools
Once these tools are installed, go to : Control Panel -> Programs -> Programs and Features.
Then, click «Turn Windows Features on or off» and locate the «Remote Server Administration Tools» feature.
Deploy this node and check only these boxes :
- Server Manager : to manage RDS deployment, collections, RemoteApp programs, …
- Role Administration Tools -> Remote Desktop Services Tools : to Manage CAL licenses and your RD Gateway
Once these features are enabled, go to Control Panel -> System and Security -> Administrative Tools.
In this folder, you will find the «Server Manager».
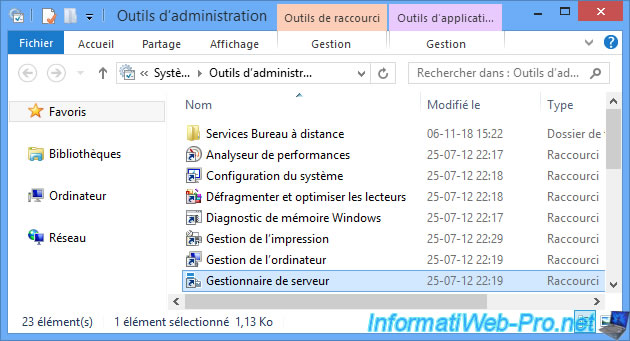
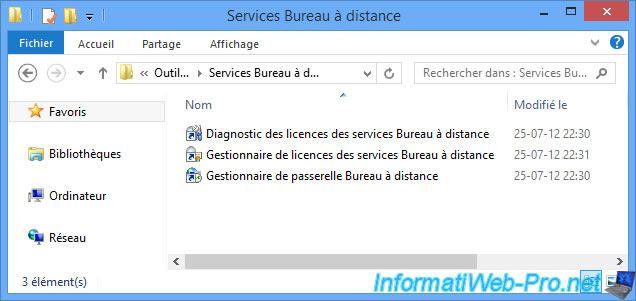
And tools specific to RDS in the «Remote Desktop Services» folder :
- RD Licensing Diagnoser
- RD Licensing Manager
- RD Gateway Manager
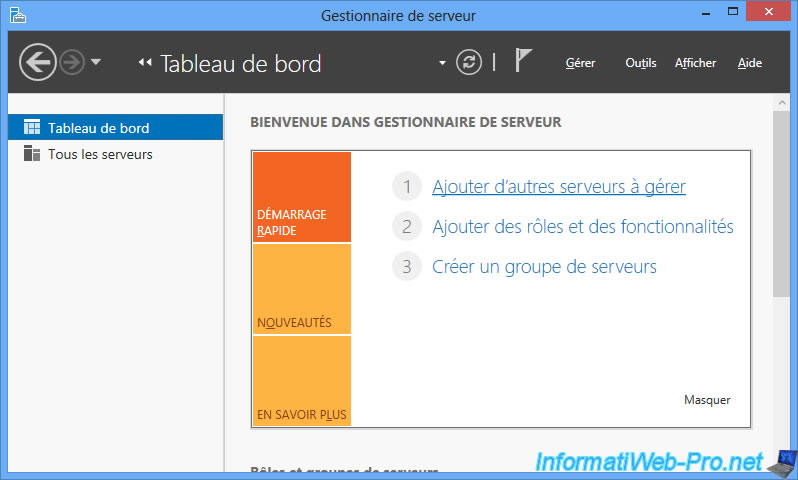
2. Server Manager
To manage your RDS infrastructure through the server manager, you will need to add the desired servers first.
To do this, click : Add other servers to manage.
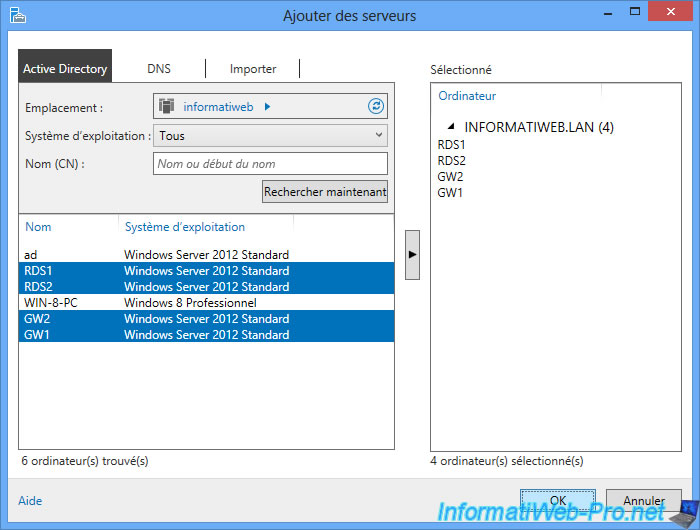
In the «Active Directory» tab, click «Search Now», then select your RDS servers and your RDS gateway servers (if you have them) and click on the arrow in the center.
The «Remote Desktop Services» tab will appear in the server manager and the list of your RDS servers will appear in the «Servers» section.
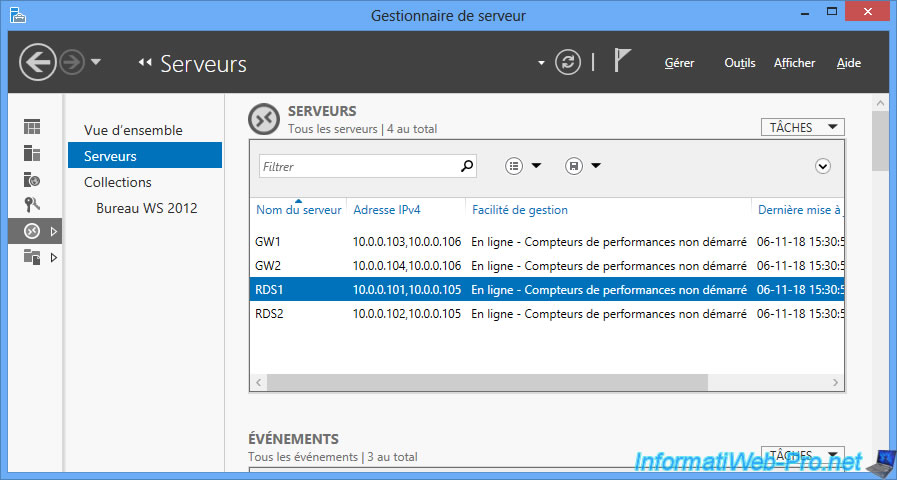
Please wait a bit and you will be able to access the overview of your RDS deployment as if you were on your RDS server.
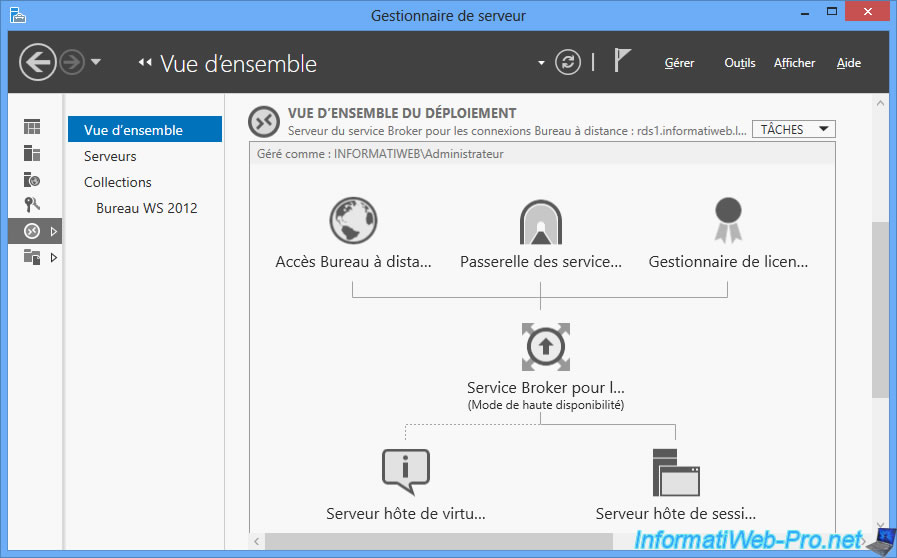
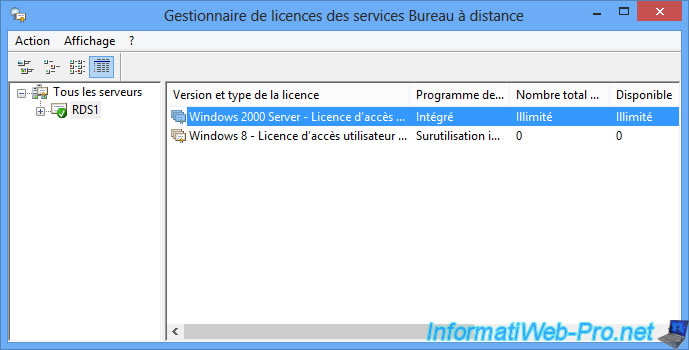
3. Remote management of user access licenses (CALs)
To get started, start the RD Licensing Manager.
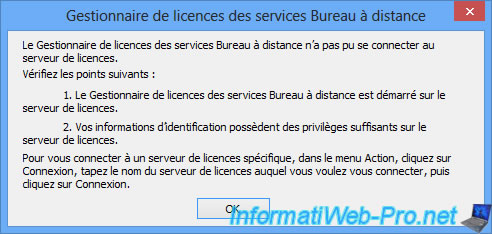
Once started, this license manager will warn you that it could not connect to the license server.
This is normal because it attempts to connect to the local PC by default and not to your RDS server.
To solve this problem, go to : Action -> Connection.
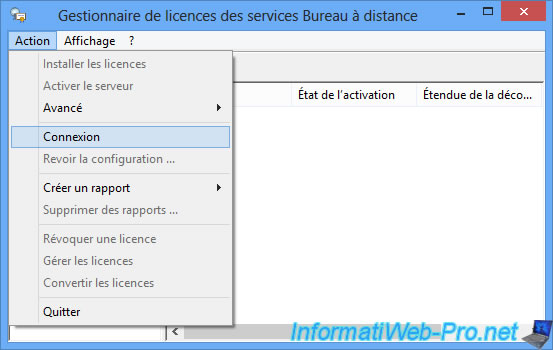
Enter the name of your RDS server and click : Connect.
Your license server appears.
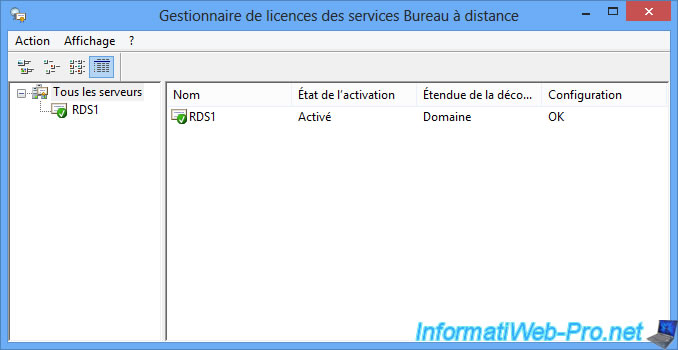
If you select it on the left, you will see your user access licenses.
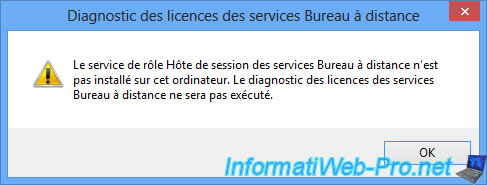
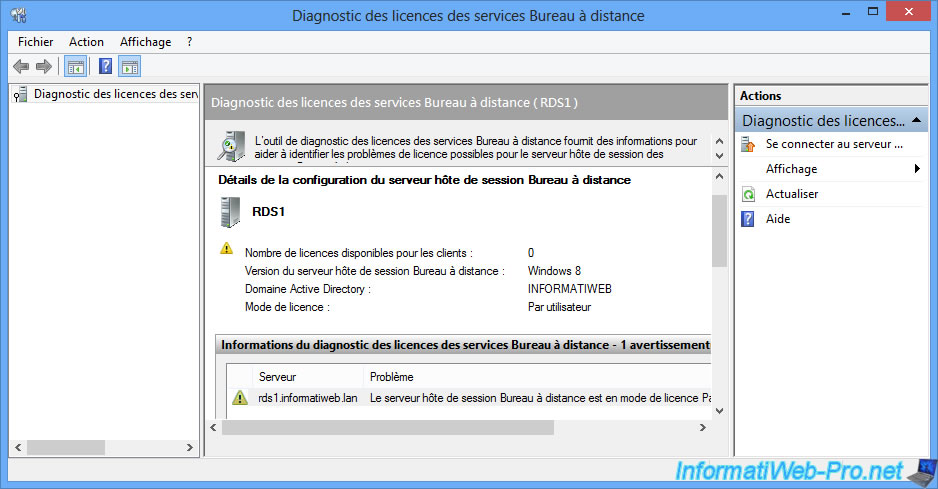
For the «RD Licensing Diagnoser» program, you will also receive a warning (for the same reason as the License Manager) :
The Remote Desktop Session Host role service is not installed on this computer. Licensing Diagnosis will not be run.
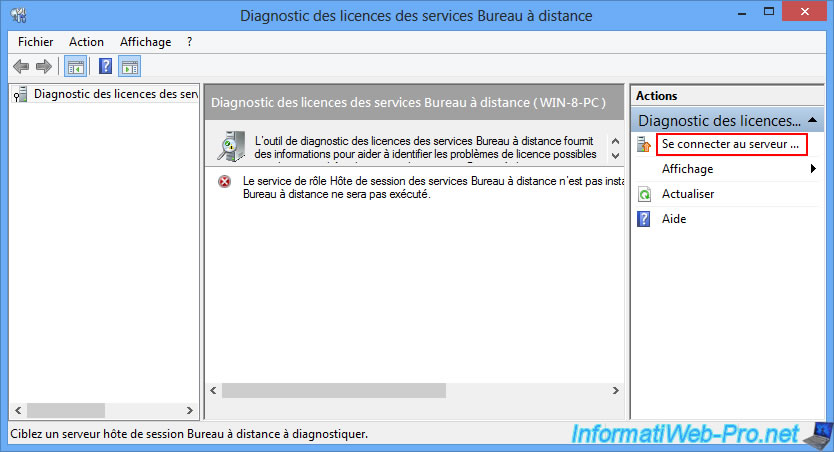
Click on «Connect to the server» at the top right.
Select «Another computer» and enter the name of your RDS server.
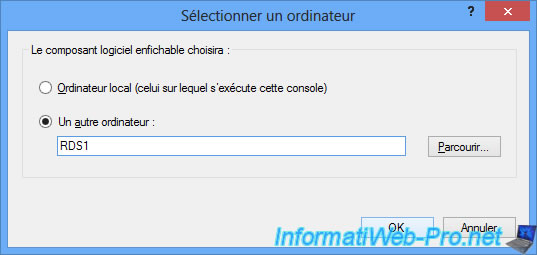
The program shows you the configuration details of your RD Session Host server.
Note that the warning displayed on the image below is simply due to the fact that we are currently using the grace period.
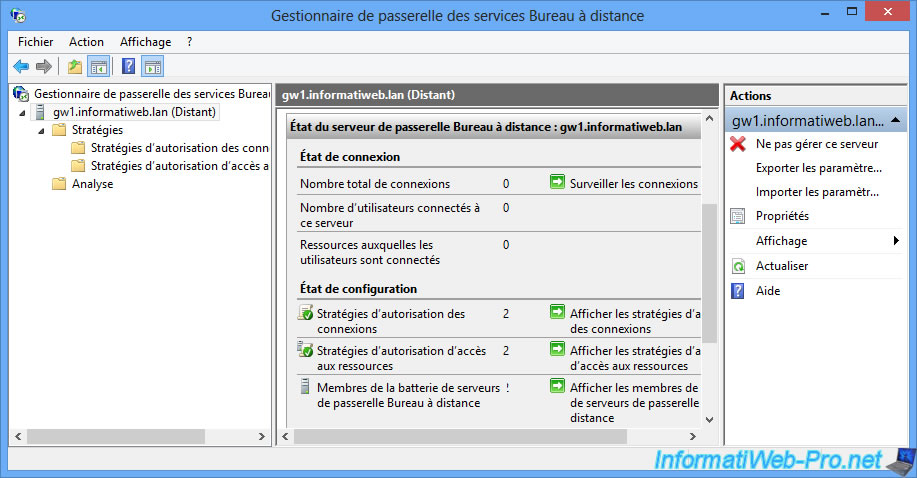
4. Remote management of the RD gateway
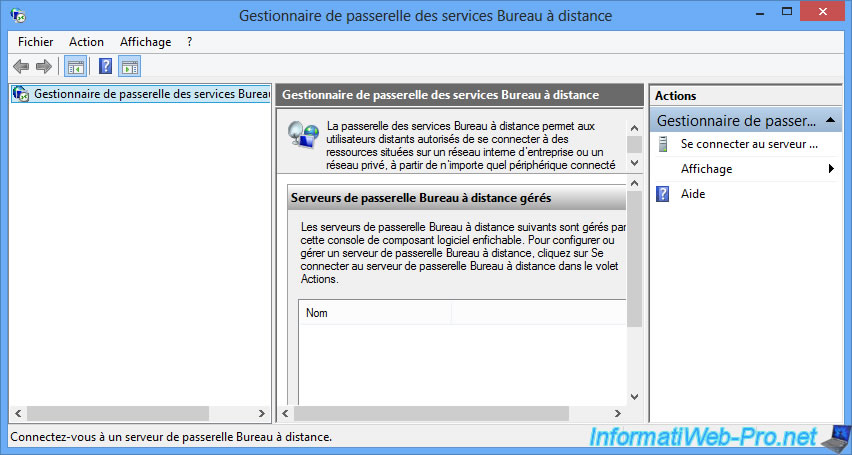
For the RD Gateway Manager, it will appear empty by default.
Click on «Connect to the server» at the top right.
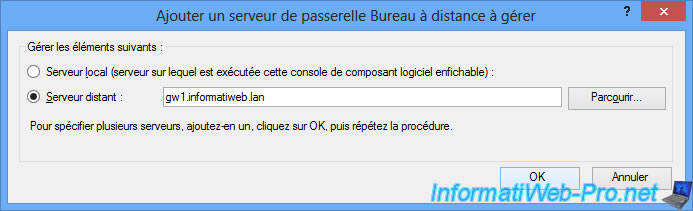
Provide the name of your RDS gateway server.
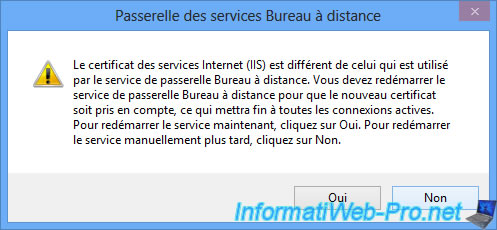
Ignore the warning about the certificate name.
Now, you have remote access to managing your RDS gateway.
If you are a system administrator and have lots of servers to manage in your environment, it’s always convenient to manage the servers from one location. Windows Remote Server Administrator Tools (RSAT) has been created with the same purpose in mind.
RSAT tools enable an administrator to install all the important management consoles on their own client computer and manage all the servers directly from it. The client computer may be running Windows, rather than Microsoft Server, enabling them to manage the remote servers with RSAT.
Table of Contents
Below you will find the download links of RSAT tools for all Windows operating systems including Windows 11, Windows 10, Windows 8.1, Windows 8, and Windows 7.
Remote Server Administration Tools (RSAT) enables system administrators to remotely manage roles and features in Windows Server 2012 R2, Windows Server 2012, Windows Server 2008, and Windows Server 2008 R2 from a computer that is running Windows.
RSAT Compatible Versions
You cannot install RSAT on computers that are running Home or Standard editions of Windows. You can install RSAT only on Professional, Enterprise, or Education editions of the Windows client operating system.
Unless the download page specifically states that RSAT applies to a beta, preview, or other pre-release versions of Windows, you must run a full (RTM) release of the Windows operating system to install and use RSAT.
Although some users have found ways of manually cracking or hacking the RSAT .MSU files to install RSAT on unsupported versions of Windows, this is a violation of the Windows end-user license agreement.
RSAT Installation
Installing RSAT is similar to installing Adminpak.msi on Windows 2000-based or Windows XP-based client computers. However, there is one major difference: On Windows Vista and Windows 7, the tools are not automatically available after you download and install RSAT.
You must enable the tools that you want to use by using the Control Panel. To do this, open the “Programs and Features” page in the Control Panel by typing in appwiz.cpl in Run, and then click “Turn Windows features on or off” from the left.
How to Access RSAT
In the RSAT releases for Windows 11, Windows 10, Windows 8.1, and Windows 8, the tools are enabled by default. You can open “Turn Windows features on or off” to disable the tools that you don’t want to use. In RSAT for Windows 11, Windows 10, Windows 8.1, and Windows 8, you access GUI-based tools on the “Tools” menu from within the Server Manager console.
RSAT Direct Download Links
You can download the respective RSAT from the links given below, according to your operating system. You can check your operating system’s version by typing in winver in Run.
whichever OS version you are using, you can easily download and install the RSAT for your Windows from here. All the links given are official and don’t contain any virus or ads.
Windows 11
Install RSAT for Windows 11
Windows 10 (Version 1809 or Later)
Install RSAT for Windows 10 Version 1809 or later
Windows 10 (Version 1803 or Earlier)
Download RSAT for Windows 10 All Versions
Windows 8.1
Download RSAT for Windows 8.1 (32-bit + 64-bit)
Windows 8
Download RSAT for Windows 8 (32-bit + 64-bit)
Windows 7
Download RSAT for Windows 7 (32-bit + 64-bit)
Closing Words
Remote Server Administration Tools enable sysadmins to configure multiple servers remotely while using a client (Windows) operating system. This way, they do not need to get up each time a configuration needs to be made, and neither do they need to have a Server operating system installed on their own computer.