
Есть машина под управлением домена. на ней была установлена Windows 10 pro 1607 на днях прилетел в WSUS апдейт до 1703. Обновились все норм казалось бы. Теперь если пользователь домена ранее не сидел за этим компом при попытке залогиниться когда создаётся локальный профиль пользователя на компе через пару секунд сразу пишет «Выход из системы» и выбрасывает обратно на ввод пароля и так можно делать до бесконечности. Если пользователь ранее логинился на этот комп то он логинится без проблем. Такая же проблема была после обновления с 1511 на 1607 и решалось заменой папки Default в папке юзверей, щас не прокатывает.
В ветке реестра [HKEY_LOCAL_MACHINE\SOFTWARE\Microsoft\Windows NT\CurrentVersion\Winlogon] параметры
«Userinit»=»C:\WINDOWS\system32\userinit.exe,» UIHost = «logonui.exe» Shell = «Explorer.exe»
Shell = «Explorer.exe»
присутствуют.
-
Вопрос задан
-
9106 просмотров
Попробуйте после подмены папки Default на заведомо исправную, зачистить сведения о новом пользователе (который не может залогиниться) в папке юзверей и в ветке реестра HKLM\SOFTWARE\Microsoft\Windows NT\CurrentVersion\ProfileList — она раскрывающаяся там удалите SID учетной записи пользователя, понять чей SID можно просмотрев параметры каждого.
Пригласить эксперта
В папке дефолтного юзера лежит какой-то файл, права на который не дают ему скопироваться в новый профиль.
Смотри эвентлог после такого, неудачного, логона.
-
Показать ещё
Загружается…
Минуточку внимания
Ты не написал, какая у тебя версия Windows. Тебе нужно выполнить восстановление системы. Если у тебя Windows 10, то тебе сюда:
http://remontcompa.ru/842-vosstanovlenie-windows-10.html
Но сначала попробуй проверь эти два параметра в реестре твоей системы:
Код:
[HKEY_LOCAL_MACHINE\SOFTWARE\Microsoft\Windows NT\CurrentVersion\Winlogon]
"Userinit"="C:\WINDOWS\system32\userinit.exe,"

[HKEY_CURRENT_USER\Software\Microsoft\Windows\CurrentVersion\Explorer\Advanced]
"PersistBrowsers"=dword:00000000
Они должны быть и должны иметь такие значения как указано выше.
Для того чтоб попасть в реестр не запущенной системы воспользуйся следующим способом:
Пример редактирования реестра из LiveCD или параллельно установленной системы:
- запустить Regedit
- установить указатель на HKEY_LOCAL_MACHINE
- меню Файл -> Загрузить куст -> указать папку с рухнувшей системой \WINDOWS\system32\config, открыть файл software
- задать имя куста, например SFT
- зайти в раздел HKEY_LOCAL_MACHINE\SFT\Microsoft\Windows NT\CurrentVersion\Winlogon и восстановить параметр Userinit
- меню Файл -> Выгрузить куст
Hello, on my Windows 10 PC that I updated today, whenever I type in my password it says, «Just a moment…» for a few minutes and then it takes me back to the Lock screen. And it’s like that, Rinse and repeat. — Microsoft Community
If you’re facing a similar issue, you’re not alone. Many Windows 10 users are stuck in a login loop. This article will explore the causes of this issue. We’ll also give you solutions to fix it. EaseUS guide you with step-by-step methods to fix the login screen loop and restore your computer. Our guide is for everyone. It’s easy to follow. It will help you fix this frustrating issue.
So, what triggers this frustrating login screen loop in Windows 10? Several factors can contribute to this issue. Here are some common culprits:
- Corrupted User Profile. A corrupted profile can stop Windows from loading your account. This can cause a login loop.
- Recent Windows Updates. A recent update can sometimes cause a login loop.
- Driver Issues. Outdated, corrupted, or incompatible drivers can cause a login loop.
- Invalid Password or PIN. Entering the wrong login credentials or relevant file corruption can cause a loop.
- Malware or Virus Infections. Malicious software can disrupt the login process. It may cause a loop or block access to your account.
How to Fix Windows 10 Login Screen Loop — Ways
To help you with the frustrating login loop, we’ll share seven ways to fix it. In the following sections, we’ll provide detailed steps and screenshots to guide you through each process. This will help you fix the problem and regain access to your Windows 10 system.
- Method 1. Boot Into Safe Mode and Restart
- Method 2. Uninstall Windows Update
- Method 3. Remove Windows Password
- Method 4. Run the System File Checker
- Method 5. Perform Boot Repair
- Method 6. Update Drivers
- Method 7. Reset Your PC
Method 1. Boot Into Safe Mode and Restart
If your Windows 10 system is stuck in a login screen loop, booting into Safe Mode and restarting can be a simple yet effective solution. This method bypasses any potentially problematic drivers or software that might be causing the issue.
Step 1. Reboot your computer when the Windows logo appears. Repeat it 2-3 times until you access Windows Recovery Environment.
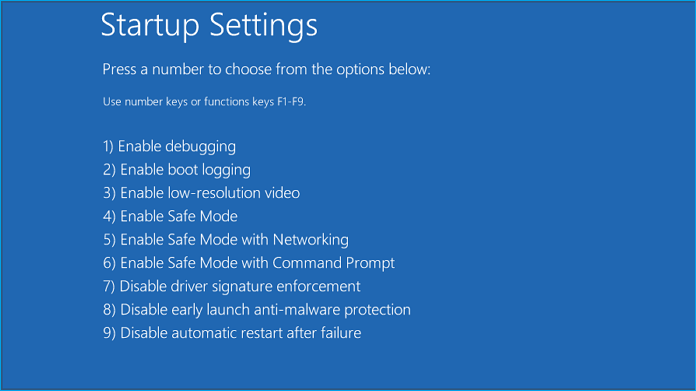
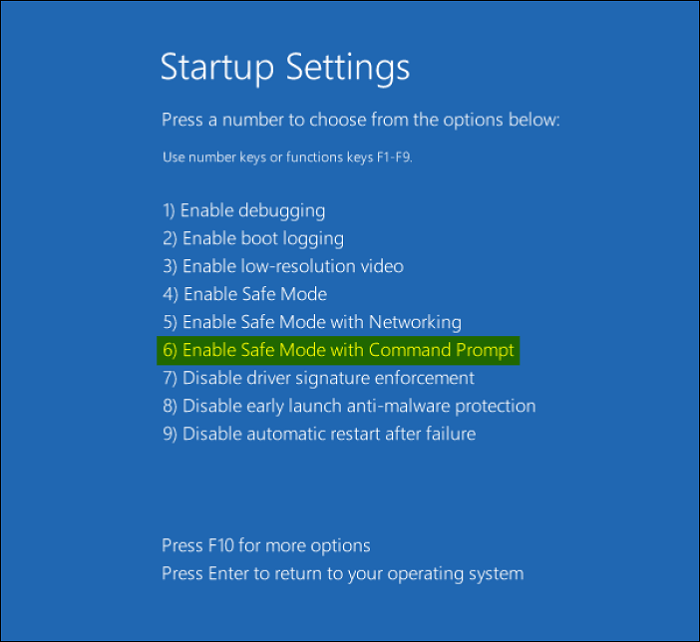
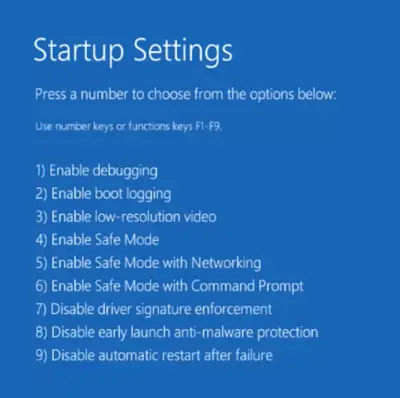
Step 2. Navigate to «Troubleshoot» > «Advanced options» > «Startup Settings» and press «4/F4» to select «Enable Safe Mode» in the menu. Your OS will load in Safe Mode, and the system may reload drivers and settings, causing the login screen loop issue.
Step 3. Then, reboot your computer to see if this would fix the login screen loop issue; otherwise, proceed to the following method if that doesn’t work.
Method 2. Uninstall Windows Update
If restarting from Safe Mode didn’t fix the problem, it may be due to a problematic Windows update. In this method, we’ll uninstall the most recent update and see if this resolves the login screen loop issue. If you are already in Safe Mode, let’s proceed with the steps. If not, you can check the steps above to access it.
Step 1. Open the Control Panel by pressing the «Win» key and type Contro Panel.
Step 2. Navigate to «Programs» > «Programs and Features,» where you can manage installed programs.
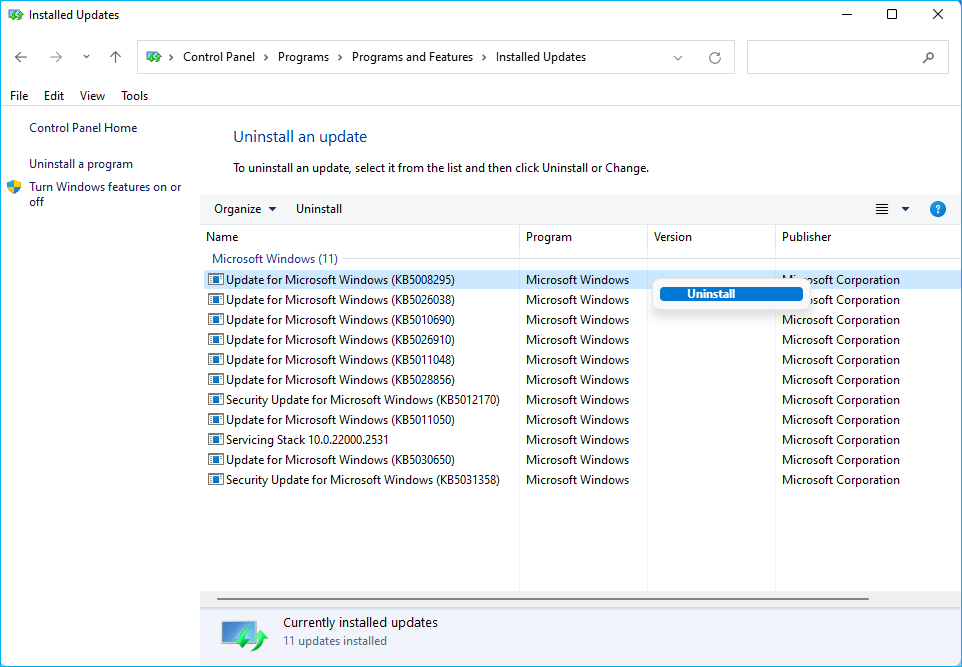
Step 3. Click «View installed updates» on the left side of the window to display a list of all installed updates.
Step 4. Sort the updates by date to find the latest update, which is likely the cause of the issue.
Step 5. Select the update and click the «Uninstall» button, then follow the prompts to confirm the uninstallation.
Step 6. Once the update is uninstalled, restart your computer normally to help your system adjust to the changes and potentially resolve the login screen loop issue.
🚩Read also: Windows 10 Won’t Boot After Update? Easy Fixes
Method 3. Remove Windows Password
If there’s a problem with your user profile, leading to the correct password or PIN becoming invalid, you’ll need to resort to a third-party tool to remove the Windows password.
We’ll use EaseUS WinRescuer. It’s a powerful, easy-to-use toolkit perfect for beginners. This program has a simple, intuitive interface, making it easy to use even for people with limited tech skills.
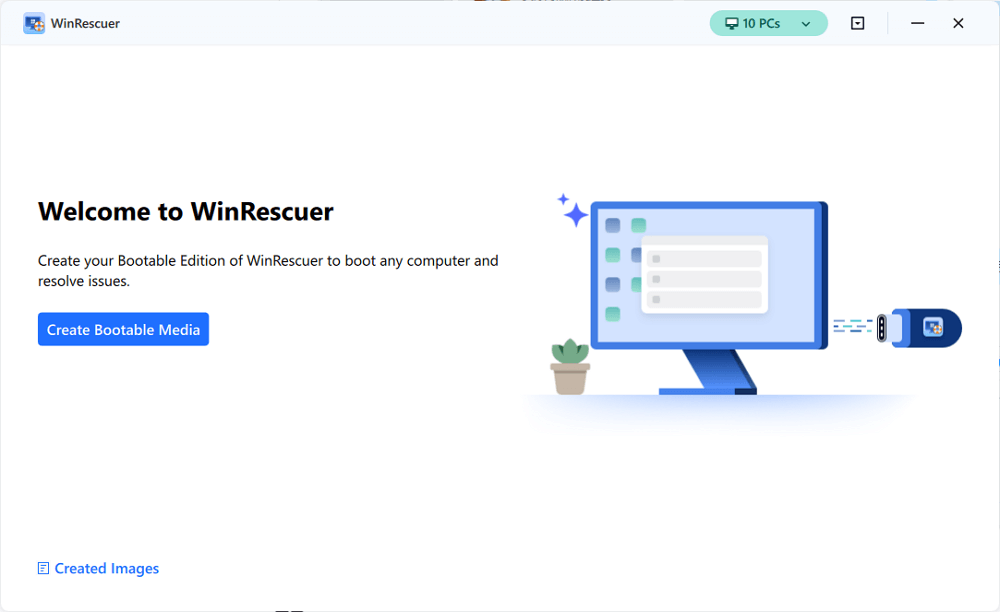
Step 1. Connect the USB drive/external drive to a working computer, open EaseUS WinRescuer, and click «Create Bootable Media.»
Step 2. Select EaseUS Boot Toolkits and other components you need. Then, click «Next.»

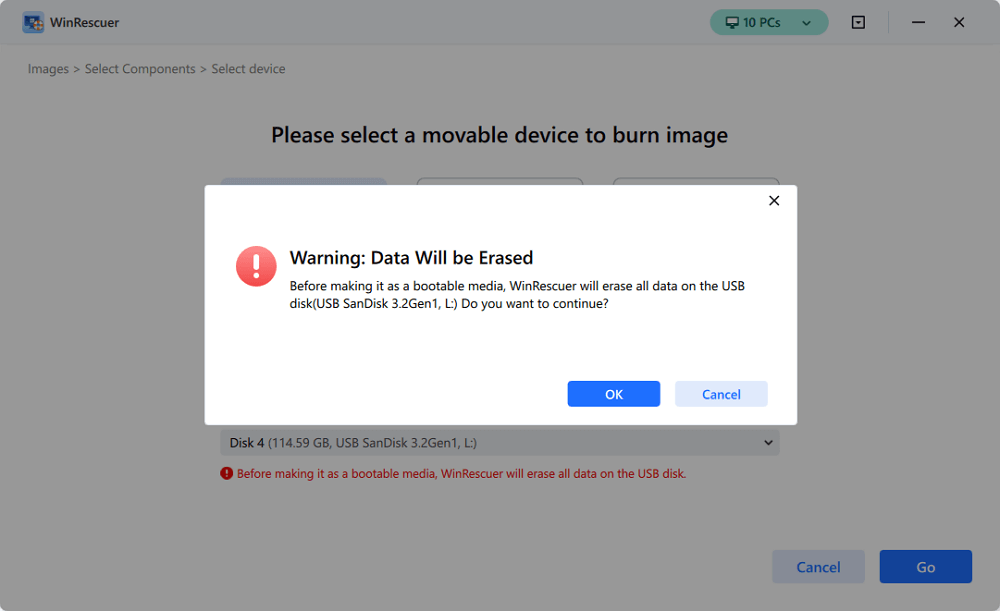
Step 3. Select your movable device and click «Go» to create an image on your USB drive/external drive.
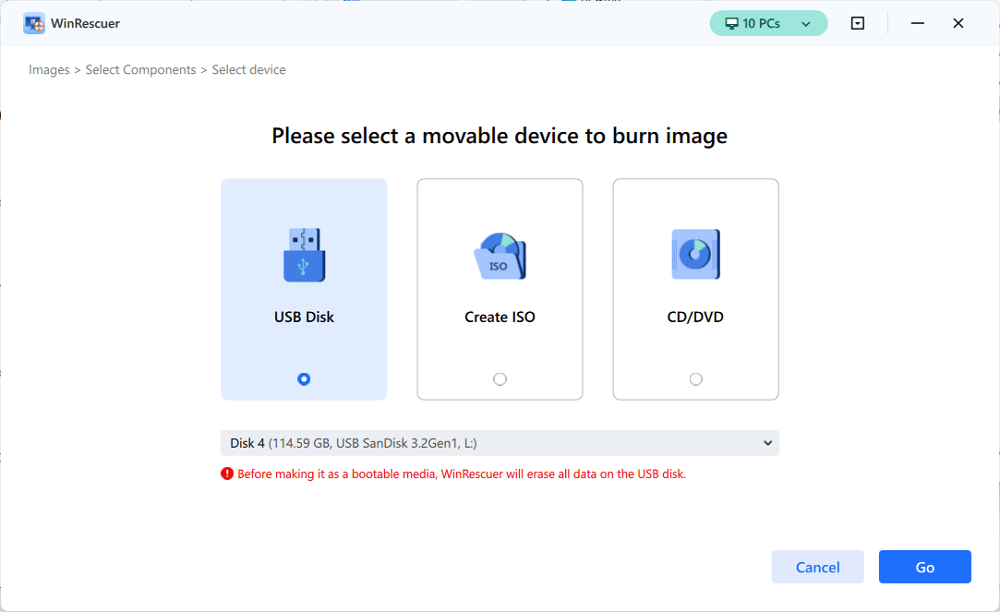
Step 4. Before making the bootable media, you will receive the warning message: data will be erased. Click «OK» to confirm.
Step 5. Connect the created bootable drive to the faulty computer and reboot it by pressing and holding «F2″/»Del» to enter the BIOS. Then, set the WinPE bootable drive as the boot disk and press «F10» to exit.

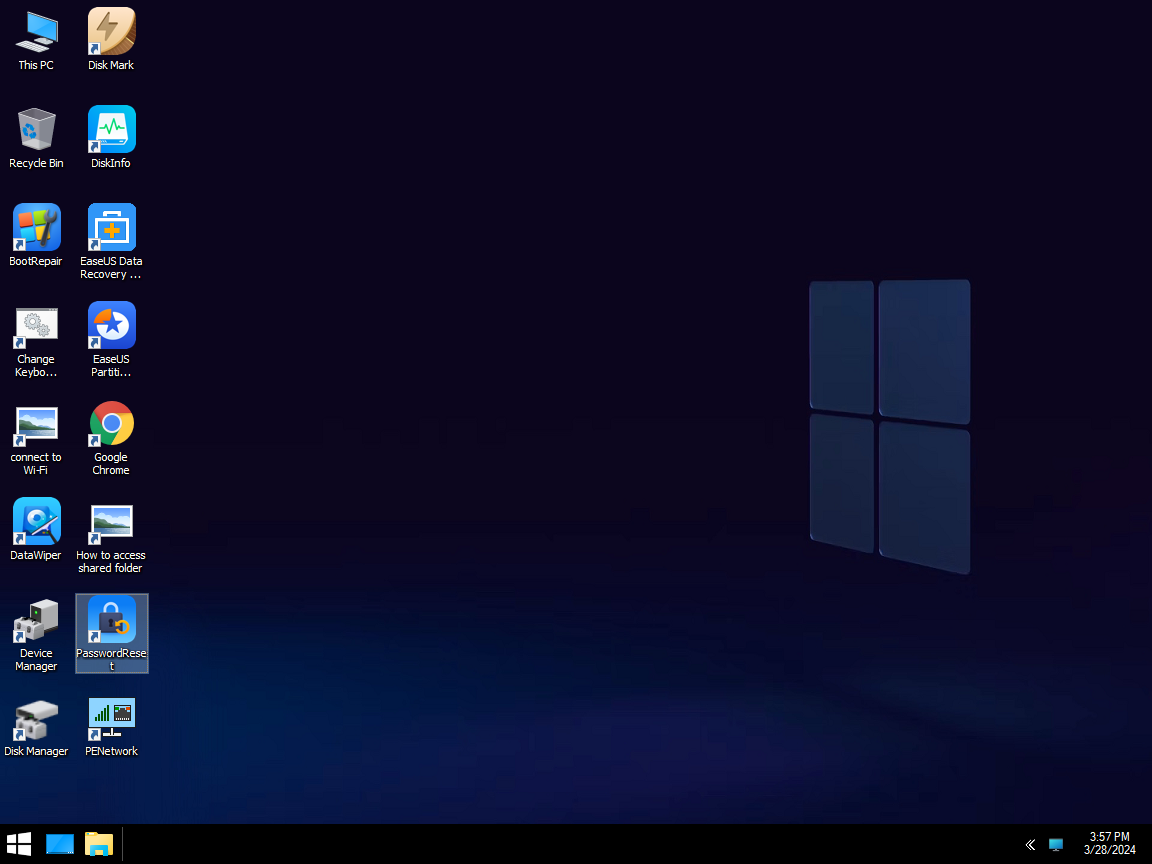
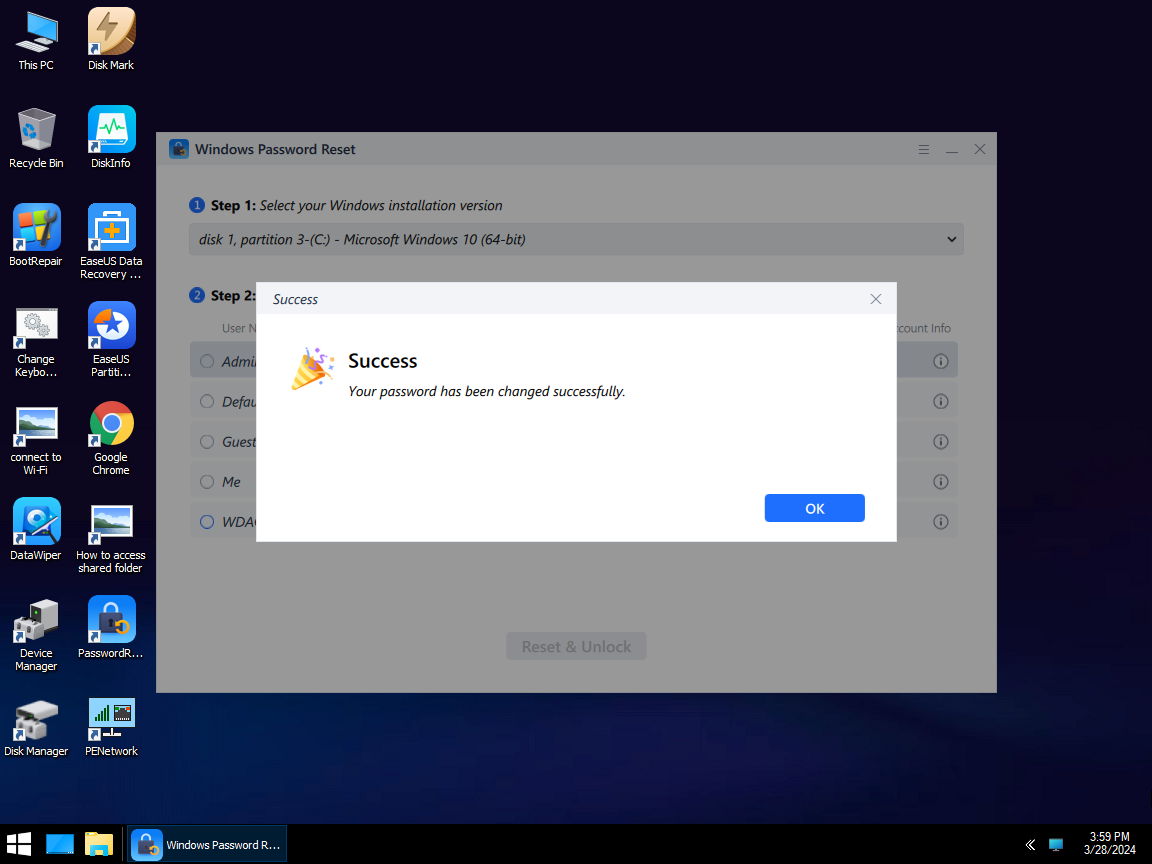
Step 6. Then, the computer will enter WinPE desktop. Find and launch Password Reset.
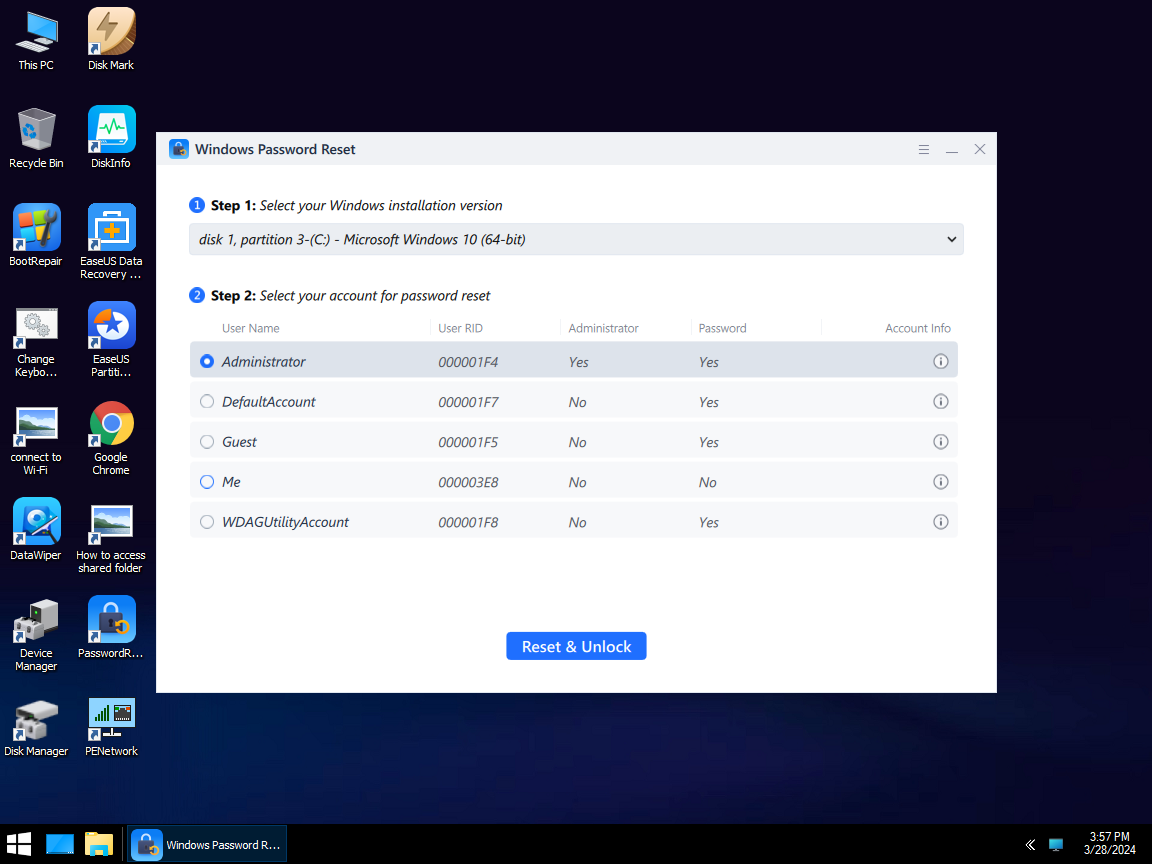
Step 7. Select your Windows version and choose the Windows account you want to reset.
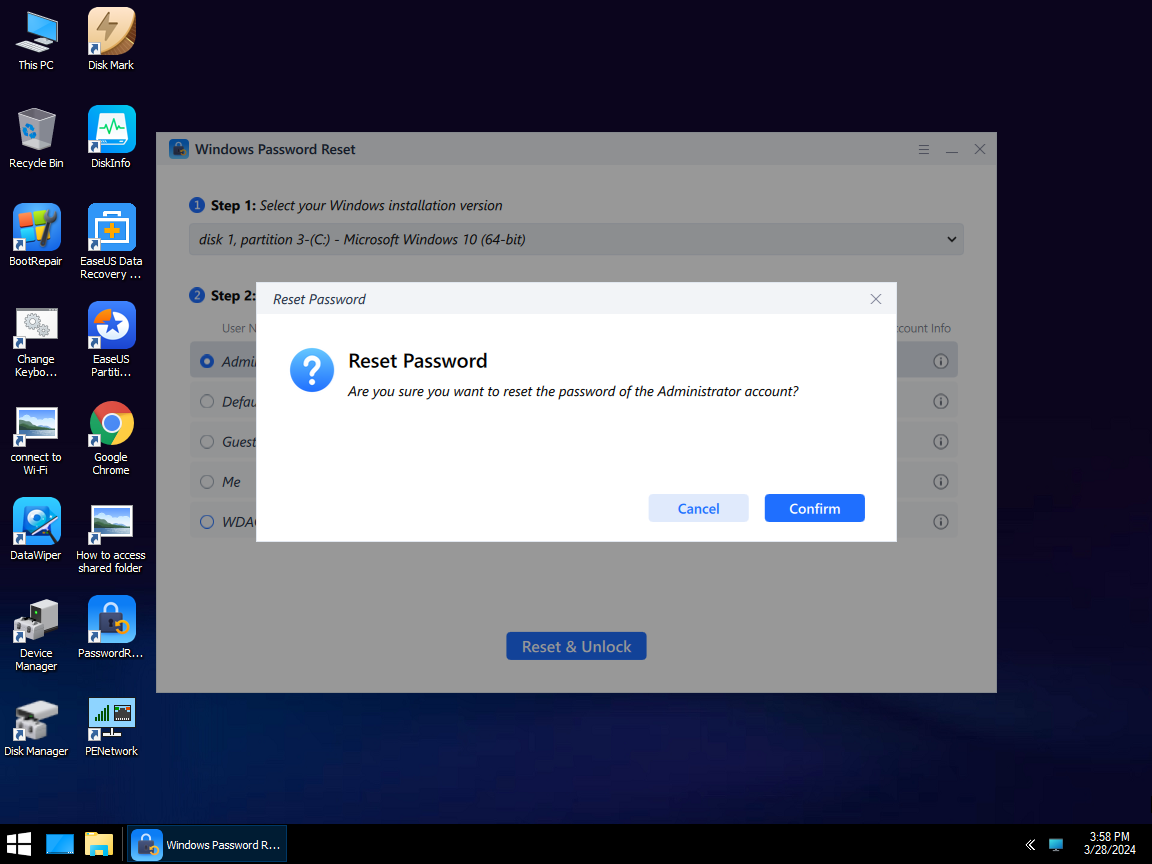
Step 8. When this prompts, click «Confirm» to continue resetting your Windows password.
Step 9. Wait patiently, and you will receive an message that the password has been changed successfully. Click «OK» to complete the password reset process.
With this powerful utility, you can reset the Windows password and log in again to your account. If that still doesn’t work, follow the next method.
Method 4. Run the System File Checker
If updating drivers didn’t fix the problem, it may be due to corrupted system files in the login screen loop. We will run the SFC — System File Checker command — inside Safe Mode in this method.
Step 1. Enter Safe Mode with Command Prompt. (You can refer to steps in Method 1)
Step 2. In the Command Prompt, type sfc /scannow. This will run the System File Checker Scan, which might take a while to complete.
Step 3. The SFC scan will search for all the protected files of the system and replace the corrupted file with a healthy one. If there are any infected files, then it will try to repair them. Let the scan complete its work, and if it prompts to restart then, restart your computer.
Once your computer is started again, check whether the login screen loop has been resolved. If not, follow the next method.
- Tip
- The SFC scan may take a while, so be patient and let it finish. You can also use a tool like EaseUS Partition Master. It’s for you if you’re not comfortable running the SFC scan manually.
Fixed: SFC (SFC / SCANNOW) Is Not Working on Windows
This article offers a practical guide on how to fix the SFC SCANNOW not working issue on your Windows computer. Continue reading to learn more. Read more >>
Method 5. Perform Boot Repair
If the System File Checker fixed nothing, the cause might be a corrupted boot sector or master boot record. We will use this method to repair the boot problems using the EaseUS WinRescuer’s Boot Repair feature.
It will fix corrupted boot sectors, master boot records, and boot configuration data. It helps users fix all problems occurring at system boot-up and gives them access back to their Windows account.
Step 1. Connect the USB drive/external drive to a working computer, open EaseUS WinRescuer, and click «Create Bootable Media.»
Step 2. Select EaseUS Boot Toolkits and other components you need. Then, click «Next.»
Step 3. Select your movable device and click «Go» to create an image on your USB drive/external drive. You can also burn the Windows ISO file to the storage media.
Step 4. Confirm the warning message and then wait for the creation process to complete.
Step 5. Connect the created bootable drive to the faulty computer and reboot it by pressing and holding «F2″/»Del» to enter the BIOS. Then, set the WinPE bootable drive as the boot disk and press «F10» to exit.
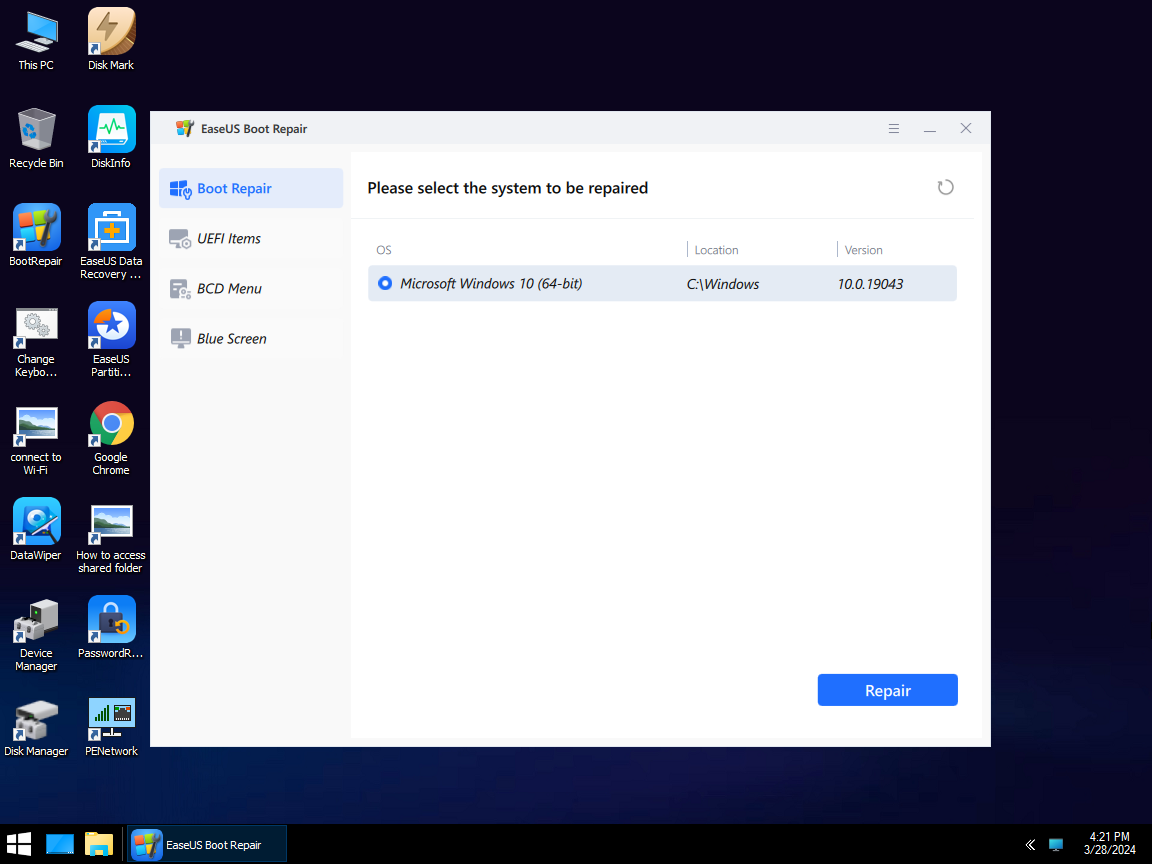
Step 6. Then, the computer will enter WinPE desktop. Open BootRepair, select the system you want to repair, and click «Repair.»
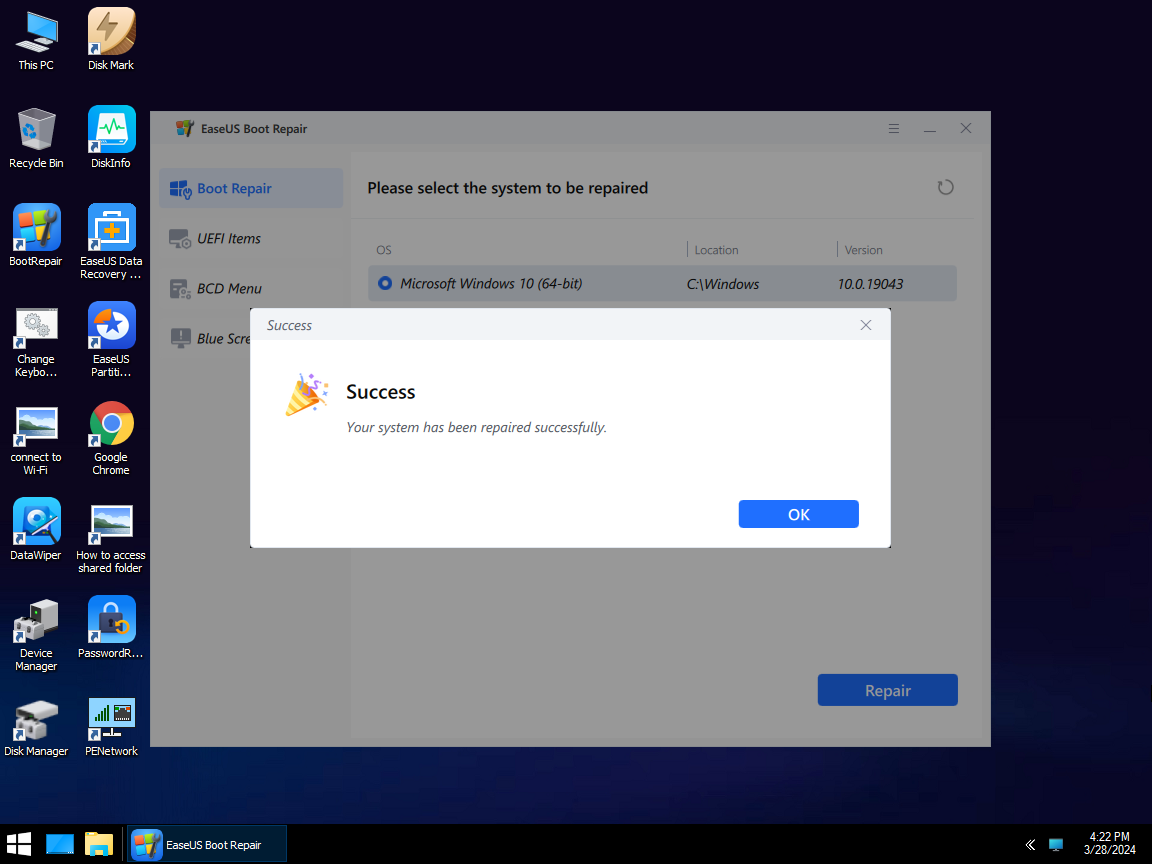
Step 7. Wait a moment, and you will receive an alert that the system has been successfully repaired. Click «OK» to complete the boot repair process.
Hopefully, this will fix the login screen loop issue. Beside login screen loop, this powerful tool can also fix many other system issues:
Method 6. Update Drivers
If the issue persists after turning off the Windows password, it may be due to outdated drivers. In this method, we will update these drivers in Safe Mode to smooth the booting process.
Step 1. Enter Safe Mode. (Detailed steps discussed in Method 1)
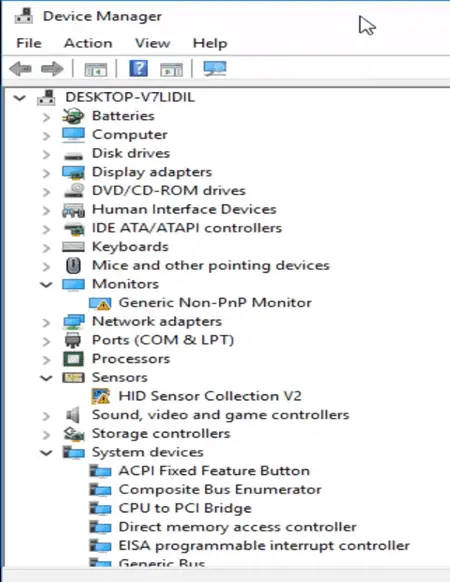
Step 2. In the Taskbar search box, enter Device Manager and open it.
Step 3. Click on each category to expand it. You will be able to view a list of devices for each of the categories, such as «Display adapters,» and so on.
Step 4. In the menu, look for devices just below that have a yellow exclamation mark or a red X. That means they are old or bad drivers.
Step 5. Right-click on it, click «Update driver,» and proceed.
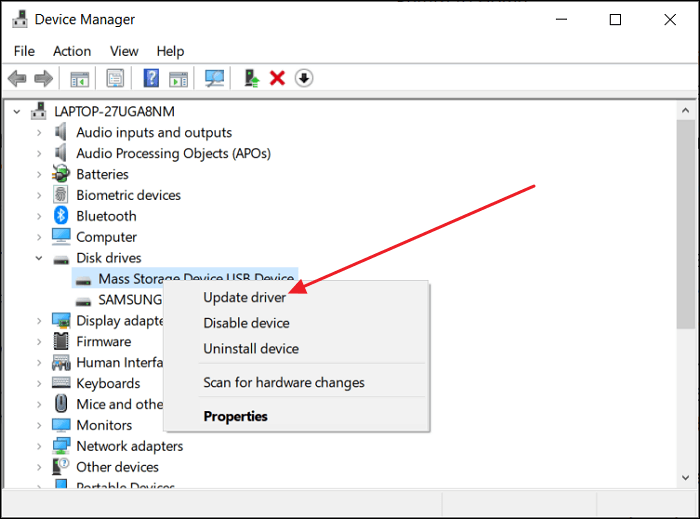
Step 6. After updating all the drivers, reboot your computer. Then, check if the login screen loop is fixed.
For those who prefer automatic updates, EaseUS DriverHandy is the solution. It scans for missing and outdated drivers. You can update them with a few clicks, saving you time and effort in resolving the issue.
Method 7. Reset Your PC
If any of the methods described above failed to fix your login screen loop, now is the time to reset your PC to factory defaults.
- Warning
- This will delete every personal data on your computer, so be sure you have backed up anything important before proceeding.
Step 1. Reboot your computer when the Windows logo appears. Repeat it 2-3 times until you access Windows Recovery Environment.
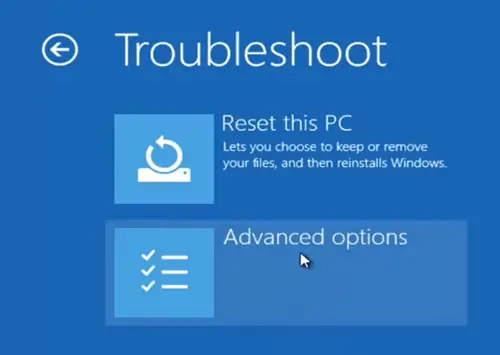
Step 2. Navigate to «Troubleshoot» > «Reset this PC.»
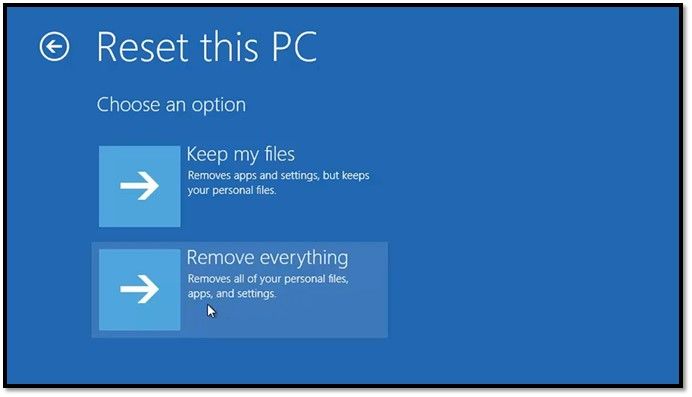
Step 3. A window asks you to choose between «Keep my files» and «Remove everything.» Since we are trying to fix something deep, let’s select «Remove everything» to reset Windows 10 fully.
Step 4. Put the prompts in order to acknowledge the choice and begin the reset. Your PC will reboot and start the reset, which will take some time.
Step 5. After the reset, you will have your PC set up as if you used it for the first time. On-screen instructions will help you finish setting up your PC.
After configuring your PC, check whether the login screen loop issue has been resolved. Otherwise, if the problem persists after this, it will be because of hardware-related matters and more professional advice may be needed.
If these methods above are helpful to you, please share them on your social media to assist more users.
Conclusion
The article provided up to 7 ways to fix a Windows 10 login screen loop. If one still has problems, EaseUS WinRescuer might be considered for deeper troubleshooting. With its powerful features and user-friendly interface, it is a perfect fit. Either by the other methods above or with EaseUS WinRescuer, you should be able to fix this problem and get back into your Windows account.
FAQs about Windows 10 Login Screen Loop
-
Q
1. Can I bypass a Windows login screen?
-
You can bypass the Windows login screen by either.
- Resetting or removing the password using third-party tools, like EaseUS WinRescuer.
- Booting in Safe Mode and turning off the login screen.
Be careful in bypassing the login screen. It will weaken your account’s security.
-
Q
2. How to fix Windows stuck on the login screen?
- To fix Windows stuck on the login screen, update drivers, run System File Checker, and reset your PC. When all else fails, try the advanced troubleshooting features of EaseUS WinRescuer. They are robust and easy to use.
-
Q
3. Can you log into Windows 10 without a password?
- If you’re locked out of Windows 10 and don’t remember your password, you cannot log in without it unless you have a password reset disk or a Microsoft account for recovery. If you have a reset disk, use it to reset your password. Otherwise, you may need third-party recovery tools, which can be complex
Windows 10 users have been facing login screen loop issues for the past couple of months. When the login screen pops up, ask the user to key-in login information, and after hitting enter, it goes back to the same login screen again. In this post, we will talk more about Windows 10 login screen loop issue, why it happens, and how to fix this problem.
Causes for Windows 10 Login Screen Loop:
- The first and foremost reason for this problem is the recently installed Windows Update. Most of us are aware that Microsoft deploys updates to keep the OS up to date. However, there are situations where newly installed Windows Update doesn’t get installed correctly, or conflict between any third-party applications causes a breakdown
- Second reason would-be third-party applications recently installed/updated device drivers
- Third would be connected peripheral devices that don’t fit properly with the newer version of Windows 10 after the Windows update, which mixes up with already running OS and causes such issues.
- Another reason is upgrading from the previous version of Windows to Windows 10. When a user upgrades to the newest build of Windows 10 using an option provided by Windows 10 installer, it upgrades or migrates all files/applications/drivers and many more. Thus, if an application is not at all compatible with Windows 10, it will start creating a problem like not responding, login screen error, graphics error, or an issue with the registry or policies.
As we now understand all Windows 10 login screen loop scenarios, let’s work together to troubleshoot this issue.
How to Fix Windows 10 Login Screen Loop (Glitch):
Here are a few ways via which we can resolve this problem.
Solution 1:
- Try to restart the computer or do a hard shutdown, if required.
- While restarting the computer, press F12 to open Advanced Troubleshooting Wizard
- Select Safe Mode and login into the computer
- Once logged in Safe Mode, restart and login back in normal mode and check
Abstract of solution 1, exactly what we are trying to do is booting the computer in safe mode -> logging in and restarting it back in a standard way.
It looks pretty straightforward and doesn’t make sense from the top. However, under the hood, what is happening is when a system is updated and the computer boots up for the first time. It checks for all dependent files in the registry/application and then starts.
When these issues occur, the startup files don’t load, thus causing such problems. When we restart the computer in safe mode and complete the login process, the startup file used by Windows gets refreshed and loads without any interferences on its next boot.
Microsoft uses these phenomena in its LKGC (last known good configuration) boot option.
Solution 2:
- Try to restart the computer in the advanced troubleshooting option by pressing F12 while starting the computer or holding the “SHIFT” key while clicking on the restart button
- Boot the computer in Safe mode with networking by going to Troubleshoot -> advanced option -> startup settings -> safe mode with networking
- Go to device manager by typing “device manager” on the search bar at the bottom left-hand corner.
- Look for any device manager with a yellow triangle, right-click -> try to update the driver.
- If it is an externally connected device, try to disconnect after shutting down the computer.
- Reboot the computer in normal mode and see how it works.
Abstract of Solution 2: In this step, we are running the computer in safe mode with networking, logging into the device manager and updating drivers.
Solution 3:
- Boot the computer in the advanced troubleshooting wizard -> System Restore
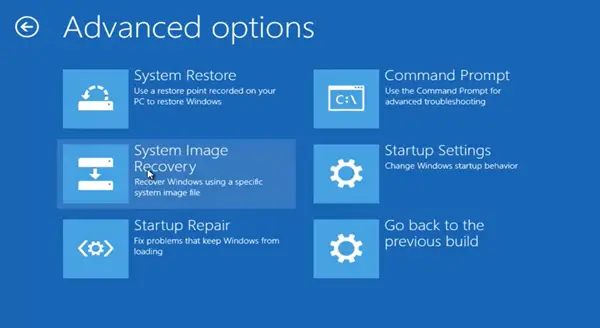
- Look for the restore point and try to do a system restore to the previous date
- The system will automatically start in normal mode if the restore is successful
Abstract of Solution 3: Usually, when a new Windows Update is installed before Windows perform the installation, it creates a restore point on its own automatically. Hence, if the Windows 10 login screen loop issue started after Windows Update, it can easily be rolled back using a restore point.
Related: How to fix scanning drive 100% stuck on Windows 10
Solution 4:
- Boot the computer in advanced troubleshooting wizard -> command prompt
- It will open a command prompt Window
- Run check disk to see any internal disk error by typing; “chkdsk /f /r “and hitting enter
- Check disk will look for bad sectors, tries to recover information saved on the disk and fixes the errors
- Once the check disk process is complete, we need to run the system file checker tool (/scannow) to scan all protected system files and folders, repair and replace them with a fresh cached copy of such corrupt files, which is saved in compressed format in %WinDir%\System32\dllcache
- After /scannow is completed, type: Repair-WindowsImage -Online -RestoreHealth and press enter
- Wait for the above step to complete, then restart the computer and try to log in.
Abstract of Solution 4: In this step, we run a scan on the hard disk for any violations or errors and try to fix them using a cache file saved in compressed format in the OS.
Solution 5:
- If you can log in to the computer and it freezes, try creating a new user profile
- A new user profile can be created by going to Run Window and typing “control userpasswords2” -> enter
- It will open the user account window, click Add -> enter username -> select type of access “administrator”, “user” and click create.
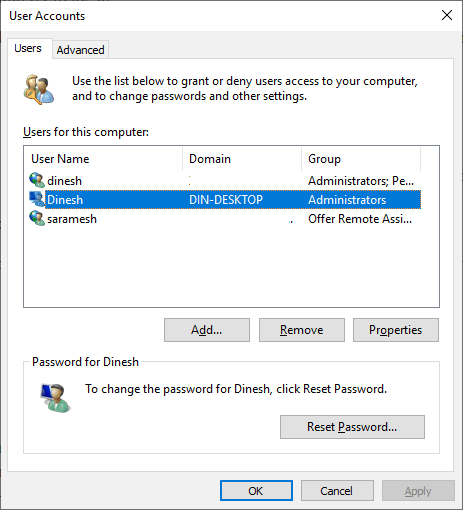
- At last, click and apply and close the window.
- Use the switch user option to login into the new user profile and see how it works.
Abstract of Solution 5: In this step, we are creating a new user account using a shortcut key and trying to see if this issue is specific to a user account. User account-related subjects can be resolved using a new user account process.
Solution 6:
- Boot the computer in advanced troubleshooting wizard -> Troubleshoot -> advanced option -> startup settings -> safe mode
- Go to the search bar at the bottom left-hand corner, type “System Configuration,” ->enter
- System Configuration window will pop up-> go to “Boot” tab -> under Boot options -> uncheck “Safe Boot” option -> apply-> okay
- Restart the computer and see if you are still getting login screen loop error
Abstract of Solution 6: Sometimes, we have seen, the system automatically checks the safe mode option on the OS, and it freezes on the login screen as system start files are unaware of such collision; hence when it recognizes it freezes at the point. Therefore, starting the computer in safe mode and looking for this option and unchecking under the system configuration Window will solve the problem.
Solution 7 (Other options):
- If you are unable to resolve the issue after following the above step, try to disconnect the computer from the network (turn off LAN, Wi-Fi)
- Restart the computer and check for the issue
- If nothing works, then boot the computer in the advanced troubleshooting wizard -> reset the PC
Abstract of Solution 7: All other possible ways to resolve the problem are pointed out in this step, like disabling networking options and resetting the PC to factory settings.
Windows 11 Login Loop, Can it Happen?
So far, none of the Windows 11 updates create this login screen loop/stuck/glitch issues. But few users reported the infinity login loop while making the PIN. The online user account and connected PIN could cause this problem. You may encounter this issue, especially when returning the Windows 11 PC from hibernation or using any virtualization software.
As the first solution, you should install all pending updates on Windows 11. Also, update the virtualization software to the latest release, which supports Windows 11 officially.
It is worth trying the other above solutions we mentioned for Windows 10.
If you ever faced a Windows 10 login screen loop/glitch issue on your computer, let us know which solution worked for you in your comments below.
Реализация DI в PHP
Jason-Webb 13.05.2025
Когда я начинал писать свой первый крупный PHP-проект, моя архитектура напоминала запутаный клубок спагетти. Классы создавали другие классы внутри себя, зависимости жостко прописывались в коде, а о. . .
Обработка изображений в реальном времени на C# с OpenCV
stackOverflow 13.05.2025
Объединение библиотеки компьютерного зрения OpenCV с современным языком программирования C# создаёт симбиоз, который открывает доступ к впечатляющему набору возможностей. Ключевое преимущество этого. . .
POCO, ACE, Loki и другие продвинутые C++ библиотеки
NullReferenced 13.05.2025
В C++ разработки существует такое обилие библиотек, что порой кажется, будто ты заблудился в дремучем лесу. И среди этого многообразия POCO (Portable Components) – как маяк для тех, кто ищет. . .
Паттерны проектирования GoF на C#
UnmanagedCoder 13.05.2025
Вы наверняка сталкивались с ситуациями, когда код разрастается до неприличных размеров, а его поддержка становится настоящим испытанием. Именно в такие моменты на помощь приходят паттерны Gang of. . .
Создаем CLI приложение на Python с Prompt Toolkit
py-thonny 13.05.2025
Современные командные интерфейсы давно перестали быть черно-белыми текстовыми программами, которые многие помнят по старым операционным системам. CLI сегодня – это мощные, интуитивные и даже. . .
Конвейеры ETL с Apache Airflow и Python
AI_Generated 13.05.2025
ETL-конвейеры – это набор процессов, отвечающих за извлечение данных из различных источников (Extract), их преобразование в нужный формат (Transform) и загрузку в целевое хранилище (Load). . . .
Выполнение асинхронных задач в Python с asyncio
py-thonny 12.05.2025
Современный мир программирования похож на оживлённый мегаполис – тысячи процессов одновременно требуют внимания, ресурсов и времени. В этих джунглях операций возникают ситуации, когда программа. . .
Работа с gRPC сервисами на C#
UnmanagedCoder 12.05.2025
gRPC (Google Remote Procedure Call) — открытый высокопроизводительный RPC-фреймворк, изначально разработанный компанией Google. Он отличается от традиционых REST-сервисов как минимум тем, что. . .
CQRS (Command Query Responsibility Segregation) на Java
Javaican 12.05.2025
CQRS — Command Query Responsibility Segregation, или разделение ответственности команд и запросов. Суть этого архитектурного паттерна проста: операции чтения данных (запросы) отделяются от операций. . .
Шаблоны и приёмы реализации DDD на C#
stackOverflow 12.05.2025
Когда я впервые погрузился в мир Domain-Driven Design, мне показалось, что это очередная модная методология, которая скоро канет в лету. Однако годы практики убедили меня в обратном. DDD — не просто. . .