
🔗 Does Squid run on Windows ?
Squid can compile and run on Windows as a system service using the
Cygwin emulation environment, or can be
compiled in Windows native mode using the MinGW + MSYS
development environment. All modern Windows versions are supported
The original development code name of the 2.5 project port was
SquidNT, but after the 2.6.STABLE4 release, this project was
complete. So when speaking about Squid on Windows, people should
always refer to Squid, instead to the old SquidNT name.
🔗 Known Limitations
🔗 Unavailable features
- DISKD: still needs to be ported
- Transparent Proxy: missing Windows non commercial interception
driver - WCCP: these features have not been ported. Without transparent
proxy support there is no need or use. - SMP support: Windows equivalent of UDS sockets has not been
implemented - Some code sections can make blocking calls.
- Some external helpers may not work.
- File Descriptors number hard-limited to 2048 when building with
MinGW.
🔗 Pre-Built Binary Packages
Packages available for Squid on multiple environments.
🔗 Squid-4
Maintainer: Rafael Akchurin, Diladele B.V.
Bug Reporting: (about the installer only)
https://github.com/diladele/squid-windows/issues
MSI installer packages for Windows are at:
- 64-bit: http://squid.diladele.com/
🔗 Squid-3.3
Bug Reporting: see https://cygwin.com/problems.html
Binary packages for the Cygwin environment on Windows are at:
- 32-bit: https://cygwin.com/packages/x86/squid/
- 64-bit: https://cygwin.com/packages/x86_64/squid/
🔗 Installing Squid
🔗 Installing with Cygwin
The usage of the Cygwin environment is very similar to other Unix/Linux
environments, and -devel version of libraries must be installed.
Squid will by default, install into /usr/local/squid.
If you wish to install somewhere else, see
the –prefix option for configure when building
Now, add a new Cygwin user (see the Cygwin user guide) and map it to
SYSTEM, or create a new NT user, and a matching Cygwin user and they
become the squid runas users.
Read the squid FAQ on permissions if you are using CYGWIN=ntsec.
Now, configure cygrunsrv to run Squid as a service as the chosen
username. You may need to check permissions here.
🔗 Service
Command line options for the Windows service support:
-
-n switch to specify the Windows Service Name. Multiple Squid
service instances are allowed. Squid is the default when the
switch is not used. All service control operations use this switch
to identify the destination instance being targeted. -
-i switch to install the Windows service. It’s possible to use
-f switch at the same time to specify a different squid.conf
file for the Squid Service that will be stored on the Windows
Registry. To install the service, the syntax is:squid -i [-f file] [-n service-name] -
-r switch will uninstall the Windows service. Use the
appropriate -n switch to determine which service instance is
being removed. To uninstall the service, the syntax is:squid -r [-n service-name] -
-k switch is not new, but requires the use of -n to target
the service instance. The syntax is:squid -k command [-f file] [-n service-name]
🔗 Command Line
To use the Squid original command line, the new -O switch must be
used ONCE, the syntax is:
squid -O cmdline [-n service-name]
If multiple service command line options must be specified, use quote.
The -n switch is needed only when a non default service name is in
use.
Do not use the “Start parameters” in the Windows 2000/XP/2003 Service
applet. They are specific to Windows services functionality and
Squid is not able to interpret and use them.
In the following example the command line of the “squidsvc” Squid
service is set to “-D -u 3130”:
squid -O "-u 3130" -n squidsvc
🔗 Cache Manager CGI on Windows
On Windows, cache manager
can be used with Microsoft IIS or Apache. Some specific configuration
could be needed:
-
IIS 6 (Windows 2003):
- On IIS 6.0 all CGI extensions are denied by default for security,
so the following configuration is needed:
— Create a cgi-bin Directory
— Define the cgi-bin IIS Virtual Directory with read and CGI
execute IIS permissions, ASP scripts are not needed. This
automatically defines a cgi-bin IIS web application
— Copy cachemgr.cgi into cgi-bin directory and look to file
permissions: the IIS system account and SYSTEM must be able
to read and execute the file
— In IIS manager go to Web Service extensions and add a new
Web Service Extension called “Squid Cachemgr”, add the
cachemgr.cgi file and set the extension status to Allowed
- On IIS 6.0 all CGI extensions are denied by default for security,
-
Apache:
On Windows, cachemgr.cgi needs to create a temporary file, so
Apache must be instructed to pass the TMP and TEMP Windows
environment variables to CGI applications:ScriptAlias /squid/cgi-bin/ "c:/squid/libexec/" <Location /squid/cgi-bin/cachemgr.cgi> PassEnv TMP TEMP Order allow,deny Allow from workstation.example.com </Location>
🔗 Configuration Guides
- Windows Update
- Active Directory Authentication
- Kerberos Authentication
-
NTLM Authentication
These and many other general manuals in the ConfigExamples
section.
🔗 Registry DNS lookup
On Windows platforms, if no value is specified in the
dns_nameservers
option in squid.conf or in the /etc/resolv.conf file, the list of DNS
name servers are taken from the Windows registry, both static and
dynamic DHCP configurations are supported.
🔗 Compatibility Notes
- It’s recommended to use ‘/’ char in Squid paths instead of ‘\’
- Paths with spaces (like ‘C:\Programs Files\Squid) are NOT
supported by Squid -
When using ACL like
‘acl aclname acltype “file”’
the file must be in DOS text format (CR+LF) and the full
Windows path must be specified, for example:acl blocklist dstdomain "c:/squid/etc/blocked1.txt" - The Windows equivalent of ‘/dev/null’ is ‘NUL’
-
Squid doesn’t know how to run external helpers based on scripts,
like .bat, .cmd, .vbs, .pl, etc. So in squid.conf the interpreter
path must be always specified, for example:url_rewrite_program c:/perl/bin/perl.exe c:/squid/libexec/redir.pl url_rewrite_program c:/winnt/system32/cmd.exe /C c:/squid/libexec/redir.cmd - When Squid runs in command line mode, the launching user account
must have administrative privilege on the system - “Start parameters” in the Windows 2000/XP/2003 Service applet cannot
be used - On Windows Vista and later, User Account Control (UAC) must be
disabled before running service installation
🔗 Compiling
configure options
- –enable-win32-service
- –enable-default-hostsfile
Unsupported configure options:
- –with-large-files: No suitable build environment is available on
both Cygwin and MinGW, but –enable-large-files works fine
🔗 Compiling with Cygwin
In order to compile Squid, you need to have Cygwin fully installed.
The usage of the Cygwin environment is very similar to other Unix/Linux
environments, and -devel version of libraries must be installed.
🔗 Compiling with MinGW
Requires the latest packages from https://osdn.net/projects/mingw/ with GCC 8 or later compiler.
This section needs re-writing. This environment has not successfuly built since Squid-3.4.
In order to compile squid using the MinGW environment, the packages
MSYS, MinGW and msysDTK must be installed. Some additional libraries and
tools must be downloaded separately:
- OpenSSL: Shining Light Productions Win32 OpenSSL
- libcrypt: MinGW packages repository
- db-1.85: TinyCOBOL download area
3.2+ releases require a newer 4.6 or later version of libdb
Before building Squid with SSL support, some operations are needed (in
the following example OpenSSL is installed in C:\OpenSSL and MinGW in
C:\MinGW):
- Copy C:\OpenSSL\lib\MinGW content to C:\MinGW\lib
- Copy C:\OpenSSL\include\openssl content to
C:\MinGW\include\openssl - Rename C:\MinGW\lib\ssleay32.a to C:\MinGW\lib\libssleay32.a
Unpack the source archive as usual and run:
    ./configure \
        --enable-build-info="Windows (MinGW32)" \
        --prefix=c:/squid \
        --enable-default-hostsfile=none

    make check && make install
Squid will install into c:\squid. If you wish to install somewhere
else, change the –prefix option for configure.
Now, to run Squid as a Windows system service, run squid -n, this will
create a service named “Squid” with automatic startup. To start it run
net start squid from command line prompt or use the Services
Administrative Applet.
Always check the provided release notes for any version specific detail.
🔗 Compiling with msys2
to be completed
🔗 Porting efforts
Squid series 3+ have major build issues on all Windows compiler systems.
Below is a summary of the known status for producing a useful Squid
for Windows. In a rough order of completeness as of the last page
update.
The TODO list for Windows has additional wishlist items that also need
to be sorted out:
- Separate Windows AIOPS logics from Unix AIO logics. The two are
currently mashed together where they should be in separate
conditionally built library modules. - Windows OIO support. Alternative to Unix AIO and AIOPS disk I/O
functionality. - Building an installer
Issues:
- missing shared socket support available in Vista and later.
Necessary for SMP workers. - The main Squid binary still lacks SMP support and will only operate
with the -N command line option.
🔗 Cygwin
Cygwin has working Squid-4 builds and available packages sponsored by
Diladele.
🔗 MinGW-w64
Currently the spare-time focus of porting efforts by the Squid developer team.
Latest cross-compilation results at https://build.squid-cache.org/job/trunk-mingw-cross/.
As this is spare-time work progress is slow.
cross-compiling:
    # Debian Packages Required:
    #
    # g++
    #       provides GCC base compiler. GCC 8 or later required.
    #
    # mingw-w64
    #       provides GCC cross-compiler. GCC 8 or later required.
    #
    # mingw-w64-tools
    #       provides pkg-config and other build-time tools used by autoconf
    #

    ./configure \
            --host=x86_64-w64-mingw32 \
            BUILDCXX="g++" \
            BUILDCXXFLAGS="-DFOO" \
            --enable-build-info="Windows (MinGW-w64 cross-build)"
Native build:
No work on this environment has been done since Squid-3.3:
Requires the latest packages from http://sourceforge.net/projects/mingw-w64/ with GCC 8 or later compiler.
    sh ./configure \
        --enable-build-info="Windows (MinGW-w64)"
🔗 MinGW32
Almost no work on this environment has been done since Squid-3.5:
There also appears to be some work done by Joe Pelaez Jorge
(https://code.launchpad.net/~joelpelaez/squid/win32).
🔗 Visual Studio
Almost no work on this environment has been done since Squid-2.7.
Entirely new .sln, .sdf and .vcxproj build files need to be generated.
Ideally these would mirror the on-Windows style of convenience libraries
assembled to produce a number of different binaries. Experiments along
those lines have some nice results.
Categories: KnowledgeBase
Navigation: Site Search,
Site Pages,
Categories, 🔼 go up
Squid Windows Installer
Squid is a caching proxy for the Web supporting HTTP, HTTPS, FTP, and more. It reduces bandwidth and improves response times by caching and reusing frequently-requested web pages. Squid has extensive access controls and makes a great server accelerator. It runs on most available operating systems, including Windows and is licensed under the GNU GPL.
http://www.squid-cache.org
This project provides MSI Windows Installer for Squid Proxy Server. It enables Squid installation in just a few clicks. Current build is based on the latest Squid 4 build for Cygwin Windows 64 bit.
Installation instructions
- Download Squid 4 for Windows MSI installer at http://squid.diladele.com
- Run it and click «Next» button till the product is installed
Native HTTP and HTTPS Filtering on Windows
In case you need a proxy and web filtering solution for Microsoft Windows with Admin UI, consider taking a look at Web Filtering Proxy project.
Web Filtering Proxy is a Windows native web filtering solution that seamlessly integrates with Active Directory and provides rich content and web filtering functionality to sanitize Internet traffic passing into home/enterprise networks. It may be used to block illegal or potentially malicious file downloads, remove annoying advertisements, prevent access to various categories of web sites and block resources with adult/explicit content.
The MSI can be downloaded from download page or installed Winget winget install webproxy package managers. Administator guide and various tutorials are available here.
Help
Squid documentation can be found at http://www.squid-cache.org. In case of any errors in the installer only, please send an email to support@diladele.com or post your question in the following google group https://groups.google.com/d/forum/web-safety. For squid specific questions please use one of Squid mailing lists http://www.squid-cache.org/Support/mailing-lists.html.
Contribution guidelines
Please contact support@diladele.com
Credits
We admire people working on Squid Cache server, who deliver great product to all of us.
You can set up a personal proxy server and can use it for many purposes. This article will set up the proxy setup with the squid proxy on the windows server. In this guide, we will go over how to set up and configure a Squid Proxy on Windows Server.
Download & Install Squid Proxy
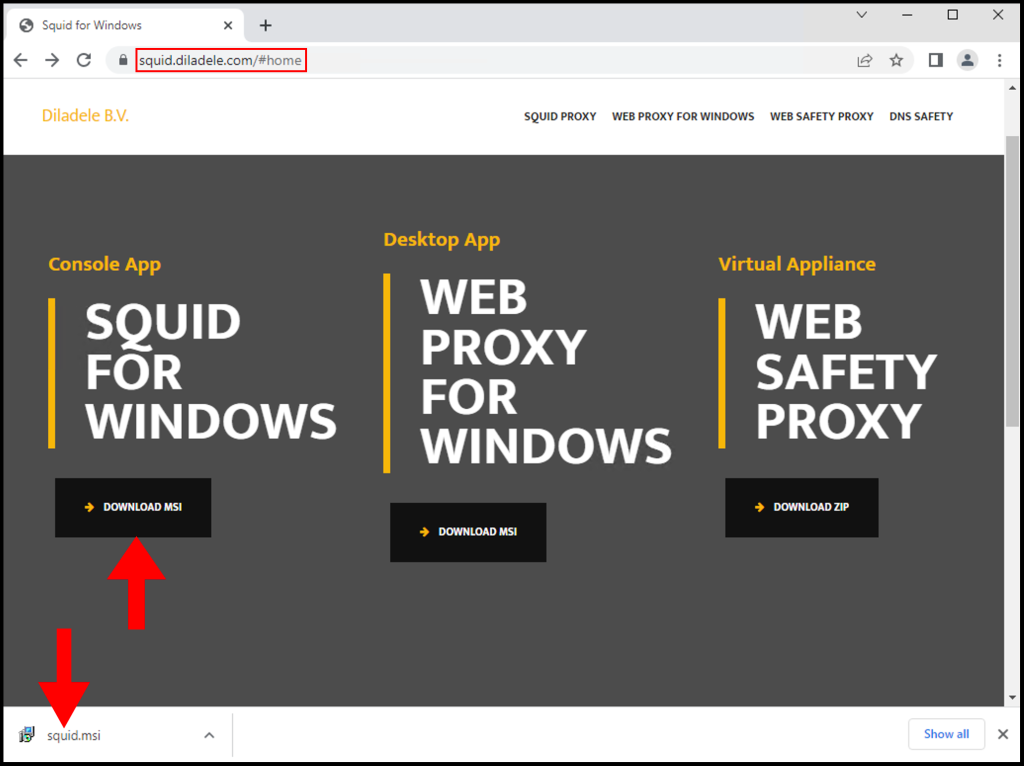
Download the Squid Proxy Installer from the following URL:
https://squid.diladele.com/#home
1. First, download the Squid Proxy application on your Windows server and open the .msi file to install Squid Proxy.
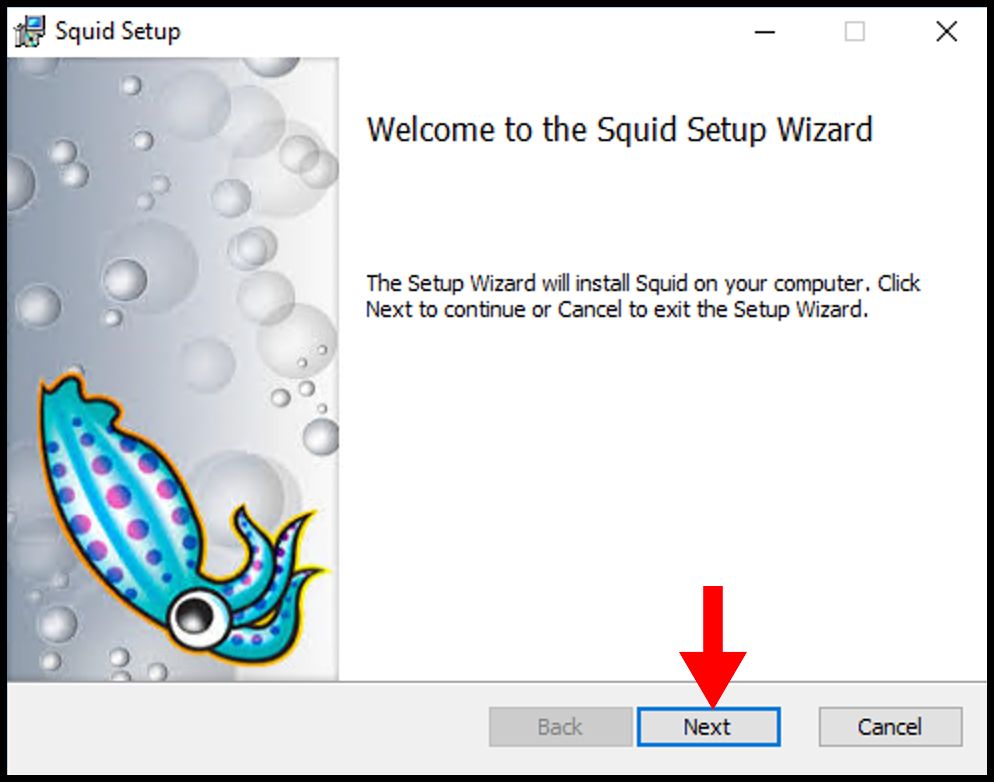
2. Once the Squid Setup window opens, click Next to begin the installation.
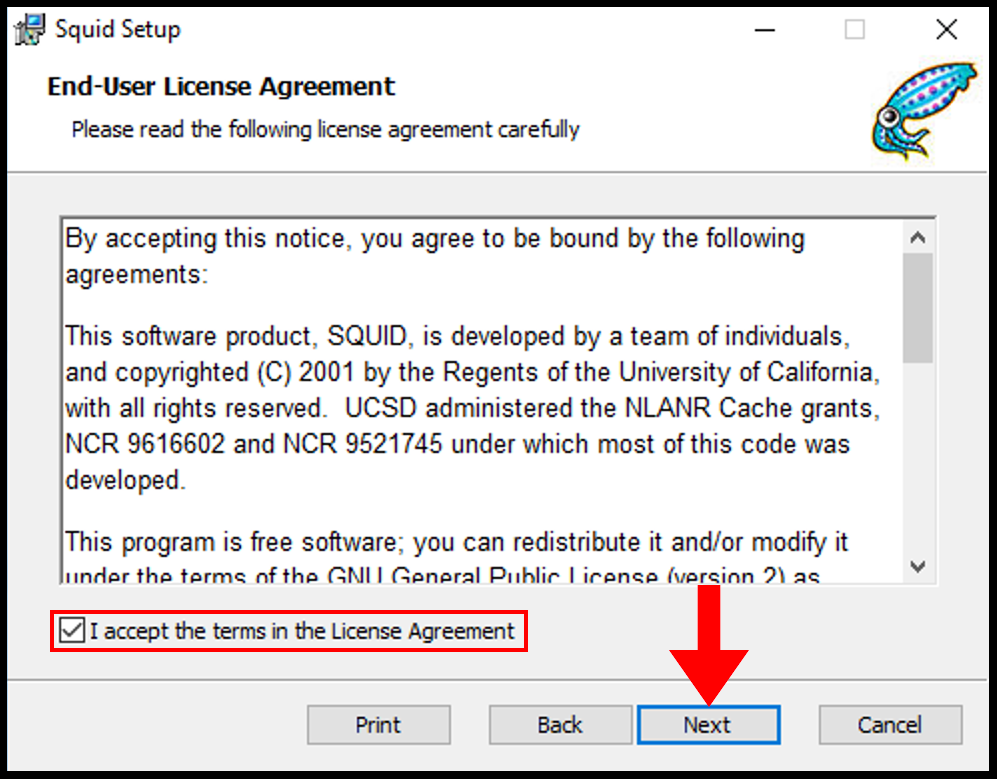
3. Next on the End-User License Agreement page, accept the terms and then click Next.
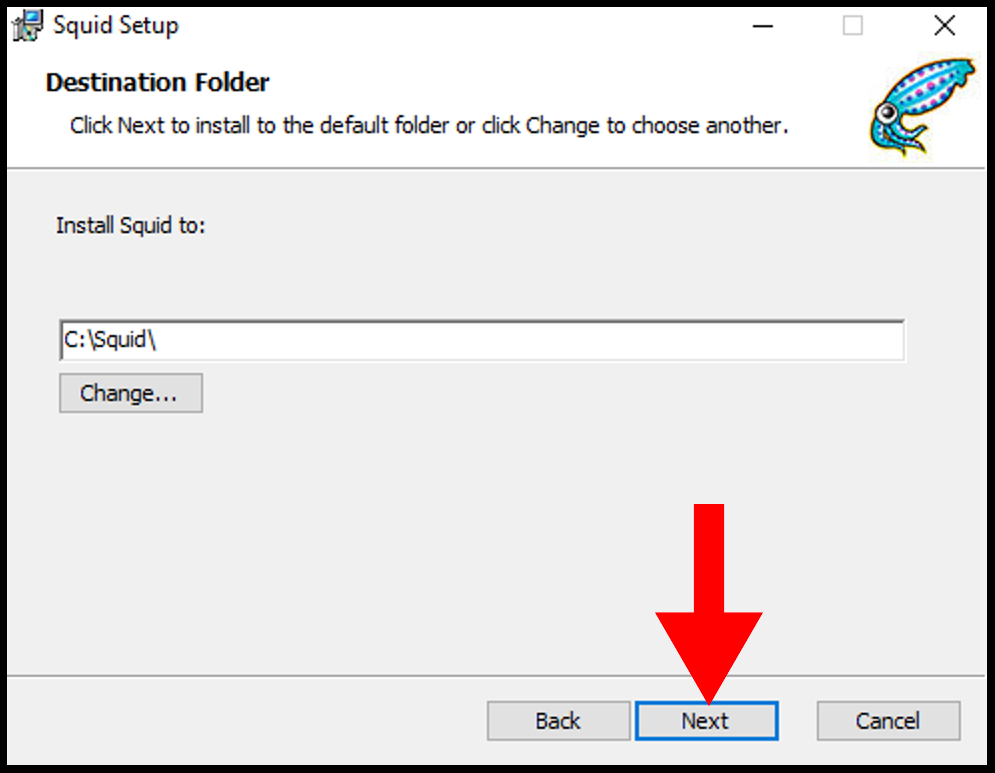
4. Then on the Destination Folder page, you can select the directory you want to install and once you are done click Next.
5. Then on the next page, click Install to begin the installation of Squid.

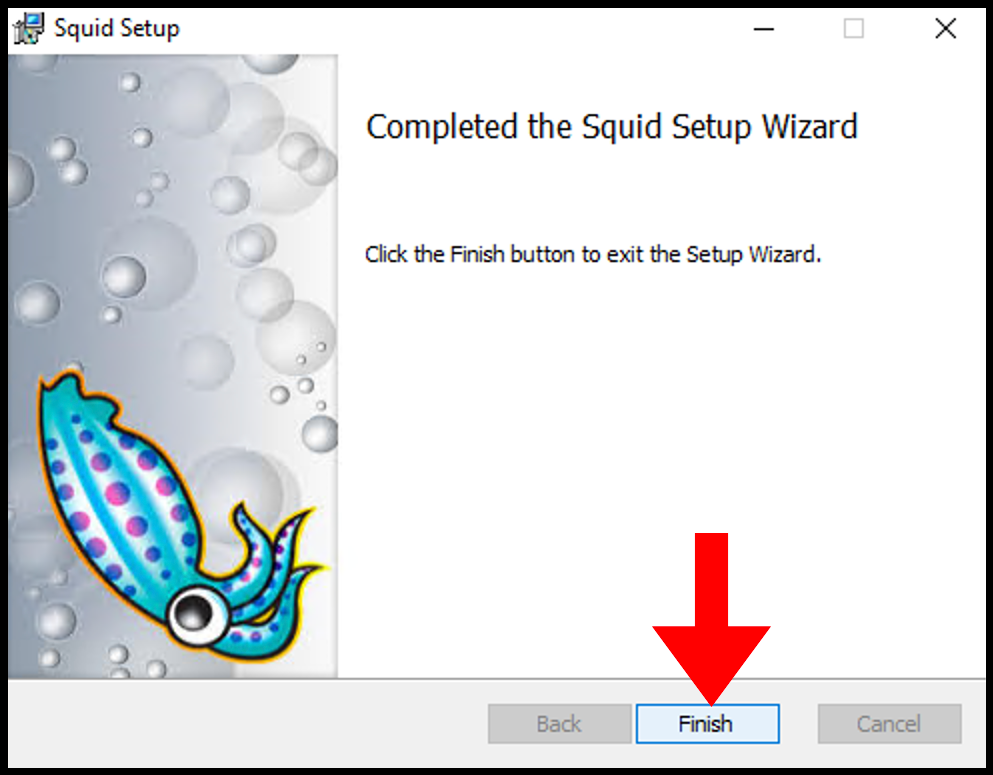
6. Once it’s done, you can close out of the setup window.
Allow Squid Port Through Firewall
Local network usage 3128 TCP port to connect through Squid Proxy. Let us first allow the 3128 TCP port in the firewall inbound rules.
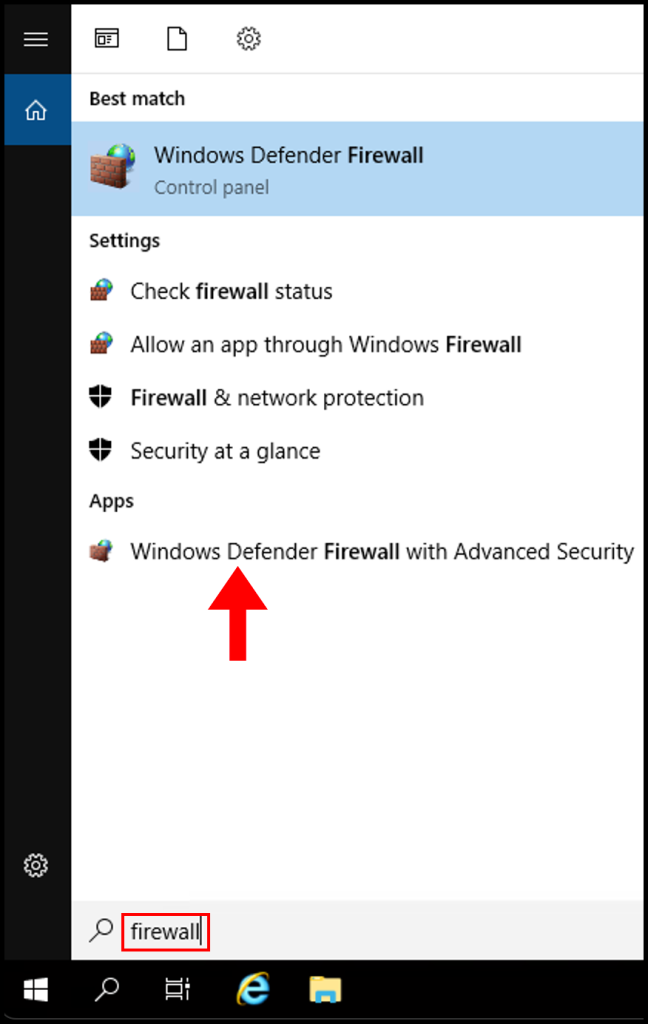
1. Log in to your Windows server, then search and open Windows Firewall with Advanced Security.
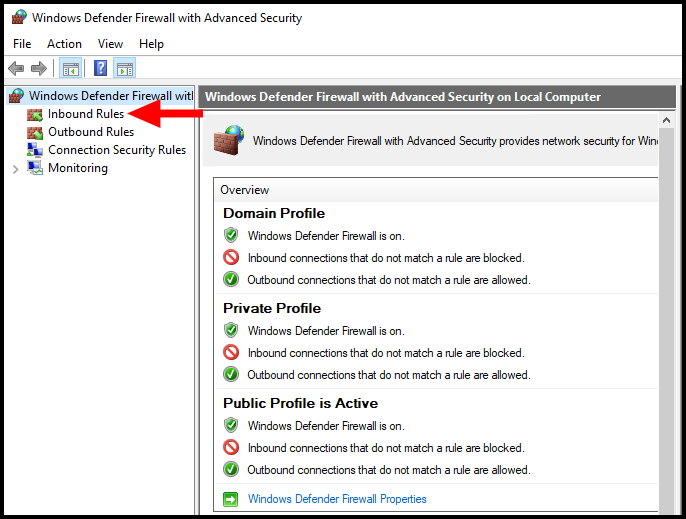
2. Then navigate to Inbound Rules on the left-side menu.
3. Next click New Rule from the right-hand menu.

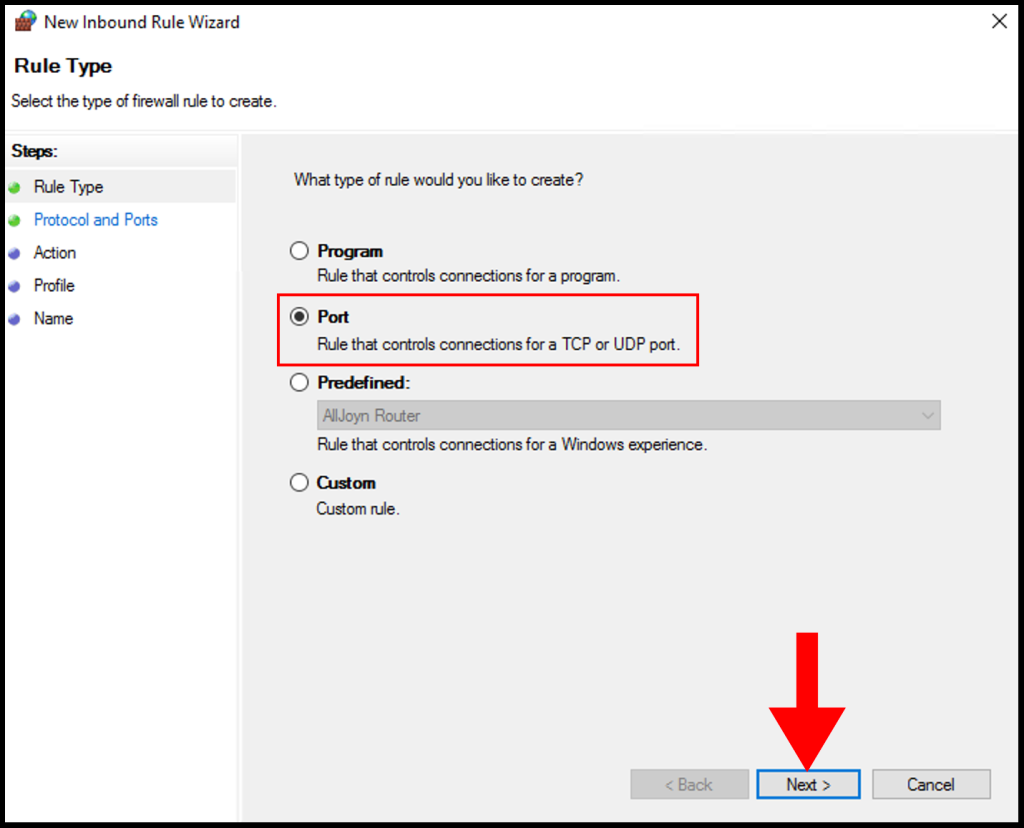
4. On the Rule Type page, select the button next to Port and click Next.
5. On Protocol and Ports, select TCP and select Specific local ports and enter 3128 then click Next.

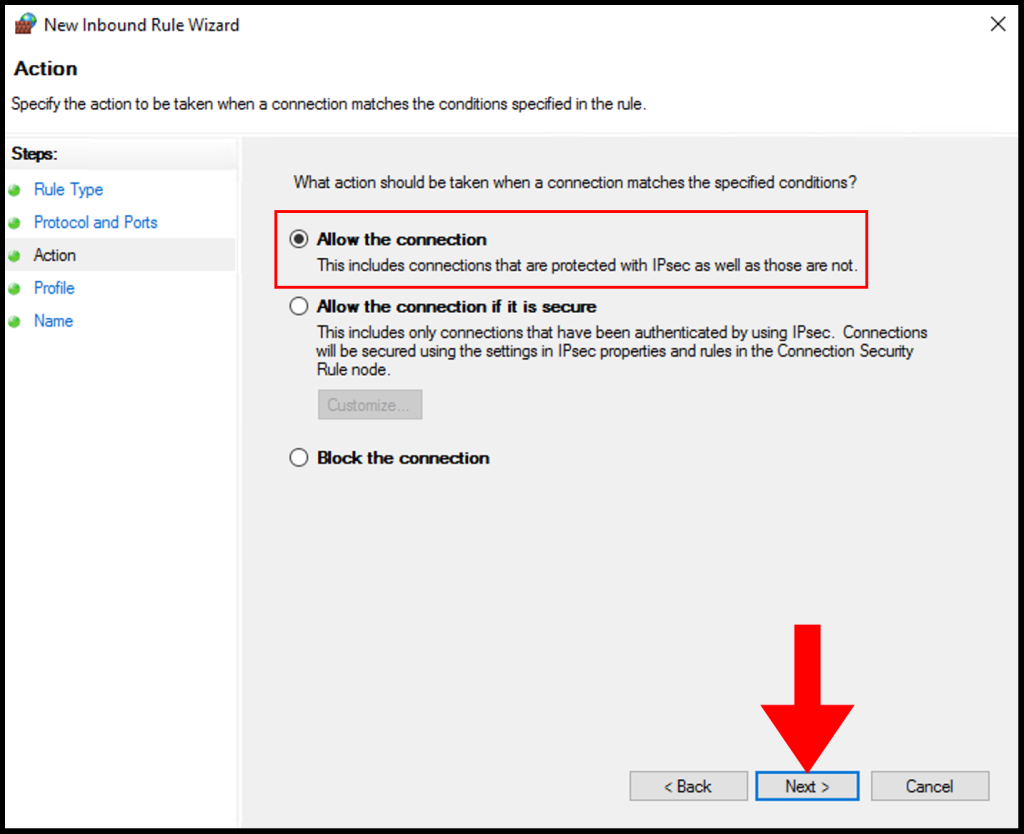
6. Next, click Allow the connection and click Next to move on.
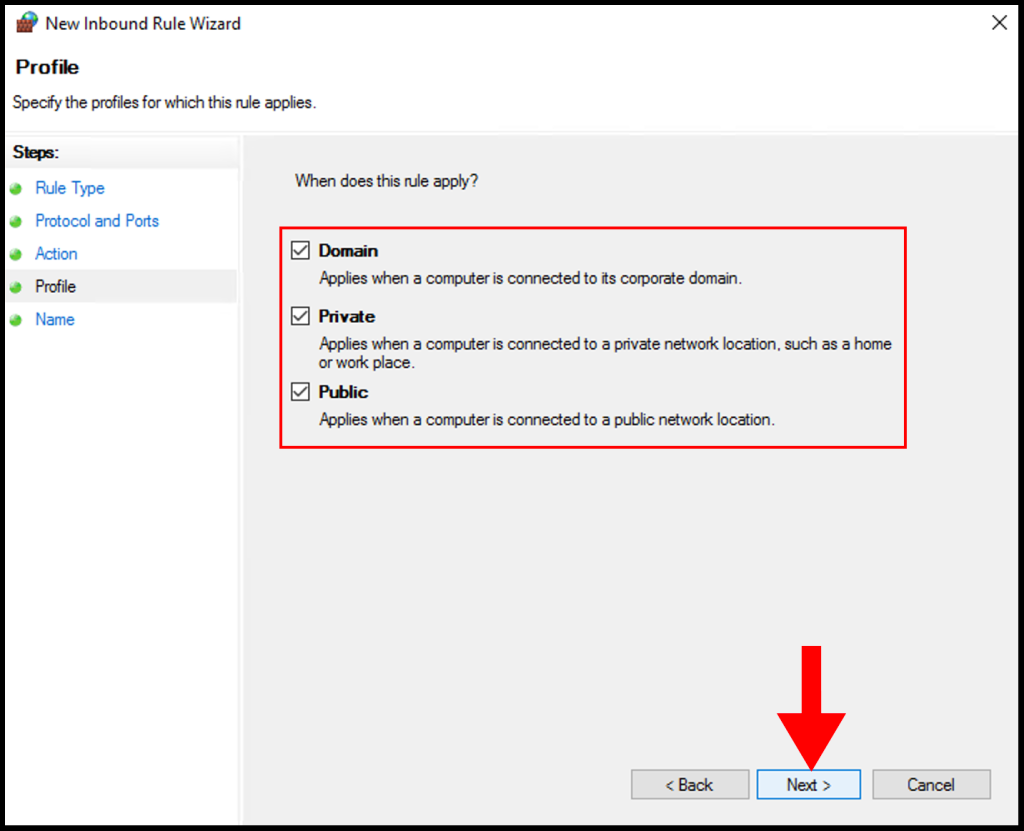
7. In the Profile tab, you need to select the below options and check the boxes for Domain, Private, and Public then click Next to move on.
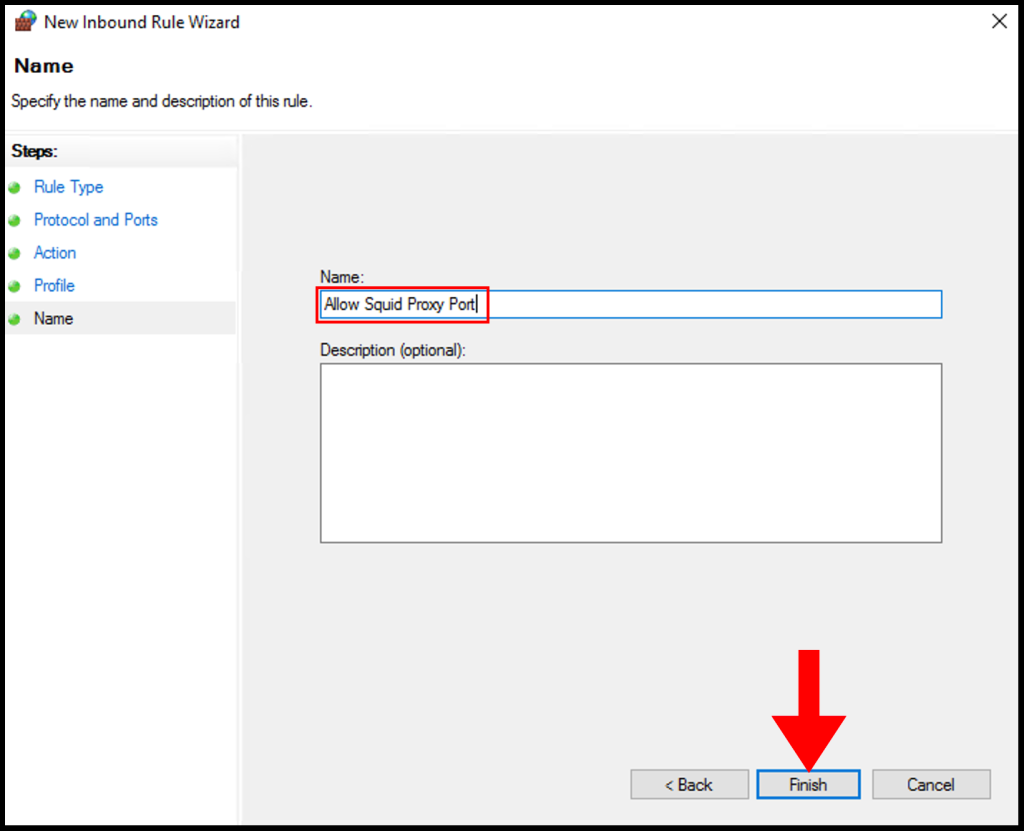
8. In the Name section, you can specify a name that is easily identifiable for the rule, then click Finish. We have successfully setup and configure a Squid Proxy on Windows Server.
Configure Squid Proxy
1. Configure Squid by following the steps below:
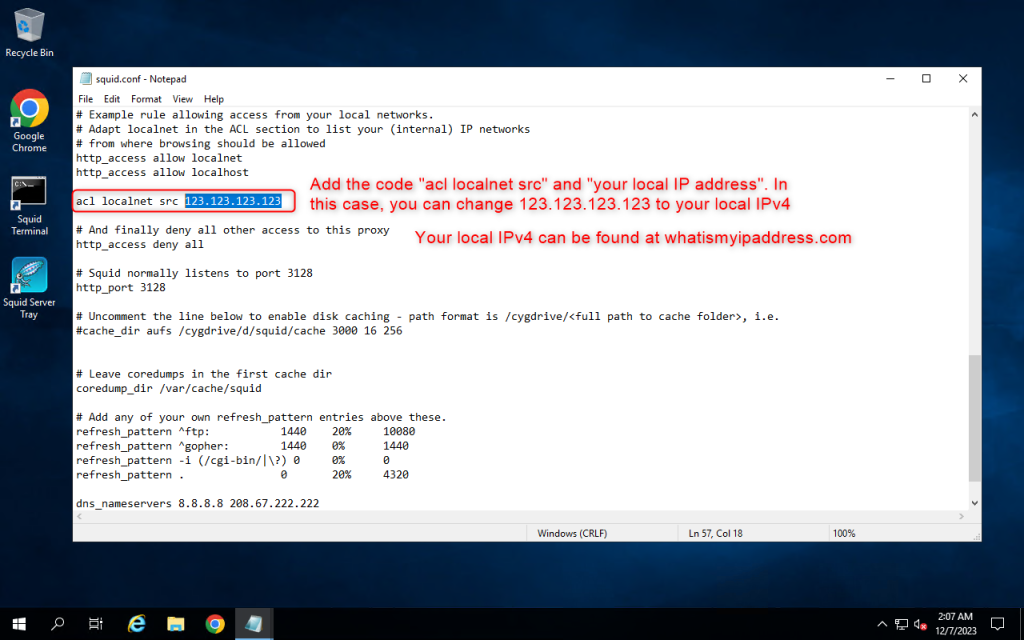
2. Add the code “acl localnet src” and “your local IPv4”. In this case, you can change 123.123.123.123 to your local IPv4. You can find your local IPv4 at https://whatismyipaddress.com/
Then save by pressing Ctrl + S
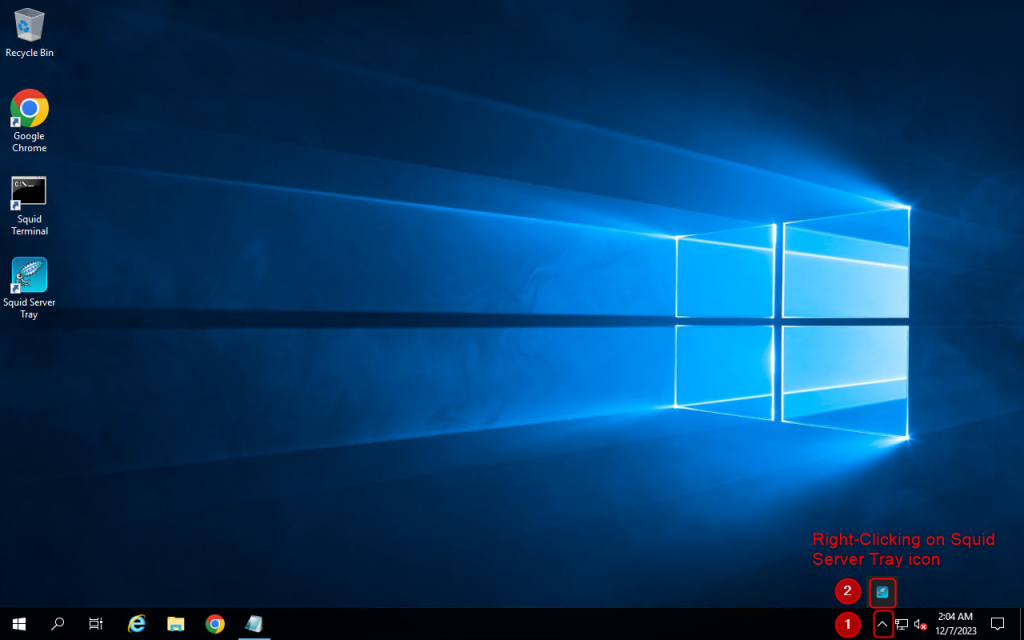
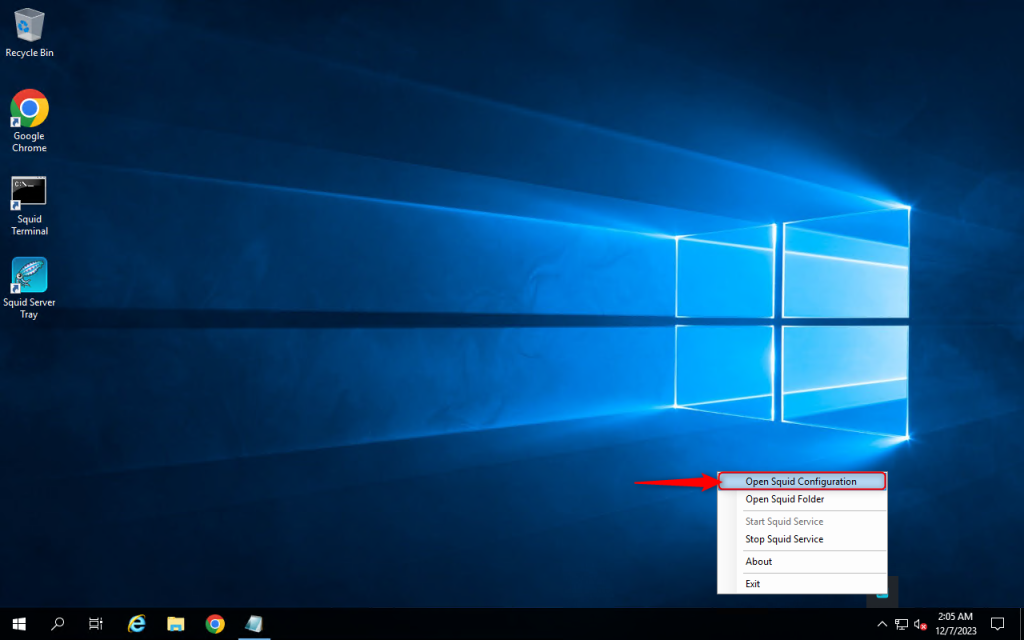
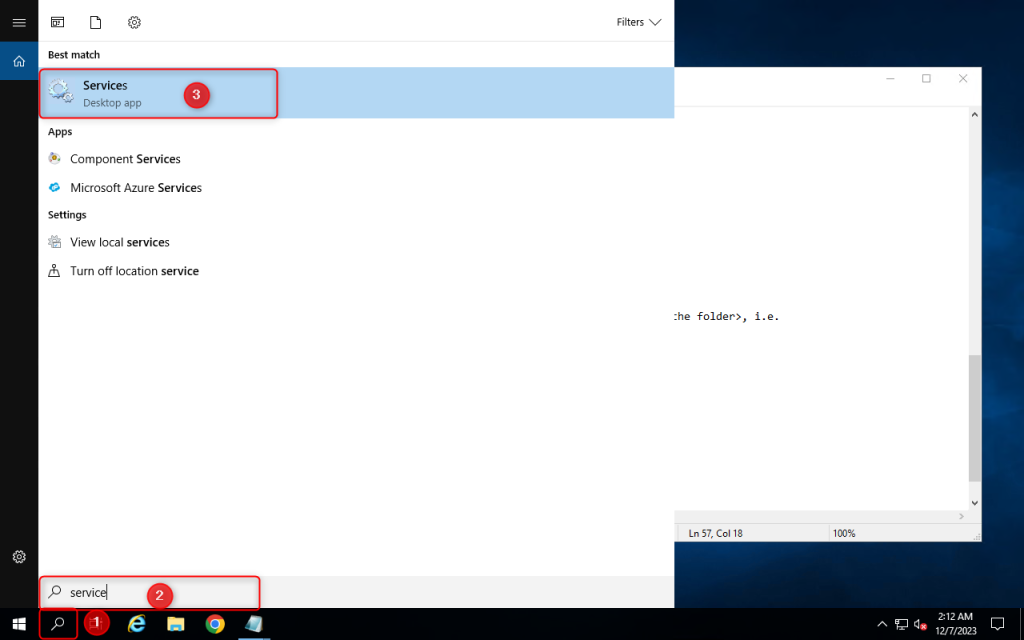
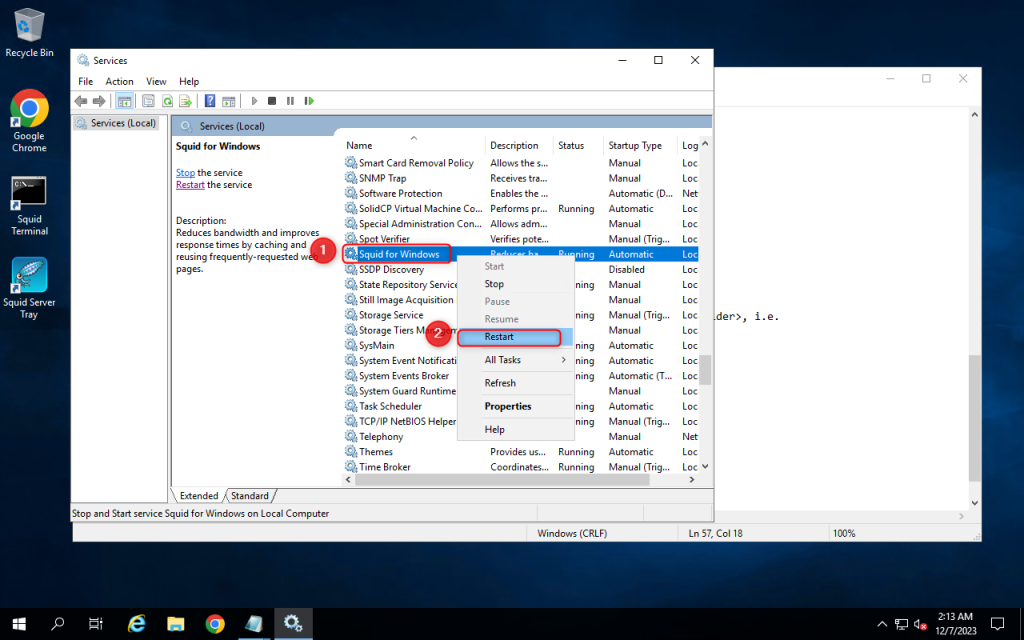
3. Open Services setting and restart the Squid for windows service
Use proxy on a client
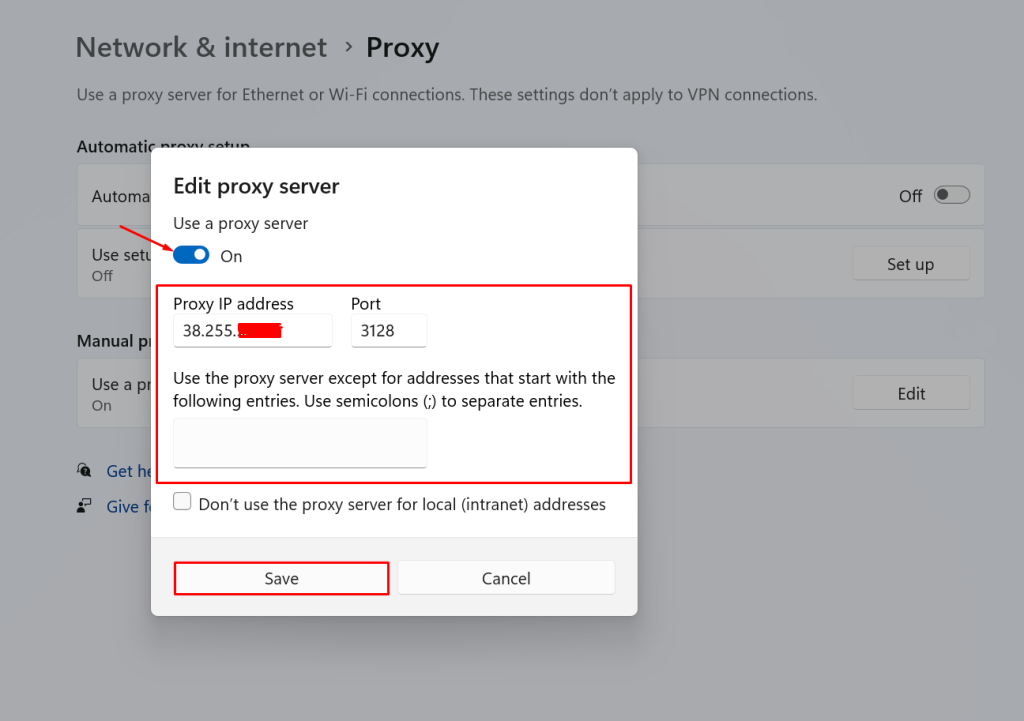
1. Go to your client computer and enter the proxy that has been setted up.

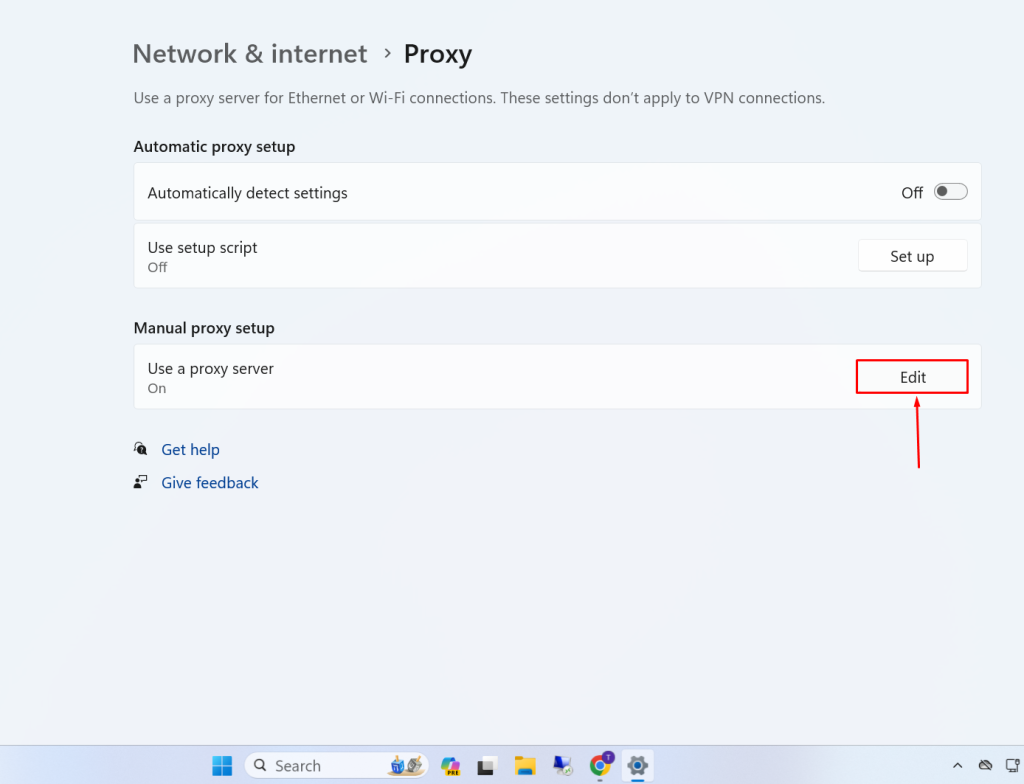
2. Enter Proxy IP address and Port. Now you will be able to use your proxy on a client
Можно я не буду отвечать на вопрос «Зачем?!!» а сразу перейду к описанию? 
Заранее опишу ограничения:
1. Squid в обязательном порядке требует указывать DNS-сервер. Можно направить его в сторону DNS-сервера на роутере или скормить публичный DNS того же гугла, но лучше поставить Acylic DNS Proxy с настроенным hosts-файлом. Это само по себе, на уровне запросов, блокирует этак 90% рекламы, которую, к тому же, squid в результате не кэширует.
2. Squid не умеет использовать внешние прокси для запросов по https, поэтому делать это придется вручную и довольно корявым образом — с применением Proxifier, в котором надо будет указывать не имена сайтов, на которые хочешь попасть, а их ip-адреса. Поскольку squid не использует системный DNS-резолвер, это единственный вариант, при котором содержимое сайтов будет кэшироваться. Для сайтов TOR можно использовать промежуточный прокси, это я опишу.
Нам потребуется:
1. Собственно, Squid под Windows — берется здесь
2. OpenSSL для генерирования собственного Certificate Authority — берется здесь. Будет достаточно light-пакета на 3Мб
3. Утилита, скрывающая окна консоли качается отсюда.
4. 3proxy, если нужно проксирование в TOR-сеть берется здесь
Начнем же!
1. Распаковываем скачанный пакет — открываем cmd, переходим в папку с пакетом, набираем msiexec /a squid.msi /qb TARGETDIR=.\unpack
2. Копируем папку Squid из unpack в то место, где squid будет работать в дальнейшем. В приведенных мной примерах это папка E:\squid
3. Каталог unpack и squid.msi можно удалить, они больше не понадобятся. Идем в папку E:\squid
4. Открываем cmd.exe в этой папке и вбиваем туда mkdir .\_cache & mkdir .\etc\bump & mkdir .\dev\shm & mkdir .\log & echo 0 > .\log\access.log & echo 0 > .\log\cache.log
Это создает папки для внутренних нужд squid. В дальнейшем предполагается, что кэш располагается в папке _cache
5. Устанавливаем OpenSSL, идем в каталог bin, открываем cmd.exe, вбиваем туда:
5.1 — openssl req -new -config «openssl.cfg» -newkey rsa:1024 -days 1825 -nodes -x509 -keyout squidCA.pem -out squidCA.pem
5.2 — openssl x509 -in squidCA.pem -outform DER -out browserCA.der
Первая команда создает сертификат SquidCA.pem для генерации вторичных сертификатов. Копируем его в E:\squid\etc\bump
Вторая команда конвертирует этот сертификат в формат для импорта в браузер (если Firefox) или систему (если все остальное)
6. Идем в E:\squid\lib\squid, открываем командную строку,
ssl_crtd.exe -c -s /cygdrive/e/squid/etc/bump/ssldb (ВАЖНО: каталога ssldb существовать не должно, иначе вылезет ошибка!)
7. Редактируем E:\squid\etc\squid.conf
У меня он выглядит так:
[squid.conf]
acl localnet src 10.0.0.0/8 # RFC1918 possible internal network
acl localnet src 172.16.0.0/12 # RFC1918 possible internal network
acl localnet src 192.168.0.0/16 # RFC1918 possible internal network
acl localnet src fc00::/7 # RFC 4193 local private network range
acl localnet src fe80::/10 # RFC 4291 link-local (directly plugged) machines
acl SSL_ports port 443
acl Safe_ports port 80 # http
acl Safe_ports port 21 # ftp
acl Safe_ports port 443 # https
acl Safe_ports port 70 # gopher
acl Safe_ports port 210 # wais
acl Safe_ports port 1025-65535 # unregistered ports
acl Safe_ports port 280 # http-mgmt
acl Safe_ports port 488 # gss-http
acl Safe_ports port 591 # filemaker
acl Safe_ports port 777 # multiling http
acl CONNECT method CONNECT
#
# Recommended minimum Access Permission configuration:
#
# Only allow cachemgr access from localhost
http_access allow localhost manager
http_access deny manager
# Deny requests to certain unsafe ports
# http_access deny !Safe_ports
# Deny CONNECT to other than secure SSL ports
# http_access deny CONNECT !SSL_ports
# We strongly recommend the following be uncommented to protect innocent
# web applications running on the proxy server who think the only
# one who can access services on «localhost» is a local user
# http_access deny to_localhost
#
# INSERT YOUR OWN RULE(S) HERE TO ALLOW ACCESS FROM YOUR CLIENTS
#
# Example rule allowing access from your local networks.
# Adapt localnet in the ACL section to list your (internal) IP networks
# from where browsing should be allowed
http_access allow localnet
http_access allow localhost
# And finally deny all other access to this proxy
http_access deny all
# DNS Options
dns_v4_first on
dns_nameservers 127.0.0.1
# Squid normally listens to port 3128
http_port 3128 ssl-bump generate-host-certificates=on dynamic_cert_mem_cache_size=8MB cert=/cygdrive/e/squid/etc/bump/squidCA.p
sslcrtd_program /cygdrive/e/squid/lib/squid/ssl_crtd -s /cygdrive/e/squid/etc/bump/ssldb -M 8MB
sslcrtd_children 32 startup=2 idle=1
always_direct allow all
ssl_bump client-first all
sslproxy_cert_error allow all
sslproxy_flags DONT_VERIFY_PEER
# LOG
cache_access_log stdio:/cygdrive/e/squid/log/access.log buffer-size=128KB
# cache_store_log stdio:/cygdrive/e/squid/log/store.log buffer-size=128KB
cache_store_log none
cache_log stdio:/cygdrive/e/squid/log/cache.log buffer-size=128KB
# Uncomment the line below to enable disk caching — path format is /cygdrive/
, i.e.
cache_dir rock /cygdrive/e/squid/_cache/rock 2048 max-size=32767 max-swap-rate=3000 swap-timeout=300
cache_dir aufs /cygdrive/e/squid/_cache/aufs 4096 16 256 min-size=32768
cache_replacement_policy heap LFUDA
memory_replacement_policy lru
ipcache_size 10240
cache_swap_low 90
cache_swap_high 95
maximum_object_size_in_memory 50 KB
cache_mem 128 MB
memory_pools off
maximum_object_size 4 MB
quick_abort_min -1 KB
log_icp_queries off
client_db off
buffered_logs on
half_closed_clients off
via off
reload_into_ims on
max_filedescriptors 3200
pid_filename /cygdrive/e/squid/_cache/squid.pid
hosts_file none
# Leave coredumps in the first cache dir
coredump_dir /cygdrive/e/squid/_cache
# Add any of your own refresh_pattern entries above these.
# refresh_pattern -i ^ftp: 100000 90% 200000
# refresh_pattern -i ^gopher: 1440 0% 1440
# cache images
refresh_pattern -i \.(gif|png|ico|jpg|jpeg|jp2|webp)$ 259200 90% 518400 override-expire reload-into-ims ignore-no-store ignore-private refresh-ims
refresh_pattern -i \.(jpx|j2k|j2c|fpx|bmp|tif|tiff|bif)$ 259200 90% 20000 override-expire reload-into-ims ignore-no-store ignore-private refresh-ims
refresh_pattern -i \.(pcd|pict|rif|exif|hdr|bpg|img|jif|jfi
refresh_pattern -i \.(woff|woff2|eps|ttf|otf|svg|svgi|svgz|p
# cache content
refresh_pattern -i \.(swf|js|ejs)$ 259200 90% 518400 override-expire reload-into-ims ignore-no-store ignore-private refresh-ims
refresh_pattern -i \.(wav|css|class|dat|zsci|ver|advcs)$ 259200 90% 518400 override-expire reload-into-ims ignore-no-store ignore-private refresh-ims
# cache videos
refresh_pattern -i \.(mpa|m2a|mpe|avi|mov|mpg|mpeg|mpg3|mpg
refresh_pattern -i \.(m1s|mp2v|m2v|m2s|m2ts|wmx|rm|rmvb|3pg|3
refresh_pattern -i \.(asx|mp2|mp3|mp4|mp5|wmv|flv|mts|f4v|f
refresh_pattern -i \.(htm|html)$ 9440 90% 518400 reload-into-ims ignore-no-store ignore-private refresh-ims
refresh_pattern -i \.(xml|flow|asp|aspx)$ 0 90% 518400 refresh-ims
refresh_pattern -i \.(json)$ 0 90% 518400 refresh-ims
refresh_pattern -i (/cgi-bin/|\?) 0 90% 518400
# live video cache rules
refresh_pattern -i \.(m3u8|ts)$ 0 90% 518400 refresh-ims
# cache microsoft and adobe and other documents
refresh_pattern -i \.(ppt|pptx|doc|docx|docm|docb|dot|pdf|p
refresh_pattern -i \.(xls|xlsx|xlt|xlm|xlsm|xltm|xlw|csv|tx
refresh_pattern -i . 0 90% 518400 refresh-ims
Я таки нежно напоминаю, что это локальный вариант, для запуска на отдельной машине, с максимальным кэшированием статики. Пути, при необходимости утащить их куда-то в другое место, надо поменять по всему конфигурационному файлу.
8. Создаем ярлык, параметры — C:\Windows\System32\cmd.exe /K «color 02 & cd /dE:\squid\ & set PATH=E:\squid\bin;%PATH%» где нужно указать путь к папке со squid
9. Запускаем этот ярлык (текст в командной строке должен быть зеленым), набираем squid -z
Если все сделано и настроено правильно, то в папке _cache появятся директории aufs и rock. Если где-то накосячено — то читаем E:\squid\log\cache.log и исправляем накосяченное.
10. Открываем cmd.exe, рабочая папка должна быть E:\squid, выполняем icacls .\_cache /T /Q /C /RESET && icacls .\etc\bump /T /Q /C /RESET && icacls .\log /T /Q /C /RESET && pause
Эти команды сбрасывают сбойные права доступа, которые назначает созданным файлам и папкам cygwin. Без выполнения команды rock-кэш работать не будет.
11. Запускаем (из зеленой консоли) squid -N (без этой опции не работает rock-database, увы), выбираем в браузере прокси-сервером 127.0.0.1:3128. Должно работать.
12. Создаем в E:\squid батник для запуска сквида. Имя на ваше усмотрение, содержимое:
cd /d %~dp0
set PATH=%~dp0bin;%PATH%
cd bin
squid -N
Запускаем его.
13. Если все работает как надо, то копируем в папку E:\squid утилиту RunHiddenConsole.exe чтобы в дальнейшем запускать прокси через нее.
Настройка для работы с TOR:
1. Качаем и распаковываем TOR Expert Bundle. Для запуска требуется распаковать его, создать файл torrc.cfg с начинкой
SOCKSPort 127.0.0.1:9050
SOCKSPolicy accept 127.0.0.1
SOCKSPolicy reject *
GeoIPFile .\Data\geoip
GeoIPv6File .\Data\geoip6
DataDirectory .\Data
Ну а далее запускается ярлыком RunHiddenConsole.exe «tor.exe -f torrc.cfg» из папки с TOR’ом.
2. В папке E:\squid создаем файл onion.txt с содержимым
^http.*onion
Аналогичным образом можно добавлять другие сайты (только HTTP), которые должны быть доступны через TOR
3. В файл конфига squid добавляем:
К листам acl
acl onion url_regex «/cygdrive/e/squid/onion.txt»
Перед командой «always_direct» вставляем
cache_peer 127.0.0.1 parent 3127 0 no-query default
never_direct allow onion
always_direct deny onion
4. Скачиваем 3proxy (в архиве), создаем в squid папку _3proxy, копируем туда файл 3proxy.exe из архива
Создаем там же файл 3proxy.cfg с содержимым:
internal 127.0.0.1
fakeresolve
auth iponly
allow * 127.0.0.1
parent 1000 socks5+ 192.168.16.250 9050
proxy -p3127
где 127.0.0.1 9050 — это адрес и порт, на котором слушает TOR (если вы выбрали другой)
5. Переделываем батник запуска squid к виду:
RunHiddenConsole.exe %~dp0_3proxy\3proxy.exe %~dp0_3proxy\3proxy.cfg
cd /d %~dp0
set PATH=%~dp0bin;%PATH%
cd bin
squid -N
Все готово, можно пользоваться. По умолчанию такой режим предназначен только для того, чтобы заходить на сайты находящиеся в доменной зоне .onion
Дополнения:
При включенном squid иметь дисковый кэш браузера включенным как-то излишне.
В Firefox выключаем через about:config, ищем строку browser.cache.disk.enable и ставим ее в false. Кэш в памяти это оставит нетронутым.
В Chromium это делается «извне», путем добавления к ярлыку запуска браузера параметров —disk-cache-size=1 —media-cache-size=1
Поэтому я рекомендую использовать Chromium (и основанные на нем браузеры) не сами по себе, а в портативном виде, с помощью программки chrlauncher, где эти параметры можно задавать в конфигурационном файле.
Если у вас есть ipv6, то опцию dns_v4_first надо переключить в off
И напоследок — ответ на вопрос «а почему бы не использовать HandyCache?»
1. Он не кэширует HTTPS, если его не купить. Лицензия дешевая, и это не проблема, но…
2. Он ломает поведение страниц, которые используют технологию CORS. Это facebook, github, addons.mozilla.org и многих других, о которых я сейчас не вспомню.
3. Поддержка родительских SOCKS в ныне доступной версии RC4 1.0.0.700 сломана.
ИМХО, squid работает быстрее + его способ хранения кэша лично мне нравится больше. Мелкие файлы сохраняются в ROCK-кэш, крупные в AUFS-кэш, пространство на жестком диске (размер кластеров на разделе 32КБ) используется оптимально, по сравнению с HandyCache, где фактический кэш 2,32 Гб у меня занимает 3,86 Гб на диске.
Setting up a Squid proxy on a Windows system can enhance your network’s performance and security. Here’s a step-by-step guide to help you get started:
1. Download and Install Squid Proxy
- Download the Squid Proxy Installer: Obtain the Squid Proxy application suitable for Windows.
- Run the Installer: Open the downloaded
.msifile to start the installation process. - Follow the Setup Wizard: Click “Next” to proceed through the setup wizard. Accept the End-User License Agreement and choose the installation directory.
- Complete the Installation: Click “Install” to begin the installation. Once finished, close the setup window.
2. Configure Firewall Settings
- Open Windows Firewall with Advanced Security: Search for this in your Windows server.
- Create a New Inbound Rule: Navigate to Inbound Rules and click “New Rule”.
- Specify the Port: Select “Port” and click “Next”. Choose “TCP” and enter port 3128.
- Allow the Connection: Click “Next”, then select “Allow the connection”.
- Define the Profile: Check the boxes for Domain, Private, and Public profiles.
- Name the Rule: Give the rule a recognizable name and click “Finish”.
3. Configure Squid Proxy
- Edit the Configuration File: Open the Squid configuration file and add the line
acl localnet srcfollowed by your local IPv4 address. - Save Changes: Save the file and restart the Squid service through the Services settings.
4. Use the Proxy on a Client
- Set Up the Client: On the client computer, enter the proxy IP address and port (3128).
- Test the Connection: Ensure the client can connect through the proxy.
By following these steps, you can successfully set up and configure a Squid proxy on your Windows system, enhancing your network’s efficiency and security.