
В этой статье:
-
Настройка яркости дисплея
-
Ночной свет
-
Управление цветным профилем
-
Использование HDR
Настройка яркости дисплея
Управление яркостью дисплея может значительно улучшить просмотр и сэкономить время работы батареи. Вы можете настроить яркость вручную или позволить компьютеру обрабатывать ее автоматически в зависимости от условий освещения или содержимого.
Важно: Ползунок Яркость может не отображаться на устройствах с внешним монитором. Чтобы изменить яркость внешнего монитора, используйте кнопки на нем.
Чтобы настроить яркость экрана, щелкните значок Сеть в правой части панели задач, а затем переместите ползунок Яркость , чтобы настроить яркость.
Кроме того, можно настроить яркость дисплея в разделе Параметры > системный > дисплей.
Важно: Ползунок Яркость может не отображаться на настольных компьютерах с внешним монитором. Чтобы изменить яркость внешнего монитора, используйте кнопки на нем.
На некоторых компьютерах Windows может автоматически регулировать яркость экрана в зависимости от текущих условий освещения. Чтобы узнать, поддерживает ли это ваш компьютер, выберите Параметры > системный > дисплей. Выберите Яркость, найдите поле Изменение яркости автоматически при изменении освещения проверка а затем выберите его, чтобы использовать эту функцию. Благодаря этой автоматической настройке текст на экране будет хорошо виден независимо от окружающих условий. Даже если вы используете его, вы все равно можете переместить ползунок Яркость, чтобы точно настроить уровень яркости для встроенного дисплея.
Примечание: На дисплеях HDR Windows оптимизирует автоматическую корректировку яркости в соответствии с тем, как воспринимает изменение яркости человеческий глаз. В результате регулировка яркости может занять больше времени на дисплеях HDR при изменении условий освещения.
Некоторые Windows 11 пк могут автоматически настраивать яркость и контрастность экрана в зависимости от содержимого, отображаемого на встроенном экране. Например, если вы смотрите видео с темной сценой, за которой следует более яркая сцена (например, с ярким солнечным днем), яркость и контрастность могут измениться. Это нормально.
Адаптивное управление яркостью содержимого обеспечивает идеальный уровень яркости и контрастности, одновременно экономя питание и обеспечивая более длительное время работы батареи. Если эти внезапные изменения яркости отвлекают вас или если вы работаете в приложениях для фото и видео, где точность цвета важна для вас, эти параметры можно настроить в соответствии с вашими потребностями между обеспечением соответствующей яркости и контрастности и экономией заряда батареи.
-
Нажмите кнопку Пуск и введите параметры. Выберите Параметры > Системный > Дисплей .
-
В разделе Параметры отображения выберите Яркость , а затем при необходимости задайте раскрывающийся список Изменить яркость на основе содержимого:
-
От: Адаптивное управление яркостью будет отключено, а яркость и контрастность экрана не будут регулироваться. Это может привести к более короткому сроку работы батареи.
-
Всегда:Адаптивное управление яркостью всегда будет работать независимо от того, подключено ли устройство к сети или от батареи.
-
Только от батареи: Адаптивное управление яркостью будет активировано только в том случае, если устройство работает от аккумулятора.
-
Ночной свет
Дисплей излучает синий свет, похожий на дневной. Однако ночью этот свет может мешать вам спать. Чтобы лучше засыпать, включите ночной свет для дисплея. В результате свет дисплея смягчится и не будет утомлять глаза.
Примечание: Ночной индикатор недоступен, если на устройстве используются определенные драйверы, например DisplayLink или Basic Display.
Щелкните значок Сеть в правой части панели задач. затем найдите Ночной свет в разделе Быстрые параметры и выберите его, чтобы включить или отключить его.
Кроме того, можно переключить параметр Ночной свет в разделе Параметры > системный > дисплей.
-
Нажмите кнопку Пуск , а затем введите параметры в поле поиска. Выберите Параметры > Система > Отображение > ночного света.
-
Переместите ползунок прочности, чтобы отрегулировать интенсивность уменьшения синего света.
-
Нажмите кнопку Пуск , а затем введите параметры в поле поиска. Выберите Параметры > Система > Отображение > ночного света.
-
Включите параметр Расписание ночного света. Затем выберите От заката до рассвета или Установить время и задайте время включения и отключения ночного света.
Управление цветным профилем
Параметры управления цветом Windows позволяют пользователям добавлять или удалять цветовые профили, задавать цветовые профили по умолчанию для подключенных дисплеев, а также получать доступ к калибровке дисплея и включать автоматическое управление цветом.
Творческие профессионалы и энтузиасты заботятся о полностью откалиброванных, точных цветах, потому что это помогает обеспечить согласованность цветов от начала до конца своих проектов. Автоматическое управление цветами в Windows обеспечивает управление цветом на уровне системы, чтобы цвета в приложениях Windows отображались точно и согласованно на поддерживаемых дисплеях независимо от того, управляются ли они цветом.
Автоматическое управление цветом также помогает новым и обновленным приложениям отображать больше цветов с большей точностью. Это обеспечивает дополнительную детализацию и меньшее число цветовых артефактов (например, в градиентах, тени и более темных сценах или рисунках). Благодаря автоматическому управлению цветом приложения могут использовать миллиарды цветов с точностью от 10 до 16 бит. Даже на дисплеях, поддерживающих только 8-разрядный цвет, автоматическое управление цветом помогает улучшить качество цвета с помощью различных методов, таких как дизеринг.
Включение автоматического управления цветом
-
Нажмите кнопку Пуск , а затем выберите Параметры > Системный > Дисплей > Профиль цвета.
-
Выберите дисплей в верхней части экрана, а затем проверка для следующего параметра: Автоматическое управление цветом для приложений.
-
Выберите Автоматически управлять цветом для приложений, чтобы включить его.
-
Перейдите в раздел Параметры > Системный > Дисплей > Профиль цвета.
-
На странице Параметры управления цветом выберите дисплей, для которого вы хотите управлять цветными профилями.
-
Добавьте новый цветной профиль, щелкнув Добавить профиль и найдите цветной профиль.
-
Перейдите в раздел Параметры > Системный > Дисплей > Профиль цвета.
-
На странице Параметры управления цветом выберите дисплей, для которого вы хотите управлять цветными профилями.
-
Разверните цветной профиль, который нужно удалить, и нажмите кнопку Удалить в нижней части экрана.
-
Перейдите в раздел Параметры > Системный > Дисплей > Профиль цвета.
-
На странице Параметры управления цветом выберите дисплей, для которого вы хотите управлять цветными профилями.
-
Задайте один из цветовых профилей по умолчанию, нажав кнопку Задать профиль.
-
Перейдите в раздел Параметры > Системный > Дисплей > Профиль цвета.
-
Выберите Calibrate display (Калибровка дисплея ) и следуйте инструкциям по калибровке дисплея. При этом будет создан новый цветовой профиль для дисплея, на котором расположен инструмент калибровки.
Использование HDR
Содержимое HDR в Windows обеспечивает лучшую яркость и цветовые возможности по сравнению с традиционным содержимым (иногда называемое стандартным динамическим диапазоном [SDR]). Традиционное содержимое обычно показывает детали в яркой части сцены или более темной части сцены, но не в обеих частях одновременно.
Дополнительные сведения о параметрах HDR в Windows см. в статье Что такое HDR в Windows?
Opening and Utilizing Color Management in Windows 11
Published
7 min read
How to Open and Use Color Management in Windows 11
Color management in Windows 11 is an essential feature for anyone who works with graphics, photos, or any visual content. Whether you’re a professional photographer, graphic designer, or just an average user looking to display colors accurately on your monitor, understanding how to utilize Windows 11’s Color Management settings can make a significant difference in your visual output. This guide will give you a comprehensive overview of how to open and use Color Management in Windows 11, ensuring that you make the most of the tools at your disposal for precise color control.
What is Color Management?
Color management involves controlling how colors are represented and reproduced across different devices, such as monitors, printers, and cameras. Each device has its own way of interpreting color, so the goal of color management is to ensure that colors look consistent and accurate no matter where they are displayed or printed.
Windows 11 has built-in tools that allow users to calibrate their displays, manage color profiles, and ensure that their devices are correctly interpreting colors. Understanding how to use these tools is crucial for anyone who relies on accurate color reproduction.
Accessing Color Management in Windows 11
To start working with color management in Windows 11, follow these steps to open the Color Management settings:
-
Open Settings:
- Click on the Start Menu (Windows icon) located on the taskbar or press the Windows key on your keyboard.
- Select Settings (the gear icon).
-
Navigating to Devices:
- In the Settings window, click on System from the left-hand menu.
- Under the System settings, scroll down and click on Display.
-
Accessing Color Management:
- Scroll to the bottom of the Display settings page and locate the Advanced display settings link. Click on it.
- In the advanced display settings, you’ll see your connected displays listed. Select the monitor you want to manage colors for.
- Look for Color Profile, where you can access color settings for the selected display. Here you can delve into the Color Management settings.
An alternative method to directly access Color Management is:
- Press Windows + R to open the Run dialog.
- Type
colorcpland press Enter.
Understanding Color Profiles
Once you have accessed the Color Management settings, you’ll encounter the concept of color profiles. A color profile is a collection of data that characterizes a color input or output device, describing how it processes colors. This is done through standardized color spaces like sRGB, Adobe RGB, and others.
Types of Color Profiles
-
Device Profiles: Created for monitors, printers, and other hardware. These profiles help your operating system understand how to display colors correctly according to the characteristics of the device.
-
Working Space Profiles: Used by software applications (like Adobe Photoshop) to maintain consistent colors across different devices.
-
Profile Connection Space (PCS): A device-independent color space, maintaining color accuracy when converting colors between different devices.
Adding and Managing Color Profiles
To manage color profiles for your display in Windows 11, follow these steps:
-
Access the Color Management settings using the methods described above.
-
In the Color Management window, select the display you want to adjust in the dropdown menu.
-
Here you will see the color profiles associated with the display. Click on the Add button to include new profiles.
-
Choose a Profile: From the list, select the profile you wish to add. Windows generally includes standard profiles, but you can also download custom profiles from your monitor’s manufacturer or other sources.
-
Set the Default Profile: Once you have added a new profile, select it in the list and click on Set as Default Profile to ensure that your display uses this profile for color management.
Calibrating Your Monitor
In addition to managing color profiles, Windows 11 allows you to calibrate your display. Calibration helps you ensure that the colors shown on your monitor remain as true to life as possible. Windows has a built-in calibration tool that can guide you through the steps.
To calibrate your monitor, follow these steps:
-
Open the Color Management settings as previously described.
-
Click on the Advanced tab.
-
Under the Calibration section, you’ll find the option to launch the display calibration tool. Click on Calibrate display.
-
Follow the Wizard: A wizard will guide you through the calibration process. It usually consists of two main parts:
- Adjusting Brightness and Contrast: The wizard will show you slideshows that help you adjust your screen brightness and contrast levels.
- Setting the Gamma: Gamma defines how the midtones of your image will render. The wizard will prompt you to adjust this setting using specific visual cues.
-
Fine-tuning Color Balance: At the end of the calibration, you will be prompted to set the color balance. This step ensures that the red, green, and blue channels are balanced according to your preferences and requirements.
-
Save Your Calibration Settings: After you complete the calibration process, Windows will prompt you to save the new settings. Make sure to do this for future use.
Using Color Management in Applications
Most professional graphics applications come with their own color management settings that can work in conjunction with Windows settings. Here’s how to integrate them:
- Photoshop: Open Photoshop, and then go to Edit > Color Settings. Here you can define how Photoshop will handle files from other applications or devices and set it to use the same color profiles you set in Windows.
- Illustrator: In Illustrator, go to Edit > Color Settings and ensure that the profile matches your working space and output needs.
- Photographic Software: For software like Lightroom, ensure you import images with the correct color profile and export using your monitor’s profile settings to maintain consistency.
Troubleshooting Color Management Issues
While Windows 11 provides robust tools for color management, users may occasionally encounter issues. Here are some common problems and their solutions:
Problem 1: Colors Look Different on Another Device
- Solution: Double-check the color profile settings on both devices. Make sure both monitors use their correct and appropriate profiles. Also, you may need to calibrate both displays to ensure they display colors accurately.
Problem 2: The Calibrated Monitor Reverts to Defaults
- Solution: Ensure that you’re saving your calibration settings after completing the calibration process. If the settings still revert, the monitor settings may not be storing profiles correctly, and you might need to check if the drivers are up to date.
Problem 3: Applications Not Using Correct Color Profiles
- Solution: Check the application settings to ensure that they are set to use the system color settings or the profiles that you’ve set in Windows. In some cases, you may need to reinstall or update the application for it to recognize the new profiles.
Advanced Color Management Techniques
Once you’ve grasped the basics of color management in Windows 11, you can dive into more advanced techniques, especially if you’re a professional user.
-
Custom Color Profiles: Some monitors offer proprietary software (like those from Dell, BenQ, or Eizo) that allow users to create custom profiles. These specialized setups can enhance color handling based on personal preferences or specific tasks (like photo editing versus gaming).
-
Using Third-Party Calibration Tools: For professionals needing utmost precision, hardware calibration tools, such as the X-Rite i1Display or Spyder series, can be very useful. These devices often come with their own software to guide you through the calibration process and ensure perfect color reproduction.
-
Soft Proofing: For photographers and designers, soft proofing is crucial. This process allows you to simulate how your images will look when printed, so you can make necessary adjustments ahead of time. Software like Photoshop provides options for soft proofing and working with different printer profiles.
-
Monitoring Color Blindness: If your work involves accessibility or inclusivity, using tools to check how your work appears to people with various types of color blindness can be critical. There are online tools and plugins available that simulate how colors appear to those with deficiencies, allowing you to adjust your designs accordingly.
Conclusion
Understanding and using the Color Management feature in Windows 11 is vital for anyone who values accurate color representation in their visual work. By accessing the settings, managing color profiles, calibrating displays, and troubleshooting potential issues, you can significantly improve your digital workflow.
As color management becomes increasingly important in our digital lives, taking the time to learn and apply these concepts will equip you with the skills necessary to produce vibrant, consistent, and true-to-life colors in your graphics, photographs, and more. Whether you are a seasoned professional or just beginning your journey into digital arts, embracing color management will undoubtedly elevate your creative work.
Last Updated on December 10, 2024 by
Windows tries to accomplish a lot with its color management functionality, with varying degrees of success. It’s one of the best examples of this disconnect between Windows ambitions and the realization of those ambitions. Today, I’ll walk you through the main color management settings and options in Windows 10 and 11. By the end, you should have a fair grasp of:
- How the color environments in Windows function and how to best work with the OS to accomplish your goals
- How to manage color space settings and ICC profiles in Windows, including obscure legacy menus and hidden preferences
- What your options are for display calibration in Windows and which ones are actually good for color-sensitive work
- How third party apps like GPU software solutions control your color space settings within Windows and how to avoid issues with conflicting color settings
- Known issues with Windows color management and potential fixes or options you have for each one
- FAQs about Windows color management settings
To its credit, Windows actually presents users with a good range of options when it comes to color management. Some are new, while some of these are legacy options from older versions of Windows.
The issue is they’re not universal, OS-wide options. For example, if you work in HDR on Windows 10, many of the graphic user interface (GUI) elements will appear in uncalibrated SDR. Windows 11 has, for the most part, attempted to fix this by introducing HDR versions of most GUI elements – so for example in full-screen apps, your screen won’t flicker anymore when receiving SDR system notifications.
However, Windows continues to randomly switch to uncalibrated profiles, force SDR over HDR content, default to SDR even if HDR is on, and generally allow 3rd party apps to control color space settings even when you pick a default profile. To help you out, the first thing we can do is look at how you can manage color space settings:
1. Adding and Managing Color Profiles
Thankfully, it is generally pretty straightforward to add or change your current monitor profile under Windows 10 or 11. What you need is found in the Display Settings, so type that into your Search Bar or simply right-click your desktop and select Display Settings from there, then look for the Color Profile pull down.
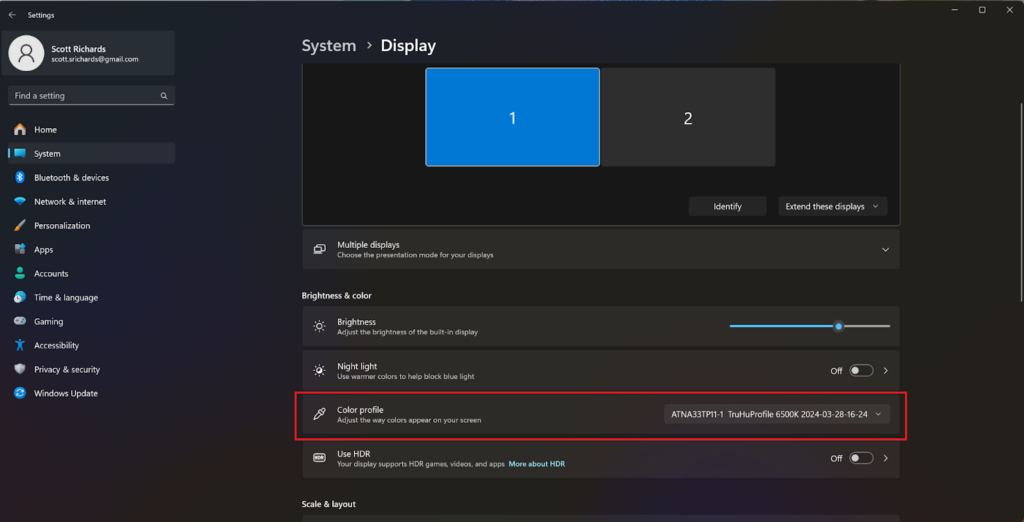
From here you can select your preferred color profile:
However, I have seen instances for Windows 10 users where only the most recently-created profile is available in this interface. In that case, if you want to activate a different or older profile, you have to go into the “legacy” Color Management control panel – as is often the case with Windows.
How do you do that? Simply search for “Color Management” and the old Windows 7 and earlier menu should appear. It looks like this:
In this control panel’s Device tab, make sure “Use my settings for this device” is checked. Then look for your preferred color profile in the list below. Note that if your desired profile is not found in the ICC Profile list, it may have moved to the “All Profiles” tab (unclear why Windows does this). If you can’t find it there either, you may need to “Add” it. It should then be available in the Display Settings.
This menu also allows you to remove profiles and set specific ones as the default, which is useful, but the latter works unreliably (i.e. sometimes Windows simply decides to switch the profile regardless of this setting). The Advanced tab allows you to set a system-wide default ICC profile (useful if you have 2 or more identical monitors).
Note: you can find old TruHu and other ICC profiles in Windows\System32\spool\drivers\color. Another option often suggested online is to download specific ICC profiles from your monitor manufacturer’s website or drivers. However, that profile is a generic one that does not account for your environment, gamma, or other external factors. Measurement-based profiles you can achieve with professional tools like TruHu or colorimeters will always be better.
2. Advanced Color Profiles
The Color Management control panel offers this as a checkbox when you “Add” a profile. It’s not really clear to me what this does, other than not assuming your monitor’s color gamut is sRGB when using Microsoft’s legacy visual calibration tool.
Given you are reading this, that means you have discovered a superior, measurement-based monitor calibrator (TruHu), so we can basically dismiss all of this as legacy and no longer relevant.
3. Nightlight and Color Filters
Also found in the Windows Display Settings, Nightlight warms up your screen at night time. It’s supposed to help with sleep, but it most definitely does not help with offering a consistent viewing experience and should be kept in “Off” mode for color critical viewing.
Color filters can be another useful setting for colorblind users. In Windows 10, you can find the option under Ease of Access in Settings. In Windows 11, it’s under Accessibility. Basically, it allows you to create filters for specific colors so that they are easier to distinguish. More info on color filters can be found in this Reddit thread.
3. HDR
If you have an HDR Monitor (while definitions vary, this generally means a max luminance exceeding 1000 NITS and a very high contrast ratio), Windows offers some features to get the most out of your fancy monitor. This can be turned on from Display Settings in both Windows 10 and 11.
Once turned on, the HDR submenu has multiple helpful options:
- HDR Video Streaming. Allows you to play HDR videos (such as movies and TV series on streaming platforms). Windows recommends using this in full-screen – confirming the earlier point that not all GUI content is HDR and may affect viewing experience.
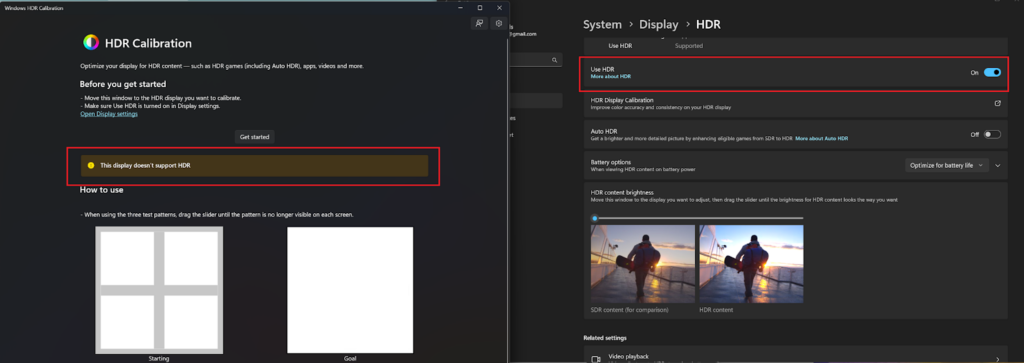
- HDR Display Calibration. Allows you to go through a visual process to try and improve dynamic range under HDR. A couple of caveats:
- The HDR calibration software will provide a warning if your monitor doesn’t support HDR.
- The application (typically a game) must also support HDR in order to take advantage of this calibration. However, some software, such as the new NVIDIA App, are adding features that use AI to automatically upgrade SDR content to HDR.
- The HDR Calibration tool allows you to optimize the maximum brightness to match your HDR monitor’s capabilities. However, it also relies on guesstimation – i.e. using your eyes as a measurement device – more on this later.
- Auto HDR. A new feature available under Windows 11 which automatically calibrates compatible applications (typically Xbox Game Pass games). This feature can be good if you don’t want to bother with calibration yourself. However, if you do calibrate your screen manually, Auto HDR makes it worse (and I’ve yet to understand why – feel free to leave a comment if you have an answer).
- SDR content brightness. Basically what it says. Another point in the “not all GUI elements are HDR” bucket.
5. Auto Color Management
A new feature added to Windows 11 recently, Auto Color Management works on compatible monitors to automatically adjust color profiles to maintain color accuracy across apps and help provide consistency between ICC-aware apps (like Photoshop) and non-ICC-aware apps (like Powerpoint) – a longtime issue with Windows. In order to enable this, you need a compatible system featuring:
- An ACM-compatible GPU (supposedly an AMD RX 400, an Nvidia GTX 10xx series, or newer).
- An ACM-compatible display (it’s recommended that you check your manufacturer’s documentation).
- The latest version of Windows 11 – ACM is a new and experimental feature (even if Microsoft makes no mention of this), so every update might improve stability and function.
The consensus online, according to this Reddit post, is that, to put it mildly, this feature doesn’t work very well, particularly since the API for it has not been released yet, meaning developers like Adobe have not been able to implement it yet. Furthermore, the thread highlights that ACM bypasses your ICC profile, effectively choosing the display’s identification data (or EDID) to use the factory-recommended ICC profile, which is inadequate for true color professionals. To be honest, this is an interesting new feature provided by Windows. Its intention is laudable, Microsoft’s goals with ACM are really commendable, and I hope that the implementation improves over time.
⚠️Warning – some color enthusiasts have reported installing a preview build of Windows to enable ACM since it did not show up in their settings. This worked, but severely slowed down their machines. I wouldn’t recommend doing the same unless you’re ready to reinstall Windows.
Display Calibration Options in Windows 10/11
If you’re a color professional or a gamer, you probably care a lot about accuracy and want to achieve the best possible color your Display + GPU can deliver. To that end, we’ve put together a full guide on how to calibrate your monitor on Windows, but for the purposes of this article, here’s a short summary of your options:
1. Built-in Legacy Display Calibration Option
A long time ago on an OS version far obsolete, Windows introduced its own tool for Display Color Calibration. Interestingly enough, while ACM seems to be a modern-day variant, you can still find the old calibration toolkit even on Windows 10 or 11 machines. If you want a simple, visual calibration method for your monitor, simply go to Display Settings, scroll to the bottom, and you should have the option to “Calibrate display color” which will open up the old legacy tool.
The tool goes through a few options:
- Basic color settings. Where you select the base color settings.
- Gamma. Using a reference image and a slider, the tool allows you to manually set your gamma.
- Brightness. Using a reference image, you can also set your brightness level (the tool prompts you to use the monitor buttons).
- Contrast. The same thing for contrast – the calibration tool allows you to see the differences in how light appears on your screen and adjust accordingly.
- Color balance. Helps you remove color cast from gray areas.
- Final calibration screen. At the end of the process, the tool presents you with a comparison tool between your old calibration and new calibration, letting you select the best one.
This tool, though simplistic, can be useful if your screen is far out of calibration (for instance, if it has a serious color cast). However, it has some glaring disadvantages for actual professional use, namely:
- It doesn’t work on wide-gamut displays, only being able to calibrate within the sRGB color space.
- It relies entirely on “guesstimation” – i.e. you’re using your eyes for measurement. While it can be somewhat useful, this is not a professional or accurate measurement method.
- Lack of color temperature adjustments. Since it’s not relying on measurement, you’re not adjusting to any known color temperature.
2. Builtin HDR Calibration
The builtin HDR calibration systems, as mentioned previously in the article, let you adjust bright and dark parts of the screen while in HDR to prevent blown-out colors and maintain shadow detail.
You have two options, one for HDR laptops, and the second for any HDR monitor:
- Calibrating HDR content on Windows 10 or 11 on your laptop. This small tool is built into Windows 10 version 1803 or later and doesn’t work on external displays. Assuming both HDR and Stream HDR Video are turned on, you should see the option in the HDR submenu under Display Settings. Once complete, you should have a fairly calibrated HDR setup, but it will only work with fullscreen HDR apps.
- Calibrating any HDR display on Windows 11 (including external displays). Starting with Windows 11, Microsoft changed its approach to calibrating HDR screens by releasing an HDR calibration app available on the Microsoft Store. The app is more tailored towards gaming, going through some test patterns from the HDR Gaming Interest Group (HGIG). The main advantage of this app is that it also calibrates how SDR content appears on your HDR display, and it affects color vibrance, accuracy, and consistency.
3. Smartphone-Based Monitor Calibration
A while ago I recognized the gap between free, “guesstimation” solutions and $200+ colorimeters. This essentially meant a lot of users had no affordable path to good color. That’s why I started TruHu, and now it’s here and you can test it out for free.
Essentially, our Windows monitor calibration software uses your phone’s camera to capture two stills of your screen and generate colorimetric data points which it then uses to create an accurate color profile. Simple, effective, and fast.
Here are the basic steps for using our app:
- Download TruHu for both your Windows PC and your mobile device (you need both).
- Create an account (either within the App or on our website).
- Go through the mobile app steps (it will control your desktop app).
- Done! The last step has you decide between your existing profile and the new TruHu calibration. At the end of the process, you can also set a reminder to repeat the calibration regularly (as monitors age, they lose accuracy).
To get a better sense of how TruHu works, check out our How To use TruHu video.
4. Colorimeter-Based Calibration
The last, most-traditional approach to calibrating your display is to use a colorimeter. These devices, such as the Spyder or Colorchecker, are typically expensive (starting at $179 for current-gen models) and need advanced system knowledge from the user in order to work. For example, most need information about your monitor’s backlight and then have to measure over 100 patches.
This process is time-consuming and can be intimidating. Could be worth it if you feel the need for that extra bit of precision provided by a colorimeter. For most users, however, the previous options are typically enough. I wrote more about colorimeters in this article.
GPU Software Color Management Options
Apart from these options for color management, you may have one of the following third-party software installed, depending on your GPU manufacturer. This is an alternative to the Windows OS Color Management options, but it’s probably not the best idea to do it in both places.
It’s also worth noting that the Brightness / Contrast / Gamma settings for all these third party apps are “competing” with the monitor’s on-screen display (OSD) control. It would be best to also avoid making these changes in both places.
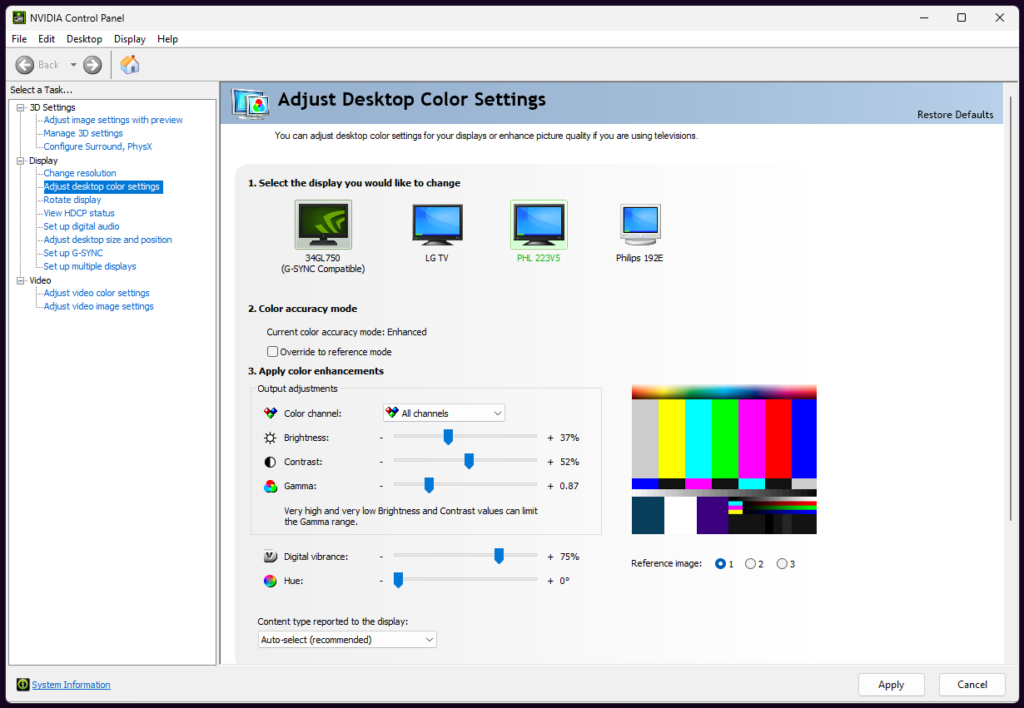
1. Nvidia Control Panel
If you have an Nvidia GPU, their drivers allow you to control how color is displayed on each monitor through the NVIDIA Control Panel. The options are fairly basic – you’ve got:
- Brightness
- Contrast
- Gamma
- Digital Vibrance
- Hue
These five options can be controlled globally, for the entire display, or for specific colors of your monitor’s color space (RGB). What’s more – the app allows you to override all Control Panel settings, essentially bypassing any edits you make in the Control Panel.
Note: Nvidia is also working on an upgrade to its GeForce Experience, Control Panel, and RTX Experience apps, uniting the three into a single interface simply called the NVIDIA App. Here’s a quote from Andrew Burnes on the Nvidia Website:
Featuring a unified GPU control center, NVIDIA app allows fine-tuning of game and driver settings from a single place, while introducing a redesigned in-game overlay for convenient access to powerful gameplay recording tools, performance monitoring overlays, automatic SDR to HDR conversion in games, and game enhancing filters, including innovative new AI-powered filters for GeForce RTX users.
– Andrew Burnes, NVIDIA Technical Writer, in a June 2024 update about the NVIDIA App
Whether this app will be better than the old setup is hard to say. The current opinions on Reddit seem to be divided between cautious optimism and slight frustration. But for the purposes of Windows color management, it seems to have the same options like the regular Control Panel, with the added AI-powered RTX HDR option which automatically upgrades SDR content to HDR. Currently, the app has just launched.
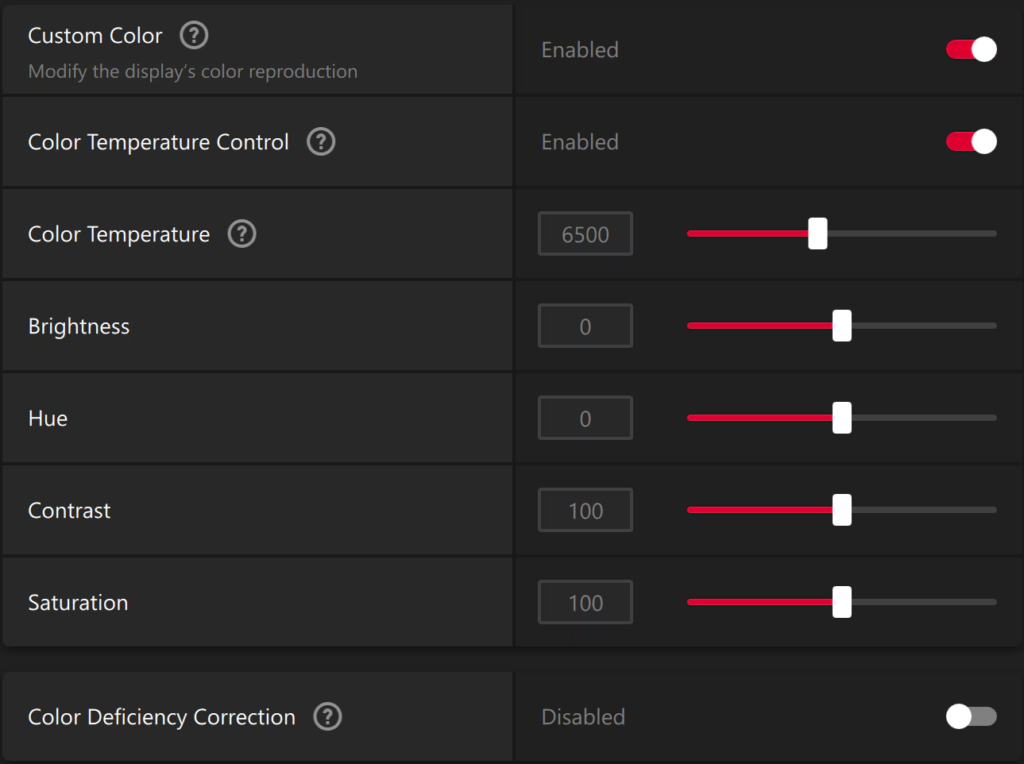
2. AMD Software Adrenalin Edition™
If you have an AMD GPU, you can use either the old AMD Radeon Settings app or the current AMD Software Adrenalin Edition™ to manage the colors of each of your displays.
Both apps feature sliders for the following:
- Color Temperature – an interesting feature of AMD’s color management software is that it allows Color Temperature selection. However, without measurement this isn’t particularly precise and is similar to a warm / cool slider.
- Brightness
- Hue
- Contrast
- Saturation
In addition, the new Adrenalin Edition™ features a Color Deficiency Correction that allows you to set up filters to make certain colors pop (useful for colorblindness, basically an alternative to Windows’ native Color Filters).
3. Intel® Graphics Command Center
If you have a builtin Intel GPU, you can also download and install the Graphics Command Center from Intel, if you don’t already have it. This tool will allow you to edit color settings within the app.
Intel’s app provides the following settings for each display, with regards to color management:
- Color profile management
- Sharpness enhancement
- Color brightness enhancement (overall, and Red, Green, Blue individually)
- Skin tone enhancement (manually adjust the appearance of skin tones)
- Hue
- Saturation

If you want to return to the default settings, you have to create a separate profile within the Intel app (distinct from an ICC profile) which starts out with default settings.
Interestingly enough, Intel’s approach is closer to Windows’ native Color Settings (it even looks similar) than any of the other GPU manufacturers’ apps.
If you’re a gamer, here’s some more info on the best monitor settings for gaming – I wrote this to address gamers’ frustrations with inconsistent color accuracy across games. This guide will help you optimize your color setup for better accuracy and enhanced performance. Hope you find it useful!
Known Issues with Color Management in Windows 10 / 11
1. Auto HDR Makes Colors Worse
While Auto-HDR can be very useful for regular users who don’t typically calibrate their displays, color-conscious users who do will see blown-out colors and crushed blacks if they enable Auto HDR in compatible apps. I recommend turning this off if you’ve already created an accurate ICC profile with TruHu or a Colorimeter.
2. Bad Colors / Incorrect Profile on Startup
Sometimes, for no apparent reason, Windows will switch to an unoptimized color profile either on startup or when exiting a fullscreen app, particularly if you’re running in HDR. What I’ve seen is Windows likes to default to an SDR profile. Either that, or the monitor does not switch on HDR, either because it doesn’t recognize the HDR signal sent by the GPU, or because Windows doesn’t send the correct signal. Thankfully, there’s an easy fix that works almost every time: resetting your graphics adapter using Ctrl + Windows + Shift + B.
If that doesn’t help, use your GPU control panel to increase your brightness slightly, then exit without saving (it should revert to the correct HDR setting). You can also try picking the correct ICC profile from your Display Settings, but that doesn’t usually fix the HDR issue.
Unfortunately, I’ve seen no reliable way to prevent this issue other than keeping your display drivers up to date and calibrating your screen to achieve an optimal color setup – but even that doesn’t seem to prevent it entirely, only reducing its frequency.
3. HDR Looks Blown-out
If your HDR colors look blown out, you might not have an HDR monitor, but a fake HDR one. It’s either that, or Auto-HDR is turned on for a fully-calibrated color profile.
If you have a monitor that can only reach 400 cd/m2 peak brightness, you can still achieve a reasonably good color setup by tweaking your GPU control panel color settings, then running a calibration (either with TruHu or a professional colorimeter), and turning off Auto-HDR. If these methods did not work, you can use Microsoft’s HDR Calibration App to adjust your peak luminance, then begin a new calibration with TruHu or your colorimeter of choice.
4. Auto Color Management – Results Vary
ACM or Auto Color Management is a relatively new Windows feature. It can display wildly different results based on various factors – chief among which is your environment, which ACM does not account for. Furthermore, ACM uses the EDID to determine the optimal ICC profile for your display, superseding any calibration you may have done with your colorimeter or with TruHu. If you’re using one of these professional calibration options, I would suggest turning off ACM.
FAQs Related to Windows Color Management
Some of these have been answered above, but for ease of use, I’m going to repeat a short version and point to the respective section above if I’ve already answered or covered the question.
1. How do I change my Windows colors?
Simple. Right click your desktop and open up Display Settings. Once there, find your Color Profile setting for the monitor for which you want to change your colors. In the dropdown, you should see multiple color profiles – pick the one that looks the best.
Alternatively, if you don’t have more than one color profile there, start a search for Color Management and the legacy menu should show a list of all your color profiles. If that doesn’t work either, you need to create a color profile – you can do so by using either the Calibrate display color option under Display Settings, the TruHu monitor calibration app, or a colorimeter device.
2. How do I install new ICC profiles?
To install a new ICC profile, open up the Color Management window (Settings / Display / Color Profile / Color Management, or simply search for Color Management). Under the table with all your existing profiles, you should see an “Add” button, which allows you to open a more extensive list of existing profiles. From there, simply click “Browse” and select the ICC profile you want to install. You can also Right-Click on an ICC file and select “Install.”
3. How do I use color profiles in Windows?
Color profiles help you optimize your display color for increased accuracy, variable color temperatures, and colorblind options. You can use color profiles in WIndows in multiple ways:
- Create a new calibrated ICC profile using the builtin Calibration tool, TruHu, or a colorimeter.
- Change your ICC profile by going to Display Settings, picking the monitor you want, then going to Color Profile and selecting your preferred one from the dropdown menu.
- Manage all your ICC profiles by going to Display Settings / Color Profile / Color Management and reviewing your existing profiles. You then have the option to Enable, Add, Remove, or Set Default for any color profile on the list.
4. How do I reset Windows color settings?
To reset your Windows color settings, first open up Color Management (Display Settings / Color Profile, or just search for Color Management). From there:
- Go to the Devices tab
- Find the Profile button and click it
- Select the monitor for which you want to reset color settings
- Click the Profiles button
- Select the option to “Reset my settings to the system defaults”
5. What is Windows HD color?
Windows HD color is synonymous with Windows HDR, only it appears in older versions of Windows. Both refer to visual dynamic ranges*, and specifically the technology that uses a High Dynamic Range (HDR) to improve the quality of the display, respectively with regards to a larger-than-usual amount of variation in the light and dark levels within images, videos, and video-games, increasing the overall level of detail. HDR modifies the video signal to change the way luminance levels and colors are sent.
*HDR in and of itself doesn’t necessarily refer to visual ranges, it simply means High Dynamic Range and can apply to any medium, from audio to images and video, as well as the means of recording and rendering specific files in that medium.
Summing Up, or How to Make Your Colors Look Good in Windows
So there you have it – (nearly) everything you could possibly need to know about color management under both Windows 10 and 11. Think I missed something? Knowing Windows, I probably did, and there will probably be issues that haven’t even been created yet.
So let me know in the comments about anything you think is worthy of adding to the piece and please give as many details as possible. My goal is to make this article a hub for any questions and issues relating to Windows Color Management, so any help would be greatly appreciated.
And don’t forget to try out TruHu – we made it for you, so you can easily have better colors. Catch you in my next blog post. ✌️
Установка цветового профиля
Вариант №1 (основной)
Работоспособность
– 95 %
Сложность – Низкая
Это основной способ, который срабатывает у подавляющего большинства пользователей Windows 8.1 и 10, без применения дополнительных программных средств.
1. Для начала сохраните полученный цветовой профиль формата ICC в любую папку на компьютере. Кликните на профиле правой кнопкой мыши и выберите в открывшемся меню пункт «Установить профиль». Цветовой профиль попадёт в системную папку Windows\System32\spool\drivers\color
и будет доступен для выбора;

2. На рабочем столе Windows нажмите правую кнопку мыши и выберите «Параметры экрана». В данном разделе должна появиться закладка «Профиль», в которой вам следует выбрать установленный профиль для вашего монитора;
3. В случае отсутствия закладки «Профиль» мы советуем воспользоваться утилитой DisplayProfile (нажмите чтобы скачать). Откройте программу, найдите в списке предварительно установленный профиль дисплея и нажмите на него один раз. После этого, как правило, нужный пункт в «Параметрах экрана» становится доступен и от вас больше ничего не требуется.
Для дополнительной проверки работоспособности профиля и правильности его установки вы можете воспользоваться второй полезной утилитой – Calibration Tester (нажмите чтобы скачать). Откройте программу, нажмите кнопку Refresh, посмотрите на основную область с линиями гамма-коррекции и убедитесь, что перед вами НЕ диагональная линия (объём её изменений зависит от степени правок в LUT-видеокарты), а сверху написано «The gamma curves for display 0 have been modified» Если линия коррекции расположена строго по диагонали, а в верхней части окна вы видите «The gamma curves for display 0 have not been modified», то смело переходите к одному из следующих вариантов установки профиля.
PS – исключением из правил являются мониторы с поддержкой аппаратной калибровки (все правки в их случае вносятся в открытую LUT-область самого дисплея с помощью специализированного ПО от производителя). При активации созданных профилей для таких моделей утилита Calibration Tester, проверяющая LUT-видеокарты, выдаст ровную диагональную линию, но сверху будет указано «The gamma curves for display 0 have been modified», что подтверждает верность установки.
Вариант №2 (для сложных случаев и пользователей Windows XP|Vista|7|8)
Работоспособность
– 80 %
Сложность – Высокая
Описание данного варианта установки цветового профиля вы можете встретить на многих онлайн ресурсах в том или ином виде. Считается, что предложенный способ является основным и чуть ли не единственно правильным. Как же показал наш опыт – его работоспособность оказывается ниже всех остальных – более простых вариантов.
1. Сохраните полученный цветовой профиль формата ICC в любую папку на компьютере. Кликните на профиле правой кнопкой мыши и выберите в открывшемся меню пункт «Установить профиль». Цветовой профиль попадёт в системную папку Windows\System32\spool\drivers\color и будет доступен для дальнейшего выбора;

2. Выберите «Поиск» в строке «Пуск» или нажмите сочетание клавиш Win + R. Введите в строке colorcpl
и нажмите клавишу Enter. Это самый простой способ для того, чтобы попасть в инструмент «Управление цветом»;

3. В открывшемся окне «Управление цветом» нажмите кнопку «Определить мониторы». Запомните номер вашего экрана и в выпадающем списке «Устройство» выберите его (как правило, это «Экран 0/1» или название вашего дисплея);
4. Установите галочку «Использовать мои параметры для этого устройства»;

5. Нажмите кнопку «Добавить». В открывшемся окне «Сопоставление цветового профиля» найдите установленный вами профиль, выберите его и нажмите «ОК»;
6. Выделите добавленный цветовой профиль в списке и нажмите кнопку «Сделать профилем по умолчанию»;

7. Для обеспечения корректной автозагрузки LUT-правок из установленного цветового профиля для любого пользователя ОС перейдите на закладку «Подробно» и нажмите кнопку «Изменить параметры по умолчанию»;

8. В открывшейся системной копии окна «Управление цветом» повторите действия из пунктов 1-4, а в закладке «Подробно» установите галочку «Использовать калибровку экрана Windows» после чего закройте все окна;

9. Перезагрузите систему. Установка и активация профиля завершены;
10. Удостоверьтесь, что в разделе «Параметры экрана» появилась закладка «Профиль»
(актуально только для Windows 8.1 и 10), а в ней выбран требуемый профиль монитора.
Для дополнительной проверки работоспособности профиля и правильности его установки вы снова можете воспользоваться утилитой Calibration Tester (нажмите чтобы скачать). Откройте программу, нажмите кнопку Refresh, посмотрите на основную область с линиями гамма-коррекции и убедитесь, что перед вами НЕ диагональная линия (объём её изменений зависит от степени правок в LUT-видеокарты), а сверху написано «The gamma curves for display 0 have been modified.» Если линия коррекции расположена строго по диагонали, а в верхней части окна вы видите «The gamma curves for display 0 have not been modified.», то следующий вариант установки и активации профиля должен решить все проблемы.
PS – исключением из правил являются мониторы с поддержкой аппаратной калибровки (все правки в их случае вносятся в открытую LUT-область самого дисплея с помощью специализированного ПО от производителя). При активации созданных профилей для таких моделей утилита Calibration Tester, проверяющая LUT-видеокарты, выдаст ровную диагональную линию, но сверху будет указано «The gamma curves for display 0 have been modified», что подтверждает верность установки.
Вариант №3 (для продвинутых пользователей)
Работоспособность
– 99 %
Сложность – Средняя
Последний предложенный вариант для пользователей Windows связан с необходимостью установки дополнительного ПО – применяемой нами программы для калибровки DisplayCAL, использующей библиотеки Argyll CMS. Основными достоинствами данной программы для простого пользователя являются высокоточный и стабильный способ загрузки цветового профиля в систему, а также постоянный автоматический контроль за его работоспособностью – то, чем не может похвастаться ни одна из версий Windows.
1. Сохраните полученный цветовой профиль формата ICC в любую папку на компьютере;
2. Скачайте программу DisplayCAL и установите её;
3. После установки запустите программу и согласитесь с запросом ОС Windows на доступ ПО к рабочей сети интернет (для дальнейшей корректной работы);

4. При первом запуске программа должна предложить вам произвести скачивание и установку исполнительных библиотек Argyll CMS. Согласитесь на автоматическое скачивание нажав кнопку Download и ещё раз Download в открывшемся окне с информацией по версии библиотек.
5. На скачивание библиотек может потребоваться от нескольких десятков секунд до часа (зависит от скорости сервера, где и находятся необходимые файлы), дождитесь их скачивания и установки;

6. В зависимости от выбранного языка локализации зайдите в первую вкладку сверху (Файл/File) и выберите пункт «Установите профиль устройства отображения…/Install display device profile…». Найдите сохранённый ICC-профиль и откройте его;

7. В появившемся окне с основной информацией по профилю нажмите кнопку «Установить профиль/Install Profile» и далее Ок/Ok. Профиль установлен и активирован;

8. Закройте программу и убедитесь, что в системном трее появилась иконка DisplayCAL Profile Loader, а при нажатии на неё правой кнопкой мыши установлена галочка напротив «Load calibration on login & preserve calibration state»;
И вновь для дополнительной проверки работоспособности профиля и правильности его установки вы снова можете воспользоваться утилитой Calibration Tester (нажмите чтобы скачать). Откройте программу, нажмите кнопку Refresh, посмотрите на основную область с линиями гамма-коррекции и убедитесь, что перед вами НЕ диагональная линия (объём её изменений зависит от степени правок в LUT-видеокарты), а сверху написано «The gamma curves for display 0 have been modified.» Если линия коррекции расположена строго по диагонали, а в верхней части окна вы видите «The gamma curves for display 0 have not been modified.», то следующий вариант установки и активации профиля должен решить все проблемы.
PS – исключением из правил являются мониторы с поддержкой аппаратной калибровки (все правки в их случае вносятся в открытую LUT-область самого дисплея с помощью специализированного ПО от производителя). При активации созданных профилей для таких моделей утилита Calibration Tester, проверяющая LUT-видеокарты, выдаст ровную диагональную линию, но сверху будет указано «The gamma curves for display 0 have been modified», что подтверждает верность установки.
Вариант №4 (для пользователей Apple MacOS)
Работоспособность
– 99 %
Сложность – Низкая
Для MacOS также существует несколько способов установки профиля (в том числе метод с DisplayCAL для данной разновидности ОС), но самый действенный и простой из них займёт всего одну минуту.
1. Сохраните полученный цветовой профиль формата ICC в любую папку на компьютере;
2. Через Finder или прямой переход к папке (для этого можно нажать сочетание клавиш Cmd + Shift + G) перейдите к «~/Library/ColorSync/Profiles/Displays/» и скопируйте в неё цветовой профиль;

3. Откройте «Системные настройки» и выберите раздел «Дисплей»;

4. Удостоверьтесь, что для используемого монитора выключены HDR, TrueTone и автоматическое управление яркостью подсветки;

5. Перейдите к разделу «Цвет» и найдите в списке добавленный профиль. Нажмите на него один раз, после чего должны произойти визуальные изменения картинки на экране;
6. Перезагрузите систему и убедитесь, что во вкладке «Цвет» необходимый профиль остался выставлен по умолчанию;
7. Закройте вкладку и смело приступайте к работе.
Отдельно отметим, что в случае с MacOS изменения картинки должны быть заметны даже в случае с мониторами с поддержкой аппаратной калибровки, без правок в LUT-видеокарты. Любые изменения изображения на экране при переключении с одного доступного профиля на стандартный «Профиль монитора», встроенный в ОС, лишь подтверждают работоспособность установленного профиля.
Вариант №5 (для пользователей Linux)
К сожалению, мы не являемся адептами ни одной из версий Linux, а в нашей работе сталкивались с необходимостью установки профилей в различные дистрибутивы данной ОС лишь 2-3 раза за последние 4 года. Как правило, любители Linux являются продвинутыми пользователями и знают свои систему лучше всех и быстро находят подходящий способ установки, который может существенно отличаться. Главное, что стоит помнить – Linux прекрасно переваривает профили формата ICC, в том числе созданные в средах других ОС.
Какие ОС и приложения поддерживают работу с цветовым профилем?
Глобальная система управления цветом интегрирована исключительно в операционную систему MacOS и именно поэтому она влюбила в себя многих фотографов, видеографов и дизайнеров. Здесь управление цветом распространяется на все доступные приложения, включая видеопроигрыватели и игры (за крайне редким исключением).
В дистрибутивах Linux система Color Management System работает на том или ином уровне в зависимости от используемого системного модуля. Количество поддерживаемых приложений, пожалуй, самое небольшое по сравнению с остальными ОС, но и популярность Linux среди поклонников точной цветопередачи – минимальная, а поэтому проблем мы здесь не видим.
В самой популярной ОС – Windows от Microsoft система управления цветом (CMS) была интегрирована ещё в первые версии Windows XP, обновлена в Windows 7 и максимально доработана в Windows 10. Тем не менее, глобальная работа CMS, как в случае MacOS, до сих пор не налажена, а приложений с полноценной поддержкой цветовых профилей насчитывается порядка ~50-60.
В случае заказа услуги «Настройка и калибровка» вы можете не переживать за корректность установки яркости, цветовой температуры, гаммы и других параметров – эти изменения на уровне самого монитора будут с вами всегда, до того момента пока вы не сбросите настройки или не выставите их на свой вкус. На дополнительные коррекции цветопередачи с помощью применяемого цветового профиля — правки гамма-кривых от которых зависит контрастность изображения, баланс серого, различимость светов и теней — вы можете рассчитывать в любых приложениях (за исключением большинства игр), а полноценная поддержка ICC с возможностью программного пересчёта цветового пространства присутствует в профессиональных продуктах по работе с цветом (Adobe, Coral, Black Magic), популярных браузерах (Google Chrome, Opera, Edge, Mozilla) и программах для просмотра изображений (XnView, Faststone Viewer, ACDSee, Google Picasa и др.). Многие из них не требует дополнительных настроек, в других же потребуется базовая настройка и активация поддержки CMS.
Автор: Грыжин Александр ака =DEAD=
-
Home
-
News
- 7 Ways to Open Color Management in Windows
By Shirley | Follow |
Last Updated
Windows’ built-in Color Management is designed to assign different color profiles to different display devices. Do you know how to open Windows Color Management? If not, then you are in the right place. This article from MiniTool focuses on this question and lists several ways to do that.
In general, Windows will automatically assign the corresponding color profile to your device. But if you need to install and assign a color profile by yourself, you can try the following methods to open Color Management.
How to Open Color Management in Windows
Way 1. Using the Windows Search Box
The quickest way to open Color Management is by using the Windows search bar located right next to the Windows icon in Windows 10/11.
You just need to click the Windows search box and type Color Management in the pop-up window. Then press the Enter key. The Color Management window will appear.
Way 2. Using Control Panel
Through the windows Control Panel, you can change various computer hardware and software functions, such as setting up monitors, printers, keyboards, etc. Similarly, Color Management can also be opened through Control Panel.
Step 1. Open Control Panel using the Windows search box.
Step 2. Find and click Color Management to open it.
Way 3. Using Run
Windows Run box, included with Microsoft Windows 95 and all later Windows versions, can help you open various programs and files. So, you can also use it to open Color Management in Windows 10/11.
Step 1. Press Windows + R key combinations to open the Run window.
Step 2. Type colorcpl in the input box and press Enter.
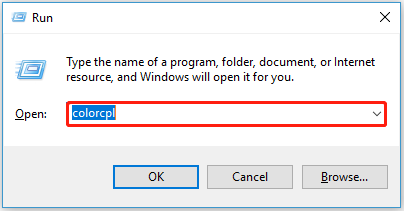
Now the Color Management window appears, and you can start to customize your color settings.
Way 4. Using Command Prompt
If you are familiar with the Command Prompt, then you can open Color Management directly by entering a simple command line. Here you can see how to do that.
Step 1. Open Command Prompt using the Windows search bar.
Step 2. In the Command Prompt interface, type colorcpl and press Enter.
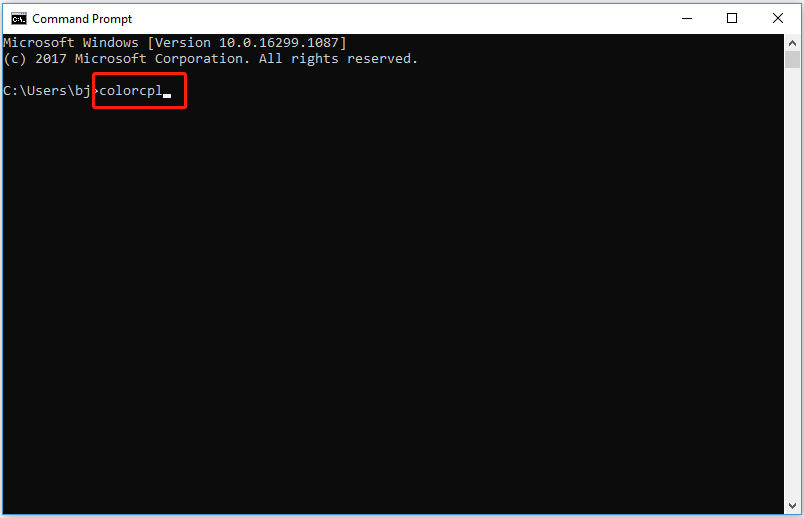
Then the Color Management windows will pop up.
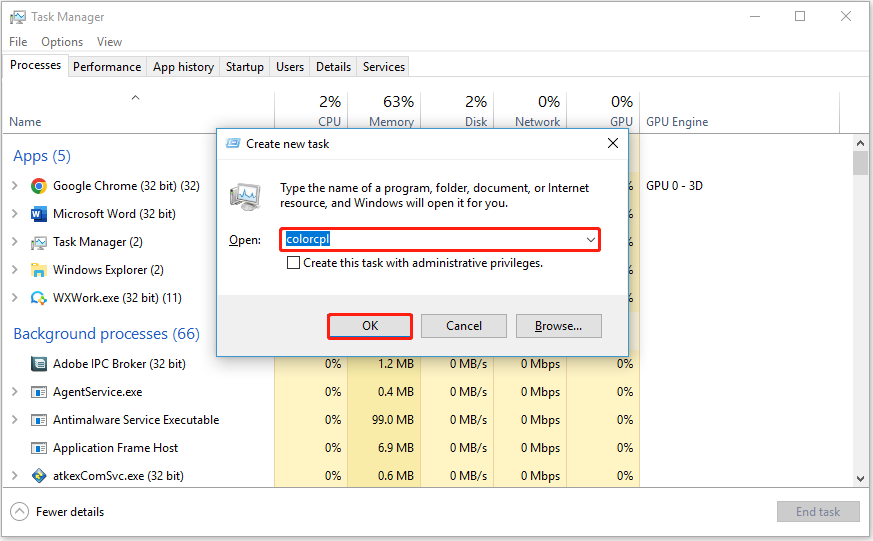
Way 5. Using Task Manager
Task Manager is a commonly used Windows option that provides information about the processes and applications running on your computer. Here you can see how to access Color Management using this feature.
Step 1. Right-click the Start button and select Task Manager (Or you can use Ctrl + Shift + Esc keyboard shortcuts).
Step 2. Click File > Run new task in the taskbar.
Step 3. Input colorcpl in the input box and click OK.
Way 6. Using File Explorer
Although File Explorer is mainly used to manage files and folders, it can also create shortcuts and open programs. Let us see how to open Color Management using it.
Step 1. Press Windows + E key combinations to open File Explorer.
Step 2. In the address bar, type colorcpl and press Enter. Then you will move to the interface of Color Management.
Tips:
Tip: If you find some files in File Explorer are lost, here professional data recovery software – MiniTool Power Data Recovery is recommended to you. You can use this easy-to-use tool to get your deleted files back for free (No more than 1GB of data).
MiniTool Power Data Recovery FreeClick to Download100%Clean & Safe
Way 7. Using a Desktop Shortcut
If you use Color Management frequently, it is recommended that you create a desktop shortcut for it. Then you can directly click the shortcut to open Color Management.
Step 1. Move to your desktop and right-click a blank area to select New > Shortcut.
Step 2. Input C:\windows\system32\colorcpl.exe in the input box and click Next.
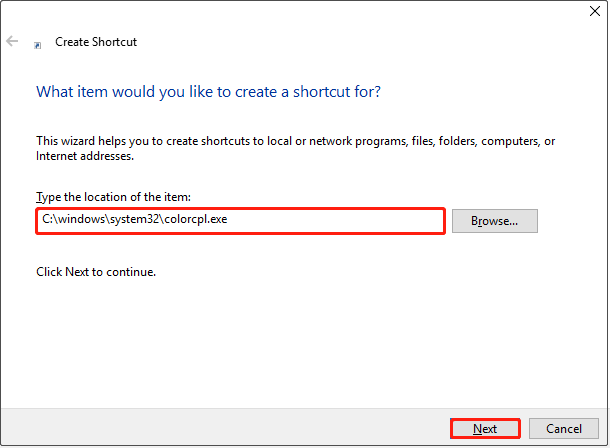
Step 3. Type a name for this shortcut and click Finish.
Now you have created a shortcut icon for Color Management on the desktop.
Bottom Line
This article describes several approaches to open Color Management in Windows 11/10. You can choose the one you preferred. Should you have any questions, please feel free to let us know.
For more information about Color Management, welcome to go to MiniTool News Center.
About The Author
Position: Columnist
Shirley graduated from English major and is currently an editor of MiniTool Team. She likes browsing and writing IT-related articles, and is committed to becoming a professional IT problem solver. The topic of her articles are generally about data recovery, data backup, and computer disk management, as well as other IT issues. In spare time, she likes watching movies, hiking and fishing.