The best free video editing software, Windows Movie Maker, can help you make a wonderful video with your pictures as well as videos. With the best free video editing software, you can save your Movie Maker project to MP4, but you can also publish it on OneDrive, Facebook, Vimeo, YouTube, and Flickr.
Windows Movie Maker, a free video editing software released by Microsoft, can help you effectively and quickly create your own videos for your friends as well as family. However, do you know how to save Movie Maker project after finishing editing your movie?
Don’t worry if you don’t know how to save Movie Maker to MP4. Now, this post will tell you how to save a Movie Maker file as a video as well as show you the steps for creating your own custom settings for exporting video.
Note: As of January 10th, 2017, Windows Movie Maker was officially discontinued. Now, fortunately, MiniTool Solution Ltd., a professional company based in Canada, has saved the links to the archived files for you. You can download the best free video software from MiniTool.
How to Save Movie Maker Project Using the Recommended Settings
Windows Movie Maker offers the recommended settings for you to save Movie Maker to MP4 video which can be uploaded, shared and burned.
As long as you choose the recommended settings free Movie Maker will take a look at the size and bit rate of your source videos and choose settings according to what it thinks will produce the best balance between file size and video quality.
Now, let’s look at the detailed steps on how to save a Movie Maker file as a video.
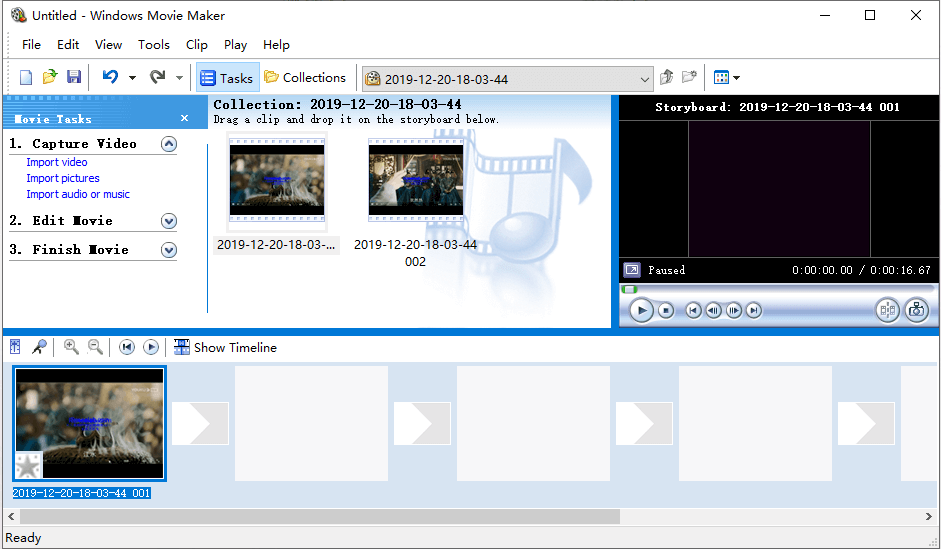
Step 1. Launch Windows Movie Maker, open a new project, import your videos and pictures, split and trim your movie, add transitions as well as effects to enhance your movie, and add Titles and Credits to complete the movie as you like.
Watch Video
Click the Play button to learn how to split and trim a video.
Step 2. Go to the ribbon and then click the Save movie button found in the Share section on the Home tab. This will bypass all the complicated video settings that you might not understand and bring you right to the Save Movie dialog.
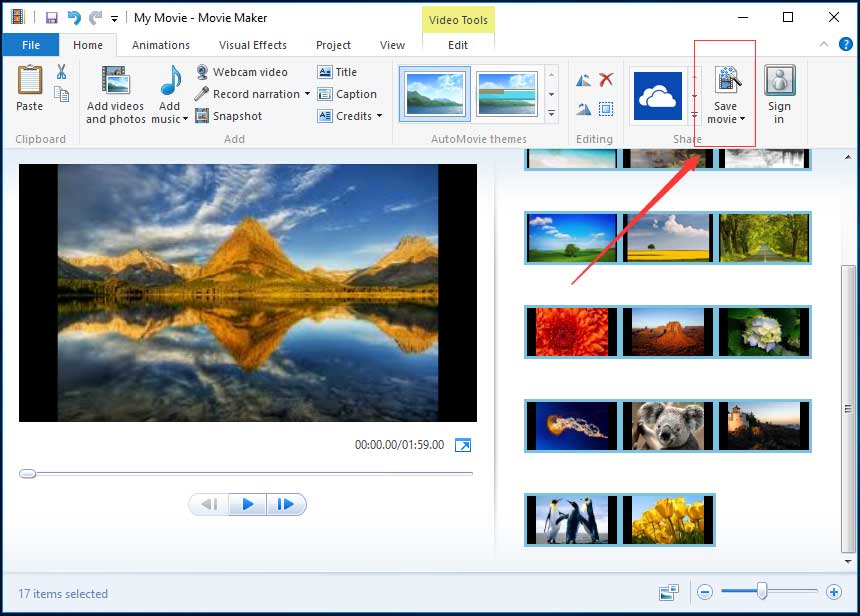
You can click the triangle next to Save movie and hold your mouse over the Recommended for this project to learn the detailed information if you are curious to what video settings Windows Movie Maker deemed optimal for your project, as shown below.
Step 3. Type your file name and choose your video file type: MPEG Video File (*.mp4) or Windows Media Video File (*.wmv).
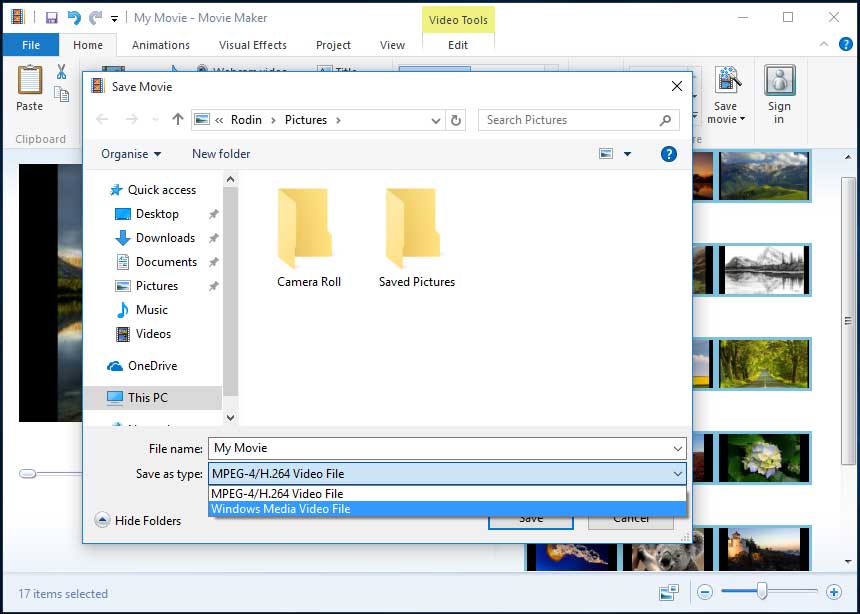
For most people, the recommended settings will be sufficient for most purposes. You can convert Movie Maker file to MP4 or WMV, and then you are able to share it, upload it or burn it as you see fit.
Hi! I saved Windows Movie Maker project to MP4 without any difficulty. I want to share it with you. Click to Tweet
However, if you plan on sharing your movie via a specific means such as email or a DVD, you are suggested to check out some of Windows Movie Maker’s pre-set video settings. Now, I guess you might be wondering:
“How can I save Movie Maker videos by using the pre-set video settings?”
Want to know the answer?
How to Save Movie Maker Project Using the Preset Video Settings
The best free video editing software offers a few pre-set video settings and these settings are optimized based on what you plan on doing with the file once they are saved.
The steps as follows:
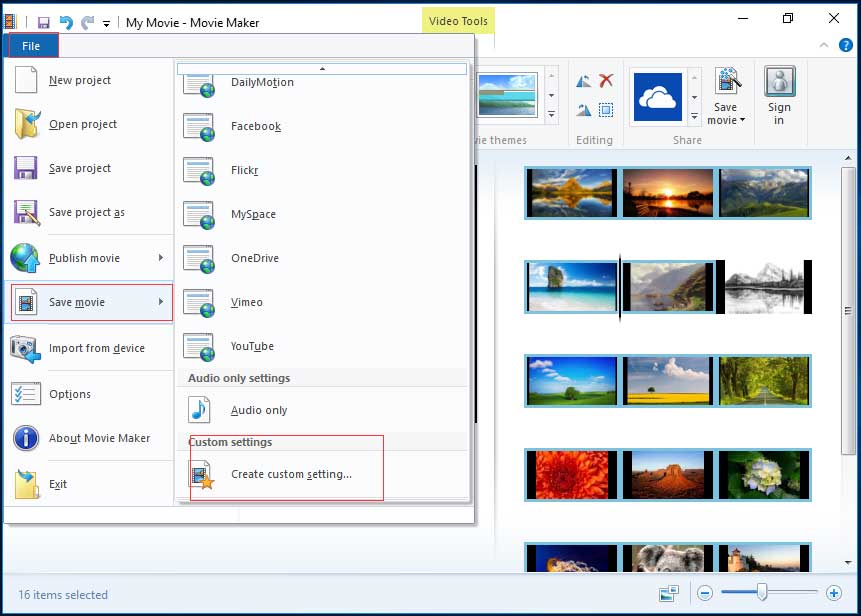
Step 1. Click the small triangle on the Save movie button. After that, you will find these pre-set video settings in the drop-down menu. These settings are optimized for a number of devices as shown below.
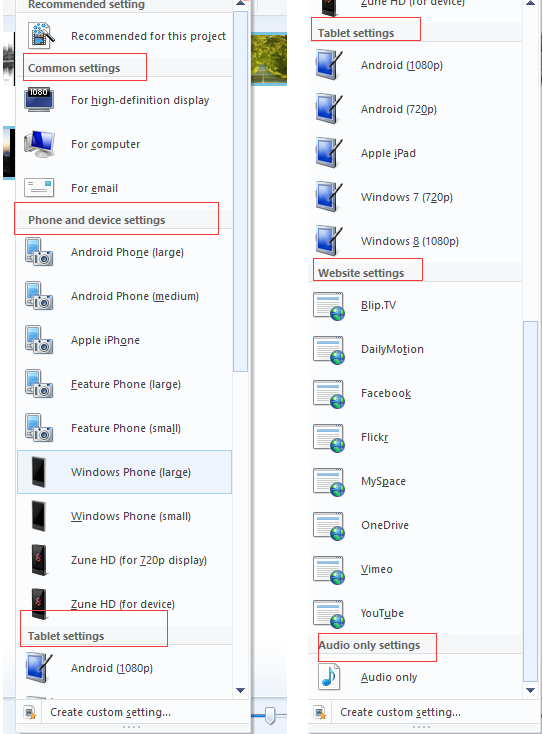
Common settings: For high-definition display, For computer, Burn a DVD, and For email.
The Burn a DVD option is available only in Windows 7. If you choose this option, the file will be saved to the location of your choice and then loaded into a new Windows DVD Maker project.
Phone and device settings: Android phone (large), Android phone (medium), Apple iPhone, Feature phone (large), Feature phone (small), Window phone (large), Windows phone (small), Zune HD (for 720p display), and Zune HD (for device).
Tablet settings: Android (1080p), Android (720p), Apple iPad, Windows 7(720p), and Windows 8(1080p).
Website settings: Bilp.TV, Dailymotion, Facebook, Flickr, MySpace, OneDrive, Vimeo, and YouTube.
Audio only settings: Audio only.
Step 2. Hold over yout mouse over an option in order to see the details, and then choose a suitable setting like For high-definition display, and pick a location to save the file and then click or tap Save button.
See! it is very easy to save a Movie Maker file as a video.
However, what should you do if you don’t want to choose the existing present settings to convert Windows Movie Maker video to MP4 or WMV? Is it possible to publish your video by using more specific options?
Of course, you can!
Windows Movie Maker allows you to create a custom setting of your own to use. Now, I guess you might be wondering:
“How do I create your own custom setting in Windows Movie Maker?”
Please continue reading!
How to Save Movie Maker Project by Creating New Custom Settings
After editing your movie on Windows Movie Maker, you can try the following 6 steps to optimize the video for playback on specific devices.
Step 1. Click on the File button located on the top-left corner of the free video editing software window to open the file panel.
Step 2. Click on the Save movie button to open up a new sub-menu to the right.
Step 3. Scroll down the sub-menu and click on Create custom setting button at the very end of the sub-menu.
Step 4. Now, input the following information:
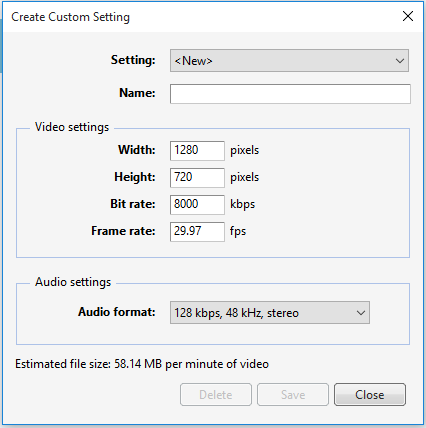
- Setting: Click on the setting’s drop-down list. You either can choose, “<New>,” to start from scratch or select any of the existing settings from the list.
- Name: Give this new export setting a name (for example, Wild China).
- Width & Height: Enter your source file’s original width as well as height. If you wish to export your video at a smaller frame size, edit these values. If you aren’t sure, leave them as-is.
- Bit rate: This can affect the level of detail in your video. Although lower bit rates lead to smaller file sizes and faster uploads, you had better set this higher for improved quality.
- Frame rate: This will affect the smoothness of motion and animations in your video. For basic slideshows you can choose 24fps because photos don’t have to be particularly high. For full motion video it’s not usually necessary to go above 30fps.
- Audio format: Click on the drop-down list and select the audio settings you want. The higher the bit rate (kbps), the better the quality, but it also means a bigger file size. 192 kbps, 48 kHz, stereo is considered CD quality, but 128kbps is passable for video.
Step 5. Check the estimated file size.
As long as you make an adjustment on the settings an estimated file size is displayed at the bottom of the window. The higher you set them, the better the quality and the file size will be larger. Of course, the quality won’t exceed the source material.
Step 6. Click Save after you finish these settings. Then, your video will be saved as a Windows Movie Maker video settings file (.wlvs). After saving, you will find that this file will be added to your list of video settings in the Save movie menu as shown below.
Hi! I now have 3 ways to save Windows Movie Maker project with ease. Share them with more people. Click to Tweet
3 Useful Tips About Using Windows Movie Maker
Windows Movie Maker Supports Many File Types.
Windows Movie Maker is able to support almost any video, audio and photo format.
The formats for import are:
Video Files: mp4, mov, 3gp, avi, rmvb, swf, flv, mkv, mpg, vob, wmv
Audio Files: mp3, aac, amr, flac, m4a, m4r, mmf, wav, wv, ape
Image Files: jpg, png, gif, bmp, ico, jpeg, pcx, tga, tiff, webp
The formats for export are:
mp4, m4a, wmv
Upload A Windows Movie Maker Video
After saving Windows Movie Maker project you can share it with your friends or upload it to YouTube, Facebook, and other famous social platforms. As a matter of fact, with Windows Movie Maker you can directly upload your video to OneDrive, YouTube, Facebook, Flickr, Vimeo, etc.
You can click on the icon of a video-sharing website like YouTube in the Share group under the Home button to directly upload your current Movie Maker video. Then, choose the suitable resolution of your movie to publish it.
Error – Windows Movie Maker Cannot Save the Movie?
According to a survey, we find some users will get the following error message when they save Windows Movie Maker project:
Windows Movie Maker cannot save the movie to the specified location. Verify that the original source files used in your movie are still available, that the saving location is still available, and that there is enough free disk space available, and then try again.
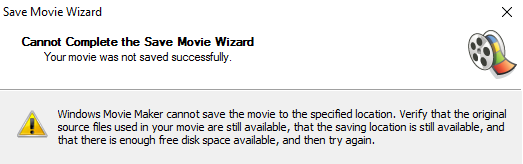
If you encounter this error, you should try the following solutions:
- Make sure your computer has enough memory for the processing of your project.
- Close all other tasks before converting the Windows Movie Maker file as a video.
- Do not edit corrupted file in the free video editing software.
- Make sure your source files are not locked by any type of, “Folder Lock,” software. Many users of “Folder Lock” software have problems when the locked folders include those with the source files used by a project.
- Reinstall Windows Movie Maker.
Bottom Line
Now, it’s your time to convert your Windows Movie Maker video to MP4 or WMV.
If you have any questions or suggestions about how to save Movie Maker project, don’t hesitate to leave a comment in the following part or send us an email via [email protected]. We provide 24*7 Technical Support.
На чтение 4 мин. Просмотров 5.8k. Опубликовано
Готовый продукт, созданный с помощью этого видеоредактора, можно сохранить на компьютере. Сохранить фильм в Movie Maker можно в виде проекта, если нужна будет дальнейшая работа, или в окончательном виде, если изменений не планируется.
Навигация
- Сохранение результата в виде проекта
- Сохранение окончательного варианта фильма
- Быстрый способ сохранения
- Публикация в сети Интернет
Сохранение результата в виде проекта
Если нужно сохранить готовый фильм с тем, чтобы впоследствии внести в него изменения, то разумно сделать это в виде проекта. Файл в таком случае сохранится в формате WLMP. Проектное сохранение выгодно тем, что позволяет открыть создаваемый фильм в Movie Maker в любой момент для того, чтобы внести в него изменения.
Сделать это можно следующим образом:
- Открыть вкладку «Файл».
- Далее следует выбрать кнопку «Сохранить проект как».

- В открывшемся окне напечатать имя проекта и выбрать путь его сохранения.

- Определившись с именем и местом хранения, нужно кликнуть по кнопке «Сохранить».


Сохраненный проект будет открываться по умолчанию в Movie Maker.
В процессе работы с видео все дорожки сливаются в одну, из-за этого после сохранения их в виде единого объекта формата MP4, редактировать такой видеофайл уже не получится. Поэтому и нужны проекты формата WLMP, которые дают возможность доработки фильма.
Сохранение окончательного варианта фильма
Для начала нужно убедиться в том, что все правки внесены и проект не нуждается в доработке. Можно воспользоваться опциями проекта и настроить его под нужды пользователя. Это можно сделать, кликнув по вкладке «Проект». Инструментарий этой вкладки даст возможность сделать акцент на громкости одного из элементов видео. К примеру, можно выделить музыку, наложенную на видео. Эта вкладка позволит пользователю установить нужные для видео пропорции.

После настройки можно приступить к сохранению. Сохранить видео в Movie Maker можно следующим способом:
- Кликнуть по вкладке «Файл».
- Выбрать кнопку «Сохранить фильм».
- Список, который открывается при нажатии на кнопку «Сохранить фильм», включает в себя возможные параметры сохранения объекта. Лучше всего выбрать пункт «Рекомендуемые для этого проекта». При желании можно выбрать параметры сохранения файла для планшета, смартфона или дальнейшей публикации в Интернете. Для каждого сайта из приведенных в списке предусмотрены свои параметры сохранения.
- Если подходящий параметр не нашелся, можно настроить его под требования конкретного пользователя. Для этого можно из приведенного списка выбрать пункт «Создать настраиваемый параметр».

- Появившееся окно позволяет настроить данные сохраняемого объекта. В первую очередь к ним относятся разрешение видеофайла, скорость потока, формат аудио и частота кадров в секунду. Задав нужные значения, нужно присвоить имя шаблону и нажать кнопку «Сохранить».
- После этого следует выбрать один из параметров, кликнув по нему. Откроется диалоговое окно.
- В диалоговом окне нужно выбрать директорию сохранения фильма, присвоить имя. По умолчанию можно выбрать один из двух форматов сохранения файлов — WMV и MPEG-4. Далее нужно нажать на кнопку «Сохранить».
Фильм не сохраняется в Movie Maker в формате MPEG-4, только в формате AVI. В его современной версии, Киностудии Windows Live, все происходит наоборот.
- Запустится процесс сохранения и конвертации видеофайла в нужный формат.
- По окончании процесса откроется следующее окно. В нем можно воспроизвести сохраненный файл или открыть содержащую его папку.


Вышеперечисленные действия позволят сохранить фильм в формате MP4. В случае, если требуется получить на выходе файл другого формата, можно воспользоваться одним из многочисленных видеоконвертеров.
Быстрый способ сохранения
Для ускорения процесса сохранения можно воспользоваться таким методом:
- Перейдите на вкладку «Главная».
- Нажмите кнопку «Сохранить фильм».

- Откроется список параметров, выберите подходящий.

Сохранение осуществляется по инструкции, описанной выше. Выберите формат и кликните по соответствующем кнопкам.
Публикация в сети Интернет
В случае, если сохранение не требуется, можно разместить фильм на одном из доступных для публикации сервисов.
- На вкладке «Главная» нужно кликнуть по выпадающему списку.

- Выбрав один из доступных сайтов, нужно выбрать его.
- В открывшемся окне следует выбрать разрешение, рекомендованное для конкретного сервиса.

- Выбрав разрешение, нужно кликнуть по нему.
- Запустится процесс публикации. Копия публикуемого фильма сохранится на компьютере.


Опубликовать файл можно только при наличии учетной записи в Microsoft Live.
С помощью описанных способов можно сохранить объект в формате MP4. Это один из самых распространенных форматов видео.
Тема урока: Создание,
открытие, сохранение проекта видео в Windows Movie Maker.
Цели урока:
Обучающая: научить создавать мультимедийные
продукты средствами программы Movie Maker;
сформировать у обучающихся прочные практические навыки
вставки фото, видео, графических изображений в фильмы, созданные в программе Movie
Maker.
Развивающая: научить применять на практике
теоретические знания по созданию мультимедийных продуктов средствами программы Movie
Maker.
Воспитывающая: формировать у
обучающихся стремление к постоянному развитию профессиональных способностей и
мастерства
Материально-техническая база:
Персональные компьютеры, мультимедийный видеопроектор, инструкционные карты.
ХОД УРОКА
I. ОРГАНИЗАЦИОННАЯ
ЧАСТЬ
(5 минут)
1. Отчет
старосты группы о количестве присутствующих и отсутствующих обучающихся.
II. ВВОДНЫЙ ИНСТРУКТАЖ (40 минут)
Сообщение темы урока: Создание мультимедийного
продукта средствами программы Windows Movie Maker.
1. Сообщение
учебной цели урока: сформировать у обучающихся прочные практические навыки
вставки фото, видео, графических изображений в фильмы, созданные в программе Movie
Maker (Презентационный слайд)
2. Проверка
знаний обучающихся: вопросы к обучающимся по материалу, изученному на уроках
специальных дисциплин, связанному с материалом данного урока.
— Каково назначение
программы Movie
Maker?
— Какие типы файлов
можно импортировать в проект Movie Maker?
— Каковы
дополнительные возможности программы?
Работа с программой Movie Maker в Windows
XP
При
помощи Movie Maker можно записывать аудио и видео ролики, которые в последствии
можно организовать и редактировать для создания фильмов. Дополнительно с
помощью этой программы можно сохранять файлы в другом формате и сжимать
видеофайлы.
Movie
Maker входит в пакет стандартных программ и устанавливается вместе с Windows
XP, а в Windows 7 ее исключили. Поэтому чтобы установить
программу для монтажа фильмов, ее необходимо отдельно скачивать с
интернета.
Для
вызова приложения, откройте меню Пуск, из него вызовите программу Windows Movie
Maker, из подменю стандартных программ, на экране отобразиться окно
приложения, в верхней части расположено главное меню и панель инструментов. На
панели инструментов собраны значки, щелчок мышью на которых приводит к
выполнению и какой либо команды, к примеру, она позволяет получить быстрый доступ
к командам работы с файлами, такие как открытие или сохранение, или к командам
редактирования. В правой части окна расположен экран, в котором производится
просмотр смонтированных файлов. Под экраном располагаются кнопки управления
позволяющие просматривать фильм. Так же в данной панели присутствуют кнопки
задания режима полноэкранного просмотра и разделения клипа на части. В нижней
части экрана, расположена панель редактирования фильма, она состоит из кнопок
управления расположенных в левой части и ленте кадров.
Работаем в программе Movie Maker
1. Запускаем программу.
3. Открывается
рабочее окно программы.
4.
3.
Сохраняем проект под выбранным именем, обязательно в
папке, где будут собраны ВСЕ материалы (картинки, фото, видео, текст). Сохраненный
файл проекта в Windows Movie Maker имеет
расширение .mswmm. Для того, чтобы продолжить работу над проектом, заходим в
папку, где лежит проект, открываем его.
4.
Работа с изображениями.
Загружаем
изображения (нажимаем кнопку Импорт изображений, выбираем нужную папку,
в которой хранятся фото – это должна быть одна папка, с которой мы будем
работать, выбираем файлы, нажимаем Импорт).
Перетаскиваем
(наводим курсор на файл, щелкаем, удерживая левую кнопку, тянем файл) нужные
файлы на шкалу раскадровки.
Для
удобной работы нажимаем Отображение раскадровки
Перекидываем
файлы в нужной последовательности – они становятся кадрами (если мы изменим
последовательность, кадры можно легко поменять местами).
5. Между
кадрами ставим видеопереходы. Для этого нажимаем в Монтаже фильма
Просмотр видеопереходов.
Видим
видеопереходы, которые можно использовать. Для их использования достаточно
нажать левой кнопкой мыши и перетянуть на пространство между кадрами.
Для
просмотра эффекта видеоперехода пользуемся окном справа.
6.
Создание названий и титров.
Для
создания названий и титров нажимаем Создание названий и титров
Выбираем,
что нам нужно вставить.
Мы
можем вставлять титры в начало и конец фильма (текст будет написан на
однотонном цветном поле; цвет поля и цвет текста выбираем самостоятельно!)
1-текст
2-изменяем
анимацию (т.е. как этот текст будет появляться на поле)
3-изменяем
шрифт и цвет текста
4-просмотр
5-результат
Если
все устраивает нажимаем Готово, добавить в фильм
С
текстом перед и после выбранного кадра (Текст встанет на
выбранном кадре или после него!), на выбранном кадре работаем
аналогично!
Пример
текста на выбранном кадре:
Любой
текст и титры можно редактировать. Для этого нажимаем 2 раза левой
кнопкой по кадру или по надписи (она будет видна внизу, в поле Наложение
названия)!
7.
Работа со звуком.
Нажимаем
Импорт звука и музыки
Выбираем
музыкальный файл (см. п. 4), вставляем его в сборник (коллекция файлов, с
которыми мы работаем!).
Перетаскиваем файл на раскрадровку (выбираем дорожку Звук или музыка).
При необходимости громкость звука можно отрегулировать или убрать совсем
(щелкнуть по муз. файлу правой кнопкой, выбрать Громкость).
При
необходимости громкость звука можно отрегулировать или убрать совсем (щелкнуть
по муз. файлу правой кнопкой, выбрать Громкость)
8. Редактируем титры, надписи, переходы и т.д.
Для плавного перехода между кадрами или музыкой, «берем» левой
кнопкой файл и немного совмещаем его с предыдущим.
По
умолчанию программой задается определенное время для воспроизведения кадра, его
мы видим на шкале времени вверху. Мы можем его менять (н-р, под музыку). Для
этого необходимо навести курсор, щелкнуть, увидев две красные стрелочки, тянуть
в нужном направлении, обрезая или, наоборот, увеличивая кадр.
9.
Завершающий этап. Запись фильма.
Записываем фильм: Завершение создания фильма, Сохранение на компьютере, Даем
имя фильму и выбираем папку, в которую он будет сохранен, нажимаем кнопку
Далее, ждем, когда фильм запишется.
Вот и все основные шаги по созданию
видеороликов в программе Movie Maker.
Теперь Вы готовы к созданию собственного
видеоролика!
Закрепление материала вводного инструктажа, вопросы
к обучающимся (Презентация «Контроль знаний»).
1. Перечислите
основные способы создания, сохранения и открытия файла программы Movie Maker.
2. Назовите
основные возможности программы.
3. Перечислите
основные операции по созданию фильма. .
III ТЕКУЩИЕ
УПРАЖНЕНИЯ ОБУЧАЮЩИХСЯ. ИНСТРУКТИРОВАНИЕ (4 часа 45 минут)
Деятельность обучающихся – создать проект
на любую из предложенных тем:
1. Сохраним
природу родного края
2. Моя
будущая профессия
3. Времена
года
4. Выпускник
училища 2012
5. Моя мечта
6. Дружба-это
навсегда
Для
создания проекта использовать фотографии, видео и звуковые файлы из папки
«ИСХОДНЫЕ МАТЕРИАЛЫ»
Деятельность мастера – наблюдение,
целевые обходы, индивидуальное инструктирование, приемка результатов работы,
оценивание.
Ведомость целевых обходов:
|
Ф.И.О. |
1 обход |
2 обход |
3 обход |
4 обход |
5 обход |
ИТОГОВАЯ ОЦЕНКА |
Критерии оценивания:
|
ОРМ |
Кол-во работ |
Качество выполнения |
Наличие ошибок |
Соблюдение правил ОТ |
|
|
«5» |
правильная |
Создан полный проект |
отличное |
1 незначительная |
без нарушений |
|
«4» |
правильная |
использованы изображения, и звуковые |
хорошее |
отсутствуют видеофайлы |
без нарушений |
|
«3» |
имеются посторонние предметы на столе |
проект создан только из фотографий |
удовл |
не настроены переходы |
незначительные нарушения |
|
«2» |
грубые нарушения ОРМ |
проект не создан, либо создан только |
неуд |
отсутствуют переходы, не сохранен и не |
нарушение правил ОТ |
IV. ЗАКЛЮЧИТЕЛЬНЫЙ
ИНСТРУКТАЖ (15 минут).
— Что вы сегодня
научились делать в программе Movie Maker ?
— Какие способы
создания готового фильма использованы в сегодняшнем проекте?
— Каковы способы
сохранения готового фильма?
— Какие переходы
использовались при выполнении практических работ?
— Для чего
используется «раскадровка»?
— Как работать с видео
и аудио дорожками?
— Как работает шкала
времени?
— Была ли информация
полезной для вас?
— Какие вопросы
вызвали затруднения?
— Сообщение о
достижении целей урока
— Анализ выполнения
учебно-производственных работ
— Защита выполненных
работ
— Разбор типичных
ошибок
— Сообщение оценок
— Сообщение темы
следующего урока
— Уборка рабочих
мест
Windows Movie Maker

To save a movie on your computer
- On the File menu, click Save Movie File, and then click My computer.
–or-
In the Movie Tasks pane, under Finish Movie, click Save to my computer.
- In the Enter a file name for your saved movie box, type a name for your movie.
- In the Choose a place to save your movie box, do one of the following:
- Choose the path and folder name from the list of available places in the drop-down box.
- Click Browse to choose a new place that is not already listed in the drop-down box.
- To create a new folder, click Make New Folder in the Browse For File dialog box, and then type a name for the new folder.
- On the Movie Setting page, do one of the following:
- To use the default movie setting, click Best quality for playback on my computer (recommended). The specific setting details, such as the file type, bit rate, display size, aspect ratio, and frames per second displayed in the video, are shown in the Setting details area.
- To use a different movie setting, click Show more choices, and then choose another movie setting from the list.
- If you want to watch your movie after completing the wizard, select the Play movie when I click Finish check box.
- After the movie is saved, click Finish.
Related topics
- Saving a movie to My computer
© 2000-2002 Microsoft Corporation. All rights reserved.
19 January 2021 Technology Manager of Test Dept.
Summary
As we all know, Windows Movie Maker merely supports to export the MSWMM/WLMP project file and save as “.wmv”. But these files cannot be uploaded to the video websites like YouTube or be played by phone. Therefore, some people want to convert the files to the common video formats, such as MP4. In this article, we show you how to save a Windows Movie Maker project as MP4 with the format converters.
Part 1: What is Windows Movie Maker?
Windows Movie Maker is the tool attach with Windows Vista and the above versions. The functions are very simple, including editing, trimming, splitting, and adding background music, filters and themes. In addition, it is very easy to use, especially suitable for some short family videos. Only by dropping the video files into the application can you create a touched family movie.
Well as Windows Movie Maker is, it supports few video formats. Therefore, you may need to convert video formats before importing videos into this application.
TipsWindows Movie Maker only supports to import the following formats:
asf, avi, wmv, mpeg, mpg, m1v, mp2, asf, wm, wma, wmv, etc.
Part 2: How to Save a Windows Movie Maker Project as MP4?
If you are using the latest version of Windows Movie Maker, you can convert the video format to MP4 directly because H.264/MP4 has been the default export format in Windows Movie Maker. The steps are as follow:
Launch Windows Live Movie Maker from the Start menu. Then select [File] to open the WMM project file. Next, right click at the video file and select [Save as] to convert the file to MPEG-4/H.264 (MP4) or Windows media file (WMV). After that, click [Save] to save the file.

However, Windows 10 users cannot use the functions of Windows Movie Maker anymore because it was officially disabled on January 10, 2017. Now, it has been merged into [Video projects] within the application [Photos]. How to Save a Windows Movie Maker Project as MP4 in Windows 10? Here are the steps:
Get [Photos] started from the Start menu and then turn to [Video projects]. Then, import the target video into the application and simply edit the video. After that, click on [Finish video] at the right corner and finally save the video as MP4.
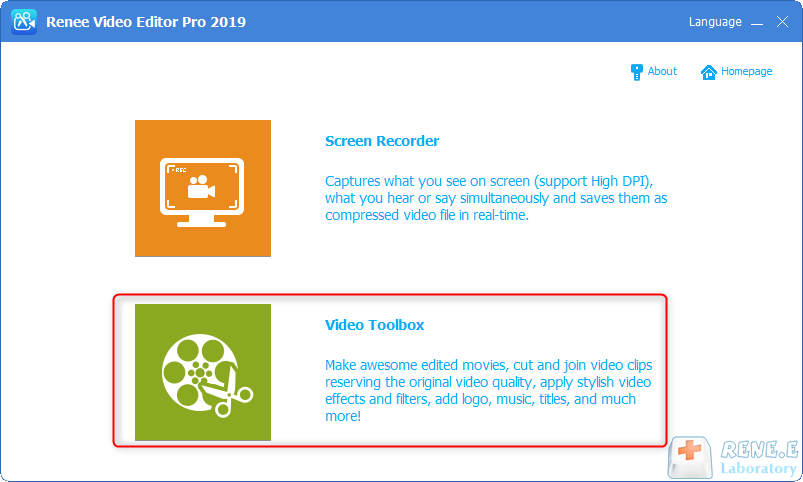
Although there is no Windows Movie Maker in Windows 10, you can draw support from Renee Video Editor Pro – the multifunctional video editing software when you want to edit videos and convert video formats. Its functions are more complete than those of Windows Movie Maker.
1. About Renee Video Editor Pro
Renee Video Editor Pro is the multifunctional software that contains screen recorder and video editor. It not only allows users to record desktop screen, play videos collect audio materials, but also further edit videos, such as adding watermark during recording screen, adding various transitions, filters and subtitles.
Renee Video Editor Pro – Multi-function Video Editing Software
Screen RecordingRecord screen and webcam in Windows computer.
Cut Videos & AudiosUsers are free to cut videos and audios clips with setting start and end time.
Multiple Edit ToolsMerge, crop, rotate, cut and transform video easily. Change and add background music, subtitles and remove watermark from video.
Format ConversionSupport to convert videos and audios into different formats.
Screen Recording Record screen and webcam in Windows computer.
Multiple Edit ToolsCut Videos & Audios Users are free to cut videos and audios clips with setting start and end time.
Multiple Edit ToolsMerge, crop, rotate, cut and transform video easily. Change and add background music, subtitles and remove watermark from video.
Format ConversionSupport to convert videos and audios into different formats.
2. Save Windows Movie Maker Project with Renee Video Editor Pro
How to save a Windows Movie Maker Project as MP4 with Renee Video Editor Pro? Even though you never use any video editing tool before, you can go through the following steps smoothly.
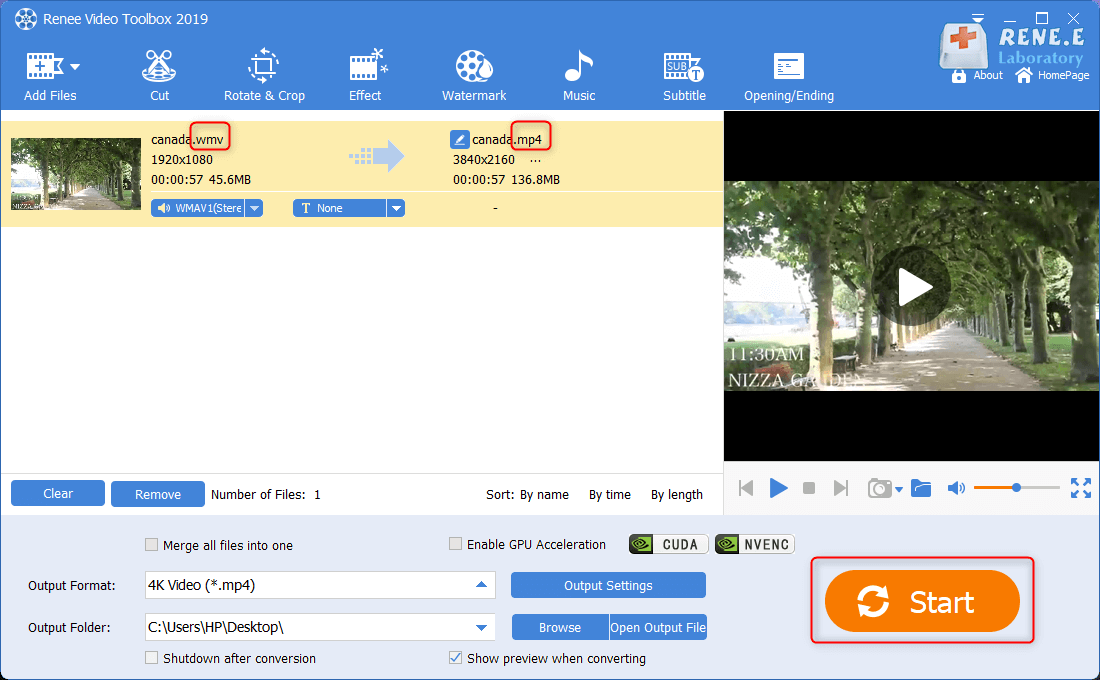
Step 1: Download and launch Renee Video Editor Pro, and then select [Video Toolbox].
Step 2: Click on [Add Files] to select the WMV video file exported from Windows Movie Maker.
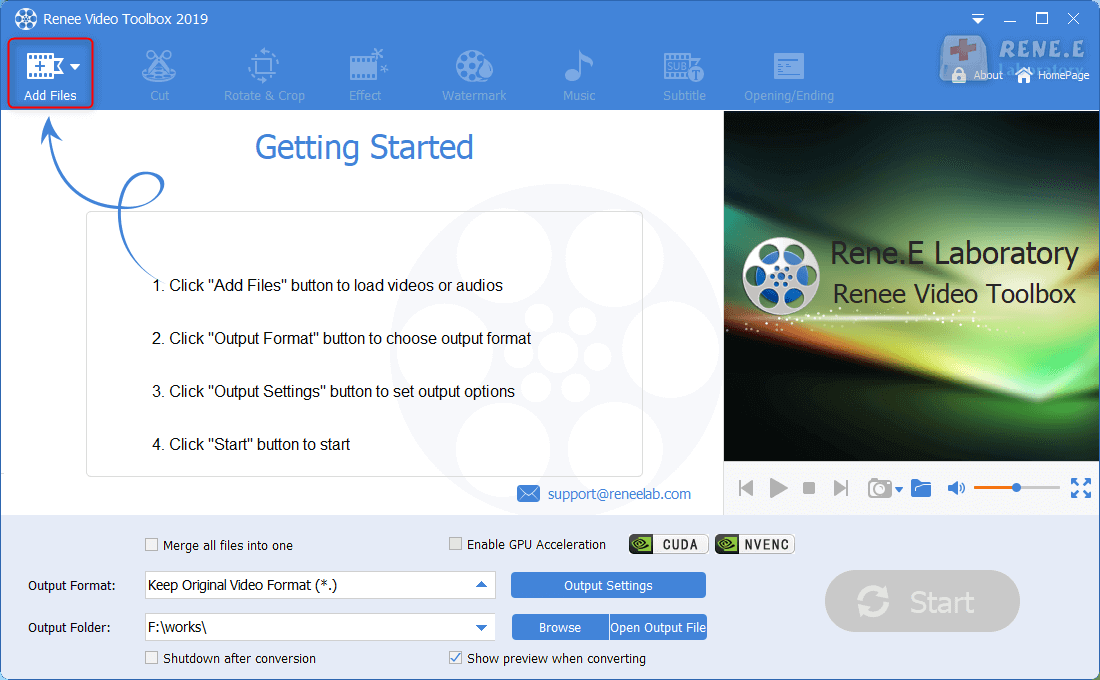
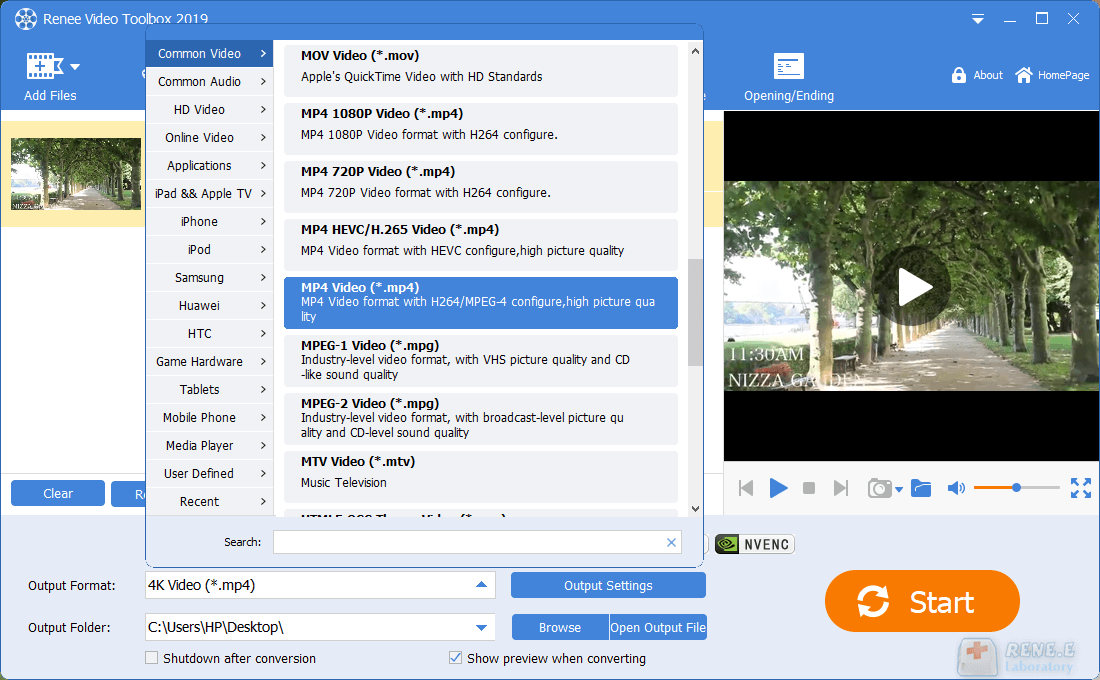
Step 3: Select MP4 as the output format. There are different kinds of MP4 for different devices in the options, such as iPhone/iPad/ Huawei, etc. You can select a suitable one according to your personal needs.
Step 4: Finally, click on [Start] to output and save the file. When the conversion is completed, check the file in the output folder.
3. Save Windows Movie Maker Project with Online Converter
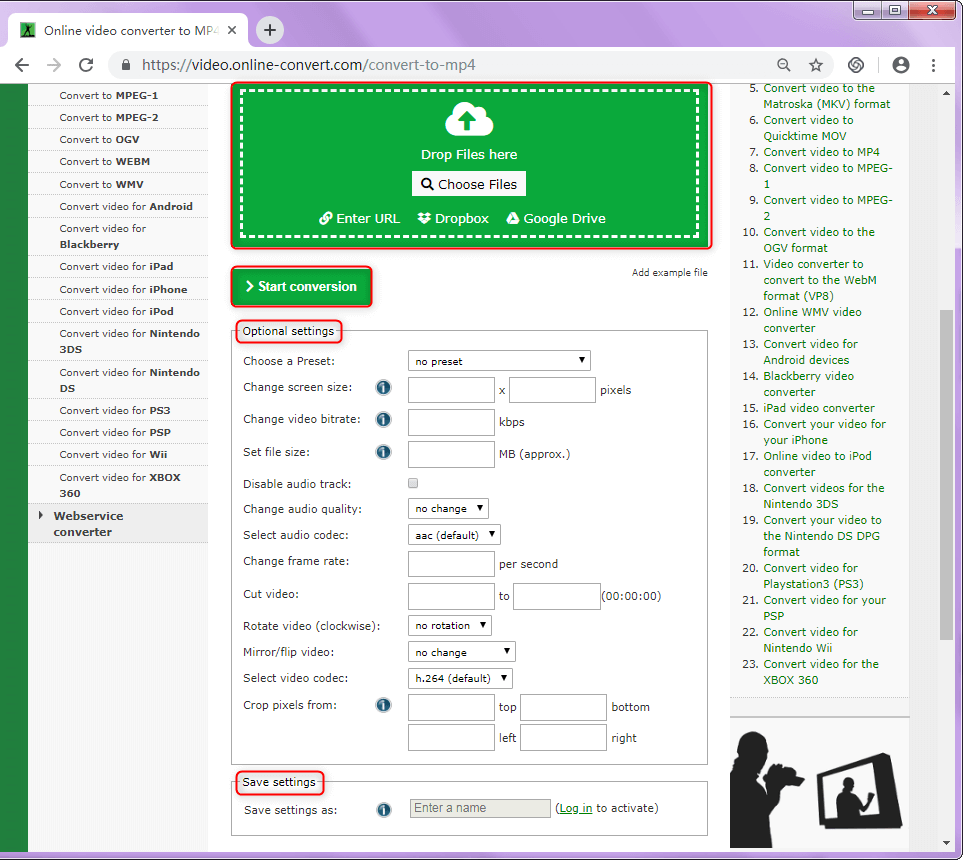
Online converters can convert files from the local disks, the URLs, Dropbox and Google Drive. It can output the high-quality files and set the optional settings, such as bit rate, file size and frame rate. In addition, unlike the multifunctional PC software, it is suitable for those who merely need to convert formats.
However, the drawbacks are also obvious: most online format converters are open for the registered accounts. In addition, they will also be affected by the network speed and will sometimes fail to transfer.
How to save a Windows Movie Maker Project as MP4 with the online converter:
Step 1: Run the link in your browser:
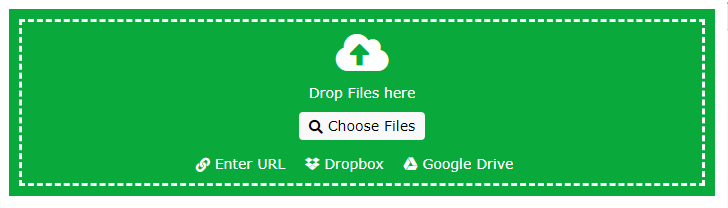
Step 2: Under [Video Settings (optional)], you can change various video settings as needed. Click on [Start Conversion] to convert the Windows Movie Maker project to MP4. Finally, download the file as the webpage provided.