
| Version | 9.0.1 |
| Vendor products | Windows 8.1 Windows 10 Windows 11 Windows Server 2012/2012 R2 Windows Server 2016 Windows Server 2019 Windows Server 2022 Microsoft Active Directory Microsoft Windows DNS Server Windows Security Windows Performance Windows DHCP Windows File Server |
| Visible in Splunk Web | No. This add-on does not contain any views. |
The Splunk Add-on for Windows allows a Splunk software administrator to collect: CPU, disk, I/O, memory, log, configuration, and user data with data inputs. Active Directory and Domain Name Server debug logs from Windows hosts that act as domain controllers for a supported version of a Windows Server. You must configure Active Directory audit policy since Active Directory does not log certain events by default. Domain Name Server debug logs from Windows hosts that run a Windows DNS Server. Windows DNS Server does not log certain events by default, and you must enable debug logging
This add-on provides the inputs and CIM-compatible knowledge to use with other Splunk apps, such as Splunk Enterprise Security, the Splunk App for PCI Compliance, the Splunk ITSI Operating System Module, the Splunk App for Windows Infrastructure, and the Splunk App for Microsoft Exchange
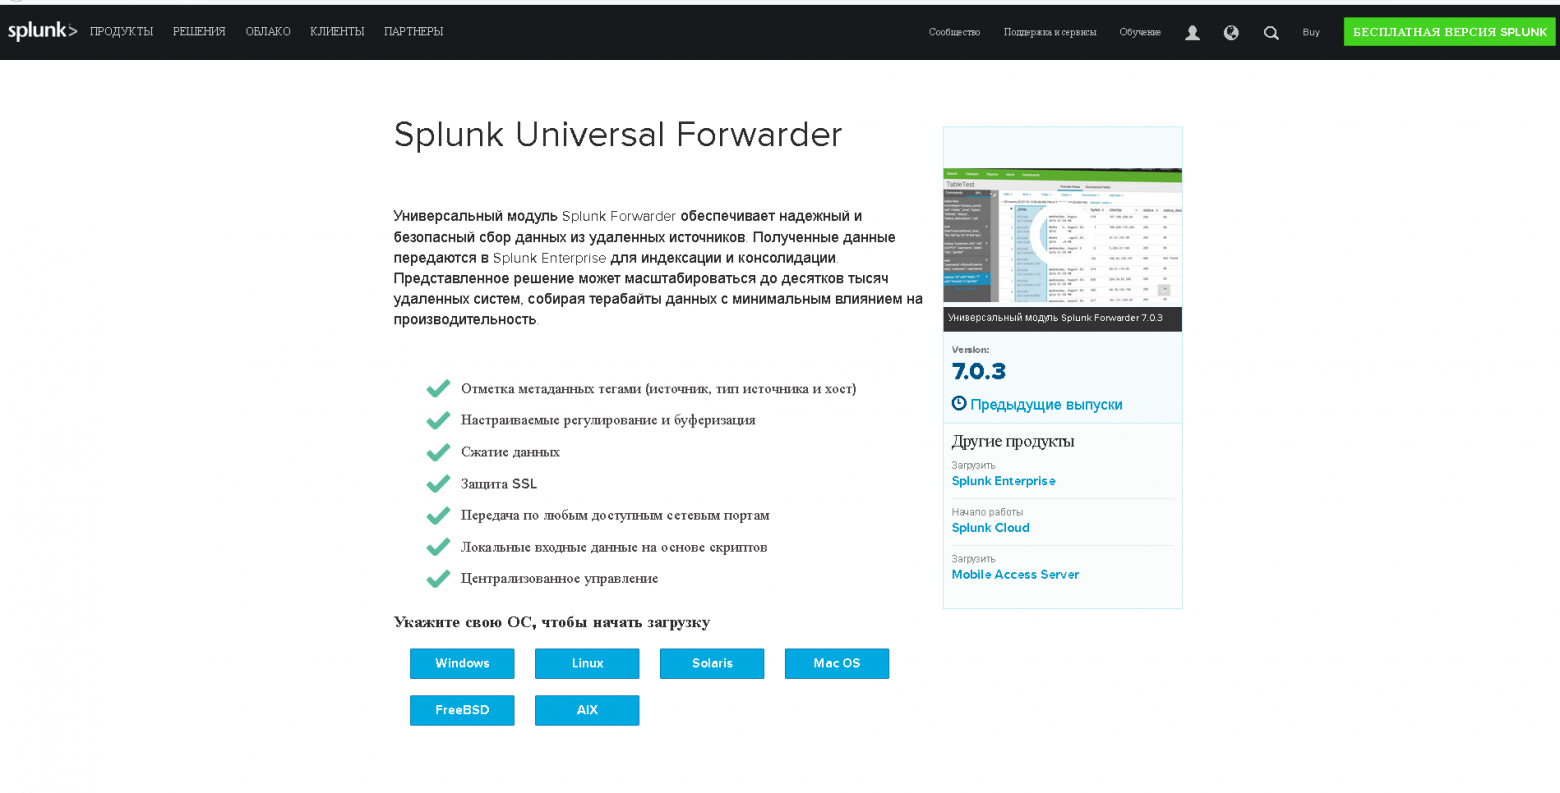
Download the Splunk Add-on for Windows from Splunkbase
For a summary of new features, fixed issues, and known issues, see Release Notes for Splunk Add-on for Windows
See Questions related to Splunk Add-on for Windows on the Splunk Community page
The Universal Forwarder in a Splunk environment is a component designed to collect machine data from almost any device, including Windows systems. This lightweight version of Splunk is optimized for gathering logs and forwarding them to a Splunk indexer for further processing and analysis.
In this tutorial, we will guide you through the steps to install and configure the Universal Forwarder on a Windows machine. Additionally, we will cover how to install the Windows Add-on and configure it to collect various types of logs from your Windows machine.
By the end of this tutorial, you will be able to:
-
Create an Index for Windows to store and index on Indexer machine
-
Install the Splunk Universal Forwarder on a Windows machine
-
Configure the Universal Forwarder to forward logs to a Splunk Indexer
-
Install and configure the Windows Add-on to collect specific types of logs
-
Verify that the logs are being successfully collected and indexed by Splunk
This tutorial assumes that you have a basic understanding of Splunk and its components. If you’re new to Splunk, consider reading the Splunk Getting Started Guide before proceeding.
Lab Setup
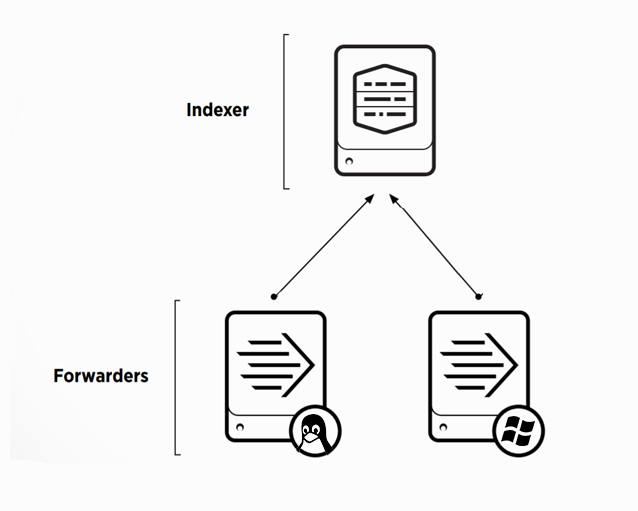
For this tutorial, we will be using a simple lab setup consisting of two machines: a Mac and a Windows machine. The Splunk Indexer instance is deployed on the Mac, while the Universal Forwarder will be installed on the Windows machine, which serves as our log source.
The diagram above illustrates the lab setup, with the Universal Forwarder on the Windows machine will collect logs and forward them to the Splunk Indexer running on the Mac. This configuration allows for centralized log collection and analysis, making it easier to monitor and troubleshoot issues across your environment.
To follow along with this tutorial, you will need:
-
A Mac or Linux machine with a running Splunk Indexer instance (version 8.x or later)
-
A Windows machine (Windows 7 or later) to install the Universal Forwarder
-
Network connectivity between the two machines
If you haven’t already set up your Splunk Indexer on the Mac or Linux, refer to the Splunk Installation Manual for detailed instructions on installing and configuring Splunk Enterprise.
In the next section, we will walk through the process of installing the Splunk Universal Forwarder on your Windows machine and configuring it to send logs to the Indexer.
In case, if you want to deploy Universal Forwarder on a Linux or Mac refer these two tutorials:
Configuration Overview
Before diving into the configuration of the Universal Forwarder and Indexer instances, let’s take a moment to outline the steps we’ll be taking on each machine.
Splunk Indexer Configuration (Mac)
1. Create a new App named «windows_logs_app» to keep our configurations organized and separate from other Splunk configurations.
2. Create a new index named «windows_logs» within the «windows_logs_app» to store the logs collected from the Windows machine.
3. Configure the inputs.conf file within the «windows_logs_app» to receive the logs forwarded by the Universal Forwarder.
Windows Machine Configuration
1. Download and install the Splunk Universal Forwarder on the Windows machine.
2. Download and install the Splunk Add-on for Windows to enable the collection of specific Windows log types.
3. Configure the inputs.conf file in the Splunk Add-on for Windows to specify which log types should be collected and forwarded to the Indexer.
By creating a dedicated App and index on the Splunk Indexer, we ensure that our Windows log data remains separate from other data sources, making it easier to manage and search. The inputs.conf configuration on the Indexer will specify the port and index to receive the logs from the Universal Forwarder.
On the Windows machine, the Universal Forwarder acts as the log collection agent, while the Splunk Add-on for Windows provides the necessary configuration files and parsing logic to collect specific Windows log types. By configuring the inputs.conf file within the Add-on, we can selectively collect the logs that are relevant to our use case.
In the following sections, we will walk through the detailed steps for configuring both the Splunk Indexer and the Windows machine to establish a robust log collection and forwarding pipeline.
Recommendations from the author: Read these articles before you start this article.
Configuring the Splunk Indexer
You already know what we will do in the Indexer from our previous section. Well, in this section, we will walk through the process in step by step way.
Step 1: Create a new App
-
Log in to your Splunk Web UI on the Mac.
-
Navigate to «Settings» > «Applications» and click on «Create app».
-
Enter «windows_logs_app» as the App name and provide a description (optional).
-
Click «Save» to create the new App.
From CLI:
ls -l /Applications/splunk/etc/appsWe published a dedicated articles on managing Apps and Add-ons, we recommend to refer for more detail.
Step 2: Create a new index
1. Within the Splunk Web UI, navigate to «Settings» > «Indexes».
2. Click on «New Index» and enter the following details:
— Index Name: windows_logs
— App: windows_logs_app
— Max Size: 500 MB (you can adjust this based on your requirements)
3. Click «Save» to create the new index.
Alternatively, you can create the index by editing the indexes.conf file directly:
1. Open a terminal on your Mac and navigate to $SPLUNK_HOME/etc/apps/windows_logs_app/local/.
2. Create a new file named indexes.conf (if it doesn’t exist) and add the following content:
[windows_logs]
homePath   = $SPLUNK_DB/windows_logs/db
coldPath   = $SPLUNK_DB/windows_logs/colddb
thawedPath = $SPLUNK_DB/windows_logs/thaweddb
Save the file and restart the Splunk Indexer.
Note: If you don’t see the index on the Web UI console. Reload the configuration visiting this URL: «https://splunk_server:8000/debug/refresh«. We covered creating Indexes in detail on a different article. We recommend to refer for more details.
Step 3: Configure inputs.conf
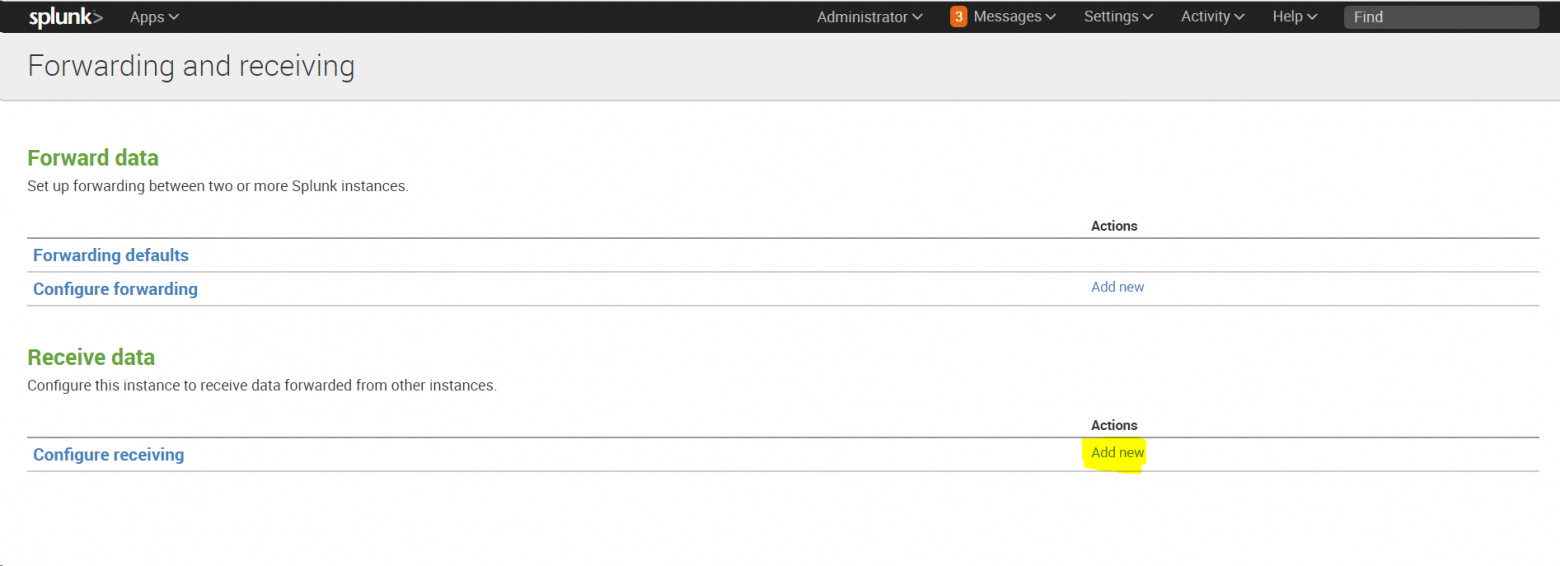
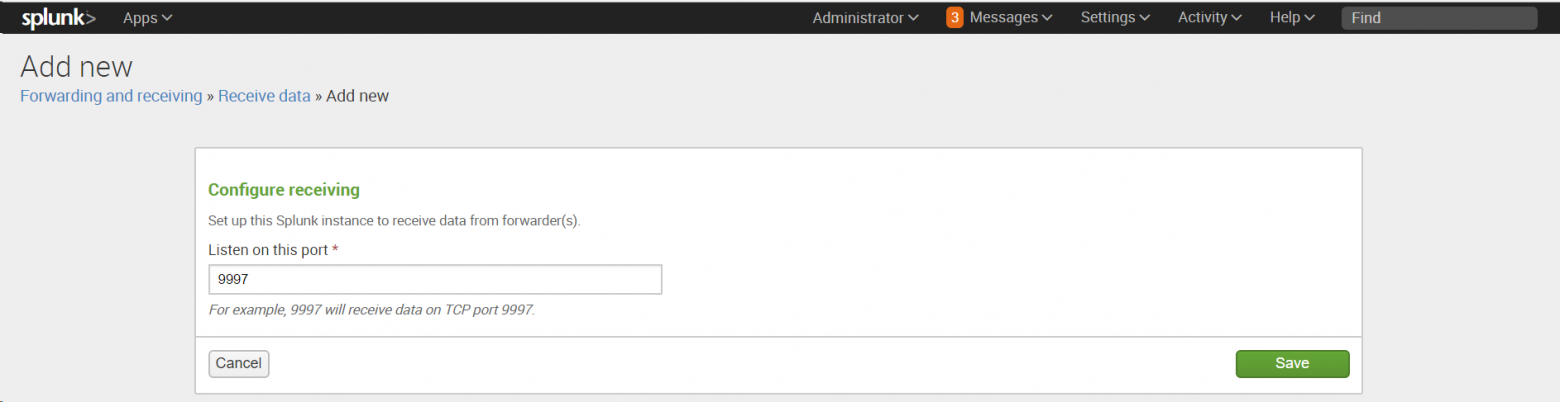
1. In the Splunk Web UI, navigate to «Settings» > «Forwarding and Receiving».
2. Click on «Configure Receiving» and then «New Receiving Port».
3. Enter the following details:
— Port: 10997 (or any available port of your choice. Ensure post no is not in conflict with other services)
4. Click «Save» to save the configuration.
Alternatively, you can configure inputs.conf directly from CLI:
1. Open a terminal on your Mac and navigate to $SPLUNK_HOME/etc/apps/windows_logs_app/local/.
2. Create a new file named inputs.conf (if it doesn’t exist) and add the following content:
[splunktcp://10997]
index = windows_logs
disabled = 0
Save the file and restart the Splunk Indexer.
Your Splunk Indexer is now configured to receive logs from the Universal Forwarder on the specified port and index them in the «windows_logs» index within the «windows_logs_app».
We published a dedicated articles on configuring indexes.conf file, we recommend to refer for more detail.
In the next section, we will configure the Universal Forwarder on the Windows machine to collect and forward logs to the Splunk Indexer.
Deploying the Universal Forwarder on Windows
Let’s come to the source side configuration. let’s see how to set up the Universal Forwarder on your Windows machine in detail.
Step 1: Download and Install the Splunk Universal Forwarder
-
Visit the Splunk Universal Forwarder download page.
-
Select «Windows» as the platform and choose the appropriate CPU architecture (32-bit or 64-bit) for your Windows machine.
-
Click «Download» and save the installer file.
-
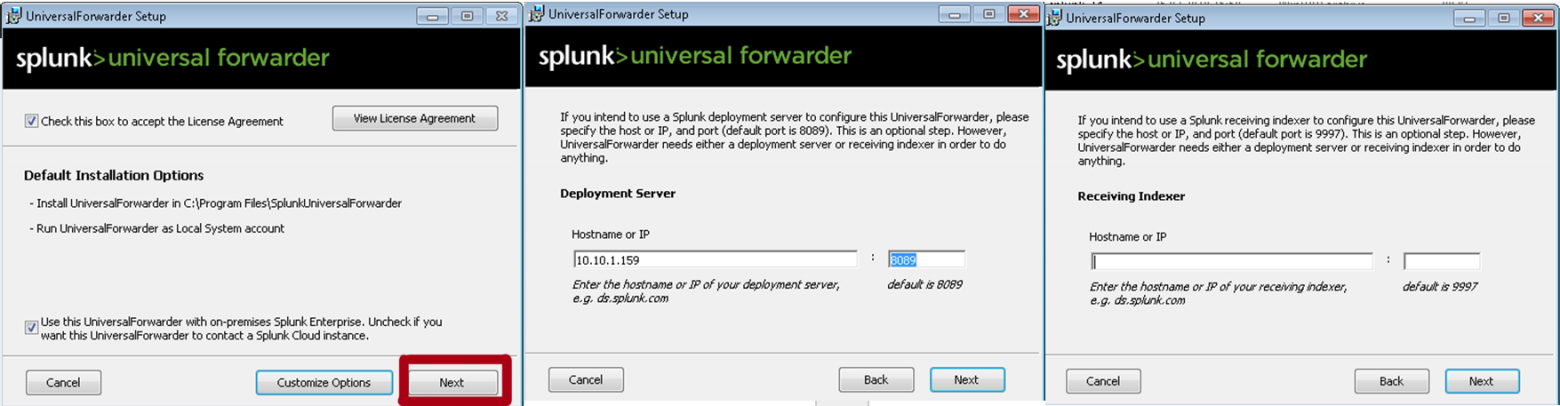
Double-click the downloaded installer file and follow the installation wizard:
Accept the license agreement. Choose the Splunk Indexer instance (Cloud or On-Premises).
Provide Username and Password for UF administrator.
Provide the host mane or IP address and listening port number of the Splunk Deployment Server. Leave blank if you don’t have a Deployment Server.
Provide the host mane or IP address and listening port number of the Splunk Indexer.
Install Universal Forwarder.
Finish the installation.
Splunk Universal Forwarder installed in C:\Program Files\SplunkUniversalForwarder directory.
Check the Status of Universal Forwarder service.
If your configurations and network ncommunication between your Indexer and Universal Forwarder are good. Your UF will start reporting to the Indexer. Verify the Windows Universal Forwarder is reporting to the Indexer. To do that, Search this query on the Search app. If you see your Windows Hostname in the search result, your Universal Forwarder is started reporting to the Indexer.
index=_internal | stats count by hostSince, we can see our Windows host name in the search results, we can conclude the installation of Universal Forwarder is complete.
If you try searching for the logs from the Windows machine, you don’t see anything at this point in time. Since, you haven’t configured the log collection. You will have to configure the inputs.conf to collect the logs.
Well, you can configure the inputs.conf under the C:\Program Files\SplunkUniversalForwarder\etc\system\local directory or C:\Program Files\SplunkUniversalForwarder\etc\apps\<your_app>\local\. However, we recommend to install the Splunk Add-On for Windows add-on, which comes with preconfigured inputs.conf file with multiple configuration options and log parsers. This makes both Splunk’s and our life easier. Let’s see how to download and install Splunk Add-On for Windows in the next step.
Step 2: Download and Install the Splunk Add-on for Windows
Download the Splunk Add-on for Windows from Splunkbase.
-
Click the «Download» button on the add-on’s page.
-
Log in to your Splunk account or create a new one if prompted.
-
Agree to the terms and conditions and click «Download».
Unzip the downloaded file and copy the directory ‘Splunk_TA_windows‘ to C:\Program Files\SplunkUniversalForwarder\etc\apps\.
This completes the installation of Splunk Add-on for Windows.
Note: You can’t see the local directory inside this Add-On. You will have to configure the preexisting configuration files under the default directory. Which we will configure in the next section.
Step 3: Configure inputs.conf in the Splunk Add-on for Windows
Open File Explorer and navigate to the directory where the Splunk Add-on for Windows is installed (default: C:\Program Files\SplunkUniversalForwarder\etc\apps\Splunk_TA_windows\default).
Look for a file named inputs.conf.
Open the inputs.conf file using a text editor (e.g., Notepad). Enable the desired log types by setting disabled = 0 for the stanza you need to enable. Each stanza represents a log type.
Also, it is important to add the index for each stanza to direct the Universal Forwarder to store and index the logs in a specific Index.
Example:
To enable the Security logs go the the [WinEventLog://Security] stanza and set the value of disabled to 0 and add index = windows_logs at the end of that stanza.
[WinEventLog://Security]
disabled = 0
start_from = oldest
current_only = 0
evt_resolve_ad_obj = 1
checkpointInterval = 5
blacklist1 = EventCode="4662" Message="Object Type:(?!\s*groupPolicyContainer)"
blacklist2 = EventCode="566" Message="Object Type:(?!\s*groupPolicyContainer)"
renderXml=true
index = windows_logs
After enabling the logs of your choice. Restart the Splunk Forwarder service. Tat’s it.
If you follow all the steps, your Universal Forwarder will start collecting and forwarding the logs to the Indexer.
Verify the Logs on the Indexer or Search Head
Let’s take a look at some of the networks and processes running on the Windows machine.
-
Local network address of the machine:
2. Local Port opened:
3. Processes running on the host:
You can also see, remote address, remote host name, remote protocol, and more.
We hope this article helps understand how to deploy Universal Forwarder on a Windows machine and configure it to send logs to the indexer.
That’s all for now, we will cover more informative topics about Splunk in the upcoming articles. Please keep visiting thesecmaster.com for more such technical information. Visit our social media page on Facebook, Instagram, LinkedIn, Twitter, Telegram, Tumblr, & Medium and subscribe to receive information like this.
You may also like these articles:
We’re happy to share that the Splunk-supported Splunk Add-on for Microsoft Security is now available. This add-on maps the Microsoft Defender for Endpoint Alerts API properties or the Microsoft 365 Defender Incidents API properties onto Splunk’s Common Information Model (CIM).
Update: The update incidents and update alerts functionality and the dashboards that were available in the Microsoft 365 Defender Add-on for Splunk 1.3.0 have now moved to the Microsoft 365 App for Splunk 3.3.0 in Splunkbase.
The Splunk SOAR Windows Defender ATP App 3.5.2 supports 30 additional Microsoft Defender for Endpoint API calls (see Additional Information below).
Additional Information:
- Documentation for the Splunk Add-on for Microsoft Security is available here:
https://docs.splunk.com/Documentation/AddOns/released/MSSecurity/About - Splunk guidance on migrating from the Microsoft 365 Defender Add-on for Splunk version 1.3.0 to the Splunk Add-on for Microsoft Security is available here:
https://docs.splunk.com/Documentation/AddOns/released/MSSecurity/Migrate - Documentation of the Microsoft 365 App for Splunk 3.3.0 is available here:
https://splunkbase.splunk.com/app/3786/#/details - Documentation for the Splunk SOAR Windows Defender ATP App version 3.5.2 is here:
https://github.com/splunk-soar-connectors/windowsdefenderatp
The Microsoft 365 Defender Team
Нам часто задают вопросы о том, как загрузить различные данные в Splunk. Одними из самых распространенных источников, представляющих интерес, оказались логи Windows и Linux, которые позволяют отслеживать неполадки операционных систем и управлять ими. Загружая данные в Splunk, Вы можете анализировать работу всех систем в одном месте, даже когда у Вас десятки или сотни различных источников.

В данной статье мы пошагово объясним Вам, как загрузить данные из Windows и Linux в Splunk, для последующей обработки и анализа.
Настройка базовой инфраструктуры
Для того, чтобы начать собирать данные нам необходимы следующие элементы системы:
- Splunk – Indexer
- Windows сервер
- Linux сервер
Для того, чтобы загружать логи в Splunk, необходимо сначала предварительно настроить индексер, для этого потребуется:
• Установить и настроить Splunk-indexer на прием данных;
В первую очередь, вам понадобится Splunk на машине, которая является нашим индексером. Если у вас нет установленного Splunk, то прочитать подробнее, как и на какие системы можно поставить его вы можете прочитать тут.
После установки необходимо настроить индексер на прием данных:
Settings -Forwarding and Receiving, затем в разделе Receive data добавить новую конфигурацию: Configure receiving.
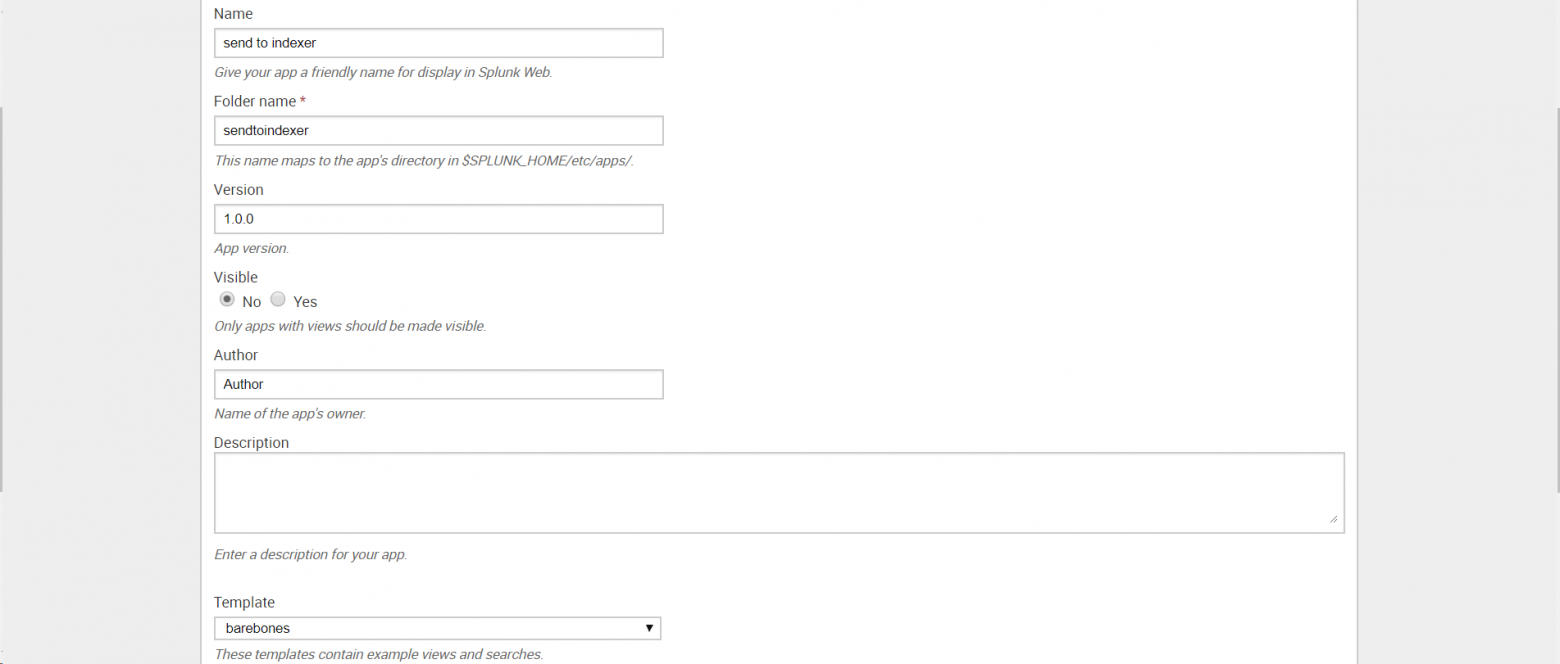
• Создать приложение «Send to indexer», которое будет настраивать пересылку на всех источниках, отправляющих данные в индексер;
Это приложение необходимо для того, упростить управление источниками данных, когда этих источников много или доступ к ним для внесения изменений затруднителен. Также приложение позволит вам не совершать потенциально ошибочные изменения конфигурации на многих хостах, ограничивая изменением только на одном месте.
Создаем приложение: Apps — Manage Apps — Add New
•Сформировать конфигурационный файл оutputs.conf
После создания приложения, необходимо сформировать конфигурационный файл оutputs.conf (Подробнее об том файле Вы можете прочитать на официальном сайте Splunk)
В текстовом редакторе введите следующий текст, заменив indexer_hostname_or_ip_address именем хоста или IP-адресом индексера и получающим портом, установленным на предыдущем шаге:
[tcpout]
defaultGroup = default-autolb-group

[tcpout:default-autolb-group]
server = <indexer_hostname_or_ip_address>:9997

[tcpout-server://<indexer_hostname_or_ip_address>:9997]
Сохраните как outputs.conf и добавьте в папку \etc\apps\sendtoindexer\local (Папку local необходимо создать).
• Настроить Deployment Server для управления приложением «Send to indexer» и другими приложениями;
Deployment Server необходим для того, чтобы распространять приложения и конфигурации на все связанные экземпляры Splunk на других хостах. Чтобы активировать Deployment Server, необходимо поместить хотя бы одно приложение в папку %SPLUNK_HOME%\etc\deployment-apps. В нашем случае мы переместили туда приложение «Send to indexer». (Именно переместили, а не скопировали, как мы будем делать дальше с другими приложениями.)
На этом этапе мы заканчиваем предварительную настройки индексера и переходим к установке агентов на машины Windows и Linux.
WINDOWS
Универсальным инструментом для загрузки логов является специальный агент – Splunk Universal Forwarder. Universal Forwarder представляет собой версию Splunk Enterprise с существенно ограниченным функционалом, единственной задачей которого является сбор данных с хоста и отправка их.
Скачать его можно по этой ссылке.
На картинке выше видно, что Universal Forwarder можно установить как на Windows, так и на Linux, Solaris и другие операционные системы.
1. Устанавливаем Universal Forwarder
В качестве Deployment Server указываем IP-адрес или название Splunk индексера, где мы создали приложение «Send to indexer». Порт по умолчанию: 8089. Раздел Receiving Indexer оставим пустым, так как эти функции выполнит «Send to indexer».
2. Следующий шагом нам необходимо вернуться к Splunk и определить класс сервера для приложения «Send to indexer».
Класс сервера что-то похожее на правило, в котором мы указываем какие приложения мы будем распределять между какими целевыми машинами-клиентами. Критериями для формирования разных классов сервера могут стать тип машины, ОС, географическая область или тип приложения, причем классы могут пересекаться между собой. (Более подробно можно прочитать на официальном сайте)
Settings — Forwarder Management — edit action — add new classes.

3. После сохранения вам будет предложено добавить приложения, которые мы будем рассылать и целевые системы, так называемые клиенты, которым мы будем их рассылать.
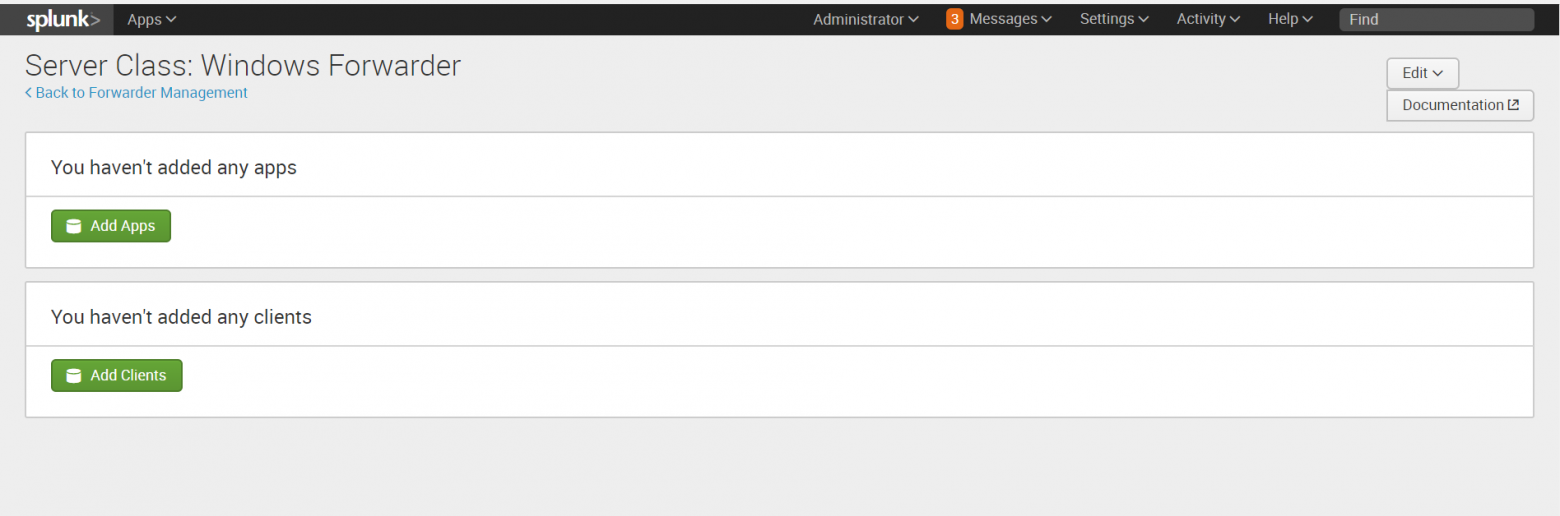
Добавляем «Send to indexer» в раздел приложений.

4. Затем добавляем клиента. Клиентом будет наша машина с Windows, на которую мы установили Universal Forwarder. Если Universal Forwarder был установлен правильно, то машина должна появиться в списке клиентов, подключенных к Deployment Server. Заносим ее в Include (whitelist).

5. Проверить правильно ли все работает можно, посмотрев на содержимое индекса _internal. После добавления «Send to indexer» в класс сервера Universal Forwarder начинает отправлять свои внутренние логи туда. Также в этом индексе далее мы можем следить за тем, правильно ли работают наши агенты.
6. Далее скачиваем специальный Add-on с сайта SplunkBase, который позволяет собирать данные о работе Windows.
7. Устанавливаем приложение на Splunk-Indexer ( Apps — Manage Apps — Install app from file)
По умолчанию оно устанавливается в каталог …\Splunk\etc\apps\Splunk_TA_windows, но нам необходимо скопировать его в папку deployment-apps, чтобы это приложение было доступно для deployment server, чтобы потом мы могли отправить его на другие машины также, как и «Send to indexer». (Важно: в папке apps оно также должно остаться, чтобы на индексере сформировались нужные нам индексы для данных).
8. Затем необходимо сделать преднастройку приложения.
Переходим в каталог …\Splunk\etc\deployment-apps\Splunk_TA_windows
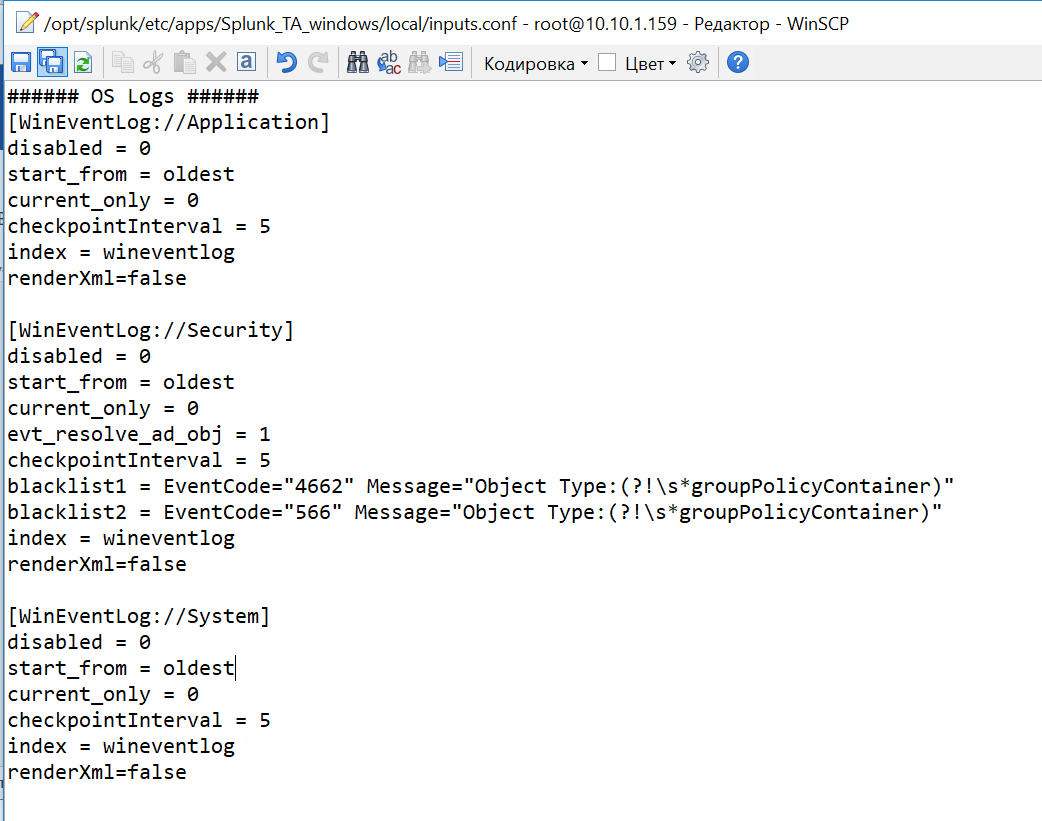
Создаем в нем под-каталог «local» (Важно: Вносить изменения в конфигурационные файлы необходимо всегда в каталоге local).
Скопируем файл inputs.conf из ...\Splunk\etc\deployment-apps\Splunk_TA_windows\default\inputs.conf в каталог local.
Включим индексацию требуемых данных. Для этого в файле inputs.conf из каталога local через текстовый редактор делаем некоторые изменения. Заменим значения disabled=1 на disabled=0 в необходимых блоках файла. Давайте добавим логи системы по Application, Security, System.
9. Далее, на Splunk-indexer, добавляем к приложению созданный ранее сервер-класс. (Settings — Forwarder Management — Apps — Splunk_TA_Windows – «+» — Windows Forwarder)

10. Перезагрузим deployment server, это можно сделать через командную строку из каталога … /splunk/bin:
./splunk reload deploy-server Проверям, загружаются ли данные. (Settings – Indexes ) Они должны попадать в индекс wineventlog. Как видно на нашем рисунке последние данные, которые были загружены на данный момент имеют временную метку 3 минуты назад.

LINUX
Одним из инструментов, позволяющих повысить уровень безопасности в Linux, является подсистема аудита auditd. C её помощью можно получить подробную информацию обо всех системных событиях. Именно данные, генерируемые этой системой мы будем индексировать в Splunk.
(Код будет представлен для Linux CentOS)
1. Проверим, если ли на машине предустановленная система аудита, если нет установим ее.
sudo yum list audit audit-libs
sudo yum install audit audit-libs
Добавим новое правило, которое мы будем отслеживать.
sudo auditctl -w /etc/ -p wa -k test_auditПроверить его наличие можно с помощью функции.
auditctl -lЛоги, генерируемые auditd попадают в файл:
cd /var/log/audit/audit.log
cat audit.log
2. Далее, установим Universal Forwarder. Найти дистрибутив можно по ссылке.
Следует скачать файл формата .rpm, после скачивания которого появится возможность получить wget ссылку.
yum install wget
cd /tmp/
wget -O splunkforwarder-7.0.3-fa31da744b51-linux-2.6-x86_64.rpm 'https://www.splunk.com/bin/splunk/DownloadActivityServlet?architecture=x86_64&platform=linux&version=7.0.3&product=universalforwarder&filename=splunkforwarder-7.0.3-fa31da744b51-linux-2.6-x86_64.rpm&wget=true'
rpm -i splunkforwarder-7.0.3-fa31da744b51-linux-2.6-x86_64.rpm
3. Далее на создадим нового пользователя, который будет отвечать за работу со splunk.
adduser splunk4. Дадим разрешения пользовалелю, которого мы только что создали и запустим UniversalForwarder от его имени.
chown -R splunk:splunk /opt/splunkforwarder/
/opt/splunkforwarder/bin/splunk enable boot-start -user splunk
5. Проведем настройку форвардера и укажем Deployment Server, также как в части с Windows, это IP-адрес или имя Splunk-indexer/
/opt/splunkforwarder/bin/splunk set deploy-poll <IP-адрес Splunk Indexer> :8089 -auth admin:changeme
/opt/splunkforwarder/bin/splunk edit user admin -password <Укажите новый пароль> -auth admin:changeme
 /opt/splunkforwarder/bin/splunk restart
6. Можно проверить, работает ли форвардер, следующим образом:
   cd /opt/splunkforwarder/bin/
   ./splunk status
7. Далее переходим в Splunk-indexer и устанавливаем на него специальный Add-on, позволяющий передавать логи с Linux. Скачать дистрибутив можно по ссылке.
8. После установки, находим папку с приложением по следующему адресу ../splunk/etc/apps/Splunk_TA_nix. Копируем папку Splunk_TA_nix из apps в deployment-apps. Чтобы это приложение появилось как доступное для deployment server.
В каталоге …/ deployment-apps/Splunk_TA_nix создаем папку local и копируем в нее файл input.conf из папки ../Splunk_TA_nix/default.
В файл …/ deployment-apps/Splunk_TA_nix/ local/ input.conf через текстовый редактор вносим изменения, которые покажут данные из каких папок мы хотим собирать. В нашем случае это /var/log/audit.
В input.conf есть раздел [monitor:///var/log], в котором необходимо изменить disabled=1 на disabled=0 (Важно: убедитесь, что необходимая папка есть в whitelist, если ее нет, но нужно ее добавить)
9. Далее проверим, увидел ли Deployment server нового клиента, нашу машину Linux. (Settings — Forwarder Management – Clients).
Если ее нет, то необходимо проверить название (Host name) машины, если он совпадает с названием машины индексера, то необходимо его изменить, иначе возникает ошибка.
cd /etc/hosts
cat hosts
hostname test.testdomain.com
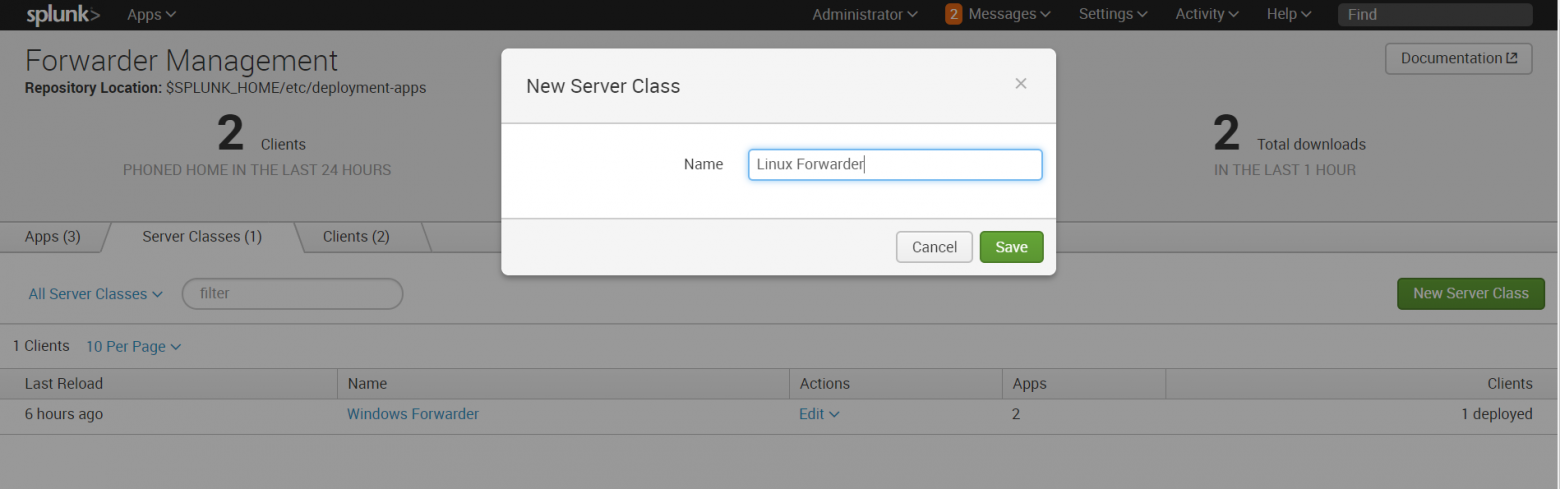
10. Затем создаем новый сервер класс, относящийся к Linux.
Settings — Forwarder Management – Server Classes — New Server Class
11. Добавляем в этот класс приложения «Send to indexer» и «Splunk_TA_nix», а в качестве клиента добавляет машину Linux.

Обратите внимание, что файлы не будут загружаться, если у Universal Forwarder (у юзера, под которым мы используем Universal Forwarder) нет доступа к папкам, которые необходимо мониторить. Так что необходимо учесть этот момент и разрешить доступ.
12. В конце необходимо перезагрузить deployment server, это можно сделать через командную строку из каталога … /splunk/bin :
./splunk reload deploy-server После проведения выше описанных операций, Вы получите логи Linux, которые будут загружены в индекс OS.
Заключение
Таким образом, мы показали вам, как загрузить ваши логи из Windows и Linux в Splunk для дальнейшего анализа и обработки. Надеемся, что эта информация будет полезна для Вас.
Мы рады ответить на все ваши вопросы и комментарии по данной теме. Также, если вас интересует что-то конкретно в этой области, или в области анализа машинных данных в целом — мы готовы доработать существующие решения для вас, под вашу конкретную задачу. Для этого можете написать об этом в комментариях или просто отправить нам запрос через форму на нашем сайте.
Splunk Admin Tutorial | Splunk Add-on For Microsoft Windows Installation and Configuration
Splunk add on for MS windows | Getting Windows data into splunk
Splunk Basics Tutorial | How To Setup Splunk | Splunk Windows Installation Guide
Demo of the SPLUNK App for windows infrastrucure
Splunk Admin |1|Types of Splunk deployment.Configuring Standalone Deployment with Demo
Install and Configure Splunk Universal Forwarder on Windows
Splunk Installation on Win 10 64-Bit
Splunk Installation | Splunk installation on windows | @S3CloudHub
Inside My Splunk Enterprise Dashboard | Ellington Cyber Academy Capstone 1 Walkthrough
Install and Configure Splunk universal forwarder for windows 2022
Splunk Tutorial for Beginners (Cyber Security Tools)
DIY Splunk Installation Tutorial (STEP BY STEP GUIDE) #getajobinit
My Start Will Go On: Splunk’s TA for Windows Part 2
How to install Splunk Universal Forwarder | Splunk Installation | Log Server
Splunk Enterprise Administration: Configuring Distributed Search Course Preview
How to Install Splunk Forwarder on Windows
Splunk:how to Install Splunk for windows server
Splunk Enterprise Install and Setup — Run as Dedicated User
How To Install And Integrate Splunk Universal Forwarder on Windows
Basic setup of a Splunk Deployment Server to push out technology add-ons and custom apps
Conclusion
All things considered, one can see that this specific post offers pertinent knowledge about Splunk Admin Tutorial Splunk Add On For Microsoft Windows Installation And Configuration. From beginning to end, the essayist presents extensive knowledge related to the field.
Crucially, the part about notable features stands out as a crucial point. The narrative skillfully examines how these features complement one another to develop a robust perspective of Splunk Admin Tutorial Splunk Add On For Microsoft Windows Installation And Configuration.
Also, the content does a great job in deciphering complex concepts in an user-friendly manner. This straightforwardness makes the subject matter beneficial regardless of prior expertise.
The content creator further bolsters the study by introducing related illustrations and actual implementations that put into perspective the theoretical constructs.
An extra component that is noteworthy is the detailed examination of several approaches related to Splunk Admin Tutorial Splunk Add On For Microsoft Windows Installation And Configuration. By considering these various perspectives, the piece provides a impartial view of the issue.
The exhaustiveness with which the content producer handles the topic is really remarkable and establishes a benchmark for comparable publications in this area.
Wrapping up, this article not only instructs the consumer about Splunk Admin Tutorial Splunk Add On For Microsoft Windows Installation And Configuration, but also prompts more investigation into this captivating area. Should you be a novice or an experienced practitioner, you will come across valuable insights in this exhaustive content.
Many thanks for engaging with this detailed piece. If you have any inquiries, please do not hesitate to reach out with the discussion forum. I am excited about your comments.
In addition, here is various related publications that might be helpful and supportive of this topic. Wishing you enjoyable reading!