
Setting up Split DNS in Windows Server 2008
Recently i ran into a huge brick wall at work, we had just got a new dedicated internet service and we had to purchase an enterprise grade router, we went with the Cisco 881 with advanced IP as recommended by the ISP, this wasn’t an issue as i am familiar with Cisco IOS and command line programming, I have a number of web servers in house for the websites that I host, as I have multiple sites running on a single server I need to use the domain and sometimes the sub domains to access them, the IP address with the port at the end just simply does not work internally.
I ended up having to ask for some support from the Cisco Help Desk as this was something that i could not work out on my own, I explained my situation and he explained that what i wanted to do was simply disabled by default in the Cisco IOS as it was a security issue, so after a few days of trying different things the Cisco support guys told me that what i wanted to achieve wasn’t going to work , he had tried to setup NAT on a stick and also loop backs to direct outbound traffic via the loop back address, none of these worked with my setup of the websites.
I had to have a rethink about how to tackle this issue, then i was reading on the MSDN forums about a similar issue and the way in which it was approached was to setup Split DNS or Split Brain DNS as some call it. I knew what it was but just never thought of using it in my situation, I didn’t have nothing to lose so I set out my plan to set this up and it was pretty straight forward. I have 3 domains that I use, My main website is hosted externally but I have 2 other servers for testing, dev and staging these are hosted internally.
To setup Split DNS follow the steps below.
Connect to your Domain Controller and open up your Server Manager just next to your Start button
Expand the roles section and then expand the DNS Server role and then expand DNS,
Then finally expand the server and you will see there are 4 options, Global Logs, Forward Lookup Zones, Reverse Lookup Zones and Conditional Forwarders.
We want to expand the Forward Lookup Zones as this is where we will be making the changes.
You will see from the above image that i already have my domain names in there so we are going to add another one in there, so right click on the Forward Lookup Zones and click on New Zone …
You will then see the New Zone Wizard, click on Next to continue.
Choose a Primary Zone and tick the box to (Store the zone in Active Directory) then click on next.
You want this zone to replicate across all DNS servers running on domain controllers then click on next.
You then need to enter the name of the zone this is the domain name that you are wanting to use, in my case this is thesuperkev.in, then click on next.
I want to allow only secure dynamic updates then click on next.
And finally review the name is the correct name then click on the finish button to add the zone.
So that is the zone now in place if you expand the zone you will see that it automatically puts in 2 records for you the Start of Authority (SOA) and Name Server (NS) records.
For this to work properly we need to add in the www and the naked entries and where they point to do do this we need to right click on the zone name and click on New Host (A or AAAA)
The first record we are going to create is the naked domain record so basically the http://thesuperkev.in record, so we leave the Name blank, in the IP address put in the External Public IP address of your host, the Create associated pointer is ticked by default you can leave this although it may complain, this is fine.
The next record we want to add is the www. record this will also point to the External IP address of your host. just like the above entry you can once again just leave the Create associated pointer checked, Click on Add Host.
You will now see that in your zone you have 4 entries now the 2 default ones and the 2 we just created, if like me you have internal uses for the domains also here is where you need to add in the sub domains you require.
If you have a dev server and want to use the internal address of dev.thesuperkev.in then do the same process again add a new A Host record but this time instead of putting in the external ip address put in the internal ip.
That is pretty much it for setup you will now be able to use the live site on the www. and naked domain that will divert to the correct address, if you do not put these 2 records in then you will get the page cannot be displayed in your browser.
The Split DNS Architecture
Now that you have a good background on the special DNS techniques you can use, let’s discuss a very common and fairly secure way to deploy DNS within your organization: using the split DNS architecture.
As I’ve briefly mentioned previously in this chapter, the split DNS architecture scenario consists of a set of internal nameservers that are used within the corporate computing environment in daily operations. There are also one or more nameservers facing externally to the Internet that outsiders use to connect to your corporation’s electronic services, but that are separated from the internal nameservers for security purposes. Outsiders who query for information from your external nameservers won’t be able to obtain information on your internal network structure and composition because the external nameserver is completely separate from the internal nameservers that hold this data. The external nameservers hold records only for externally facing servers and not for your entire internal domain. This technique is called the split DNS architecture because DNS information is split between the inside and the outside of an organization.
Tip
Split DNS is a great way to deploy Active Directory-compatible DNS services within your organization, but it isn’t the only way to deploy DNS.
Stub Zones
Now is the time to introduce a new type of zone, introduced in Windows Server 2003, called the stub zone. Stub zones contain only a subset of the information contained in a regular forward or reverse lookup zone. Specifically, a stub zone contains the SOA record, any pertinent NS records, and the A records for the nameservers that are authoritative for that zone, and nothing more. Stub zones are useful for creating split DNS infrastructures, where internal machines service internal DNS requests and external DNS requests are serviced elsewhere, perhaps at a datacenter or Internet service provider.
Now, how do stub zones and conditional forwarding play into the split DNS architecture? In a couple of ways: for one, you might do business with an organization that occasionally needs to access systems that reside within your corporate firewall, not outside of it. Because the external nameservers have no information on your internal systems, there’s no default way to use split DNS to allow outsiders to resolve canonical names within your firewall. To resolve this, you use stub zones, placed on the internal nameserver of the corporation with whom you’re doing business, which again contain only NS and SOA records of your internal nameservers. That way, when people query for resources that you host, they go to their local nameservers, and their local nameservers see the stub zones placed there about your organization with the proper name and IP address for your nameservers. In essence, any organization that hosts a stub zone for your domain always will know the names and addresses of your nameservers. Best of all, regular zone transfers will make sure the information inside these stub zones is kept up-to-date, but of course you must have permission to conduct these zone transfers.
Conditional forwarding operates very similarly to stub zones, except that where stub zones simply contain information about a foreign domain’s nameservers, conditional forwarding is used on the local nameserver to directly forward requests for information to the foreign nameserver. Unlike stub zones, conditional forwarders don’t automatically update when information changes, so manual intervention is required if you need to change the addresses or names of the foreign nameserver; however, you don’t need any special permissions on the foreign nameserver to use conditional forwarding because no zone transfers are involved. Some overhead is involved with conditional forwarding, however, if you have a large list of names to forward; the server has to check each and every request against this list, and if you have a large load on the server, this can slow down response time considerably for everyone hitting that particular server. For just a few zones, however, conditional forwarding can be the best solution, and it can be done without the foreign DNS hostmaster or administrator knowing or approving.
Both of these techniques are a major part of the split DNS architecture strategy. Let’s take an example corporation—one that intends to use Active Directory and is deploying DNS with that in mind—with a primary and secondary nameserver for the external side of the infrastructure and a second set of primary and secondary nameservers for the internal side. A basic diagram of this infrastructure is shown in Figure 4-26.
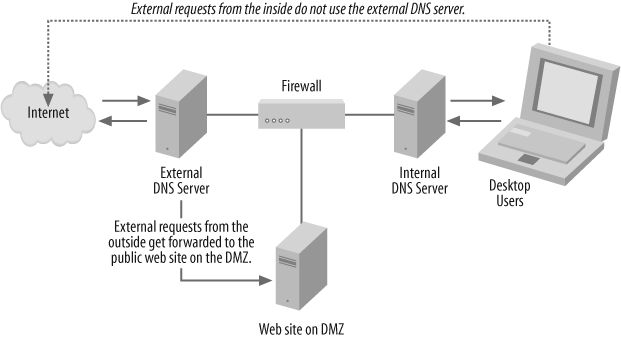
Figure 4-26. How split DNS architecture is laid out
Note that the first set of primary and secondary nameservers is outside the corporate firewall, and they take care of any external requests that come for the domain. In fact, the registrar that has the corporation’s domain registration lists these two nameservers as authoritative for that domain. However, the zone files on these servers are static—they list only a few, rarely changing items, which could be web, FTP, and mail servers. This is really all the public needs to know.
There are two points to note about this portion of the scenario:
-
The external nameservers are not authoritative for the internal, Active Directory-based DNS structure. They are authoritative only for external, Internet-based requests.
-
If your ISP has been providing hosting for your nameservers, there’s no reason it can’t continue doing so. In fact, this is simpler to administer than hosting both sets of nameservers on your own premises.
Now let’s focus on the internal nameservers for this corporation. The primary nameserver on the internal side is configured as the primary nameserver for the internal zone and is instructed to accept dynamic DNS updates from internal workstations and servers. However, these internal servers are blind (at this point) to the fact that outside the firewall, another set of nameservers is holding the same zone name with different records. In addition, the workstations within the business are configured to think of the authoritative nameservers for the domain as the internal servers; this is where they will register themselves via dynamic DNS, and also where they will first look to resolve Internet names.
So, how do internal users resolve names on the Internet if they can’t see the external set of nameservers? It’s easy—the internal primary and secondary nameservers are configured to forward Internet requests to the external primary nameserver. So, if the address being requested by the client isn’t in the internal nameserver’s cache (meaning it hasn’t been requested recently by another client), it will ask the external nameserver for the answer. No zone transfers are involved—it’s just straight forwarding, as I covered earlier in this chapter. But how might external users resolve internal DNS names? The short answer is: they won’t. That’s a security feature. Because the external users know only about the external nameservers, and the external nameservers know only about themselves and not the internal nameservers, there’s no way for the external nameservers to report any information about internal DNS records inside the firewall.
The only problem you might run into is when internal users attempt to access the company’s own resources on the external side of the firewall; to allow this, simply add a static record to the internal nameservers that points to the correct external resource. You don’t introduce any security problems that way because there’s still no «window» for external users to see into your internal structure.
So, in essence, you have a DNS architecture «split» between internal and external nameservers. If you’re looking to reproduce this architecture, the following summarizes the correct procedure:
-
Create two sets of servers—one for in front of the firewall, and one for behind it. Install the DNS service on both.
-
Make every nameserver point to itself for its own DNS information; you do this within the network card properties where you indicate the IP address. There’s no need to configure a secondary nameserver for each of these.
-
Copy any external records your internal users might need to the internal zone. This includes web, mail, and FTP servers. Remember, if you don’t do this, your users won’t be able to resolve the names of anything outside the firewall.
-
Configure external forwarders—these are the machines to which your internal nameservers will forward requests so that your internal users can resolve Internet names.
-
Slave the internal set of nameservers to these external forwarders you created in the previous step. This shields them from the Internet’s blinding eye.
-
Configure all machines on the internal network to use only the internal nameservers. This allows them to register with Active Directory if appropriate and to find internal resources, which they couldn’t find if directed to the external nameservers outside the firewall.
Security Considerations
Split DNS architecture is implemented with security in mind, but you can always take more steps to harden those DNS systems. You’ve already taken two steps in this process: for one, slaving the internal nameservers to the external forwarders eliminates the possibility that if the firewall of some other transmission problem prevents the external forwarder from responding, the internal nameserver will conduct its own search of the Internet. You obviously don’t want your internal nameservers touching anything on the outside of the firewall except those external forwarders.
The other step is the use of the firewall to separate the two sets of nameservers from each other. You need to ensure that the firewall that protects the perimeter of your corporate network from the Internet is configured correctly and locked down as tightly as possible. I recommend Building Internet Firewalls, Second Edition (O’Reilly), by Zwicky et al., for detailed and thorough guidance on this topic. You’ll especially want to ensure that only a few ports—such as the DNS port, 53—are open.
Other than that, this architecture is fairly secure right after implementation.
how to create split dns server 2008r2
internal/external same dns name setup split dns for mail. and www. how to configure in DNS manager
August 21st, 2013 2:23am
Hi,
The following link provides step by step configuration of split DNS:
Setting up Split DNS in Windows Server 2008
http://www.thesuperkev.com/2012/10/setting-up-split-dns-in-windows-server.html
Please Note: Since the web site is not hosted by Microsoft, the link may change without notice. Microsoft does not guarantee the accuracy of this
information.
Hope this helps
-
Marked as answer by
Tuesday, August 27, 2013 2:19 AM
August 22nd, 2013 1:09am
Just for the for the record and if someone happens to search for this topic.
Regarding the referenced link: http://www.thesuperkev.com/2012/10/setting-up-split-dns-in-windows-server.html. This
article does NOT describe a SPLIT DNS, just a «work around» using subdomains as descibed by Dustin below
Dustin Humann
6
months ago — Shared publicly
This is not split-brain/split-horizon/split dns. «Split-horizon DNS is designed to provide different authoritative answers to an identical query» usually based on source, such and internal or external. You state the correct use case for split
dns but not the right implementation. Split dns is not simply having your root domain answer with one IP and subdomains answer differently… that’s just dns subdomains, and has nothing to do with split dns.
-
Edited by
Lars Hammarstrand
23 minutes ago
August 21st, 2015 2:42am
Skip to content
Install and configure DNS Server in Windows Server 2008, in this article we configured only a single DNS Server and applied a trick to cheat Domain Name authority which requires at least two name servers. In Install and configure DNS Server in Windows Server 2008 article we created two name server records both pointing to the same DNS Server but to different IP address configured on a single network adapter. As we know we need at least two name servers to provide DNS services to public domains. This requirement is to provide high availability DNS services for domains. If primary name server goes down DNS requests will be served by secondary name server. So here we go with the step by step instruction on how to configure secondary DNS server.
Primary DNS Nameserver
Do the following activity on the machine running DNS server which will act as Primary name server.
- Install DNS Server role on Primary DNS Server as shown in Install DNS Server
- Configure DNS Server Properties
- Create the forward lookup zone
- Configure the forward lookup zone with a few changes as listed below:
- Name Servers: Add ns1.example.com >> 192.168.1.225 and secondary name server ns2.example.com >> 192.168.1.226 (IP address of the secondary DNS Server). Don’t worry if you receive “The server with this IP address is not authoritative for the required zone” see Snapshot 1.
- Zone transfers: Make sure that “Allow zone transfers” is enabled and “Only to servers listed on the Name Servers” is selected.
- Notify: Make sure that “Automatically notify” is enabled and “Servers listed on the Name Servers tab” is selected.

Secondary DNS Server
We need to carry out following activities on the DNS Server machine which will act as secondary name server.
- Install DNS Server role on Secondary DNS Server as shown in Install DNS Server.
- Configure DNS Server Properties
Create Secondary Forward Lookup Zone
- Launch DNS Manager by clicking Start > Administrative Tools > DNS or type dnsmgmt.msc in Run window (Press Windows Key + R) and press Enter.
- Expand Server > Right click Forward Lookup Zones > New Zone which will launch New Zone wizard.
- Click Next on Welcome to the New Zone wizard.
- Select “Secondary zone” radio button and the click Next.
- Enter zone name e.g. example.com and then click Next.
- Enter IP Address of the Master DNS Server i.e. Primary DNS Server. In my case it is 192.168.1.225. Click Next.

- Click Finish to complete the New Zone creation wizard.
Let’s verify if it works!!!
Once we complete new secondary zone creation wizard within a few minutes entire zone should be transferred from Primary DNS Server to secondary DNS server. We can verify the zone from DNS Management console (dnsmgmt.msc) of Secondary DNS Server. If it doesn’t appear press F5 to refresh.
One more thing we should check is that when we make any changes with forward lookup zone on primary name server those changes should immediately appear in secondary forward lookup zone of secondary name server. This is because we have configured primary forward lookup zone to automatically notify all the name servers listed on name servers tab about the changes happening in primary forward lookup zone.
Register & Update Name servers at Domain Name Registrar
After setting up primary and secondary name servers now we need to register and update name servers at domain name registrar.
Say I have domain.com and its hosted externally.
I add an exchange server and, I add an external record pointing to my server called mail.domain.com and it points to my external IP.
I ALSO want to be able to access my server using the internal IP instead of going through my firewall and back in. (This is called split DNS)
Split DNS = I have 2 DNS zones, one external and one internal for the same domain.
The issue is that you have to manage both zones individually (even if you only need one specific host record)
And alternative method is to create a zone JUST for that one host name.
Here are the directions to create a domain and same as parent A record
- Open DNS on your DC, right click Forward Lookup Zone, and select New Zone
-

-


Now you have split DNS for the single host name only.