
Windows — многопользовательская система, что означает, что в ней могут относительно независимо работать несколько пользователей. Помимо пользовательских учетных записей, создаваемых при установке и после, в системе предусмотрено несколько скрытых системных учетных записей. При необходимости вы можете получить список и тех и других.
В этой простой инструкции подробно о способах посмотреть список пользователей Windows 11 или Windows 10, большинство из которых подойдёт и для предыдущих версий системы. Если вам требуется получить список пользователей без входа в систему, обратите внимание на последний раздел этого материала.
Windows PowerShell или Терминал Windows
Если по той или иной причине вам потребовалось получить список всех пользователей Windows 11, Windows 10 или одной из предыдущих версий системы — сделать это можно как в графическом интерфейсе, так и средствами командной стройки или PowerShell.
Я рекомендую начать с PowerShell, так как он позволяет быстро получить максимум информации об учетных записях пользователей:
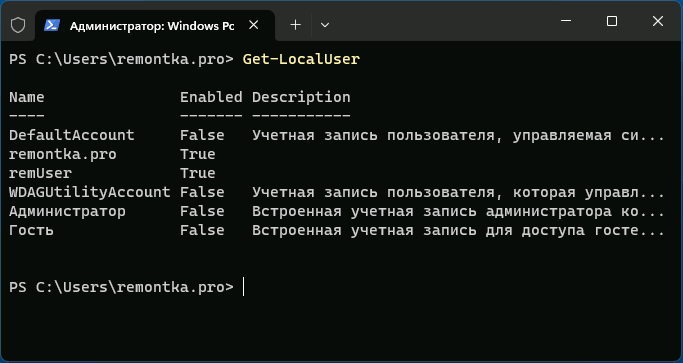
- Запустите Windows PowerShell или Терминал Windows от имени администратора, для этого можно нажать правой кнопкой мыши по кнопке «Пуск» и выбрать нужный пункт контекстного меню.
- Введите команду
Get-LocalUser
и нажмите Enter.
- В результате вы получите полный список учетных записей пользователей, а также информацию, включена ли учетная запись в столбце «Enabled».

Обратите внимание, некоторые учетные записи могут вызвать вопросы, ответы на них можно найти в статьях:
- Как включить скрытую системную учетную запись Администратор в Windows 11 (подойдет и для Windows 10)
- Для чего нужна учетная запись WDAGUtilityAccount в Windows 11/10
Командная строка
Список пользователей Windows можно получить с помощью командной строки:
- Запустите командную строку (права администратора не обязательны).
- Введите команду
net user
и нажмите Enter, чтобы получить список всех пользователей.

- Ещё одни вариант команды:
wmic useraccount get name


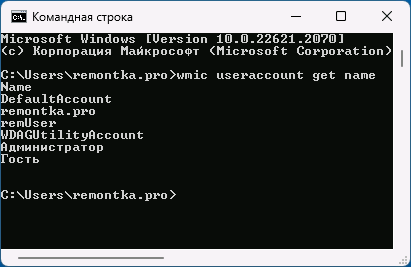
Оба варианта отобразят как активных, так и отключенных (скрытых) пользователей, но без информации, о том, что это за учетная запись и включена ли она. Второй вариант команды допускает следующую модификацию:
wmic useraccount get name,status
для просмотра информации о статусе учетных записей (для включенных — Ok, для отключенных — Degraded).
Параметры Windows 11 и Windows 10
«Основной», но не идеальный метод просмотра списка пользователей в графическом интерфейсе — приложение «Параметры»:
- Откройте «Параметры».
- В Windows 11 откройте раздел «Учетные записи» — «Другие пользователи» для того, чтобы посмотреть список пользователей, помимо текущего (и без отключенных и системных учетных записей).

- Если вы используете семейную группу (например, для родительского контроля Windows), пользователи, добавленные в семью, будут показаны не в «Другие пользователи», а в «Учетные записи» — «Семья».

- В Windows 10 откройте «Параметры» — «Учетные записи» — «Семья и другие пользователи». На открывшемся экране будут показаны пользователи компьютера (за исключением текущего), а также члены семейной группы при их наличии.


Как в Windows 11, так и в Windows 10 в «Параметрах» вы не увидите отключенные учетные записи.
Локальные пользователи и группы
Ещё один вариант просмотра пользователей в графическом интерфейсе — оснастка «Локальные пользователи и группы».
- Нажмите клавиши Win+R на клавиатуре, либо нажмите правой кнопкой мыши по кнопке «Пуск» и выберите пункт «Выполнить». Введите lusrmgr.msc в диалоговое окно «Выполнить» и нажмите Enter.
- В открывшемся окне «Пользователи» вы сможете посмотреть список пользователей текущей системы, их статус (если рядом со значком отображается стрелка — пользователь отключен).

- Дважды нажав по учетной записи пользователя, можно изменить её параметры (например, включить или отключить пользователя) и посмотреть описание.


Некоторые дополнительные детали, которые могут пригодиться в части получения списка пользователей:
- Если при использовании способов получения списка пользователей в командной строке или PowerShell вам требуется вывести список в файл, просто добавьте «> путь_к_файлу» через пробел после команды, например:
wmic useraccount get name,status > spisok.txt
Учитывайте, что путь (папка) в которую сохраняется файл должен существовать, а если для сохранения файла в указанном расположении требуются права администратора, консоль следует запускать с соответствующими правами.
- При необходимости получить список пользователей без входа в систему в случае, если он невозможен, либо если система не запускается, вы можете использовать утилиты с WinPE, те же самые, которые описаны в последней части инструкции про сброс пароля Windows 11 (подойдет и для других версий системы).
Если у вас остаются вопросы, касающиеся просмотра списка пользователей Windows, вы можете задать их в комментариях ниже, описав ситуацию и задачу в деталях.
Для управления локальными пользователями и группами в Windows можно использовать встроенный PowerShell модуль Microsoft.PowerShell.LocalAccounts. С помощью этого модуля вы можете создать или удалить локального пользователя, создать новую группу безопасности и добавить в нее пользователей. Этот модуль доступен во всех версиях Windows, начиная с Windows Server 2016 и Windows 10. В предыдущих версиях Windows этот модуль устанавливается вместе с Windows Management Framework 5.1 при обновлении версии PowerShell.
Содержание:
- Создать нового локального пользователя с помощью PowerShell
- Управление локальными пользователями Windows из PowerShell
- Используем PowerShell для управления локальными группам
Полный список командлетов PowerShell в модуле LocalAccounts можно вывести так:
Get-Command -Module Microsoft.PowerShell.LocalAccounts
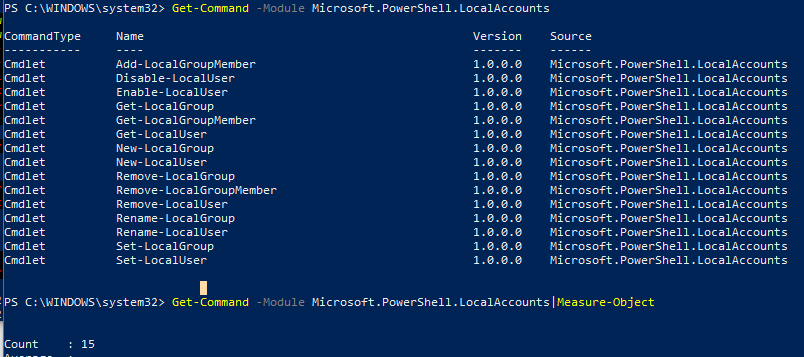
- Add-LocalGroupMember – добавить пользователя в локальную группу
- Disable-LocalUser – отключить локальную учетную запись
- Enable-LocalUser – включить учетную запись
- Get-LocalGroup – получить информацию о локальной группе
- Get-LocalGroupMember – вывести список пользователей в локальной группе
- Get-LocalUser – получить информацию о локальном пользователе
- New-LocalGroup – создать новую локальную группы
- New-LocalUser – создать нового пользователя
- Remove-LocalGroup – удалить группу
- Remove-LocalGroupMember – удалить члена из группы
- Remove-LocalUser – удалить пользователя
- Rename-LocalGroup – переименовать группу
- Rename-LocalUser – переименовать пользователя
- Set-LocalGroup – изменить группу
- Set-LocalUser – изменить пользователя
Рассмотрим несколько типовых задач по управлению локальными пользователями и группами на компьютере Windows при помощи PowerShell командлетов из модуля LocalAccounts.
Ранее для управления локальными пользователями и группами в Windows использовалась графическая оснастка Local Users and Groups Management (
lusrmgr.msc
) и команды
net user
,
net localgroup
.
Создать нового локального пользователя с помощью PowerShell
Чтобы быстро создать нового пользователя, выполните команду:
New-LocalUser -Name "TestUser1" -FullName "Test User" -Description "User for tests"
Укажите пароль для нового пользователя:

Если вы хотите использовать командлет New-LocalUser для автоматического создания новых локальных пользователей из скриптов PowerShell, пароль можно задать заранее в коде скрипта. Строку с паролем нужно преобразовать в формат Secure String:
$pass = ConvertTo-SecureString "WinitP@ss321!" -AsPlainText -Force
New-LocalUser -Name TestUser2 -Password $pass
Чтобы сразу добавить пользователя в группу локальных администраторов, выполните команду:
Add-LocalGroupMember -Group Administrators -Member TestUser2
При создании пользователя можно дополнительно использовать следующие параметры:
-
-AccountExpires
– дату действия учетной записи, при наступлении которого учетная запись будет автоматически отключена (по умолчанию командлет New-LocalUser создает бессрочную учетную запись) -
-AccountNeverExpires -
-Disabled
– отключить учетную запись после создания -
-PasswordNeverExpires
– неограниченный срок действия пароля -
-UserMayNotChangePassword
– запретить пользователю менять свой пароль
Для создания нового пользователя в домене AD нужно использовать командлет New-ADUser.
Управление локальными пользователями Windows из PowerShell
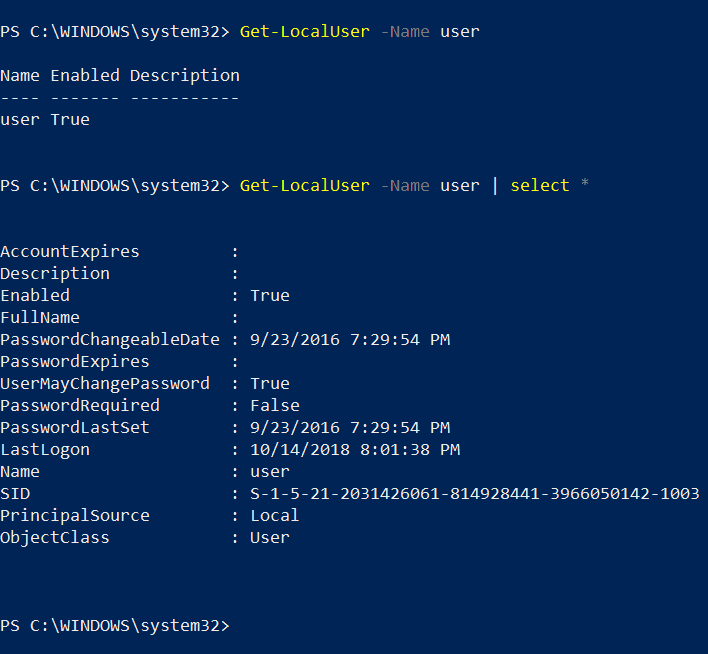
Чтобы вывести список всех локальных пользователей Windows на текущем компьютере, выполните:
Get-LocalUser
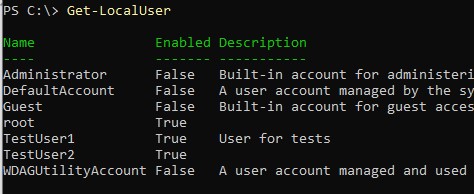
Как вы видите, на компьютере имеется 7 локальных учетных записей, 4 из которых отключены (Enabled=False) (в том числе встроенный администратор Windows).
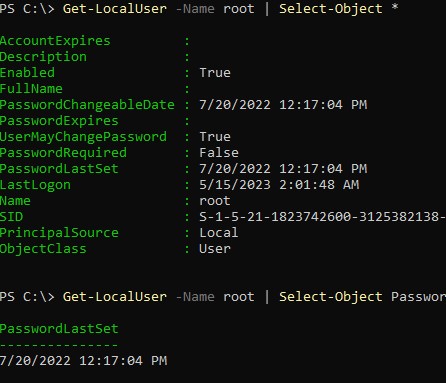
Чтобы вывести все свойства конкретной локальной учетной записи (аналог комадлета для получения информации о пользователях из AD — Get-ADUser), выполните:
Get-LocalUser -Name ‘root’ | Select-Object *
AccountExpires         :
Description            :
Enabled                : True
 FullName               :
PasswordChangeableDate : 7/20/2022 12:17:04 PM
PasswordExpires        :
UserMayChangePassword  : True
PasswordRequired       : False
PasswordLastSet        : 7/20/2022 12:17:04 PM
LastLogon              : 5/15/2023 2:01:48 AM
Name                   : root
SID: S-1-5-21-1823742600-3125382138-2640950260-1001
PrincipalSource        : Local
ObjectClass            : User
Обратите внимание на атрибут PrincipalSource. В нем указан тип аккаунта. Это может быть:
- Локальный пользователь Windows (PrincipalSource: Local)
- Учетные записи Microsoft (PrincipalSource: Microsoft Account)
- Учетные записи Azure AD (PrincipalSource: AzureAD)
Чтобы получить значение конкретного атрибута пользователя, например, время последней смены пароля, выполните:
Get-LocalUser -Name ‘root’ | Select-Object PasswordLastSet
Чтобы изменить пароль существующего пользователя, выполните команду:
Set-LocalUser -Name TestUser2 -Password $UserPassword –Verbose
Чтобы установить флаг «Срок действия пароля пользователя не истекает» («Password never expired»), выполните:
Set-LocalUser -Name TestUser2 –PasswordNeverExpires $True
Отключить учетную запись:
Disable-LocalUser -Name TestUser2
Включить пользователя:
Enable-LocalUser -Name TestUser2
Чтобы удалить локального пользователя, выполните:
Remove-LocalUser -Name TestUser2 -Verbose
Используем PowerShell для управления локальными группам
Теперь выведем список локальных групп на компьютере:
Get-LocalGroup
Создадим новую группу:
New-LocalGroup -Name 'RemoteSupport' -Description 'Remote Support Group'
Теперь добавим в новую группу несколько локальных пользователей и группу локальных администраторов:
Add-LocalGroupMember -Group 'RemoteSupport' -Member ('SIvanov','root', 'Administrators') –Verbose
Также вы можете добавить пользователя в группы с помощью следующего конвейера (в этом примере мы добавим пользователя в локальную группу, разрешающую ему удаленный доступ к рабочему столу через RDP):
Get-Localuser -Name TestUser2 | Add-LocalGroupMember -Group 'Remote Desktop Users'
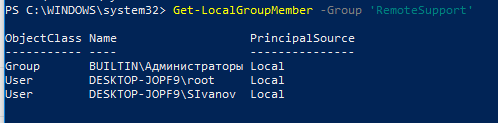
Выведем список пользователей в локальной группе:
Get-LocalGroupMember -Group 'RemoteSupport'
В локальную группу могут быть добавлены не только локальные учетные записи (PrincipalSource – Local), но и доменные аккаунты (domain), учетные записи Microsoft (MicrosoftAccount) и аккаунты из Azure (AzureAD).
Чтобы добавить в локальную группу пользователя из Microsoft или AzureAD, используется такой синтаксис:
Add-LocalGroupMember -Group 'RemoteSupport' -Member ('MicrosoftAccount\[email protected]','AzureAD\[email protected]') –Verbose
Чтобы вывести список локальных групп, в которых состоит конкретный пользователь, выполните следующий скрипт:
foreach ($LocalGroup in Get-LocalGroup)
{
if (Get-LocalGroupMember $LocalGroup -Member 'sivanov' –ErrorAction SilentlyContinue)
{
$LocalGroup.Name
}
}
Чтобы удалить пользователя из группы, выполните:
Remove-LocalGroupMember -Group 'RemoteSupport' –Member 'testuser2'
Для управления локальными пользователями на удаленном компьютере нужно сначала подключится к нему через WinRM командлетами Invoke-Command или Enter-PSSession.
Например, нам нужно собрать список учетных записей в локальной группе на удаленных компьютерах:
$s = new-pssession -computer pc01,pc02,pc03
invoke-command -scriptblock {Get-LocalGroupMember -Group 'RemoteSupport'} -session $s -hidecomputername | select * -exclude RunspaceID | out-gridview -title "LocalAdmins"
Sometimes, you may need to extract a list of all the user accounts on a Windows computer. What if you want to see all the hidden user accounts that exist alongside your user account? Can you use graphical tools in Windows to learn all that? Can you list all users with Windows’ CMD? Moreover, which Windows PowerShell CLI command can be used to list the users within local groups on a given computer? These are all answers you might need, so to help you out, here are seven methods you can use to see all the users in Windows:
NOTE: This guide covers Windows 11 and Windows 10. Most instructions are the same in both operating systems, so I’m mainly using screenshots from Windows 11. When things differ, you’ll find separate sections for Windows 11 and Windows 10.
1. How to list all users in Windows’ CMD (or PowerShell)
This method works both in the Command Prompt and PowerShell. Open the command-line app that you prefer, and run this command:
net user
After you press Enter on your keyboard, the net user command lists the users that have accounts configured on a Windows PC, including hidden ones or disabled user accounts. The user accounts are listed by their internal names that Windows uses behind the scenes, not by their full display name, seen when you sign in to Windows.
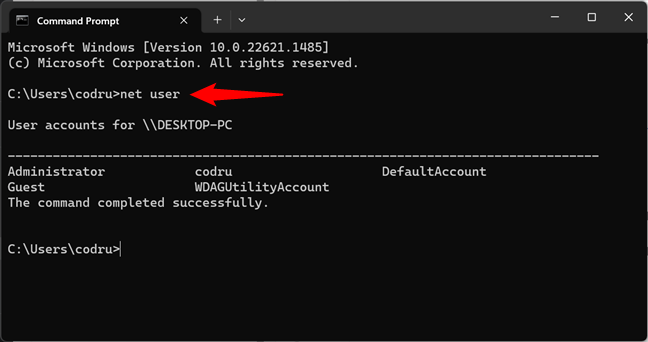
Run net user to make Windows CMD show users
You can also ask the net user command to store the list of users in a text file that opens in Notepad or any other text editor. To do that, specify the file name after the command, like this:
net user > filename.txt
Then, a file with the name you provided is created under “C:\Users\Your User Name.”
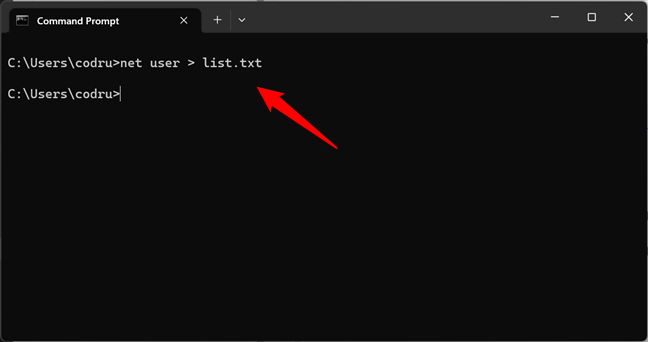
Save the net list of users to a file using net user
If you want to export the CMD list of users to a text file that’s saved in a location you choose, run the net user command like this:
net user > «path\filename.txt»
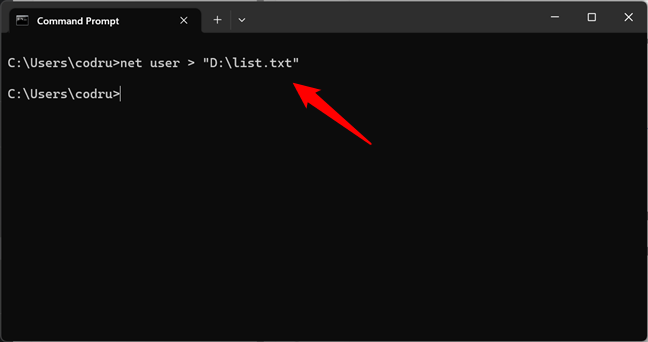
Export the CMD list of users to a file at a specified location
A neat trick is using this command to find information about a specific user account. You can do it using the command like this:
net user username
Once you press Enter, Windows displays helpful information about that user account, like the date its password was last set, when it expires (if it’s set to expire), and the groups it’s a part of.
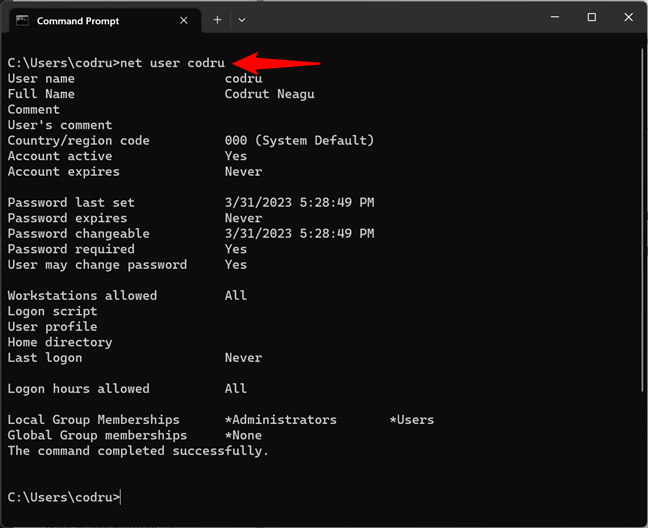
Getting details about a user account in CMD, using the net user command
If you want to know more about this command and all its parameters, access this documentation page: Net user command.
2. How to use PowerShell to get all users on a computer
PowerShell offers an alternative way of finding all the users on your computer. If this is your favorite CLI (command-line interface), you might prefer using the next commands:
2.1. Which Windows PowerShell CLI command can be used to list the users on a given computer?
While you can also use the net user command in PowerShell, the best command to view all users in Windows 11 and Windows 10 in this CLI is:
get-localuser
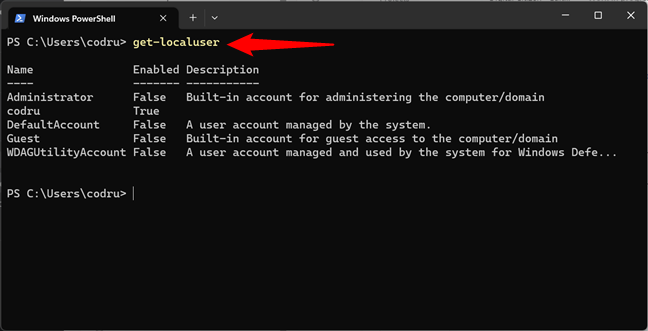
Using PowerShell to get all users on a computer
Another alternative is to use this command:
Get-WmiObject Win32_UserAccount -filter «LocalAccount=True» | Select-Object Name,FullName,Disabled
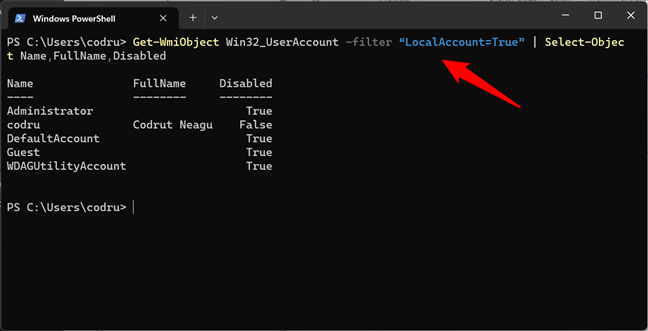
An alternative way to list all users in PowerShell
However, if you have many user accounts configured on your computer, this command is slower than the get-localuser one.
2.2. Which Windows PowerShell CLI command can be used to list the users within local groups on a given computer?
In addition to the get-localuser command, PowerShell also offers another command that I think you might find useful: Get-LocalGroupMember. This command allows you to list all the users from a local group on your PC. For instance, if you’d like to see what other users are administrators on your Windows computer, you can run the command like this:
Get-LocalGroupMember -Group «Administrators»
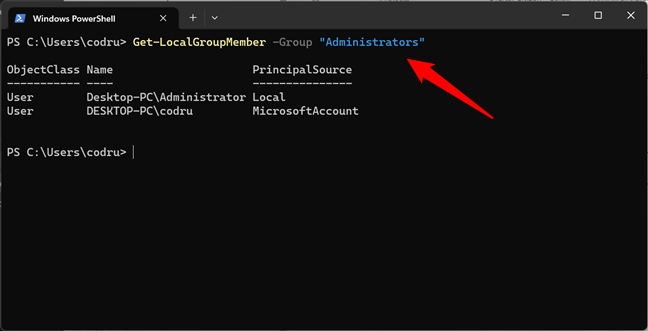
List local group members in PowerShell
Replace the Administrators group in my example with any other group to list its users. And by the way, if you need to see the local user groups configured on your PC, you can run this command:
Get-LocalGroup
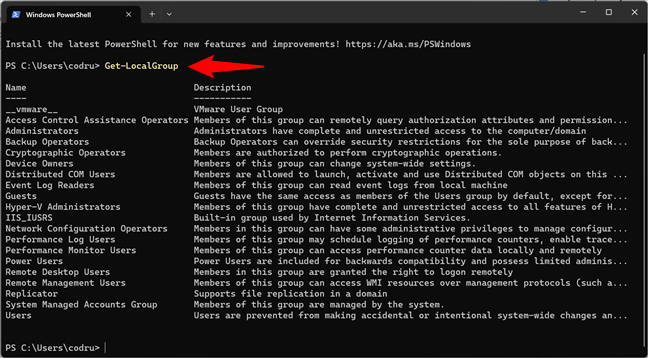
Command to see local groups
Now that we’ve seen the PowerShell CLI commands for listing users let’s move on to the easier methods. And by easier, I mean graphical. 🙂
3. How to see the list of all user accounts in Computer Management
A click-or-tap method that displays all user accounts, including hidden users or disabled ones, involves using Computer Management. Open Computer Management, and go to Local Users and Groups > Users. On the right side, you get to see all the user accounts, their names as used by Windows behind the scenes, their full names (or their display names), and, in some cases, a description as well.
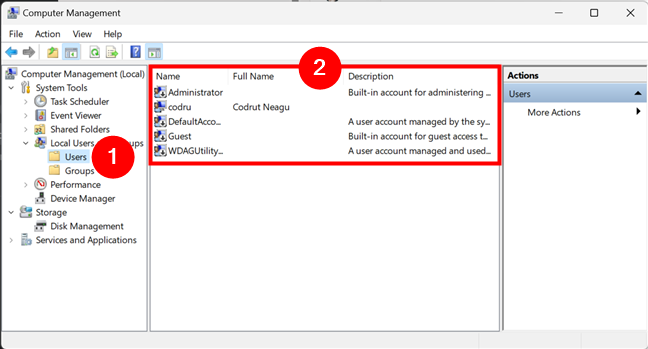
Windows list of users displayed in Computer Management
Double-click or double-tap on a user account to learn more about its properties and settings, including the user groups that it is part of.
4. How to see the list of active user accounts in Windows 11’s Settings
If all you want is to find out who are the active users of your Windows 11 PC, you don’t actually need to use the command-line or advanced snap-ins like Computer Management. You can simply see them in the Settings app. Press Win + I on the keyboard to launch it, select Accounts on the left sidebar and click or tap Other users on the right side of the app.
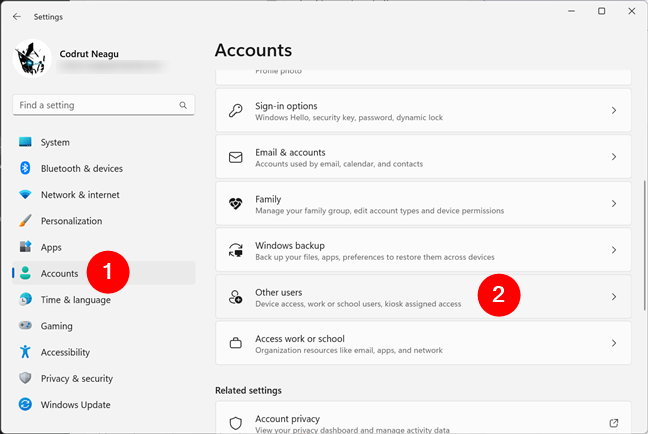
Head to Other users in Settings’ Accounts section
Then, you can see the list of users with access to your Windows 11 computer beside you.
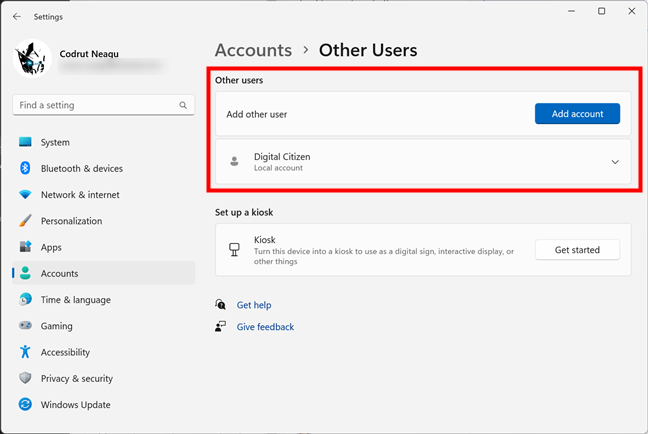
See the list of active users in Windows 11
The drawback of this method is that it doesn’t tell you anything about hidden or disabled user accounts.
5. How to see the list of active user accounts in Windows 10’s Settings
Windows 10 also lets you find the active user accounts on your computer without having to run commands or use the advanced Computer Management application. You can simply use Settings for that. Open the Settings app (a quick way is to click on its Start Menu button), and head to Accounts.
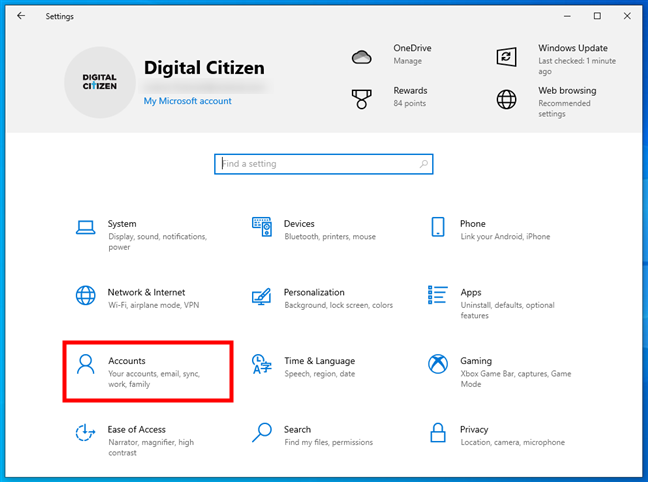
Go to Accounts in Windows 10’s Settings
Select Family & other users on the left sidebar and check the list of active users on your PC on the right. You’ll find all of them listed under Other users.
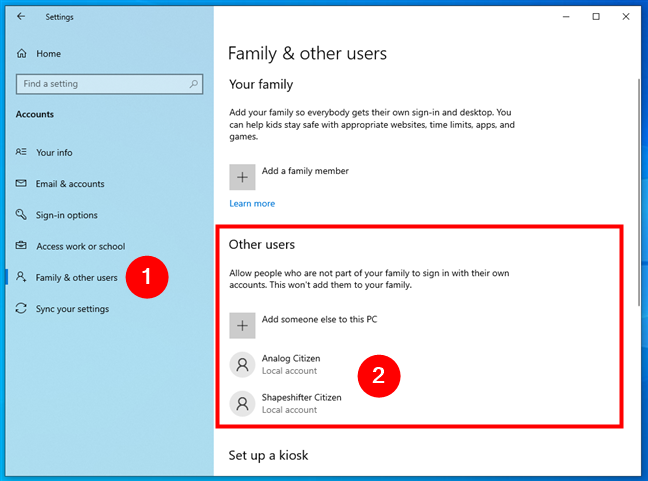
See the list of active users in Windows 10
The disadvantage of using this method is that it doesn’t show you hidden or disabled user accounts.
6. How to see the list of active user accounts using the Control Panel
An old-fashioned method that you can use to get the list of active user accounts involves opening the Control Panel. After launching it, go to User Accounts.
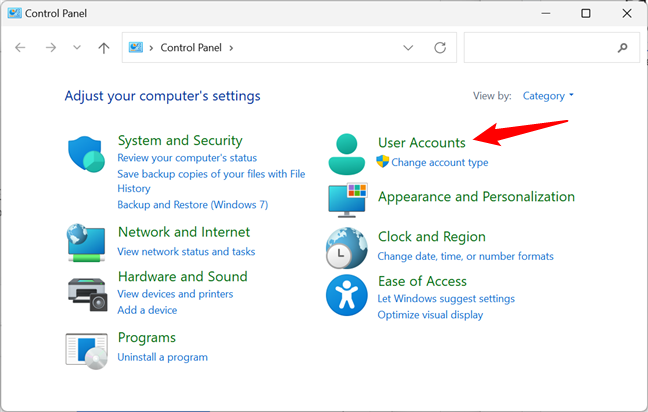
The User Accounts entry from the Control Panel
Then, click or tap on User Accounts.
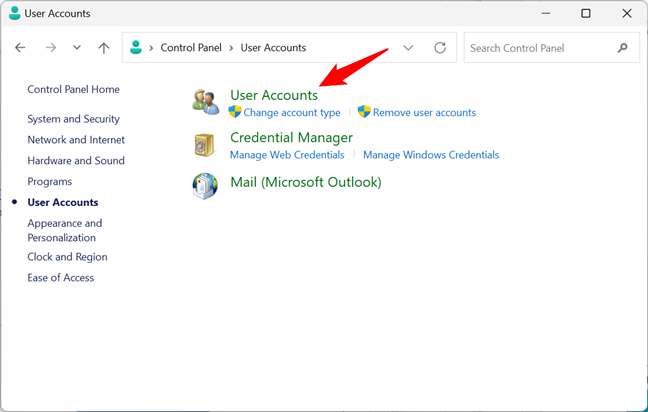
Opening the User Accounts settings
You now see your user account, information about it, and several links. Click or tap the “Manage another account” link.
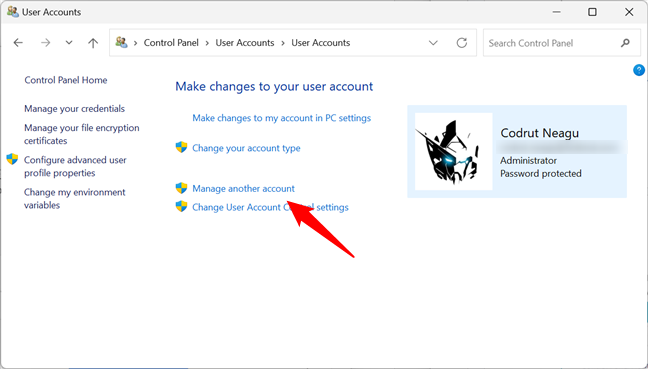
Manage another account
Now you see the active, not-hidden user accounts in Windows, whether they are local accounts, administrators, etc.
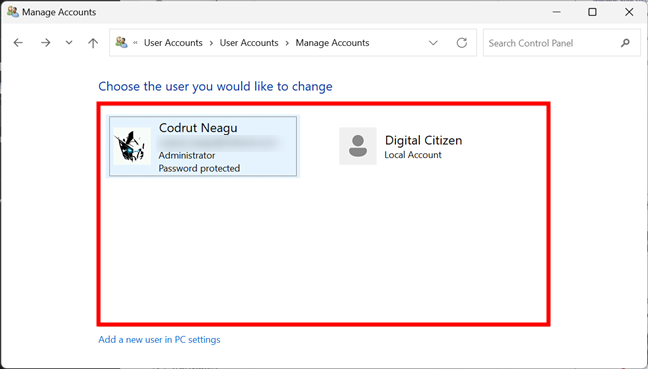
Control Panel shows the list of users on a Windows computer
With this method, you cannot see hidden or disabled user accounts either.
7. How to see the list of active user accounts on the Windows sign-in screen
The obvious and most straightforward method is to look at the sign-in screen before logging into Windows. On this screen, you should see all the active (not hidden) user accounts that exist in Windows. Both in Windows 11 and Windows 10, this list is shown in the bottom-left corner of the sign-in screen.
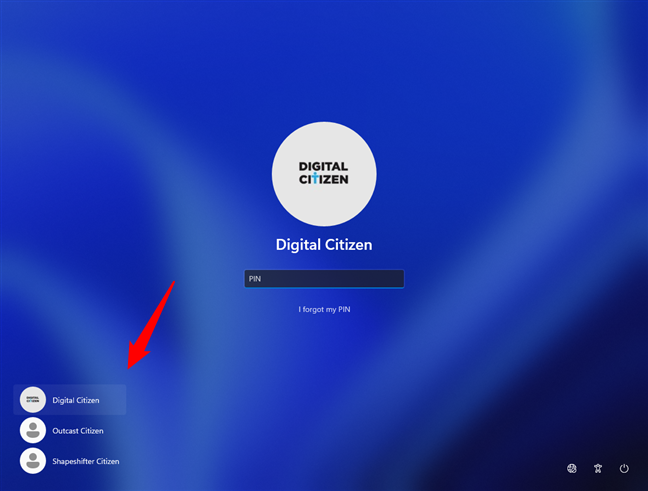
Windows list of users shown on the sign-in screen
The downside of this method is that you cannot see hidden or disabled user accounts.
Did you find many hidden user accounts on your Windows PC?
We highly recommend trying the first three methods for identifying all the user accounts that exist on your Windows computer or device. You may be surprised to see that some of your apps created hidden user accounts that you had no idea existed. Before closing this tutorial, share in a comment whether you found hidden user accounts on your PC and how many of them were there. We are curious to know, so tell us your story.
Being able to list all user accounts on a Windows system is crucial for security and management purposes. It allows administrators to identify all user accounts present, ensuring accountability for system actions and enabling prompt action in case of unauthorized activities or breaches. Regular auditing of user accounts helps maintain system security and control by promptly detecting and addressing suspicious or unidentified accounts.
Access control is improved as administrators can assign appropriate permissions and privileges to each account based on their roles. Password policies are enforced efficiently, reducing the risk of weak passwords and brute-force attacks. Troubleshooting becomes more effective, and technical support can diagnose and resolve user-specific issues better.
Compliance with regulations and data security requirements is facilitated through transparency and control over user access. Additionally, the feature aids in employee onboarding and offboarding, ensuring timely access provisioning and account disabling/removal for departing employees.
In essence, the “List All User Accounts” feature simplifies user management, enhances security, and streamlines administrative tasks, resulting in a more organized and secure Windows environment.
In this post, I’ll show you how to list all the local users on a Windows system using PowerShell. However, because this method of using PowerShell is both complex and time consuming, I’ll also show you an alternative, more straightforward method using Lepide Auditor for Active Directory.
Use Get-LocalUser PowerShell cmdlet to List All User Accounts
The Get-LocalUser PowerShell cmdlet lists all the local users on a device. Remember that Active Directory domain controllers don’t have local user accounts.
Get-LocalUserIf you want to see all the parameters available, pipe the results to the Select cmdlet:
Get-LocalUser | Select *Running the cmdlet without any parameters returns all accounts but you can also add the -Name or -SID parameters to return information about a specific account. The command below returns the user account with security identifier (SID) S-1-5-2.
Get-LocalUser -SID S-1-5-2Get-LocalUser is limited to listing accounts on the system where the command is run. But Get-WmiObject queries local users on remote systems using Windows Management Instrumentation (WMI).
Get-WmiObject -ComputerName workstation1 -Class Win32_UserAccount -Filter "LocalAccount=True"The output can be piped to Select to display just the information you need, and then piped to Out-GridView to display it in separate window with the ability to sort and filter the information.
Get-WmiObject -ComputerName workstation1 -Class Win32_UserAccount -Filter "LocalAccount=True" | Select PSComputername, Name, Status, Disabled, AccountType, Lockout, PasswordRequired, PasswordChangeable | Out-GridViewMost people associate ADSI with Active Directory, but it can also be used to enumerate local accounts.
$adsi = [ADSI]"WinNT://workstation1"
$Users = $adsi.Children | where {$_.SchemaClassName -eq 'user'}
$Users
The above code displays information about all the users on workstation1. You can add a number after the $Users variable to display each user individually. Adding a zero displays information about the first user, and a ‘1’ about the second user, and so on.
$Users[0] | Select *How Lepide Helps
The native PowerShell method for listing all user accounts requires knowledge of PowerShell scripting and is a time-consuming process.
An alternative is to use Lepide Auditor for Active Directory. The Lepide Solution provides an All Users Report which allows you to list all users quickly and easily without the need for any PowerShell scripting expertise.
Here is an example of the report:
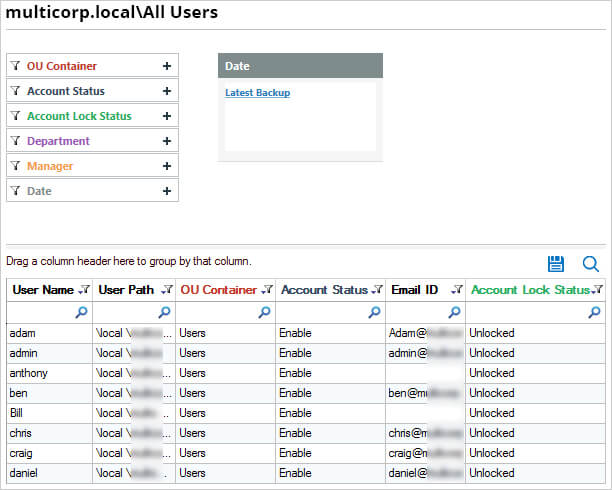
The All Users Report is straightforward to run using the following steps:
- From the States and Behavior screen, expand Active Directory Reports, User Reports and then choose the All Users
- Click Generate Report
- The report can be filtered, grouped, exported and saved
It is an essential part of data security to be able to understand what your users have permissions to and what they are doing with your critical files and folders. To do this in a straightforward way, you’ll need a data security solution like Lepide Auditor for Active Directory, Try it for free today!
Updated March 6, 2023
Definition of PowerShell User List
PowerShell User list is a way to retrieve the users from the local windows machines or the active directory users using the specific cmdlets like Get-LocalUser for the local users on windows OS and Get-ADUsers for the active directory users to retrieve the user details like Distinguished Name (DN), GUID, Security Identifier (SID), Security Account Manager (SAM) or name and can be exported to the CSV or the text file.
Syntax
Syntax of PowerShell User List are given below:
Get-LocalUser syntax:
Get-LocalUser

[[-Name] <String[]>]

[<CommonParameters>]

Get-LocalUser

[[-SID] <SecurityIdentifier[]>]

[<CommonParameters>]
Get-ADUser syntax:
Get-ADUser

[-AuthType <ADAuthType>]

[-Credential <PSCredential>]

-Filter <String>

[-Properties <String[]>]

[-ResultPageSize <Int32>]

[-ResultSetSize <Int32>]

[-SearchBase <String>]

[-SearchScope <ADSearchScope>]

[-Server <String>]

[<CommonParameters>]
Get-ADUser

[-AuthType <ADAuthType>]

[-Credential <PSCredential>]

[-Identity] <ADUser>

[-Partition <String>]

[-Properties <String[]>]

[-Server <String>]

[<CommonParameters>]
Get-ADUser

[-AuthType <ADAuthType>]

[-Credential <PSCredential>]

-LDAPFilter <String>

[-Properties <String[]>]

[-ResultPageSize <Int32>]

[-ResultSetSize <Int32>]

[-SearchBase <String>]

[-SearchScope <ADSearchScope>]

[-Server <String>]

[<CommonParameters>]
From the Get-ADUser syntax, you can use any set of combinations and similarly for the Get-LocalUser account. You can’t use the -Filter and -Identity property together in Get-ADUser cmdlet and -Name and -SID property in Get-LocalUser cmdlet.
We can also use the WMI or CIMInstance class Win32_UserAccount to retrieve the local user details from the local or the remote computers. In addition “Net User” command in cmd is also helpful to retrieve the local user list.
How to List Users in PowerShell?
There are various methods to list the users in the PowerShell by using the Native commands like Get-LocalUser which retrieves the local user account details from the local computer or the remote computers or the Get-ADUser which retrieves the users from the Active Directory domain.
Get-LocalUser command was introduced in PowerShell 5.1 and it is part of Microsoft.PowerShell.LocalAccounts module. In the earlier PowerShell version, to retrieve the list of users you either need to download the local accounts module or you need to use the cmd command like Net User (which still works) or the WMI method class Win32_UserAccount.
If you are remoting to the older PowerShell version machines then the Get-LocalUser command won’t work there. When you run the local user commands on the domain controller, it will provide you the active directory users because DC doesn’t have the local users.
Examples of PowerShell User List
Following are the examples are given below:
Example #1: Getting Local User Accounts List Using Cmd
We can use the “Net User” cmd command to retrieve the user list from the cmd or the PowerShell.
net user
Output:

- To get the local users list from the remote computer use Invoke-Command in PowerShell,
Invoke-Command -ComputerName LabMachine2k16 -ScriptBlock { net user}
Output:

The above output is from the remote computer LabMachine2k16.
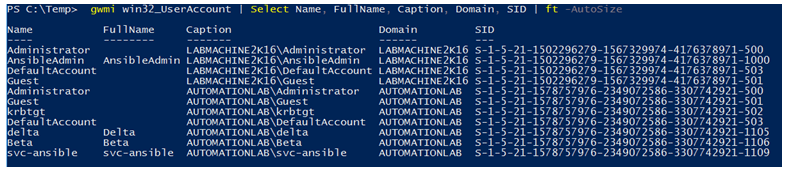
Example #2: Retrieving the Local Users Using the Wmi Method
We can use the WMI method or the CIM instance method class Win32_UserAccount to retrieve the user list.
gwmi win32_UserAccount | Select Name, FullName, Caption, Domain, SID | ft -AutoSize
Output:
- To get the local user details on the remote computer, you need to add the -ComputerName
Invoke-Command -ComputerName LabMachine2k16 { gwmi win32_UserAccount} | Select Name, FullName, Caption, Domain, SID | ft -AutoSize
You can also use the Get-CimInstance command instead of the gwmi method.
You can export the output file to the text or CSV as shown below. In the below example, the output will be exported to the UserAccounts.Csv file.
gwmi win32_UserAccount | Select Name, FullName, Caption, Domain, SID | Export-Csv C:\Temp\Useracccounts.csv -NoTypeInformation
To export into the text file.
gwmi win32_UserAccount | Select Name, FullName, Caption, Domain, SID | Out-File C:\temp\UserAccounts.txt
If you want to check the specific user or the domain user list,
gwmi win32_UserAccount | where{$_.Domain -like "LabMachine2k16*"} | Select Name, FullName, Caption, Domain, SID | ft -AutoSize
Output:

- To retrieve the local accounts only with the Password properties use the below command,
gwmi win32_useraccount | where{$_.LocalAccount -eq $true} | Select Name, LocalAccount, PasswordChangeable, PasswordRequired
Example #3: Retrieving the ADUsers List
To get the domain user list, you can use the Get-ADUser command. To run this command you need to make sure that you have the RSAT (Remote Server Administration Tools) installed on the computer.
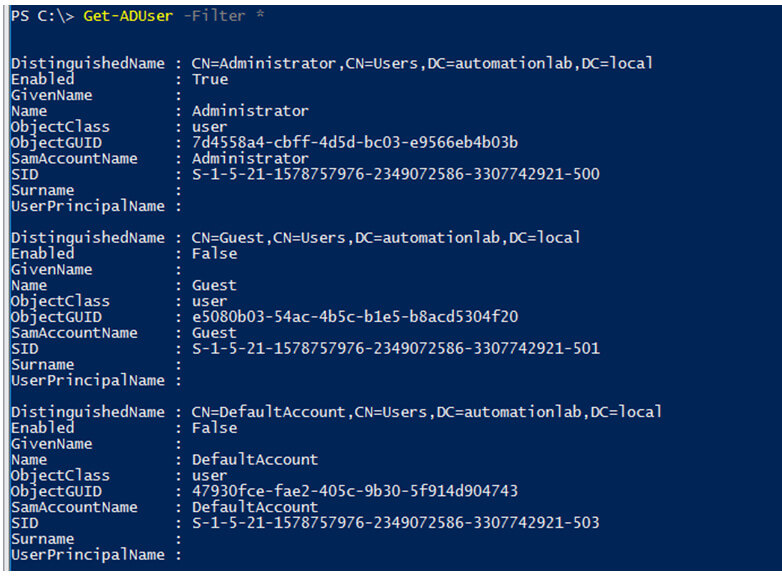
Get-ADUser -Filter *
The above command will get all users from the active directory domain.
- To expose all the properties of the users, you can use the -Property
Get-ADUser -Filter * -Properties *
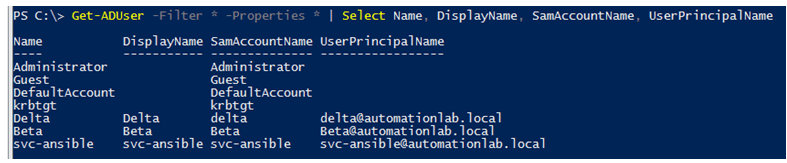
- To filter the specific properties,
Get-ADUser -Filter * -Properties * | Select Name, DisplayName, SamAccountName, UserPrincipalName
Output:
- To get the list of the users who have accounts Disabled and export it to the CSV file, use the below command.
Get-ADUser -Filter * | where {$_.Enabled -eq $false} | Export-Csv C:\DisabledUserAccounts.csv -NoTypeInformation
- To get the specific user accounts details,
Get-ADUser -Identity beta -Properties *
You need to use the SamAccountName property in the -Identity parameter.
- To retrieve the users from the specific Organization Unit (OU), use the below command.
Get-ADUser -Filter * -Properties * | where{$_.DistinguishedName -like "*CN=Users*"} | Select Name, DisplayName, userPrincipalName, SAMAccountName
- Retrieving the list of users in the active directory domain whose password is expired or set to never expires with password properties in the output.
- Retrieves the Expired Password user accounts.
Get-ADUser -Filter * -Properties * | where{$_.PasswordExpired -eq $true} | Select Name, SAMAccountName, PasswordExpired, PasswordLastSet
- Retrieves the Password never expires user accounts.
Get-ADUser -Filter * -Properties * | where{$_.PasswordNeverExpires -eq $true} | Select Name, SAMAccountName, PasswordNeverExpires
Conclusion
As explained in this article, PowerShell uses the various commands to retrieve the list of the Users from the windows computer or from the active directory domain and that is helpful for administrators for their audit and clean-up tasks. You can use the task scheduler to send emails to Administrators for the list of created, expired, about to expire accounts monthly.
Recommended Articles
This is a guide to PowerShell User List. Here we also discuss the definition and syntax of PowerShell User List along with different examples and its code implementation. You may also have a look at the following articles to learn more –
- PowerShell Environment Variable
- PowerShell Write to Console
- PowerShell ZIP
- PowerShell Multiline String