
PowerShell provides commands, to display the list of files & folders in the file system. Below are the cmdlets, commonly we use to get these details;
Display files and folders list
Get-Item is one of the cmdlet used to get the item (for example: directory, file, registry entry etc.,) details at the specified location. By defaultm it gets only one item, unless you specify wildcard (*). When you specify wildcard (*) it gets the child items at the specified location.
We can use Get-Item cmdlet, to get the details of the file or the folder. For example: if you want to see the details of the folder “C:\WINDOWS”, we can use this cmdlet, like below;
PS C:\> Get-Item "C:\WINDOWS"

    Directory: C:\

Mode                LastWriteTime     Length Name
----                -------------     ------ ----
d----         8/14/2018   3:15 PM            WINDOWS

PS C:\>
Observe that, Get-Item by default displays only one entry; not all the files in the folder. If you want to get the details of multiple file(s) or the folder(s); we can give the names in double quotes (“) – which is optional and separated by comma (,). For example: below command displays the details of the folder & the file at a time. Observe that, the folder ( Dot (.) – means, current directory) and the file name; are separated by comma (,).
PS C:\WINDOWS> Get-Item "." , "regedit.exe"

    Directory: C:\

Mode                LastWriteTime     Length Name
----                -------------     ------ ----
d----         8/14/2018   3:15 PM            WINDOWS

    Directory: C:\WINDOWS

Mode                LastWriteTime     Length Name
----                -------------     ------ ----
-a---         7/14/2009   7:09 AM     427008 regedit.exe

PS C:\WINDOWS>
As mentioned above, Get-Item can display the content of the Item if you use the wildcard (*). Does content mean file content.? No. For example: if the item is the Directory, if we use wildcard (*) with Get-Item; it will display files which are in the Directory.
Below command will display files which are in the current directly. Observe that, PS prompt shows that the directory is C:\WINDOWS. That means, below command display files which are in the C:\WINDOWS directory. Also observe that, we used wildcard (*) to display multiple items;
PS C:\WINDOWS> Get-Item .\*
If we use below command, it displays the files which are having the file extension “.exe”.
PS C:\WINDOWS> Get-Item *.exe
Get-ChildItem is another cmdlet, PowerShell provides to display the content of the Item. By default Get-ChildItem will display all the items at the specified location; where Get-Item will display only one item.
Below command will display the files which are in the current directory.
PS C:\WINDOWS> Get-ChildItem
Both these cmdlets, are used for the same purpose. But we have to pass more parameters to Get-Item command to produce the same result; what we get through Get-ChildItem command.
Display, only Files
We can restrict to display, only the files, by specifying “-File” parameter to this command. Below command displays, only the Files from the current directory.
PS C:\WINDOWS> Get-ChildItem -File
Display, only Directories
We can also restrict to display, only the directories, by specifying “-Directory” parameter. Below command displays, only the Directories from the current directory.
PS C:\WINDOWS> Get-ChildItem -Directory
But, when we use Get-Item cmdlet; we need to write script or pass more parameters to get the same result.
If you like this Article, please give the feedback through below Comments section.
(Raju)
Remember the good ol’ days of the DOS dir command? How about the Linux ls command? If so, the Get-childItem is essentially that but taken up a notch.
In fact, we even have dir and ls in PowerShell in the form of an alias. The Get-Childitem PowerShell cmdlet can not only list files and folders on a file system via the PowerShell console or PowerShell script but can also enumerate registry keys and values, certificates in various certificates stores and even Active Directory, to name a few.
If you’re a beginner/intermediate PowerShell scripter, be sure to check out my FREE mini-course on Building a PowerShell Tool! 9,000+ words of deep explanation and insights on how to build a PowerShell tool.
To understand Get-Childitem, first, think of it regarding dir and ls but instead of just files it treats many objects as a child item and enumerates them. You can use the alias or the full command name to use it.
Since this command has been available since PowerShell v1, you can be sure that it will work with your PowerShell version.
Get-ChildItem Traverses a Tree
A file system is a hierarchy. It has a folder structure with files inside of folders and those folders inside of other folders. A file system is like a tree. That tree has a trunk (C:\ for example) and “branches” coming off of it (folders). In fact, we even have a tree command.
PS> tree
Folder PATH listing for volume HD
Volume serial number is 0000007B 22DC:666C
C:.
 \modules
   \AdsiPS
     \1.0.0.2
       \Public
       \AWSPowerShell
<SNIP>
You can point this command at either local paths on the local computer, use a PowerShell remote scriptblock and use Get-ChildItem inside of that or just point it at a UNC path. All work the same. Maybe I just want to list all of the files in the current directory.
PS> dir -Path .
PS> Invoke-Command -ComputerName SERVER1 -Scriptblock { dir -Path . }
PowerShell Providers
Microsoft realized that navigating this “tree” like structure of a file system could be applied to other systems as well. A file system “tree” has folders and files but a registry has keys and values while the certificate system in Windows has stores and certificates inside of those stores. Each of these specific areas can all be represented as a tree thus the PowerShell provider was born. Why all this talk about PowerShell providers? Because the Get-ChilldItem cmdlet is part of the *-Item cmdlets that interact with PowerShell drives that each provider exposes.
The Get-ChildItem cmdlet can output any number of objects on a PowerShell drive and allows you to process each item via the pipeline or perhaps in a PowerShell foreach loop. It understands the concept of a PowerShell drive which allows you to specify a Path of a file system folder, a registry key or a certificate store all in one.
You can see below that this command can enumerate the C:\ folder, the HKEY Current User hive as well as the PowerShell certificate store.
PS> Get-ChildItem -Path C:\


    Directory: C:\


Mode                LastWriteTime         Length Name
----                -------------         ------ ----
d-----         7/2/2017   7:01 AM                AppData
d-----        4/25/2017   4:36 PM                CheckPoint

PS> Get-ChildItem -Path HKCU:\


    Hive: HKEY_CURRENT_USER


Name                           Property
----                           --------
BCD00000000

PS> dir -Path Cert:\


Location   : CurrentUser
StoreNames : {TrustedPublisher, ClientAuthIssuer, Root, UserDS...}
Filtering
The Get-ChildItem PowerShell command cannot only pull all objects on a drive but can filter the information as well through a couple of different parameters: Filter, Include and Exclude. You’ll always want to use the ubiquitous PowerShell Filter parameter when possible. This parameter directly passes the filter syntax to the individual provider. Although much quicker, this syntax solely depends on the provider being queried.
For example, a Filter syntax of Name -eq 'foo' may be completely fine when querying files but won’t work at all when querying the registry because the registry provider doesn’t even have a filter!
PS> dir HKLM:\ -Filter "Name -eq 'foo'"
ls : Cannot call method. The provider does not support the use of filters.
At line:1 char:1 + ls HKLM:\ -Filter "Name -eq 'foo'" +
~~~~~~~~~~~~~~~~~~~~~~~~~~~~~~~~~~     + CategoryInfo          :
NotImplemented: (:) [Get-ChildItem], PSNotSupportedException     +
FullyQualifiedErrorId :
NotSupported,Microsoft.PowerShell.Commands.GetChildItemCommand
When all else fails though, you always have the Include and Exclude parameters as well.
This command in PowerShell also has a few filesystem-specific parameters like Force which will output hidden files and folders, File and Directory which only finds files or folders. Take a look at the full breakdown of Get-ChildItem via Get-Help or in the Microsoft docs.
Another cool thing about Get-ChildItem is it’s ability to resolve paths when using the wildcard character. In PowerShell, wildcard character typically represents anything. For example, if you’d like to see all files with the .txt file extension, just specify the path to the folder and *.txt.
PS> Get-ChildItem -Path 'C:\*.txt'We could also filter on file attributes as well. Perhaps we just want to find only the read-only files in a folder.
PS> Get-ChildItem -Path C:\ -Attributes R -FileSummary
This PowerShell command is one of those cmdlets that you’ll use repeatedly. Most of the time, you’ll probably be using the FileSystem provider, but it’s important to remember that this cmdlet is capable of much more. Use it to query files, folders, registry keys, registry values, certificates, Active Directory users, computers or even environment variables, functions and more!
When in doubt, run the Get-PSDrive command to see a list of all of the loaded PowerShell drives that Get-ChildItem can query for you.
При работе на компьютере иногда возникает необходимость получить полный список файлов и папок в каталоге или даже целом томе. Понадобиться он может для самых разных целей, например, для каталогизации, для сравнения, для использования в какой-то базе данных и так далее. В большинстве случаев приходится иметь дело с большим числом объектов, поэтому нечего и думать, чтобы составить такой список вручную.
Если создание списка файлов вручную представляется едва ли возможным, то какая есть тому альтернатива, какие программные инструменты лучше всего подойдут для этих целей? Решений существует несколько, все они очень просты и удобны. Получить список файлов и папок можно с помощью обычной командной строки, с помощью PowerShell, штатного Проводника, любого браузера, а также с помощью сторонних специализированных утилит.
Получаем список файлов и папок в командной строке
Для чтения содержимого каталогов в старой доброй командной строке предусмотрена команда dir, её то как раз мы и будем использовать. Итак, запускаем консоль CMD, командой cd Буква диска:/путь (если нужно перейти в другой диск, добавляем после cd ключ /d) переходим в нужное расположение и выполняем эти две команды:
chcp 1251
dir /b /s > D:\filelist.tхt
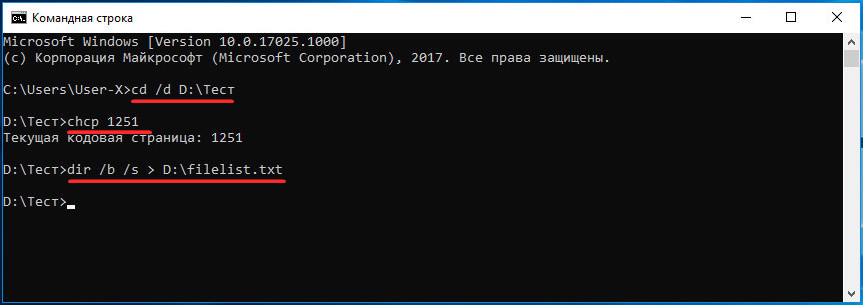
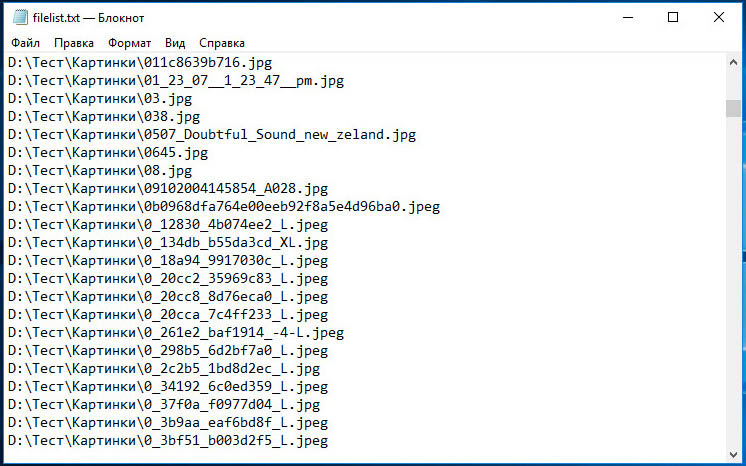
Первая команда устанавливает кириллическую кодировку, вторая сохраняет список всех файлов, папок и вложенных в них объектов в текстовый лог на диске D.
Если нужно получить список только файлов (без вложенных каталогов), достаточно использовать только ключ /b.
Примечание: в Windows 8.1 и 7 для быстрого перехода в папку в командной строке, зажмите Shift, кликните ПКМ по папке и выберите в контекстном меню опцию «Открыть окно команд».
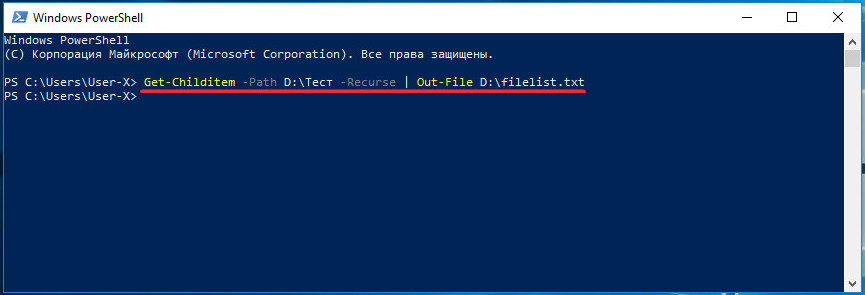
Список файлов и папок в PowerShell
В Windows 10 командная строка заменена консолью PowerShell, для получения списка файлов можете использовать её. Для примера выведем в файл содержимое папки Тест с её подкаталогами:
Get-Childitem -Path D:\Тест -Recurse | Out-File D:\filelist.tхt
А можно и проще. Зажав Shift, кликаем по папке ПКМ, выбираем в меню «Открыть PowerShell здесь».
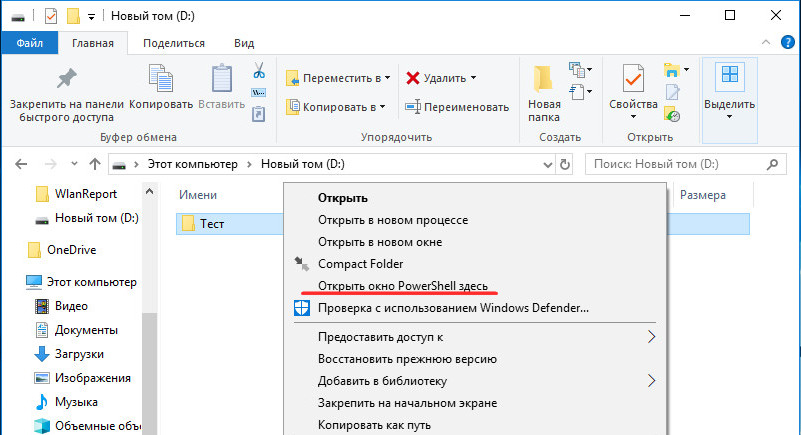
И выполняем в открывшемся окне консоли команду Get-Childitem -Recurse | Out-File D:\filelist.tхt.
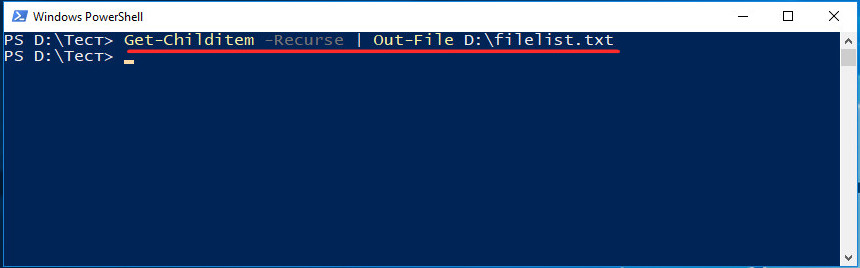
Необходимость использования параметра -Path с указанием пути в данном случае отпадает.
Получение списка файлов или папок в Проводнике
Этот способ позволяет получить список либо файлов, либо папок в конкретном расположении. Заходим в целевую папку, выделяем в ней все файлы или папки, зажимаем Shift, кликаем правой кнопкой мыши и выбираем в меню опцию «Копировать как путь».
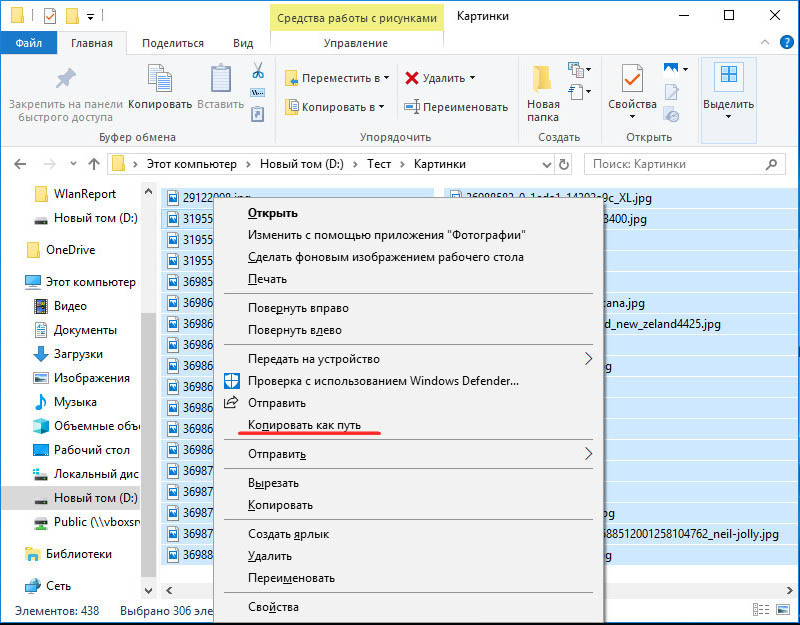
Пути и имена выделенных объектов будут переданы в буфер обмена, откуда вы уже сможете перенести их в текстовый файл.
Получение списка файлов с помощью DirLister
Для получения хорошо структурированного списка объектов файловой системы можно воспользоваться бесплатной портативной утилитой DirLister, скачав её с официального сайта:
www.barrysoft.it/blog/software/dirlister
Запустив утилиту, укажите в разделе «Directory To Scan» путь к сканируемому каталогу или диску, в разделе «Output File» выберите расположение для сохранения списка.
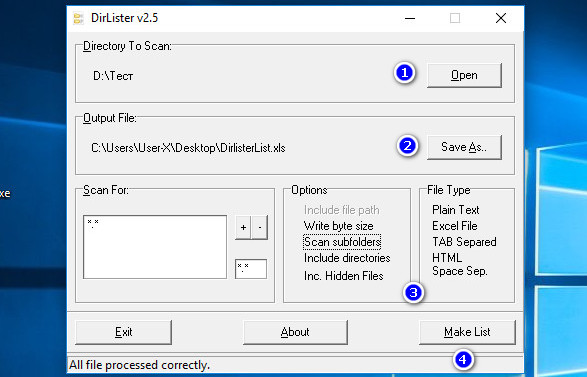
Здесь же можно задать параметры сканирования — выбрать формат, указать, нужно ли включать в список вложенные директории и скрытые объекты, задать поиск по маске. После нажатия кнопки «Make List» список будет сохранён в выбранном расположении.
Используем для получения списка файлов браузер
На худой конец для создания списка файлов и папок на диске можно воспользоваться любым браузером. Перетаскиваем папку или диск на новую вкладку браузера и получаем список имеющихся в ней файлов и каталогов.

Рекурсивно пройтись по всем вложенным каталогам, правда, не получится да и для копирования путей и имён файлов и переноса их в отдельный файл придется использовать Ctrl + C и Ctrl + V.
Джеффри Хикс опубликовал очередную статью по PowerShell, посвященную на этот раз управлению файловыми серверами. Мы решили разбить ее на две части: построение отчетов по файловому серверу и непосредственно управление файловыми шарами. В первой части рассмотрим отчеты.
В посте будут рассмотрены следующие вопросы:
- Как вывести список всех сетевых папок на компьютере (компьютерах)
- Создаем отчеты о размерах сетевых папок
- Определяем владельцев файлов
- Находим дату создания файлов выявляем «старые» файлы и файлы, созданные за определенный промежуток времени)
Итак, под катом вы найдете перевод статьи File Server Management with Windows PowerShell.
Получаем все сетевые папки
Начнем с того, что определим, что же расшарено. Задача проста: просто осуществляем запрос класса Win32_Share, чтобы использовать Windows Management Instrumentation (WMI). Вам даже не нужно логиниться на файловом сервере. Вы можете запустить эту команду откуда угодно.
Get-WmiObject -class -Win32_Share -computername chi-fp01
Вместо chi-fp01 укажем имя интересующего нас компьютера
Запустив эту команду Вы получите все сетевые папки, включая принтеры (если таковые имеются). Но так как мы говорим о файловых шарах, то давайте ограничим запрос. Все экземпляры Win32_Share имеют свойство Type, как показано в таблице 1.

Добавим фильтр в первоначальную команду:
Get-WmiObject -class -Win32_Share -computername chi-fp01 –filter "Type=0"
Тем самым мы выводим только нужную информацию.

Но если вы ищите также и скрытые папки – те, которые заканчиваются знаком доллара ($) – фильтр придется слегка переписать:
Get-WmiObject -Class win32_share -computername chi-fp01 –filter "Type=0 AND name like '%$'"
В WMI знак процента (%) используется вместо знака подстановки (wildcard). Вывести все папки, кроме тех, которые скрыты чуть сложнее.
Get-WmiObject -Class win32_share -computername chi-fp01–filter "type=0 AND name like '%[^$]'"
Команда выведен все объекты Win32_Share, у которых свойство Type равно 0 и имя не заканчивается на $.
Получаем размер сетевой папки
Довольно часто необходима информация о том, сколько места занимают файловые шары. Используем Get-ChildItem, или его сокращение dir, и передадим результаты в Measure-Object:
dir c:\shares\public -recurse | where {-Not $_.PSIsContainer}| Measure-Object -Property length -Sum -Minimum -Maximum
В итоге вы получите информацию об общем числе объектов, размер в байтах, наименьшие и наибольшее размерах файлов. В предыдущей команде, применил фильтр. В PowerShell 3.0 то же самое можно сделать проще, однако та команда, которую я использовал, работает как v2.0, так и 3.0. Ее лучше всего запускать локально. Код в примере 1 комбинирует эту команду с нашей техникой WMI, чтобы получить отчет о размере высокоуровневых папок.
Пример 1: Отчет о размерах высокоуровневых сетевых папок
$share=Get-WmiObject -Class Win32_Share -ComputerName
CHI-FP01 -filter "name='Sales'"
$sb={
Param ($path)
dir $path | where {$_.PSIscontainer} |
foreach {
$stats=dir $_.Fullname -recurse -errorAction
"SilentlyContinue" | where {-NOT $_.PSIscontainer} |
Measure-object -Property Length -sum
New-Object -TypeName PSObject -Property @{
Computername=$env:Computername
Path=$_.Name
Fullname=$_.Fullname
SizeKB=[math]::Round(($stats.sum/1KB),2)
NumberFiles=$stats.count
} #property
} #foreach
} #sb
$results=Invoke-Command -ScriptBlock $sb -ComputerName
$share.__SERVER -ArgumentList @($share.path)
-HideComputerName
Вы можете форматировать или обрабатывать $results как вашей душе будет угодно. Нужна удобоваримая таблица? Просто используйте следующую команду:
$results | Format-Table Computername,Fullname,SizeKB,NumberFiles -autosize

Тем самым можно сделать полный отчет по использованию всех папок на файловом сервере не составляет труда. Сэкономьте время, воспользуетесь примером 2.
Пример 2: Отчет об использовании файловых шар
$sb={
#Get the file shares locally.
$shares=Get-WmiObject -Class Win32_Share -filter "type=0"
foreach ($share in $shares) {
#Suppress any access denied error messages.
Write-Host "Measuring $($share.path)" -ForegroundColor Green
$stats=dir $share.path -Recurse -ErrorAction SilentlyContinue |
Where {-Not $_.PSIscontainer} |
Measure-Object -Property Length -Sum
$hash=@{
Computername=$env:Computername
Path=$share.path
Share=$share.Name
SizeKB=[math]::Round(($stats.sum/1KB),2)
Files=$stats.count
}
#Write a custom object to the pipeline for each share.
New-Object -TypeName PSObject -Property $hash
} #foreach $share
}#sb
$results = Invoke-Command -ScriptBlock $sb -ComputerName
CHI-FP01 -HideComputerName
И снова я слегка отформатирую таблицу.
$results | sort SizeKB –Descending | Select Computername,Share,SizeKB,Files | ft -auto

Получаем файлы по владельцу
Двигаемся дальше – найдем владельцев файлов. Если вы используете квоты, отчеты уже наверняка получаете. В противном случае, все, что вам нужно – это извлечь ACL файла, который включает в себя владельца, и агрегировать результаты. Лучше всего добавить владельца файла в качестве кастомного свойства
$data=dir | where {-not $_.PSIsContainer} | select name, @{Name="Owner";Expression={(Get-ACL $_.fullname).Owner}}, length
Мы можем группировать по свойству нового владельца и затем обрабатывать новый объект.
$data | group owner | Select Name,Count,@{Name="Size";Expression={($_.Group | Measure-Object -Property Length -sum).Sum}}
Пара усилий и вы можете применить тот же подход к файловой шаре, как указано в коде примера 3.
Пример 3: Группируем файловые шары по владельцу
$sb={
Param($path)
$data=dir $path |
where {-not $_.PSIsContainer} |
select name, @{Name="Owner";Expression=
{(Get-ACL $_.fullname).Owner}},length
$data | group -property owner |
Select @{Name="Computername";Expression={$env:computername}},
@{Name="Path";Expression={$path}},Name,Count,@{Name=
"Size";Expression={
($_.Group | Measure-Object -Property Length -sum).Sum}}
} #sb
<#
Run the command remotely and suppress the RunspaceID since we
don't really need it.
#>
Invoke-Command -ScriptBlock $sb -ComputerName CHI-FP01
-ArgumentList @("c:\shares\public") -HideComputerName |
Select * -ExcludeProperty RunspaceID
Я также должен указать на то, что могут проблемы: с файлами, имя которых более 260 символов или содержит необычные символы, особенно если вы пытаетесь запустить Get-ACL. В PowerShell 3.0 этот командлет имеет параметр -LiteralPath, что помогает решить вышеуказанные проблемы.
Опять выведем читаемую таблицу.
$data | Sort Size | ft -auto

Получаем файлы по дате создания
Последняя техника создания отчетов, которую я хочу продемонстрировать – это создание отчета с последними созданными файлами. Фактически, мы создаем коллекцию объектов, которую можем использовать несколькими способами. Возможно вы захотите использовать объекты или удалить или переместить файлы, или можете захотите построить отчет, который можно отправить руководству. Всегда создавайте команды PowerShell так, чтобы потом их можно использовать.
Определить возраст файл не так просто. В PowerShell файловый объект (объект типа файл) имеет несколько свойств, которые вы возможно захотите использовать. Например, команда:
get-item c:\work\wishlist.txt | Format-List Name,*time
дает вывод, представленный на скриншоте ниже.

Лично я считаю, что лучше использовать LastWriteTime, который обозначает, когда к файлу в последний раз обращались. Мне встречались ситуации, когда LastAccessTime обновлялся через сторонние программы, например, антивирус, что само по себе уже не означает правды. И LastAccessTime был деактивировал еще со времени Windows Vista, хотя вы можете его включить. Вам также нужно быть осторожным, потому что эти значения могут меняться в зависимости от того, копируете ли вы или перемещаете файлы между дисками (between volumes). Но вы можете решить это сами. Используя этот файл как пример, мы может заставить PowerShell сказать нам, насколько стар файл. См. пример 4.
Пример 4. Определяем возраст файлов
PS C:\work> get-item wishlist.txt | format-list name,
CreationTime,LastWriteTime,
>> @{Name="Age";Expression={(Get-Date)-$_.LastWriteTime}},
>> @{Name="Days";Expression={((Get-Date)
-$_.LastWriteTime).TotalDays}}
>>
Name : wishlist.txt
CreationTime : 11/23/2010 10:31:10 PM
LastWriteTime : 2/15/2011 7:36:34 AM
Age : 511.06:42:17.4251748
Days : 511.279372271039
Свойство Age является объектом TimeSpan, и свойство Days является просто свойством TotalDays этого объекта. Но так как мы можем этом сделать для одного файла, мы можем сделать и для других Давайте взглянем на мою общую папку и найдем все файлы, которые не менялись за последние 400 дней.
dir c:\shares\public -recurse | Select Fullname,CreationTime,LastWriteTime,
@{Name="Age";Expression={(Get-Date)-$_.LastWriteTime}},
@{Name="Days";Expression={[int]((Get-Date) -$_.LastWriteTime).TotalDays}},
@{Name="Owner";Expression={(Get-ACL $_.fullname).Owner}} | Where {$_.Days -ge 400} | Sort Days -Descending
Я пойду дальше и включу еще и владельца файла. На скриншоте ниже показаны результаты от запуска этого код в удаленной сессии на моем файловом сервере.

Я могу сохранить эти результаты в переменную и использовать их в любое время. Так как у меня есть полное имя файла, передать в другую команду, например, Remove-Item, не составит труда.
Одной из моих любимых техник является определение того, сколько файлов было изменено за год.
dir c:\shares\sales -recurse | Select Fullname,LastWriteTime,
@{Name="Age";Expression={(Get-Date)-$_.LastWriteTime}},
@{Name="Year";Expression={$_.LastWriteTime.Year}} | Group-Object Year | Sort Name
Как вы можете видеть на скриншоте, все выглядит причесано. Нужны детали? Можно проанализировать свойство Group, которое представляет собой коллекцию файлов.

Полезно знать, сколько файлов не изменялось за 30, 90 или 180 дней. К сожалению, простого способа использовать Group-Object для этого не существует, поэтому мне необходимо придется «пойти иным путем»; смотрите пример 5.
Пример 5: Определяем период изменения файлов
$path="c:\scripts"
#Get some other properties in case we want to further
#break down each bucket.
$files=dir $path -recurse |
Select Fullname,CreationTime,LastWriteTime,Length,
@{Name="Age";Expression={(Get-Date)-$_.LastWriteTime}},
@{Name="Days";Expression={[int]((Get-Date)
-$_.LastWriteTime).TotalDays}}
$hash=@{
Path=$path
Over= ($files | Where {$_.Days -gt 365} | Measure-Object).Count
'365Days'= ($files | Where {$_.Days -gt 180 -AND
$_.Days -le 365} | Measure-Object).Count
'180Days'= ($files | Where {$_.Days -gt 90 -AND
$_.Days -le 180} | Measure-Object).Count
'90Days'= ($files | Where {$_.Days -gt 30 -AND
$_.Days -le 90} | Measure-Object).Count
'30Days'= ($files | Where {$_.Days -gt 7 -AND
$_.Days -le 30} | Measure-Object).Count
'7Days'= ($files | Where {$_.Days -gt 0 -AND
$_.Days -le 7} | Measure-Object).Count
}
New-Object -TypeName PSObject -Property $hash |
Select Path,Over,365Days,180Days,90Days,30Days,7Days
На рисунке ниже показан результат, когда я запустил этот код для папки с моими скриптами, которая, как я знаю, имеет плотное распределение по возрасту (decent age distribution). Мой код не включает в себя актуальные файлы, но это было бы слишком сложно изменить мой пример.
За основу поста использована первая часть статьи File Server Management with Windows PowerShell.
Бонус:
Кстати, о том, как найти файлы с помощью PowerShell и WMI Джеффри Хикс пишет в своем блоге (часть 1 и 2).
Только зарегистрированные пользователи могут участвовать в опросе. Войдите, пожалуйста.
Во второй части статьи рассматриваются вопросы создания и удаления файловых шар и делегирования прав доступа к ним. Был бы интересен ее перевод?
Проголосовали 146 пользователей. Воздержались 14 пользователей.
- Use the “DIR” command to list files and folders in the current directory, or “DIR /S” to list files and folders recursively, in subdirectories as well.
- To search for specific file types use the asterisk followed by the file extension type, in this syntax: DIR *.jpg
- Use attribute switches to filter the type of files and folders to list.
It can be tricky to keep tabs on all files and folders on a Windows computer, especially if there are too many. There can be many folders and subfolders inside a partition, and many different types of file extensions. It can be difficult to view all the files and folders, or even search for specific ones using File Explorer.
Using the Command Prompt, you can view and list all sorts of files and folders inside a directory, and even its subdirectories using recursive switches. Not only that, but you can also list all items with a specific file type, or exclude them. Moreover, you can also view hidden items as well directly from the Command Prompt.
In this article, we give you a bunch of different examples to list files and folders inside the Command Prompt using the DIR cmdlet.
Command to List Files and Folders in Command Prompt
The DIR command is used to list files and folders inside a directory in Command Prompt. This command can be used with a number of switches and attributes to filter the items to display, their order or displaying, to include and exclude, and so on.
However, the only switches we will be interested in are /a and /s.
Using the DIR command alone will display all the files and folders inside that particular directory. It will not show any hidden items, and it will now show any items inside the subdirectories. However, if you use DIR /a, it will show the hidden items as well.
To perform a recursive search, we must use the /s switch.
The table below summarises the commands to use to list files and folders and these switches:
| Command | Description |
| DIR | Display items inside the current directory |
| DIR /a | Display all items inside the current directory, including hidden ones. |
| DIR /s | List items inside the current directory as well as all subdirectories |
With that known, there is a list of attributes that you can use with the DIR /a cmdlet to filter the type of information you want to list. Here is a list of the attributes you can use with /a.
| Attribute Alphabet | Description | Syntax Example |
| d | Shows directories only | DIR /ad |
| h | Show hidden items only | DIR /ah |
| s | Show system files only | DIR /as |
| l | Show reparse points only | DIR /al |
| r | Show read-only files | DIR /ar |
| a | Show files that can be archived | DIR /aa |
| i | Show files whose content is not indexed | DIR /ai |
| – (hyphen) | Used before an attribute to exclude it from the list | DIR /a-s (hide system files) |
| : (colon) | To combine multiple attributes | DIR /a:h-s (Show hidden items but hide system files) |
Example Commands to List Files and Folders in Command Prompt
Let us now continue to see more extensive examples with images to better understand how you can list files and folders using the DIR cmdlet.
-
To list all files and folders in the current directory:
DIR
List files and folders in the current directory using Command Prompt -
To list all files and folders in the current directory and subdirectories:
DIR /S
List recursive files and folders in Command Prompt -
To list only folders in the current directory:
DIR /AD
List only folders in the current directory in Command Prompt -
To list only folders in the current directory and subdirectories:
DIR /AD /S
List only folders in the current directory and subdirectories in Command Prompt -
To list all files in the current directory and exclude all folders:
DIR /A-D
List all files and exclude folders in the current directory in Command Prompt -
To list all hidden system files in the current directory:
DIR /ASH
List all hidden system files in current directory in Command Prompt -
To list all system files and exclude read-only files in the current directory and subdirectories:
DIR /A:S-A /S
List all system files and exclude read-only files in the current directory and subdirectories using Command Prompt -
To list all specific file type files in the current directory and subdirectories:
Note: You can change the file type extension to list the files you are looking for.
DIR *.txt
List all files with a specific file type using Command Prompt -
To list multiple file types in the current directory and subdirectories:
DIR *.txt *.doc *.docx /S
List multiple file types in the current directory and subdirectories from Command Prompt


There can be many different examples and syntaxes to list files and folders inside the Command Prompt. However, we hope that the examples above are sufficient so that you can combine and modify them as per your requirements.
Closing Words
The Windows command line offers much more control over the fetched data than its GUI. Using the Command Prompt, you can list different files and folders inside the current directory as well as its subdirectories. You can also filter out the type of files and folders to include, or exclude from the list.