
Как посмотреть список открытых портов в Windows
Статья обновлена: 10 сентября 2021
ID: 101
Чтобы посмотреть список открытых портов:
- Откройте командную строку. Инструкция в статье.
- Выполните команду:
netstat -a
- Нажмите Enter на клавиатуре.

Вы получите список открытых портов в Windows.
Спасибо за ваш отзыв, вы помогаете нам становиться лучше!
Спасибо за ваш отзыв, вы помогаете нам становиться лучше!
Use Netstat to See Listening Ports and PID in Windows
In the world of networking and computing, the importance of monitoring active connections and listening ports cannot be overstated. Whether you are managing a server, ensuring the security of a local machine, or troubleshooting network issues, identifying which applications are using network resources is crucial. A powerful tool included with Windows is Netstat, a command-line utility that provides a plethora of information about network connections, including listening ports and Process IDs (PIDs). This article delves into the functionality and practical usage of Netstat in a Windows environment, enabling users to proficiently command and understand their network interfaces.
Understanding Netstat
Netstat, standing for «Network Statistics,» is a command-line tool that provides information about network connections, routing tables, interface statistics, masquerade connections, and multicast memberships. It is compatible with various operating systems, including Windows, Linux, and macOS. However, this article specifically focuses on its implementation and usage within Windows operating systems, analyzing its ability to unveil listening ports associated with various processes.
Why Use Netstat?
-
Network Troubleshooting: Netstat assists in diagnosing connectivity issues by displaying established connections and listening ports.
-
Security Monitoring: Identifying unexpected listening ports can indicate a malware infection or unauthorized access.
-
System Resource Management: By providing a clear picture of network activity, Netstat enables better resource allocation.
-
Performance Analysis: Understanding which applications are utilizing network resources can help optimize system performance.
Accessing the Command Prompt
Before utilizing Netstat, it is essential to understand how to access the Command Prompt in Windows:
-
Using the Search Bar:
- Click on the Windows Start button.
- Type «cmd» or «Command Prompt» into the search bar.
- Right-click on Command Prompt and select «Run as administrator» for elevated privileges.
-
Using Run Dialog:
- Press
Windows Key + Rto open the Run dialog. - Type «cmd» and press Enter.
- Press
-
Using Windows Terminal:
- If available, open the Windows Terminal from the Start menu.
With the Command Prompt open, you are now prepared to use the Netstat command to inspect network connections.
Basic Syntax of Netstat
Netstat commands can be quite extensive, but its syntax is fairly straightforward. The basic command structure is as follows:
netstat [options]Common Options for Netstat
While there are many options available, the following are particularly useful for monitoring listening ports and their associated PIDs:
-
-a: Displays all connections and listening ports.
-
-n: Shows numerical addresses instead of resolving hostnames and port numbers.
-
-o: Displays the owning process ID associated with each connection.
-
-p [protocol]: Shows connections for the specified protocol (TCP or UDP).
-
-s: Displays statistics by protocol.
Examples of Netstat Usage
-
Display All Connections:
To view all active connections along with the listening ports and PIDs, input the following command:
netstat -anoThis command combines the
-a,-n, and-ooptions. The output will provide the local address, foreign address, state of the connection, and the owning process ID.
Sample Output Analysis
When executing the above command, you may encounter an output looking similar to the following:
Proto  Local Address          Foreign Address        State           PID
TCP    0.0.0.0:80            0.0.0.0:0              LISTENING       1234
TCP    192.168.1.10:52345    93.184.216.34:80       ESTABLISHED     5678
UDP    0.0.0.0:53            *:*                    LISTENING       910
Column Breakdown:
- Proto: Indicates whether the connection is using TCP or UDP.
- Local Address: Shows the IP address and port number of the local machine.
- Foreign Address: Displays the IP address and port number with which your machine is connected.
- State: Reflects the status of the connection (e.g., LISTENING, ESTABLISHED).
- PID: The Process ID, crucial for identifying which application is using the connection.
Identifying Processes Using PIDs
Once you have gathered a list of PIDs via Netstat, the next step is to determine which application corresponds to each PID. This can be accomplished using the Task Manager or the Command Prompt.
Using Task Manager
- Right-click on the taskbar and select Task Manager.
- Switch to the Details tab.
- Look for the PID column. If it’s not visible, right-click on the column headers, select Select Columns, and add the PID column.
- Match the PIDs displayed from the Netstat output with the list in the Task Manager.
Using Command Prompt
Alternatively, you can find the corresponding application via the following command:
tasklist | findstr [PID]Replace [PID] with the desired process ID you want to check.
This command will reveal the name of the process associated with the specified PID, further enhancing your understanding of your system’s network activity.
Filtering Connections by Protocol
To drill down into specific protocols, you can modify your Netstat command.
- Monitoring only TCP:
If you want to see only TCP connections, use:
netstat -ano -p TCP- Monitoring only UDP:
For a snapshot of UDP connections, use:
netstat -ano -p UDPBy filtering for TCP or UDP connections, you can focus on the area most relevant to your investigation.
Advanced Netstat Options
Beyond basic usage, Netstat offers more advanced options that can provide a deeper look into network activity:
Monitoring by State
You can also monitor connections by their current state. For instance, if you are interested specifically in listening ports, you could script a command to filter the output. Unfortunately, Netstat itself doesn’t provide direct filtering functionality, but combining it with other command-line utilities, like findstr, can help:
netstat -ano | findstr LISTENINGStatistics for Protocols
To gain insight into the traffic statistics of your system, you can employ the -s switch, which summarizes packets sent and received for each protocol:
netstat -sThis will yield detailed information about errors, discarded packets, and other critical data for both TCP and UDP protocols.
Use Cases for Netstat
Understanding the various use cases for Netstat can help in recognizing its full potential. Here are specific scenarios where Netstat proves valuable:
1. Checking for Unauthorized Access:
As an administrator, regularly running Netstat can help you catch unauthorized connections that may indicate a breach. By observing unusual listening ports or foreign addresses, you can act swiftly to secure your system.
2. Firewall Configuration:
When configuring Windows Firewall or any third-party firewall solution, Netstat assists in identifying necessary allowances and rules by reviewing which applications require network access.
3. Application and Service Monitoring:
For developers and IT support teams, identifying which applications are consuming unexpected network resources can lead to optimizations or troubleshooting connections that frequently drop.
4. Developing Security Protocols:
Security professionals can leverage Netstat logs to develop comprehensive security protocols. By analyzing connections over time, they can identify trends, outliers, and potential threats.
Troubleshooting Common Issues
Despite its robust functionality, users might encounter some common issues when using Netstat. Here are a few troubleshooting tips:
Unable to Run Netstat
Ensure that you are using the Command Prompt with administrative privileges. Running the command without these privileges may limit the information you can access.
No Output or Unfamiliar States
If running netstat yields no output, or you see unfamiliar connection states, it’s prudent to ensure your network is properly configured and that services that should be running are indeed active.
Spotlight on Performance
Remember that Netstat reflects real-time connections. If network activity fluctuates greatly, consider running Netstat multiple times to observe trends or abnormalities.
Limitations and Alternatives
While Netstat is a powerful tool, it does have limitations:
-
Complexity: The sheer amount of data can overwhelm new users. Relying solely on text-based output may not be practical in all scenarios.
-
Real-Time Monitoring: It is not inherently a real-time monitoring tool. For continuous observation, consider using third-party network monitoring applications like Wireshark or Microsoft Message Analyzer.
-
Limited Visual Representations: Advanced GUI-based tools provide better visualization and easier navigation, which can greatly enhance understanding for individuals unfamiliar with command-line interfaces.
Conclusion
The Netstat command is an invaluable tool for anyone looking to manage network connections on Windows systems. Understanding how to effectively use it to display listening ports and PIDs can empower users to troubleshoot issues, enhance security, and optimize performance.
By maintaining an ongoing awareness of listening ports and their associated processes, users can actively monitor their networks, detect unauthorized access, and administer necessary changes. Remember to regularly employ and combine Netstat with other tools and techniques for a comprehensive network management strategy. As networking continues to evolve, empowering oneself with tools like Netstat ensures that both personal and professional network environments are well-managed and secure.
Ultimately, mastering Netstat contributes significantly to the broader realm of network maintenance and security, positioning individuals and organizations to proactively tackle just about any network-related challenge that may arise in today’s interconnected landscape.
При запуске новых сервисов в Windows, вы можете обнаружить что нужный порт уже занят (слушается) другой программой (процессом). Разберемся, как определить какая программ прослушивает определенный TCP или UDP порт в Windows.
Например, вы не можете запустить сайт IIS на стандартном 80 порту в Windows, т.к. этот порт сейчас занят (при запуске нескольких сайтов в IIS вы можете запускать их на одном или на разных портах). Как найти службу или процесс, который занял этот порт и завершить его?
Чтобы вывести полный список TCP и UDP портов, которые прослушиваются вашим компьютером, выполните команду:
netstat -aon| find "LIST"
Или вы можете сразу указать искомый номер порта:
netstat -aon | findstr ":80" | findstr "LISTENING"
Используемые параметры команды netstat:
- a – показывать сетевые подключения и открытые порты
- o – выводить идентфикатор професса (PID) для каждого подключения
- n – показывать адреса и номера портов в числовом форматер
По выводу данной команды вы можете определить, что 80 порт TCP прослушивается (статус
LISTENING
) процессом с PID 16124.
Вы можете определить исполняемый exe файл процесса с этим PID с помощью Task Manager или с помощью команды:
tasklist /FI "PID eq 16124"
Можно заменить все указанные выше команды одной:
for /f "tokens=5" %a in ('netstat -aon ^| findstr :80') do tasklist /FI "PID eq %a"
С помощью однострочной PowerShell команды можно сразу получить имя процесса, который прослушивает:
- TCP порт:
Get-Process -Id (Get-NetTCPConnection -LocalPort 80).OwningProcess - UDP порт:
Get-Process -Id (Get-NetUDPEndpoint -LocalPort 53).OwningProcess

Можно сразу завершить этот процесс, отправив результаты через pipe в командлет Stop-Process:
Get-Process -Id (Get-NetTCPConnection -LocalPort 80).OwningProcess| Stop-Process
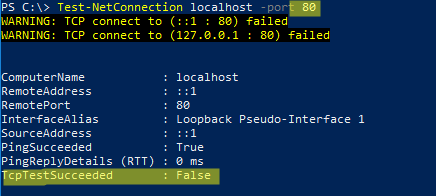
Проверьте, что порт 80 теперь свободен:
Test-NetConnection localhost -port 80
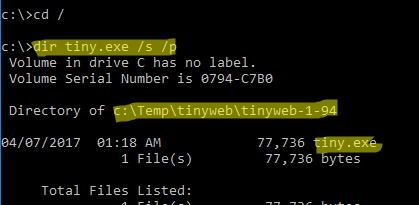
Чтобы быстрой найти путь к исполняемому файлу процесса в Windows, используйте команды:
cd /
dir tiny.exe /s /p
Или можно для поиска файла использовать встроенную команду where :
where /R C:\ tiny
В нашем случае мы нашли, что исполняемый файл
tiny.exe
(легкий HTTP сервер), который слушает 80 порт, находится в каталоге c:\Temp\tinyweb\tinyweb-1-94
Checking open TCP/IP ports on your Windows computer is crucial for managing network security and ensuring smooth connectivity. Certain apps and processes in Windows may face issues due to closed or misconfigured ports, often caused by firewalls or private IP addresses. This guide will walk you through step-by-step methods to check whether a TCP port is open or closed using built-in tools and third-party utilities.
Why You Should Check TCP/IP Ports?
Here are some common scenarios where checking ports is necessary:
- Troubleshooting connectivity issues for applications or services.
- Configuring firewalls to ensure necessary connections are allowed.
- Detecting suspicious activity that might indicate a security breach.
Methods to Check Open TCP/IP Ports
There are several ways to check open TCP/IP ports in Windows. Here are a few options:
Method 1. Using Telnet Client
Step 1: Check whether the telnet client feature is ON or not. In order to check, open the Turn Windows feature on or off settings from the search bar. OR press the ‘window’ key and type ‘windows’ features. Then press on “Turn Windows features on or off”.
-660.png)
A new prompt will be opened. Search for “Telnet Client” and check the box in front of ‘telnet Client’.

Step 2: Open the command prompt. Press the ‘windows’ key and type ‘cmd’. Press “Command Prompt”.
-660.png)
Step 3: On the command prompt, type the command “telnet + IP address or hostname + port number” and check the status of the provided TCP port.
-660.png)
Step 4: If only the blinking cursor is visible, then the port is open.
-660.png)
Step 5: If you get the message “connection failed” then the port is closed.
-660.png)
Method 2: Using built-in netstat command-line utility:
Step 1: Open the command prompt.
Step 2: Run the following command:
netstat -an

Method 3. Using TcpView
Another option is to use the TcpView utility from Microsoft’s Sysinternals suite of tools. This utility provides a more user-friendly interface for viewing active TCP/IP connections, along with additional information such as the process ID and process name for each connection. Steps to be followed:
Step 1: Download the TcpView utility from the Microsoft Sysinternals website. You can find the download link on the TcpView page of the Sysinternals website.
-660.png)
Step 2: Extract the downloaded file and run the TcpView.exe file to launch the TcpView utility. This will open the TcpView window, which shows a list of all active TCP/IP connections on your machine.

Step 3: Open the tcpview.exe (application).
By default, TcpView will display the following columns in the list of connections:
Protocol: Shows the protocol being used for the connection (TCP or UDP)
Local Address: Shows the local address and port being used for the connection
Remote Address: Shows the remote address and port being connected to
State: Shows the current state of the connection (e.g. Established, Listen, etc.)
You can use the “Local Address” and “Remote Address” columns to see which ports are being used by which applications. For example, if you see a connection with a local address of “127.0.0.1:80”, this means that the local application is using port 80 for outgoing connections.
Method 4. Using Windows PowerShell
You can also use Windows PowerShell to check open TCP/IP ports. To do this, use the Get-NetTCPConnection cmdlet, which allows you to view a list of active TCP/IP connections and the local and remote addresses and ports being used. For example, you can run the following command to view a list of all active TCP/IP connections:
Get-NetTCPConnection |
Select-Object LocalAddress,
LocalPort, RemoteAddress, RemotePort

Method 5. Using Nmap
To install Nmap in the Windows command line, follow these steps:
Step 1: Download the latest version of Nmap from the Nmap website. You can find the download link on the Nmap download page:
https://nmap.org/download.html
Step 2: Extract the downloaded file to a location on your computer. This will create a new folder containing the Nmap files.
Step 3: Open a command prompt and navigate to the directory where you extracted the Nmap files. For example, if you extracted the files to the C:\nmap directory, you would run the following command:
cd C:\nmap
Step 4: Once you are in the Nmap directory, you can install Nmap by running the nmap.exe file. To do this, run the following command:
nmap.exe -V
This will display the version number of Nmap, indicating that it has been installed successfully.
Step 5: To use nmap to scan for open TCP/IP ports, run the “nmap -sT” command, followed by the IP address or hostname of the machine you want to scan.
nmap -sT localhost

This will scan the specified host or IP address and display the results. You can also use the -h option to view a list of available options and arguments for the nmap command. Overall, installing Nmap in the Windows command line is a straightforward process. You can download the latest version of Nmap from the Nmap website, extract the files, and then run the nmap.exe file to install it. Once it is installed, you can use the nmap command to scan hosts and IP addresses and view the results.
Common Issues That Close Ports
- Applications not functioning as expected.
- Misconfigured firewall rules blocking connections.
- IP addresses improperly set as private.
Troubleshooting Common Issues
Here are some common issues that may occur during opening TCP/IP Ports in Windows:
- Telnet Not Listed in Features: Ensure your system version supports Telnet or enable it via PowerShell.
- Firewall Blocking Ports: Temporarily disable the firewall to test port connectivity.
- Command Not Recognized: Verify tool installation and environment variables.
Conclusion
Checking open TCP/IP ports on your Windows computer is an important step for maintaining your system’s security and efficiency. By regularly monitoring these ports, you can identify any unwanted or suspicious connections that might put your computer at risk. Windows provides several simple tools, like Command Prompt and PowerShell, which make it easy to see which ports are open and what applications are using them. Taking the time to check your open ports helps ensure that your computer runs smoothly and stays protected from potential threats. Staying proactive about monitoring your network connections is a key part of keeping your digital environment safe and reliable.
Содержание статьи:
- Типовые задачи и их решение
- Вариант 1: смотрим список прослушиваемых портов + приложение (общий случай)
- Вариант 2: а если наоборот — по названию приложения узнать порт
- Вариант 3: исп-ем спец. приложения (более информативнее и быстрее)
- Вопросы и ответы: 0
Доброго времени!
При запуске некоторого ПО/сервисов можно столкнуться с тем, что определенный порт в системе уже занят… какой-нибудь другой программой (скажем, настраиваете вы апач — и возникает конфликт порта 80. Например, на нем может «висеть/слушать» Skype…). Незадача…?
Собственно, в заметке приведу неск. способов, как можно относительно быстро узнать «кем» и «чем» заняты определенные порты — а это позволит быстро изменить их настройки и разрешить вопрос! (разумеется, приводить советы посмотреть описание установленного софта, в котором разработчики указывают порты — я не буду: ибо это долго, и не всегда продуктивно… 🙂).
*
Примечание:
- заметка носит информативный характер, и не явл. инструкцией в последней инстанции. Дело в том, что нередко встречаются не офиц. резервируемые порты… и, разумеется, точности здесь никакой быть не может;
- если у вас не получается подключиться к сетевым играм, есть проблемы с раздачей/загрузкой торрентов и пр. — ознакомьтесь с заметкой про проброс портов на роутере (это немного не по теме, но когда речь заходит об этом — очень часто приходится ссылаться на сию заметку).
*
Типовые задачи и их решение
Вариант 1: смотрим список прослушиваемых портов + приложение (общий случай)
По умолчанию в Windows есть консольная утилита netstat. Она позволяет посмотреть активные соединения протокола TCP/IP (в т.ч. там есть и порты).
*
Чтобы вывести полный список портов (TCP, UDP) нужно:
1) Запустить 📌командную строку от имени администратора.
2) Ввести команду Netstat –ao и нажать Enter.
(можно ее слегка изменить и использовать такую: netstat -aon| find «LISTENING»)
Примечание:
- «-a» – см. все соединения и порты.
- «-o» – см. числовые идентификаторы процесса, отвечающего за конкретное соединение (Process ID, сокращенно: PID).
- «-n» – см. номера портов в числовом формате»;
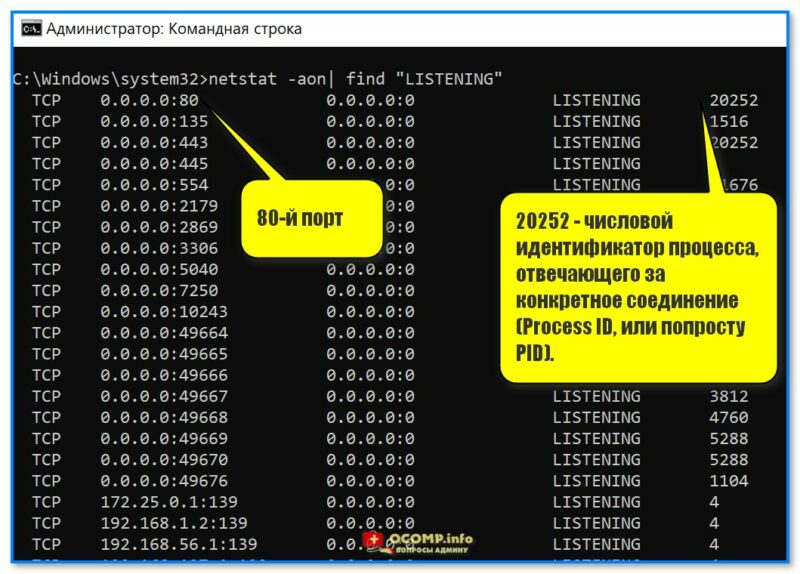
Где тут порт и идентификатор, см. скрин, я выделил // пример работы с командной строкой, команда netstat
📌 Для справки!
В списке, который предоставит нам команда Netstat, есть строки с аббревиатурами: «ESTABLISHED» и «LISTENING». В чем разница:
- «ESTABLISHED» — означает, что в данный момент установлено соединение;
- «LISTENING» — означает, что сокет ожидает соединения (в режиме прослушивания).
Причем, и тот и другой порты открыты, но один ожидает соединения, а другой уже установил соединение!
Например, протокол HTTP (это порт 80-й) находится в режиме прослушивания («LISTENING») до тех пор, пока кто-нибудь не зайдет на сервер. В тот момент, когда кто-нибудь будет загружать страницу — режим поменяется на «ESTABLISHED».
3) Например, понадобилось нам узнать какой процесс занял порт с идентификатором (PID) «5288» — вводим в командной строке tasklist | find «5288» и нажимаем Enter;
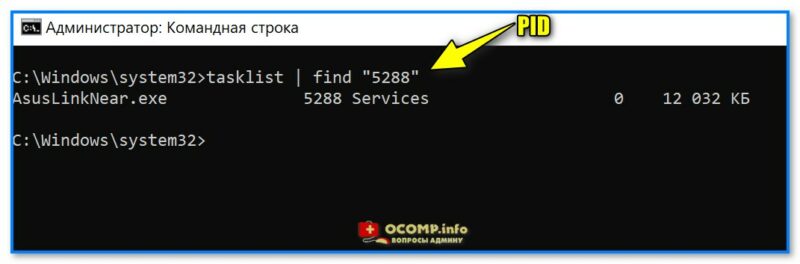
Вводим PID и смотрим название процесса
4) Почти сразу же узнаем, что это фирменная утилита от производителя ноутбука ASUS (шла вместе с операционной системой Windows // инсталлируется автоматически при установке драйверов).

Asus
5) Кстати, если вам неудобно пользоваться командной строкой — то узнать название процесса и его расположение по PID можно в 📌диспетчере задач (Ctrl+Alt+Del): достаточно перейти во вкладку «Подробности».👇
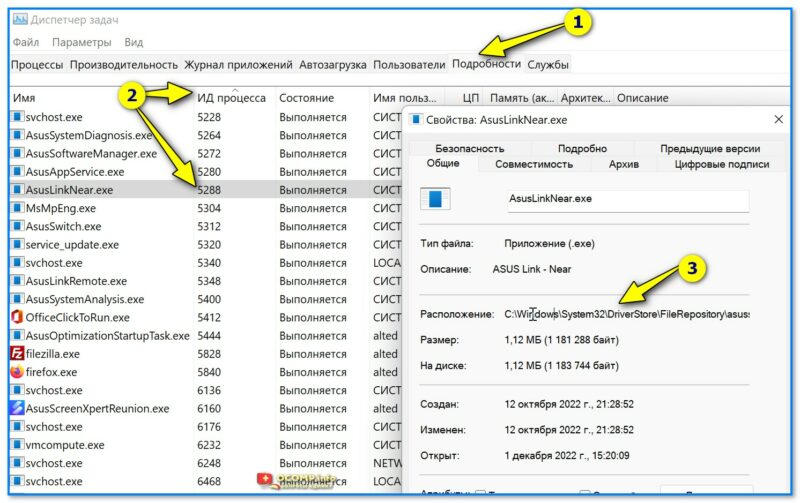
Диспетчер задач — подробности — сортировка по ИД процессу
*
Вариант 2: а если наоборот — по названию приложения узнать порт
Относительно просто!
Находим нужный процесс в 📌диспетчере задач (вкладка «Подробности» для Windows 11). Узнаем его ИД (в моем случае 6216, взял для примера uTorrent).
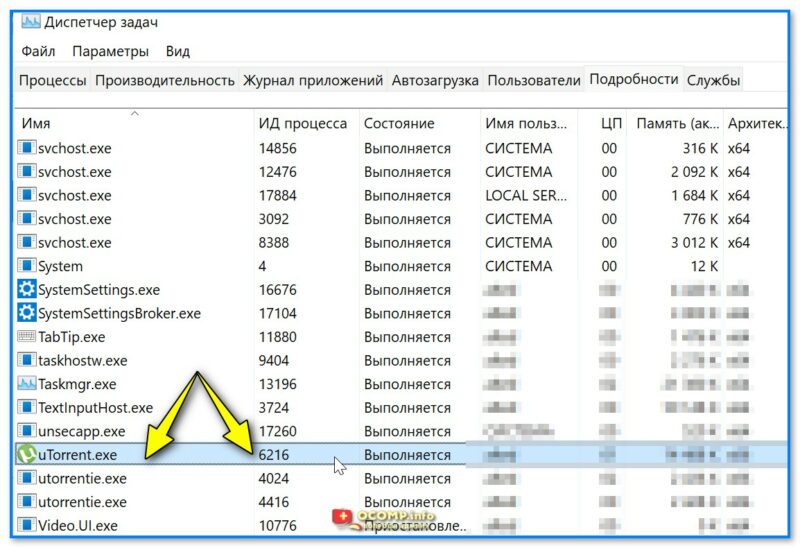
uTorrent — ИД 6216
Далее в комодной строке набираем следующее:
netstat -aon| find «6216»
где вместо «6216» нужно указать свой ИД.

19411 порт, используемый uTorrent
В результате определяем, что uTorrent слушает порт 19411…
Кстати, в настройках uTorrent (если запустить саму программу) — можно тоже узнать и изменить этот порт на какой-нибудь другой.
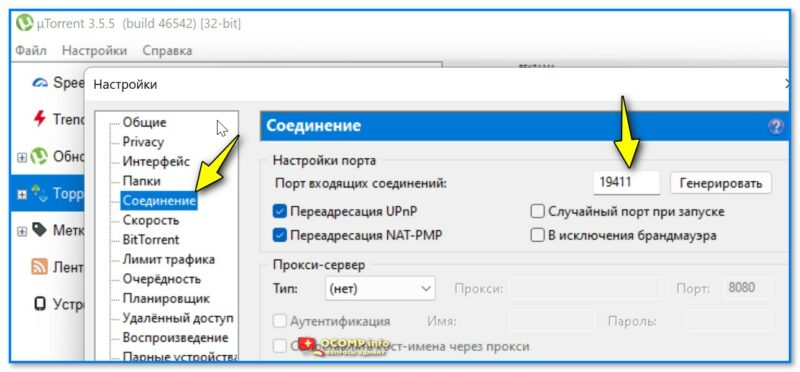
Настройки uTorrent — выбор порта
*
Вариант 3: исп-ем спец. приложения (более информативнее и быстрее)
📌 TCPView
Ссылка на сайт Microsoft: https://learn.microsoft.com/ru-ru/sysinternals/downloads/tcpview
TCPView — небольшая спец. утилита (не требующая установки), позволяющая очень быстро узнать список всех сетевых соединений, с информацией о портах, IP-адресах и пр.
Причем, список можно отсортировать по нужному вам столбцу + отфильтровать по какой-нибудь аббревиатуре. В общем, вещи удобная! См. скрин ниже. 👇
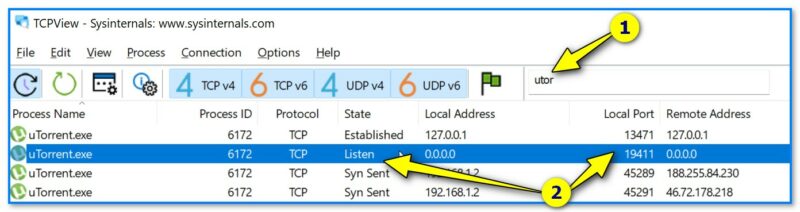
TCPView — список приложений, смотрим все необходимые свойства
📌 CurrPorts
Ссылка на офиц. сайт: https://www.nirsoft.net/utils/cports.html#DownloadLinks
CurrPorts — еще одна сетевая утилита для просмотра сетевых подкл. В установке программа не нуждается, по информативности не уступает первой. Кстати, у утилиты есть рус. перевод (но скачать его нужно отдельно, есть на офиц. сайте).
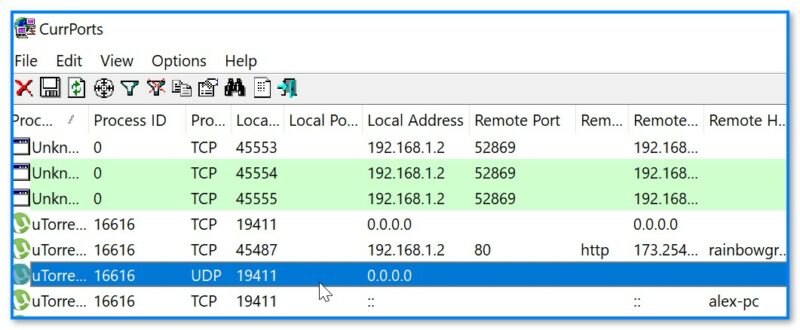
CurrPorts — пример использования
*
Дополнения по теме — приветствуются!
Успехов!
👋