Программистам часто приходится работать в консоли — например, чтобы запустить тестирование проекта, закоммитить новый код на Github или отредактировать документ в vim. Всё это происходит так часто, что все основные действия с файлами становится быстрее и привычнее выполнять в консоли. Рассказываем и показываем основные команды, которые помогут ускорить работу в терминале под OS Windows.
Для начала нужно установить терминал или запустить командную строку, встроенную в Windows — для этого нажмите Win+R и введите cmd. Терминал часто встречается и прямо в редакторах кода, например, в Visual Studio Code.
Чтобы ввести команду в консоль, нужно напечатать её и нажать клавишу Enter.
Содержимое текущей папки — dir
Выводит список файлов и папок в текущей папке.
C:\content-server>dir
 Том в устройстве C имеет метку SYSTEM
 Серийный номер тома: 2C89-ED9D

 Содержимое папки C:\content-server

06.10.2020  00:41    <DIR>          .
06.10.2020  00:37    <DIR>          .circleci
16.07.2020  16:04               268 .editorconfig
16.07.2020  16:04                10 .eslintignore
16.07.2020  16:04               482 .eslintrc
06.10.2020  00:37    <DIR>          .github
16.07.2020  16:04                77 .gitignore
06.10.2020  00:41    <DIR>          assets
06.10.2020  00:41    <DIR>          gulp
16.07.2020  16:10               379 gulpfile.js
16.07.2020  16:10           296 320 package-lock.json
16.07.2020  16:10               751 package.json
16.07.2020  16:04               509 README.md
Открыть файл
Чтобы открыть файл в текущей папке, введите его полное имя с расширением. Например, blog.txt или setup.exe.
Перейти в другую папку — cd
Команда cd без аргументов выводит название текущей папки.
Перейти в папку внутри текущего каталога:
C:\content-server>cd assets
C:\content-server\assets>
Перейти на одну папку вверх:
C:\content-server\assets>cd ..
C:\content-server>
Перейти в папку на другом диске:
c:\content-server>cd /d d:/
d:\>
Чтобы просто изменить диск, введите c: или d:.
Создать папку — mkdir или md
Создаём пустую папку code внутри папки html:
d:\html>mkdir coded:\html>dir

 Содержимое папки d:\html

03.11.2020  19:23    <DIR>           .
03.11.2020  19:23    <DIR>           ..
03.11.2020  19:25    <DIR>           code
               0 файлов              0 байт
               3 папок  253 389 438 976 байт свободно
Создаём несколько пустых вложенных папок — для этого записываем их через косую черту:
d:\html>mkdir css\js
d:\html>dir
 Том в устройстве D имеет метку DATA
 Серийный номер тома: 0000-0000

 Содержимое папки d:\html

03.11.2020  19:23    <DIR>           .
03.11.2020  19:23    <DIR>           ..
03.11.2020  19:25    <DIR>           code
03.11.2020  19:29    <DIR>           css
Создаётся папка css, внутри которой находится папка js. Чтобы проверить это, используем команду tree. Она показывает дерево папок.
Удалить папку — rmdir или rd
Чтобы удалить конкретную папку в текущей, введите команду rmdir:
d:\html\css>rmdir js
При этом удалить можно только пустую папку. Если попытаться удалить папку, в которой что-то есть, увидим ошибку:
d:\html\css>d:\html>rmdir css
Папка не пуста.
Чтобы удалить дерево папок, используйте ключ /s. Тогда командная строка запросит подтверждение перед тем, как удалить всё.
d:\html>rmdir css /s
css, вы уверены [Y(да)/N(нет)]? y
Показать дерево папок — tree
В любом момент мы можем увидеть структуру папок. Для этого используется команда tree.
d:\html>tree
Структура папок тома DATA
Серийный номер тома: 0000-0000
D:.
├───code
└───css
    └───js
Если вы хотите посмотреть содержимое всего диска, введите tree в корне нужного диска. Получится красивая анимация, а если файлов много, то ещё и немного медитативная.
Удаление файла — del или erase
Команда для удаления одного или нескольких файлов.
d:\html>del blog.txt
Переименование файла — ren или rename
Последовательно вводим ren, старое и новое имя файла.
d:\html>dir
 Содержимое папки d:\html

03.11.2020  19:23    <DIR>            .
03.11.2020  19:23    <DIR>            ..
03.11.2020  19:59                 0 blag.txt

d:\html>ren blag.txt blog.txt

d:\html>dir
 Содержимое папки d:\html

03.11.2020  19:23    <DIR>            .
03.11.2020  19:23    <DIR>            ..
03.11.2020  19:59                 0 blog.txt
Команды одной строкой
Очистить консоль — cls.
Информация о системе — systeminfo.
d:\html>systeminfo

Имя узла:                         DESKTOP-6MHURG5
Название ОС:                      Майкрософт Windows 10 Pro
Версия ОС:                        10.0.20246 Н/Д построение 20246
Изготовитель ОС:                  Microsoft Corporation
Параметры ОС:                     Изолированная рабочая станция
Сборка ОС:                        Multiprocessor Free
Информация о сетевых настройках — ipconfig.
d:\html>ipconfig
Настройка протокола IP для Windows
Адаптер Ethernet Ethernet 2:

   Состояние среды. . . . . . . . : Среда передачи недоступна.
   DNS-суффикс подключения . . . . . :
Список запущенных процессов — tasklist.
c:\>tasklist

Имя образа                     PID Имя сессии          № сеанса       Память
========================= ======== ================ =========== ============
System Idle Process              0 Services                   0         8 КБ
System                           4 Services                   0     2 688 КБ
Secure System                   72 Services                   0    23 332 КБ
…
Справка по командам — help
Команда help без аргументов выводит список всех возможных команд. help вместе с именем команды выведет справку по этой команде.
d:\html>help tree
Графическое представление структуры папок или пути.

TREE [диск:][путь] [/F] [/A]

   /F   Вывод имён файлов в каждой папке.
   /A   Использовать символы ASCII вместо символов национальных алфавитов.
В этой статье приведены не все команды и не все их возможности, но вы всегда можете воспользоваться командой help и узнать о том, что ещё может командная строка.
👉🏻 Больше статей о фронтенде и работе в айти в телеграм-канале.
Подписаться
Материалы по теме
- 10 горячих клавиш VS Code, которые ускорят вашу работу
- Полезные команды для работы с Git
- Полезные команды для работы с Node. js
«Доктайп» — журнал о фронтенде. Читайте, слушайте и учитесь с нами.
ТелеграмПодкастБесплатные учебники
- Use the “DIR” command to list files and folders in the current directory, or “DIR /S” to list files and folders recursively, in subdirectories as well.
- To search for specific file types use the asterisk followed by the file extension type, in this syntax: DIR *.jpg
- Use attribute switches to filter the type of files and folders to list.
It can be tricky to keep tabs on all files and folders on a Windows computer, especially if there are too many. There can be many folders and subfolders inside a partition, and many different types of file extensions. It can be difficult to view all the files and folders, or even search for specific ones using File Explorer.
Using the Command Prompt, you can view and list all sorts of files and folders inside a directory, and even its subdirectories using recursive switches. Not only that, but you can also list all items with a specific file type, or exclude them. Moreover, you can also view hidden items as well directly from the Command Prompt.
In this article, we give you a bunch of different examples to list files and folders inside the Command Prompt using the DIR cmdlet.
Command to List Files and Folders in Command Prompt
The DIR command is used to list files and folders inside a directory in Command Prompt. This command can be used with a number of switches and attributes to filter the items to display, their order or displaying, to include and exclude, and so on.
However, the only switches we will be interested in are /a and /s.
Using the DIR command alone will display all the files and folders inside that particular directory. It will not show any hidden items, and it will now show any items inside the subdirectories. However, if you use DIR /a, it will show the hidden items as well.
To perform a recursive search, we must use the /s switch.
The table below summarises the commands to use to list files and folders and these switches:
| Command | Description |
| DIR | Display items inside the current directory |
| DIR /a | Display all items inside the current directory, including hidden ones. |
| DIR /s | List items inside the current directory as well as all subdirectories |
With that known, there is a list of attributes that you can use with the DIR /a cmdlet to filter the type of information you want to list. Here is a list of the attributes you can use with /a.
| Attribute Alphabet | Description | Syntax Example |
| d | Shows directories only | DIR /ad |
| h | Show hidden items only | DIR /ah |
| s | Show system files only | DIR /as |
| l | Show reparse points only | DIR /al |
| r | Show read-only files | DIR /ar |
| a | Show files that can be archived | DIR /aa |
| i | Show files whose content is not indexed | DIR /ai |
| – (hyphen) | Used before an attribute to exclude it from the list | DIR /a-s (hide system files) |
| : (colon) | To combine multiple attributes | DIR /a:h-s (Show hidden items but hide system files) |
Example Commands to List Files and Folders in Command Prompt
Let us now continue to see more extensive examples with images to better understand how you can list files and folders using the DIR cmdlet.
-
To list all files and folders in the current directory:
DIRList files and folders in the current directory using Command Prompt -
To list all files and folders in the current directory and subdirectories:
DIR /SList recursive files and folders in Command Prompt -
To list only folders in the current directory:
DIR /ADList only folders in the current directory in Command Prompt -
To list only folders in the current directory and subdirectories:
DIR /AD /SList only folders in the current directory and subdirectories in Command Prompt -
To list all files in the current directory and exclude all folders:
DIR /A-DList all files and exclude folders in the current directory in Command Prompt -
To list all hidden system files in the current directory:
DIR /ASHList all hidden system files in current directory in Command Prompt -
To list all system files and exclude read-only files in the current directory and subdirectories:
DIR /A:S-A /SList all system files and exclude read-only files in the current directory and subdirectories using Command Prompt -
To list all specific file type files in the current directory and subdirectories:
Note: You can change the file type extension to list the files you are looking for.
DIR *.txtList all files with a specific file type using Command Prompt -
To list multiple file types in the current directory and subdirectories:
DIR *.txt *.doc *.docx /SList multiple file types in the current directory and subdirectories from Command Prompt
There can be many different examples and syntaxes to list files and folders inside the Command Prompt. However, we hope that the examples above are sufficient so that you can combine and modify them as per your requirements.
Closing Words
The Windows command line offers much more control over the fetched data than its GUI. Using the Command Prompt, you can list different files and folders inside the current directory as well as its subdirectories. You can also filter out the type of files and folders to include, or exclude from the list.
The dir command is one of the most useful commands while navigating the command line, and is present in its different forms in several operating systems. In this article, we will look at the Dir command and learn several use cases for it.
What is the dir Command
dir command in Windows OS is a built-in function that allows the user to do the following task:
- View the contents of any directory
- Check file attributes (both hidden and read-only)
- Filter search results based on date or file type.
Basic Syntax
The general syntax of the dir command is:
dir [path] [options]
- Path: specifies the location
- Options: modifies to filter the output
1. List Files & Directories
This command is used to list all files and directories in the current one:
help dir
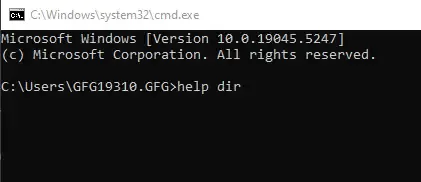
help dir command
Output :
Displays a list of files and subdirectories in a directory.

DIR [drive:][path][filename] [/A[[:]attributes]] [/B] [/C] [/D] [/L] [/N]
 [/O[[:]sortorder]] [/P] [/Q] [/R] [/S] [/T[[:]timefield]] [/W] [/X] [/4]

 [drive:][path][filename]
             Specifies drive, directory, and/or files to list.

 /A          Displays files with specified attributes.
 attributes   D  Directories                R  Read-only files
              H  Hidden files               A  Files ready for archiving
              S  System files               I  Not content indexed files
              L  Reparse Points             O  Offline files
              -  Prefix meaning not
 /B          Uses bare format (no heading information or summary).
 /C          Display the thousand separator in file sizes.  This is the
 .
 .
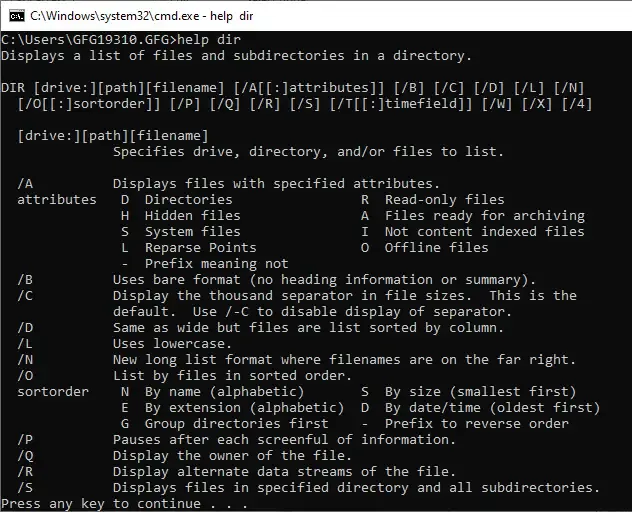
output
Usage explanation:
The command is mainly used for displaying the list of files and subdirectories in a directory. This could be done by executing the Dir command without any arguments.
Dir
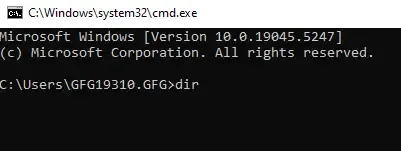
dir
Which would produce an output similar to this.
Output
Directory of C:\Users

09/26/2020  11:34 AM    <DIR>          .
09/26/2020  11:34 AM    <DIR>          ..
09/02/2020  07:07 PM             1, 000 applese
09/24/2020  08:59 PM    <DIR>          Public
10/20/2020  06:39 PM    <DIR>          Soap
              1 File(s)          1, 000 bytes
              4 Dir(s)  13, 879, 459, 840 bytes free
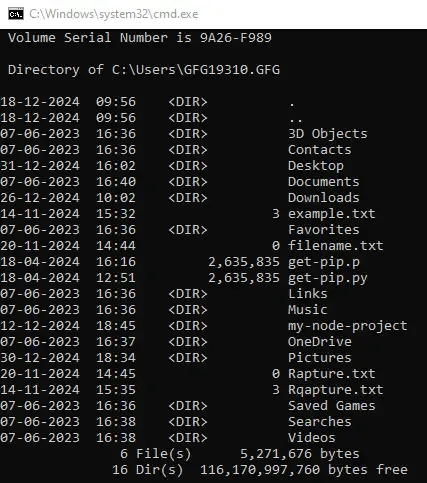
Output
2. List Content of a Specific Directory
The output of the dir command in this enable users to specify a directory to view its contents. The syntax for this command is as follows:
Input
dir C:\Users\gfg19310\Documents

List all content – Input
Output
Directory of C:\Users\gfg19310\Documents

20-03-2023  13:02    <DIR>          .
20-03-2023  13:02    <DIR>          ..
20-03-2023  13:02    <DIR>          Custom Office Templates

List all content – Output
3. Show Hidden Files
Here, we will use /A option with the H attribute to include hidden files along with it. Here’s the syntax:
Input
dir /A:H
show hidden file – Input
Output
07-06-2023  16:36    <DIR>          AppData
07-06-2023  16:36    <JUNCTION>     Application Data [C:\Users\GFG19310.GFG\AppData\Roaming]
07-06-2023  16:36    <JUNCTION>     Cookies [C:\Users\GFG19310.GFG\AppData\Local\Microsoft\Windows\INetCookies]
07-06-2023  16:36    <JUNCTION>     Local Settings [C:\Users\GFG19310.GFG\AppData\Local]
07-06-2023  16:36    <JUNCTION>     My Documents [C:\Users\GFG19310.GFG\Documents]
07-06-2023  16:36    <JUNCTION>     NetHood [C:\Users\GFG19310.GFG\AppData\Roaming\Microsoft\Windows\Network Shortcuts]
11-12-2024  05:46         3,670,016 NTUSER.DAT
07-06-2023  16:36           688,128 ntuser.dat.LOG1
07-06-2023  16:36         1,085,440 ntuser.dat.LOG2
02-01-2025  10:40         1,048,576 NTUSER.DAT{53b39e87-18c4-11ea-a811-000d3aa4692b}.TxR.0.regtrans-ms
18-12-2024  09:56         1,048,576 NTUSER.DAT{53b39e87-18c4-11ea-a811-000d3aa4692b}.TxR.1.regtrans-ms
18-12-2024  09:56         1,048,576 NTUSER.DAT{53b39e87-18c4-11ea-a811-000d3aa4692b}.TxR.2.regtrans-ms
18-12-2024  09:56            65,536 NTUSER.DAT{53b39e87-18c4-11ea-a811-000d3aa4692b}.TxR.blf
07-06-2023  16:36            65,536 NTUSER.DAT{53b39e88-18c4-11ea-a811-000d3aa4692b}.TM.blf
07-06-2023  16:36           524,288 NTUSER.DAT{53b39e88-18c4-11ea-a811-000d3aa4692b}.TMContainer00000000000000000001.regtrans-ms
07-06-2023  16:36           524,288 NTUSER.DAT{53b39e88-18c4-11ea-a811-000d3aa4692b}.TMContainer00000000000000000002.regtrans-ms
07-06-2023  16:36                20 ntuser.ini
07-06-2023  16:36    <JUNCTION>     PrintHood [C:\Users\GFG19310.GFG\AppData\Roaming\Microsoft\Windows\Printer Shortcuts]
07-06-2023  16:36    <JUNCTION>     Recent [C:\Users\GFG19310.GFG\AppData\Roaming\Microsoft\Windows\Recent]
07-06-2023  16:36    <JUNCTION>     SendTo [C:\Users\GFG19310.GFG\AppData\Roaming\Microsoft\Windows\SendTo]
07-06-2023  16:36    <JUNCTION>     Start Menu [C:\Users\GFG19310.GFG\AppData\Roaming\Microsoft\Windows\Start Menu]
07-06-2023  16:36    <JUNCTION>     Templates [C:\Users\GFG19310.GFG\AppData\Roaming\Microsoft\Windows\Templates]
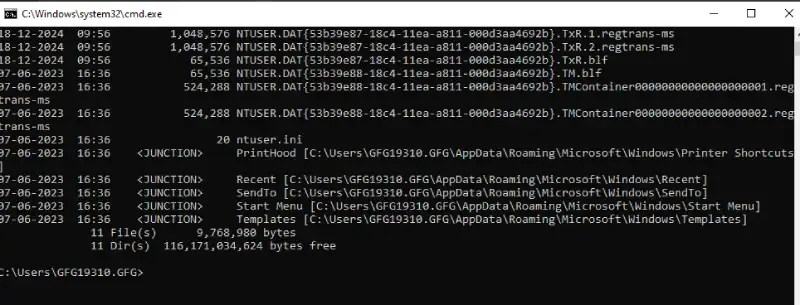
show hidden file – Output
4. List Files with Specific Extensions
To display files with a specific extension (e.g., .txt): Here’s a sample
Input
dir *.txt
Display Text -input
Output
Directory of C:\Users\GFG19310.GFG

14-11-2024  15:32                 3 example.txt
20-11-2024  14:44                 0 filename.txt
20-11-2024  14:45                 0 Rapture.txt
14-11-2024  15:35                 3 Rqapture.txt

Display Text -Output
5. View Subdirectories
To include all subdirectories and their contents, use the following command:
Input
dir /S
dir /S
Output
Directory of C:\Users\GFG19310.GFG\Saved Games

07-06-2023  16:36    <DIR>          .
07-06-2023  16:36    <DIR>          ..
               0 File(s)              0 bytes

Directory of C:\Users\GFG19310.GFG\Searches

07-06-2023  16:38    <DIR>          .
07-06-2023  16:38    <DIR>          ..
08-11-2022  16:52               855 winrt--{S-1-5-21-1623517014-2252875782-278851815-1404}-.searchconnector-ms
07-06-2023  16:37               859 winrt--{S-1-5-21-2245693176-3959787992-2909979321-1244}-.searchconnector-ms
               2 File(s)          1,714 bytes

Directory of C:\Users\GFG19310.GFG\Videos

07-06-2023  16:38    <DIR>          .
07-06-2023  16:38    <DIR>          ..
26-12-2024  13:37    <DIR>          Captures
               0 File(s)              0 bytes

Directory of C:\Users\GFG19310.GFG\Videos\Captures

26-12-2024  13:37    <DIR>          .
26-12-2024  13:37    <DIR>          ..
26-12-2024  13:37           185,053 File Explorer 26-12-2024 13_37_47.png
11-10-2023  15:51            23,668 Network Connections .png
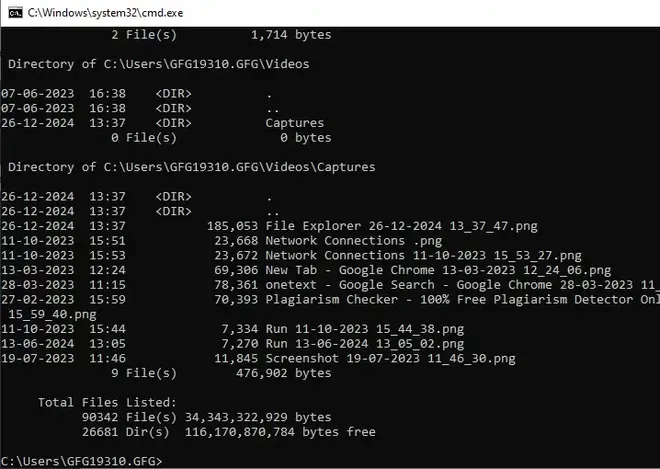
Fetching Directory
6. Sort by Date, Size, or Name
We can fetch data based on date, size or name. Let’s check them out:
By Date:
Input
dir /O:D
dir /O:D
Output
Directory of C:\Users\GFG19310.GFG

07-06-2023  16:36    <DIR>          3D Objects
07-06-2023  16:36    <DIR>          Contacts
07-06-2023  16:36    <DIR>          Favorites
07-06-2023  16:36    <DIR>          Music
07-06-2023  16:36    <DIR>          Saved Games
07-06-2023  16:36    <DIR>          Links
07-06-2023  16:37    <DIR>          OneDrive
07-06-2023  16:38    <DIR>          Searches
07-06-2023  16:38    <DIR>          Videos
07-06-2023  16:40    <DIR>          Documents
18-04-2024  12:51         2,635,835 get-pip.py
18-04-2024  16:16         2,635,835 get-pip.p
14-11-2024  15:32                 3 example.txt
14-11-2024  15:35                 3 Rqapture.txt
20-11-2024  14:44                 0 filename.txt
20-11-2024  14:45                 0 Rapture.txt
12-12-2024  18:45    <DIR>          my-node-project
18-12-2024  09:56    <DIR>          .
18-12-2024  09:56    <DIR>          ..
26-12-2024  10:02    <DIR>          Downloads
30-12-2024  18:34    <DIR>          Pictures
31-12-2024  16:02    <DIR>          Desktop
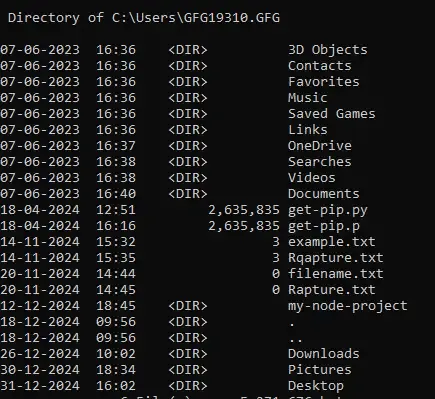
Output
By Size:
Input
dir /O:S
dir /O:S
Output
Directory of C:\Users\GFG19310.GFG

18-12-2024  09:56    <DIR>          .
18-12-2024  09:56    <DIR>          ..
07-06-2023  16:36    <DIR>          3D Objects
07-06-2023  16:36    <DIR>          Contacts
31-12-2024  16:02    <DIR>          Desktop
07-06-2023  16:40    <DIR>          Documents
26-12-2024  10:02    <DIR>          Downloads
07-06-2023  16:38    <DIR>          Searches
07-06-2023  16:36    <DIR>          Favorites
20-11-2024  14:44                 0 filename.txt
07-06-2023  16:36    <DIR>          Saved Games
07-06-2023  16:38    <DIR>          Videos
07-06-2023  16:36    <DIR>          Links
07-06-2023  16:36    <DIR>          Music
12-12-2024  18:45    <DIR>          my-node-project
07-06-2023  16:37    <DIR>          OneDrive
30-12-2024  18:34    <DIR>          Pictures
20-11-2024  14:45                 0 Rapture.txt
14-11-2024  15:32                 3 example.txt
14-11-2024  15:35                 3 Rqapture.txt
18-04-2024  12:51         2,635,835 get-pip.py
18-04-2024  16:16         2,635,835 get-pip.p
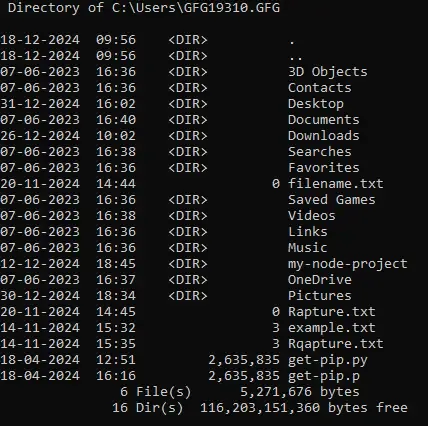
Output
By Name:
Input
dir /O:N
dir /O:N
Output
Directory of C:\Users\GFG19310.GFG

18-12-2024  09:56    <DIR>          .
18-12-2024  09:56    <DIR>          ..
07-06-2023  16:36    <DIR>          3D Objects
07-06-2023  16:36    <DIR>          Contacts
31-12-2024  16:02    <DIR>          Desktop
07-06-2023  16:40    <DIR>          Documents
26-12-2024  10:02    <DIR>          Downloads
14-11-2024  15:32                 3 example.txt
07-06-2023  16:36    <DIR>          Favorites
20-11-2024  14:44                 0 filename.txt
18-04-2024  16:16         2,635,835 get-pip.p
18-04-2024  12:51         2,635,835 get-pip.py
07-06-2023  16:36    <DIR>          Links
07-06-2023  16:36    <DIR>          Music
12-12-2024  18:45    <DIR>          my-node-project
07-06-2023  16:37    <DIR>          OneDrive
30-12-2024  18:34    <DIR>          Pictures
20-11-2024  14:45                 0 Rapture.txt
14-11-2024  15:35                 3 Rqapture.txt
07-06-2023  16:36    <DIR>          Saved Games
07-06-2023  16:38    <DIR>          Searches
07-06-2023  16:38    <DIR>          Videos
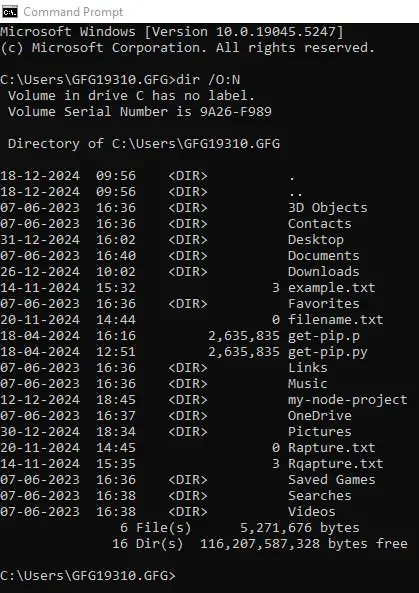
Output
7. View Results Page by Page
This command is used where too many files exists, we can use the /P option to get results one page at a time. Here’s the command:
Input
dir /P
dir /P
Output
Directory of C:\Users\GFG19310.GFG

18-12-2024  09:56    <DIR>          .
18-12-2024  09:56    <DIR>          ..
07-06-2023  16:36    <DIR>          3D Objects
07-06-2023  16:36    <DIR>          Contacts
31-12-2024  16:02    <DIR>          Desktop
07-06-2023  16:40    <DIR>          Documents
26-12-2024  10:02    <DIR>          Downloads
14-11-2024  15:32                 3 example.txt
07-06-2023  16:36    <DIR>          Favorites
20-11-2024  14:44                 0 filename.txt
18-04-2024  16:16         2,635,835 get-pip.p
18-04-2024  12:51         2,635,835 get-pip.py
07-06-2023  16:36    <DIR>          Links
07-06-2023  16:36    <DIR>          Music
12-12-2024  18:45    <DIR>          my-node-project
07-06-2023  16:37    <DIR>          OneDrive
30-12-2024  18:34    <DIR>          Pictures
20-11-2024  14:45                 0 Rapture.txt
14-11-2024  15:35                 3 Rqapture.txt
07-06-2023  16:36    <DIR>          Saved Games
07-06-2023  16:38    <DIR>          Searches
07-06-2023  16:38    <DIR>          Videos
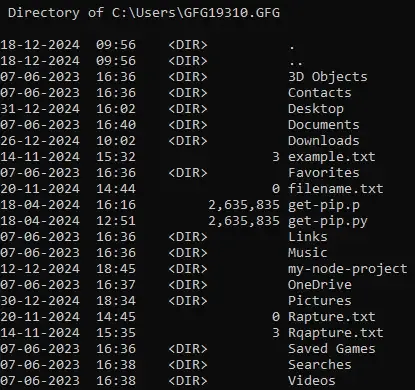
Output
8. List File Attributes
We can also include attributes such as read-only files and archives using the following command:
Input
dir /A
dir /A
Output
Directory of C:\Users\GFG19310.GFG

18-12-2024  09:56    <DIR>          .
18-12-2024  09:56    <DIR>          ..
07-06-2023  16:36    <DIR>          3D Objects
07-06-2023  16:36    <DIR>          AppData
07-06-2023  16:36    <JUNCTION>     Application Data [C:\Users\GFG19310.GFG\AppData\Roaming]
07-06-2023  16:36    <DIR>          Contacts
07-06-2023  16:36    <JUNCTION>     Cookies [C:\Users\GFG19310.GFG\AppData\Local\Microsoft\Windows\INetCookies]
31-12-2024  16:02    <DIR>          Desktop
07-06-2023  16:40    <DIR>          Documents
26-12-2024  10:02    <DIR>          Downloads
14-11-2024  15:32                 3 example.txt
07-06-2023  16:36    <DIR>          Favorites
20-11-2024  14:44                 0 filename.txt
18-04-2024  16:16         2,635,835 get-pip.p
18-04-2024  12:51         2,635,835 get-pip.py
07-06-2023  16:36    <DIR>          Links
07-06-2023  16:36    <JUNCTION>     Local Settings [C:\Users\GFG19310.GFG\AppData\Local]
07-06-2023  16:36    <DIR>          Music
07-06-2023  16:36    <JUNCTION>     My Documents [C:\Users\GFG19310.GFG\Documents]
12-12-2024  18:45    <DIR>          my-node-project
07-06-2023  16:36    <JUNCTION>     NetHood [C:\Users\GFG19310.GFG\AppData\Roaming\Microsoft\Windows\Network Shortcuts]
11-12-2024  05:46         3,670,016 NTUSER.DAT
07-06-2023  16:36           696,320 ntuser.dat.LOG1
07-06-2023  16:36         1,003,520 ntuser.dat.LOG2
02-01-2025  10:40         1,048,576 NTUSER.DAT{53b39e87-18c4-11ea-a811-000d3aa4692b}.TxR.0.regtrans-ms
18-12-2024  09:56         1,048,576 NTUSER.DAT{53b39e87-18c4-11ea-a811-000d3aa4692b}.TxR.1.regtrans-ms
18-12-2024  09:56         1,048,57 ..
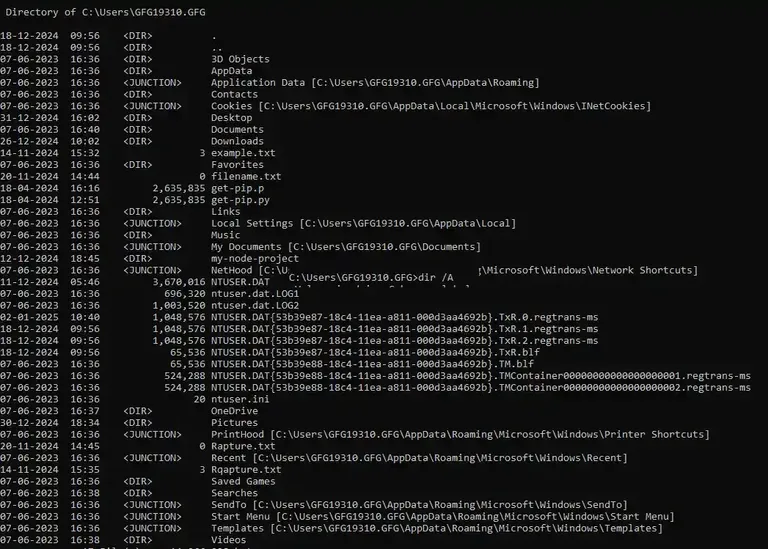
Output
9. Display File Size
You can also check the file size (in bytes) using the following command:
Input
dir /-C
dir /-C
Output
Directory of C:\Users\GFG19310.GFG

18-12-2024  09:56    <DIR>          .
18-12-2024  09:56    <DIR>          ..
07-06-2023  16:36    <DIR>          3D Objects
07-06-2023  16:36    <DIR>          Contacts
31-12-2024  16:02    <DIR>          Desktop
07-06-2023  16:40    <DIR>          Documents
26-12-2024  10:02    <DIR>          Downloads
14-11-2024  15:32                 3 example.txt
07-06-2023  16:36    <DIR>          Favorites
20-11-2024  14:44                 0 filename.txt
18-04-2024  16:16           2635835 get-pip.p
18-04-2024  12:51           2635835 get-pip.py
07-06-2023  16:36    <DIR>          Links
07-06-2023  16:36    <DIR>          Music
12-12-2024  18:45    <DIR>          my-node-project
07-06-2023  16:37    <DIR>          OneDrive
30-12-2024  18:34    <DIR>          Pictures
20-11-2024  14:45                 0 Rapture.txt
14-11-2024  15:35                 3 Rqapture.txt
07-06-2023  16:36    <DIR>          Saved Games
07-06-2023  16:38    <DIR>          Searches
07-06-2023  16:38    <DIR>          Videos
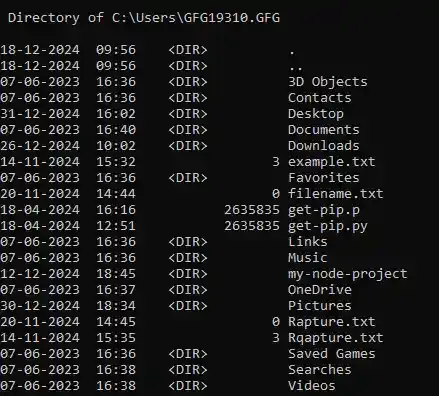
Output
Advanced Syntax
The above-mentioned syntaxes is for general usage. Now, let’s see some of the advanced usage syntax along with their examples.
10. Save Output to a File
We can redirect the output to a text file (dir command) using the syntax below:
Input (file name: rapture.txt)
dir /S > rapture.txt
dir /S > filename
Output
A file name with the provided name will be created containing the directory list.
Output
11. Search for any Specific File
You can search for any file by its name (or even partial name), following this syntax:
Input (file name: rapture – taken as a partial name “rapt”)
dir *rapt*
*filename*
Output
Directory of C:\Users\GFG19310.GFG

03-01-2025  11:03         7,854,908 Rapture.txt
               1 File(s)      7,854,908 bytes
               0 Dir(s)  116,168,089,600 bytes free

Output
12. Check the Total Number of Files
This syntax will summarise the total count of a file including directory:
Input
dir /W
dir /W
Output

Output
Bonus: Useful cmd Options (Summarization)
| Option | Description |
|---|---|
/P |
Fetch results one page at a time |
/S |
Includes all files in subdirectories. |
/A |
Displays files with specified attributes (e.g., /A:H for hidden files). |
/O |
Sorts output (e.g., /O:D for date, /O:N for name). |
/B |
Displays output in bare format (file names only, without additional details). |
/L |
Displays names in lowercase. |
/T |
Displays time attributes (e.g., /T:C for creation time). |
/Q |
Displays file ownership information. |
The dir command is vastly used among users for managing and exploring directories through different ways and patterns in Windows OS. You can give it all a try and organize your work smoothly.
-
Home
-
Partition Magic
- CMD List Files: How to List Files in Command Prompt Windows 10/11
By Ariel | Follow |
Last Updated
What command can be used to list files in a directory? How to list files in Command Prompt Windows 10/11? A great many people are confused about these questions. In this post, MiniTool explains the Command Prompt list files topic in detail and introduces an alternative to CMD list files.
CMD (Command Prompt) is a powerful Windows built-in tool that can be used to do many works such as CMD copy files, CMD list drives, CMD WiFi password, and more. However, a lot of users don’t how to list files in Command Prompt. Here’s a true example from the StackOverflow forum:
I tried searching for a command that could list all the files in a directory as well as subfolders using a command prompt command. I have read the help for the «dir» command but couldn’t find what I was looking for. Please help me with what command could get this.
https://stackoverflow.com/questions/15214486/command-to-list-all-files-in-a-folder-as-well-as-sub-folders-in-windows
Although there are already many discussions and posts about the Command Prompt list files, most of them lack clear steps and screenshots, which makes people difficult to understand the “CMD list files” operation. Thus, we want to write a complete guide to explain it. Let’s keep reading.
What Command Can Be Used to List Files
To list directory CMD smoothly, you need to know what command can be used to list files in a directory Windows first. The answer is to use the DIR command. This command can be used to show all files and subfolders in the current directory. In addition, it displays the file name, size, and last modification date of each file like File Explorer.
The DIR command is available in CMD for almost all Windows systems, including Windows 11/10/8/7/Vista/XP. Here are the most commonly used command lines about the CMD list directory/files:
- D: List all directories in the current path
- R: Show read-only files
- H: Show hidden files
- A: Archive files
- S: List system files
- I: Not content indexed files
- L: Reparse points
- -: Add a minus in front of any of the file attribute to let the DIR command not show that kind of file.
How to List Files in Command Prompt Windows 10/11
How to list files in CMD Windows 10/11? The answer depends on what files you want to list. Here we summarize several common examples of the Windows Command Prompt list files.
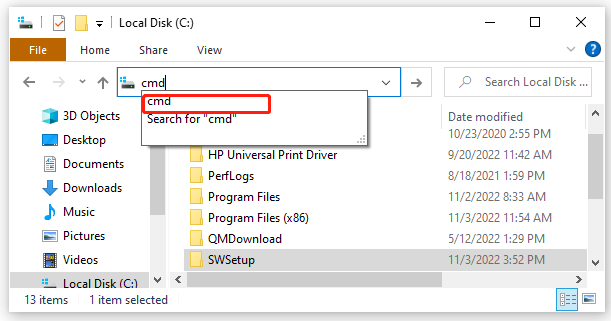
Step 1. First of all, you need to navigate to the directory in which you want to list files in File Explorer.
Step 2. Click on the address bar and type cmd in the file path and hit Enter, which will open the Command Prompt window.
Tips:
Also, you can locate the directory first in File Explorer, and then press the Win + R keys to open the Run box, type cmd in it, and hit Enter to open the Command Prompt window.
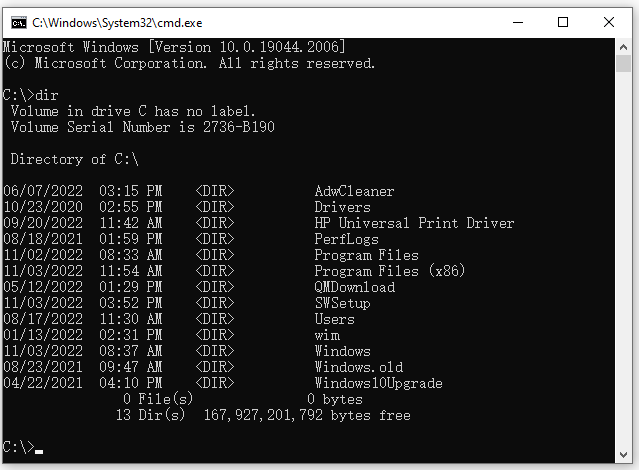
Step 3. In the pop-up window, you can list file CMD according to your needs. For example:
Example 1. CMD List all directories and folders under the current path.
dir
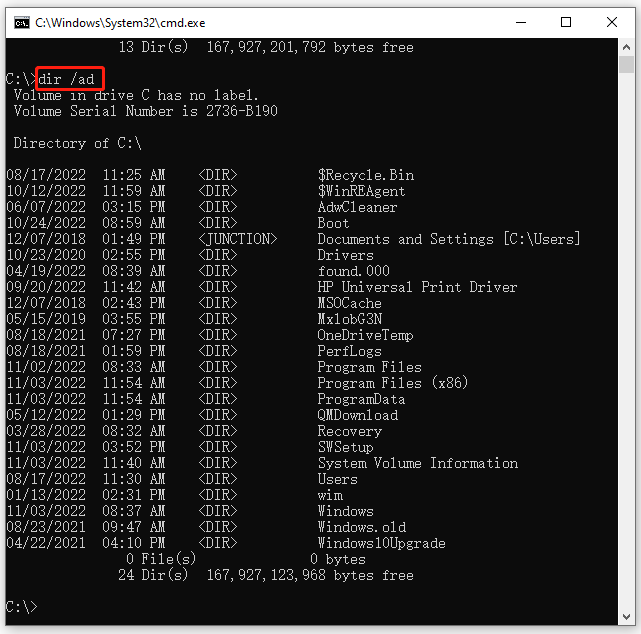
Example 2. CMD List folders of the current directory only.
dir /ad
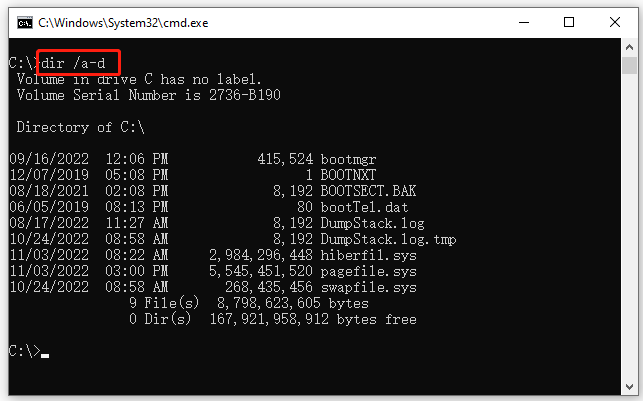
Example 3. CMD list files only under the directory.
dir /a-d
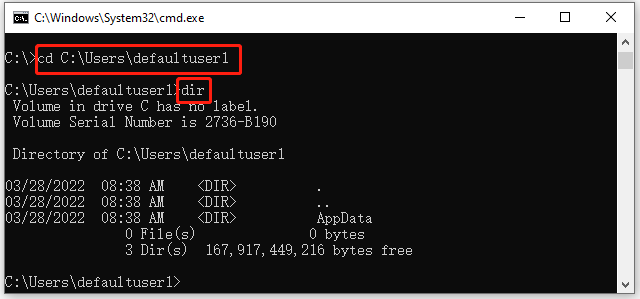
Example 4. CMD list files and folders under a specific directory (e.g. C:Usersdefaultuser1)
cd C:Usersdefaultuser1
dir
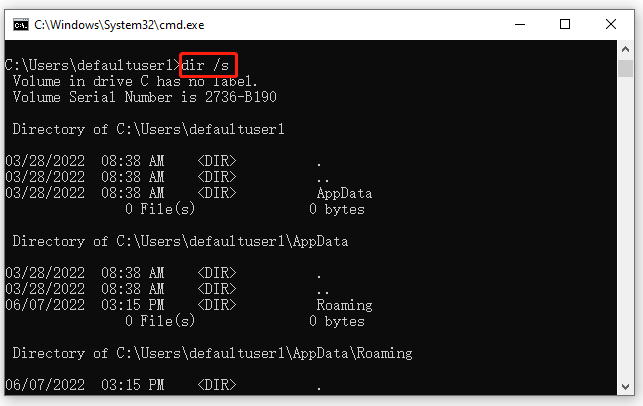
Example 5. CMD list all system files under the directory.
dir /s
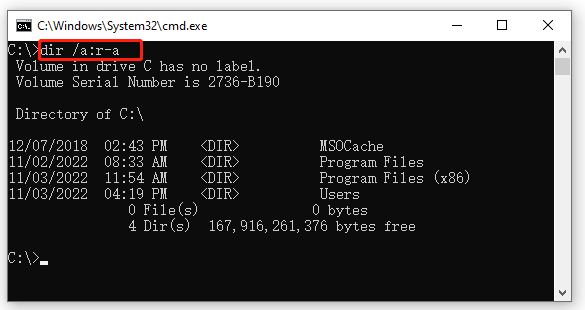
Example 6. CMD list all read-only non-achieve files.
dir /a:r-a
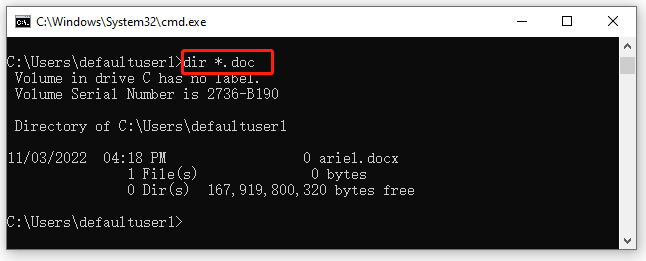
Example 7. CMD list all files with the file extension .doc.
Tips:
You can replace the doc with other file extensions such as exe, png, xml, etc.
dir *.doc
Example 8. CMD list all files with the file extension .doc and .jpg.
dir *.doc *.jpg
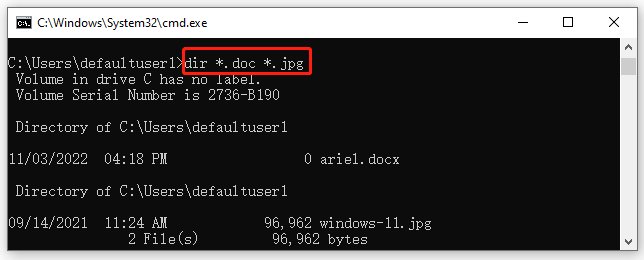
Of course, there are many other dir commands to list file CMD on Windows 10/11 and we can’t explain all in this post. If you want to know more information about Windows CMD list files, you can search for corresponding commands online on Google.
Better Alternative to Command Prompt List Files
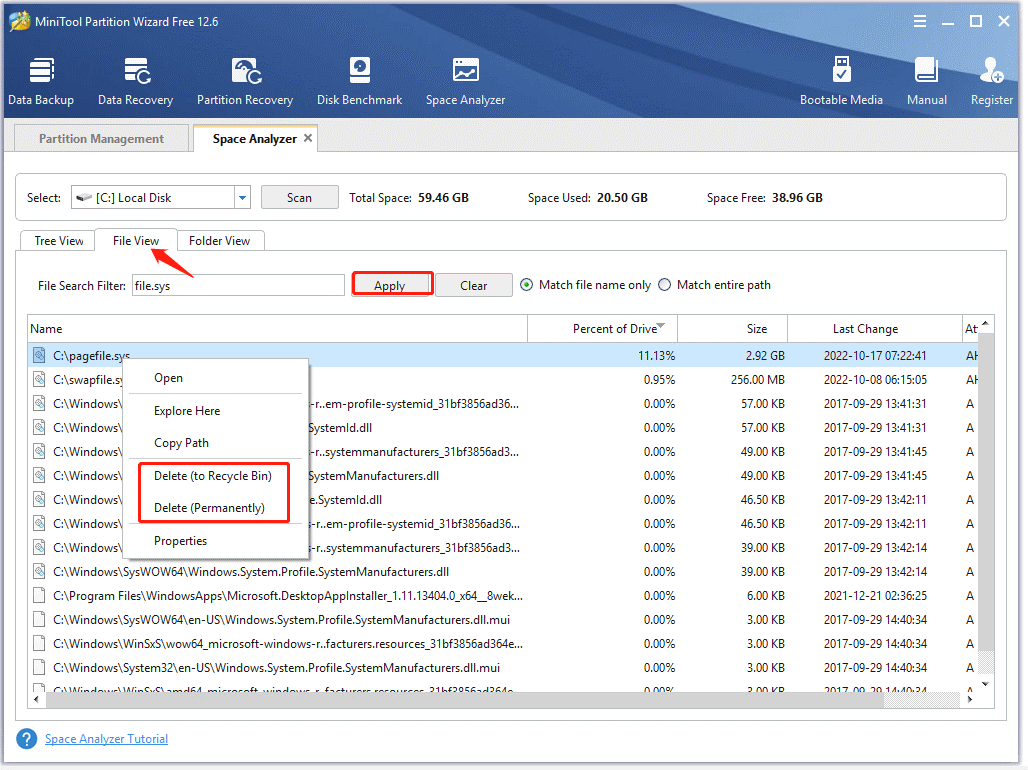
Although you can list files in a directory CMD, many professional commands might be unfamiliar to you. How to list all files/folders under a directory more easily? MiniTool Partition Wizard is a better alternative to Windows Command Prompt list files.
Its Space Analyzer feature can show all files/folders under a specific path in the file name, size, last change, extension, percentage of drive, etc. In addition, it tells you what files are taking up your disk space and helps you free up disk space.
MiniTool Partition Wizard FreeClick to Download100%Clean & Safe
About The Author
Position: Columnist
Ariel has been working as a highly professional computer-relevant technology editor at MiniTool for many years. She has a strong passion for researching all knowledge related to the computer’s disk, partition, and Windows OS. Up till now, she has finished thousands of articles covering a broad range of topics and helped lots of users fix various problems. She focuses on the fields of disk management, OS backup, and PDF editing and provides her readers with insightful and informative content.
Когда ко мне обратились с вопросом о том, как быстро вывести список файлов в текстовый файл, я понял, что ответа я не знаю. Хотя задача, как оказалось, достаточно часто встречающаяся. Это может потребоваться для передачи списка файлов специалисту (для решения какой-то проблемы), самостоятельного ведения журнала содержимого папок и других целей.
Решено было устранить пробел и подготовить инструкцию на эту тему, в которой будет показано, как получить список файлов (и вложенных папок) в папке Windows средствами командной строки, а также о том, как автоматизировать этот процесс, если задача возникает часто.
Получение текстового файла с содержимым папки в командной строке

Сначала о том, как сделать текстовый документ, содержащий список файлов в нужной папке, вручную.
- Запустите командную строку от имени администратора.
- Введите cd x:\folder\ где x:\folder\ — полный путь к папке, список файлов из которой нужно получить. Нажмите Enter.
- Введите команду dir /a /-p /o:gen >files.txt (где files.txt — текстовый файл, в котором будет сохранен список файлов). Нажмите Enter.
- Если использовать команду с параметром /b (dir /a /b /-p /o:gen >files.txt), то в полученном списке будет отсутствовать любая дополнительная информация о размерах файлов или дате создания — только список имен.
Готово. В результате будет создан текстовый файл, содержащий необходимую информацию. В команде выше, данный документ сохраняется в той же папке, список файлов из которой требуется получить. Можно также убрать вывод в текстовый файл, в этом случае список будет отображаться только в командной строке.
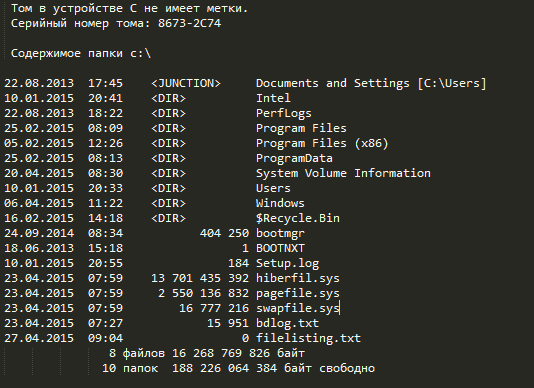
Кроме этого, для пользователей русскоязычной версии Windows следует учитывать то, что файл сохраняется в кодировке Windows 866, то есть в обычном блокноте вместо русских символов вы увидите иероглифы (но можно использовать альтернативный текстовый редактор для просмотра, например, Sublime Text).
Получаем список файлов с помощью Windows PowerShell
Вы также можете получить список файлов в папке используя команды Windows PowerShell. Если вы хотите сохранить список в файл, то запустите PowerShell от имени администратора, если просто просмотреть в окне — достаточно простого запуска.

Примеры команд:
- Get-Childitem -Path C:\Folder — вывод списка всех файлов и папок, находящихся в папке Folder на диске C в окне Powershell.
- Get-Childitem -Path C:\Folder | Out-File C:\Files.txt — создание текстового файла Files.txt со списком файлов в папке Folder.
- Добавление параметра -Recurse к первой описанной команде выводит в списке также содержимое всех вложенных папок.
- Параметры -File и -Directory позволяют получить список только файлов или только папок соответственно.
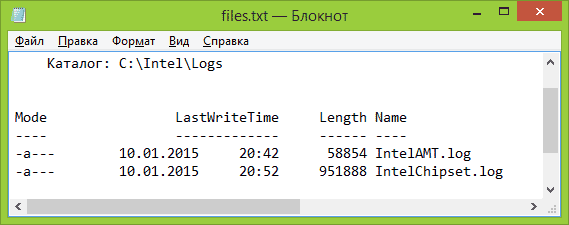
Выше перечислены далеко не все параметры Get-Childitem, но в рамках описываемой в этом руководстве задачи, думаю, их будет достаточно.
Утилита Microsoft Fix it для печати содержимого папки
На странице https://support.microsoft.com/ru-ru/kb/321379 присутствует утилита Microsoft Fix It, добавляющая в контекстное меню проводника пункт «Print Directory Listing», выводящий список файлов в папке на печать.

Несмотря на то, что программа предназначена только для Windows XP, Vista и Windows 7, она успешно сработала и в Windows 10, достаточно было запустить ее в режиме совместимости.
Дополнительно, на той же странице показан порядок ручного добавления команды вывода списка файлов в проводник, при этом вариант для Windows 7 подойдет и для Windows 8.1 и 10. А если вам не требуется вывод на печать, вы можете немного подправить предлагаемые Microsoft команды, удалив параметр /p в третьей строке и полностью убрав четвертую.


