
Конечно, что самый простой и интуитивный способ создать загрузочную USB флешку для установки Windows Server 2016 на физический сервер – воспользоваться утилитой Windows USB/DVD Download Tool. Данная утилита позволяет записать имеющийся *.iso образ Windows на USB флешку/диск и сделать его загрузочным. Однако, она форматирует флешку в файловую систему NTFS, загрузка с которой не поддерживается на UEFI системах и пригодна такая флешка только для установки Windows только на BIOS системах. В данной статье мы покажем, как без использования сторонних утилит создать установочную флешку с дистрибутивом Windows Server 2016.
Примечание. В отличии BIOS систем, которые могут загрузиться с загрузочных разделов с файловыми системам FAT, FAT32, exFAT или NTFS, UEFI системы могут загрузится только с загрузчика, находящегося на диске, отформатированном в ФС FAT32.
В зависимости от архитектуры сервера UEFI / BIOS нужно воспользоваться одним из следующих способов создания установочной флешки.
Содержание:
- Установочная USB флешка для UEFI системы
- Установочная флешка c таблицей разделов MBR для BIOS и UEFI архитектур
- Размер файла Install.wim более 4 Гб
Важно. При выполнении данной инструкции нужно быть внимательным, проверять пути к дискам и номера дисков, в противном случае, можно случайно отформатировать диск с данными. USB флешка будет отформатирована в любом случае, и данные на ней удалены.
Установочная USB флешка для UEFI системы
В том случае, если флешка будет использоваться для загрузки и установки Windows Server 2016 на сервере с поддержкой UEFI, на загрузочную флешку накладываются следующие требования:
- Минимальный размер USB флешки – 8 Гб
- Тип таблицы разделов флешки – GPT
- Файловая системе — FAT32
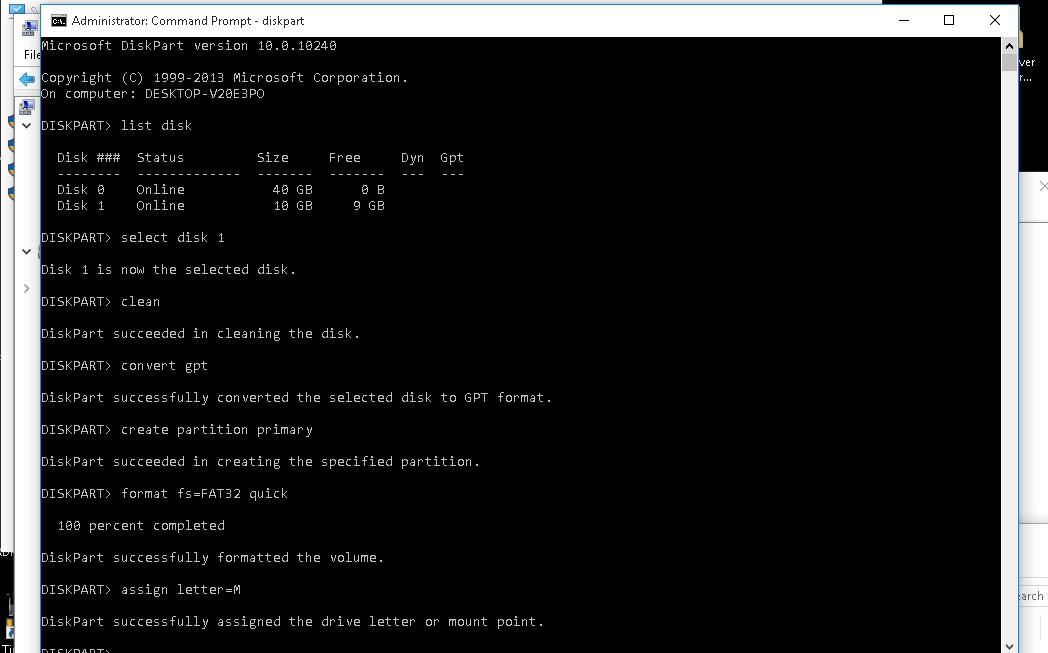
Итак, подключите USB флешку к компьютеру (в нашем примере это ПК с Windows 10), откройте командную строку с правами администратора, выполните команду DISKPART, в контексте которой выполните следующие команды:
list disk
Выведем список дисков, моем случае USB флешка имеет номер диска 1. Выберем ее.
select disk 1
Очистим содержимое флешки.
clean
Преобразуем таблицу разделов в GPT:
convert gpt
Создадим новый раздел (размер не должен превышать 16 Гб):
create partition primary
Совет. Если размер USB флешки более чем 16 Гб, нужно создать раздел, размером до 16Гб:
create partition primary size=16000
Отформатируем раздел в ФС FAT32:
format fs=FAT32 quick
Назначим новому разделу букву диска:
assign letter=M
Осталось завершить сеанс diskpart:
exit
Скопируем файлы дистрибутива со смонтированного iso образа Windows Server 2016 на флешку (предполагаем, что iso образ смонтирован с буквой диска E:\).
xcopy e:\* m:\ /H /F /E
Установочная флешка c таблицей разделов MBR для BIOS и UEFI архитектур
Возможно создать установочную флешку с Windows Server 2016 с таблицей разделов MBR для BIOS и UEFI системе. К USB драйву предъявляются следующие требования:
- Минимальный размер USB флешки – 8 Гб
- Тип таблицы разделов– MBR
- Файловая системе — FAT32
Также запустите сессию diskpart и последовательно выполните команды:
Список дисков в системе:
list disk
Выбираем USB диск (в моем примере, Disk 1):
select disk 1
Очистим диск:
clean
Создадим новый раздел размером не более 16 Гб. Если размер флешки меньше 16 Гб:
create partition primary
Если больше:
create partition primary size=16000
Отформатируем флешку в файловой системе FAT32:
format fs=FAT32 quick
Сделаем раздел активным и назначим букву диска M:
active
assign letter=M

Завершим работу diskpart командой exit и скопируем файлы дистрибутива на флешку:
xcopy e:\* m:\ /H /F /E
Размер файла Install.wim более 4 Гб
В том случае, если размер файла Install.wim более 4Гб, скопировать такой файл на флешку не получится, т.к. максимальный размер файла на файловой системе ограничен 4 Гб. В данной ситуации придется разбить wim файл на несколько более мелких файлов с помощью DISM:
dism /Split-Image /ImageFile:e:\sources\install.wim /SWMFile:m:\sources\install.swm /FileSize:4096
Sometimes specialists and system administrators are faced with the task of installing Windows Server 2022 on one or more machines. To solve this problem, you will need reliable bootable media to quickly deploy systems. This instruction is not necessarily useful only to IT workers. One way or another, if you are faced with the task of installing Windows Server 2022, we will try to explain step by step and clearly how to create a bootable USB drive required to install the operating system on the server. We will break everything down into several stages (steps): from preparing the necessary devices and programs to starting the installation of the operating system.
Preparing the necessary tools
Before you begin, make sure you have a free USB drive with at least 8 GB of capacity. By the way, you can use any external drive to solve this problem. Next, you will need to download the official image of Windows Server 2022 from the Microsoft website.
We will also need the Rufus program to create a system image on the drive, or if you have experience, you may be more familiar with this task using Diskpart (a Windows console system program).Both options lead to the same result, it’s just that in the case of Rufus the process will be accompanied by a more friendly interface. But sometimes it happens that instead of an operating system, you only have the command line at hand. In any case, we will look at both methods.
If you choose rufus, you need to go to their website and download the latest version of the program.
Formatting USB and burning Windows Server 2022 distribution to a USB drive
While the distribution and program are loading, connect the USB to your PC. Make sure that your important files are not there – make a copy of them, because we will need a completely empty flash drive. Once you are ready to start formatting, right-click on the usb icon and select “Format” from the context menu. Before starting the formatting process, change the file system type to NTFS, as the FAT32 file system does not support files larger than 4 GB. Click the “Start” button and wait for the result.
Create a bootable USB using Rufus
We use the Rufus tool to burn an ISO image of Windows Server 2022 to a flash drive. This free app makes it easy to create a bootable disk. In the Rufus interface, select our USB, load the downloaded ISO image and click “Start”. It is important to select the image recording mode in “DD”. Once the process is complete, Rufus will show a message indicating that the USB drive is ready. You can now safely remove the USB and use it to install Windows Server 2022 on your desired machine.
Create a bootable USB using Diskpart
Diskpart is a console system program included in Windows through which you can manage disks, partitions and volumes by directly entering commands.
To create a boot entry on a USB drive using the Diskpart utility, you will need to run a series of commands.
- Open a command prompt with administrator rights.
- Type diskpart and press Enter to start using the Diskpart utility.
- Enter list disk command to display a list of all available disks.
- Find your USB disk number in the list and enter select disk X command, replacing X with the number of your USB disk.
- Enter the clean command to delete all data on the selected drive.
- To create a new primary partition, use create partition primary command.
- Next, enter select partition 1 command to focus on the partition you just created.
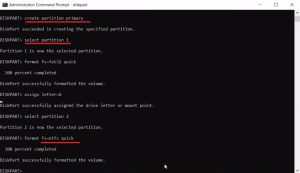
8. To format the partition in NTFS, enter format fs=ntfs quick .
9. Finally, enter the active command to make the partition bootable.
After completing these steps, your USB drive will be prepared and activated as bootable. You can close the Diskpart utility by entering the exit command.
Please be careful when using Diskpart, as this powerful tool can erase data from any drive you access. Always make sure you select the correct drive before running the clean command.
Once you have formatted the flash drive, you need to transfer the Windows Server 2022 distribution files to it. To do this, write list volume to display a list of volumes on all connected media and determine the letter or volume number of the flash drive and run the command select volume Y , where Y is this is the letter or number of the desired volume. After selecting the volume, you can exit Diskpart by typing exit .
It should be noted that the Diskpart utility itself is not capable of copying files; it is designed to manage disks and partitions. To copy files to a flash drive, you can use regular Windows Explorer or the copy command in the command line.
For example, after preparing a flash drive using Diskpart, in the command line you can use the following command to copy file: copy C:\windowsserver2022.iso E:
Here copy C:\windowsserver2022.iso E: should be replaced with the path to the file you want to copy, and `E:` with the letter of the assigned flash drive volume.
Installing the distribution from a flash drive
Once your USB drive is ready, insert it ino the machine’s USB port and reboot it. Enter BIOS or UEFI mode and set the USB boot priority.
If you did everything correctly, you will see the installation start welcome window. Select the desired configuration and begin installation. All that’s left is to wait a little. You have successfully created a bootable USB flash drive for Windows Server 2022 and installed the server operating system from it on your hardware. Remember that accuracy and attentiveness in this process is the key to successful installation and further stable operation of your server.
Post Views: 3,000
Windows Server 2022 is the latest version of Microsoft’s server operating system, offering enhanced performance and a range of new features. Creating a bootable ISO image is crucial for users, particularly IT professionals, who must install an operating system. This article will provide a detailed guide on creating a bootable ISO image of Windows Server 2022. Additionally, we will recommend an easy and reliable solution, EaseUS Todo Backup, which can assist you in restoring your Windows Server 2022 operating system to any bare metal computer.
Start a live chat with an EaseUS Expert to tailor an enterprise backup solution specific to your requirements. We are here to assist you with the following as well:
- Commence a free trial
- Obtain a quotation
- Arrange a free demonstration
What is an ISO Image
An ISO image is an archive file format that contains the complete contents of a CD, DVD, or other optical disk. It can be mounted using virtual disk drive software or burned onto physical disks. One everyday use is to create bootable disks for operating systems or software installation.
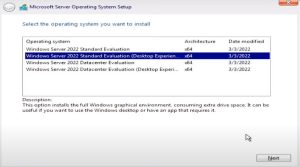
How to Create a Bootable Installation of Windows Server 2022
Before you proceed with the creation process, ensure you have a Windows Server 2022 ISO file and a USB device to store the bootable image. One popular tool for creating a bootable ISO image is Rufus. Follow these steps to create a bootable ISO image:
1. Launch Rufus. Then it will automatically detect your USB storage device connected to your computer.
2. Under Boot selection, please click SELECT to choose the Windows Server 2022 ISO file you prepared.
3. Customize the additional settings based on your specific requirements, such as the File system.
4. Once the above process is completed, click the Start button. A warning message will appear, stating that the data on your USB device will be lost. To proceed with the process, click on the OK button.
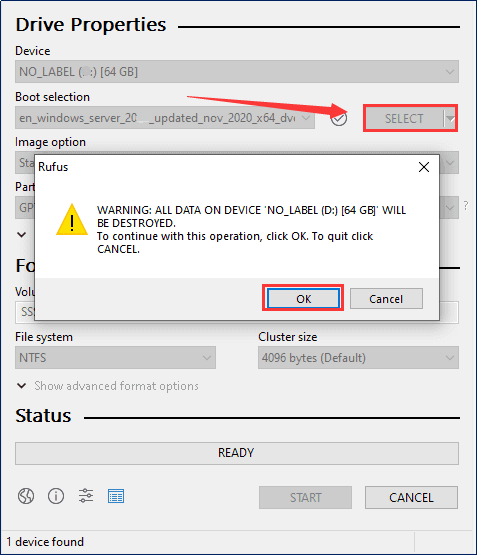
After the processes finish, your USB device will be a bootable one to install the Windows Server 2022 on any computer.
Transfer Windows Server 2022 with EaseUS Todo Backup
EaseUS Todo Backup is a comprehensive backup and recovery tool with advanced features and capabilities. It allows you to transfer your system to any computer or bare metal, providing flexibility and convenience. If you are looking for a way to transfer or restore your Windows Server 2022 operating system, follow the steps below to complete the process.
Create a System Image
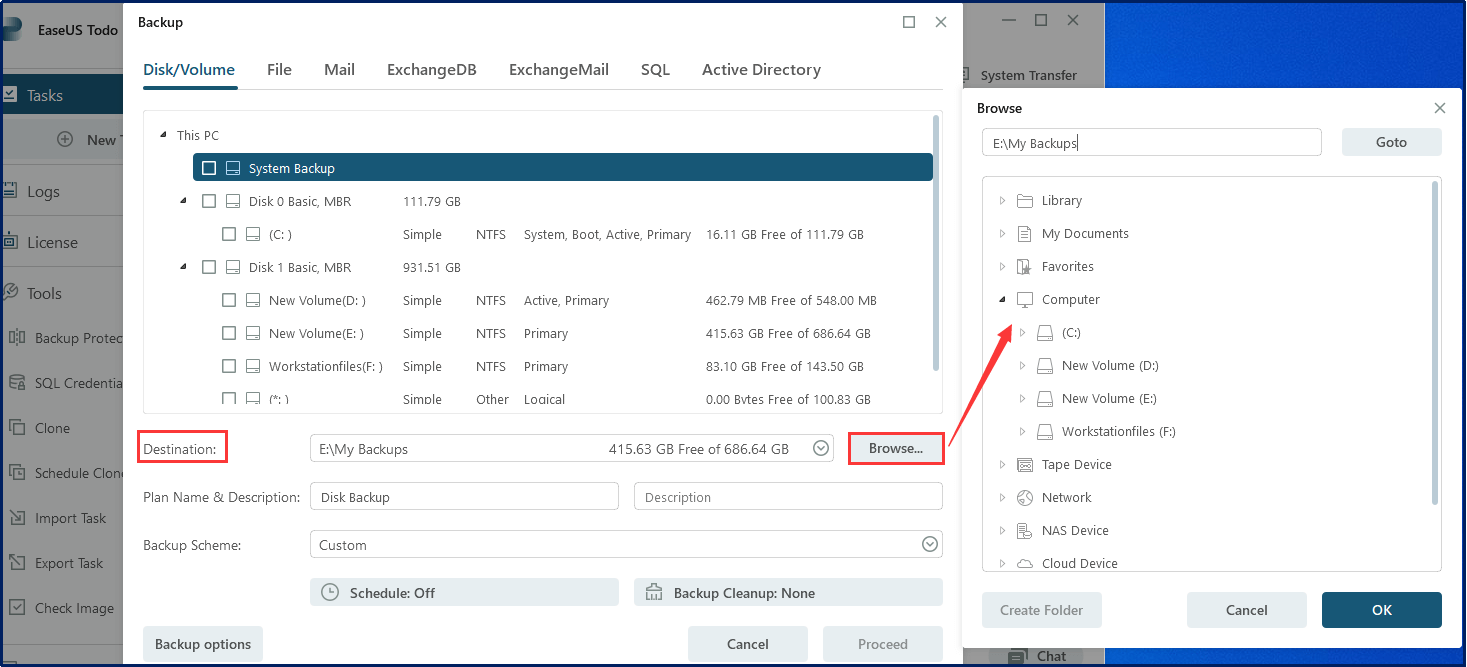
1. Run EaseUS Todo Backup and click New Task to create a task.
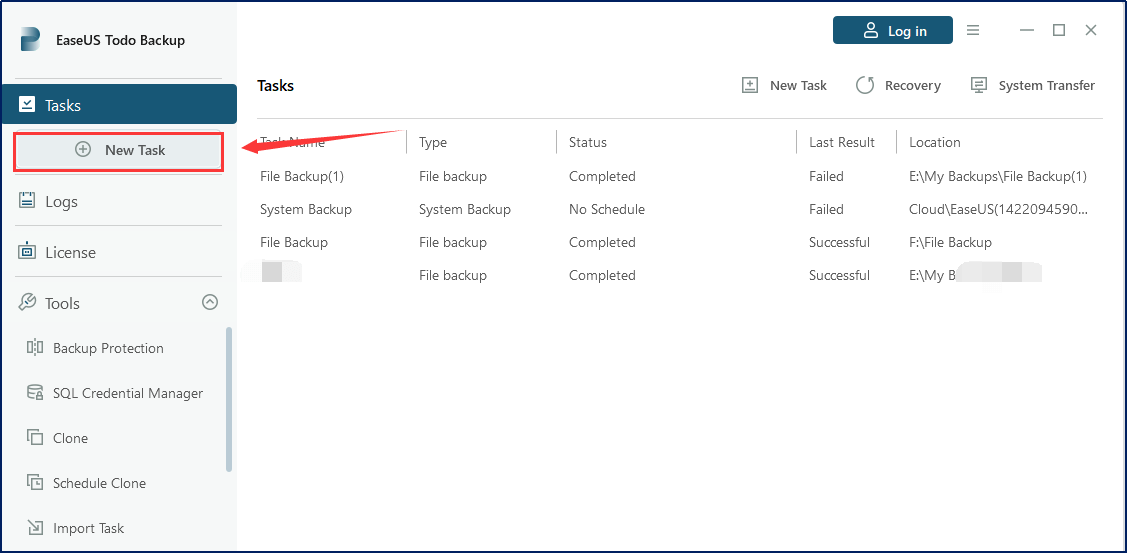
2. Select Disk/Volume as the target option from the available options at the top, and then choose System Backup.

3. Click Browse… to select a destination to keep the backup image and click OK.
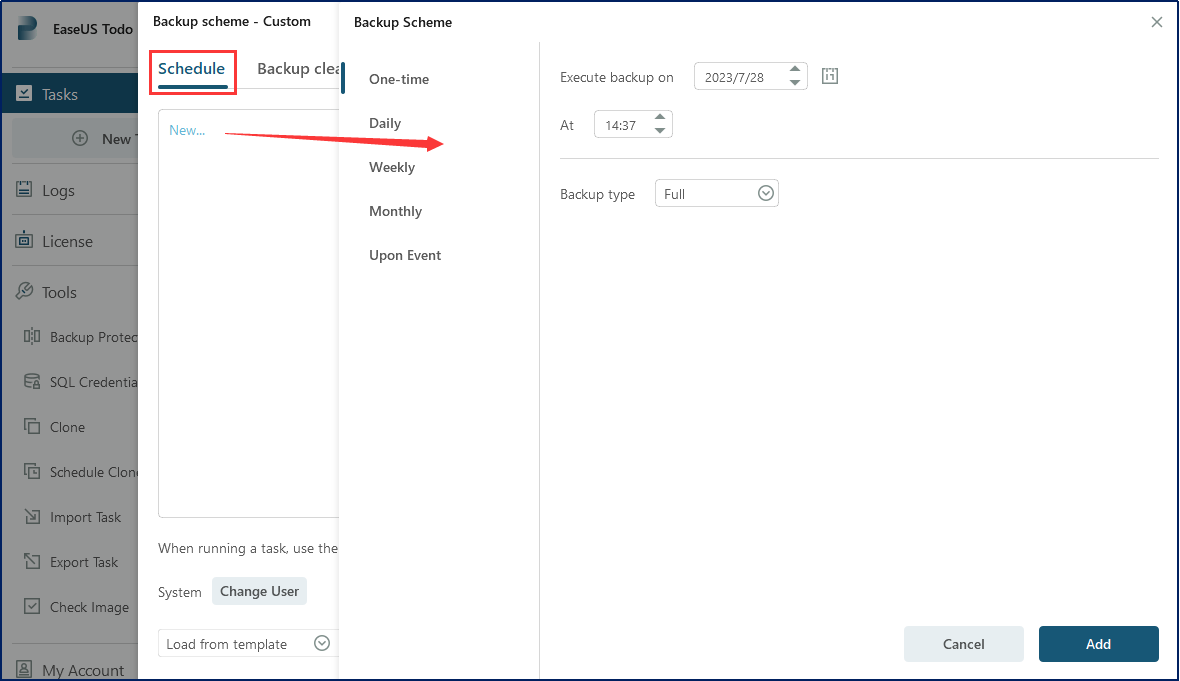
The product also offers advanced settings for personalized use. Here, you can see Schedule, Backup Cleanup, and Backup options.
Click New under the Schedule function. Then you can set the backup frequency based on your needs.
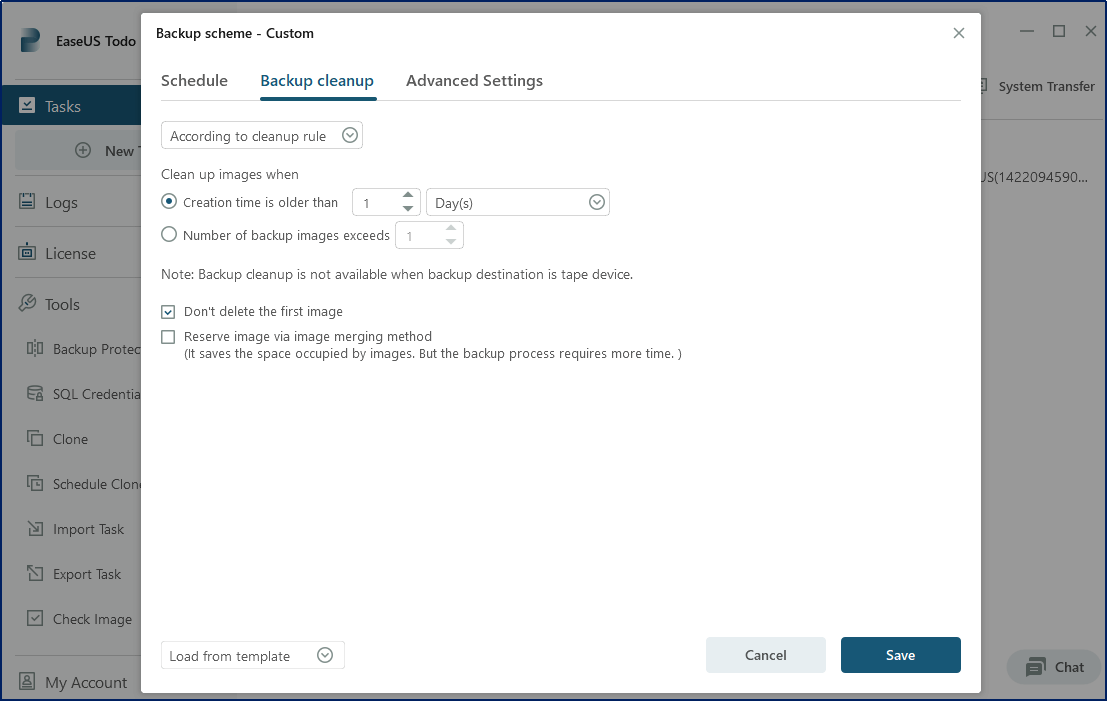
The Backup Cleanup there enables you to optimize storage space usage.
And Backup options function offers more customization features, such as encryption, compression, and email notifications.
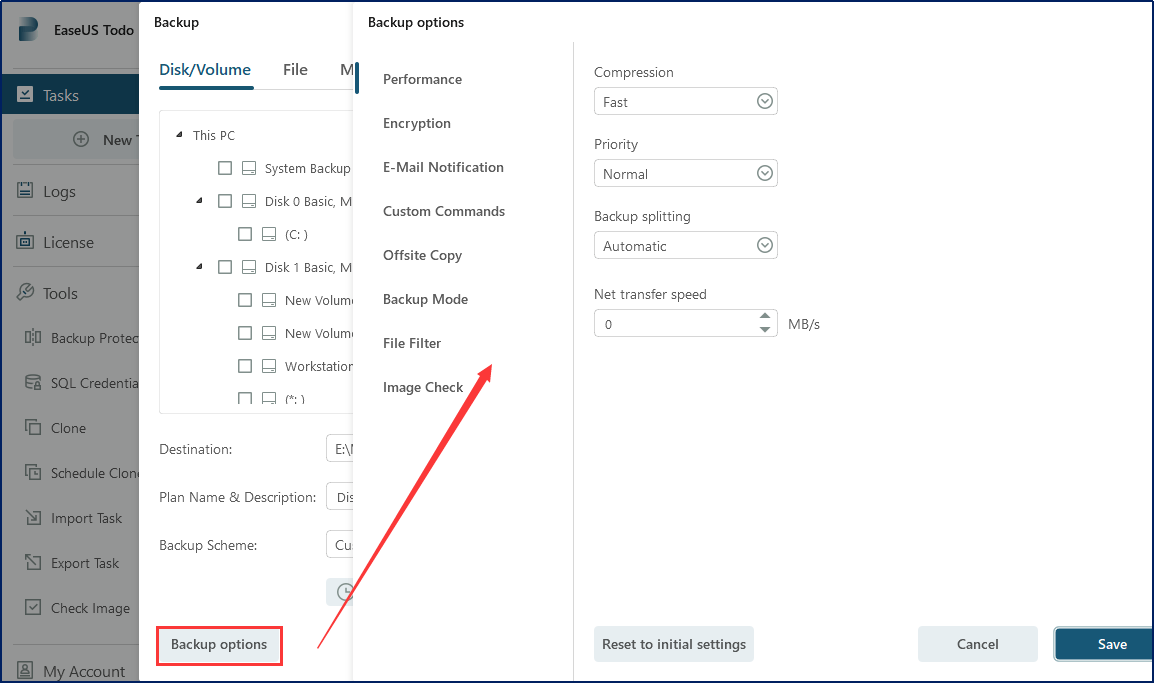
After configuring your backup task, click Proceed to start the system backup process.
Restore the System Image
Launch the EaseUS Todo Backup on your computer. Click on the Recovery button first. Then click the Browse… button to locate and select the system image that you created.
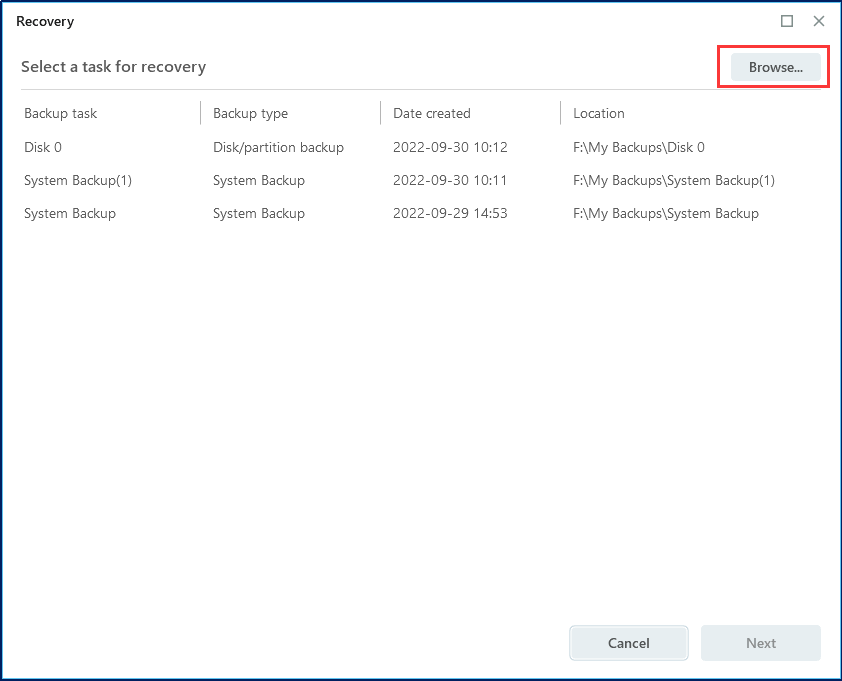
Next, select a location to restore the image and click Proceed.

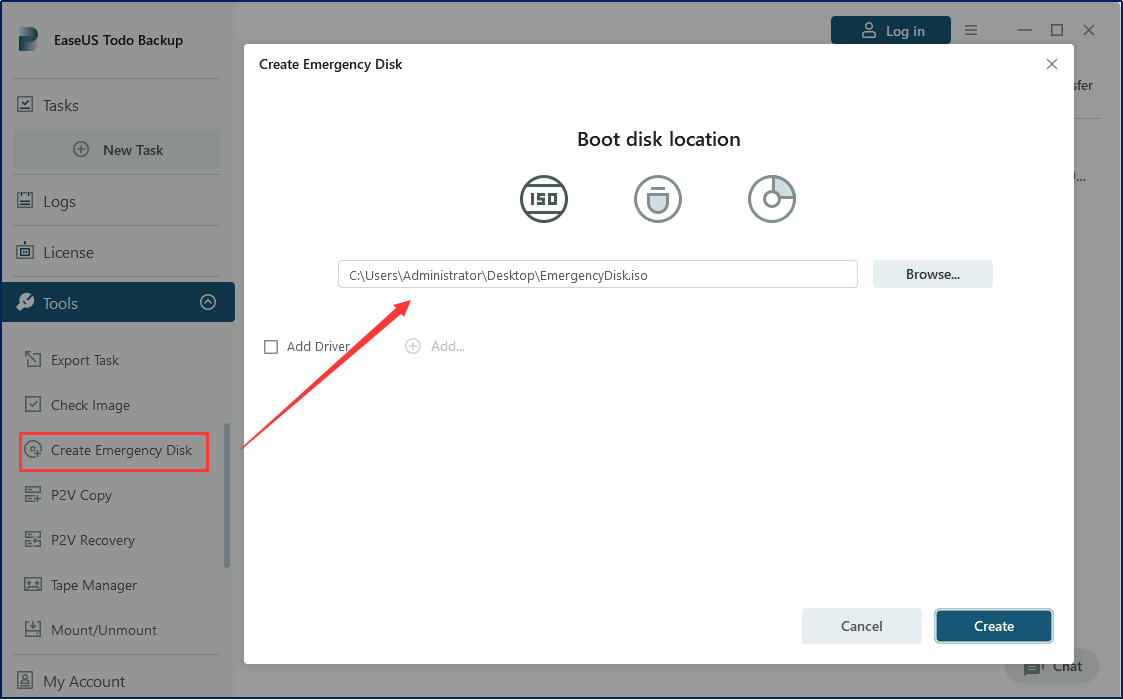
If your computer is bare metal, you must create a bootable media of EaseUS Todo Backup using the Create Emergency Disk function. Once you have created the bootable media, follow the steps above to initiate the system recovery process.
Once the recovery process is finished, your system is restored and transferred to the computer you need.
Conclusion
Creating a bootable ISO for Windows Server 2022 is a simple process that enables you to install the operating system seamlessly. By following the steps mentioned above, you can ensure a smooth installation of Windows Server 2022. EaseUS Todo Backup will also enable you to back up and restore your system to any computer you require safely and easily.
1. How to get Windows Server 2022 ISO?
To obtain the Windows Server 2022 ISO image, you must register on Microsoft’s official Windows Insider page. Access this webpage using any browser and locate the Windows Server 2022 option. Click on it and select the «Download the ISO» option from the provided choices.
2. Does Windows Server 2022 require a Secure Boot?
Windows Server 2022 does not require Secure Boot, but enabling it for enhanced security is recommended. Secure Boot helps protect against unauthorized operating systems and bootloaders from running during the startup process. However, it depends on the user’s preference and specific system requirements.
3. Is Windows Server 2022 UEFI or BIOS?
Windows Server 2022 supports UEFI (Unified Extensible Firmware Interface) and BIOS (Basic Input/Output System) boot modes. This allows flexibility in choosing the appropriate boot mode based on the hardware and system requirements.
4. Do you need a license for Windows Server 2022?
Yes, you need a valid license to use Windows Server 2022. Microsoft requires users to obtain a license for each operating system installation. Different licensing options are available, including per-core licensing for physical servers and virtual machine licensing for virtualized environments. It is essential to ensure compliance with licensing requirements to use Windows Server 2022 legally.
Start a live chat with an EaseUS Expert to tailor an enterprise backup solution specific to your requirements. We are here to assist you with the following as well:
- Commence a free trial
- Obtain a quotation
- Arrange a free demonstration
This blog post explains how to create a bootable USB drive for installing Windows Server 2025 on a physical server. The guide utilizes only the built-in tools available in Windows 10, Windows 11, or Windows Server. The installation process varies slightly depending on your system; it can be installed on either a BIOS system, which uses an MBR disk, or a UEFI-based system, which uses GPT disks. Follow these steps to prepare a USB drive for Windows Server 2025 installation.
Getting ready to create a USB Drive for a Windows Server 2025 Installation
First, you will need to have all the prerequisites in place.
- To download the Windows Server 2025 ISO file, you have various sources available. If you wish to test Windows Server 2025 without a license, you can obtain it from the evaluation center.
- Windows Server Evaluation Center offers options to try and download Windows Server 2025 download or to deploy it in Azure.
- Volume Licensing Service Center, where Volume License customers can download Windows Server 2025.
- An USB drive with at least 8GB size
Windows Server 2025 USB Thumb Drive for UEFI (GPT) systems
To create the USB drive to install Windows Server 2025 on a UEFI (GPT system, you do the following steps:
- The at least an 8GB USB drive has to be formatted in FAT32
- The USB needs to be GPT and not MBR
- You will need to split the wim file using dism since it is larger than 4GB
- Copy all files from the ISO to the USB drive
This is it, and here is how you do it. First, plug in your USB drive to your computer.
Open a PowerShell using the Run as Administrator option. You will need to change the path of the Windows Server 2025 ISO, and you will need to replace the disk number in the script before running the third command and make sure C:\Temp exists. From previous experiences with users, run the script line by line.
REMINDER: The following commands will wipe the USB Drive completely. Backup everything before you run through the PowerShell.
# Define Path to the Windows Server 2025 ISO
$ISOFile = "C:\Temp\WindowsServer2025.iso"

# Create temp diectroy for new image
$newImageDir = New-Item -Path 'C:\Temp\newimage' -ItemType Directory

# Mount iso
$ISOMounted = Mount-DiskImage -ImagePath $ISOFile -StorageType ISO -PassThru

# Driver letter
$ISODriveLetter = ($ISOMounted | Get-Volume).DriveLetter

# Copy Files to temporary new image folder
Copy-Item -Path ($ISODriveLetter +":\*") -Destination C:\Temp\newimage -Recurse

# Split and copy install.wim (because of the filesize)
dism /Split-Image /ImageFile:C:\Temp\newimage\sources\install.wim /SWMFile:C:\Temp\newimage\sources\install.swm /FileSize:4096


# Get the USB Drive you want to use, copy the disk number
Get-Disk | Where BusType -eq "USB"

# Get the right USB Drive (You will need to change the number)
$USBDrive = Get-Disk | Where Number -eq 2

# Replace the Friendly Name to clean the USB Drive (THIS WILL REMOVE EVERYTHING)
$USBDrive | Clear-Disk -RemoveData -Confirm:$true -PassThru

# Convert Disk to GPT
$USBDrive | Set-Disk -PartitionStyle GPT

# Create partition primary and format to FAT32
$Volume = $USBDrive | New-Partition -Size 8GB -AssignDriveLetter | Format-Volume -FileSystem FAT32 -NewFileSystemLabel WS2025

# Copy Files to USB (Ignore install.wim)
Copy-Item -Path C:\Temp\newimage\* -Destination ($Volume.DriveLetter + ":\") -Recurse -Exclude install.wim

# Dismount ISO
Dismount-DiskImage -ImagePath $ISOFile
After that, you can safely remove the USB drive and use it to boot your server from.
Windows Server 2025 USB Thumb Drive for BIOS (MBR) systems
To create the USB drive to install Windows Server 2025 on BIOS (MBR) systems, you can follow these steps:
- The at least an 8GB USB drive has to be formatted in NTFS
- USB drive needs to us MBR
- The partition needs to be set active
- Copy all files from the ISO to the USB Drive
This is it, and here is how you do it. First, plug in your USB drive to your computer.
Open a PowerShell using the Run as Administrator option. You will need to change the path of the Windows Server 2025 ISO, and you will need to replace the disk number in the script before running the third command and make sure C:\Temp exists. From previous experiences with users, run the script line by line.
REMINDER: The following commands will wipe the USB Drive completely. Backup everything before you run through the PowerShell.
# Define Path to the Windows Server 2025 ISO
$ISOFile = "C:\Temp\WindowsServer2025.iso"

# Get the USB Drive you want to use, copy the friendly name
Get-Disk | Where BusType -eq "USB"

# Get the right USB Drive (You will need to change the FriendlyName)
$USBDrive = Get-Disk | Where FriendlyName -eq "Kingston DT Workspace"

# Replace the Friendly Name to clean the USB Drive (THIS WILL REMOVE EVERYTHING)
$USBDrive | Clear-Disk -RemoveData -Confirm:$true -PassThru

# Convert Disk to MBR
$USBDrive | Set-Disk -PartitionStyle MBR

# Create partition primary and format to NTFS
$Volume = $USBDrive | New-Partition -UseMaximumSize -AssignDriveLetter | Format-Volume -FileSystem NTFS -NewFileSystemLabel WS2025

# Set Partiton to Active
$Volume | Get-Partition | Set-Partition -IsActive $true

# Mount ISO
$ISOMounted = Mount-DiskImage -ImagePath $ISOFile -StorageType ISO -PassThru

# Driver letter
$ISODriveLetter = ($ISOMounted | Get-Volume).DriveLetter

# Copy Files to USB
Copy-Item -Path ($ISODriveLetter +":\*") -Destination ($Volume.DriveLetter + ":\") -Recurse

# Dismount ISO
Dismount-DiskImage -ImagePath $ISOFile
After completing these steps, you may safely eject the USB drive and use it to boot your server for the installation of Windows Server 2025. For exmaple you can use this media to install it on a phyiscial server or even on an Intel NUC for Windows Server labs.
Conclusion
I trust this post has been informative. Should you have any inquiries, feel free to ask in the comments section.
Tags: Azure, Cloud, Microsoft, USB, USB Drive, USB media, Virtualization, Windows, Windows Server, Windows Server 2025 Last modified: July 3, 2024