Уведомления в Windows предназначены для информирования о важных обновлениях, сообщениях и оповещениях. Будь то новое сообщение электронной почты, напоминание в календаре или обновление системы, уведомления помогут вам оставаться на курсе событий без постоянной проверки приложений.
Чтобы помочь вам управлять этими уведомлениями и свести к минимуму отвлекающие факторы, Windows предлагает функцию «Не беспокоить«. Эта функция позволяет заглушить уведомления в определенное время или действия, обеспечивая непрерывную фокусировку.
Принцип работы уведомлений
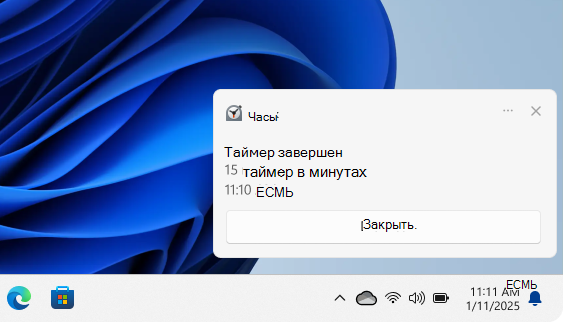
Уведомления в Windows могут отображаться в виде баннеровна экране, а также доступны в центре уведомлений. Вы можете настроить, какие приложения могут отправлять вам уведомления, приоритет и стиль этих оповещений.
При появлении новых уведомлений загорается значок колокольчика уведомлений на панели задач.
Для уведомлений, которые отображаются в виде баннеров, можно нажать кнопки быстрого действия в баннере для выполнения определенных задач, таких как отклонение напоминания или звук будильника.
Чтобы проверка пропущенные уведомления, откройте центруведомлений с помощью одного из следующих параметров:
-
Выберите часы или значок колокольчика уведомлений на панели задач
-
НажмитеКлавиша Windows +N.
-
Проведите пальцем от боковой части экрана
Действия с уведомлениями в центре уведомлений
В центре уведомлений можно выполнять различные действия с уведомлениями:
-
Ознакомьтесь с дополнительными сведениями или выполните действие, например ответ на сообщение, не открывая связанное приложение.
-
Если рядом со временем в уведомлении есть стрелка, щелкните стрелку, чтобы развернуть ее и проверка дополнительные сведения или дополнительные действия.
-
Нажмите кнопку закрыть в уведомлении, чтобы очистить его. Вы также можете нажать кнопку закрыть рядом с именем приложения, чтобы удалить все уведомления из определенного приложения.
-
Отключить все уведомления для определенного приложения: нажмите кнопку «Дополнительно» > Отключить все уведомления
-
Нажмите кнопку Очистить все, чтобы удалить все уведомления из центра уведомлений.
Настройка уведомлений
Управление уведомлениями важно, чтобы избежать перегрузки постоянными оповещениями. Настроив параметры уведомлений, вы можете обеспечить получение только самых важных обновлений, что позволит вам оставаться сосредоточенными и продуктивными без лишних перерывов.
Разверните каждый раздел, чтобы узнать больше:
-
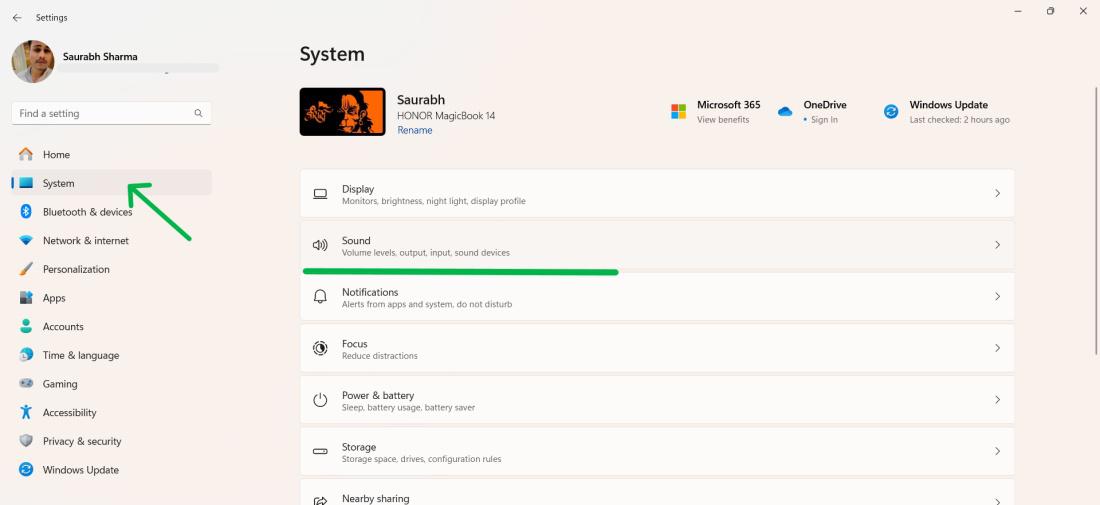
В приложении «Настройки» на устройстве с Windows, откройте Системные > Уведомления или используйте следующий ярлык:
Уведомления
-
Переключение переключателя рядом с элементом Уведомления вкл . или Выкл.
Чтобы настроить параметры уведомлений для каждого приложения на устройстве с Windows, выполните следующие действия:
-
В приложении «Настройки» на устройстве с Windows, откройте Системные > Уведомления или используйте следующий ярлык:
Уведомления
-
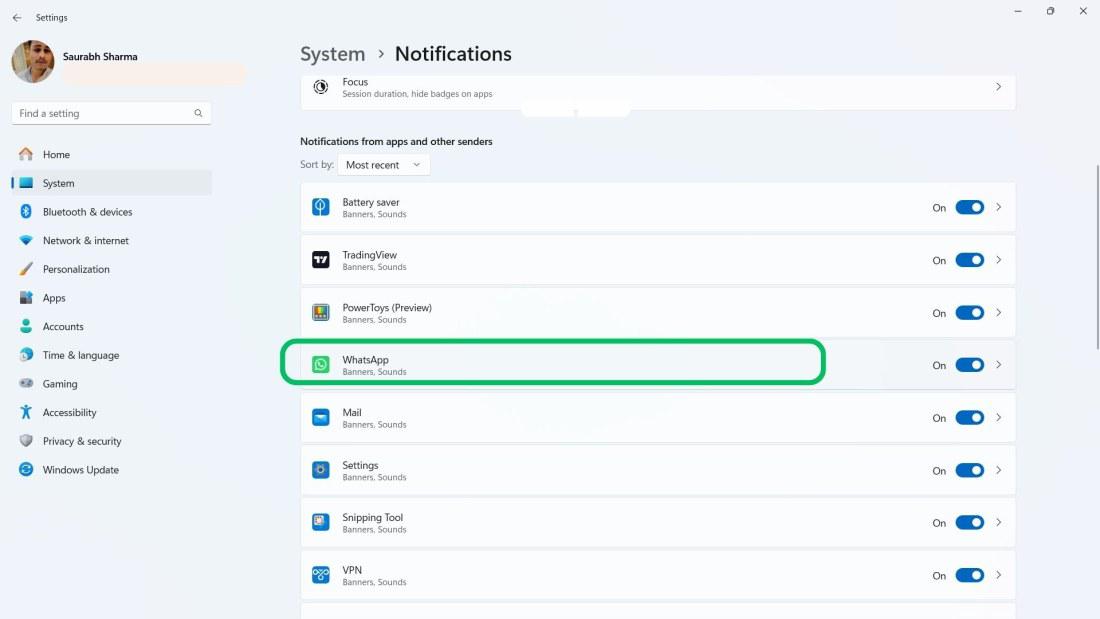
Выберите приложение в разделе Уведомления от приложений и других отправителей. Настройте параметры уведомлений. Ниже приведены доступные параметры.
-
Включение и отключение уведомлений: отключите уведомления для определенных приложений, если вы больше не хотите их получать.
-
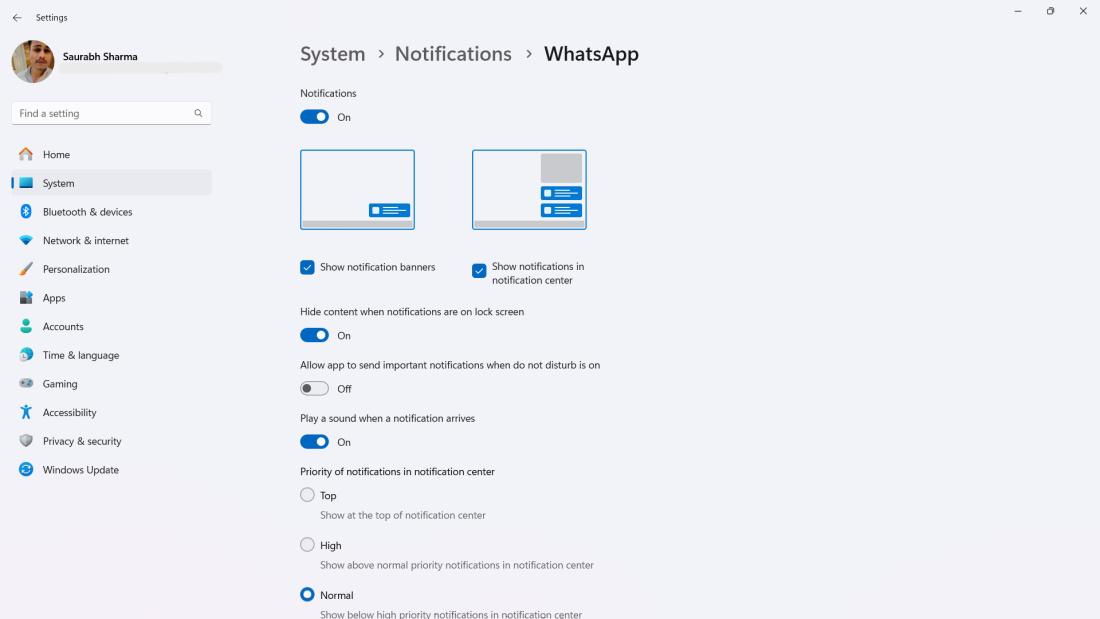
Отображение баннеров уведомлений: включение или отключение всплывающих баннеров для уведомлений
-
Отображение уведомлений в центре уведомлений: укажите, должны ли уведомления отображаться в центре уведомлений
-
Скрыть содержимое, когда уведомления находятся на экране блокировки: запретить отображение конфиденциальных уведомлений на экране блокировки
-
Воспроизведение звука: переключение звука для входящих уведомлений
-
Приоритет уведомлений. Задайте для этого параметра значение Верхнего, Высокого или Обычного. Только одно приложение можно задать в качестве верхнего приоритета, а уведомления с высоким приоритетом будут отображаться над обычными в центре уведомлений.
-
Настройте эти параметры, чтобы важные оповещения были выделены, а менее важные оповещения были сведены к минимуму.
Существует два дополнительных параметра уведомлений, которые можно просмотреть.
В приложении «Настройки» на устройстве с Windows, откройте Системные > Уведомления и разверните узел Дополнительные параметры или используйте следующий ярлык:
Уведомления
-
Отображение приветствия Windows после обновления и при входе в систему, чтобы показать новые и предлагаемые возможности: установите этот флажок, чтобы получить экран приветствия с новыми функциями и предложениями после обновления или при входе
-
Получение советов и рекомендаций при использовании Windows: включите этот флажок, чтобы получать полезные советы и предложения при использовании Windows
Не беспокоить
Функция «Не беспокоить» в Windows предназначена для того, чтобы помочь вам сосредоточиться на уведомлениях в критические моменты. Эту функцию можно активировать вручную или настроить для автоматического включения с фокусом или при определенных условиях.
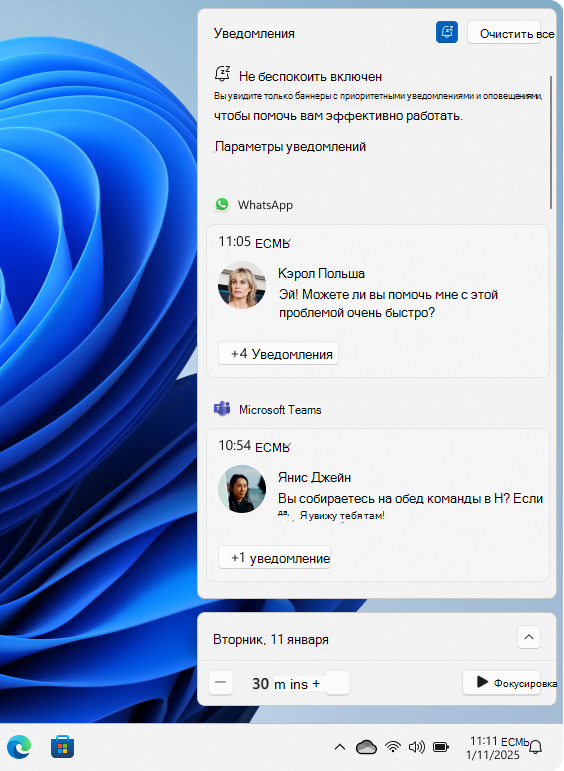
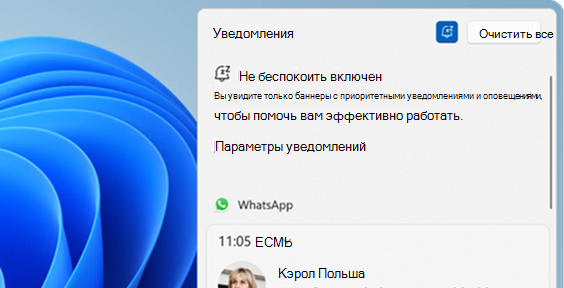
Чтобы вручную включить параметр «Не беспокоить«, откройте центр уведомлений и щелкните значок колокола с ZZ. Это приведет к отключению всех уведомлений, пока вы не выключите их вручную.
Когда вы снова будете готовы получать уведомления, вернитесь в центр уведомлений и нажмите ту же кнопку, чтобы отключить не беспокоить. Затем вы можете просмотреть все уведомления, которые вы пропустили, пока не беспокоить было активно.
Если не беспокоить, вы будете получать только баннеры для будильников, напоминаний и приложений по вашему выбору. Другие уведомления отправляются непосредственно в центр уведомлений, пока вы не отключите его.
Настройка не беспокоить
Вы можете настроить параметр «Не беспокоить», задав условия для автоматического включения и настроив уведомления о приоритете. Разверните каждый раздел, чтобы узнать больше:
-
В приложении «Настройки» на устройстве с Windows, откройте Системные > Уведомления или используйте следующий ярлык:
Уведомления
-
Разверните узел Включить не беспокоить автоматически и настройте следующие условия:
-
В определенное время суток
-
При дублировании дисплея
-
При игре
-
При использовании приложения в полноэкранном режиме
-
В течение первого часа после обновления компонентов Windows
-
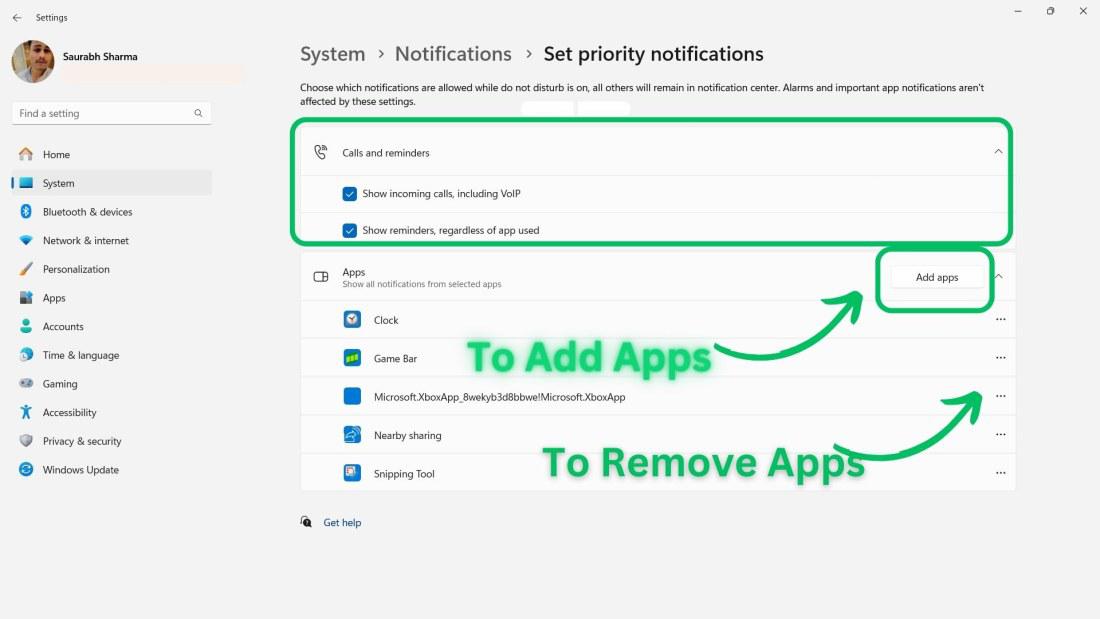
С помощью параметров приоритетных уведомлений можно настроить, разрешены ли вызовы, напоминания и определенные уведомления приложений, пока включен параметр «Не беспокоить»:
В приложении «Настройки» на устройстве с Windows, откройте system > Notifications > Set priority notifications (Задать уведомления о приоритете ) или используйте следующее сочетание клавиш:
Уведомления
-
В разделе Звонки и напоминания установите флажки, чтобы разрешить входящие звонки или напоминания, пока не беспокоить
-
В разделе Приложения выберите приложения, которым разрешено отправлять уведомления, пока не беспокоить, нажав кнопку Добавить приложения.
Статьи по теме
Фокус: оставайтесь на задаче без отвлекающих факторов в Windows
Apps can show alerts when they need a user’s attention e.g., the ‘Do you want to save changes’ alert you try to close a Notepad file with unsaved changes. They can also show messages e.g. when a file has downloaded or it has been processed.
These messages are useful but they don’t have to come from an app. Users can show a custom message box on Windows 10 using a batch script, PowerShell script, or by running a command in Command Prompt or PowerShell.
Need to show a toast notification? Use a PowerShell module.
A custom message box will have a title, a message, and a call to action button i.e., an OK button which will dismiss the message.
First, decide if you want to use a script or if you want to run a command. Running a command is easier so we’ll go over the script method first.
1. Batch/PowerShell script to show message box
Follow the steps below to create the script.
- Open a new Notepad file (or use any text editor of your choice).
- Paste the following in the Notepad file.
@echo off

powershell -Command "& {Add-Type -AssemblyName System.Windows.Forms; [System.Windows.Forms.MessageBox]::Show('My Message', 'Message title', 'OK', [System.Windows.Forms.MessageBoxIcon]::Information);}"
- If you intend to use a PowerShell script, remove the first line:
@echo off. - Edit the script as below:
- Replace ‘My Message‘ with the message you want the message box to show.
- Replace “Message Title” with the title of the message box you want.
Example:
@echo off

powershell -Command "& {Add-Type -AssemblyName System.Windows.Forms; [System.Windows.Forms.MessageBox]::Show('Go to the reactor room', 'Reactor Meltdown', 'OK', [System.Windows.Forms.MessageBoxIcon]::Information);}"
- Save the file with the .bat extension for a batch script or the .ps1 extension for a PowerShell script.
- Run the script and the message box will appear.
2. Command Prompt or PowerShell – Message box
Showing a message box from the Command Prompt or from PowerShell is easy. You do not need admin rights to show the message box.
Command Prompt
- Open Command Prompt.
- Run the following command in it.
- Edit the command as below to set your custom message and title.
- Replace ‘My Message’ with the message you want the message box to show.
- Replace “Message Title” with the title you want the message box to have.
@echo off

powershell -Command "& {Add-Type -AssemblyName System.Windows.Forms; [System.Windows.Forms.MessageBox]::Show('My Message', 'Message Title', 'OK', [System.Windows.Forms.MessageBoxIcon]::Information);}"
PowerShell
- Open PowerShell.
- Run the following command.
- Edit the command to add your own message and title.
- Replace ‘My Message’ with the message you want the message box to show.
- Replace “Message Title” with the title you want the message box to have.
powershell -Command "& {Add-Type -AssemblyName System.Windows.Forms; [System.Windows.Forms.MessageBox]::Show('My Message', 'Message Title', 'OK', [System.Windows.Forms.MessageBoxIcon]::Information);}"

Fatima Wahab
Fatima has been writing for AddictiveTips for six years. She began as a junior writer and has been working as the Editor in Chief since 2014.
Fatima gets an adrenaline rush from figuring out how technology works, and how to manipulate it. A well-designed app, something that solves a common everyday problem and looks
Last Updated :
16 Apr, 2024
Windows 11 offers a feature of customizable notification settings, which enables users to select the type of alerts they wish to receive and how these will be displayed on their screen. Such notifications are useful in keeping the users updated about the latest updates, reminders, and messages, but can be distractful and annoying if they are too frequent or not relevant.
In this article, We’ll show you how to customize notification settings in Windows 11.
Table of Content
- How to Turn Notifications Off or On?
- How to Turn Do Not Disturb On or Off
- How to Customize Do Not Disturb Automatic Rules?
- How to Customize Priority Notifications in Windows 11?
- How to Customize Notifications for Each App?
- How to Change Notification Sound?
- How to Change Banner Notifications Duration?
- How to Disable Lock Screen Notifications?
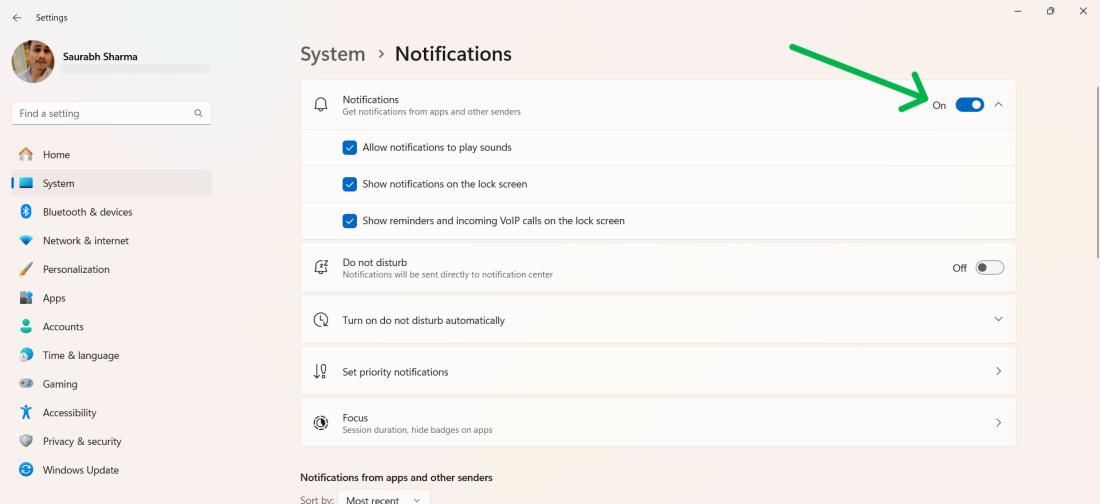
1. How to Turn Notifications Off or On?
Step 1: Press Win + I to open settings then navigate to System > Notifications.
Step 2: Toggle the «Notifications» switch to turn them on or off for all apps.
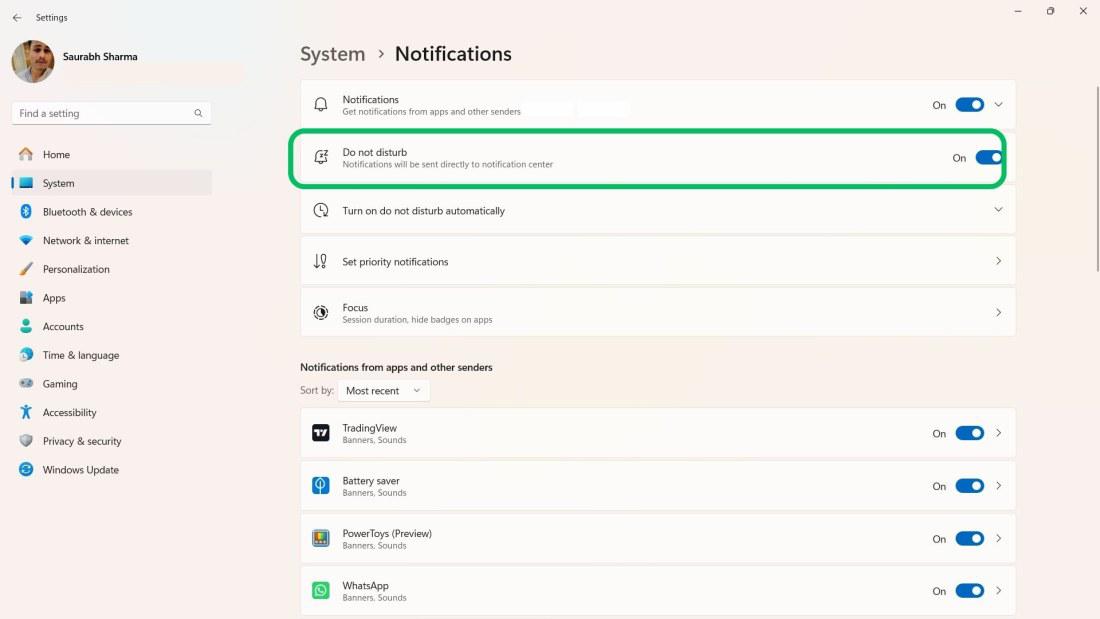
2. How to Turn Do Not Disturb On or Off?
DND (Do Not Disturb) mode is a feature that allows you to silence notifications during certain times or activities, including when you are working, sleeping, playing a game, or presenting something. To turn Do Not Disturb mode on or off manually, follow these steps:
Step 1: Press Win + I to open settings then navigate to System > Notifications.
Step 2: Toggle on the «Do not disturb» to selient the all notifications
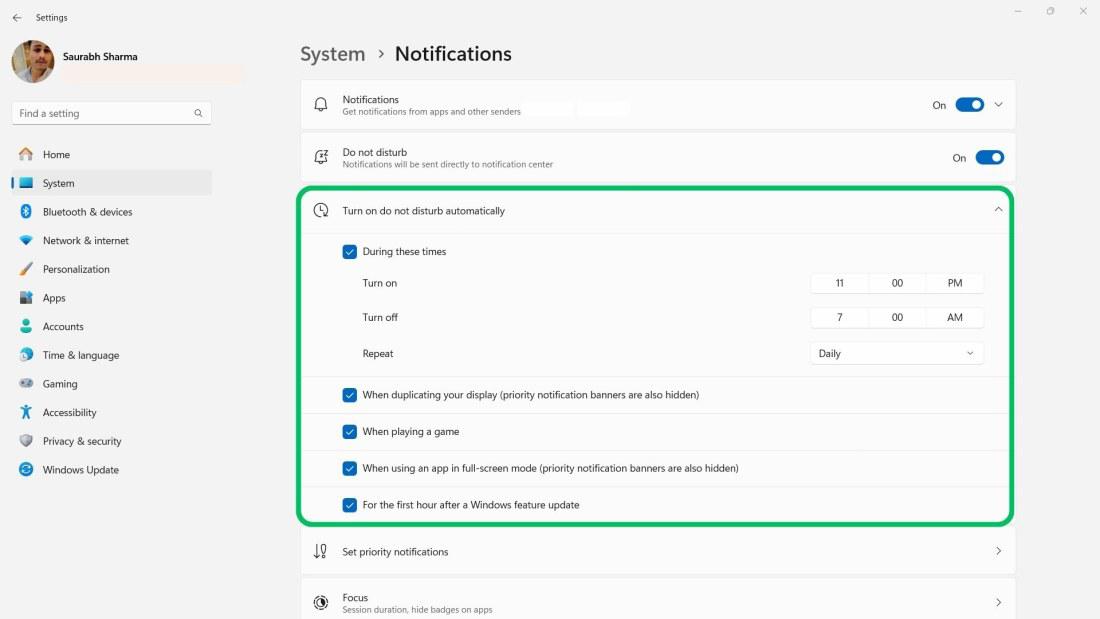
3. How to Customize Do Not Disturb Automatic Rules?
Step 1: Expand the «Turn on do not disturb automatically«
Step 2: From the Reminders list of option you can turn on the features as your need
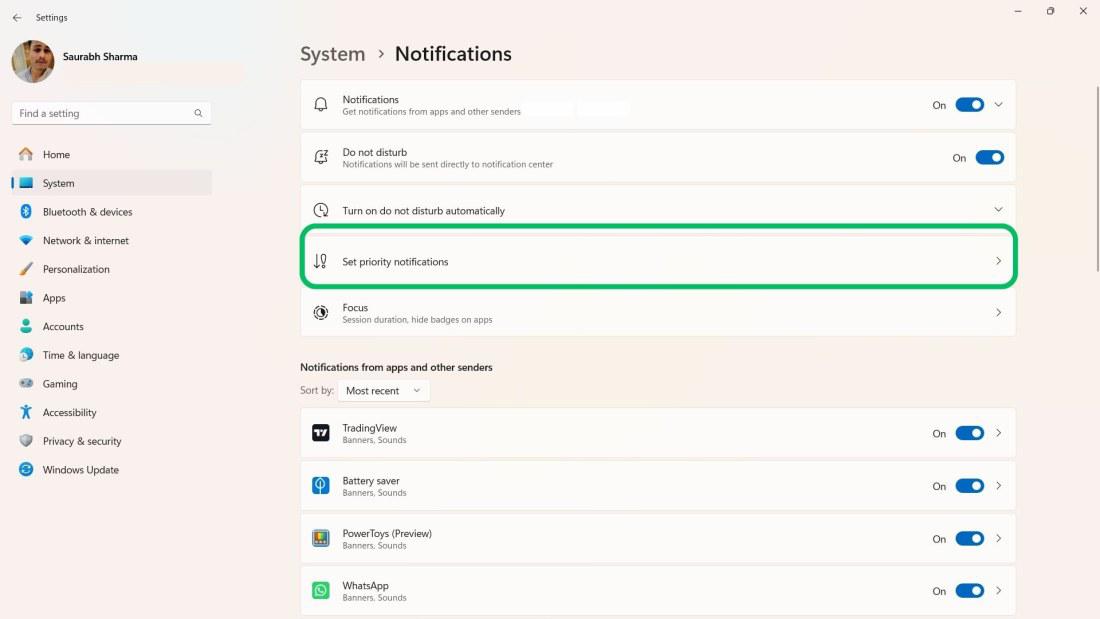
4. How to Customize Priority Notifications in Windows 11?
Step 1: Press Win + I to open settings then navigate to System > Notifications
Step 2: Click on the «Set priority notifications»
Step 3: The Calls and Reminders group is for notifications from apps like Teams or alarms.
Step 4: For Apps, you can turn the toggle on for each app that you want to receive notifications from when Do Not Disturb is on.
Step 5: To add apps to the priority list, click Add apps and select the desired app to not disturb.
Step 6: To remove an app, click the ellipsis button and choose Remove.
5. How to Customize Notifications for Each App?
Step 1: Press Win + I to open settings then navigate to System > Notifications
Step 2: To customize an app, scroll down to your apps and select the desired app
Step 3: Here, you can change these settings:
- Show banners: Turn off to hide pop-up alerts.
- Show in center: Turn on to see notifications in the taskbar area.
- Hide content on lock: Turn on to conceal notification details on the lock screen.
- Allow important in DND: Turn on to let some notifications bypass Do not disturb mode.
- Play sound: Turn on to hear a sound when notified.
- Priority in center: Set the order of notifications from different apps.
6. How to Change Notification Sound?
Step 1: Press Win + I to open settings then navigate to System > Sound
Step 2: Under the Advanced section and click More Sound settings
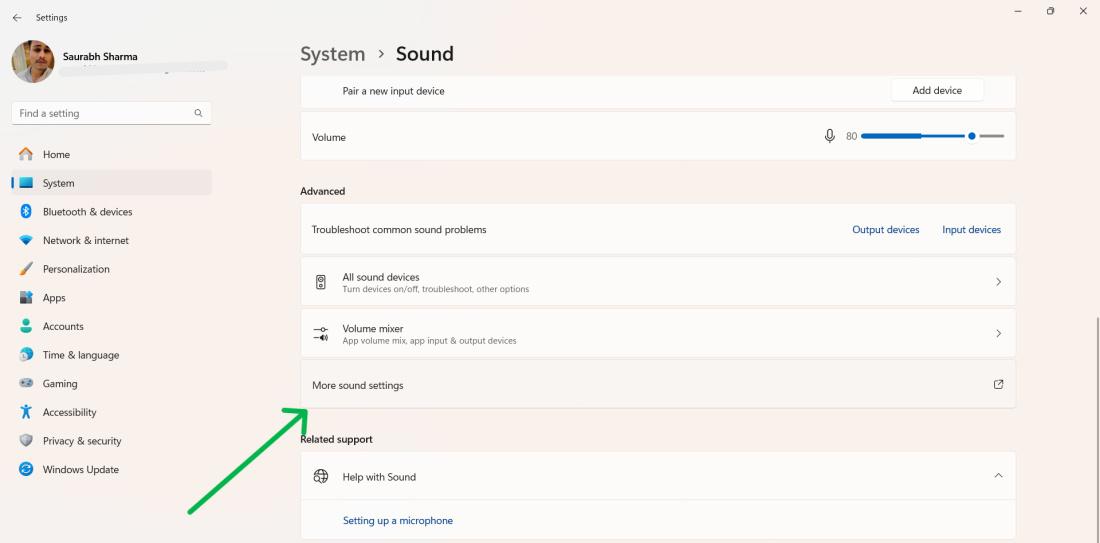
Step 3: Scroll down to the Notification option under the Sounds tab.
Step 4: Select the sound from the menu, preview it, and then click Apply.

Step 5: Click on “OK”
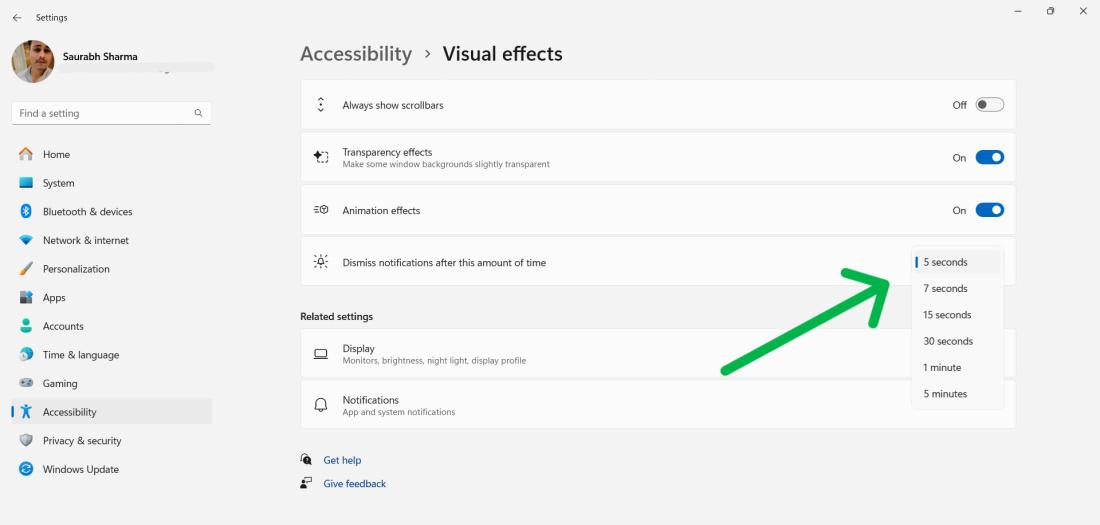
Step 1: Press Win + I to open settings then navigate to Accessibility > Visual effects
Step 2: From Dismiss notifications after this amount of time dropdown menu you can select any time
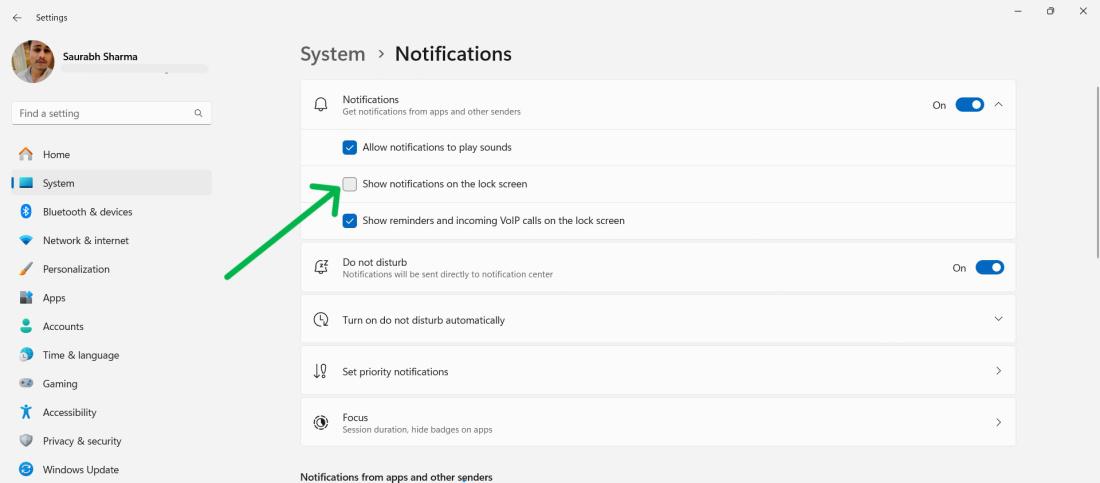
8. How to Disable Lock Screen Notifications?
Step 1: Press Win + I to open settings then navigate to System > Notifications.
Step 2: Click on Notification to expand then uncheck the «Show notifications on the lock screen.»
Quick Solution!
Here is a quick solution for our active and speedy learners. Follow these steps to customize notification settings in Windows 11.
Turn On or Off Notifications:
- Press Win + I, go to System > Notifications, and toggle on and off «Notifications»
Turn On or Off Do Not Disturb Mode:
- Press Win + I, go to System > Notifications, and toggle «Do not disturb» to silence notifications.
Customize Notification Settings in Windows for Each App:
- Press Win + I, and go to System > Notifications. Select the app, and customize settings: hide banners, show in taskbar, hide content on lock, allow important in DND, play sound, set priority.
Conclusion
In Conclusion, We have shown you how to Customize Notification Settings in Windows 11 and 10. You can enable/disable notifications, use the Do Not Disturb mode, personalize priority notifications, switch the notification sound, and disable notifications from some apps or sources. By adjusting notification settings you can improve your productivity, privacy and user experience.
А вы знали, что можно легко настроить под себя оповещения, которые вы получаете на компьютере под управлением Windows 10? Благодаря этому вы сможете сфокусироваться на том, что действительно важно для вас.
Все настройки можно найти в меню Параметры/Settings > Система/System > Уведомления и действия/Notifications & actions (а если вы читаете с ПК на Windows 10, можно просто кликнуть здесь).
Если вы хотите, чтобы вас не беспокоили всплывающие напоминания, уведомления и будильники, включите тихий режим, кликнув правой кнопкой мыши по иконке Центра уведомлений на панели задач в правом нижнем углу и выбрав в контекстном меню Включить режим «Не беспокоить»/Turn on quiet hours.
Чтобы ничего лишнего не появлялось во время ваших презентаций, активируйте опцию Скрыть уведомления при дублировании моего экрана/Hide notifications when I’m duplicating my screen. Также может быть полезно запретить отображение оповещений на экране блокировки (Отображать уведомления на экране блокировки/Show notifications on the lock screen).

Если вам надоели уведомления от какого-то конкретного приложения, просто выключите их в разделе Получать уведомления от этих отправителей/Get notifications from these senders.

Можно выключить все оповещения на вашем ПК, деактивировав тумблер Получать уведомления от приложений и других отправителей/Get notifications from apps and other senders.

Возможно, вам будет интересен предыдущий пост из серии Советы по Windows 10.
Советы по Windows 10: превратите текст во временную шкалу в PowerPoint
- Hi, I’m Den 👋/
- Writing/
- Generating Windows 10 Notifications With PowerShell/
·543 words
I recently moved all my development boxes to Windows. That’s right, all those Mac machines, with the exception of one that I need for testing, have been Boot Camp-ed to use the latest and greatest of the Windows 10 ecosystem. As part of this process, I started building some automation scripts — I’ve had that for macOS in the form of shell scripts that I could run whenever I re-installed the system, but nothing like that for Windows. This led me down the rabbithole of trying to figure out how to use PowerShell to do things that I’ve been doing in Bash for the past couple of years. And before someone says, “But WSL — you can just re-use your Bash scripts!” Yes and no — I had some interesting dependencies that don’t quite translate as well to Bash, so here I am, stuck dealing with PowerShell.
Here is the thing about installation/system provisioning scripts — they can run for some time. I wanted to be alerted when they finish specific steps, error out, or are finished. The standard approach might have been using the console output, but that is just basic. Instead, I resorted to using native Windows 10 APIs, that would allow me to produce toast notifications, as if I am running a real application.
Here is how I did it (you can also grab the code in a Gist):
function Show-Notification {
    [cmdletbinding()]
    Param (
        [string]
        $ToastTitle,
        [string]
        [parameter(ValueFromPipeline)]
        $ToastText
    )

    [Windows.UI.Notifications.ToastNotificationManager, Windows.UI.Notifications, ContentType = WindowsRuntime] > $null
    $Template = [Windows.UI.Notifications.ToastNotificationManager]::GetTemplateContent([Windows.UI.Notifications.ToastTemplateType]::ToastText02)

    $RawXml = [xml] $Template.GetXml()
    ($RawXml.toast.visual.binding.text|where {$_.id -eq "1"}).AppendChild($RawXml.CreateTextNode($ToastTitle)) > $null
    ($RawXml.toast.visual.binding.text|where {$_.id -eq "2"}).AppendChild($RawXml.CreateTextNode($ToastText)) > $null

    $SerializedXml = New-Object Windows.Data.Xml.Dom.XmlDocument
    $SerializedXml.LoadXml($RawXml.OuterXml)

    $Toast = [Windows.UI.Notifications.ToastNotification]::new($SerializedXml)
    $Toast.Tag = "PowerShell"
    $Toast.Group = "PowerShell"
    $Toast.ExpirationTime = [DateTimeOffset]::Now.AddMinutes(1)

    $Notifier = [Windows.UI.Notifications.ToastNotificationManager]::CreateToastNotifier("PowerShell")
    $Notifier.Show($Toast);
}
A couple of things are going on in the Show-Notification function. First, the parameters. I am a fan of passing things through pipes (also known as |). That is, I like to pass the output of a previous command to the next one seamlessly. By adding the ValueFromPipeline attribute to $ToastText, I am telling PowerShell that this parameter, when omitted, should just be taken from whatever ran before the function call.
Next, I am getting the native toast template that ships in Windows 10. There are a couple that I can use, but the one of most interest is ToastText02 — a simple template that allows specifying a toast title and a message. The interesting part here is that for me to manipulate the toast notification, I need to know the XML structure of the template. The latest documentation, unfortunately, is not that good in this regard. There is content on the toast schema but it does little in telling me what the actual XML looks like for the template I am using. I had to dig through legacy content to find real XML examples — and that was good enough!
Using the newly acquired XML knowledge, I now knew what I needed to modify. I used .NET XML functions to add my text to the notification bindings, and I was on my way, right after serializing the XML into a ToastNotification instance. All that was left was using CreateToastNotifier to create the notification manager instance, and show the actual toast.