
On Windows 10, you can combine multiple drives to create one big logical storage using a “RAID 5” configuration to improve performance and protect your files from a single drive failure.
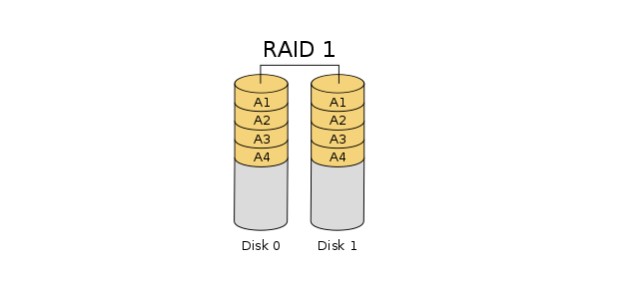
While there are many RAID (Redundant Array of Independent Disks) levels that you can use, when using the striped volume with parity (RAID 5), the data is spread across three or more drives using parity. In the event of a hardware failure, you can replace the drive, and the data will be regenerated from the data on the remaining drives.
Although you can use a hardware-based solution on Windows 10, if you try to set up a software-based RAID 5 with the Disk Management application, you will notice that the option is grayed out because it’s only available on Windows Server. However, you can use Storage Spaces to create a striped volume with parity that works just like a RAID 5 configuration.
This guide will teach you how to set up a RAID 5 storage on Windows 10 using Storage Spaces.
Create a RAID 5 storage from Storage Spaces on Windows 10
To set up a RAID 5 storage from Storage Spaces on Windows 10, use these steps:
-
Open Settings on Windows 10.
-
Click on System.
-
Click on Storage.
-
Under the “More Storage settings” section, click the “Manage Storage Spaces” option.

-
Click the “Create a new pool and storage space” option.
-
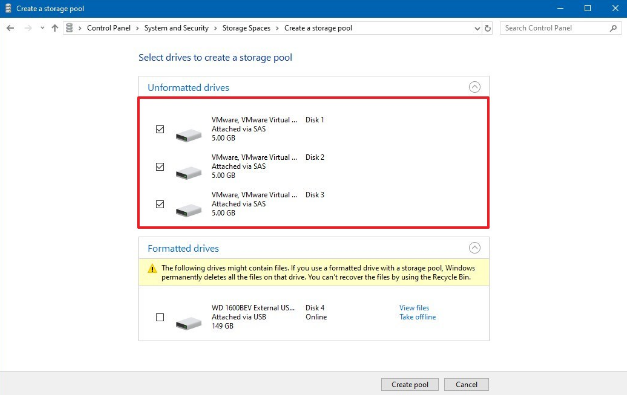
Select the drives (at least three) to create a storage pool.

-
Click the Create pool option.
-
Under the “Name and drive letter” section, specify a name, letter, and file system for the storage array.
-
Under the “Resiliency” section, use the “Resiliency type” drop-down menu and select the Parity option, equivalent to the RAID 5 level.

-
Under the “Size” section, specify the maximum size as needed.
Important: Change the size option carefully because a pool can be larger than the actual physical capacity, and if you run out of space, you will need to add more drives. You can refer to this Microsoft TechNet page to calculate the parity of the storage space. For this guide, I’m dividing the total pool capacity by three, and multiplying it by two, because I’m using three drives. Also, on a RAID 5 configuration, you will permanently lose one drive for parity.
-
Click the Create storage space button.


Once you complete the steps, the RAID 5 storage will be created to start storing files with fault tolerance, and if one of the drives fails, the data will still be accessible.
You can technically use any drive, but traditional hard drives are usually not designed for this setup. If you’re building a storage array to store a lot of files, or you plan to share the storage in the network with other users, you should try drives designed for storage arrays, such as the 4TB drive from Seagate IronWolf or 4TB Western Digital (Red).
Why You Can Trust Pureinfotech
The author combines expert insights with user-centric guidance, rigorously researching and testing to ensure you receive trustworthy, easy-to-follow tech guides. Review the publishing process.
Создание RAID массива на вашем сервере позволяет в разы увеличить уровень сохранности данных в случае поломки любого из дисков. В этой статье мы рассмотрим, как создать RAID массив на Windows Server.
Содержание
- Что такое Windows Server?
- Отличия Windows Server от обычной системы Windows
- Как создать RAID массив в Windows Server?
- Как определить вышедший из строя диск и заменить его в Windows Server?
- Как восстановить сломанный RAID массив в Windows Server?
Что такое Windows Server?
Windows Server – это операционная система, разработанная специально для использования на серверах. В ее состав входит набор специальных служб и утилит, которые призваны обеспечить максимально быструю и удобную работу с сервером. На сегодняшний день Windows Server является наиболее распространенной системой в мире. Причина тому проста – это очень гибкая система, что позволяет использовать ее в файловых и почтовых серверах, DNS-службах, удаленных серверах, мультимедиа серверах и т.д.
Кроме этого, Windows Server работает достаточно быстро и обеспечивает необходимый уровень безопасности данных. Требования к безопасности данных стали причиной тщательных проверок системы на наличие уязвимостей и сбоев, а также добавление нового функционала, отвечающего за безопасность. Одной из таких функций стала общая языковая среда выполнения. Она отвечает за общую безопасность вычислительной среды.
Помимо прочего, для увеличения уровня сохранности данных пользователь может создать программный RAID массив путем объединения нескольких жестких дисков.
Установка и администрирование Windows Server просты, а наличие политик сильно упрощает управление. На додачу, Windows Server позволяет автоматизировать многие процессы, что дает ей еще одно преимущество перед конкурентами. Также присутствует возможность объединять несколько серверов в одну сеть. Именно из-за этого многие большие фирмы выбирают именно ее для своих целей.
Отличия Windows Server от обычной системы Windows
Схожесть обычной Windows и Windows Server можно увидеть не только в названии. Microsoft построила обе эти системы на общем программном коде, у них очень похожая (практически идентичная) графическая оболочка (например рабочий стол, дизайн окон и меню пуск и т.д.) Также можно запускать программы, созданные для обычной Windows на Windows Server и наоборот. То есть вы с легкостью сможете установить Google Chrome или Adobe Photoshop на Windows Server. Windows Server также как и обычная Windows позволяет создать программный RAID поскольку это позволяет обеспечить целостность данных на сервере в случае выхода одного из накопителей из строя. Однако, помимо общего ядра и общего дизайна существует целый ряд особенностей, которые делают эти системы абсолютно разными.
В первую очередь стоит сказать, что набор функций и утилит у Windows Server и обычной Windows будет сильно отличатся. Тут все дело в том, что всем нам привычные Windows 7, 8 и 10 рассчитаны на персональное использование на настольных компьютерах, ноутбуках и планшетах. Естественно, что автоматически отпадает необходимость в использовании таких служб как DHPC, удаленного развертывания Windows, Active Directory и многих других серверных служб, так как для обычного пользователя они просто не нужны, а если даже в возникнет такая необходимость – их без проблем можно доустановить отдельно. В то же время в Windows Server нет необходимости в том же браузере, мультимедиа плеерах, играх и даже в графическом интерфейсе, так как администрировать сервер можно удаленно. Именно поэтому после установки этой системы на сервере сразу же открывается диспетчер сервера, который предлагает отключить графический интерфейс и настроить другие базовые функции.

Благодаря этому решению (отключению графического интерфейса) удается сильно ускорить работу системы, так как та часть ресурсов, которая раньше занималась обработкой графики теперь выделена под нужды сервера. Даже сама Microsoft рекомендует отключать графический интерфейс для увеличения производительности.
Windows Server обеспечивает более быструю передачу данных при помощи функции SMB Direct. В обычной Windows эта функция включена только в Windows Pro версию.
Помимо встроенного набора функций эти две системы различаются поддержкой более мощного оборудования. Так, если обычная Windows поддерживает до 2 ТБ оперативной памяти (и то здесь речь идет о Pro версии, обычные же поддерживают меньше) то Windows Server поддерживает до 24 ТБ ОЗУ. Поддержка таких больших объемом обусловлена тем, что серверы более рационально используют оперативную память нежели настольный компьютер или ноутбук. Так, например, далеко не каждый обычный рабочий стационарный компьютер сможет распознать хотя бы 2 ТБ ОЗУ, не говоря уже о 24 ТБ.
Помимо оперативной памяти Windows Server может работать с большим количеством сокетов. То есть, если обычная операционная система поддерживает работу с максимум двумя процессорами, то Windows Server может работать одновременно с 64-мя процессорами.
Ну и напоследок, поговорим о цене на Windows Server. Так как пользователями этой ОС в основном являются фирмы и малый бизнес – цена на нее заметно дороже и начинается от $500 с базовым набором функций и заканчивается $6200 для самых требовательных клиентов.
Как создать RAID массив в Windows Server?
Как уже упоминалось выше в Windows Server можно создать RAID массив, который обеспечит сохранность данных в случае выхода из строя одного из дисков. Создавать программный RAID рекомендуется перед тем, как вы отключите графический интерфейс вашего сервера. Процесс создания массива прост и выглядит так же, как и в Windows 10. Для примера, создадим RAID 5 в Windows Server, предварительно подключив к нему все диски из которых будет состоять наш массив. Для создания RAID 5 в Windows Server следует:
Шаг 1: Щелкните правой кнопкой мыши по «Пуск» и выберите «Управление дисками»
Шаг 2: В менеджере дисков будут отображаться все подключенные диски. Щелкните правой кнопкой мыши по одному из нужных дисков и выберите «Создать том RAID-5»
Шаг 3: Перед вами откроется мастер создания томов RAID-5. Щелкните «Далее», затем добавьте диски в массив используя кнопку «Добавить» и снова нажмите «Далее»


Шаг 4: Выберите букву для вашего массива и нажмите «Далее»

Шаг 5: Теперь выберите файловую систему и имя массива. Подтвердите действием нажатием кнопки «Далее». Мастер создания тома RAID-5 покажет вам все параметры будущего массива. Нажмите «Готово»


Система выдаст предупреждение о том, что диски будут переконвертированы в динамические и что вся информация будет удалена. Подтвердите запуск конвертирования нажатием кнопки «Да»

После этого запустится процесс форматирования и ресинхронизации всех дисков. Длительность этого процесса будет зависеть от объема ваших дисков и мощности сервера.
По окончании этих процессов вы получите новый RAID-5 массив, с которым можно будет работать как с обычным диском. Теперь можно отключить графический интерфейс и работать с сервером удаленно или через терминал.
Стоит также отметить, что при помощи этого способа можно создать также RAID 0 (страйпинг), RAID 1 (зеркалирование) и JBOD (объединение всех дисков в один большой без чередования или зеркалирования). Для этого на втором шаге выберите нужную вам опцию:
- Добавить составной том – для создания JBOD;
- Добавить чередующийся том – для создания массива RAID 0;
- Создать зеркальный том – для создания массива RAID 1;
Как определить вышедший из строя диск и заменить его в Windows Server?
Использование RAID массивов позволяет сохранить данные в случае поломки одного из накопителей. Однако, если любой из дисков вышел из строя – следует немедленно заменить его, иначе вы можете потерять важную информацию, поскольку некоторые типы массивов не переживут поломку еще одного накопителя (например, RAID-5).
Но как узнать, что диск вышел из строя и определить какой именно диск сломался?
В случае поломки любого из дисков вы заметите сильное снижение производительности. Поэтому, если ваш сервер начал сильно тормозить – в первую очередь проверьте все ли диски работают нормально. Для этого:
Шаг 1: Нажмите комбинацию клавиш «Win+R», затем в открывшемся окне введите команду «diskmgmt.msc» и нажмите кнопку «ОК» для подтверждения.

Шаг 2: В окне менеджера дисков состояние вашего массива будет отображаться как «Failed Redundancy» (Отказавшая избыточность), а возле поломанного диска будет состояние «Missing» (у остальных дисков массива состояние будет «Online»)


После того, как вы определили какой именно диск вышел из строя – замените его. Для этого подключите новый диск к вашей системе (предварительно отключив питание), запустите компьютер и выполните вышеописанные два шага. Затем, находясь в управлении дисками следует:
Шаг 1: Щелкните правой кнопкой мыши на поломанном диске и выберите «Repair Volume» (Восстановить диск).

Шаг 2: В открывшемся окне выберите диск, который будет использоваться вместо сломанного и нажмите «ОК»
Шаг 3: Система выдаст предупреждение, что новый диск будет переконвертирован в динамический и что информация на нем будет уничтожена. Нажмите «ОК»
После этого запустится процесс ресинхронизации дисков (как при создании массива), по завершении которого ваш массив будет полностью восстановлен.
Стоит отметить, что если ваш массив состоит из дисков объемом в несколько терабайт – будьте готовы к тому, что процесс восстановления может занять достаточно долгое время.
Как восстановить сломанный RAID массив в Windows Server?
RAID массивы являются достаточно надежным решением, когда речь идет о работе дисков, однако данные могут быть утеряны и по другим причинам. Например, ваш RAID массив может перестать работать из-за поломки контроллера, который отвечает за распределение данных между дисками. Причиной тому чаще всего являются сбои в работе операционной системы, немного реже — скачки напряжения или резкое отключение питания. Кроме того, людям свойственно ошибаться и часто данные могут быть утеряны из-за случайного удаления или форматирования массива, а иногда неправильные действия пользователя приводят к повторному созданию массива. Естественно, что в таком случае данные полностью пропадают.
Если такая ситуация приключилась с вами – не паникуйте. Лучше всего – сразу же воспользуйтесь программой RS RAID Retrieve – профессиональным решением для восстановления утерянных данных.
Благодаря тому, что Windows 7, 8, 10 и Windows Server построены на одном и том же ядре – программа позволяет восстановить информацию в 99% случаев, а благодаря поддержке всех современных файловых систем — она отлично подходит для восстановления утерянных данных на вашем сервере.
Процесс восстановления данных детально описан в статье «Как восстановить программный RAID?»
Кроме того, RS RAID Retrieve очень удобна и проста в использовании, а также абсолютно не требовательна к ресурсам вашей системы, а интуитивно понятный интерфейс программы делает процесс восстановления быстрым и удобным.
Хотелось бы также отметить, что встроенный RAID-конструктор автоматически определит тип вашего массива, а наличие режима глубокого сканирования поможет восстановить даже те файлы, которые были удалены несколько месяцев назад.
Часто задаваемые вопросы
Главное отличие этих систем заключается в функциональных возможностях. В Windows Server их коробки доступы функции, которые используются для работы на серверах, в то время как Windows 10 ориентирована на обычных пользователей, использующих настольный ПК, ноутбук или планшет.
Да. Можно. Процесс создания RAID детально расписан в этой статье.
Да. RS RAID Retrieve позволяет восстанавливать утерянные данные на серверах под управлением Windows Server.
Максимальное количество оперативной памяти в Windows Server составляет 24 ТБ (В то время как в Windows 10 вы можете использовать только 2 ТБ ОЗУ).
Да. Максимальное количество сокетов для Windows Server составляет 64 шт.
Up until Windows 8, software RAID in Windows was a mess. Windows 7 has arbitrary restrictions on the available RAID levels, and it was impossible to create a Level 5 RAID without Windows Server. Fortunately, it is easy to build a software RAID 5 in Windows 8.1 and Windows 10. We just need a couple of disks, and we will have the extra security of RAID in no time.
Unblock any international website, browse anonymously, and download movies and Mp3 with complete safety with CyberGhost, just for $2.75 per month:
We can create both level 1 and level 5 RAID in Windows 8.1 and Windows 10, depending on the number of hard drives we have at our disposal. We will need two drives for RAID 1 and three or more drives for RAID 5.
However, with software RAID 5 it’s impossible to have the operating system on the RAID. We can only use it for storage.
To create a software RAID 5, we need at least three hard drives of the same capacity, apart from the OS drive. All three disks need to be unformatted.
We can build a RAID with drives of unequal size, but then the smaller disk will dictate the array’s total capacity.
Making sure our drives are unformatted
A simple way to check if the drives are unformatted is through the Disk Management Console. We can open it by pressing the Windows key + R, and on the Run window type:
diskmgmt.msc
All three drives we will use for the RAID need to be Unallocated.
If any of the drives has a partition, we need to back up any data on it, then right-click and select «Delete Volume.»
After that, we won’t be needing the Disk Management console anymore; we can close it.
Managing Storage Spaces
We go to the Start Screen (Windows 8.1) or Start Menu (Windows 10) and start typing «storage spaces.» The «Search» dialogue will automatically come up, and we select the relevant option.
On the Storage Spaces window, we select the only option, «Create a new pool and storage space.»
The system will automatically detect the unformatted drives and select them.
If we want, we can change the name, drive letter, or file system for the storage space. To create a software RAID 5, on resiliency type we select «Parity.»
On «Size,» we see the size of the storage space. To calculate the array’s capacity, we just need to take the smallest disk’s capacity and multiply it by the number of drives minus one.
With three 1TB HDDs, it is 1*(3-1) = 2TB array.
If we had three 1TB drives and one 500GB drive for the array, the array’s capacity would have been 500*(4-1)=1500GB.
After we click the Create storage space button, our software RAID 5 is ready.
On the «This PC» folder, we will see it as one disk.
How to move our personal folders on the software RAID
The primary reason to create a software RAID 5 is for the added data security. When any of the three disks fails, we will still have access to all the data; nothing will be lost.
So, it makes sense to have our personal folders on the RAID. Documents, Pictures, Music, even the Desktop will be much safer there than on the single Windows disk.
Moving those folders is easy. We just need to go to Local Disk C: -> Users -> (our username) — filod, in the example.
There, we Ctrl+click to select some of our personal folders or select them all with Ctrl+A. Then, we right-click on one of the selected folders and click on «Cut.»
Caution! If the hidden folder AppData is visible on your system, do not select that folder. It’s not a folder that we can move to the RAID.
After we cut our important folders, we right-click on the software RAID 5 and select «Paste.»
Now, whatever we save on the Desktop and in our Documents, Pictures, Music, Videos, etc. folders will be safe on the RAID.
What happens when a drive on the RAID fails
If When one of the drives fails, the rest of the drives give us full access to our data. If, however, a second drive fails before we replaced the first drive, all the files on the RAID will be irretrievably lost.
Strangely, in the case of a disk failure, both Windows 8.1 and Windows 10 take their time to report that something is wrong.
A few minutes after we boot the PC, Windows 8.1 will show the Action Center flag, with a nonchalant «Check Storage Spaces for issues» message.
It wouldn’t hurt if it had a bit more urgency.
Windows 10 does it slightly better, by adding an exclamation mark on the notification. It still takes a couple of minutes to show up after boot, though, and some Windows 10 users don’t check the Action Center notifications often.
The best warning system is if we had moved the Desktop folder to the RAID. We will know that something is wrong right at boot time.
The array won’t appear when Windows boots…
…but it will appear a few seconds later.
Our data is still safe and readily accessible with the rest of the disks working.
In case we get the notification or the message that desktop isn’t accessible, we need to go immediately to «Manage Storage Spaces.»
There, we will get the warning that a drive is gone, and we have reduced resiliency.
How to rebuild the software RAID 5
The first thing we must do when we have a drive failure is to completely backup all the data in the RAID, preferably on an external hard drive. Remember, if a second drive fails, all the array data is gone for good.
After the backup and after we have bought and installed a replacement drive, at the «Manage Storage Spaces» window we click on «Change settings»…
…and then «Add drives.»
The system will recognize the new drive, provided it is unformatted.
After we have added the drive, we remove the one that crashed from the RAID.
That’s it. Now the software RAID 5 is healthy again and can withstand a single disk failure.
Is software RAID 5 for you?
HDDs are pretty inexpensive nowadays, even for a couple of Terabytes of capacity. Getting two or three of them to create a RAID array wouldn’t make a big dent in our budget.
Will you consider building a Software RAID 5 on Windows 8.1 or Windows 10? Or do you find it wasteful, and prefer an external hard drive or cloud backup? Let us know in the comments below.
Support PCsteps
Do you want to support PCsteps, so we can post high quality articles throughout the week?
You can like our Facebook page, share this post with your friends, and select our affiliate links for your purchases on Amazon.com or Newegg.
If you prefer your purchases from China, we are affiliated with the largest international e-shops:
- Banggood
- Geekbuying
Well, on Windows 10, you can also combine multiple drives in order to create larger logical storage using a RAID 5 configuration. In order to improve performance and also protect your files from a single drive failure. In this article, we are going to talk about How can You Set Up Raid 5 in Windows 10 – Tutorial. Let’s begin!
However, there are many RAID (redundant array of independent disks) levels that you can use. whenever using a striped volume along with parity (RAID 5), then the data is spread across three or more drives using parity. In the event of a hardware failure, you guys can replace the drive, and the data will be created again from the data on the other drives as well.
Although you guys can also use a hardware-based solution on Windows 10 if you try to set up a software-based RAID 5 along with Disk Management. Then you guys will notice that the option is grayed out as it’s only an option available on Windows Server. But, you can use Storage Spaces in order to create a striped volume with the parity that works just like a RAID 5 configuration.
So, in this guide, you guys will learn the steps in order to set up a RAID 5 storage on Windows 10 using Storage Spaces.
Contents
- 1 What type of RAID do you want
- 2 JBOD (extend, spillover):
- 3 RAID 0 (Striping):
- 4 RAID 1 (Mirroring):
- 5 RAID 5 (Distributed Parity):
- 6 RAID 1+0, 0+1, 10:
- 7 What do You need to set up RAID? | raid 5 in windows 10
- 8 Windows Software RAID:
- 9 RAID controller:
- 10 Two or more hard drives:
- 11 Floppy drive (Windows XP-only):
- 12 Tools:
- 13 How can you create a RAID 5 storage using Storage Spaces
- 14 Conclusion
What type of RAID do you want
RAID basically comes in a number of flavors—or levels—that offers data protection, enhanced performance, or both as well. In addition to the seven core levels (RAID 0 via RAID 6), you will encounter a number of variants and combinations as well. Some controllers (and dedicated external storage and also NAS boxes) can layer and even abstract RAID levels. That allows you to mix and match different capacity drives and add capacity without even any additional configuration.
Let’s have a look at a few of the RAID levels you’ll find on affordable, consumer-level RAID adapters, motherboard chipsets, and also Windows software RAID:
JBOD (extend, spillover):
JBOD or Just a Bunch Of Disks simply permits you to extend a volume (drive letter, e.g. C:\) onto other disks as well. Data is written to the first disk until it’s full, then to the second disk, then the third as well, etc. It offers no boost in performance or redundancy and is a holdover from the days whenever smaller disks had to chain in order to handle large amounts of data.
RAID 0 (Striping):
This setup actually increases hard-drive performance through splitting, or striping, data across two drives. By leveraging two data busses, data can also be read and written more instantly. Unfortunately, RAID 0 provides no data protection—in fact, it basically increases the chances of data loss. Because the failure of either drive in the array results in the loss of the data stored on both drives. RAID 0 setups are normal on high-end gaming PCs and graphic design workstations, and also provide a measurable, albeit modest performance boost for hard-disk-intensive programs as well.
RAID 1 (Mirroring):
A RAID 1 setup protects data from drive failure through simultaneously writing the same data to two hard drives. Because each and every drive is an exact duplicate of the other, you can continue working if one fails actually. RAID 1 offers no gain in performance and effectively decreases available capacity by half—two 2TB drives provide the only 2TB of storage.
RAID 5 (Distributed Parity):
Although you get both faster disk performance and data protection from this setup, it needs a minimum of three hard drives. Rather than using an entire hard drive as a backup, RAID 5 spreads redundancy information—called parity bits—across all of the array’s drives actually. Where RAID 1 needs 50% of available storage for redundancy, RAID 5 needs only 33%.
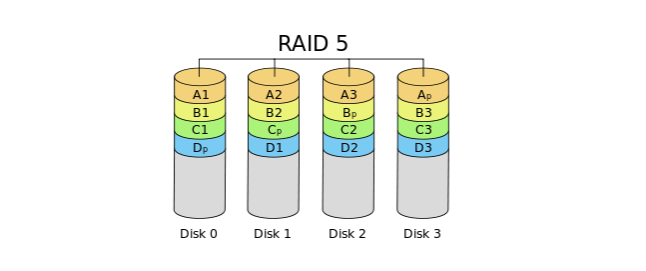
When one of the drives in a RAID 5 array fails, then the data content of that failed drive is reconstructed via the parity bits on the surviving drives and written to a new, replacement drive as well. The array is still usable in the meantime actually.
RAID 1+0, 0+1, 10:
Some of the adapters combine (referred to as nesting) RAID 0 and RAID 1 to provide both data redundancy and increased disk performance as well. This works by either striping data across a pair of drives then mirroring (0+1) them with another pair actually. Or striping data across two mirrored pairs (1+0, aka 10) as well. RAID 0+1, 1+0, and 10 need a minimum of four hard drives.
What do You need to set up RAID? | raid 5 in windows 10
A Fresh Backup (existing data only):
If you are installing and configuring hardware RAID on a fresh system along with no OS (your best option), or are also adding disks for a separate array, then skip this. Otherwise, back up your important data actually. The best practice is to have three copies of your data: the original, a backup, and also a backup of the backup, preferably offsite.
If you guys have existing data that you want on the array, then you’ll need to back it up, then restore it from a backup you make before creating your array. A process that writes new data to your hard drives regardless of what’s actually there. This is not important with Windows software RAID 0. But, it’s far faster than letting Windows re-sync (copy the data to) the mirror in the background as well.
Transferring an existing operating system is really tricky, and with older versions of Windows, most of the time impossible.
Windows Software RAID:
Start with the Windows XP, Microsoft integrated RAID functionality into its operating systems. What type actually depends on the flavor of Windows:
- Windows XP allows spanned volumes (one volume over two or more disks as well), aka JBOD.
- Windows Vista Ultimate gives permission JBOD and RAID 1 striping.
- Also Windows 7 Home allows JBOD and RAID 1 while Professional and also Ultimate add RAID 0 mirroring. Windows 2000 Professional also has JBOD, 0, and 1 as well.
- Windows Server operating systems from 2000 on have JBOD, 0, 1, plus support for RAID 5 distributed parity actually.
Well, windows RAID offers several benefits. You can also create arrays from within Window Drive manager so there’s no BIOS to configure actually. It’s also more flexible along with mirrors, that allow you to create them from existing volumes containing data, as well as delete either half of a mirror with the other remaining intact as well. You can mirror individual partitions, that also includes partitions from different drives onto a single drive.
RAID controller:
If you do not use software RAID, then there’s hardware. You guys probably already have a RAID controller in your PC; much older midrange and also high-end motherboards also come along with the secondary RAID controller, and newer motherboard chipsets offer integrated RAID obviating the need for an additional controller. Check your PC or motherboard documentation in order to find out if your motherboard supports RAID (and if so, which levels), and for particular installation instructions.
If your PC does not have integrated RAID, then you may use an adapter card. Basic PCI and PCIe adapters supporting RAID levels 0, 1, 10, and most of the time 5 can be found online for $100 or less. Adaptec, Promise, and many other vendors offer a wide selection of pricier. However, more capable RAID adapters with onboard cache and advanced features. If possible, then buy a card that supports greater-than-2.2TB disks and also 36Gbps SATA III.
Two or more hard drives:
If you decide on Windows software RAID, then you may use any drives you choose. They need not be the same size if you are mirroring individual volumes, though it’s basically a good idea.
Back in the days of parallel ATA, it was a no-no to mix drives from different vendors on a RAID controller actually. Most of the time it would work—more often it would not. With the advent of SATA, mixing vendors is no longer as problematic actually.
Also, though there are controllers that allow mixing and matching capacities without even losing storage space (via advanced parity techniques), these are still relatively rare. Using drives of different sizes mostly results in total storage capacity that’s only a multiple of the smallest drive. Such as, combining 500GB and 320GB drives in RAID 1 would be 320GB * 2, or 640GB rather than 820GB.
In practice, you guys will save yourself a lot of time and sidestep possible issues through building your array with identical hard drives. That means drives of the same make, model, and size as well. You need at least two drives for RAID 0 and 1, three drives for RAID 5, and also four for RAID 0+1, 1+0, and 10.
Floppy drive (Windows XP-only):
If you plan to install Windows XP on your new array, then you will need a floppy disk with your RAID adapter’s Windows drivers, and a floppy drive in order to read it. Windows installation won’t install the drivers from an optical drive. Thankfully, this incredibly irritating limitation of Windows XP does not apply in Windows Vista and Windows 7. That can read drivers from hard drives, flash drives, or optical media as well.
Tools:
You will need a small, non-magnetic Phillips screwdriver in order to remove and replace the fastener screw. That secures the adapter card to the PC chassis, as well as to install any new hard drives. You might also want a simple grounding strap that basically attaches to your wrist; look for one at your local computer store for less than $15. Just like that, never touch exposed contacts or electronics.
How can you create a RAID 5 storage using Storage Spaces
In order to set up a RAID 5 storage via Storage Spaces, use these simple steps:
- First, open Settings on Windows 10.
- Then click on System.
- Tap on Storage.
- Now under the “More Storage settings” section, tap on the Manage Storage Spaces option.
- Press the Create a new pool and storage space option.
- Press the drives (at least three) in order to create a storage pool.
- Tap on the Create pool option.
- Now under the “Name and drive letter” section, specify a name, letter, and also file system for the storage array.
- Under the “Resiliency” section, use the “Resiliency type” drop-down menu and choose the Parity option. That is the equivalent to the RAID 5 level.
- Now under the “Size” section, you need to specify the maximum size as needed.
- Tap the Create storage space button.
When you complete all the steps, then the RAID 5 storage will be created to start storing files with fault tolerance. And if one of the drives fails, then the data will still be accessible.
You can technically use any type of drive, but mostly, traditional hard drives are not designed for this kind of setup actually. If you guys are building a storage array in order to store a lot of files. Or if you are planning to share the storage in the network with other users, then you should try drives designed for storage arrays, for example, the 4TB drive from Seagate IronWolf or 4TB Western Digital (Red) as well.
Conclusion
Alright, That was all Folks! I hope you guys like this raid 5 in windows 10 article and also find it helpful to you. Give us your feedback on it. Also if you guys have further queries and issues related to this article. Then let us know in the comments section below. We will get back to you shortly.
Have a Great Day!
Also See: How To Use Robocopy To Transfer Files Over The Internet
In addition to configuring RAID 5 from within Disk Management, the configuration may also be implemented from the command prompt using DiskPart. DiskPart may be launched either from a command prompt or a Run dialog simply by typing diskpart. Once invoked, DiskPart will display the DiskPart> command prompt and is ready to receive commands.
The first step in the configuration process is to identify the disks attached to the system using the list disk command:
DISKPART> list disk
Disk ### Status Size Free Dyn Gpt
——– ———- ——- ——- — —
Disk 0 Online 30 GB 15 GB *
Disk 1 Online 8 GB 8189 MB
Disk 2 Online 8 GB 8189 MB
Disk 3 Online 8 GB 8189 MB
For the purposes of this chapter disks 1, 2 and 3 will be used to create a RAID 5 configuration. Each of these disks needs to be converted to dynamic disks before the configuration can proceed. This is achieved by selecting each disk in turn and executing the convert dynamic command:
DISKPART> select disk 1
Disk 1 is now the selected disk.
DISKPART> convert dynamic
DiskPart successfully converted the selected disk to dynamic format.
DISKPART> select disk 2
Disk 2 is now the selected disk.
DISKPART> convert dynamic
DiskPart successfully converted the selected disk to dynamic format.
DISKPART> select disk 3
Disk 3 is now the selected disk.
DISKPART> convert dynamic
DiskPart successfully converted the selected disk to dynamic format.
Once the disks have been converted to dynamic disks the next step is to create the RAID 5 volume using the create volume raid command. This command also takes as a parameter the disk= directive followed by a list of disks to be used in the array. The size= directive may also be specified to declare the size of the volume. If this value is omitted the volume will be sized to match the smallest contiguous block of unallocated space on the designated disk drives:
DISKPART> create volume raid disk=1,2,3
DiskPart successfully created the volume.
Once the command has completed and displayed the DISKPART> prompt the system will have begun the resynching process. This can take a considerable amount of time depending on the size of the volume. During this process, the status of the volume will be listed as Rebuild when the list volume command is executed:
DISKPART> list volume
Volume ### Ltr Label Fs Type Size Status Info
———- — ———– —– ———- ——- ——— ——–
* Volume 0 RAW RAID-5 16 GB Rebuild
Volume 1 C NTFS Simple 15 GB Healthy System
Volume 2 D DVD-ROM 0 B No Media
Once the resynch is complete the volume status will change to Healthy at which point the volume may be formatted (the RAW type listed above indicates the volume has yet to be formatted). The volume may be formatted using the format command as follows:
DISKPART> format fs=ntfs label=”RAID 5 Vol”
100 percent completed
DiskPart successfully formatted the volume.
DISKPART>list volume
DISKPART>select volume 2
DISKPART>assign letter=C
DISKPART>format quick
Once the volume has been formatted the RAID 5 configuration is ready for use.
If you find out that one of the disks in a RAID 5 volume has failed, replace it with a new disk of equal or larger capacity and convert it to a dynamic disk. Then start the Diskpart command interpreter and bring the new disk to focus. For example, if disk 2 has been replaced, use the fallowing command to repair the RAID 5 volume:
Repair Disk=2
In the preceding code, Disk=2 is the replaced disk. The new disk will be added to the RAID 5 volume, and the status of the RAID 5 volume will be shown as Regenerating (reconstruction) in the Disk Management Console. Once The process is complete the status will show as Healthy.