
Introduction
In Windows or Windows Server environment, SMB (Server Message Block) shares are essential for seamless network file sharing, allowing users and applications to access files remotely. This post explores several methods to create an SMB share, including using Server Manager, File Explorer, PowerShell, and Computer Management.
Understanding Permissions
When creating an SMB share in Windows Server, understanding how permissions work is crucial for securing access to your shared resources. Windows Server uses two types of permissions: NTFS permissions and Share permissions. These permissions control what actions users can perform on the files and folders, both locally and over the network.
NTFS Permissions
NTFS (New Technology File System) permissions are applied directly to the files and folders on the disk and determine what users can do when accessing the folder locally or over the network.
The permissions can be ranked from least restrictive (most permissive) to most restrictive (least permissive) based on the level of access they grant to files and folders. In other words:
- More Actions Allowed = Less Restrictive: The more actions a permission allows, the less restrictive it is.
- Fewer Actions Allowed = More Restrictive: The fewer actions a permission allows, the more restrictive it is.
Here’s the order from least restrictive to most restrictive:
- Full Control: Allows users to do everything, including modifying permissions and taking ownership.
- Modify: Users can read, write, and delete files, but cannot manage permissions.
- Read & Execute: Users can view and execute files, but cannot modify them.
- Read: Users can only view the contents of the folder.
- Write: Users can create and modify files, but cannot delete them.
Share Permissions
Share permissions control what users can do when they access the folder over the network. Unlike NTFS permissions, these are applied only when the folder is accessed as a network share.
Combining NTFS and Share Permissions
Windows Server determines a user’s effective permissions by combining NTFS and Share permissions, with the most restrictive permission applying. For example, if a user has “Read” permission on the Share level but “Modify” permission on the NTFS level, their effective permission will be “Read” when accessing the folder over the network.
Methods to Create an SMB Share
Windows Server provides multiple methods for creating an SMB share, each offering different advantages depending on your administrative needs. Below, we’ll walk through some common approaches:
Using Server Manager
Server Manager is a powerful tool that simplifies the process of managing server roles and features, including creating SMB shares. Here is the step by step guide:
- Make sure you have “File and iSCSI Services” Role installed first.
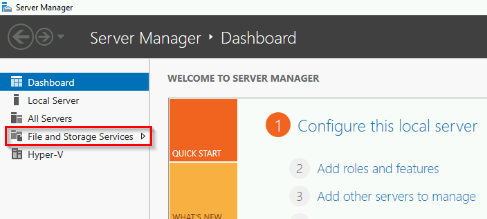
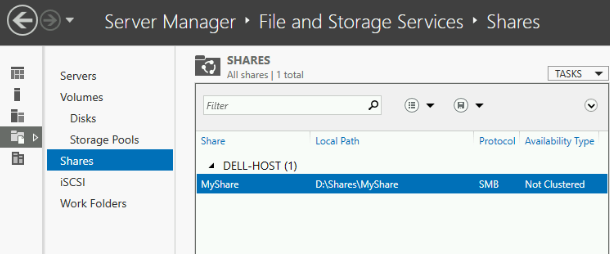
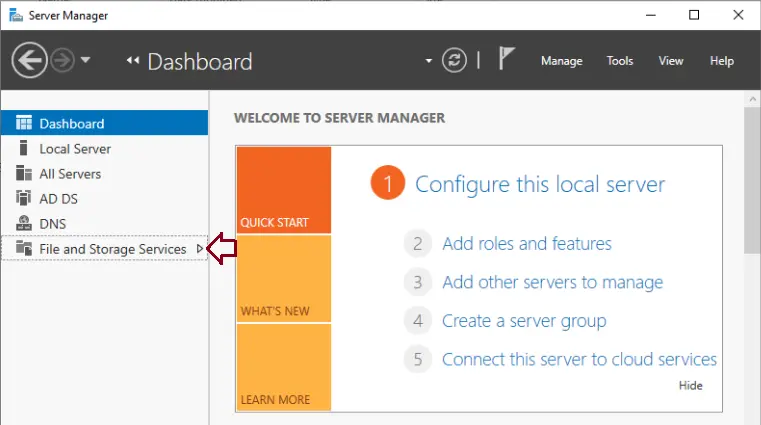
- Open Server Manager and navigate to “File and Storage Services.”
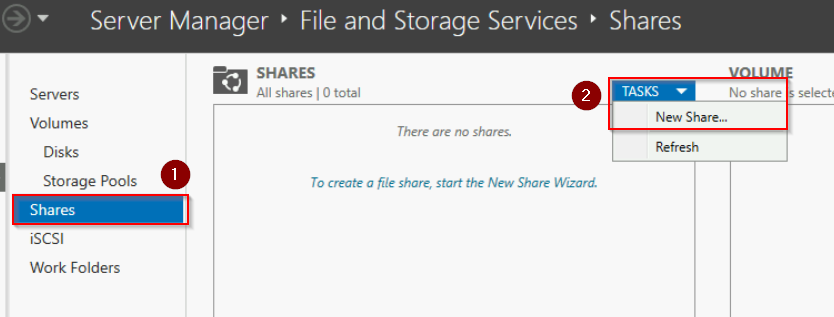
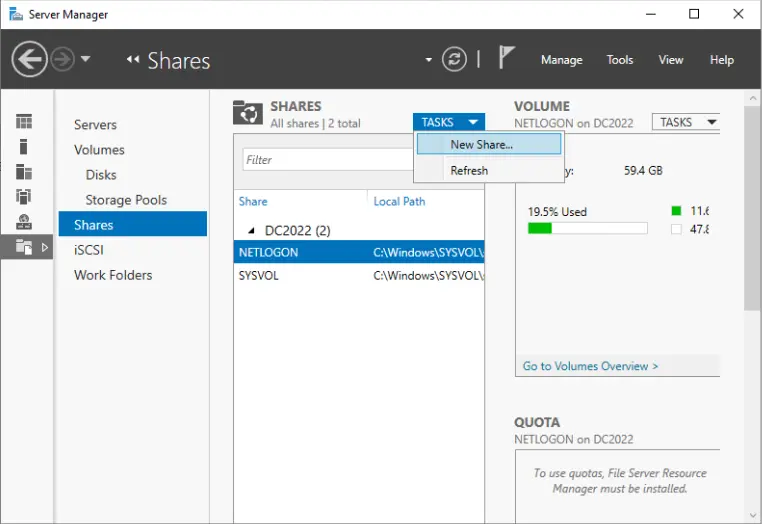
- Select “Shares,” then click on the “Tasks” menu and choose “New Share.”
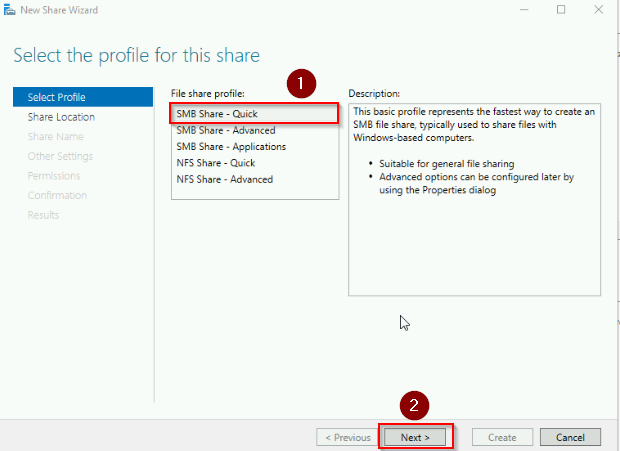
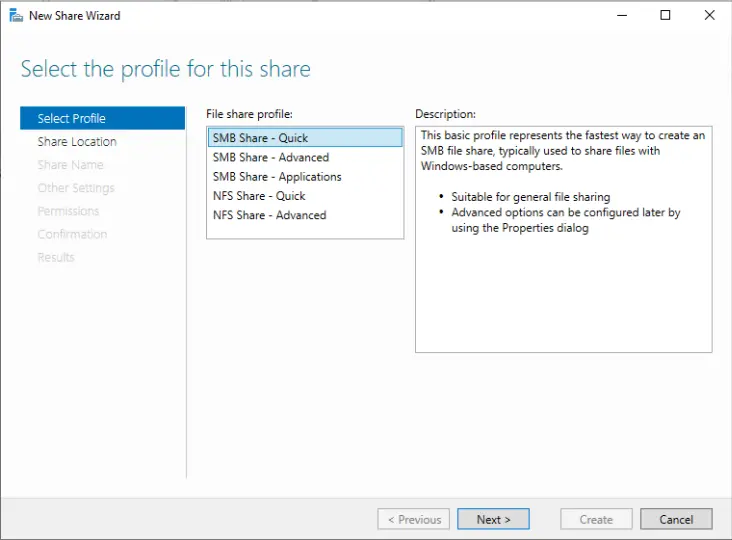
- On the New Share Wizard window, under File share profile section, select “SMB Share – Quick”. Then click “Next”.
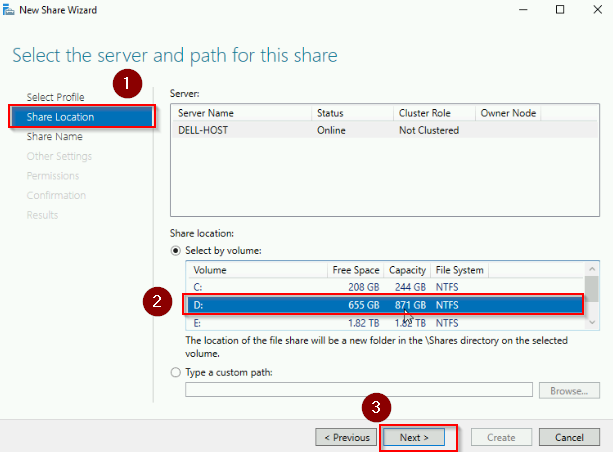
- Under the Share location section, choose the volume you want, in this case, we choose “D” volume. Click “Next”.
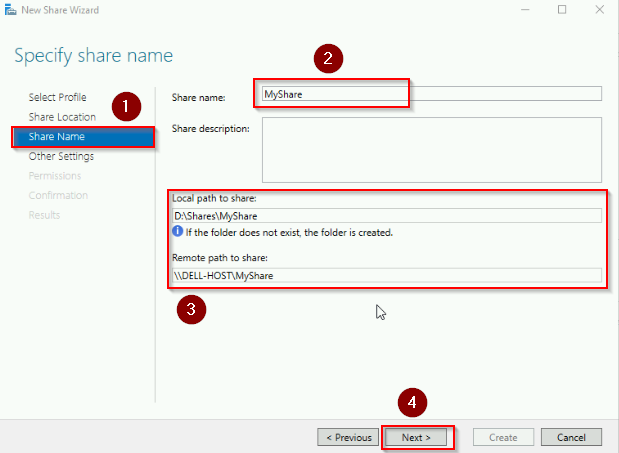
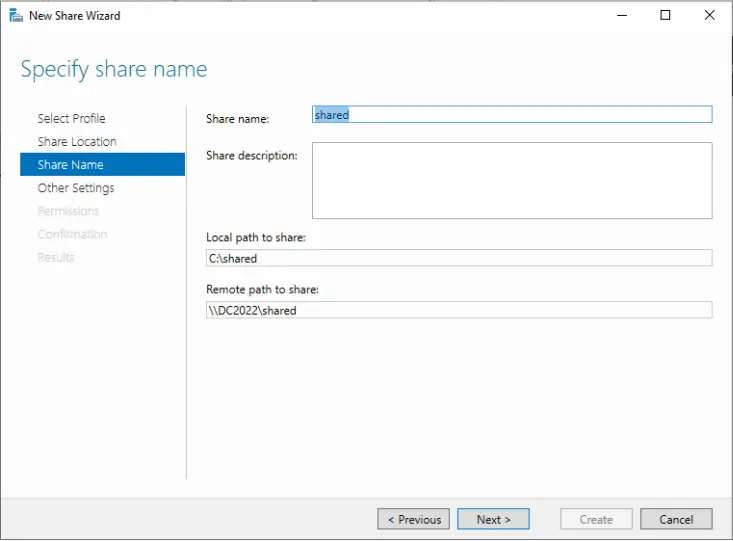
- Under Share Name, give it a name, the “Local path to share” and “Remote path to share” text boxes will automatically filled. Click “Next”.
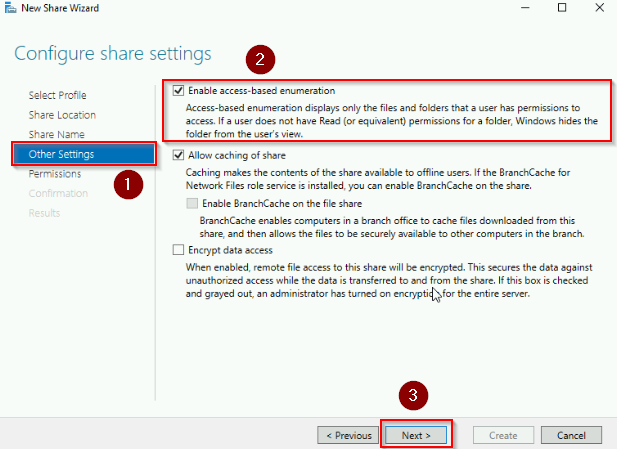
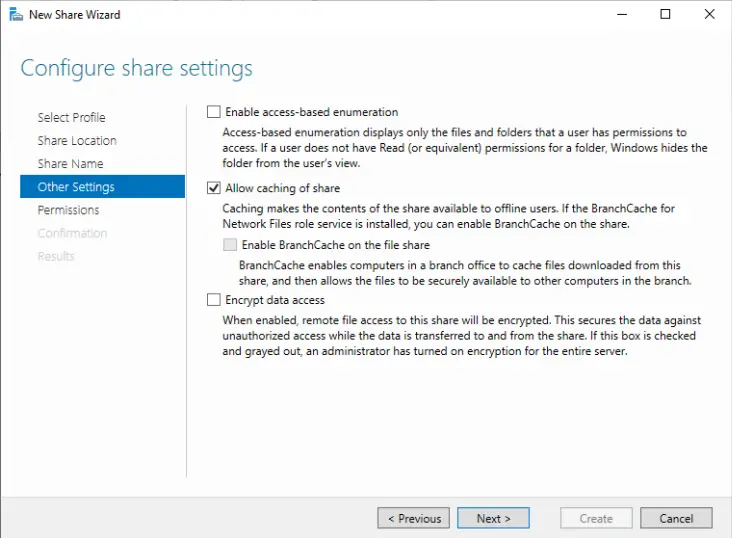
- Under Other Settings , select “Enable access-based enumeration” checkbox. Click “Next”.
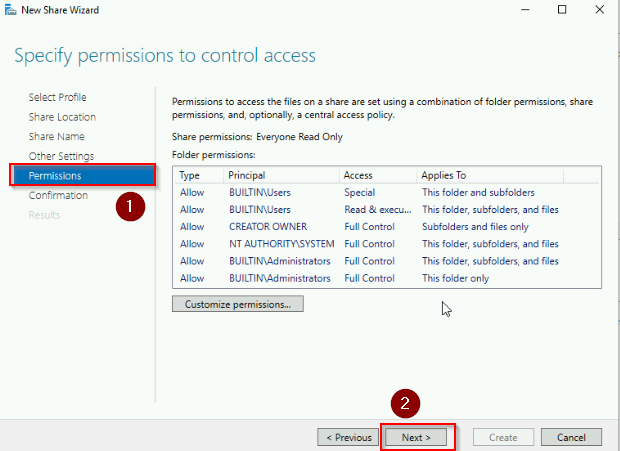
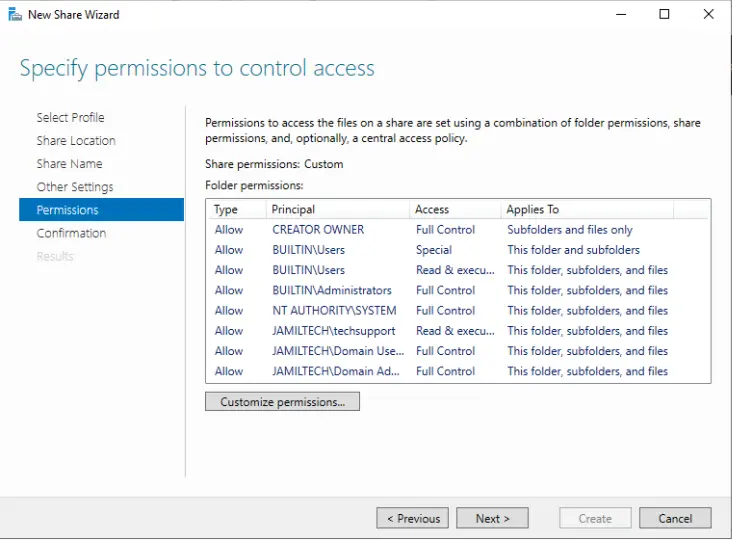
- Under Permission, keep things as default. Click “Next”.
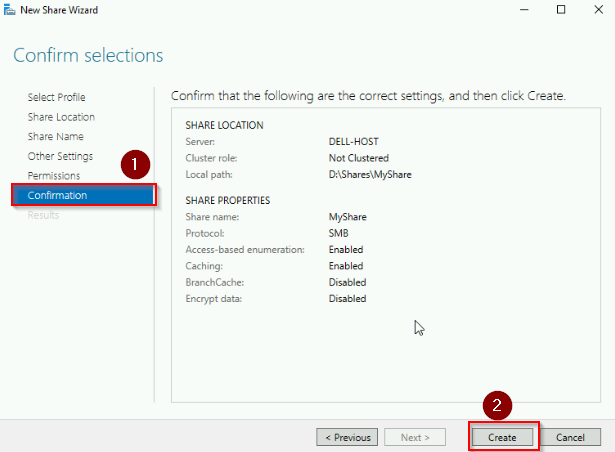
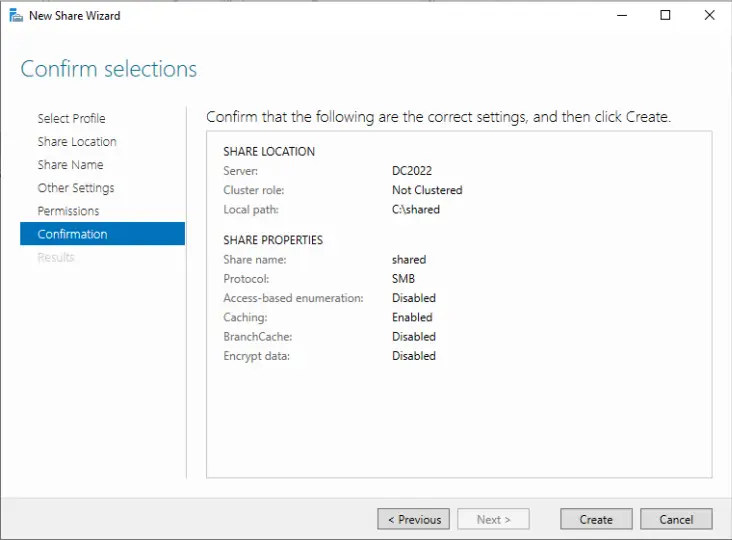
- Under Confirmation, review and click “Create”.
See screenshots of all the steps below:
Using File Explore
File Explorer offers a quick and straightforward way to create an SMB share, making it accessible even for those with minimal server management experience:
- Right-click on the folder you want to share and select “Properties.”
- Go to the “Sharing” tab and click “Advanced Sharing.”
- Check “Share this folder,” set the share name, and configure permissions as needed.
See screenshots below:
Using PowerShell
PowerShell provides a versatile and scriptable method to create and manage SMB shares, perfect for automation or bulk operations:
- Open PowerShell with administrative privileges.
- Use the
New-SmbSharecmdlet to create the share. For example:
New-SmbShare -Name "MyShare" -Path "D:\Share\MyShare" -Read "Everyone"
PowerShell is excellent for administrators who need to automate tasks or manage shares across multiple servers.
Using Computer Management
Computer Management is a versatile console that allows you to manage system tools, including shared folders, from a single interface. Here are the steps:
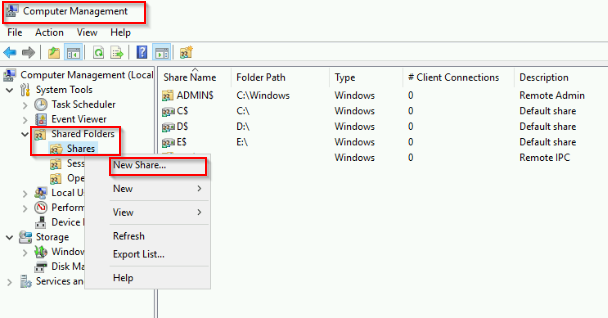
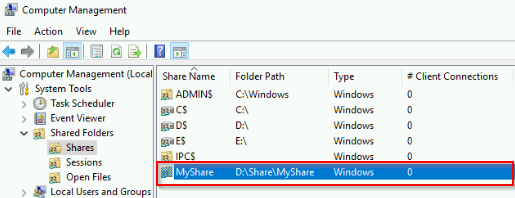
- Open Computer Management and navigate to “Shared Folders” > “Shares.”
- Right-click on “Shares” and select “New Share.”
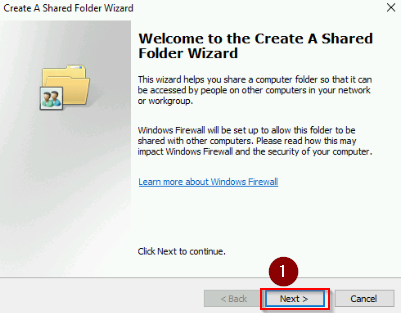
- On the Create a Shared Folder Wizard, Click “Next“.
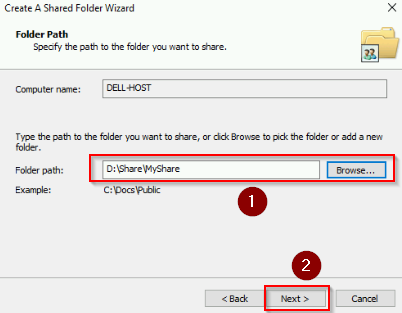
- Choose the path for the folder under “Folder path“. Click “Next“.
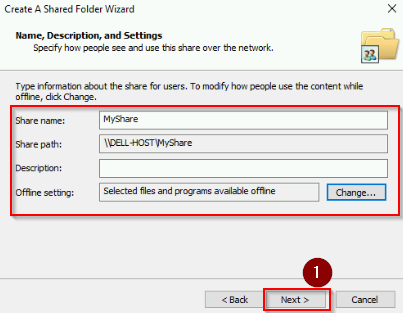
- Next you will specify Name, and Description for the share folder. We keep it as default for this case. Click “Next“.
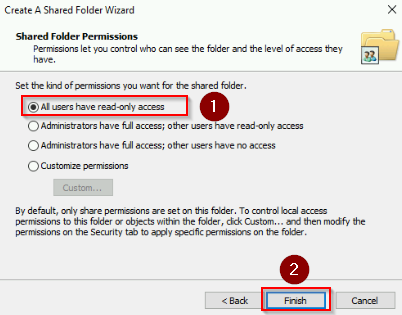
- On the Shared Folder Permissions. We choose “All users have read-only access“. Click “Finish“.
This method is useful for managing existing shares as well as creating new ones.
See screenshots below:
Conclusion
To sum up, creating and managing SMB shares in Windows Server can be done through various methods, each suited to different administrative needs. Whether you prefer the GUI of Server Manager or the automation capabilities of PowerShell, understanding the interplay between NTFS and Share permissions is key to ensuring your shared resources are both accessible and secure.
Creating an SMB (Server Message Block) shared folder on Windows Server 2022 allows multiple users to access and share files efficiently within an organization. This guide will walk you through the steps to set up a secure and effective SMB shared environment, streamlining file sharing and collaboration within your business.
Understanding SMB on Windows Server 2022
SMB is a network file sharing protocol that allows applications to read and write to files and request services from server programs in a computer network. In Windows Server 2022, SMB facilitates resource sharing, such as files and printers, making it easier for users to collaborate and share information.
Visit Microsoft to learn in detail how to set up SMB sharing on Server 2022.
Key Features of Windows Server 2022 for SMB:
- Enhanced Security: Advanced security features, including SMB over QUIC, to protect data in transit.
- Performance Improvements: Optimized for better file sharing performance, especially in distributed networks.
- Ease of Management: Simplified management tools to streamline the creation and management of shared resources.
Table of Contents
Step 1: Open Server Manager
- Launch Server Manager:
- Click on the Start menu and select Server Manager from the list of available applications.
- In the Server Manager dashboard, navigate to File and Storage Services.
- Navigate to Shares:
- In the File and Storage Services section, click on Shares to view all existing shared folders.
- Click on Tasks and select New Share to initiate the process.
- Select Share Profile:
The New Share Wizard will appear. Choose SMB Share – Quick as the profile for creating a standard SMB share and click Next.
Click on Shared and click on Tasks and New Shared.
The new share wizard will be displayed; select SMB Shared – quick and click next.
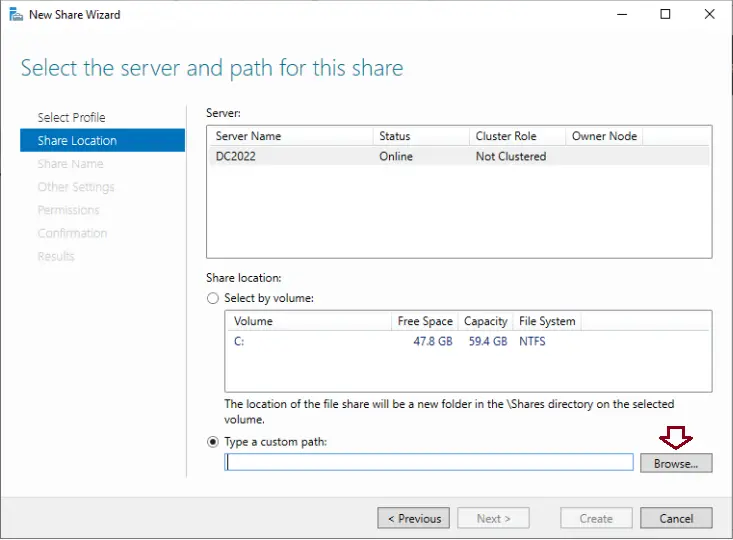
In the share location window, tick the box “Type a custom path” to select the folder to share.
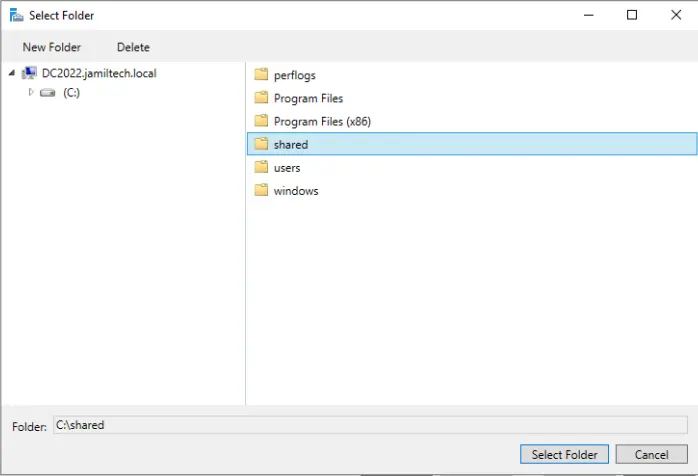
Find your shared folder and choose select folder.
Click next.

Specify a share name and click next.
Verify the configured share settings and click next.
- Select the Folder to Share:
- In the Share Location window, select Type a custom path to manually choose the folder you want to share.
- Click Browse to navigate to the folder on your server that you want to share. Once selected, click Next.
- Name Your Share:
- In the Share Name window, enter a name for the shared folder. This name will be used by users to access the share over the network.
- Click Next to proceed.
- Review and Configure Settings:
- Review the default share settings. If needed, adjust the settings according to your requirements.
Click Next to continue.

Click on the share tab.
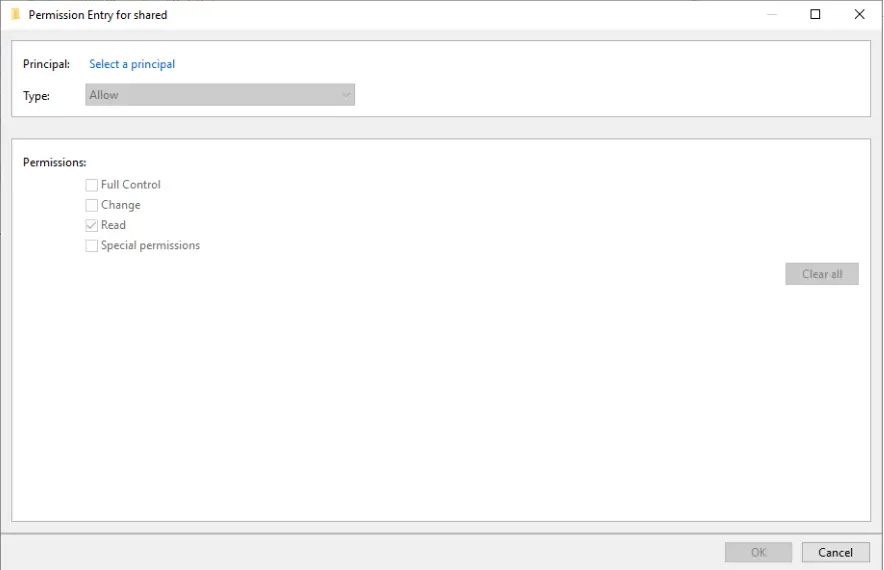
In the Share tab, click on Add.
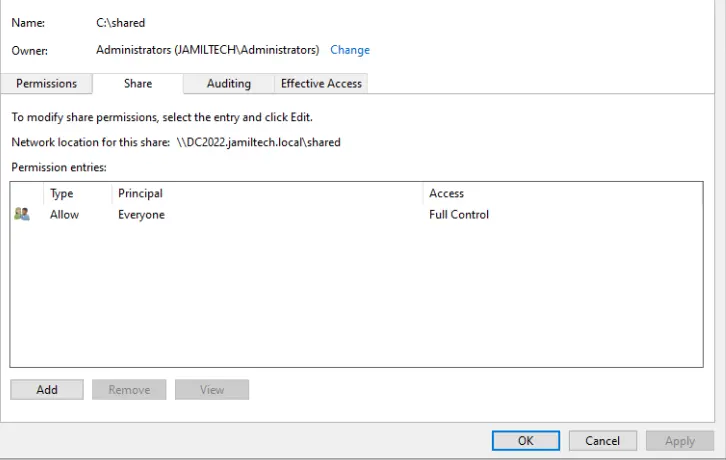
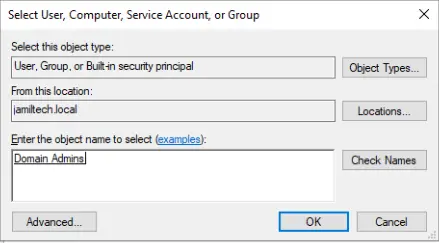
Click on Select a principal link.
Type domain users and click OK.
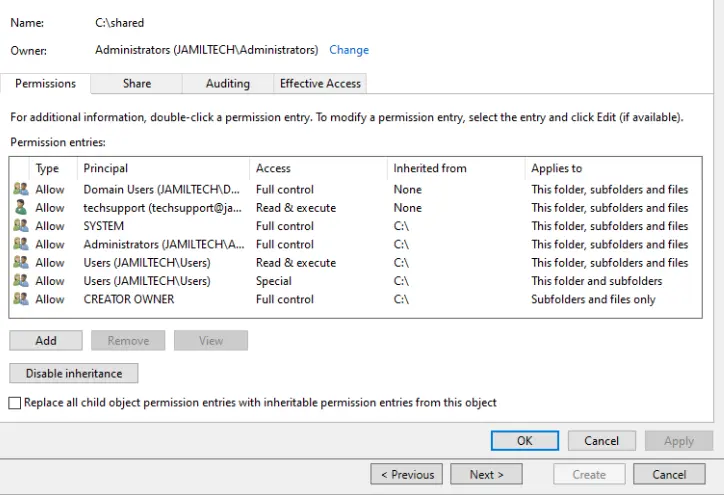
Step 5: Specify Permissions to Control Access
- Set Access Permissions:
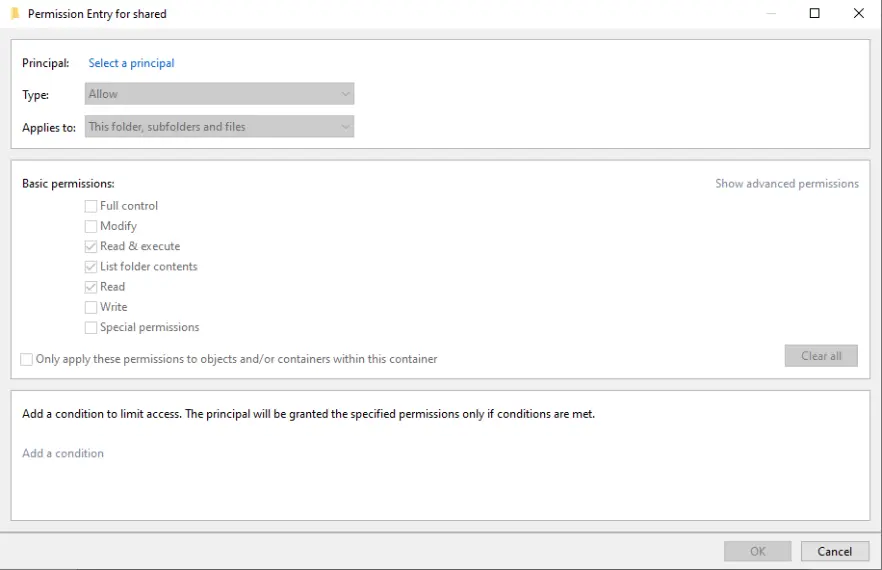
- In the Specify Permissions window, click on Customize Permissions to define who can access the shared folder and what actions they can perform (read, write, etc.).
- Modify Share Permissions:
- Under the Share tab, click Add to include users or groups who will have access to this shared folder.
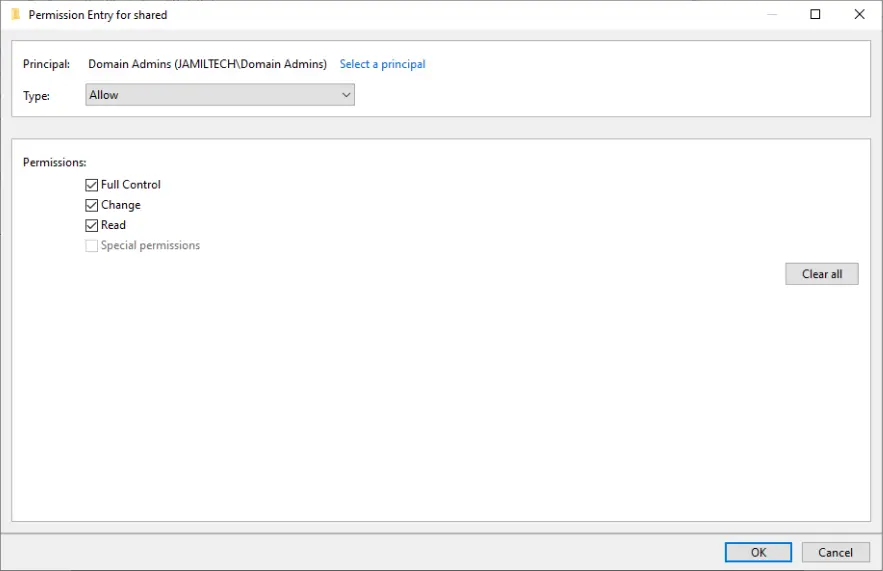
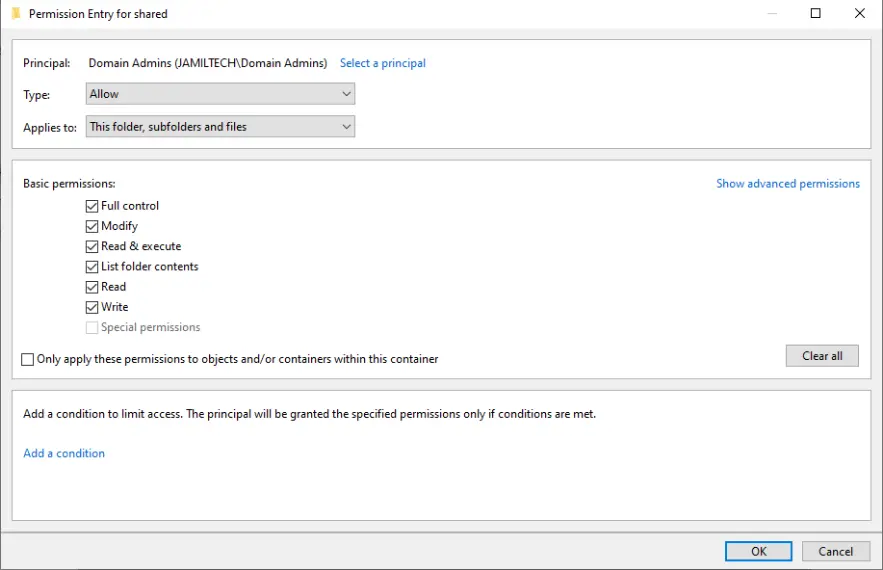
- Click on Select a Principal to choose the users or groups. For example, you might type Domain Users for general access and Domain Admins for administrative control.
- Set the required permissions (e.g., read, write) and click OK to apply the changes.
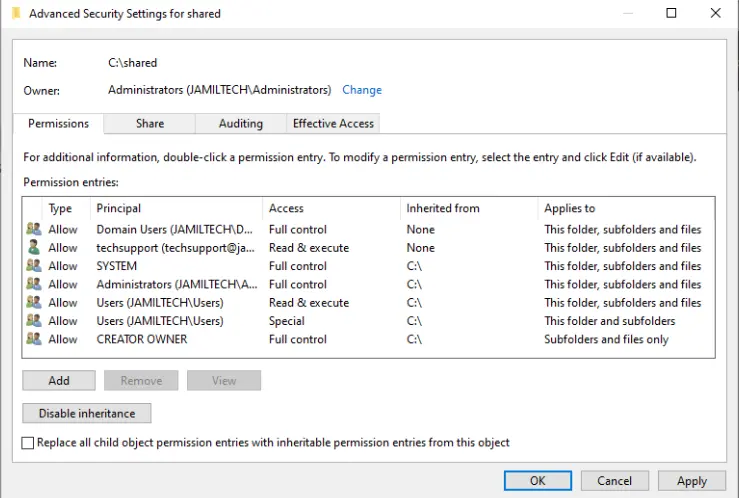
- Advanced Security Settings:
If you need to set more granular permissions, click on the Advanced Security Settings link. Here you can modify permissions at a more detailed level.
Click on the change link.
Choose to select a principal.
Type domain admins and click OK.
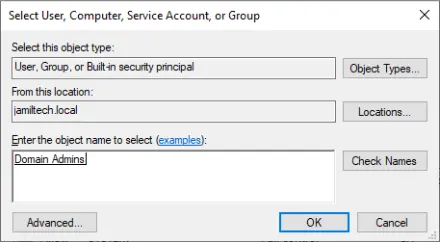
Click ok
- Finish and Create the Share:
- After configuring permissions, review the settings once more and click Create to finalize the setup.
- A confirmation page will appear. Click Close to exit the wizard.
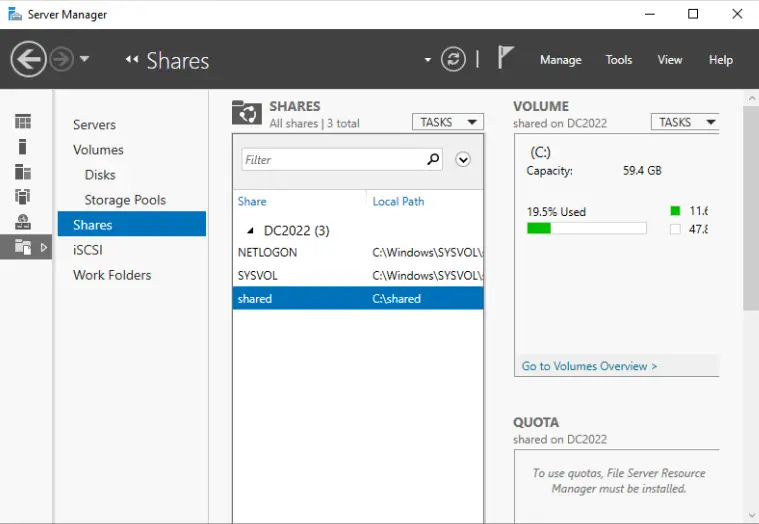
- Verify the Shared Folder:
- The new shared folder should now appear under the Shares section in Server Manager.
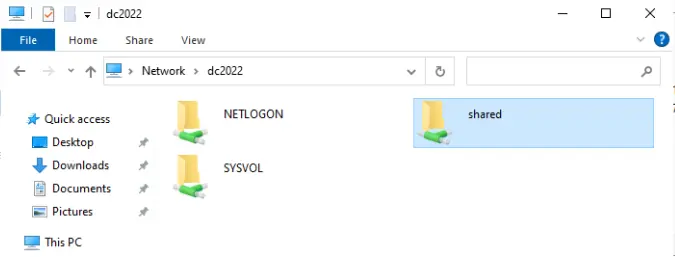
You can also verify its creation by navigating to Network in File Explorer. The shared folder should be visible and accessible to the users you have granted permissions.
Click Create to complete the process.
Choose Close.

We see the shared folder.
In File Explorer, go to Network Options, and there you will see the shared folder.
Conclusion
By following these steps, you can create an SMB shared folder on Windows Server 2022, enabling efficient and secure file sharing within your organization. This setup not only improves collaboration but also ensures that your shared resources are managed effectively. For more detailed information on setting up SMB sharing on Windows Server 2022.
With any of the above methods, we are able to create shared folders on Windows Server 2022.
Jamilhttp://jamiltech.com
A Professional Technology Blog Writer | An energetic professional with more than 20+ years of rich experience in Technology, Planning, Designing, Installation, and Networking.
Встроенный PowerShell модуль SMBShare позволяет создавать, тонко настраивать и управлять общими сетевыми папками в Windows. В этой статье рассмотрим особенности управления сетевыми SMB папками Windows с помощью PowerShell. Вы можете использовать эти примеры для простого и быстрого управления настройками ваших файловых SMB серверов и сетевых папкок в различных сценариях автоматизации.
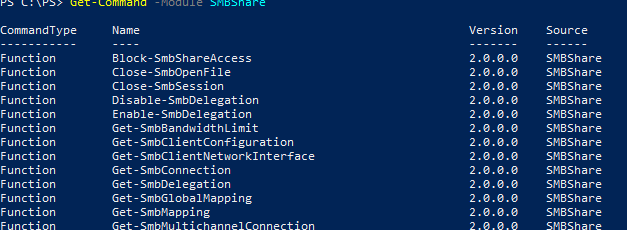
В модуле SMBShare доступно 42 команлета PowerShell для управления сетевыми папками. Их полный список можно вывести так:
Get-Command -Module SMBShare
Вывести текущую конфигурацию SMB сервера Windows:
Get-SmbServerConfiguration
AnnounceServer : False AsynchronousCredits : 64 AuditSmb1Access : False AutoDisconnectTimeout : 15 AutoShareServer : True AutoShareWorkstation : True CachedOpenLimit : 10 DurableHandleV2TimeoutInSeconds : 180 EnableAuthenticateUserSharing : False

EnableDownlevelTimewarp : False EnableForcedLogoff : True EnableLeasing : True EnableMultiChannel : True EnableOplocks : True EnableSecuritySignature : False EnableSMB1Protocol : False EnableSMB2Protocol : True EnableStrictNameChecking : True EncryptData : False IrpStackSize : 15 KeepAliveTime : 2 MaxChannelPerSession : 32 MaxMpxCount : 50 MaxSessionPerConnection : 16384 MaxThreadsPerQueue : 20 MaxWorkItems : 1 NullSessionPipes : NullSessionShares :  OplockBreakWait : 35 PendingClientTimeoutInSeconds : 120 RejectUnencryptedAccess : True RequireSecuritySignature : False ServerHidden : True Smb2CreditsMax : 2048 Smb2CreditsMin : 128 SmbServerNameHardeningLevel : 0 TreatHostAsStableStorage : False ValidateAliasNotCircular : True ValidateShareScope : True ValidateShareScopeNotAliased : True ValidateTargetName : True
Чтобы изменить эти параметры используйте командлет Set-SmbServerConfiguration:
Например, чтобы отключить использование устаревшего протокола SMB 1, выполните:
Set-SmbServerConfiguration -EnableSMB1Protocol $false -Force
Вывести список версий протокола SMB, использующихся активными клиентами для подключения к общим папкам на этом файловом сервере:
Get-SmbConnection
Чтобы ограничить пропускную способность для файлового SMB трафика, можно настроить политику QoS для SMB сервера. Например, следующая команда ограничит максимальную используемую ширину канала для SMB трафика до 10 Мб:
Set-SmbBandwidthLimit -Category Default -BytesPerSecond 10MB
Создать сетевую папку Windows с помощью PowerShell
Чтобы вывести полный список сетевых папок, доступных на компьютере, выполните:
Get-SmbShare
На этом компьютере открыт доступ к административным общим ресурсам и к каталогу Distr.
Чтобы создать новую общую сетевую папку, выполните команду:
New-SmbShare -Name Scripts -Path C:\PS -FullAccess winitpro\spb_admins, winitpro\msk-man01$ -ChangeAccess "winitpro\msk-man01_script_rw" -ReadAccess “$env:USERDOMAIN\domain users” –description “Collection of management PowerShell scripts”
В этом примере мы создали сетевую папку и предоставили права доступа доменным группам и одному компьютеру.
Дополнительно при создании папки можно использовать такие параметры:
-
-CachingMode [None|Manual|Programs|Documents|BranchCache]
– задать режим кэширования для офлайн доступа (автономных файлов); -
-EncryptData $True
– включить шифрование SMB трафика; -
-FolderEnumerationMode [AccessBased | Unrestricted]
– включить опцию перечисления на основании доступа (Access-based Enumeration). Позволяет скрыть в сетевой папке объекты, на которых у пользователя нет доступа; -
-CompressData $True
– включить сжатие при передаче файлов по SMB; -
-ConcurrentUserLimit 50
– позволяет ограничить количество одновременных подключений к папке (по умолчанию 0, не ограничено); -
-Temporary
– создать временную сетевую папку (пропадет после следующей перезагрузки Window).
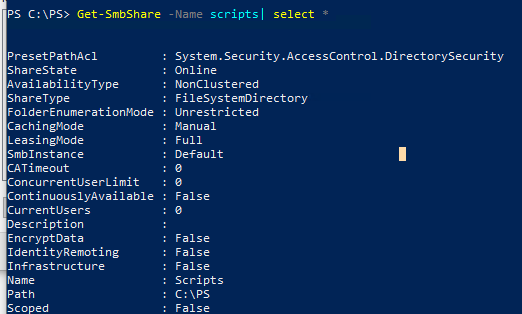
Полный список настроек сетевой папки можно вывести:
Get-SmbShare -Name scripts| select *
Чтобы удалить сетевую папку:
Remove-SmbShare Scripts
Добавить в список доступа сетевой папки разрешения на запись для указанного пользователя:
Grant-SmbShareAccess -Name Scripts -AccountName "winitpro\kbuldogov" -AccessRight Change –force
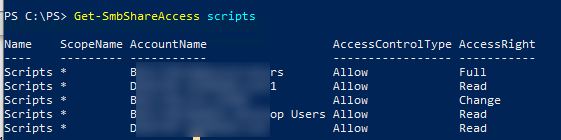
Вывести текущий список доступа к общей папке:
Get-SmbShareAccess scripts
Удалить группу из списка доступа:
Revoke-SmbShareAccess -Name Scripts -AccountName Everyone –Force
Принудительный запрет на доступ к общей папке (запрещающее разрешение имеет более высокий приоритет):
Block-SmbShareAccess -Name Scripts -AccountName winitpro\ExtUsers -Force
В большинстве случаев на уровне сетевой папки предоставляют доступ Everyone RW, а фактически права доступа к папке определяются на уровне NTFS.
Текущий NTFS ACL для сетевой папки можно получить с помощью команды:
(get-acl \\msk-man01\scripts).access
Чтобы изменить права доступа, используйте Set-Acl (подробнее про управление NTFS разрешениями с помощью PowerShell).
Управление открытыми файлами в сетевой папке
Командлеты модуля SMBShare можно использовать для просмотра списка файлов, открытых клиентами в сетевой папке на файловом сервере.
Вывести список открытых файлов с именами пользователей, именами компьютеров (IP адресами), и путями к файлам:
Get-SmbOpenFile|select ClientUserName,ClientComputerName,Path,SessionID
Вывести список файлов, открытых определённым пользователем:
Get-SMBOpenFile –ClientUserName "corp\kbuldogov" |select ClientComputerName,Path
Закрыть файл, открытый и заблокированный пользователем:
$sessn = New-CIMSession –Computername msk-fs01
Get-SMBOpenFile -CIMSession $sessn | where {$_.Path –like "*godovoy_otchet_2021.docx"} | Close-SMBOpenFile -CIMSession $sessn
Подключение сетевых дисков с помощью командлетов SmbMapping
Командлеты форматы SbmMapping используются для управления сетевыми дисками.
Чтобы подключить удаленную сетевую папку в сетевой диск U:, выполните команду:
New-SmbMapping -LocalPath U: -RemotePath \\msk-man01\scripts -UserName kbuldogov -Password mypass –Persistent $true -SaveCredential
- Без параметра Persistent сетевой диск будет доступен только до перезагрузки компьютера;
- Параметр SaveCredential позволяет сохранить учетные данные пользователя для подключения в диспетчер учетных данных Windows Credential Manager
Вывести список подключенных сетевых папок:
Get-SmbMapping
Для удаления сетевого диска:
Remove-SmbMapping U: -force
Все способы:
- Шаг 1: Активация компонента
- Шаг 2: Проверка и настройка
- Вариант 1: Клиент
- Вариант 2: Сервер
- Шаг 3: Подключение
- Вопросы и ответы: 2
Шаг 1: Активация компонента
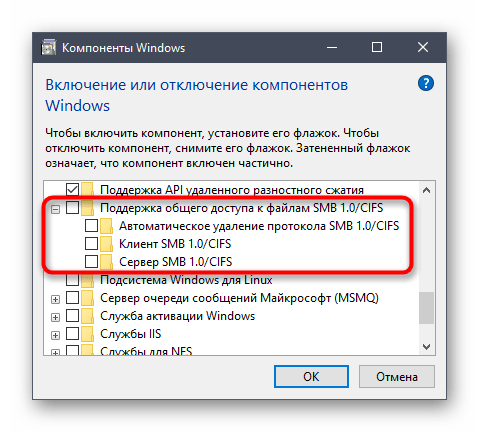
По умолчанию компонент, отвечающий за работу службы Samba (SMB), отключен в Windows 10, поэтому перед настройкой его следует активировать. Делается это в специальном меню «Панели управления». Достаточно будет открыть окно «Компоненты Windows» и установить отметку напротив пункта «Поддержка общего доступа к файлам SMB 1.0/CIFS». В завершение следует перезапустить компьютер, чтобы внесенные изменения зарегистрировались в системе. При надобности обратитесь за помощью к тематической статье на нашем сайте — в ней автор описал эту процедуру более подробно. Там же вы сможете найти альтернативные методы выполнения поставленной задачи. Для ознакомления с темой перейдите по ссылке ниже.
Подробнее: Как включить SMBv1 в Windows 10
Шаг 2: Проверка и настройка
После того как компонент «Поддержка общего доступа к файлам SMB 1.0/CIFS» будет включен, необходимо проверить его работу и выполнить запуск. Для клиентской и серверной части эти действия выполняются по-разному. Подробнее о них будет рассказано дальше по тексту.
Вариант 1: Клиент
Если вы собираетесь настроить клиентскую часть SMB, запустите оболочку «Windows PowerShell» от имени администратора и выполните несколько команд. Делается это следующим образом:
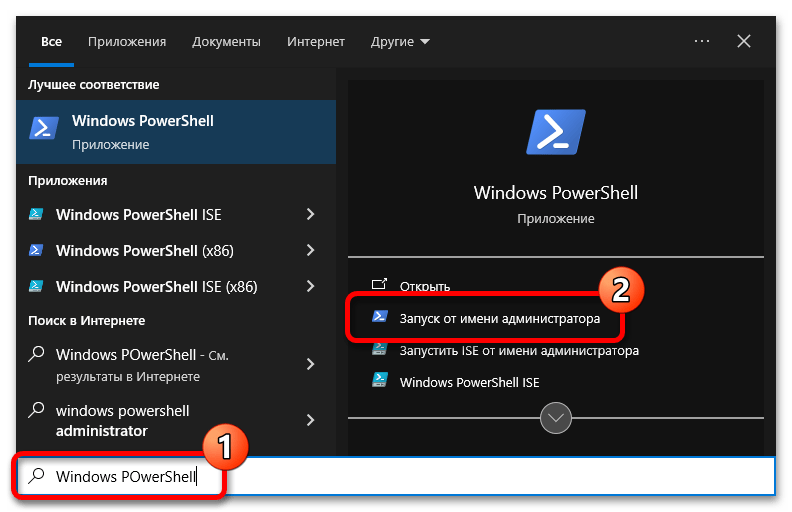
- Запустите оболочку любым доступным способом. Например, сделать это можно посредством поиска по системе. Установите курсор в соответствующее поле на панели задач, введите запрос «Windows PowerShell» и в результате щелкните по пункту «Запуск от имени администратора».

Читайте также: Как открыть Windows PowerShell в Windows 10
- При появлении диалогового окна контроля учетных записей щелкните по кнопке «Да», чтобы разрешить запуск оболочки.
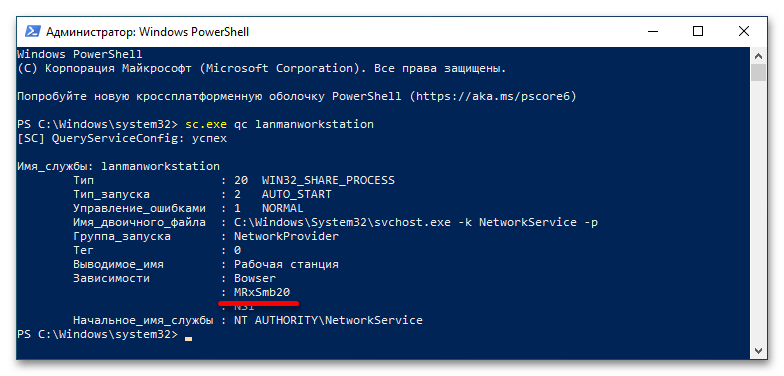
- В появившееся окно «Windows PowerShell» вставьте команду
sc.exe qc lanmanworkstationи нажмите Enter для ее выполнения.В результате появится информация, касающаяся клиентской части службы SMB. Здесь вам необходимо обратить внимание на строку «Зависимости». Важно, чтобы в списке была указана службы под названием «MRxSmb20». Если она есть, значит, все нормально и клиент Samba настроен правильно.
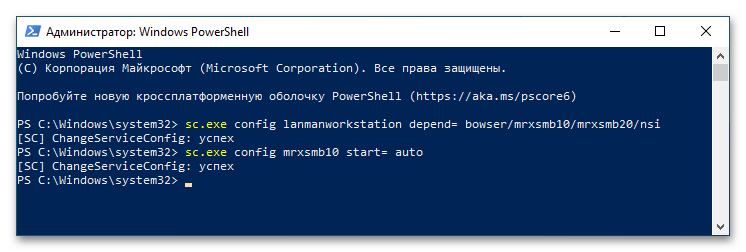
- Если в списке «MRxSmb20» отсутствует, следует вручную включить эту службу. Сделать это можно посредством редактирования системного реестра или путем ввода специальных команд в «Windows PowerShell». Во втором случае воспользуйтесь приведенными ниже командами. Поочередно вставьте их в консоль и нажмите по клавише Enter для выполнения.
sc.exe config lanmanworkstation depend= bowser/mrxsmb10/mrxsmb20/nsi
sc.exe config mrxsmb10 start= auto
Если после ввода команд на экране появлялось сообщение «[SC] ChangeServiceConfig: успех», значит, вы все выполнили верно и клиентская часть Samba полностью настроена.
Вариант 2: Сервер
Серверная часть SMB настраивается похожим образом, но прежде следует проверить ее статус посредством специальной команды, приведенной ниже. Откройте «Windows PowerShell» от имени администратора, как это было показано ранее, а затем выполните команду.
PowerShell Get-SmbServerConfiguration | Select EnableSMB1Protocol
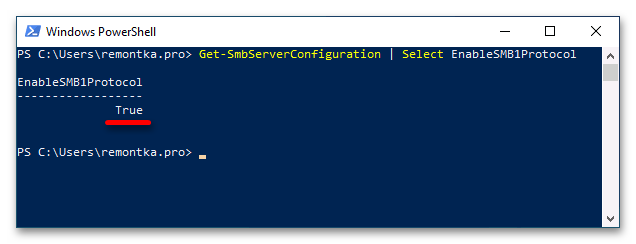
Наличие в столбце «EnableSMB1Protocol» значения «True» означает, что сервер настроен корректно и готов к работе. В противном случае вам необходимо выполнить настройку вручную. Для этого сделайте следующие действия:
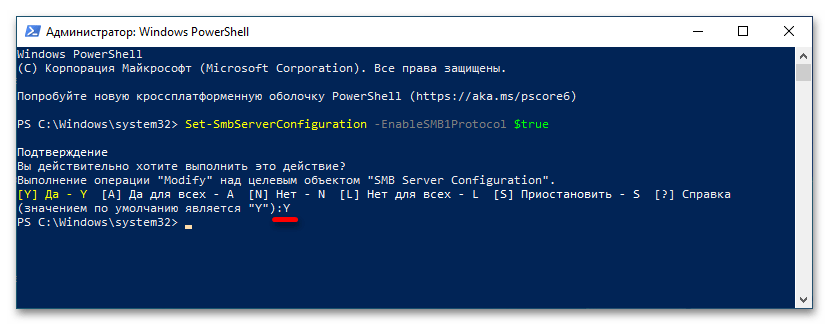
- Впишите в «Windows PowerShell» команду
Set-SmbServerConfiguration -EnableSMB1Protocol $trueи нажмите Enter, чтобы ее выполнить.
При появлении запроса подтверждения впишите символ «Y» (без кавычек) и нажмите по клавише Enter. Это нужно для завершения выполнения команды.
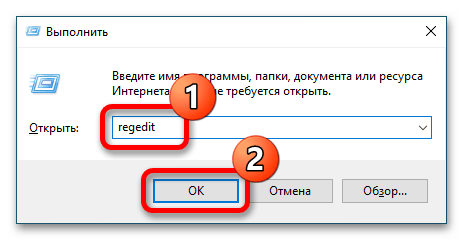
- После этого окно консоли вы можете закрыть, оставшиеся действия выполняются в «Редакторе реестра». Откройте его через системный поиск или утилиту «Выполнить», вызываемую сочетанием клавиш Win + R. Вставьте в поле «Открыть» команду
regeditи кликните по кнопке «ОК».
При появлении диалогового окна контроля учетных записей кликните по кнопке «Да», чтобы разрешить запуск «Редактора реестра».
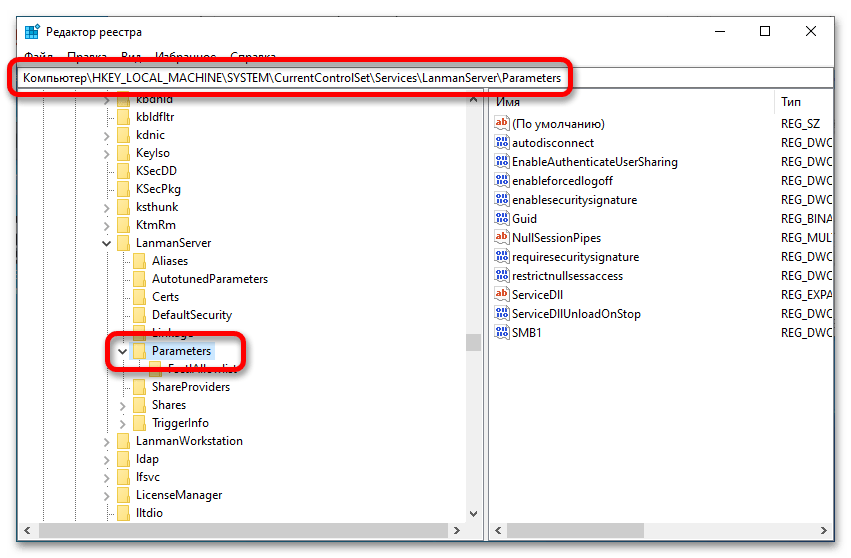
- В появившемся окне приложения воспользуйтесь древовидной структурой каталогов в левой части интерфейса, чтобы перейти по указанному далее пути. Вы также можете сделать это намного быстрее — вставив адрес в адресную строку, находящуюся сверху. Просто скопируйте путь и вставьте его туда, а для перехода нажмите по клавише Enter.
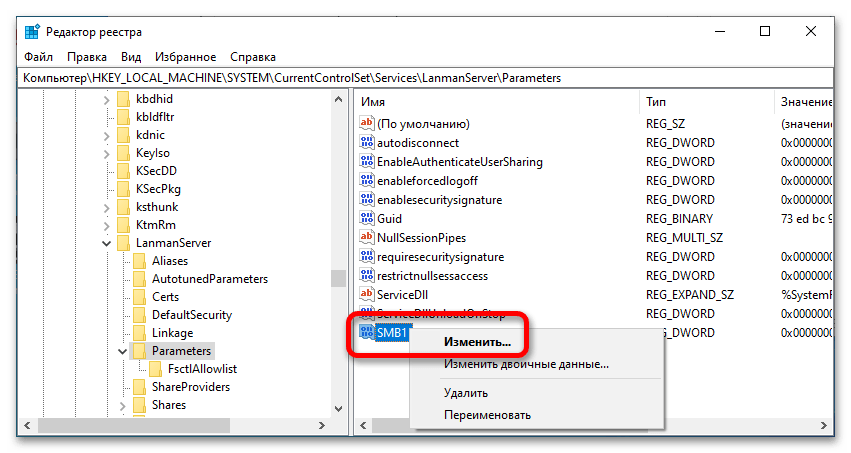
HKEY_LOCAL_MACHINE\SYSTEM\CurrentControlSet\Services\LanmanServer\Parameters - Находясь в целевой директории, найдите в ней параметр под названием «SMB1» и откройте его свойства. Для этого щелкните по нему правой кнопкой мыши и из появившегося контекстного меню выберите пункт «Изменить».
- В поле «Значение» введите цифру «1» (без кавычек) и нажмите по кнопке «ОК», чтобы сохранить внесенные изменения.
Как только все описанные действия будут выполнены, настройку серверной части службы Samba можно считать оконченной.
Шаг 3: Подключение
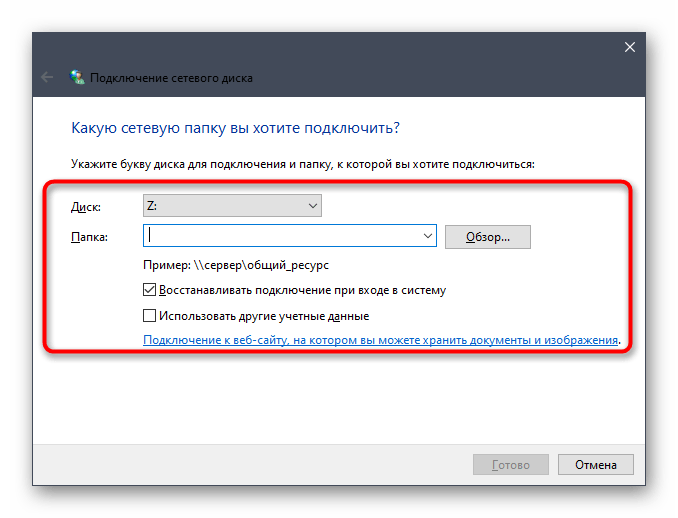
Теперь, когда служба SMB настроена, можно непосредственно пробовать подключаться к серверу. Делается это стандартным способом через меню сетевого диска. Открыть его вы можете через файловый менеджер «Проводник». По итогу вам нужно будет присвоить букву новому диску, ввести адрес сервера Samba и нажать на «Готово». Подробнее об этом рассказывается в другой статье на нашем сайте. Ознакомиться с ее содержанием вы можете посредством следующей ссылки.
Подробнее: Как подключить сетевой диск в Windows 10
Читайте также: Что делать, если не удается подключить сетевой диск в Windows 10
Наша группа в TelegramПолезные советы и помощь

One of the easiest ways to access your media and files over a network is to setup an SMB file share on Windows. With the proper setup, you can access your media files through other devices using the SMB protocol. Windows has SMB file sharing built into its operating system.
With a few quick configurations on Windows, you will be fully setup with SMB file share enabled so you can access your files or media from other devices on your network. First, ensure SMB is enabled on your Windows operating system. After confirming SMB is enabled, select the folders and files to share over the network. Follow this guide for step-by-step instructions to get SMB file share working on Windows.
How to Enable SMB on Windows
By default, SMB should be enabled on Windows 10 and 11. The SMB feature on Windows is called SMB Direct and is Windows’ name for the SMB 3.x file sharing protocol. The first step is to ensure this feature is enabled. If for some reason it is disabled, follow these steps to enable it. If you don’t have the SMB Direct feature available, make sure your Windows operating system is fully up to date.
Launch the Control Panel and select the Programs and Features option.

Once you have clicked on Programs and Features, on the left menu bar, at the top, look for Turn Windows Features On or Off. Go ahead and click into that.

Clicking on Turn Windows Features On or Off will bring up a new small window with a list of checkboxes. These should be listed alphabetically. Scroll down and find SMB Direct. Make sure this box is checked. You may also see SMB 1.0/CIFS File Sharing Support.
If you do have this option, make sure it is unchecked. This is how you enable SMB 1.0, but SMB 1.0 has some vulnerabilities associated with it. If this feature is enabled, your machine and entire network could become compromised. I highly suggest turning this feature off, if enabled, and leaving it off, it disabled.

After turning SMB Direct on by checking the box, your Windows machine should be good to go and have SMB enabled. Now all we need to do is setup SMB file shares on Windows and assign the correct users to the shares.
Before beginning with setting up the SMB file share, I would strongly encourage you to create a new user on Windows specifically for sharing. It only takes about 30 seconds and provides a lot of extra security. You can choose to skip creating a new user, but then anyone who has access to your network will have access to the SMB file shares you create.
If you are not going to create a new user, you will need to go into Control Panel -> Network and Sharing -> Change Advanced Sharing Options -> All Networks ->then enable Turn Off Password Protected Sharing. Again, this is not ideal and exposes you to anyone who may have, or will have access to your network. Replace the word kodi in my screenshots with the word Everyone (that is a preexisting user you can select).
I am using a user I named kodi to setup SMB file shares. Use the user’s name that you created in place of kodi as seen in the provided screenshots.
First navigate to the folder you wish to share. Go ahead and right click on the folder and select Properties at the bottom.
Once the folder’s Properties window is open, navigate to the Sharing tab.
From there, go ahead and click the Share button to open another window.
Another window will open and you will want to click on the dropdown bar and select your user. I selected the user I created named kodi.

Once you have selected your user, click the Add button to the right of the dropdown bar.

Once your user has been added to the list, click on the Share button.

This folder you just set up is now ready to be shared via the SMB protocol. Repeat this process for any other folders you want to share. Once all folders are shared, you are finished with setting up SMB file share on Windows.
With that, a congratulations are in order, you have officially setup SMB file share on Windows. You can now move on to the devices you wish to access files on. Remember to use the user you created as the credentials when setting up SMB on those devices.
If you chose to use Everyone rather than create a new user, that user does not have a password. Some applications, such as Kodi, for example, require a password even if there isn’t an actual password. For cases such as this, use a single space as the password. If you have any questions or get stuck, please leave a comment and I’ll do my best to assist!