
В качестве простейшего примера работ
в среде PowerShell рассмотрим,
каким образом можно изменять ее параметры,
обеспечивая комфортность работы
пользователя. По своему желанию
пользователь может устанавливать
размеры и расположение окна PowerShell,
характеристики используемых шрифтов,
выбор цвета и другие параметры.
Проще всего эти установки выполняются
с помощью диалогового окна оболочки.
Для его вызова нужно установить курсор
мыши на заголовке окна, кликнуть правой
кнопкой и выбрать пункт Свойства в
появившемся контекстном меню. Должно
появиться диалоговое окно (рис.
4)
О
кно
имеет несколько вкладок (Общие, Шрифт,
Расположение, Цвета), каждая из которых
позволяет настраивать определенную
группу параметров. Здесь можно
буферирование и запоминание интерактивно
выполняемых команд с целью их последующего
использования отдельным блоком в
сценарии.
После выбора и установки всех нужных
параметров следует нажать кнопку ОК.
Система тут же требует указаний, к какому
объекту применить эти изменения (рис.
5). Если изменения свойств должны
действовать постоянно, то следует
выбрать переключатель Сохранить
свойства для других окон
Рис. 4 Диалоговое окно для установки
параметров оболочки.
с тем же
именем,
если изменения предусмотрены как
разовые, то выбирается Изменить
свойства только текущего окна.
Рис. 5 Выбор объекта установки параметров
оболочки.
Кроме инструментальных средств настройки
командного окна имеется возможность
применения чисто программных средств,
являющихся неотъемлемой частью самой
оболочки.
По умолчанию командлет Get-Host
без параметров отображает информацию
о самой оболочке (региональные настройки,
версия и т.п.):
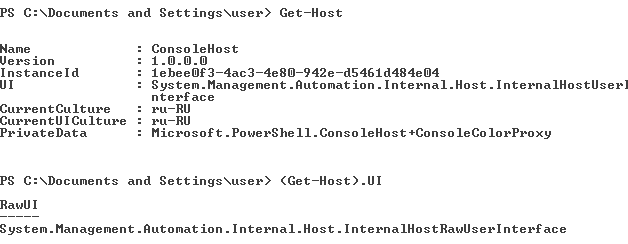
Рис. 6 Обобщенные данные оболочки
PowerShell и место размещения
ее параметров
В команде (Get-Host).UI
имя командлета взято в круглые скобки.
Это обозначает, что требуется выполнить
данный командлет и сформировать выходной
объект. Только после этого извлекается
свойство объекта UI. Пройдя
эту цепочку, получаем доступ к параметрам
командного окна:

Рис. 7 Параметры командного окна оболочки
PowerShell
Значение каждого из перечисленных
параметров можно изменить, настраивая
внешний вид окна по желанию. При изменениях
параметров целесообразно объект RawUI
сохранить в качестве значения отдельной
переменной [1]. Покажем, например, как
изменить цвет фона и текста. Свойство
BackgroundColor отвечает за цвет
фона, а ForegroundColor – за цвет
текста. В качестве цветов можно
использовать следующие 16: Black,
Gray, Red,
Magenta, Yellow,
Blue, Green,
Cyan, White,
DarkGreen, DarkCyan,
DarkRed, DarkMagenta,
DarkYellow, DarkGray,
DarkBlue. Установим желтый
цвет текста на темно-синем фоне. Такое
сочетание цветов часто используется в
различных системах программирования.
Желаемый эффект обеспечивается
выполнением следующих трех команд.

Действие этих команд обеспечивается
сразу после их выполнения. Оно не
затрагивает строки, предшествующие
этим командам.
Некоторые параметры оболочки, например,
WindowSize, содержат по две
координаты. Для изменения их значений
проще всего объявить новую переменную
$b=$a.WindowSize.
Переопределим значения ширины и высоты
командами $b.Width=80
и $b.Height=25,
а затем изменим содержимое объекта
WindowSize переменной $a,
то есть выполним команду $a.WindowSize=$b.
Последняя строка рис. 7 отражает заголовок
командного окна PowerShell.
Оно достаточно длинное и непривлекательное.
Выполнив команду $a.WindowTitle=”
Мое командное окно”, получаем более
приемлемое название.

В некоторых случаях возникает необходимость
в изменении приглашения. Мигающему
курсору после букв PS
предшествует запись полного пути к
текущему каталогу. Вид приглашения
командной строки в PowerShell
определяется функцией Prompt,
которая имеет формат, отражаемый командой
Не рассматривая подробно составные
части формата, так как это можно сделать,
используя справочную систему, укажем,
как создать приглашение, эквивалентное
командной строке cmd.exe.
В данной команде используется конструкция
“$(Get-Location)…,
называемая подвыражением (subexpression).
Подвыражение – это блок кода на языке
PowerShell, который в строке
заменяется значением, полученным в
результате выполнения этого кода.
Все иллюстрированные выше настройки
выполнялись в интерактивном режиме и
их действие распространяется лишь на
время текущего сеанса работы. После
окончания сеанса работы в оболочке
PowerShell они утрачивают
силу.
Для сохранения настроек с целью их
регулярного, а может быть и повседневного,
использования необходимо создать файл
с соответствующим набором команд-настроек.
Этот файл текстового типа получил
название профиль. Профиль – это
сценарий, который будет загружаться и
активизировать необходимые настройки
при каждом запуске оболочки PowerShell.
Значение профиля очень близко значениям
файлов autoexec.bat
для ранних и autoexec.nt
для современных версий ОС Windows.
Все они предназначаются для автоматического
выполнения требуемых подготовительных
работ. Корректно составленный профиль
призван обеспечить не только комфортные
условия работы пользователя, но и создать
удобства для администрирования.
Разработка и распространение профилей
позволяет использовать единые условия
работы пользователей на группе компьютеров
в распределенной среде, например, в
локальных компьютерных сетях.
В зависимости от уровня выполняемых
настроек и значимости администрируемых
ресурсов можно формировать профили
четырех видов:
— профили, действующие на всех пользователей
сети и на все их оболочки PowerShell
(хосты);
— профили, действующие на всех пользователей
сети с использованием единой оболочки
PowerShell;
— профили, действующие только на текущего
пользователя и на все оболочки;
— профили, действие которых распространяется
только на текущего пользователя и только
на хост powershell.exe.
Видимо поэтому в инструментальных
средствах оболочки (см. рис. 4 Свойства,
вкладка Общие) предусмотрена возможность
работы с несколькими буферами, в которых
одновременно подготавливаются блоки
команд сразу для нескольких профилей.
Каждый тип профиля имеет свое место
хранения в особой зоне ОС Windows.
При работе с оболочкой на автономном
компьютере используется только
пользовательский профиль, относящийся
к последнему типу. Место его расположения
и имя файла можно определить по значению
специальной переменной $profile:
С помощью командлета Test-Path
можно установить факт наличия созданного
профиля:
Если профиль создан, то реакция будет
True, в противном случае –
False.
По умолчанию, даже если профиль создан,
выполнение блока его команд запрещено.
Параметр политики выполнения
устанавливается Restricted.
Это сделано для обеспечения безопасности
системы.
Автоматическое выполнение сценариев
профиля с цифровой подписью разрешается
при параметрах политики выполнения
AllSigned и RemoteSigned.
Возможно выполнение сценариев и без
цифровой подписи при параметре
Unrestricted. В этом случае
система выдает предупреждение и требует
подтверждения со стороны пользователя.
Узнать, какая политика является активной,
можно с помощью команды
Переустановка значения параметра
обеспечивается командлетом
Set-ExecutionPolicy
и далее через пробел пишется название
политики выполнения, например,
RemoteSigned. Запоминать имена
возможных политик нет необходимости.
Установив курсор после имени командлета,
и нажимая клавишу Tab, можно
перебрать все варианты политик выполнения,
оставив необходимую.
Задание 4.
-
Вызвать диалоговое окно оболочки для
проверки и установки параметров
командного окна. Внимательно изучить
рубрики вкладок Общие, Шрифт, Расположение,
Цвета. Просмотреть, как изменение
различных параметров отражается на
внешнем виде командного окна. -
Изучить последовательность команд для
программного изменения свойств консоли.
По образцу и подобию установить новые
размеры командного окна, применить
другие сочетания цветов. -
Изменить название командного окна.
Соседние файлы в предмете [НЕСОРТИРОВАННОЕ]
- #
- #
- #
- #
- #
- #
- #
- #
- #
- #
- #
Table of Contents
- 1. Introduction
- 2. Using cmd.exe Directly
- 3. Using PowerShell’s Invoke-Expression
- 4. Using PowerShell’s Start-Process Cmdlet
- 5. Using Batch Files
- 6. Using Pipe Operator
- 7. Using Call Operator (&)
- 8. Dealing with Complex Scenarios Related to Quotes and Escape Characters
- 8.1 Using Quotes in CMD Arguments
- 8.2 Escaping Characters in CMD Commands
- 8.3 Complex Argument with Quotes and Escape Characters
- 8.4 Nested Commands with Escape Characters
- 9. Performance Comparison
- 10. Conclusion
1. Introduction
PowerShell, a powerful scripting and automation tool by Microsoft, is often used for its advanced features and flexibility. However, there are scenarios where it is necessary to run traditional Command Prompt (CMD) commands within PowerShell. This necessity may arise due to specific CMD functionalities, integration with legacy systems, or compatibility reasons. In such instances, it’s essential to understand how to execute CMD commands and pass parameters to them within the PowerShell environment. We will explore various methods to accomplish this, focusing on practical examples and their respective performances.
2. Using cmd.exe Directly
Invoking cmd.exe within PowerShell allows for direct execution of CMD commands. This method is straightforward and simulates running commands in CMD.
|
$output = cmd.exe /c ipconfig /all |
Explanation:
cmd.exe: The command-line interpreter for Windows./c: Instructscmd.exeto execute the command and exit.ipconfig /all: Example CMD command with a parameter. It displays detailed network configuration.$output: Captures the output of the command in PowerShell.
3. Using PowerShell’s Invoke-Expression
Invoke-Expression in PowerShell can evaluate or execute a command represented as a string. This method is useful for dynamically constructed commands.
|
$cmdCommand = «ipconfig /all» $output = Invoke-Expression «cmd.exe /c $cmdCommand» |
Explanation:
Invoke-Expression: Executes a string as a PowerShell command.$cmdCommand: A variable holding the CMD command.- The command string passed to
Invoke-Expressionincludescmd.exe /cand the CMD command.
While flexible, Invoke-Expression can pose security risks if the command string is constructed from untrusted sources. Performance-wise, it introduces additional parsing overhead compared to direct execution.
4. Using PowerShell’s Start-Process Cmdlet
Start-Process is a PowerShell cmdlet that starts a new process. It can be used to run CMD commands, especially when more control over the execution is needed.
|
$processInfo = Start-Process cmd.exe -ArgumentList «/c ipconfig /all» -NoNewWindow -Wait -RedirectStandardOutput «output.txt» -PassThru $output = Get-Content «output.txt» Remove-Item «output.txt» |
Explanation:
Start-Process: Starts a new CMD process.-ArgumentList: Specifies the CMD command.-NoNewWindow: Prevents opening a new window.-Waitand-RedirectStandardOutput: Waits for the command to complete and redirects the output to a file.Get-Content: Reads the output from the file.
5. Using Batch Files
Batch files are scripts of CMD commands. PowerShell can execute these batch files, allowing for running a series of CMD commands.
Let’s create a batch file example.bat with CMD commands:
Run the batch file in PowerShell:
|
$output = cmd.exe /c «path\to\example.bat» |
Explanation:
- A batch file containing CMD commands is created.
- PowerShell executes the batch file using
cmd.exe /c. - The output is captured in PowerShell.
6. Using Pipe Operator
|
echo «ipconfig /all» | cmd.exe /c |
The pipe operator (|) in PowerShell passes the output of one command as input to another. Here, the string “ipconfig /all” is piped into cmd.exe, which executes the CMD command.
Using the pipe operator is straightforward and works well for single-line commands. It is less suitable for complex multi-command scenarios.
7. Using Call Operator (&)
|
$command = «cmd.exe /c ipconfig /all» & $command |
Explanation:
The call operator (&) allows execution of a command stored in a variable or a string. This method is useful when the command is dynamically constructed or stored in a variable.
The call operator is efficient for executing string commands and offers flexibility in command execution. However, care must be taken with command construction to avoid errors.
8. Dealing with Complex Scenarios Related to Quotes and Escape Characters
In PowerShell, when we execute Command Prompt (CMD) commands that involve quotes and escape characters, special attention is needed due to the differing ways in which CMD and PowerShell interpret these characters. Let’s explore how to handle such scenarios effectively.
8.1 Using Quotes in CMD Arguments
Scenario:
We need to run a CMD command with a file path argument that contains spaces.
|
$filePath = «C:\Program Files\Example\myfile.txt» $output = cmd.exe /c dir «$filePath» |
Explanation:
- We store the file path in a variable
$filePath. - The file path is enclosed in quotes to be treated as a single argument.
- When executing the
dircommand in CMD viacmd.exe /c, CMD receives the file path correctly, even with spaces.
8.2 Escaping Characters in CMD Commands
Scenario:
Executing a CMD command from PowerShell where the command includes characters like ampersands (&) that CMD treats specially.
|
command = ‘echo This ^& that’ $output = cmd.exe /c $command |
Explanation:
- Here,
^is used to escape the&in the CMD command. - We enclose the command in single quotes in PowerShell, ensuring PowerShell doesn’t interpret the escape character.
- CMD interprets
^&as an escaped ampersand, allowing the command to run correctly.
8.3 Complex Argument with Quotes and Escape Characters
Scenario:
We want to run a CMD command with an argument that itself includes both quotes and escape sequences.
|
$argument = ‘»»C:\Program Files\Example\myfile.txt»»‘ $output = cmd.exe /c «echo $argument» |
Explanation:
- We use double quotes around the file path and include an additional set of quotes for CMD to parse it correctly.
- The outer double quotes in PowerShell allow for variable expansion, so
$argumentis correctly expanded and passed to CMD.
8.4 Nested Commands with Escape Characters
Scenario:
Executing a nested CMD command from PowerShell, where the inner command also includes quotes or special characters.
|
$output = cmd.exe /c «echo $(cmd.exe /c dir `»C:\Program Files`»)» |
Explanation:
- This command runs
cmd.exe /cinside anothercmd.exe /c. - The inner
dircommand requires a path with spaces, so we use PowerShell’s backtick (`) as an escape character for the quotes. - This ensures that the inner quotes are interpreted correctly by CMD.
9. Performance Comparison
- Direct
cmd.exeInvocation: Fast and efficient for simple commands. Ideal for straightforward execution with minimal overhead. Invoke-Expression: Offers flexibility but introduces additional parsing overhead, making it slightly slower than direct execution. Security risks should be considered.Start-Process: Provides robust control, especially for complex scenarios, but is slower due to the process start-up time and file I/O operations for output handling.- Batch Files: Efficiency depends on the complexity of the batch file. Generally, it has additional overhead compared to executing a single command due to file reading and execution.
- Pipe Operator: Quick and effective for simple commands. Not suitable for complex or multi-command sequences.
- Call Operator (
&): Similar in performance to direct invocation. It is particularly useful for executing dynamically constructed commands or commands stored in variables.
10. Conclusion
In PowerShell, various methods are available to execute CMD commands, each with its unique advantages and suited for different use cases. The choice of method depends on the task’s complexity, performance requirements, and specific scenario. Whether it’s a simple command execution or a more complex script, PowerShell provides the flexibility to integrate CMD functionality seamlessly into its environment. Understanding these methods enhances the scripting capabilities in PowerShell, allowing for efficient and effective task automation.
-
Using the PowerShell Invocation Operator
& -
Running
CMDCommands Usingcmd.exe -
Piping to
CMDUsing PowerShell -
Conclusion
We’ve created a detailed YouTube video to accompany this article, embedded below!

Many legacy Command Prompt (CMD) commands work in the Windows PowerShell scripting environment. The PowerShell environment carries these commands forward from the most used commands like ping to the most informational commands like tracert from the legacy environment using aliases.
However, some running commands in the Command Prompt terminal will not work in Windows PowerShell’s scripting environment. This article will discuss how we can transcribe them correctly to Windows PowerShell.
Using the PowerShell Invocation Operator &
In the versatile world of scripting, PowerShell stands out for its ability to incorporate and execute commands from other scripting environments, notably the Command Prompt (CMD). One of the most direct methods to achieve this is through the Invocation Operator (&).
This article delves into the usage of the Invocation Operator for running CMD commands within PowerShell, an invaluable skill for those looking to bridge the functionalities of PowerShell and traditional CMD scripts.
The basic syntax for using the Invocation Operator is as follows:
& <Command-String> <Arguments>
&: This is the Invocation Operator.<Command-String>: This is the command you want to execute. This can be aCMDcommand, a PowerShell cmdlet, or a script block.<Arguments>: This is optional and represents any arguments or parameters that the command requires.
Example Code:
& cmd.exe /c echo "Hello from CMD"
In this script, we employ the Invocation Operator & to seamlessly execute a CMD command within PowerShell. Firstly, we call upon cmd.exe, the designated executable for the Command Prompt, ensuring that we are working within the correct command-line environment.
We then pass the /c parameter to cmd.exe, a crucial instruction that directs the Command Prompt to execute our specified command and promptly terminate thereafter. Our command of choice, echo "Hello from CMD", is a straightforward yet effective demonstration, as it simply prints the message Hello from CMD to the console.
Output:

This output demonstrates that the CMD command echo was successfully executed within PowerShell, displaying the intended message.
Running CMD Commands Using cmd.exe
Another example of running CMD commands is by using the cmd.exe. We can add cmd.exe inside Windows PowerShell like our previous method.
Once added and executed, it will call the command line interface inside the Windows PowerShell command prompt.
The syntax for using cmd.exe directly in PowerShell is as follows:
cmd.exe /c "<Command-String>"
cmd.exe: This is the executable for the Command Prompt./c: This is a parameter that instructscmd.exeto carry out the command specified by the string and then terminate."<Command-String>": This is theCMDcommand or series of commands you want to execute.
Example Code:
cmd.exe /c "echo Hello from CMD"
In this script, we seamlessly integrate CMD functionality into PowerShell by directly invoking cmd.exe with the /c parameter, followed by our command of interest, echo Hello from CMD. By using cmd.exe /c, we establish a bridge between PowerShell and CMD, enabling us to tap into the familiar command-line environment and functionalities of CMD within our PowerShell script.
The command "echo Hello from CMD" is a straightforward yet illustrative example of this integration, where we utilize a basic CMD command to print our desired text to the console.
Output:

This output demonstrates the successful execution of a CMD echo command in PowerShell, displaying the message Hello from CMD.
Piping to CMD Using PowerShell
In Windows PowerShell, we can also send over commands to the command prompt terminal by piping in the cmd cmdlet to the command you wanted to send over.
Piping to CMD in PowerShell is primarily used for executing CMD commands or batch scripts within a PowerShell context. This method is particularly useful when you need to run a CMD command that doesn’t have a direct PowerShell equivalent or when you’re dealing with legacy CMD scripts.
The basic syntax for piping to CMD in PowerShell is:
"<Command-String>" | cmd.exe /c -
"<Command-String>": This is theCMDcommand you wish to execute.|: This is the PowerShell pipe operator, which passes the output of one command as input to another.cmd.exe /c -: This calls the Command Prompt to execute the command passed to it via the pipe. The-signifies thatcmd.exeshould expect the command from the standard input (stdin).
Example Code:
"echo Hello from CMD" | cmd.exe
In this example, we use the piping technique to send the string "echo Hello from CMD" into cmd.exe, demonstrating an elegant blend of PowerShell’s piping capabilities with CMD’s command execution.
Our journey begins with "echo Hello from CMD", a simple yet effective CMD command encapsulated as a string, designed to display a specific message when executed in the CMD environment.
We then employ the pipe operator |, a powerful tool in PowerShell, to seamlessly forward this command string to cmd.exe. The culmination of this process is observed in cmd.exe /c -, where the - symbol plays a crucial role, instructing cmd.exe to attentively read and execute the command arriving from the pipeline.
Output:
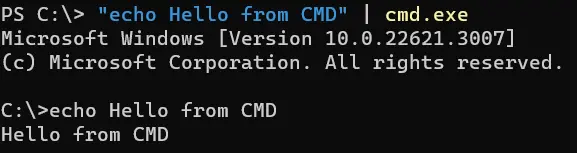
This output is the result of the CMD echo command, which prints Hello from CMD to the screen.
Running CMD Commands in PowerShell Using Invoke-Expression
A versatile and powerful method to execute CMD commands within PowerShell is through the Invoke-Expression cmdlet. This approach is particularly useful when you need to dynamically construct and execute a command or a script block.
This article delves into the purpose, application, and usage of the Invoke-Expression method in PowerShell for running CMD commands.
The syntax for Invoke-Expression is:
Invoke-Expression -Command "<Command-String>"
-Command: This specifies the command to execute. This parameter can be abbreviated as-C."<Command-String>": This is the string that contains the command to be executed.
Example Code:
Invoke-Expression -Command "cmd.exe /c echo Hello from CMD"
In our script, we harness the power of Invoke-Expression to adeptly execute a CMD command encapsulated within a string. Our process begins with Invoke-Expression -Command, a pivotal cmdlet and parameter combination that equips PowerShell with the ability to interpret and execute the provided command string.
We then introduce "cmd.exe /c echo Hello from CMD" as our chosen command string. This string deftly instructs cmd.exe to utilize the /c parameter, a directive that commands CMD to execute the subsequent command and then conclude its process.
The echo command, nestled within this string, is the heart of our execution, designed to output Hello from CMD in CMD.
Output:

This output is the direct result of the echo command being processed by CMD, which is invoked by Invoke-Expression in PowerShell.
Conclusion
In this comprehensive exploration, we delved into the versatility of running Command Prompt (CMD) commands within the Windows PowerShell environment, covering four distinct methods: the straightforward Invocation Operator &, directly using cmd.exe, the innovative technique of piping commands to CMD, and the dynamic Invoke-Expression cmdlet. Each approach offers unique advantages for integrating CMD’s familiar functionalities into PowerShell’s advanced scripting realm.
For those seeking to further their PowerShell expertise, delving into advanced topics like Creating Custom PowerShell Cmdlets or Advanced PowerShell Scripting Techniques is highly recommended, opening doors to more sophisticated and robust scripting solutions that harmoniously blend the strengths of both PowerShell and CMD.
Command prompt is primarily used for executing batch commands or troubleshooting some primary software problems, while PowerShell is usually used for executing batch commands and administration purposes. While the two tools may look similar, they are not entirely the same.
For the most part, legacy cmd commands will run in the PowerShell scripting environment, but several command prompt terminals will not unless you transcribe them correctly. This article will show you how to do it so that you can successfully run cmd commands in PowerShell.
How to Run CMD Commands Using PowerShell
You will learn three ways to run cmd commands in PowerShell in this section. You can use the cmd.exe, the PowerShell invocation operator, or pipe to CMD using PowerShell. Let’s get into the details of each method!
Method 1: Use the Invocation Operator
While some CMD command lines will run directly in PowerShell you need to apply tweaks like the PowerShell invocation operator which is the ampersand sign & to .exe command lines to run. For example, the CMD command line «c:\windows\system32\msiexec.exe» will display the Windows installer property as seen below:
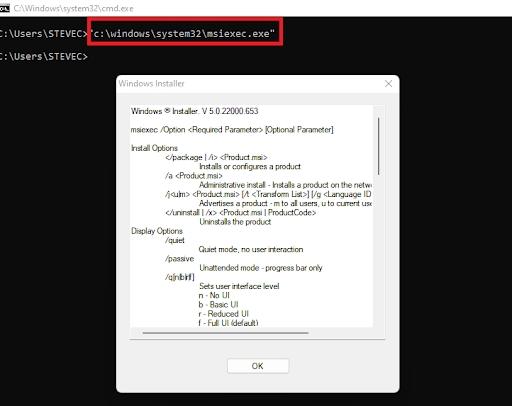
However, the same command will fail to run directly in PowerShell. You will get a blank page as seen below, instead:

To fix this, you need to introduce the invocation operator (ampersand sign) at the beginning of the command line in PowerShell to get:
& "c:\windows\system32\msiexec.exe"The invocation operator will help PowerShell to treat the string path as an executable path and give the expected output as seen below:
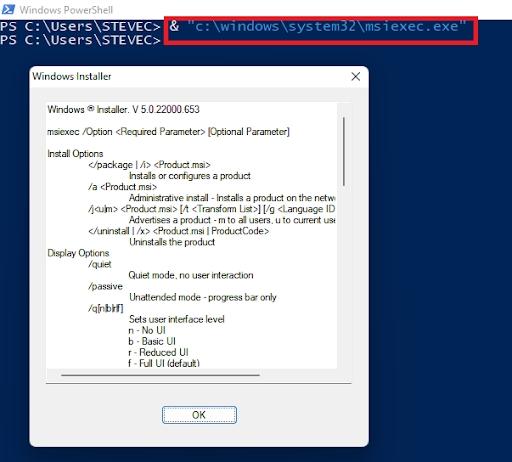
Therefore, you can simply add the ampersand sign “&” to the start of a cmd command line to run it in PowerShell.
Method 2: Use cmd.exe
Another easy way to run CMD commands in PowerShell is to use cmd.exe. You can do this by adding cmd.exe to the CMD command line within Windows PowerShell. This is similar to the approach in the first method. The only difference is that you are adding a different extension to the start of the cmd command line.
For instance, you cannot run the native cmd.exe command like dir in PowerShell, but you can run it by adding a cmd.exe extension and an additional parameter like \c.
In the example below where you have the command line: cmd.exe /c dir /w, the system will run the cmd.exe /c, and then run the old cmd command «dir» with its argument /w.
The parameter /c will perform whichever command you enter and terminate the cmd.exe command-line interpreter.

You may run the syntax cmd.exe /? to bring up the cmd.exe command’s help documentation for more information on other parameters.
Method 3: Pipe CMD command Using PowerShell
You can also run a cmd command in PowerShell by piping the cmd.
For example, you can pipe the command to query the IP configurations of your local computer by sending it to the CMD command-line interface.
To do this, you will add | cmd to the end of the cmd command line before running it. You have: «Ipconfig /all» | cmd instead of the command «Ipconfig /all».

The system will run the code with the command prompt terminal, terminate the terminal, and bring the user back to the PowerShell terminal denoted by Powershell at the start of the line.
You may also like to read:
Split String into Array in Powershell
Run CMD Commands Using C#
How to comment PowerShell code?
If-Else in SQL Server with Example
Applies to: Windows PowerShell 2.0+
Sometimes when you enter commands into PowerShell they don’t execute the same way as they would in the command prompt. I ran into this issue with an uninstall string for a security software called Cylance Protect. The uninstall string looks like this:
msiexec /Lvx* c:\Temp\MsiUnInstall.log /x {2E64FC5C-9286-4A31-916B-0D8AE4B22954} /qn
When I executed it within the command prompt it ran as expected, however when executed in PowerShell it pulled up the msi info page. The way I resolved this was by using cmd C\ followed by my uninstall command. The below code demonstrates this. Long story short use cmd /C “Command” to run cmd commands inside a PowerShell script.
Run CMD commands in PowerShell
cmd /c "msiexec /Lvx* c:\Temp\MsiUnInstall.log /x {2E64FC5C-9286-4A31-916B-0D8AE4B22954} /qn"
Filepath has spaces
cmd /c "`"C:\Program Files\Sophos\Endpoint Defense\SEDcli.exe`" -TPoff $tamperpassword"
Contribution Gabriel McColl
PowerShellCMDCommand Prompt
137 Words
2015-04-10 00:00 +0000