
Applies ToWindows 10 Windows 11
С помощью домашней беспроводной сети можно получить доступ к Интернету в разных местах вашего дома. В этой статье описаны основные действия по настройке беспроводной сети и началу ее использования.
Приобретение необходимого оборудования
Чтобы создать собственную беспроводную сеть, необходимы указанные ниже компоненты.
Широкополосное подключение к Интернету и модем. Широкополосное подключение к Интернету — это высокоскоростное подключение. Оптоволокно и кабель являются наиболее распространенными широкополосными подключениями. Чтобы получить услуги широкополосного подключения, обратитесь к поставщику услуг Интернета. Часто поставщики услуг Интернета предлагают широкополосные модемы. Кроме того, в дополнение к модемам некоторые поставщики услуг Интернета предлагают беспроводные маршрутизаторы. Вы также можете найти это оборудование в магазинах электроники и компьютерной техники или в интернет-магазинах.
Беспроводной маршрутизатор. Маршрутизатор пересылает данные между вашей сетью и Интернетом. При использовании беспроводного маршрутизатора вы можете подключить компьютеры к своей сети, используя радиосвязь вместо проводов. Существует несколько различных типов технологий беспроводной сети, которые включают 802.11a, 802.11b, 802.11g, 802.11n, 802.11ac и 802.11ax.
Беспроводной сетевой адаптер. Адаптер беспроводной сети — это оборудование, которое подключает устройство к беспроводной сети. Чтобы подключить портативное или классическое устройство к беспроводной сети, оно должно иметь адаптер беспроводной сети. Большинство ноутбуков и планшетов и некоторые настольные компьютеры поставляются с уже установленным адаптером беспроводной сети.
Чтобы проверка, есть ли на устройстве Windows адаптер беспроводной сети, выполните указанные действия.
-
Нажмите кнопку Пуск , введите диспетчер устройств в поле поиска, а затем выберите диспетчер устройств.
-
Разверните узел Сетевые адаптеры.
-
Найдите необходимый сетевой адаптер. В его имени может встречаться слово беспроводной.
Настройка модема и подключения к Интернету
После того как у вас будет в наличии все необходимое оборудование, вам потребуется настроить модем и подключение к Интернету. Если ваш модем не был настроен для вас поставщиком услуг Интернета, следуйте инструкциям, которые поставляется с модемом, чтобы подключить его к устройству и Интернету.
-
Для оптоволоконных подключений: подключите модем к оптоволоконной розетке, как правило, с помощью соединителя SFP (Small Form-factor Pluggable).
-
Для подключения к кабелю. Подключите модем к разъему кабеля с помощью коаксиального кабеля.
-
Для подключений цифровой абонентской линии (DSL): подключите модем к разъему телефона с помощью фильтра DSL и телефонного кабеля.
Размещение беспроводного маршрутизатора
Разместите беспроводной маршрутизатор в месте, в котором уровень его сигнала будет максимальным, а уровень помех — минимальным. Для достижения наилучших результатов следуйте указанным ниже советам.
Разместите беспроводной маршрутизатор в центре дома или квартиры. Разместите маршрутизатор как можно ближе к центру дома или квартиры, чтобы его радиосигнал равномерно охватывал все уголки дома.
Разместите беспроводной маршрутизатор над полом вдали от стен и металлических объектов, например от металлических шкафов. Чем меньше физических препятствий между компьютером и беспроводным маршрутизатором, тем сильнее будет его сигнал.
Уменьшите уровень помех. Некоторое сетевое оборудование использует радиоканал с частотой 2,4 ГГц. Эту же частоту использует большая часть микроволновых печей и многие беспроводные телефоны. Если вы включите микроволновую печь или вам позвонят на беспроводный телефон, то сигнал беспроводного маршрутизатора может быть временно прерван. Вы можете избежать большей части таких проблем, используя беспроводный телефон, работающий на более высокой частоте, например на частоте 5,8 ГГц.
Совет: Дополнительные сведения о Wi-Fi диапазонах, каналах и силе сигнала см. в статье Wi-Fi и макет вашего дома.
Обеспечение безопасности беспроводной сети
Безопасность сети всегда важна. При использовании беспроводной сети этот вопрос становится еще более актуальным, так как сигнал вашей сети может выходить за пределы дома. Если вы не обезопасите свою сеть, посторонние люди с компьютерами могут получить доступ к вашим подключенным к сети компьютерам и воспользоваться вашим подключением к Интернету.
Чтобы повысить безопасность своей сети, выполните указанные ниже действия.
Измените имя пользователя и пароль по умолчанию.Это помогает защитить маршрутизатор. Большинство производителей маршрутизаторов имеют имя пользователя и пароль по умолчанию на маршрутизаторе и сетевое имя по умолчанию (также известное как SSID). Посторонние могут воспользоваться этой информацией для доступа к вашему маршрутизатору втайне от вас. Чтобы избежать этого, измените имя пользователя и пароль по умолчанию для маршрутизатора. Инструкции см. в документации по сетевому устройству.
Настройте ключ безопасности (пароль) беспроводной сети. В беспроводных сетях используются ключи безопасности сети, позволяющие защитить сети от несанкционированного доступа. Мы рекомендуем использовать безопасность Wi-Fi защищенный доступ 3 (WPA3), если маршрутизатор и компьютер поддерживают ее. Дополнительные сведения см. в документации по маршрутизатору, в том числе о том, какой тип безопасности поддерживается и как его настроить.
Использование WPS
Некоторые маршрутизаторы поддерживают протокол WPS. Если ваш маршрутизатор поддерживает протокол WPS и подключен к сети, выполните следующие действия, чтобы настроить ключ безопасности сети:
-
В зависимости от того, какая версия Windows установлена на вашем компьютере, выполните одно из следующих действий.
-
В Windows 10 нажмите кнопку Пуск, а затем выберите Параметры > Сеть & Интернет > Состояние > Центр управления сетями и общим доступом.
-
В Windows 11 нажмите кнопку Пуск, введите панель управления, а затем выберите панель управления > Сеть и Интернет > Центр управления сетями и общим доступом.
-
-
Выберите Настройка нового подключения или сети.
-
Выберите Создание и настройка новой сети, а затем нажмите кнопку Далее.
Мастер поможет вам создать имя сети и ключ безопасности. Если маршрутизатор поддерживает его, мастер по умолчанию будет обеспечивать безопасность защищенного доступа Wi-Fi (WPA2 или WPA3). Мы рекомендуем использовать WPA3, если это возможно, так как он обеспечивает лучшую безопасность, чем безопасность WPA2, WPA или WEP. При использовании WPA3, WPA2 или WPA также можно использовать парольную фразу, поэтому вам не нужно запоминать зашифрованную последовательность букв и цифр.
-
Запишите ключ безопасности и храните его в надежном месте.
-
Используйте брандмауэр. Брандмауэр — это оборудование или программное обеспечение, защищающее ваш компьютер от несанкционированного доступа и вредоносного программного обеспечения (вредоносных программ). Запуск брандмауэра на каждом компьютере в сети помогает контролировать распространение вредоносных программ в сети и защищать компьютеры при доступе к Интернету. Брандмауэр Windows входит в состав Windows.
Статьи по теме
Подключение устройства к сети Wi-Fi
Нужна дополнительная помощь?
Нужны дополнительные параметры?
Изучите преимущества подписки, просмотрите учебные курсы, узнайте, как защитить свое устройство и т. д.
Download Article
Establish a connection with both visible and hidden networks
Download Article
- Connect to Visible Wi-Fi
- Connect to Hidden Wi-Fi
- Video
- Q&A
- Tips
|
|
|
|
Wi-Fi has been around for a while now, enabling us to connect to our favorite websites and chat while playing games with our friends. Windows 10’s brand new interface changes how you connect to wireless networks. Luckily, connecting to Wi-Fi is easier and simpler than before.
Things You Should Know
- Click on the network

icon within your taskbar to open the network flyout and select the network to which you want to connect.
- You may need to enter the network’s password if it has one.
- Click or tap + Add a new network to manually input the info for a hidden network and establish a connection.

-

The router acts like a man in the middle, connecting you to the internet. If it’s off, then you won’t be able to connect to that network.
-
If your device is able to connect to a wireless network through a wireless adapter, then you’ll see a signal/broadcast radio wave icon with a star above it.
- If your device is wireless capable but the icon is missing, then go to «Settings > Personalization > Taskbar > Select which icons appear on the taskbar» and slide the switch next to «Network» to «On».
- You can also go to «Settings > Network & Internet > Wi-Fi > Show available networks».
Advertisement
-
See if the «Wi-Fi» tile is colored at the bottom of the pane.
-
Click or tap the network name (SSID/service set identifier[1]
) you want to connect to. -
Either check or uncheck the box next to «Connect automatically».
-
-
- If the router is WPS enabled, press the button on the router to connect.
-
-
You’ll be asked «Do you want allow your PC to be discoverable by other PCs and devices on this network». Clicking away will choose the «No» option.
- If on your home or workplace network, select Yes, otherwise choose No.
-
You might have to agree to the network Terms. To do this, open a browser and attempt to access a website. Complete the requirements and begin using the network.
-
Press Disconnect.


Advertisement
-
Open Settings. Click the Start
button and select the settings

gear in the lower left corner.
-
-
-
-
-
Type the network’s name (SSID/service set identifier[1]).
-
-
Either check

or uncheck
the box next to «Connect automatically».
-
Simply check the box next to it if you want to.
-


Advertisement
Add New Question
-
Question
Where do I find the WiFi settings in Windows 10?
There are two different ways of accessing the WiFi settings. One is to go to Start > Settings > Network & Internet > WiFi. You can also click the taskbar network icon, choose «Network & Internet settings» from the bottom of the menu, then choose «WiFi» from the left.
-
Question
On Windows 10, I do not use a «Connect Automatically» setting. When I do click «Connect» I want it to ask me for the Security Key. However, it does not and I cannot find how to force it to do so. What should I do?
The connect automatically settings do not control the computer storing your WiFi password. Any device will remember the network every time you log in and therefore will always remember the password and automatically connect when you click on it. To set it where you must put in your password every time you would need to forget the network every time you were done.
-
Question
What is wrong if my device can’t see my WiFi after being connected to it a week ago when my other devices are connected fine?
This could be multiple issues. Your router could simply be overloaded — routers often have limits as to how much they can process, so it may just be «full.» Alternatively, your device might have a damaged WiFi card, or has been set to ignore the WiFi.
See more answers
Ask a Question
200 characters left
Include your email address to get a message when this question is answered.
Submit
Advertisement
Video
-
Connection problems and errors? Do the following in this order:
- Restart your router.
- Troubleshoot Wi-Fi by right-clicking (or long pressing for touchscreens) the taskbar icon and selecting Troubleshoot problems.
- Perform a network reset. Go to Settings > Network & Internet > Status and scroll down. Press «Network reset» (at the very bottom) and click or tap Reset now. Your PC will restart.
- Search for fixes online. Be sure to include error codes and messages in your search.
Thanks for submitting a tip for review!
Advertisement
References
About This Article
Thanks to all authors for creating a page that has been read 145,155 times.
Is this article up to date?
-
Home
-
News
- How To Connect To WiFi On Windows 10: Step-by-step Guide
By Sarah |
Last Updated
When you have a lot of devices that need to be connected to the Internet, the WiFi network is a better choice than wired network; it can avoid the costly process of introducing cables into your home/office and the intricate network connections. The methods and steps of how to connect to WiFi on Windows 10 will be introduced in this MiniTool post.
How to Connect to WiFi on Windows 10
Many people prefer to use WiFi rather than connect to the wired network for many reasons:
- This can avoid the jumbled network cables.
- You can access the Internet from any location within network coverage.
- The WiFi helps to increase the interactivity between devices (for example, transfer files wirelessly).
The question is how to connect to WiFi on Windows 10? Different methods and the detailed steps to enable and use Windows 10 WiFi will be shown to you in the following sections.
Tip: A powerful recovery tool is necessary for Windows 10 and other systems to recover from unexpected data loss disaster. You should start to recover Windows 10 missing files ASAP.
MiniTool Power Data Recovery TrialClick to Download100%Clean & Safe
Windows 10 Connect to WiFi Using Taskbar
Connecting to networks or connecting to WiFi Windows 10 is not a difficult task for even ordinary users. But considering that you don’t know how to turn WiFi on Windows 10, I’ll tell you what you should do exactly.
How to enable WiFi Windows 10:
- Open Settings by pressing Windows + I.
- Select Network & Internet from the Settings window.
- Shift to the Wi-Fi option in the left pane.
- Toggle the switch under Wi-Fi to On in the right pane.
You can also turn on WiFi Windows 10 by pressing Fn + Wi-Fi button or clicking on the Wi-Fi icon on the taskbar. (How do you fix when the Windows 10 taskbar is not working?)
How to connect to WiFi:
- Navigate to the bottom right corner of your PC screen.
- Click on the Network icon.
- Browse the wireless networks available for you.
- Click on the one you want to connect.
- Click Connect -> type the password required -> click Next.
To disconnect the WiFi, you should select it by above steps and then click Disconnect.
If you don’t see the Network icon in step 2, you must troubleshoot it.
- Click on the Up arrow to see if it is included here -> click it.
- Press Windows + A to open the Action Center -> look for the Network button in the Quick actions section -> click it.
That’s all about connecting to WiFi on your Windows 10 computer.
Windows 10 Add a New Network via Settings
- Open Settings by pressing Windows + I or other ways.
- Choose Network & Security and select Wi-Fi.
- Click on the Manage known networks link in the right pane.
- Select Add a new network.
- Type a Network name -> select a proper Security type -> enter a Security key -> check Connect automatically and Connect even if this network is not broadcasting according to needs -> click on the Save button.
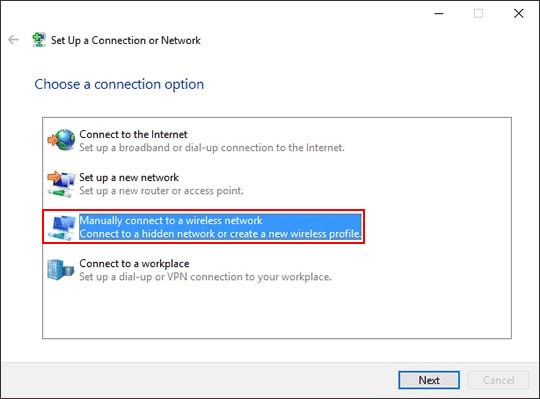
Windows 10 Set up a New Connection or Network
- Open Settings -> select Network & Security -> choose Dial-up.
- Click on the Set up a new connection link.
- Select Manually connect to a wireless network and click Next.
- Type a Network name -> select a Security type -> enter a Security key -> check Start this connection automatically and Connect even if the network is not broadcasting (optional) -> click Next -> click Close.
Windows 10 Connect to WiFi through Command Prompt
- Run the Command Prompt as administrator.
- Type netsh wlan show profile and hit Enter.
- Confirm the information.
- Type netsh wlan connect ssid=a=b (a is network name while b is profile name) and hit Enter.
- Wait for the operations to finish.
How to recover files using Command Prompt (CMD)?
About The Author
Position: Columnist
Sarah has been working as an editor at MiniTool since she graduated from university. Sarah aims at helping users with their computer problems such as disk errors and data loss. She feels a sense of accomplishment to see that users get their issues fixed relying on her articles. Besides, she likes to make friends and listen to music after work.
Don’t know how to connect your Windows 10 PC to WiFi? You’ve come to the right place! It’s very, very easy! You should be able to connect your Windows 10 PC to WiFi easily and quickly after reading this article.
Follow these steps
- Check if your PC has a wireless network adapter
- Update the driver for your wireless network adapter
- Enable WiFi on your Windows 10 PC
- Connect your Windows 10 PC to WiFi
Step 1: Check if your PC has a wireless network adapter
To connect your Windows 10 PC to WiFi, you need to check if your PC has a wireless network adapter first. Without the wireless network adapter, your PC is not supported to connect to WiFi. Follow the instructions below to check if your PC has a wireless network adapter or not:
- On your keyboard, press the Windows logo key and R at the same time to open the Run dialog. Type devmgmt.msc and press Enter. You’ll be prompted for permission. Click Yes to open Device Manager.
- Double-click Network adapters to expand the list. If there is a network adapter whose name contains “wireless”, it suggests that your PC has a wireless network adapter.

If you can’t find a wireless network adapter in Device Manager, it indicates that your PC doesn’t have one. You need to buy a USB wireless network adapter to allow your PC to connect to WiFi.

Step 2: Update the driver for your wireless network adapter
Before you connect your PC to WiFi, you need to ensure the driver for your wireless network adapter functions well. It is a good idea to update the driver for your wireless network adapter to the latest version. By doing that, you can avoid many unexpected network issues.
There are two ways to update the driver for your wireless network adapter: manually or automatically.
Update the driver for your wireless network adapter manually – You can update the driver for your wireless network adapter manually by going to the manufacturer’s website, and searching for the latest driver for your wireless network driver. Be sure to choose the driver that’s compatible with the model of your wireless network adapter and your version of Windows.
Or
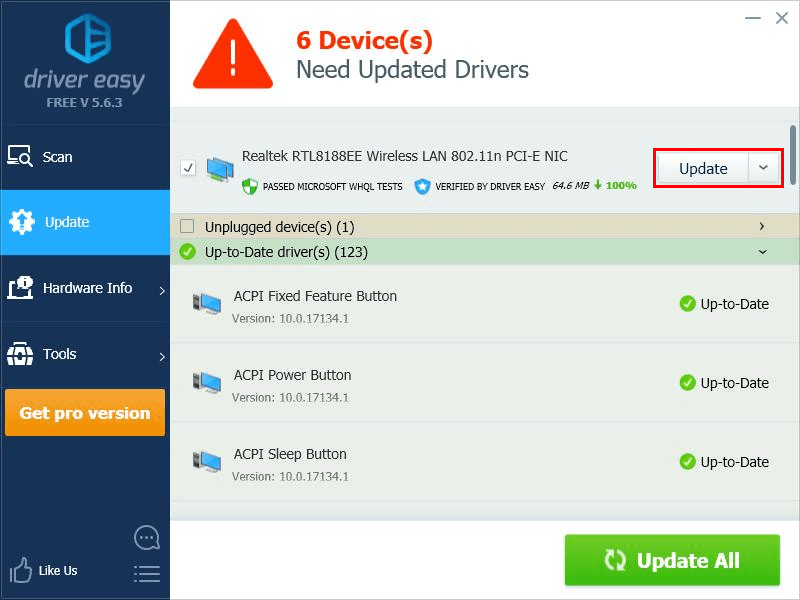
Update the driver for your wireless network adapter automatically – If you don’t have the time, patience or computer skills to update the driver for your wireless network adapter manually, you can, instead, do it automatically with Driver Easy. You don’t need to know exactly what system your PC is running, you don’t need to risk downloading and installing the wrong driver, and you don’t need to worry about making a mistake when installing. Driver Easy handles it all.
- Download and install Driver Easy.
- Run Driver Easy and click Scan Now. Driver Easy will then scan your computer and detect any problem drivers.

- Click Update next to your wireless network adapter to automatically download the correct version of its driver, then you can install it manually. Or click Update All to automatically download and install the correct version of all the drivers that are missing or out of date on your system (This requires the Pro version – you’ll be prompted to upgrade when you click Update All. You get full support and a 30-day money back guarantee).
You can do it for free if you like, but it’s partly manual. If you need assistance, please contact Driver Easy’s support team at support@drivereasy.com.

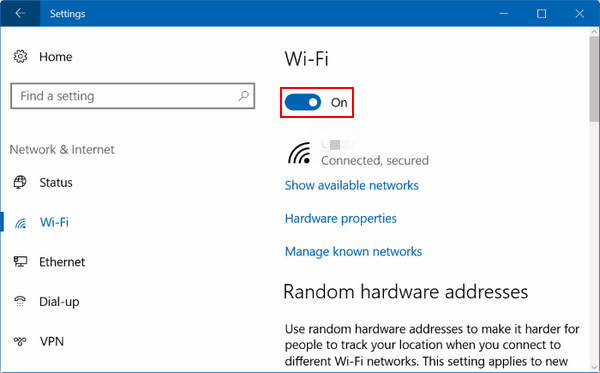
Step 3: Enable WiFi on your Windows 10 PC
You also need to enable WiFi on your Windows 10 PC before you connect it to WiFi. Here is how to do it:
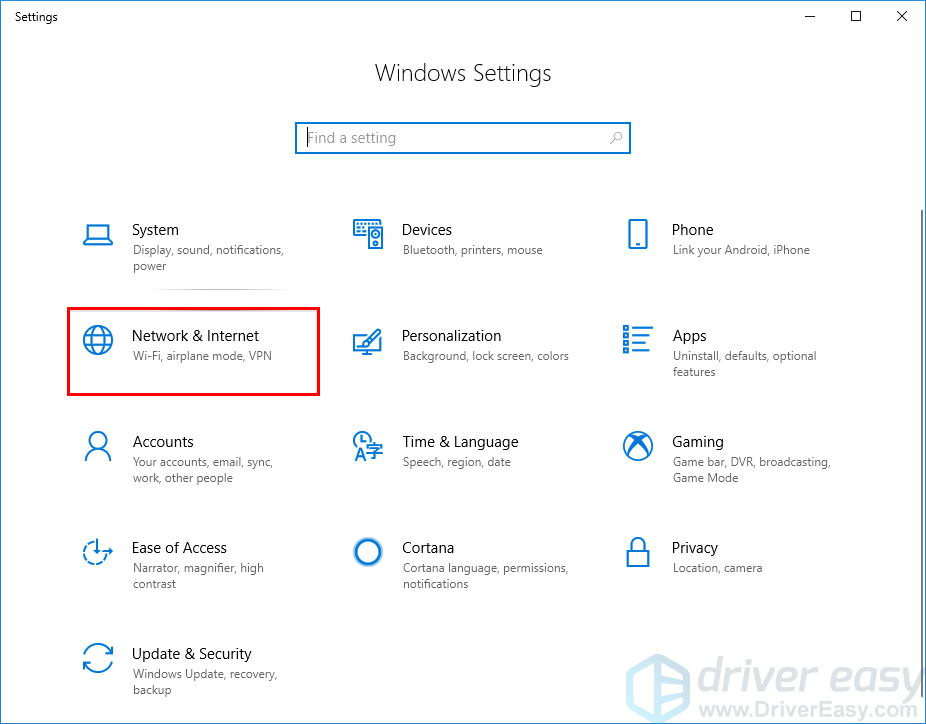
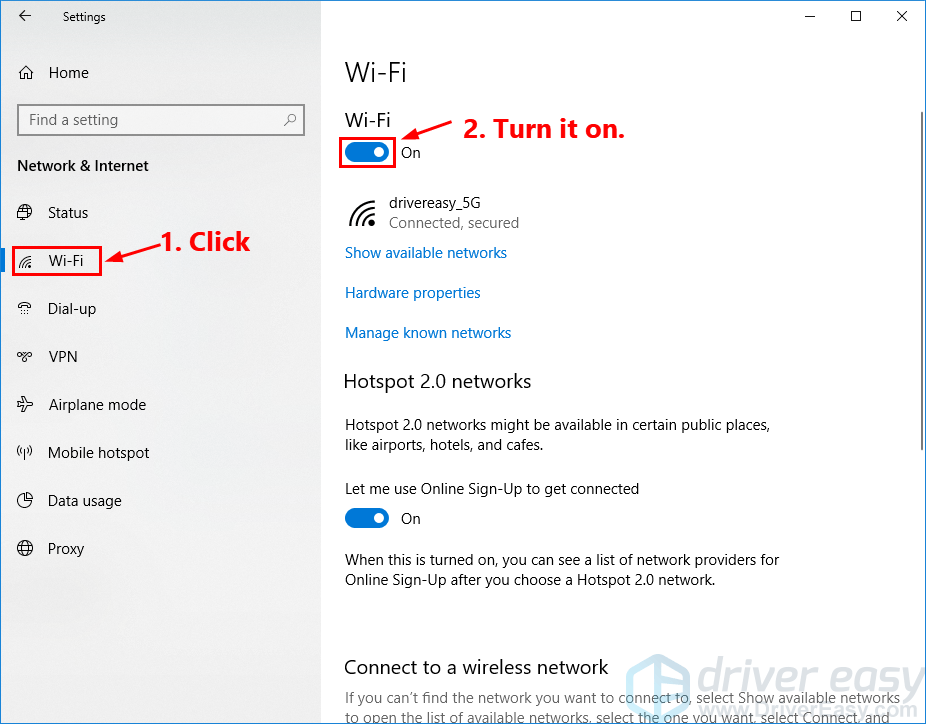
- On your keyboard, press the Windows logo key and I to open Windows Settings. Then click Network & Internet.

- On the left panel, click Wi-Fi. Then turn on the toggle under Wi-Fi.
Step 4: Connect your Windows 10 PC to WiFi
After you enabled Wi-Fi on your Windows 10 PC, you now can begin to connect your Windows 10 PC to WiFi. Here is how to do it:
- Click the WiFi icon in the notification area.
- Windows 10 will automatically search for available WiFi networks. Click the WiFi network you want to connect from the list, then Click Connect.
- Enter the correct network security key and click Next.
- If the security key you entered is correct, your PC is now connected to WiFi.
If you have any questions or suggestions, please leave your comment below.
Windows 10
1. В правом нижнем углу нажимаем на значок Wi-Fi.
2. В списке доступных беспроводных сетей находим и выделяем Вашу сеть. В настройках Wi-Fi на маршрутизаторе мы создали TP-LINK. Затем нажимаем кнопку «Подключится».
3. В следующем окне необходимо ввести ключ доступа к беспроводной сети, который был придуман и введен Вами при настройке Wi-Fi на маршрутизаторе. Вводим пароль и нажимаем кнопку «Далее».
4. Если ключ безопасности введён верно, Вы увидите окно как на скриншоте.
На этом настройка беспроводной сети закончена.