
First if you have not already install the IIS role on your windows system.
Open IIS and choose the top level folder(your server) then choose Server Certificates
Now choose Create Self Signed Certificate from the far right
friendly name should be the DNS name of the device you need to create the pem file for, then choose ok.
Now open the certificate manager on your system, to do this run mmc
File > Add/Remove snap-in
Choose Certificates > Add > Computer account > Next > Local computer > Finish > OK
Now expand the certificates folder you create the cert in, by default this is Personal > Certificates.
right click on the certificate you created and choose all tasks > export > next > No, > next > Base-64 > next >
pick a file name
filename.cer
Now, you can rename the .cer file to .pem and that’s it you’re done.
To generate a PEM certificate using OpenSSL is easy, but if you haven’t yet done it before it can be a bit frustrating if you’ve never used OpenSSL before.
If you think you can just go to OpenSSL.org and download the binaries you are mistaken. They only provided source files which you need to compile.
After some searching around I found Shining Light Productions which have an already compiled OpenSSL binaries ready to use in an installer.
Getting started:
I downloaded Win64 OpenSSL v1.1.1c MSI installer and completed the installation.

Add the environment variables. This is not required but makes life easier.

Double-click on the Path variable as shown below:

Click the “New” button and type the path to where you installer OpenSSL. Mine was installed to “C:\Program Files\OpenSSL-Win64\bin”

Once you’ve confirmed and closed the System Variables windows, you can now use OpenSSL from the command line.
Lets create the certificate
Open the windows command prompt and type “OpenSSL” and press enter.

Next, type the following command below and press enter.
This file contains hidden or bidirectional Unicode text that may be interpreted or compiled differently than what appears below. To review, open the file in an editor that reveals hidden Unicode characters.
Learn more about bidirectional Unicode characters
| req -x509 -newkey rsa:4096 -keyout private_key.pem -out public_key.pem -days 365 -nodes -subj ‘/CN=localhost’ |
This will create a self-signed certificate in the “C:\Users\YourUserName\” folder using RSA 4096 encryption and will be valid for the next 365 days. You can change ‘localhost’ to a domain name if you need it.
Next step
To create a .pfx file from the public and private .pem file you can run the following command.
This file contains hidden or bidirectional Unicode text that may be interpreted or compiled differently than what appears below. To review, open the file in an editor that reveals hidden Unicode characters.
Learn more about bidirectional Unicode characters
| openssl pkcs12 -inkey private_key.pem -in public_key.pem -export -out private_key.pfx |
To create a .crt file from the public .pem file you can run the following command.
This file contains hidden or bidirectional Unicode text that may be interpreted or compiled differently than what appears below. To review, open the file in an editor that reveals hidden Unicode characters.
Learn more about bidirectional Unicode characters
| openssl x509 -outform der -in public_key.pem -out public_key.crt |
Things to remember
This is a self-signed certificate and will not work for securing public websites as there’s no CA (Certificate Authority) involved when creating this certificate.
In this short article, we want to show how to generate localhost *.pem certificate (+ private key) using openssl command under Windows.
Quick solution (run in cmd.exe):
openssl.exe req -x509 -newkey rsa:4096 -keyout key.pem -out cert.pem -days 365 -nodes -subj '/CN=localhost'Note: be sure that
openssl.exeis added to system paths.
Practical example
Simple steps:
- find
openssllocation path (or installopensslthat is available in Git for Windows), - open Command Prompt (cmd.exe),
Hint: motivation to use cmd.exe are freezes that may occur with external terminals.
- run the following command:
"C:\Program Files\Git\usr\bin\openssl.exe" req -x509 -newkey rsa:4096 -keyout key.pem -out cert.pem -days 365 -nodes -subj '/CN=localhost'
Screenshots:
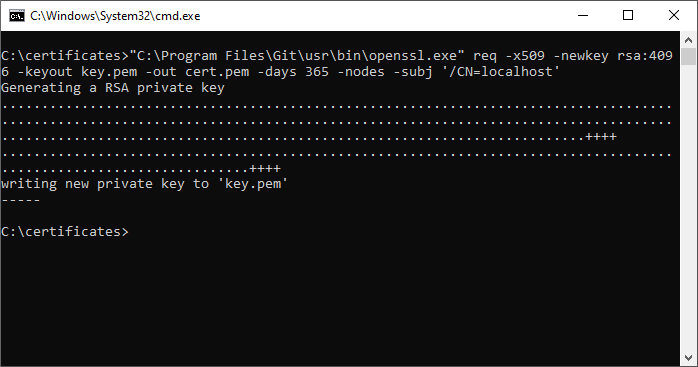
- OpenSSL — create localhost *.pem certificate under Windows
Donate to Dirask
Our content is created by volunteers — like Wikipedia. If you think, the things we do are good, donate us. Thanks!
Join to our subscribers to be up to date with content, news and offers.
Native Advertising
🚀
Get your tech brand or product in front of software developers.

We need to a create self-signed certificate for local development so that the local development server behaves similar to a live production server. Additionally the certificate must not generate warnings in the browser (Chromium based browsers only) that the certificate is self-signed and can’t be trusted.
Developing locally with plain http is just fine. But sometimes we need to mimic development with production so that TLS encryption via https is available also on our development machines. We also don’t want to see ugly security warnings from browsers. The following article shows how to create self-signed certificates on Windows that doesn’t generate browser warnings on Chrome and other Chromium based browsers.
The article is a bit long but please grab a coffee and follow along. The result is worth the effort as you only need to generate the certificate once in a very long time. I set the expiry date 10 years in the future for the domains I create for local development.
Goal: Create an imaginary domain pdb.oak.san with a self-signed certificate that works on major browsers (except Firefox) without generating a warning. Works great on Chromium based browsers like Chrome, Canary, Microsoft Edge and Opera, IE.
Step 1: Setup hostname
- Open Notepad in Administrator mode: Click Windows Start icon in task bar and start typing Notepad, right click the Notepad icon and click Run as administrator
- Inside Notepad, open the file:
C:\Windows\System32\drivers\etc\hosts - We want to create an imaginary domain:
pdb.oak.san, add the following line to the hosts file:
- Save the file and close
Step 2: Create a client-side self-signed certificate
- Open PowerShell in Administrator mode: Click Windows Start icon in task bar and start typing PowerShell, right click the PowerShell icon and click Run as administrator
- Type the following to generate a self-signed certificate for domain
pdb.oak.sanwith friendly namepdb.oak.santhat expires after 10 years:
New-SelfSignedCertificate -CertStoreLocation Cert:\LocalMachine\My -DnsName "pdb.oak.san" -FriendlyName "pdb.oak.san" -NotAfter (Get-Date).AddYears(10)
- You should get the following output

Step 3: Copy the certificate created in Step 2 to Trusted Root Certification Authorities, then export it
- Open Management Console for Certificates: Click Windows Start icon and start typing certificates, click Manage computer certificates
- On the left panel, click Personal -> Certificates, you should see the client-side certificate for pdb.oak.san created above in Step 2

- On the left panel, open the tree for (but don’t left click the folder) Certification Authorities -> Certificates
- With the right mouse button, drag and drop the certificate to the location opened in the previous step

- Now export the certificate: right-click the certificate, All Tasks -> Export…

- Welcome screen appears, click Next
- Select Yes, export the private key, click Next
- Keep the default values for .PFX, click Next
- Type a password for the private key, click Next
- Browse for a location and give the certificate a name (cert.pfx), click Next
- Finally click Finish
- You will get a notice that the export was successful
Step 4: Create the server-side certificate and key
- Pre-requisite: you need to have OpenSSL https://www.openssl.org/ installed. Since you are a developer and on Windows, it’s highly likely you already have https://git-scm.com/ installed, so you should also have OpenSSL installed. Otherwise we recommend installing Git for Windows with Git Bash support – this will automatically also install OpenSSL.
- Open Command Prompt and change directory to the location where you exported the certificate with .PFX extension cert.pfx in Step 3 above.
- Type the following commands in the Command Prompt one by one. When prompted for password, type the password you used in Step 3 above when exporting the .PFX certificate.
$ openssl pkcs12 -in cert.pfx -nocerts -out key.pem -nodes
$ openssl pkcs12 -in cert.pfx -nokeys -out cert.pem
$ openssl rsa -in key.pem -out server.key

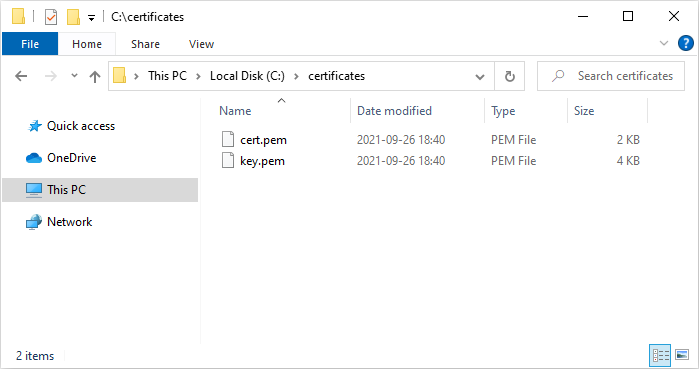
- You should now have the following files in the folder, we will be using the cert.pem and server.key files. You can delete the other files if you want to.
cert.pem    --> KEEP
server.key  --> KEEP
cert.pfx
key.pem
Step 5: Test
- You can use Apache or Nginx to test the https connection for the pdb.oak.san domain. We will create a simple Go server as it can be created really fast with a few lines of code. Create a file called main.go and type the code below. Make sure cert.pem and server.key is in the same folder as the main.go file.
package main

import (
    "fmt"
    "net/http"
)

func handleHome(w http.ResponseWriter, r *http.Request) {
    _, _ = fmt.Fprintln(w, "Home page to test the TLS cert and secure https connection")
}

func main() {
    http.HandleFunc("/", handleHome)
    s:=http.Server{}
    _ = s.ListenAndServeTLS("cert.pem", "server.key")
}
- Build and run the Go server:
go build main.go, then run the resulting executable programmain.exe - Now if we visit https://pdb.oak.san/ in a browser, we can see the home page with the following content: “Home page to test the TLS cert and secure https connection”

- We can also check the certificate by clicking on the lock icon in the browser address bar:
For Nginx Users
To test on Nginx instead of writing Go code, you can use the configuration below.
- Make sure to copy your cert.pem and server.key to the locations for ssl_certificate and ssl_certificate_key.
- Folder paths like
C:\Users\sanji\pdn\pdb.oak.san\wwwshould of course match the locations in your own computer.
server {
    listen          443 ssl;

    server_name     pdb.oak.san;
    root            C:\Users\sanji\pdn\pdb.oak.san\www;
    access_log      C:\Users\sanji\pdn\pdb.oak.san\logs\access.log;
    error_log       C:\Users\sanji\pdn\pdb.oak.san\logs\error.log;
    index           index.html;

    ssl_certificate     C:\Users\sanji\pdn\pdb.oak.san\ssl\cert.pem;
    ssl_certificate_key C:\Users\sanji\pdn\pdb.oak.san\ssl\server.key;
}
The video below shows the steps I took to setup SSL on an imaginary domain on my local machine. The video is 20 minutes; maybe I could have been done the video in 10 minutes or less. But here I am showing the actual problems I am running into and the steps I am taking to solve them.
Setting up domains, servers and certificates in real-life is not without problems. This is not a scripted video. It shows the problems I face and how I resolve them.
This a scenario where you have created personal certificates and digitally signed them on your own and now you want them available and trusted on another machine.
Step 1
Generate a private root key
openssl genrsa -des3 -out myCA.key 2048
Step 2
Generate a root certificate
openssl req -x509 -new -nodes -key myCA.key -sha256 -days 1825 -out myCA.pem
Step 3
Windows specific
Bundle root certificate and private key into a format that
can be uploaded into Trusted Root Certification Authorities.
openssl pkcs12 -inkey myCA.key -in myCA.pem -export -out certificate.p12
Step 4
Windows specific
Upload into Trusted Root Certification Authorities.
- Open up Microsoft Management Console
- Go to File > Add Snap In.
- Open Certificates.
- Right click on Trusted Root Certification Authorities.
- Select All Tasks > Import.
- Upload .p12 file from Step 3.
openssl pkcs12 -inkey myCA.key -in myCA.pem -export -out certificate.p12
Step 5
Create a private key for a specific site that needs HTTPS.
openssl genrsa -out kals.dev.key 2048
Step 6
Create a certificate signing request (CSR) for a specific site that needs HTTPS.
openssl req -new -key kals.dev.key -out kals.dev.csr
Step 7
Create a Subject Alternative Name extension to .ext file (e.g. kals.dev.ext) which will be used along with the key from Step 5 and CSR from Step 6 to create a site specific certificate.
authorityKeyIdentifier=keyid,issuer
basicConstraints=CA:FALSE
keyUsage = digitalSignature, nonRepudiation, keyEncipherment, dataEncipherment
subjectAltName = @alt_names

[alt_names]
DNS.1 = localhost
Step 8
Create the certificate for a specific site that needs HTTPS
openssl x509 -req -in kals.dev.csr -CA myCA.pem -CAkey myCA.key -CAcreateserial
-out kals.dev.crt -days 1825 -sha256 -extfile kals.dev.ext
Step 9
Use the .crt from Step 8 and the .key file from Step 5 with your server to enable HTTPS.
/* config settings for Webpack Dev Server */

  devServer: {
    open: true,
    historyApiFallback: true,
    https: {
      key: fs.readFileSync('kals.dev.key'),
      cert: fs.readFileSync('kals.dev.crt')
    }
  }