
Applies ToWindows 11 Windows 10
Support for Windows 10 will end in October 2025
After October 14, 2025, Microsoft will no longer provide free software updates from Windows Update, technical assistance, or security fixes for Windows 10. Your PC will still work, but we recommend moving to Windows 11.
Learn more
The Recovery Drive utility in Windows is a valuable tool designed to back up essential system files needed to restore a PC to its original state. This utility creates a USB recovery media that can help you restore your Windows device to its factory settings, even if you replace the hard drive or completely wipe the drive. The recovery media includes built-in Windows files, any updates installed at the time of media creation, and any customizations from the PC manufacturer, ensuring a reliable backup solution for bare metal recovery scenarios.
Creating a recovery media is a proactive measure to ensure that you can quickly and efficiently restore your system in case of major issues such as hardware failure. This media can be used for bare metal recovery on the device it was created for, ensuring a smooth and efficient restoration process.
It’s recommended to recreate the recovery media annually to include the latest Windows updates and improvements. Additionally, it’s important to note that the recovery media doesn’t include your personal files. Therefore, you should use a different backup method, such as Windows Backup or File History, to back up your personal data separately.
Create a recovery drive
Warning: Use an empty USB drive because this process will erase any data that’s already stored on the drive.
-
To open Recovery Drive you can use one of the following methods:
-
From Start, search for Recovery Drive and select it
-
Use the command recoverydrive.exe
-
-
When the tool opens, make sure Back up system files to the recovery drive is selected and then select Next
-
Connect a USB drive to your PC, select it, and then select Next
-
Select Create. Many files need to be copied to the recovery media, so this might take a while
Reinstall Windows with a recovery drive
Follow these steps to reinstall Windows using the recovery media:
-
Start your device from the USB drive that was created with Recovery Drive. The process to boot from a USB drive may vary by manufacturer, so refer to your device’s manual if needed
-
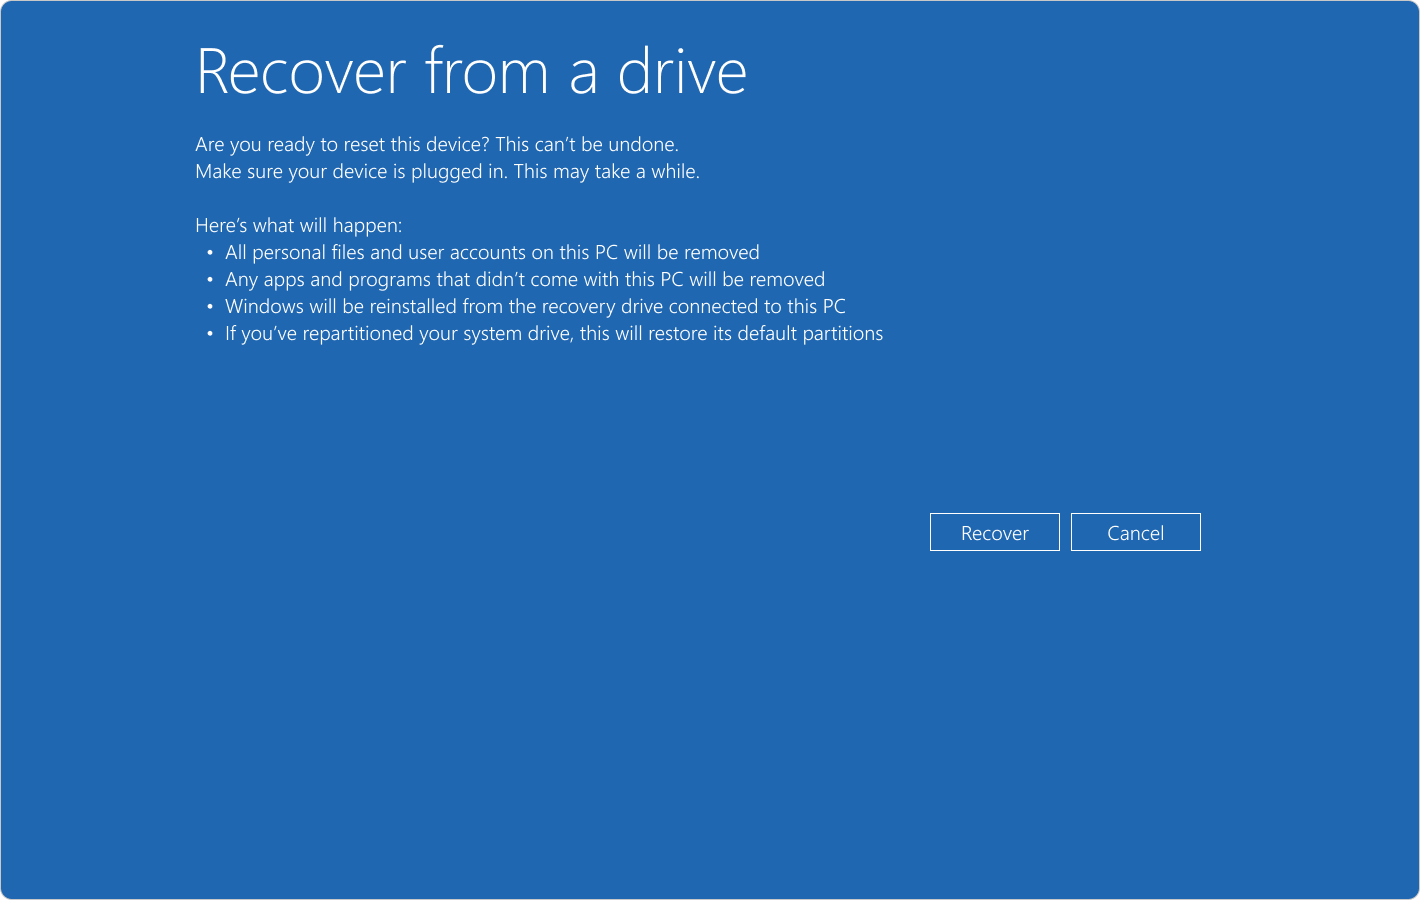
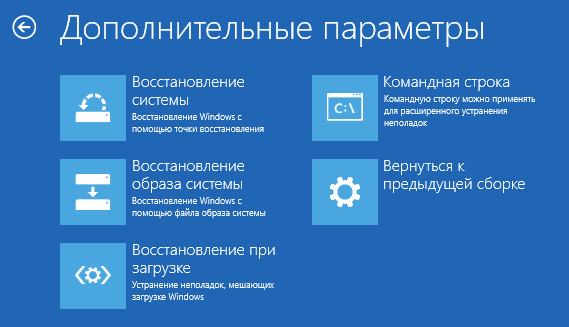
Once Windows Recovery Environment (Windows RE) loads, select Recover from a drive
-
Choose either Just remove my files of Fully clean the drive, depending on your preference
-
Select Recover to confirm and start the recovery process

Need more help?
Want more options?
Explore subscription benefits, browse training courses, learn how to secure your device, and more.
В этой инструкции подробно о том, как создать диск восстановления Windows 10, а также о том, как использовать загрузочную флешку или DVD с установочными файлами системы в качестве диска восстановления, если возникла такая необходимость. Также ниже присутствует видео, в котором все шаги показаны наглядно.
Диск восстановления Windows 10 способен помочь в случае самых различных проблем с системой: когда она не запускается, стала неправильно работать, требуется восстановить систему, выполнив сброс (возврат компьютера в исходное состояние) или использовав заранее созданную резервную копию Windows 10.
Во многих статьях на этом сайте есть упоминание диска восстановления, как одного из инструментов решения проблем с компьютером, а потому и было решено подготовить данный материал. Все инструкции, имеющие отношение к восстановлению запуска и работоспособности новой ОС вы можете найти в материале Восстановление Windows 10.
Создание диска восстановления Windows 10 в панели управления
В Windows 10 предусмотрен простой путь сделать диск восстановления или, вернее USB флешку через панель управления (способ для CD и DVD также будет показан далее). Делается это в несколько шагов и минут ожидания. Отмечу, что даже если ваш компьютер на запускается, вы можете сделать диск восстановления на другом ПК или ноутбуке с Windows 10 (но обязательно с той же разрядностью — 32-бит или 64-бит. Если у вас нет другого компьютера с 10-кой, в следующем разделе описывается, как обойтись без него).
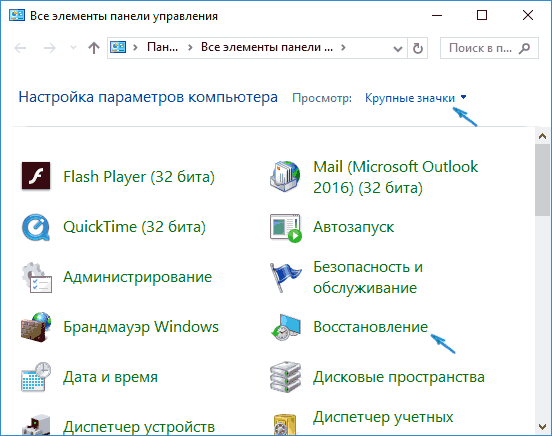
- Зайдите в панель управления (можно кликнуть правой кнопкой мыши по Пуску и выбрать нужный пункт).
- В панели управления (в пункте Просмотр установите «Значки») выберите пункт «Восстановление».

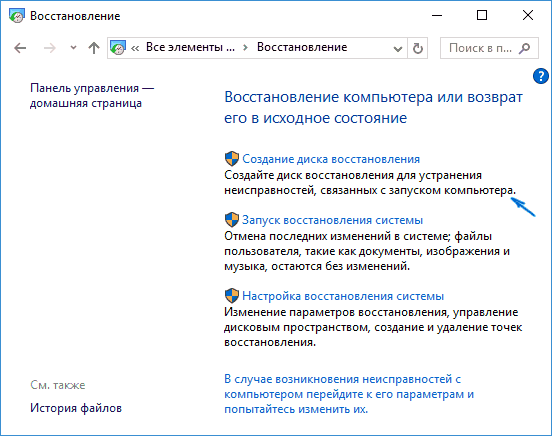
- Нажмите «Создание диска восстановления» (требуются права администратора).
- В следующем окне вы можете отметить или убрать пункт «Выполнить резервное копирование системных файлов на диск восстановления». Если сделать это, то будет занят значительно больший объем места на флешке (до 8 Гб), зато, упростится сброс Windows 10 в исходное состояние, даже если встроенный образ восстановления был поврежден и требует вставить диск с отсутствующими файлами (т.к. необходимые файлы будут находиться на накопителе).

- В следующем окне выберите подключенную флешку, из которой будет создан диск восстановления. Все данные с нее будут удалены в процессе.
- И, наконец, дождитесь, когда создание флешки будет завершено.


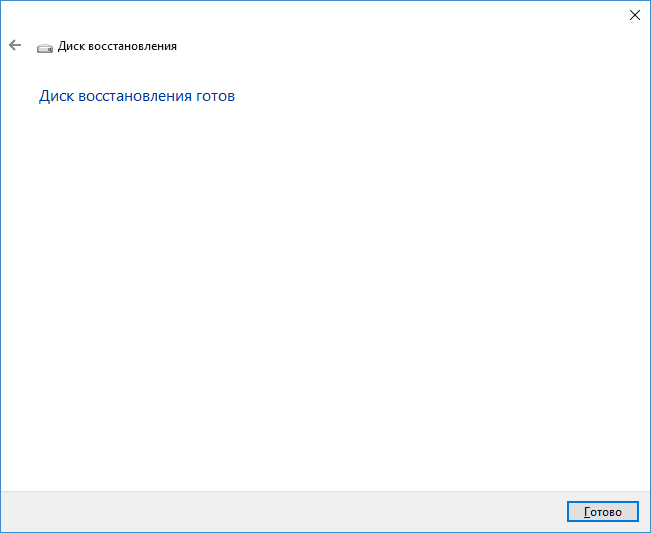
Готово, теперь у вас в наличии есть диск восстановления, поставив загрузку с которого в БИОС или UEFI (Как зайти в БИОС или UEFI Windows 10, или используя Boot Menu) вы можете войти в среду восстановления Windows 10 и выполнить многие задачи по реанимации системы, включая откат ее к изначальному состоянию, если ничто другое не помогает.
Примечание: вы можете продолжать пользоваться USB накопителем, из которого сделали диск восстановления, для хранения своих файлов, если есть такая необходимость: главное, чтобы в результате не оказались затронуты уже размещенные там файлы. Например, вы можете создать отдельную папку и пользоваться только ее содержимым.
Как создать диск восстановления Windows 10 на CD или DVD
Как можно заметить, в предыдущем и основном для Windows 10 способе создания диска восстановления, под таким диском подразумевается только флешка или иной USB накопитель, без возможности выбрать CD или DVD для этой цели.
Однако, если вам требуется сделать диск восстановления именно на компакт-диске, такая возможность всё еще присутствует в системе, просто в немного другом расположении.
- В панели управления откройте пункт «Резервное копирование и восстановление».

- В открывшемся окне средств резервного копирования и восстановления (при этом не придавайте значения тому, что в заголовке окна указано Windows 7 — диск восстановления будет создан именно для текущей установки Windows 10) слева нажмите «Создать диск восстановления системы».


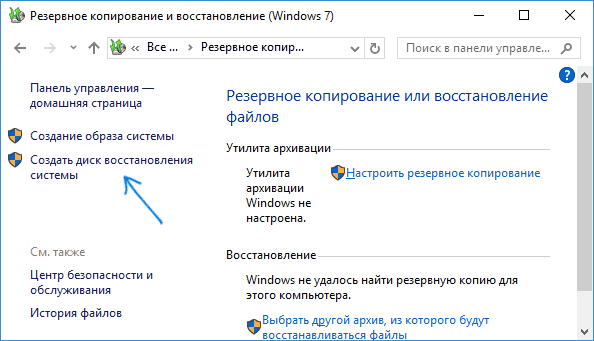
После этого вам останется выбрать привод с чистым диском DVD или CD и нажать «Создать диск» для записи диска восстановления на оптический компакт диск.

Его использование не будет отличаться от создаваемой в первом способе флешки — достаточно поставить загрузку с диска в BIOS и загрузить компьютер или ноутбук с него.
Использование загрузочной флешки или диска Windows 10 для восстановления
Сделать загрузочную флешку Windows 10 или установочный диск DVD с этой ОС проще простого. При этом, в отличие от диска восстановления, возможно практически на любом компьютере, вне зависимости от версии установленной на нем ОС и состоянии ее лицензии. При этом такой накопитель с дистрибутивом можно потом использовать на проблемном компьютере как диск восстановления.
Для этого:
- Поставьте загрузку с флешки или диска.
- После загрузки, выберите язык установки Windows
- В следующем окне внизу слева выберите пункт «Восстановление системы».


В результате вы попадете в ту же среду восстановления Windows 10, что и при использовании диска из первого варианта и сможете выполнить все те же действия по исправлению проблем с запуском или работой системы, например, использовать точки восстановления системы, проверить целостность системных файлов, восстановить реестр с помощью командной строки и не только.
Как сделать диск восстановления на USB — видео инструкция
И в заверешение — видео, в котором все описанное выше показано наглядно.
Ну а если у вас остались вопросы — не стесняйтесь задавать их в комментариях, я буду стараться отвечать.
Position: Resource — Disk Utilities — How to Create a Windows 11/10 Recovery Disk from Another Computer?
[Last week I upgraded my ASUS computer from Windows 7 to Windows 10. I have a lot of files to delete. But now I can’t start my computer. I’m told to create a recovery disk from another computer. Can you help me create a recovery disk? Thank you.]
If a Windows 10 system has a startup problem, such as a Windows 10 BCD error, it is important to create a Windows recovery disk. You can create a recovery disk from another working computer using a disk (CD / DVD) or USB flash drive in Windows. Once your operating system encounters a serious problem, you can create a Windows recovery disk from another computer to solve the problem or reset the computer.
Even if your computer works properly, it’s wise to create a Windows 10 recovery disk as a precaution. Next, you can refer to the following to learn how to create a Windows 10 recovery disk from another computer.
There are two ways to create a Windows recovery disk. The first method is to use the built-in «create recovery drive» program, which is only applicable to Windows 8 and windows 10. It does not provide a direct solution to the boot problem, but it will reset your computer to its original state.
Therefore, if you are running on another Windows system, you can use method 2.
Method 1. Use Windows built-in tool to create Windows 10 recovery disk
Step 1: Connect the disk or USB drive to another computer, type the Search icon, enter «Recovery Drive» in the Search box, and then click «Create a recovery Drive».
Step2: The Recovery Drive window is displayed. Check «Back up system files to the recovery drive» and click «Next».
Step 3: Select the drive to connect to your computer, and then click «Create» to create a Windows recovery disk. When you’re done, you can insert a disk or USB drive into your computer to restore the operating system.
Step 4: After booting from the recovery drive, choose «Troubleshoot» > «recover from a drive» to recover the operating system. Upon completion, all your personal files and applications will be deleted.
Method 2. Creating a Windows 10 recovery disk using DiskGenius Free Edition
Resetting your computer using method 1 will delete your personal data and software. When you encounter boot problems, you can also use the data recovery tool-DiskGenius. It enables you to create a bootable disk from another computer in Windows 11 / 10 / 8 / 7. The bootable disk or USB can be used as a Windows 11 / 10 / 8 / 7 recovery disk to boot your computer.
In addition, DiskGenius is also a partition management tool. After booting from the recovery drive, it can help you manage your hard disk, such as creating, deleting, cloning and resizing partitions. Let’s see how to use this tool.
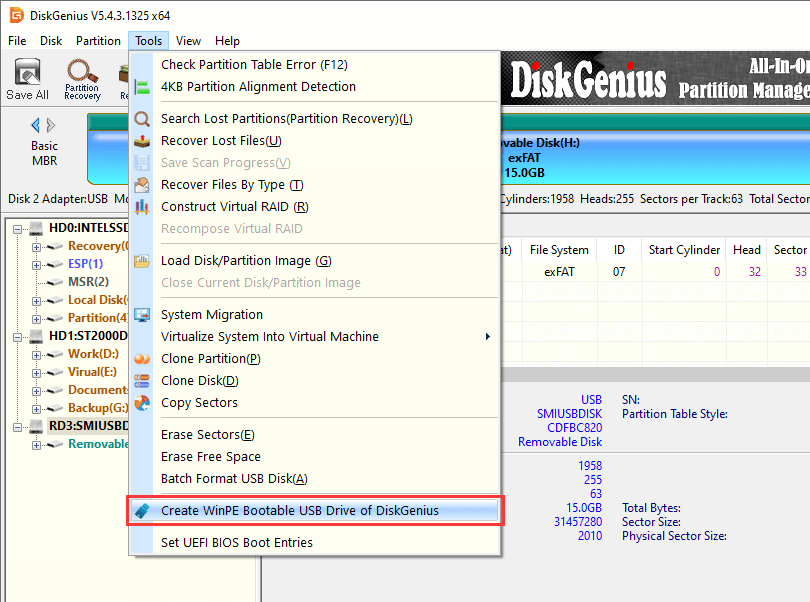
Step 1: Insert the USB drive and start DiskGenius. Click the Tools menu and select the Create WinPE Bootable USB Drive of DiskGenius option.
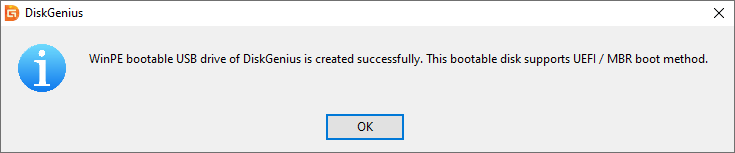
Step 2: Click the OK button in the pop-up window. Wait a few seconds and a bootable disk will be created.
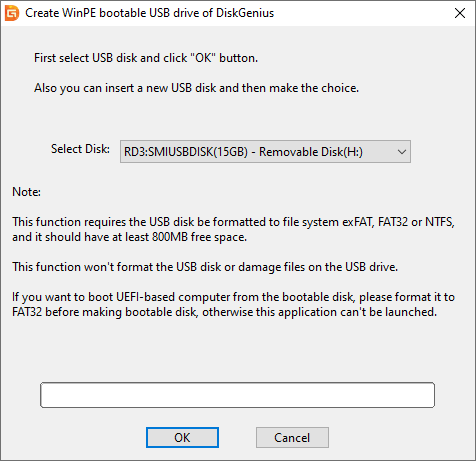
Step 3: After the bootable disk is successfully created, click OK.
Note:
-This feature requires that the USB disk be formatted as a file system exFAT, FAT32, or NTFS, and that it should have at least 800MB of free space.
-This feature does not format USB disks or damage files on USB drives.
-If you want to boot a UEFI-based computer from a bootable disk, format it to FAT32 before making a bootable disk, otherwise the application will not start.
FAQs about Windows 10 recovery disk
Q: What is a Windows recovery disk?
A: A Windows Recovery disk is a storage device that contains Windows exact copy and Troubleshooting tools for fixing system problems and reinstalling Windows to bring the system back to normal.
Q: Can I create a Windows 10 recovery disk on one computer and use it on another?
A: It’s troublesome. Because the two computers must be the same make, model, even the drivers and installed devices. DiskGenius provides the easiest way to create a recovery drive from one computer and use it on another, regardless of the Windows operating system.
Q: How do I fix a problem when creating a recovery disk?
A: A failure may occur during the creation of a Windows 10 recovery disk from another computer, and the program may fail to create a recovery disk and have problems creating a recovery disk. When this happens, you should first check that your disk or USB is properly connected.
If the connection is good, probably because the recovery environment is disabled, you can check the Windows environment status and enable it at the command prompt.
1. In the Windows search box, Enter CMD and press Enter. Then click the search results to open the command prompt.
2. Type reagent/info and press Enter. You can see the status of the Windows recovery environment.
3. If the Windows RE status is disabled, type reagentc /enable to enable it.
Conclusion
This is all about how to create a Windows 10 recovery disk from another computer. You can now use it to restore and reset the system. In addition, the bootable media created by DiskGenius is ideal for managing disk partitions in WinPE mode, such as formatting C drives, deleting system drives, cloning disks from boot, and so on. In addition, DiskGenius can help you extend system partitions, erase sectors, and more. DiskGenius can meet any data recovery and partition management needs. Download and use it quickly.
Read more
- How To Recover Data from Crashed Internal Hard Disk?
- Fixed: The Boot Selection Failed Because a Required Device Is Inaccessible
- How to Fix Unmountable Boot Volume in Windows 10/8/7?
- How to Get Files Off an Old Hard Drive That Won’t Boot?
Can I create a Windows 10 recovery USB from another computer to restore my PC when it is unbootable? The answer is yes if you are looking for the answer to this question. Well then, how to create a Windows 10 recovery USB for another PC? MiniTool Solution introduces a complete guide in this post and let’s go to see it.
Can You Create a Windows 10 Recovery Disk from Another Computer
Creating a Windows 10 recovery disk is a good idea. If your PC has major issues and fails to boot, you can troubleshoot system errors and even reinstall Windows 10 via the recovery disk. A USB drive or CD/DVD disc is suitable. But due to the portability of a USB stick, it becomes a more mainstream way.
If your system crashes before creating a Windows 10 repair USB, what should you do? Perhaps you ask this question: can I create a Windows 10 recovery USB from another computer? Of course, you can create a Windows 10 recovery USB for another PC.
The following is an example from an ASUS user:

When your PC fails to start but you don’t have a repair USB drive, you can easily create such a drive from a working PC, boot your computer from the drive, and then perform the recovery operation or reinstall the system.
Well then, how can you make a Windows 10 recovery USB for another PC? The methods are easy and let’s see the complete guide below.
How to Create Windows 10 Recovery USB for Another PC
Use Media Creation Tool to Get Windows 10 Recovery USB for Another PC
To get a Windows 10 recovery USB drive from another PC, you can ask Media Creation Tool for help. This tool is offered officially by Microsoft and it allows you to create installation media (USB flash drive, DVD, or ISO file) to install Windows 10 on a different PC.
The following are the detailed steps:
Step 1: Prepare a USB flash drive with at least 8GB of capacity. Make sure no important files are saved to the USB drive since the creation will delete all the data.
Step 2: Move to the website of Download Windows 10 from Microsoft and then click Download tool now to get the MediaCreationTool.exe.

Step 3: Double-click the executable file to run this tool. After a while, accept the applicable notices and license terms to continue.
Step 4: To create Windows 10 recovery USB for another PC, choose the second option – Create installation media (USB flash drive, DVD, or ISO file) for another PC.

Step 5: Uncheck Use the recommended options for this PC and select a language, architecture, and edition.
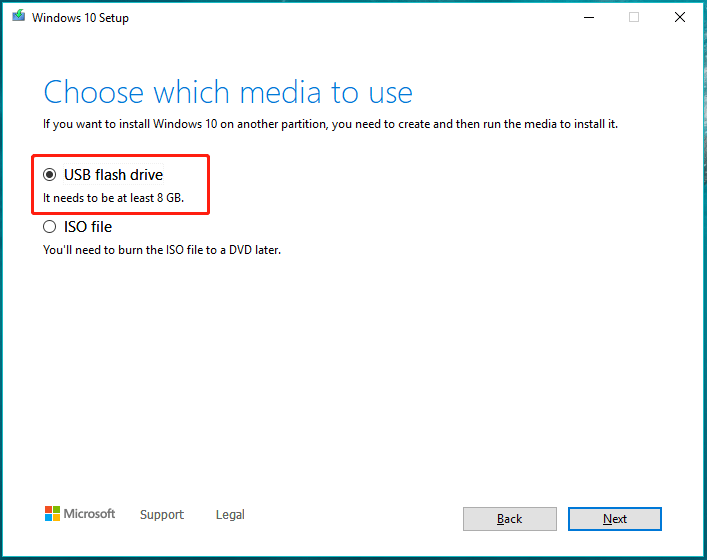
Step 6: Which media do you want to use? Check the box of USB flash drive and click Next to go on.
Step 7: Choose the USB flash drive that has been connected to the computer.
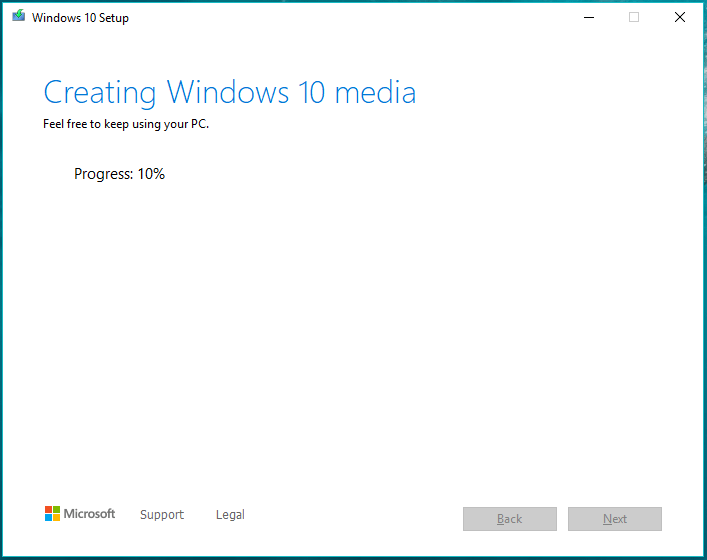
Step 8: Media Creation Tool is downloading Windows 10. This can take some time, so wait patiently.
Step 9: This tool is creating Windows 10 media.
Step 10: A few minutes later, the bootable USB recovery drive is created. Click Finish to exit the tool.
Tip: You can also use this tool to download a Windows 10 ISO file and use Rufus to burn it to your USB drive. To know more information, refer to this post – How to Create Bootable USB from ISO Windows 10 for Clean Install.
After getting the Windows 10 recovery USB drive, how can you restore your system from the drive that is created on another computer? Here is how to restore Windows 10 from the recovery USB.
- Plug the drive into your unbootable computer, restart the machine and press a specific key to enter the BIOS menu.
- Change the boot order in the BIOS settings to boot the PC from the USB drive.
- When you see the Install Windows page, you can click the install button and then start installing Windows 10 from scratch to restore the PC. Or you can click Repair your computer to enter WinRE and perform some repair operations like Startup repair, reset this PC, system restore, etc.
Make a choice based on your actual situation and follow the on-screen instructions to finish the remaining steps.
Create a Recovery Drive Windows 10
In Windows 10, there is a feature called Create a recovery drive. If you have such a drive, it can help you reset the PC, troubleshoot problems, or even reinstall Windows when the PC can’t start.
Perhaps you ask: can a Windows 10 recovery USB be used on another computer? If you use the drive on a different computer, the recovery drive can work. If your system crashes, you can easily create such a recovery drive from a working PC and then restore your PC from the drive.
How to create a recovery drive? Follow the steps below.
- Plug your USB stick into the computer.
- Type create a recovery drive to the search box and click it to open the tool.
- Check the box of Back up system files to the recovery drive and click Next to continue.
- Select your USB drive.
- Click Create to start the creation process. This will take some time.
Tip: Sometimes you fail to create a recovery drive. To get the solutions, refer to this post – Can’t Create Recovery Drive Windows 10? Solutions Here!
To restore your crashed system, boot the PC from the created recovery drive on another PC, then go to Troubleshoot > Recover from a drive, choose Just remove my files or Clean the drive fully and finish the recovery by following the on-screen wizards.
“Can you create a Windows 10 recovery disk from another computer? Of course, two ways to create a Windows 10 recovery USB for another PC are here. Share them on Twitter. ”Click to tweet
Tip: In addition to these two approaches of getting Windows 10 recovery USB for another PC, if you want to get a Windows 10 disc, you can go to Settings > Update & Security > Backup > Go to Backup and Restore (Windows 7) > Create a system repair disc.
There is another way to create a bootable USB recovery drive and that is to use MiniTool ShadowMaker. It is a Windows backup software that allows you to create a system image and then perform system image recovery in case of system breakdown.
If your computer fails to run, you can also back up the system on another PC with different hardware and then restore the system to your non-working computer. The Universal Restore feature is quite helpful.
How can you create a Windows 10 recovery USB for another PC and perform the recovery operation with MiniTool ShadowMaker? The whole process includes four steps and let us see them.
Step 1: Create a System Image of Windows 10
1. Free download MiniTool ShadowMaker and install it on a working computer.
MiniTool ShadowMaker TrialClick to Download100%Clean & Safe
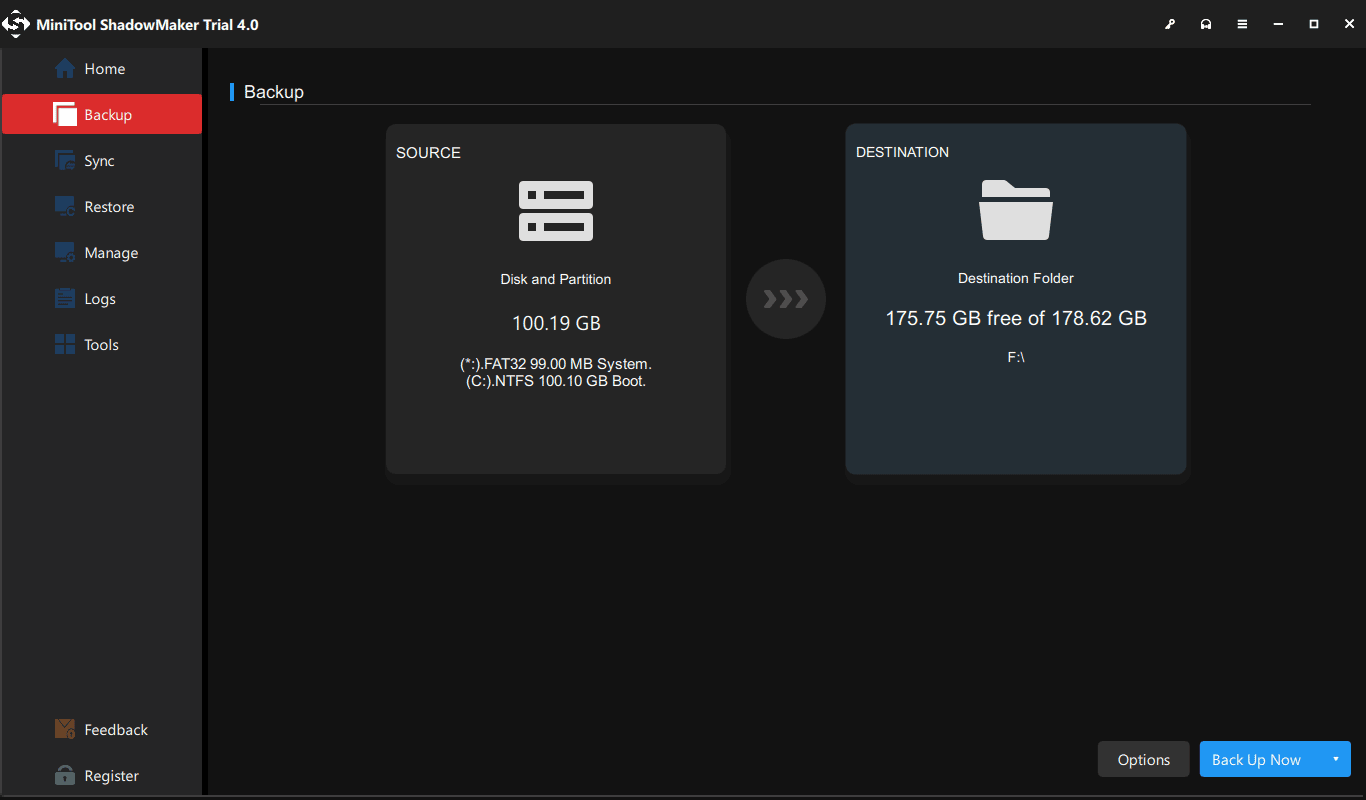
2. Launch this backup software and then go to the Backup system-related partitions are selected as the backup source. You only need to go to Destination and choose a path to save the backed-up system image file.
3. Click the Back Up Now button to execute the system immediately.
Step 2: Create a Bootable USB Drive
To make sure you can boot your PC when it fails to start, you need to create a recovery drive. MiniTool ShadowMaker allows you to get a bootable USB drive based on WinPE.
- Also, prepare an empty USB flash drive and connect it to your computer.
- Open this tool and go to its Tools page.
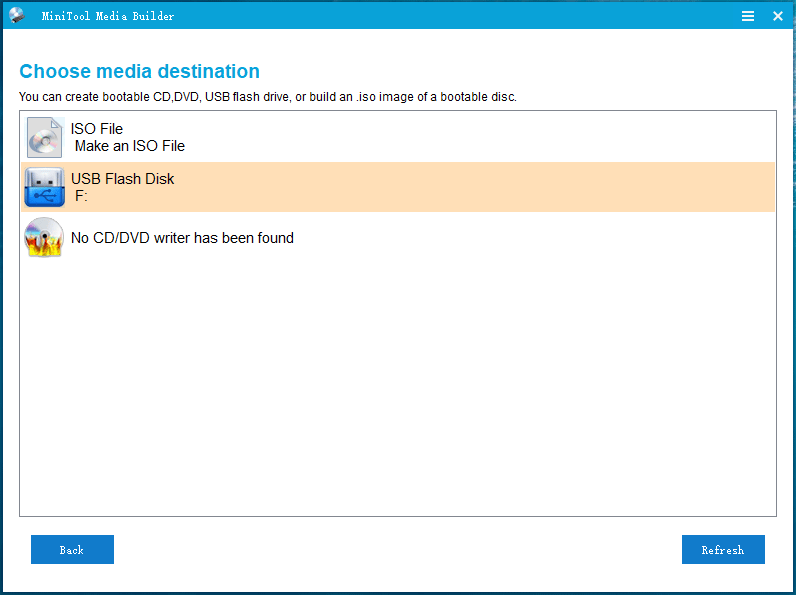
- Click the Media Builder feature and then click WinPE-based media with MiniTool plug-in to continue.
- Select your USB stick and click Yes to confirm the operation. Then, this tool starts creating a USB bootable drive.
Step 3: Restore Windows 10 Using the Recovery USB Drive
If you run into trouble in starting up your PC, boot your PC from the recovery USB drive and then perform a system image recovery. Follow the instructions below.
- After booting the PC from the MiniTool WinPE recovery drive, you get MiniTool ShadowMaker Bootable Edition.
- Go to the Restore page, choose the system recovery file and click Restore to begin.
- Choose a backup version to continue.
- Select volumes to restore from the backup file. Make sure MBR and Track 0 is checked to make sure a successful recovery.
- Decide which target disk you want to restore the system image to.
- Start the system image recovery process. Wait patiently.
To know more information, you can refer to this post – Restore System Image from External Hard Drive in Windows 10/8/7.
Step 4: Perform Universal Restore
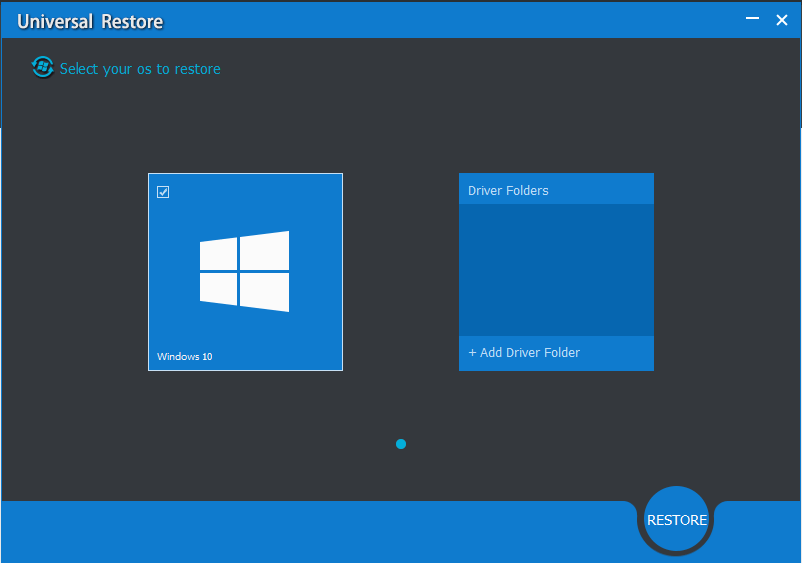
Since you create the system backup, get a Windows 10 recovery USB drive on another PC and restore the system to the non-working computer, the compatible issue may appear. So, the final operation you should do is to run Universal Restore with MiniTool ShadowMaker.
- Go to the Tools interface and click Universal Restore.
- MiniTool ShadowMaker will detect and list the operating system installed on your PC. Click Restore to fix the compatibility issue. Then, reboot your PC and it should run properly.
Related article: How Can You Do Windows Backup Restore to Different Computer?
This way is not a direct way to create Windows 10 recovery USB for another PC and it can be a good way to restore your PC to an earlier state when it goes wrong. If you prefer it, get MiniTool ShadowMaker for system backup and recovery. Actually, the best way is to back up your computer regularly and beforehand and then restore your computer when it crashes.
Bottom Line
That’s all the information about Windows 10 recovery USB for another PC. If your Windows goes wrong, you can follow the ways above to create a bootable USB drive from another computer and then restore your system to a normal state. Just choose one based on your actual situation. Hope this post is helpful to you.
If you have any issues or suggestions on this topic, let us know in the following comment or send an email to [email protected] and we will reply to you as quickly as possible.
When Windows crashes because of a faulty update or when it doesn’t boot correctly, you can try fixing it with a recovery USB drive. Creating a recovery drive involves plugging a USB memory stick into a working Windows computer and running the Recovery Media Creator wizard. Here’s how it all works and how to create a recovery USB drive that works on any PC with Windows 10 or Windows 11, regardless of whether it’s yours or someone else’s:
Important things to know about creating a Windows recovery USB drive
You can create a recovery drive on the same computer you intend to use or on a different PC. Furthermore, you can use a USB memory stick or a USB external hard drive. In my tests, the procedure worked well on both types of devices.
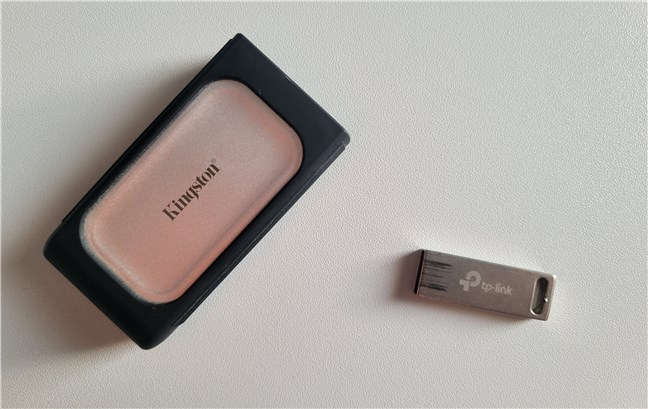
You can create a recovery drive on any kind of USB drive
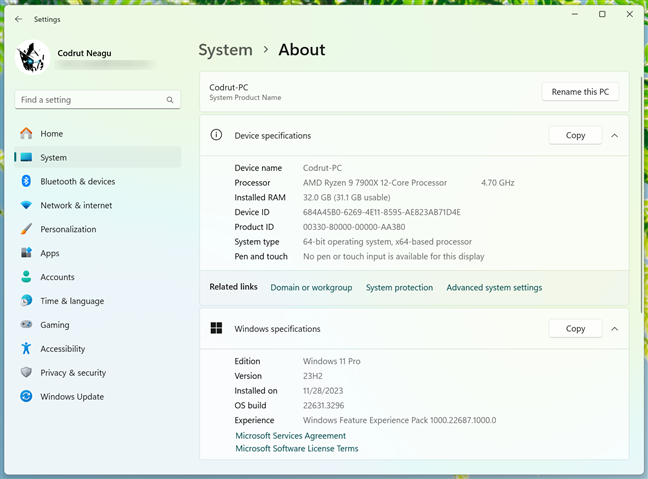
Some sites on the internet tell you that you can use the USB recovery drive only on the Windows 10 or Windows 11 PC where you created it. That is not true. The recovery drive works on any computer using the same architecture (64-bit or 32-bit) and the same version of Windows 10 or Windows 11, or at least a relatively close version to the one used to create the recovery drive. If you don’t know these details about your computer, here’s how to check your Windows 10 version and how to find your version of Windows 11.
Even if the computer you want to repair doesn’t use the same Windows version as the PC on which you created the recovery drive, you can still boot from the USB recovery drive and use most of the recovery options available. However, you might be unable to use all the recovery tools. Some may not work, like the option to reinstall Windows, because the USB recovery drive has the system files for a different Windows version than the one found on the PC you want to recover. This is especially true when you use a USB recovery drive created on an older version of the operating system to repair a PC with a much newer Windows 10 or Windows 11 version.
You can create a Windows recovery USB on other computers, too
You can use any USB memory stick. However, it must have at least 8 GB of free space if you’re creating a Windows 10 recovery drive or at least 16 GB if you’re creating a Windows 11 recovery drive. These are the storage capacities Microsoft recommends. Oh, and another aspect to remember is that USB 2 memory sticks are much slower than USB 3 ones. Therefore, if you don’t want this procedure to take forever, try to find a faster USB stick.
CAUTION: While downloadable Windows recovery USB drives are available online, their safety cannot be guaranteed. It’s unnecessary to risk using these when you can create a personal recovery drive on any computer running Windows 10 or Windows 11. If you don’t have a second PC, consider asking for help from a friend. It’s a safer and more reliable approach.
How to start the Recovery Drive wizard in Windows
There are many ways to start the Recovery Media Creator wizard you use to create a USB recovery drive. Depending on whether you’re using Windows 10 or Windows 11, follow the steps in one of the following sections:
How to open the Recovery Media Creator in Windows 10
The standard way to launch the Recovery Media Creator in Windows 10 is via the Start Menu. Open the Start Menu, navigate to the Windows Administrative Tools folder, and click or tap the Recovery Drive shortcut.
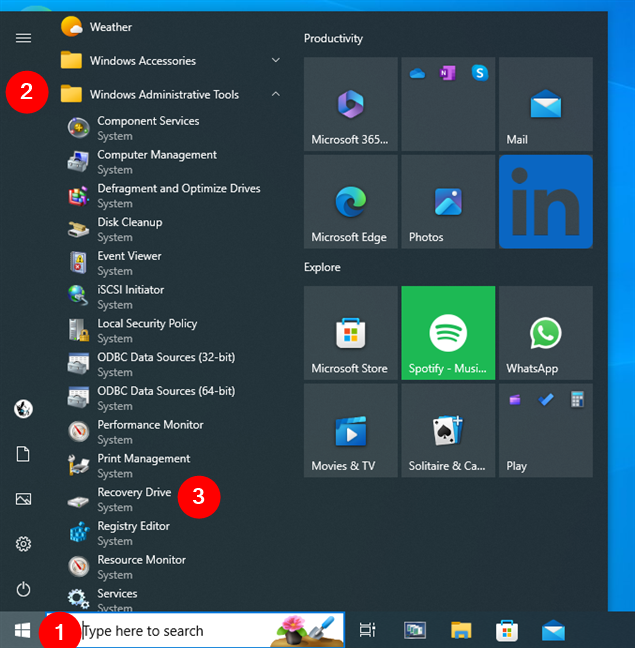
Click or tap on the Recovery Drive shortcut from the Start Menu
Before the Recovery Media Creator opens, you see a UAC prompt asking you to allow this app to make changes to your device. Press Yes to continue. Note that if you are using a standard user account to start this app, you must enter the administrator account password in the UAC window.
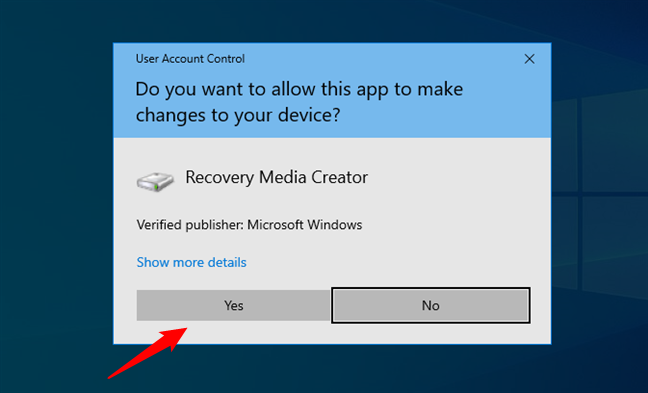
In the UAC prompt, click Yes to run the Recovery Media Creator
Another way to open the wizard to create a recovery drive is to use search. Type “recovery drive” in the Windows 10 search box and then click or tap on the Recovery Drive result or the Open option on the right.
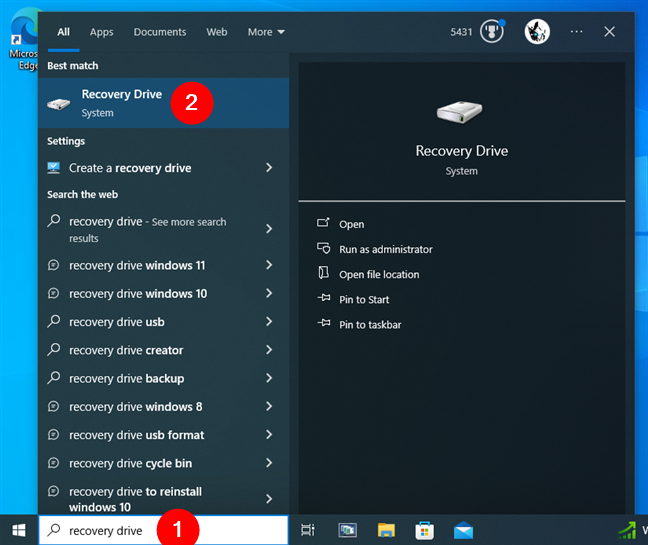
Use search to find Recovery Drive
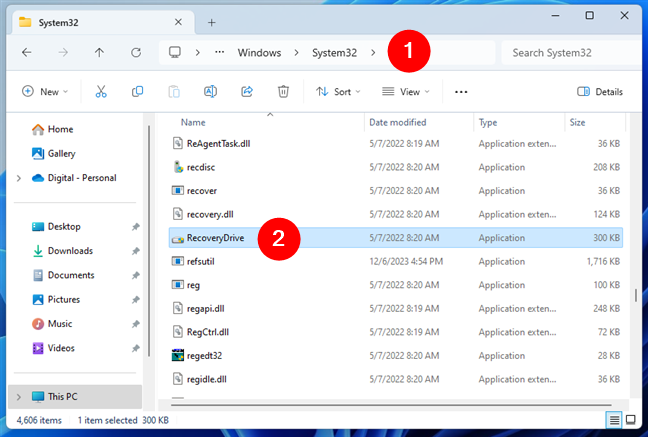
And last but not least, you can also open the Recovery Drive application using its executable. Open File Explorer and navigate to this location:
C:\Windows\System32\
Inside this folder, you’ll find a file called RecoveryDrive.exe. Double-click or double-tap it to run the Recovery Media Creator.
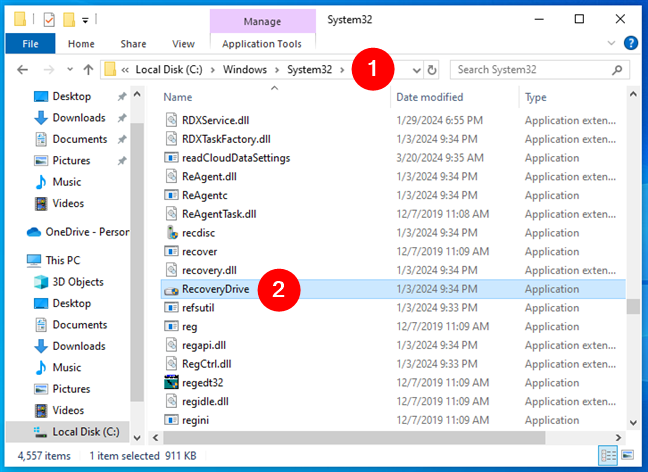
The path to the RecoveryDrive.exe file
NOTE: Before you use the Recovery Media Creator, plug a USB memory stick into your Windows 10 computer. It should ideally have more than 8 GB of free space.
How to open the Recovery Media Creator in Windows 11
The conventional method to start the Recovery Media Creator in Windows 11 is to access it through the Start Menu. Open the Start Menu, access its All apps list, and click or tap the Windows Tools shortcut.
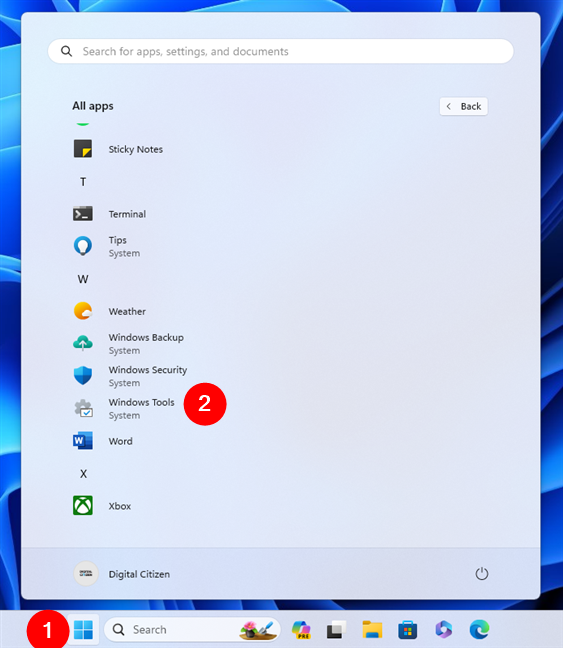
Open the Windows Tools in Windows 11
In the Windows Tools window, locate and double-click or double-tap the Recovery Drive shortcut.
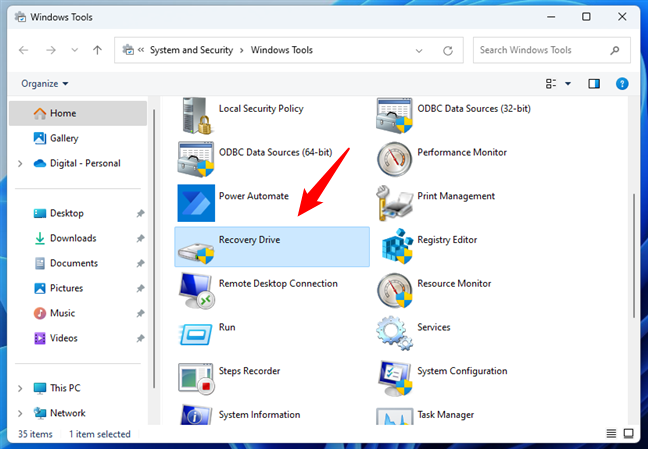
Double-click on Recovery Drive
A User Account Control (UAC) prompt will appear, asking you to authorize the Recovery Media Creator app to make changes to your device. Press Yes to grant it permission. Note that if you’re launching the app using a regular account without admin privileges, you’ll also be prompted to enter the administrator account password in the UAC window.
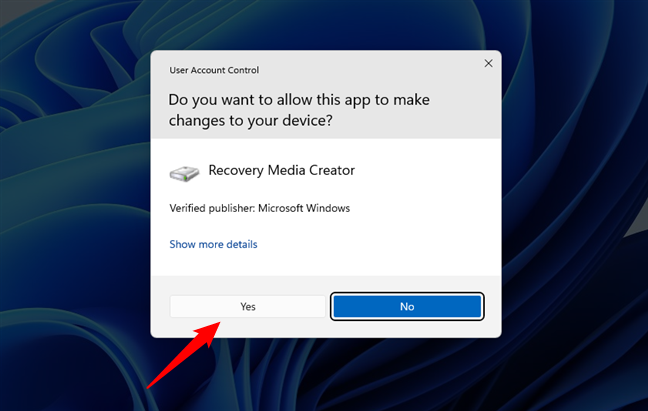
Approve the launch of the Recovery Media Creator
Alternatively, you can use Windows 11’s search function to access the Recovery Drive wizard. Type “recovery drive” into the search field on the taskbar, then click/tap the Recovery Drive result or press the Open option on the right.
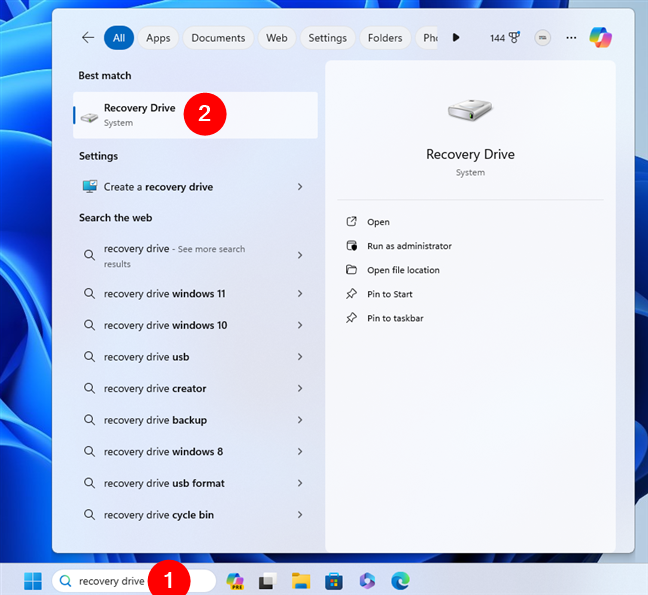
Searching for Recovery Drive in Windows 11
A third method to open the Recovery Media Creator tool involves using File Explorer. Launch it and follow this path:
C:\Windows\System32
Here, you’ll find a file called RecoveryDrive.exe. Double-click or double-tap it to start the Windows USB recovery drive wizard.
The RecoveryDrive.exe file in Windows 11
NOTE: Don’t forget to insert a USB memory stick into your Windows 11 computer before you use the Recovery Media Creator. For Windows 11, this drive should have more than 16 GB of free space.
How to create a Windows recovery USB drive
Whether you’re creating a recovery drive on a Windows 10 or Windows 11 computer, the wizard looks and works the same. To simplify this tutorial, I will use screenshots taken in Windows 10 for this chapter.
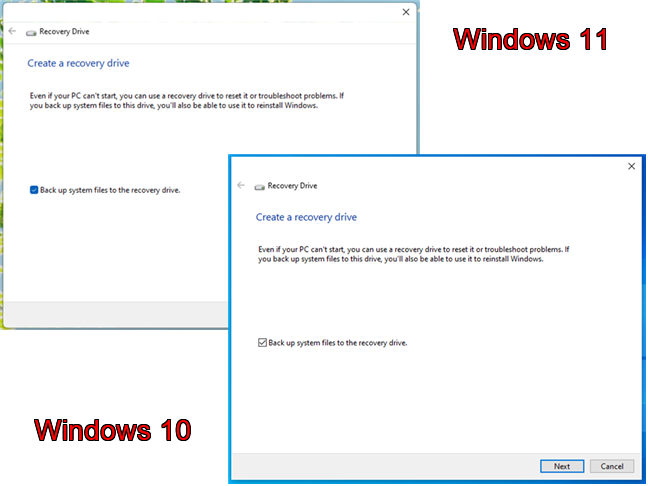
Creating a recovery USB drive is the same in Windows 11 and Windows 10
In the Recovery Drive window, you first see a description of the recovery drive’s usefulness and the option to “Back up system files to the recovery drive.” If you check the box next to this option, the recovery drive will include Windows 10 or Windows 11 system files that allow you to reinstall Windows on a PC with problems. It’s a good idea to leave it checked and press Next. However, remember that this option also increases the free space required on the USB stick. Therefore, if your USB memory stick has limited free space, you may want to uncheck this option.
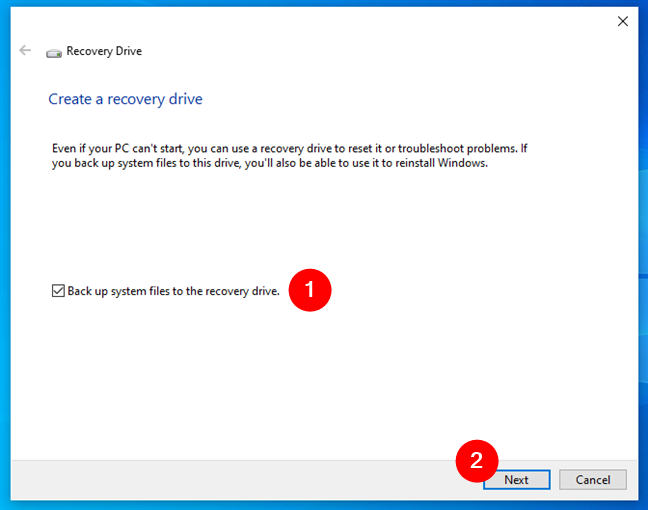
Create a Windows recovery USB drive
The Recovery Drive wizard detects and lists all the USB drives connected to your computer. Select the USB flash drive you want to use for recovery by clicking or tapping it and pressing Next.
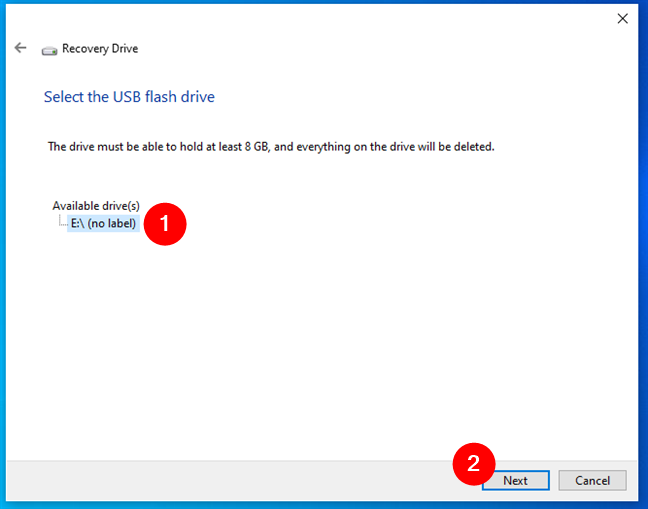
Select the USB drive you want to use
You are warned that everything on the drive is going to be deleted. If you have any data that matters to you, back it up before the next step. When you’re ready to create the USB recovery drive, press Create.
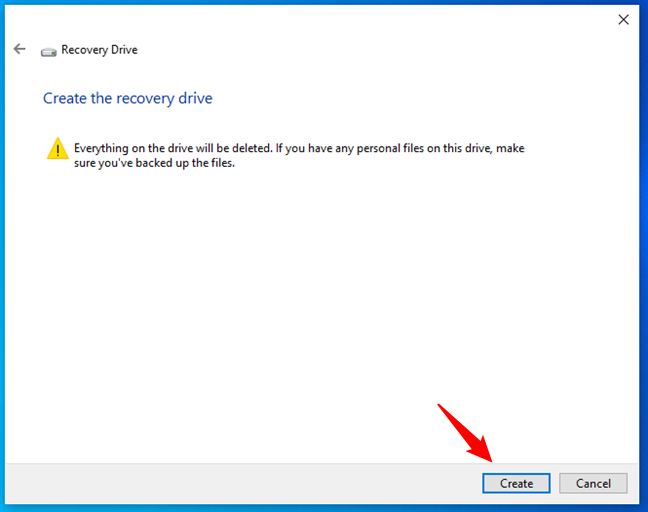
Start the process of creating the recovery USB drive
The Recovery Drive wizard will format your USB drive and copy the required Windows recovery utilities and system files. This process may take a long time, especially if you have an old USB 2.0 memory stick, so give it between 30 and 60 minutes to finish. Even with USB 3.0 flash drives, the process can take a while, although the wait will be less frustrating because these drives are faster.
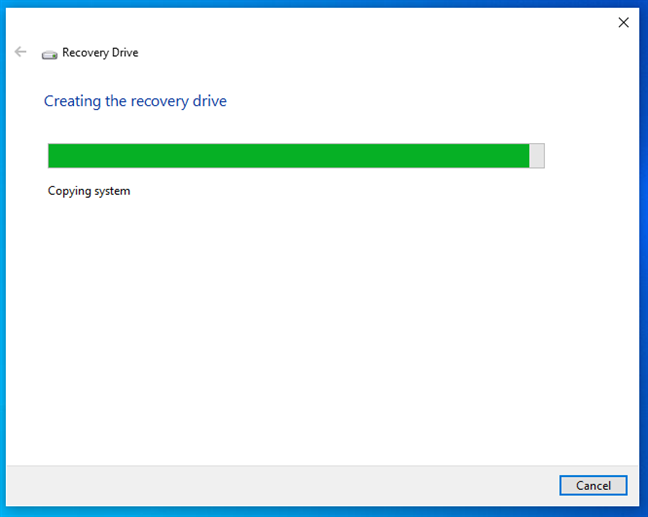
Creating the recovery USB drive may take a long time
When the Windows USB recovery drive is ready, you are informed, and all that is left to do is press Finish.
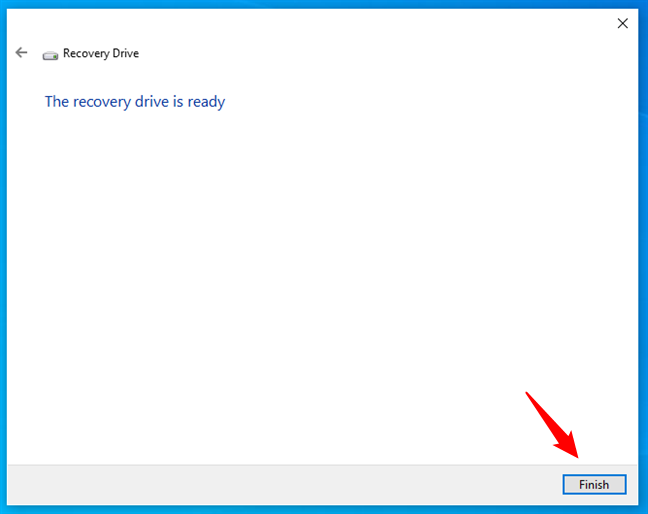
Click Finish when the recovery drive is ready
You can then use the recovery USB drive to troubleshoot your Windows PC when you encounter a problem or on other Windows devices that no longer work as they should.
How to use the Windows recovery USB drive
The Windows recovery USB drive allows you to reset your system, restore to a previous state, remove problematic updates, recover from a system image, repair startup issues, execute Command Prompt troubleshooting, and access your computer’s UEFI firmware settings. I covered all these maintenance and troubleshooting tasks in a separate article: How to use a Windows recovery USB drive. Follow it to repair your malfunctioning Windows 10 or Windows 11 laptop, tablet, or PC.
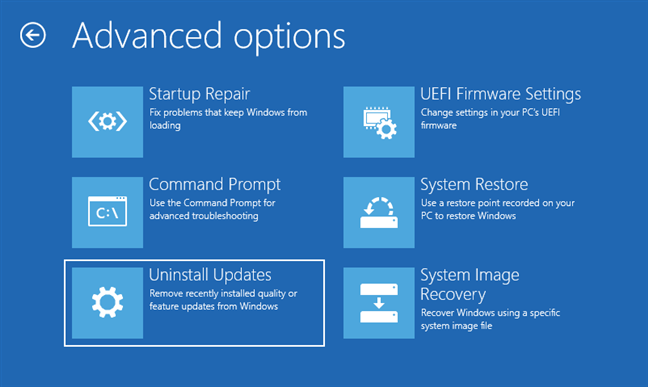
Troubleshooting options on a Windows recovery drive
If the USB recovery drive doesn’t work and your Windows PC or laptop can read DVDs, you can create a system repair disc and boot from it. If that option isn’t available, you can create a USB stick with the Windows 10 installation kit or Windows 11 setup and use that drive for repairs.
If this doesn’t work either, one last resort is reinstalling your operating system from scratch. These guides will help with the whole process: How to install Windows 10 from a USB drive, DVD, or ISO and How to install Windows 11 from USB, DVD, or ISO.
Did you create a bootable Windows recovery USB drive for Windows?
This guide should have helped you create a Windows recovery USB drive that also works on other computers, not just yours alone. As you have seen, the process isn’t that complicated, and anybody should be able to pull it off. However, before you close this article, let me know if you have any questions and if everything worked well for you. Comment below, and let’s discuss.