
Are you new to Docker Windows Images? Are you currently working in a Windows shop and curious to learn about Docker builds for container images? You have come to the right place. The best way to learn about new something is by doing with the docker build and docker build "tag" commands!
Not a reader? Watch this related video tutorial!
Not seeing the video? Make sure your ad blocker is disabled.
In this article, you are going to learn how to create your first Windows Docker image from a Dockerfile using the docker build command.
Let’s get started!
Understanding Docker Container Images
For years, the only way to test or perform development on multiple operating systems (OS) was to have several dedicated physical or virtual machines imaged with the OS version of your choice. This methodology required more hardware and overhead to provision new machines for each software and OS specification.
However, these days the usage of Docker container images has grown partly due to the popularity of micro-service architecture. In response to the rise in Docker’s popularity, Microsoft has started to publicly support Docker images for several flagship products on their Docker Hub page. They have even added native support for images for Windows as a product feature in Windows 10 and Windows Server 2016!
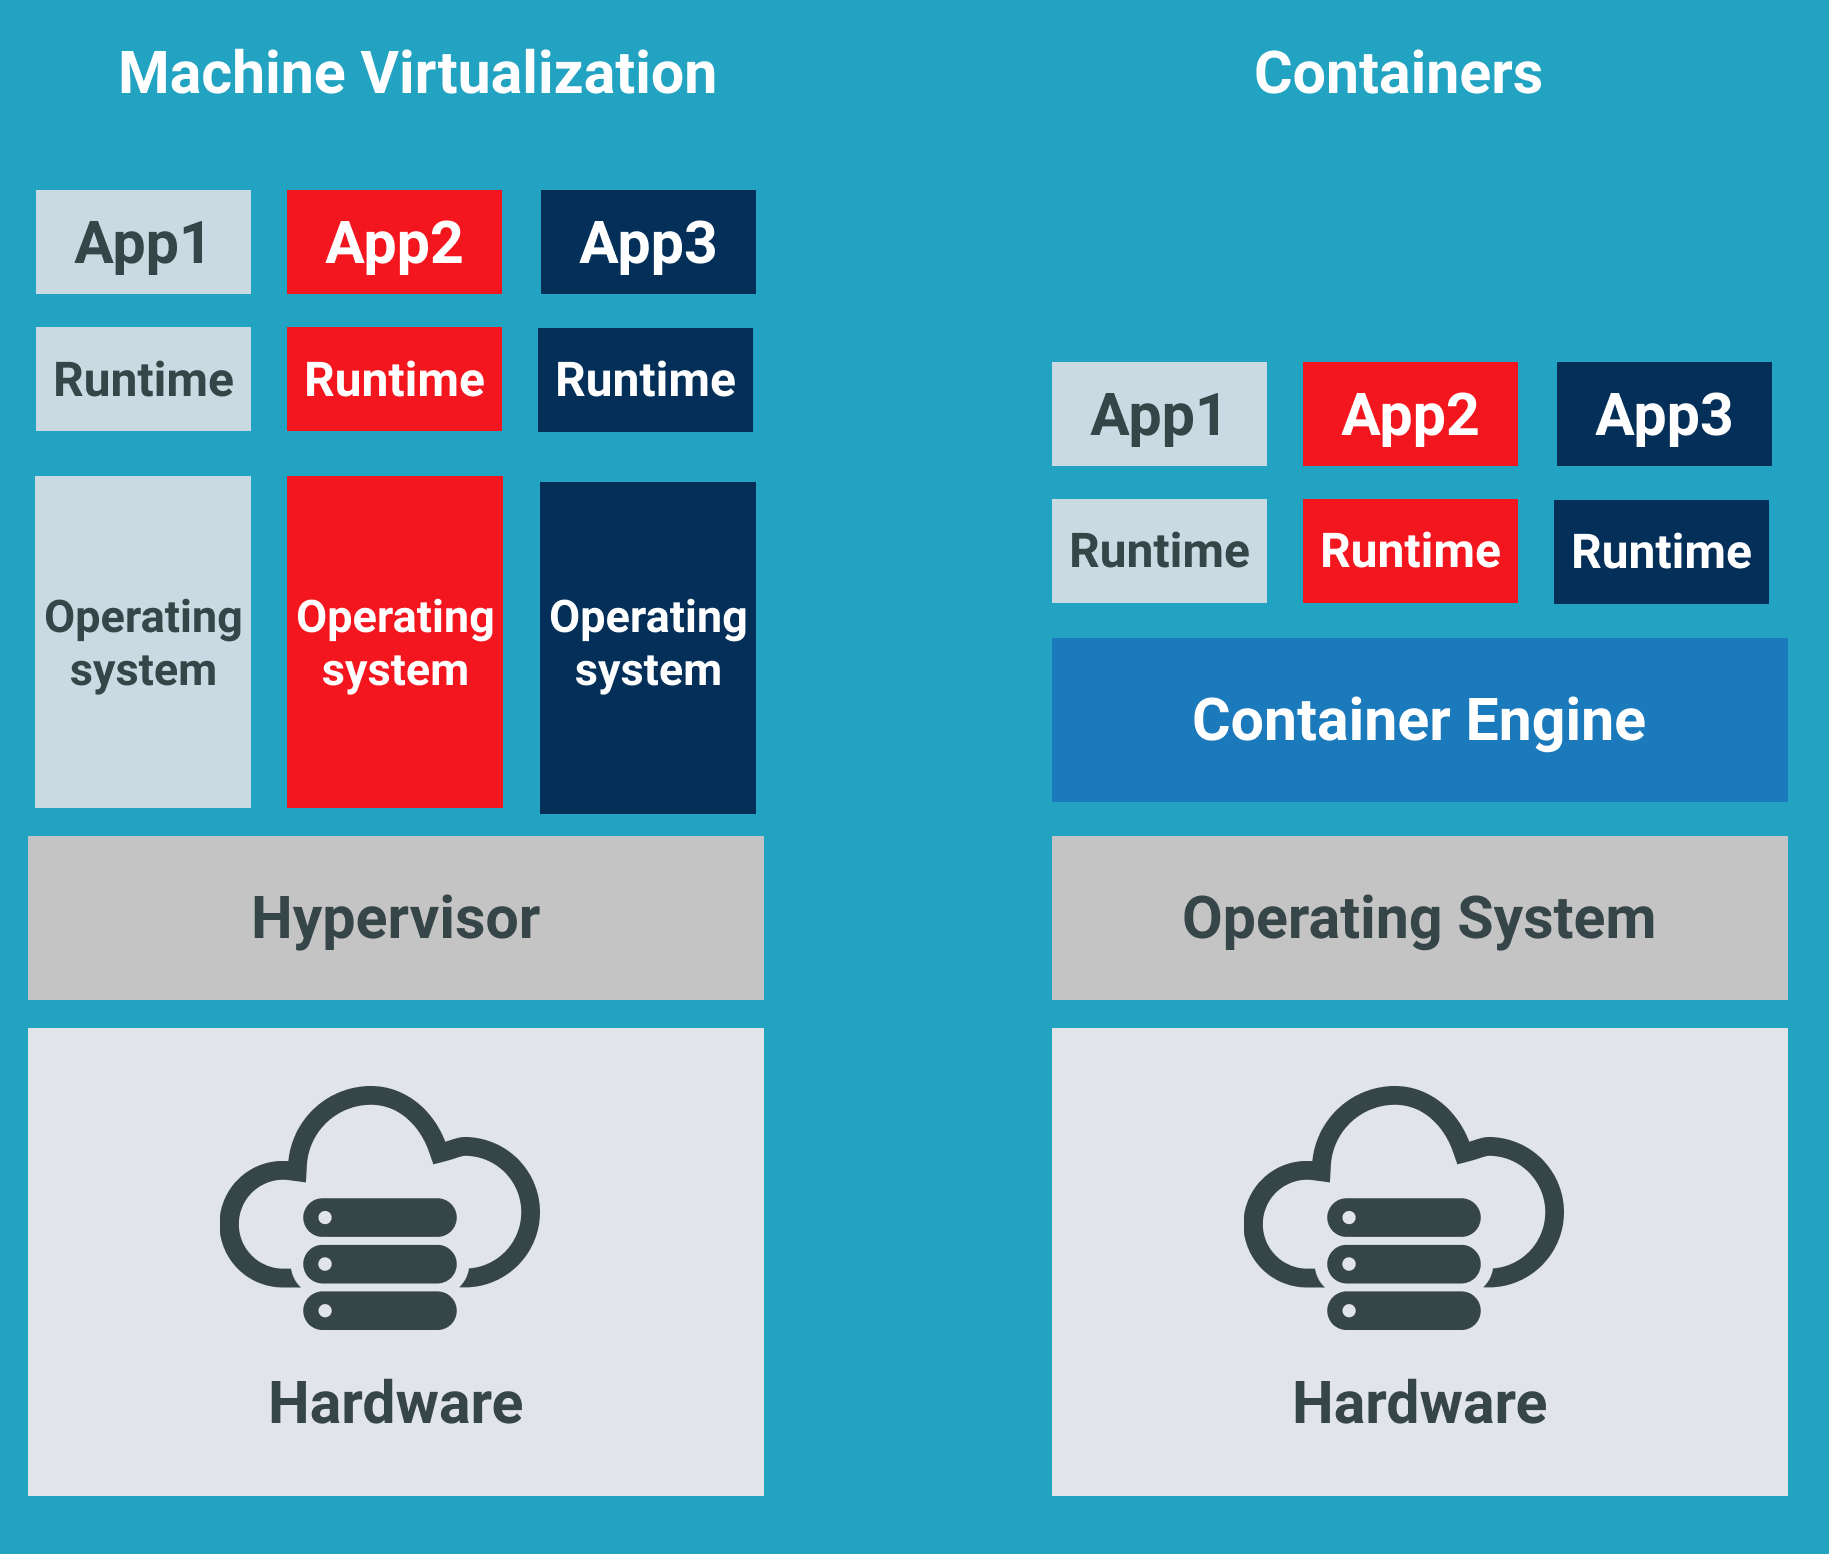
A Docker image is run on a container by using the Docker Engine. Docker images have many benefits such as portability (applicable to multiple environments and platforms), customizable, and highly scalable. As you can see below, unlike traditional virtual machines, the Docker engine runs on a layer between the host OS kernel and the isolated application services that are being containerized.
Understanding Docker Build and Images
The docker build command can be leveraged to automate container image creation, adopt a container-as-code DevOps practice, and integrate containerization into the development cycle of your projects. Dockerfiles are simply text files that contain build instructions used by Docker to create a new container image that is based on an existing image.
The user can specify the base image and list of commands to be run when a container image is deployed or startup for the first time. In this article, you will learn how to create a Windows-based docker image from Dockerfile using a Windows container.
This process has several benefits over using a pre-built container image:
- You are able to rebuild a container image for several versions of Windows – which is great for testing code changes on several platforms.
- You will have more control over what is installed in the container. This will allow you to keep your container size to a minimum.
- For security reasons, you might want to check the container for vulnerabilities and apply security hardening to the base image
Prerequisites/Requirements
This article is a walkthrough on learning about learning how to build a Docker image using a Dockerfile. If you’d like to follow along, ensure that you have the following prerequisites in place.
- Docker for Windows installed. I’ll be using the Docker Community Edition (CE) version 2.1.0.4 in my environment.
- Internet access is needed for downloading the Docker images
- Windows 10+ Operating System (version 1709 is being used for this tutorial)
- Nested virtualization enabled
- 5 GB of free diskspace on your local machine
- PowerShell 5.0+
- This tutorial uses the Visual Studio Code IDE. However feel free to use what ever IDE you’d prefer.
Note: Be sure to enable Windows Containers Configuration when installing Docker.
Getting Prepared
You’ll first need a folder to store all of the Docker images and containers you’ll be building from those images. To do so, open a Powershell or cmd terminal (you’ll be using PowerShell throughout this article) and create a new directory called C:\Containers.
Once the folder is created, change to that directory. This puts the console’s current working directory to C:\Containers to default all downloads to this directory.
PS51> mkdir C:\Containers
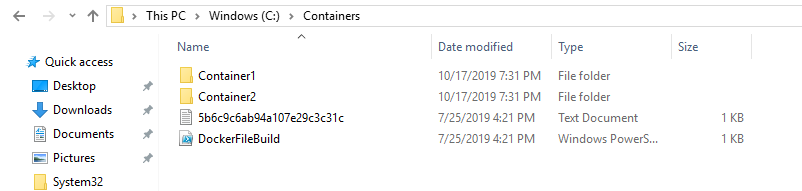
PS51> cd C:\ContainersIn this article, you’ll get a headstart. Most of the files to work through this project are already available. Once the folder is created, perform a Git pull to copy over the files needed for this article from the TechSnips Github repository to the C:\Containers folder. Once complete, check to make sure that the C:\Containers folder looks like below.
Downloading the IIS Windows Docker Image
The first task to perform is to download a “template” or base image. You’ll be building your own Docker image later but first, you need an image to get started with. You’ll be downloading the latest IIS and Windows Server Core Images that are required for this tutorial. The updated list of images can be found on the official Microsoft Docker hub image page.
Reviewing the Current Docker Base Images
Before downloading the image from the image repository, let’s first review the current Docker base images that you currently have on your local system. To do so, run a PowerShell console as Administrator and then type docker images. This command returns all images on your local system.
As you can see below, the images available are initially empty.

Downloading the Base Image
Now it’s time to download the base IIS image from Docker Hub. To do so, run docker pull as shown below. This process can take some time to complete depending on your internet speeds.
PS51> docker pull mcr.microsoft.com/windows/servercore/iis
Now run docker images and you should have the latest Microsoft Windows Core IIS image available for this tutorial.

Inspecting the Dockerfile
In an earlier step, you had downloaded an existing Dockerfile for this tutorial. Let’s now take a look at exactly what that entails.
Open the C:\Containers\Container1\Dockerfile file in your favorite editor. The contents of this Dockerfile are used to define how the container image will be configured at build time.
You can see an explanation of what each piece of this file does in the in-line comments.
# Specifies that the latest microsoft/iis image will be used as the base image
# Used to specify which base container image will be used by the build process.

# Notice that the naming convention is "**owner/application name : tag name**"
# (shown as microsoft/iis:latest); so in our case the owner of the image is
# Microsoft and the application is IIS with the "latest" tag name being used
# to specify that you will pull the most recent image version available.
FROM microsoft/iis:latest

# Copies contents of the wwwroot folder to the inetpub/wwwroot folder in the new container image
# Used to specify that you want to copy the WWWroot folder to the IIS inetpub WWWroot
# folder in the container. You don't have to specify the full path to your local
# files because docker already has the logic built-in to reference files and folders
# relative to the docker file location on your system. Also, make note that that
# docker will only recognize forward slashes for file paths - since this is a
# Windows based container instead of Linux.
COPY wwwroot c:/inetpub/wwwroot

# Run some PowerShell commands within the new container to set up the image

# Run the PowerShell commands to remove the default IIS files and create a new
# application pool called TestPool
RUN powershell Remove-Item c:/inetpub/wwwroot/iisstart.htm -force
RUN powershell Remove-Item c:/inetpub/wwwroot/iisstart.png -force
RUN powershell Import-Module WebAdministration
RUN powershell New-WebAppPool -Name 'TestPool'

# Exposes port 80 on the new container image
# Used to open TCP port 80 for allowing an http connection to the website.
# However, this line is commented out, because the IIS container has this port
# already open by default.
#EXPOSE 80

# Sets the main command of the container image
# This tells the image to run a service monitor for the w3svc service.
# When this is specified the container will automatically stop running
# if the w3svc service stopped. This line is commented out because of the
# IIS container already has this entrypoint in place by default.
#ENTRYPOINT ["C:\\ServiceMonitor.exe", "w3svc"]
Building a New Docker Image
You’ve got the Dockerfile ready to go and a base IIS image downloaded. Now it’s time to build your new Docker image using the Dockerfile.
To build a new image, use the docker build "tag" command. This command creates the image. For this article, you can see below you’re also using the -t ** option which replaces the “tag” portion. This option allows you to give your new image a friendly tag name and also reference the Dockerfile by specifying the folder path where it resides.
Below you can see an example of ensuring the console is in the C:\Containers directory and then building a new image from the Dockerfile in the C:\Containers\Container1 directory.
PS51> cd C:\Containers
PS51> docker build -t container1 .\Container1
Once started, you can see the progress of the command as it traverses each instruction in the docker file line by line:
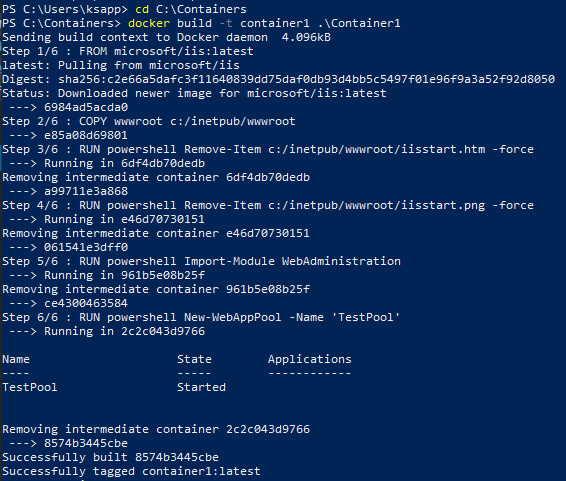
Once done, you should now have a new Docker image!
Now run the docker images command to view the images that are available. You can see below an example of the container1 image created.

Note: The
docker build —helpcommand is a useful parameter to display detailed information on the docker command being run.
Running the Docker Container
At this point, you should have a new image created. It’s time to spin up a container using that image. To bring up a new container, use the docker run command.
The docker run command will bring up a new Docker container based on the container1 image that you created earlier. You can see an example of this below.
Notice that the -d parameter is used. This tells the docker runtime to start the image in the detached mode and then exit when the root process used to run the container exits.
When docker run completes, it returns the ID of the container created. The example below is capturing this ID into a $containerID variable so we can easily reference it later.
PS51> $containerID = docker run -d container1
PS51> $containerID
Once the container is brought up, now run the docker ps command. This command allows you to see which containers are currently running using each image. Notice below that the running image is automatically generated a nickname (busy_habit in this case). This nickname is sometimes used instead of the container ID to manage the container.

Running Code Inside a Docker Container
A new container is built from a new image you just created. Let’s now start actually using that container to run code. Running code inside of a Docker container is done using the docker exec command.
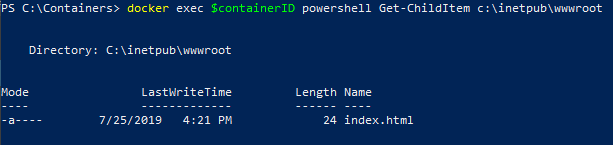
In this example, run docker exec to view PowerShell output for the Get-ChildItem command in the container using the command syntax below. This will ensure the instructions in the Dockerfile to remove the default IIS files succeeded.
PS51> docker exec $containerID powershell Get-ChildItem c:\inetpub\wwwrootYou can see below that the only file that exists is index.html which means the default files were removed.
Now run the ipconfig command in the container to get the local IP address of the container image so that you can try to connect to the IIS website.
PS51> docker exec $containerID ipconfigYou can see below that ipconfig was run in the container just as if running on your local computer and has return all of the IP information.
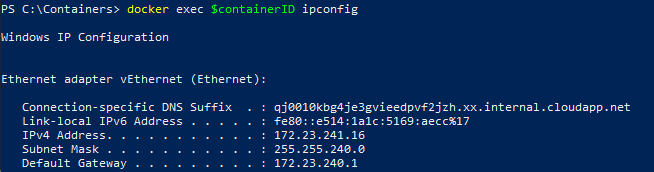
ipconfig in a Docker containerInspecting the IIS Website
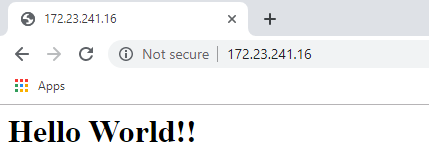
Now it’s time to reveal the fruits of your labor! It’s time to see if the IIS server running in the Docker container is properly serving up the index.html page.
Open a browser and paste the IP4 Address found via ipconfig into the address bar. If all is well, you should see a Hello World!! message like below.
Reviewing Docker History
One useful command to use when working with Docker containers i the docker history command. Although not necessarily related to creating an image or container itself, the docker history command is a useful command that allows you to review changes made to the container image.
PS51> docker history container1You can see below, that docker history returns all of the Dockerfile and PowerShell activity performed on the container1 container you’ve been working with.
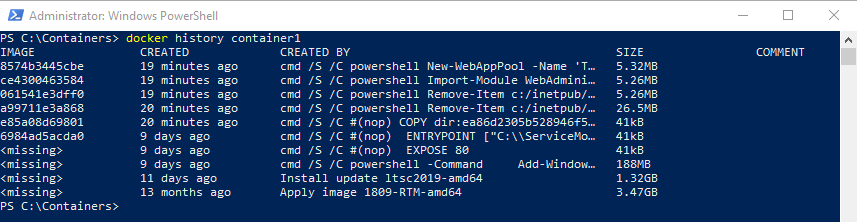
docker historyCleaning up the Running Docker Images
The steps below are used to cleanup all stopped containers running on your machine. This will free up diskspace and system resources.
Run the docker ps command to view a list of the containers running on your system:

Now stop the running containers using the docker stop command:
PS51> docker stop <image nick name: busy_haibt in my case>
PS51> docker stop <image nick name: unruffled_driscoll in my case>Finally you can permanently remove the stopped containers using the docker system prune command.
PS51> docker system prune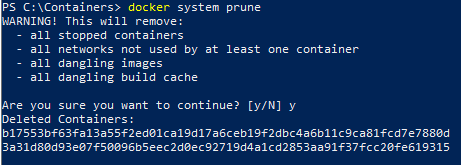
Further Reading
- Creating Your First Docker Windows Server Container
- How to Manage Docker Volumes on Windows
Время на прочтение5 мин
Количество просмотров5.2K
Всем привет! Меня зовут Андрей, и я работаю DevOps инженером в компании Exness в команде разработки. Моя основная деятельность связана со сборкой, деплоем и поддержкой приложений в docker под операционной системой Linux (далее — ОС). Не так давно у меня появилась задача с теми же активностями, но в качестве целевой ОС проекта стала Windows Server и набор проектов на C++. Для меня это было первое плотное взаимодействие c docker контейнерами под ОС Windows и в целом с приложениями на C++. Благодаря этому я получил интересный опыт и узнал о некоторых тонкостях контейнеризации приложений в ОС Windows.
В этой статье хочу рассказать, с какими трудностями мне пришлось столкнуться, каким образом их удалось решить. Надеюсь, это окажется полезным для решения ваших текущих и будущих задач. Приятного чтения!
Почему контейнеры?
В компании есть существующая инфраструктура оркестратора контейнеров Hashicorp Nomad и связанных компонентов — Consul и Vault. Поэтому контейнеризация приложений была выбрана как унифицированный метод доставки готового решения. Так как в инфраструктуре проекта имеются docker-хосты с версиями ОС Windows Server Core 1803 и 1809, то необходимо собирать отдельно версии docker-образов для 1803 и 1809. В версии 1803 важно помнить о том, что номер ревизии сборочного docker-хоста должен совпадать с номером ревизии базового docker-образа и хоста, где контейнер из этого образа будет запущен. Версия 1809 лишена такого недостатка. Подробнее можно прочитать здесь.
Почему multi-stage?
У инженеров команд разработки доступ к сборочным хостам отсутствует или сильно ограничен, нет возможности оперативно управлять набором компонентов для сборки приложения на этих хостах, например, установить дополнительный toolset или workload для Visual Studio. Поэтому мы приняли решение — все необходимые для сборки приложения компоненты установить в сборочный docker-образ. При необходимости можно достаточно быстро изменить только dockerfile и запустить пайплайн создания этого образа.
От теории к делу
В идеальной docker multi-stage сборке образа подготовка окружения для сборки приложения происходит в том же dockerfile скрипте, что и сборка самого приложения. Но в нашем случае было добавлено промежуточное звено, а именно, шаг предварительного создания docker-образа со всем необходимым для сборки приложения. Так сделано, потому что хотелось использовать возможность docker cache, чтобы сократить время установки всех зависимостей.
Давайте разберем основные моменты dockerfile скрипта для формирования этого образа.
Для создания образов разных версий ОС в dockerfile можно определить аргумент, через который при сборке передаётся номер версии, и он же тэг базового образа.
Полный список тэгов образов Microsoft Windows Server можно найти здесь.
ARG WINDOWS_OS_VERSION=1809
FROM mcr.microsoft.com/windows/servercore:$WINDOWS_OS_VERSION
По умолчанию команды в инструкции RUN внутри dockerfile в ОС Windows выполняются в консоли cmd.exe. Для удобства написания скриптов и расширения функционала используемых команд переопределим консоль исполнения команд на Powershell через инструкцию SHELL.
SHELL ["powershell", "-Command", "$ErrorActionPreference = 'Stop';"]Следующим шагом устанавливаем пакетный менеджер chocolatey и необходимые пакеты:
COPY chocolatey.pkg.config .
RUN Set-ExecutionPolicy Bypass -Scope Process -Force ;\
    [System.Net.ServicePointManager]::SecurityProtocol = \
    [System.Net.ServicePointManager]::SecurityProtocol -bor 3072 ;\
    $env:chocolateyUseWindowsCompression = 'true' ;\
    iex ((New-Object System.Net.WebClient).DownloadString( \
      'https://chocolatey.org/install.ps1')) ;\
    choco install chocolatey.pkg.config -y --ignore-detected-reboot ;\
    if ( @(0, 1605, 1614, 1641, 3010) -contains $LASTEXITCODE ) { \
      refreshenv; } else { exit $LASTEXITCODE; } ;\
    Remove-Item 'chocolatey.pkg.config'
Чтобы установить пакеты, используя chocolatey, можно просто передать их списком или же установить по одному в том случае, если необходимо передать уникальные параметры для каждого пакета. В нашей ситуации мы использовали манифест файл в формате XML, в котором указан список необходимых пакетов и их параметров. Его содержимое выглядит так:
<?xml version="1.0" encoding="utf-8"?>
<packages>
  <package id="python" version="3.8.2"/>
  <package id="nuget.commandline" version="5.5.1"/>
  <package id="git" version="2.26.2"/>
</packages>
Далее мы устанавливаем среду сборки приложения, а именно, MS Build Tools 2019 — это облегченная версия Visual Studio 2019, которая содержит в себе минимально необходимый набор компонентов для компиляции кода.
Для полноценной работы с нашим C++ проектом нам потребуются дополнительные компоненты, а именно:
- Workload C++ tools
- Toolset v141
- Windows 10 SDK (10.0.17134.0)
Установить расширенный набор инструментов в автоматическом режиме можно при помощи файла конфигурации в формате JSON. Содержимое файла конфигурации:
Полный список доступных компонентов можно найти на сайте документации Microsoft Visual Studio.
{
  "version": "1.0",
  "components": [
    "Microsoft.Component.MSBuild",
    "Microsoft.VisualStudio.Workload.VCTools;includeRecommended",
    "Microsoft.VisualStudio.Component.VC.v141.x86.x64",
    "Microsoft.VisualStudio.Component.Windows10SDK.17134"
  ]
}
В dockerfile выполняется скрипт установки, и для удобства добавляется путь к исполняемым файлам build tools в переменную окружения PATH. Также желательно удалить ненужные файлы и директории, чтобы уменьшить размер образа.
COPY buildtools.config.json .
RUN Invoke-WebRequest 'https://aka.ms/vs/16/release/vs_BuildTools.exe' \
      -OutFile '.\vs_buildtools.exe' -UseBasicParsing ;\
    Start-Process -FilePath '.\vs_buildtools.exe' -Wait -ArgumentList \
      '--quiet --norestart --nocache --config C:\buildtools.config.json' ;\
    Remove-Item '.\vs_buildtools.exe' ;\
    Remove-Item '.\buildtools.config.json' ;\
    Remove-Item -Force -Recurse \
      'C:\Program Files (x86)\Microsoft Visual Studio\Installer' ;\
    $env:PATH = 'C:\Program Files (x86)\Microsoft Visual Studio\2019\BuildTools\MSBuild\Current\Bin;' + $env:PATH; \
    [Environment]::SetEnvironmentVariable('PATH', $env:PATH, \
      [EnvironmentVariableTarget]::Machine)
На этом этапе наш образ для компиляции C++ приложения готов, и можно приступать непосредственно к созданию docker multi-stage сборке приложения.
Multi-stage в действии
В качестве сборочного образа будем использовать созданный образ со всем инструментарием на борту. Как и в предыдущем dockerfile скрипте, добавим возможность динамически указывать номер версии/ тэга образа для удобства переиспользования кода. Важно добавить метку as builder к сборочному образу в инструкции FROM.
ARG WINDOWS_OS_VERSION=1809
FROM buildtools:$WINDOWS_OS_VERSION as builder
Настал черед сборки приложения. Здесь все достаточно просто: скопировать исходный код и все, что с ним связано, и запустить процесс компиляции.
COPY myapp .
RUN nuget restore myapp.sln ;\
    msbuild myapp.sln /t:myapp /p:Configuration=Release
Завершающий этап создания конечного образа — указание базового образа приложения, где будут располагаться все артефакты компиляции и файлы конфигурации. Для копирования скомпилированных файлов с промежуточного сборочного образа надо указать параметр --from=builder в инструкции COPY.
FROM mcr.microsoft.com/windows/servercore:$WINDOWS_OS_VERSION

COPY --from=builder C:/x64/Release/myapp/ ./
COPY ./configs ./
Теперь остается добавить необходимые зависимости для работы нашего приложения и указать команду запуска через инструкции ENTRYPOINT или CMD.
Заключение
В этой статье я рассказал, как создать полноценную среду компиляции C++ приложений внутри контейнера под Windows и о том, как использовать возможности docker multi-stage сборок для создания полноценных образов нашего приложения.
Windows Images
This repository contains build instructions and Dockerfile to build Docker images with Windows-only browsers: Internet Explorer and Microsoft Edge.
System Requirements
- Bare metal machine or on VM with nested virtualization enabled and Linux installed. This example was tested on
Ubuntu 18.04.
$ uname -a
Linux desktop 4.15.0-46-generic #49-Ubuntu SMP Wed Feb 6 09:33:07 UTC 2019 x86_64 x86_64 x86_64 GNU/Linux
To check that virtualization is supported — verify that /dev/kvm file is present:
$ ls -l /dev/kvm
crw-rw---- 1 root kvm 10, 232 мар  8 19:38 /dev/kvm
- Qemu machine emulator installed. It is important to use the same
qemuversion on host machine where images are built and inside Docker image. To checkqemuversion type:
$ qemu-system-x86_64 -version
QEMU emulator version 2.11.1(Debian 1:2.11+dfsg-1ubuntu7.10)
Copyright (c) 2003-2017 Fabrice Bellard and the QEMU Project developers
- Windows license key
Build Procedure
1. Preparative Steps
1.1) Clone this repository and change dir to it:
$ git clone https://github.com/aerokube/windows-images.git
$ cd windows-images
1.2) Download Windows 10 installation image from Microsoft Software Download website.
1.3) Download virtio drivers virtio-win-0.1.141.iso. In the next steps we assume that you now have two files in current directory:
$ ls
virtio-win-0.1.141.iso  Win10_1809Oct_English_x32.iso
2. Windows Installation
2.1) Create hard disk image where Windows will be installed:
$ qemu-img create -f qcow2 hdd.img 40G
2.2) Run virtual machine and begin installation:
$ sudo qemu-system-x86_64 -enable-kvm \
        -machine q35 -smp sockets=1,cores=1,threads=2 -m 2048 \
        -usb -device usb-kbd -device usb-tablet -rtc base=localtime \
        -net nic,model=virtio -net user,hostfwd=tcp::4444-:4444 \
        -drive file=hdd.img,media=disk,if=virtio \
        -drive file=Win10_1809Oct_English_x32.iso,media=cdrom \
        -drive file=virtio-win-0.1.141.iso,media=cdrom
2.3) Windows will boot from installation image. Install Windows.
2.3.1) Proceed to the next step:

2.3.2) Click Install now:

2.3.3) Enter license key:

2.3.4) Choose Windows edition:

2.3.5) Read and accept license agreement:

2.3.6) Choose custom installation type:

2.3.7) Now you have to install virtio storage driver. Click Load driver:

2.3.8) Point to E:\viostor\w10\x86 directory:

2.3.9) Click next to install driver:

2.3.10) Choose installation partition and click next:

2.3.11) Wait while installation finishes:

2.3.12) Setup user and password:

2.3.13) Do other post-install configuration steps until you get Windows installed:

2.3.14) Install Ethernet virtio driver. Open device manager and click Update driver:

Choose virtio cdrom and click OK:

Install driver:

Connect to network:

2.3.15) Disable Windows Firewall or add firewall rule to allow access to port 4444. This is needed to access webdriver binary port with Selenium test.

2.3.16) Configure Windows as you wish: install updates, change screen resolution, apply registry modifications and so on.
3. Adding WebDriver Binaries
These binaries will handle Selenium test requests and launch respective browser.
-
For Internet Explorer — download an archive with driver binary from Selenium official website, unpack it and put the binary to
C:\Windows\System32directory. -
For Microsoft Edge web driver binary can be installed with the following command:
> DISM.exe /Online /Add-Capability /CapabilityName:Microsoft.WebDriver~~~~0.0.1.0

4. Creating Quick Boot Memory Snapshot
This snapshot contains memory state and is needed to quickly restore virtual machine instead of doing full boot which is slow. To create it:
4.1) Shutdown virtual machine.
4.2) Create overlay image that will contain VM state:
$ qemu-img create -b hdd.img -f qcow2 snapshot.img
4.3) Run VM using snapshot.img as filesystem:
$ sudo qemu-system-x86_64 -enable-kvm \
        -machine q35 -smp sockets=1,cores=1,threads=2 -m 2048 \
        -usb -device usb-kbd -device usb-tablet -rtc base=localtime \
        -net nic,model=virtio -net user,hostfwd=tcp::4444-:4444 \
        -drive file=snapshot.img,media=disk,if=virtio \
        -monitor stdio
Please note that qemu runs with monitor connected to stdio.
4.4) Browser configuration (required only for Internet Explorer).
Open Internet Explorer. The first time this browser is launched, it asks for the security setup. The option «Don’t use recommended settings» need to be selected as follows:

Then, the Internet Options have to be changed. These options can be opened using the configuration button located at the top of Internet Explorer. In the tab «Security», the protect mode for the zones «Internet» and «Restricted sites» have to be disabled, as shown in the following picture:

At this point, you have to close Internet Explorer. Select the option «Always close all tabs» when Internet Explorer is closing. Finally, you have to open again Internet Explorer and double check that the protected mode is turned off (it can be seen in a message box at the bottom of the browser).
4.5) Run web driver binary command.
- For Microsoft Edge — open command prompt with administrator privileges and run:
> MicrosoftWebDriver.exe --host=10.0.2.15 --port=4444 --verbose

- For Internet Explorer — open command prompt as unprivileged user and run:
> C:\Windows\System32\IEDriverServer.exe --host=0.0.0.0 --port=4444 --log-level=DEBUG

4.6) Minimize command line prompt window when driver is up and running.
4.7) Switch to terminal where qemu runs and type at qemu prompt:
Then type quit to stop VM:
To start VM from snapshot manually use the following command:
$ sudo qemu-system-x86_64 -enable-kvm \
        -machine q35 -smp sockets=1,cores=1,threads=2 -m 2048 \
        -usb -device usb-kbd -device usb-tablet -rtc base=localtime \
        -net nic,model=virtio -net user,hostfwd=tcp::4444-:4444 \
        -drive file=snapshot.img,media=disk,if=virtio \
        -loadvm windows
The command above is used in Dockerfile entry point script.

5. Build Docker Image
5.1) Move filesystem and state files to image directory in this repository:
$ mv hdd.img snapshot.img image
$ cd image
5.2) Build Docker image using provided Dockerfile:
$ docker build -t windows/edge:18 . # For Microsoft Edge
For Internet Explorer use:
$ docker build -t windows/ie:11 . # For Internet Explorer
5.3) Run a container from image:
$ docker run -it --rm --privileged -p 4444:4444 -p 5900:5900 windows/edge:18 # For Microsoft Edge
$ docker run -it --rm --privileged -p 4444:4444 -p 5900:5900 windows/ie:11 # For Internet Explorer
5.4) To see Windows screen inside running container — connect to vnc://localhost:5900 using selenoid as password.
5.5) To run Selenium tests — use http://localhost:4444 as Selenium URL.
Introduction
It used to be that people first downloaded their software onto a physical computer and then ran it. Now, with cloud computing, you no longer need to worry about awkward downloads. Instead, you can use all the same services online from anywhere and see updates in real-time.
Why Businesses Migrate Their Legacy Applications To the Cloud
- Probably the first main reason for moving to the cloud is access to virtually unlimited computing resources. Cloud elasticity and scalability are essential elements of cloud computing.
- Cloud elasticity is the ability of a system to dynamically manage available resources based on current workload requirements.
- Cloud Scalability is a scalable system infrastructure to meet growing workload demands while maintaining consistent performance appropriately.
- Moving from the legacy Windows app to cloud computing lets you work anytime and anywhere so long as you have an internet connection. A cloud-based web service is accessible from any device.
- In the current pandemic situation, team members are forced to work from their home offices. Using the cloud, your teammates can open, edit, and share documents anytime and from anywhere; they can do more together and do it better. Before the advent of the cloud-based workflow, employees had to send files back and forth as email attachments that a single user worked on simultaneously.
- A public cloud provider owns the hardware infrastructure and is responsible for managing and maintaining it, so you don’t have to worry about maintenance. With a public cloud, you only need to focus directly on meeting your business goals.
- Cloud computing reduces high hardware costs. You pay only for the actual consumption of resources.
Virtual Machines Vs Containers.
Containers and virtual machines (VMs) are the two main approaches to deploying multiple isolated services in the cloud. So how are they different?
Virtual Machine (VM)
Before the advent of containers, “virtual machine” was a technology used to optimize server capacity. Virtual machines (and hypervisors) emulate physical computer hardware with a complete operating system. It’s as if you are running multiple computers with several different operating systems on the same physical server.
The hypervisor orchestrates and distributes available resources (processor, memory, storage, etc.) across multiple virtual machines as needed.
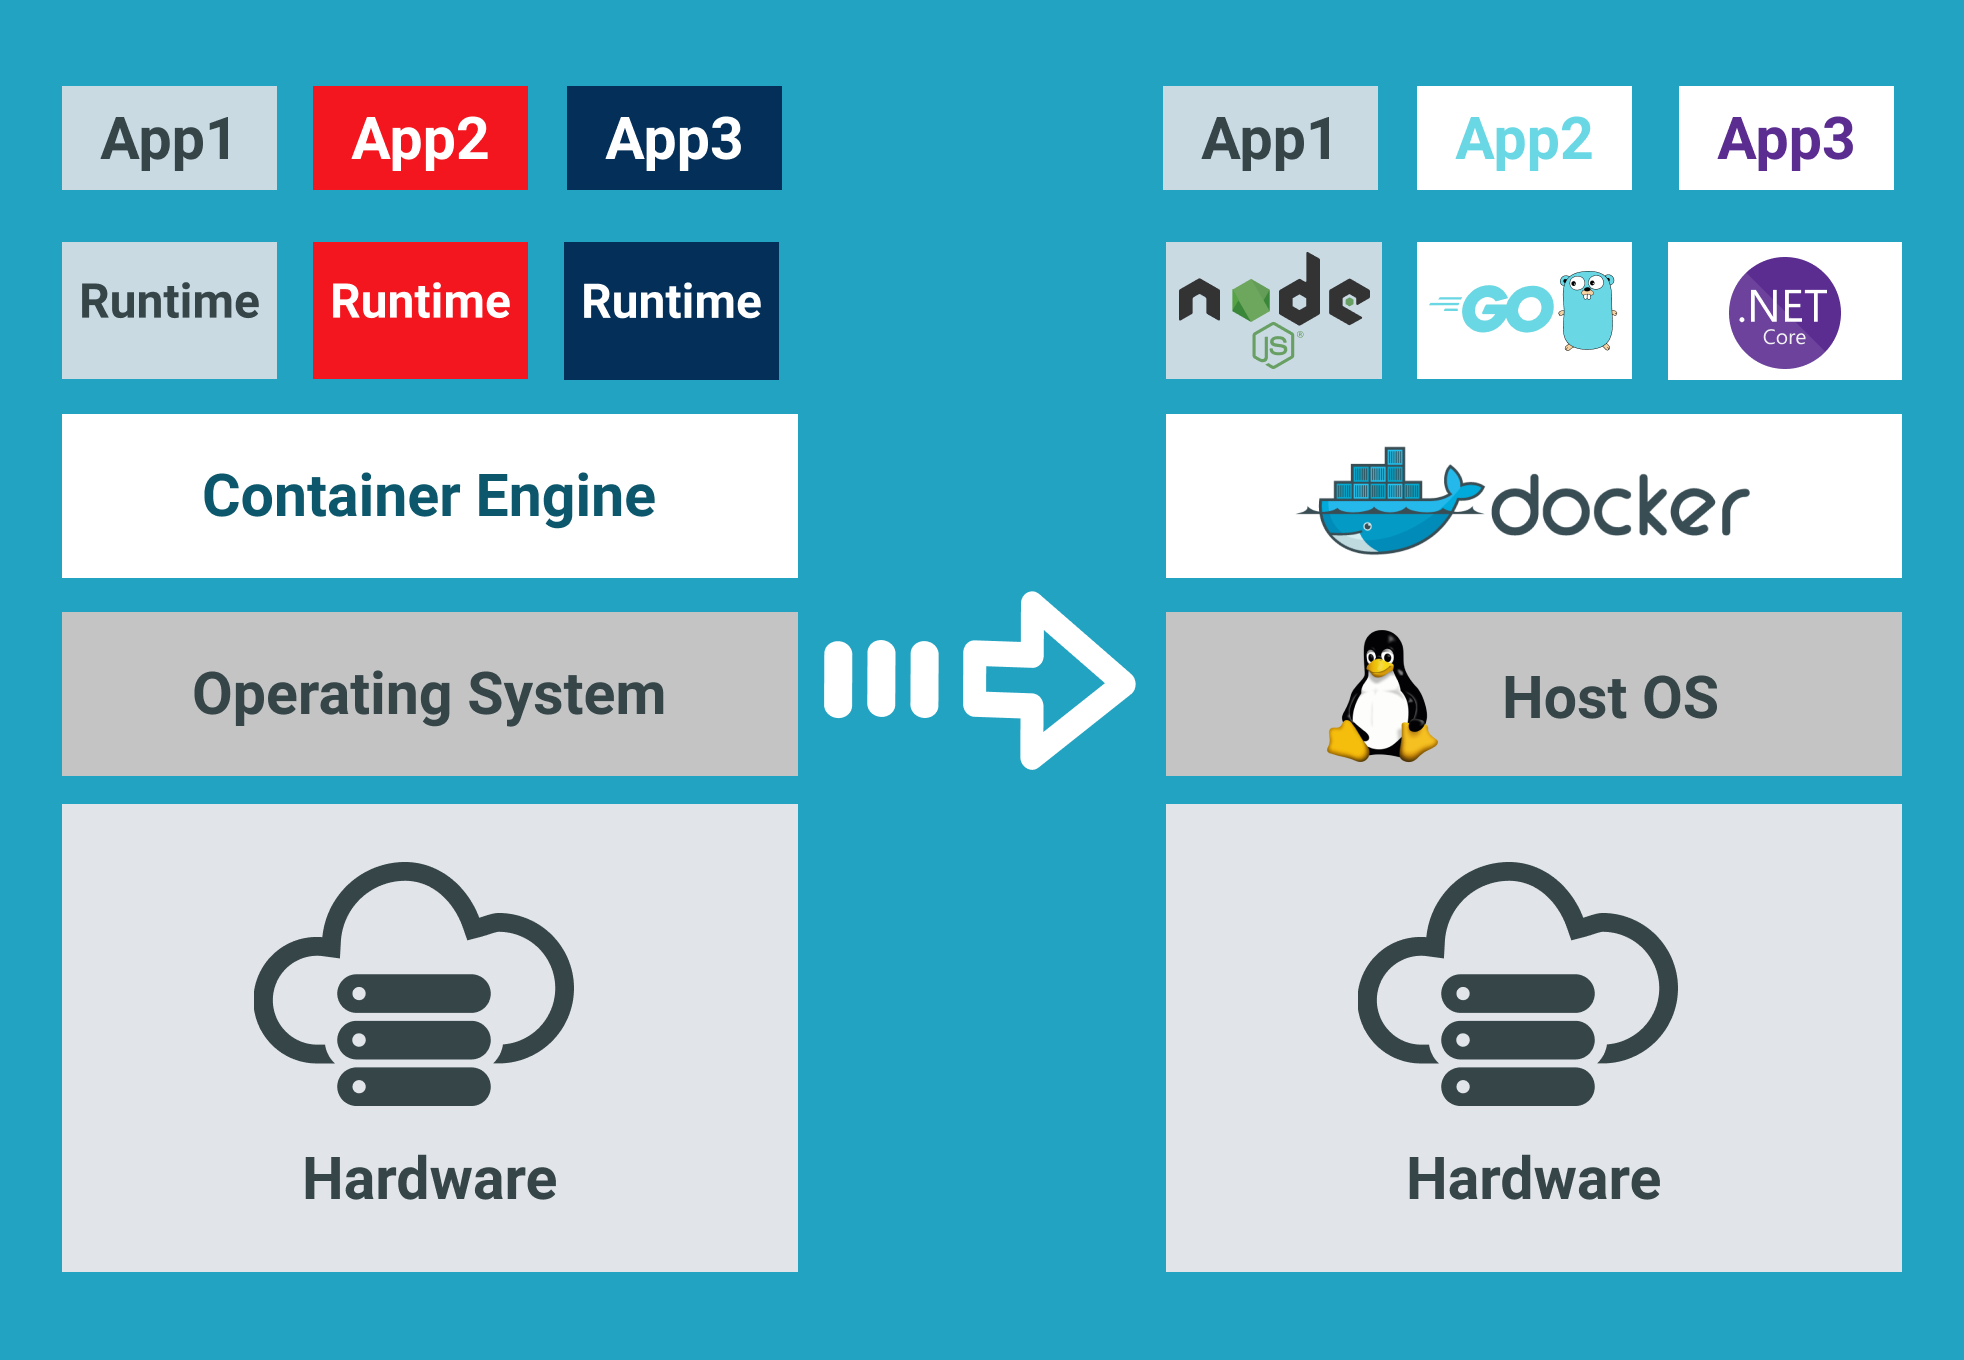
Containers
The container shares the host OS kernel as well as binaries and libraries with other containers. Common OS components are read-only. Containers are lightweight so that you can deploy multiple containers on a single server or virtual machine. You no longer need to dedicate an entire server to one application.
Advantages of Containers
The biggest advantage of containers (if we are talking about Docker) over virtual machine images is resource usage.
- Containers are lightweight, so they are fast.
- Containers consume fewer resources.
- Docker containers typically start in seconds, which speeds up deployment.
- Tearing down a Docker container is as easy as running the
docker stopcommand and usually takes less than a second.
On the other hand,
- Virtual machines take longer, as they go through the entire process of booting the entire virtual operating system each time!
- Each VM includes a separate operating system image, which adds overhead in memory and storage footprint.
Scaling container instances is far faster and easier than deploying additional VMs. Data volumes can be shared and reused among multiple containers.
Docker Containers
Docker is currently the leading container toolbox to deploy microservices to the cloud.
A software container packages the code, its libraries, frameworks, and other dependent components. As a result, the application runs quickly and reliably in any environment, be it a local data center, a public cloud, or a developer’s laptop.
Software containerization solves many of the challenges of software development and deployment, so we embraced this concept when moving our Windows desktop applications to the cloud.
The most suitable types of software to embed in a docker container are non-user interface applications that are run from the command line. Typically, Linux-based Docker images are lightweight and are widely used in cloud environments.
Unfortunately, in most cases, rewriting all of your Windows application code from scratch to make it cross-platform is too expensive and time-consuming. Besides, when it comes to platform design, sharing the kernel between Dockerized applications has significant limitations. For example, Windows containers will not be able to run on a Linux host.
Windows Container Base Images
Microsoft offers Windows containers to deliver containerized services on the Windows platform. Check out a good article from Microsoft that describes Windows docker container images that users can build from.
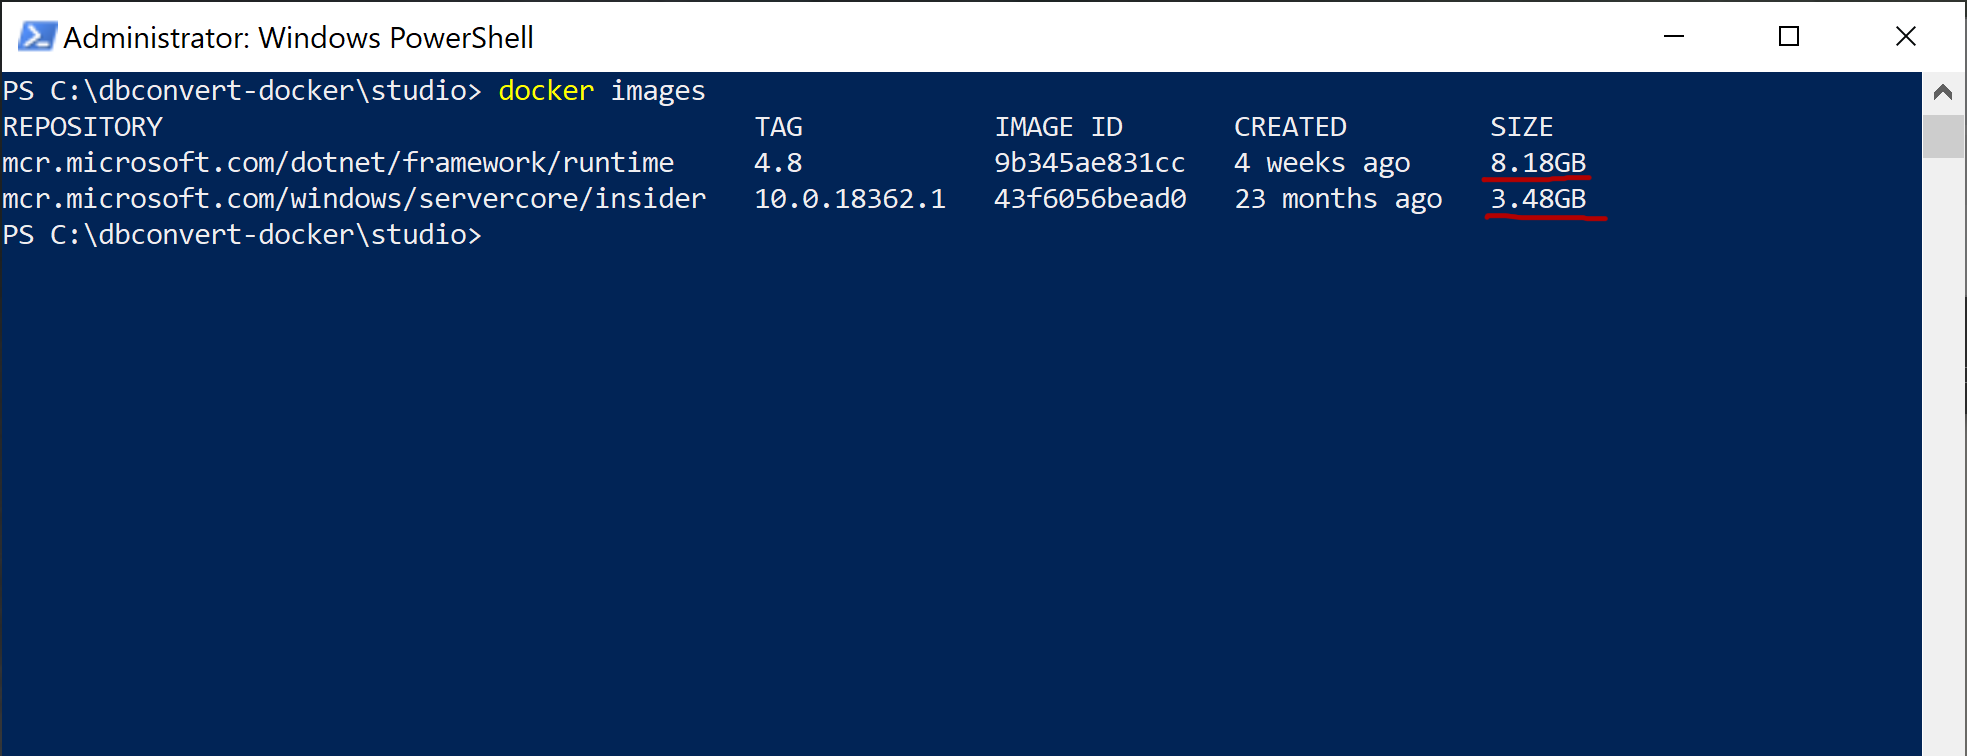
I will use an Insider Windows Server Core image as a base. This image includes a subset of the Windows Server APIs and is suitable for packaging typical .NET framework applications.
- Insider images are >50% smaller than the .Net Framework Runtime Images.
- Container startup into Windows PowerShell is 30–45% faster.
Dockerizing DBConvert Tools
As an example, I will show how to build a Docker image for DBConvert Studio. It is a classic .NET Windows application running either in GUI mode or in headless mode from the command line. It is also a good source of Docker-related techniques if you want to customize your own Dockerfiles further.
Let’s dive deeper into what the Dockerfile actually does.
- The first
FROMline pulls the Insider Windows Server Core image. - The next
RUNsimply displays the status of the followingADDcommand. It downloads the installation zip package directly to our new image. - The
COPY DBConvert-Studio. reg/command copies the DBConvert registration file info to the root of the image. We will use it later to remove all restrictions on the DBConvert studio unregistered copy of the. (See the reg import command, which will appear later.)
Let’s take a look at the rest of the PowerShell commands combined into the following RUN command.
- The
Write-Hostcommand displays the current status of the operation. Expand-Archive—extracts the contents of the newly downloaded zip archive to the root directory of our image.- The
Start-Process msiexeccommand installs the unpacked archive. - The next
Start-Process regcommand imports the registration file’s contents into our docker image’s Windows registry. Remove-Itemremoves all unnecessary intermediary files from the final image.Set-Locationsets the specified location as a working directory.- The
CMD [“powershell”]specifies what command to run within the container. In fact, we can call straightCMD [“DBConvert.exe”, “/ Session:”, “mysql2mysql”], but each time it may be a different session configuration file. Therefore, it is better to bind the directory on the host to the directory inside the container with the— volume (-v)flag.
Building Docker Image. Starting Container.
Launch the following command in the terminal to build your Docker image.
The next command, docker run, starts a container from the newly created DBConvert Studio image.
Containers are immutable by design. This means that the container will not be changed during its life cycle: no updates, no patches, no configuration changes.
When starting DBConvert studio from the command line, you need to pass in a ready-made session file that includes the configured database connections involved in the migration and some other parameters.
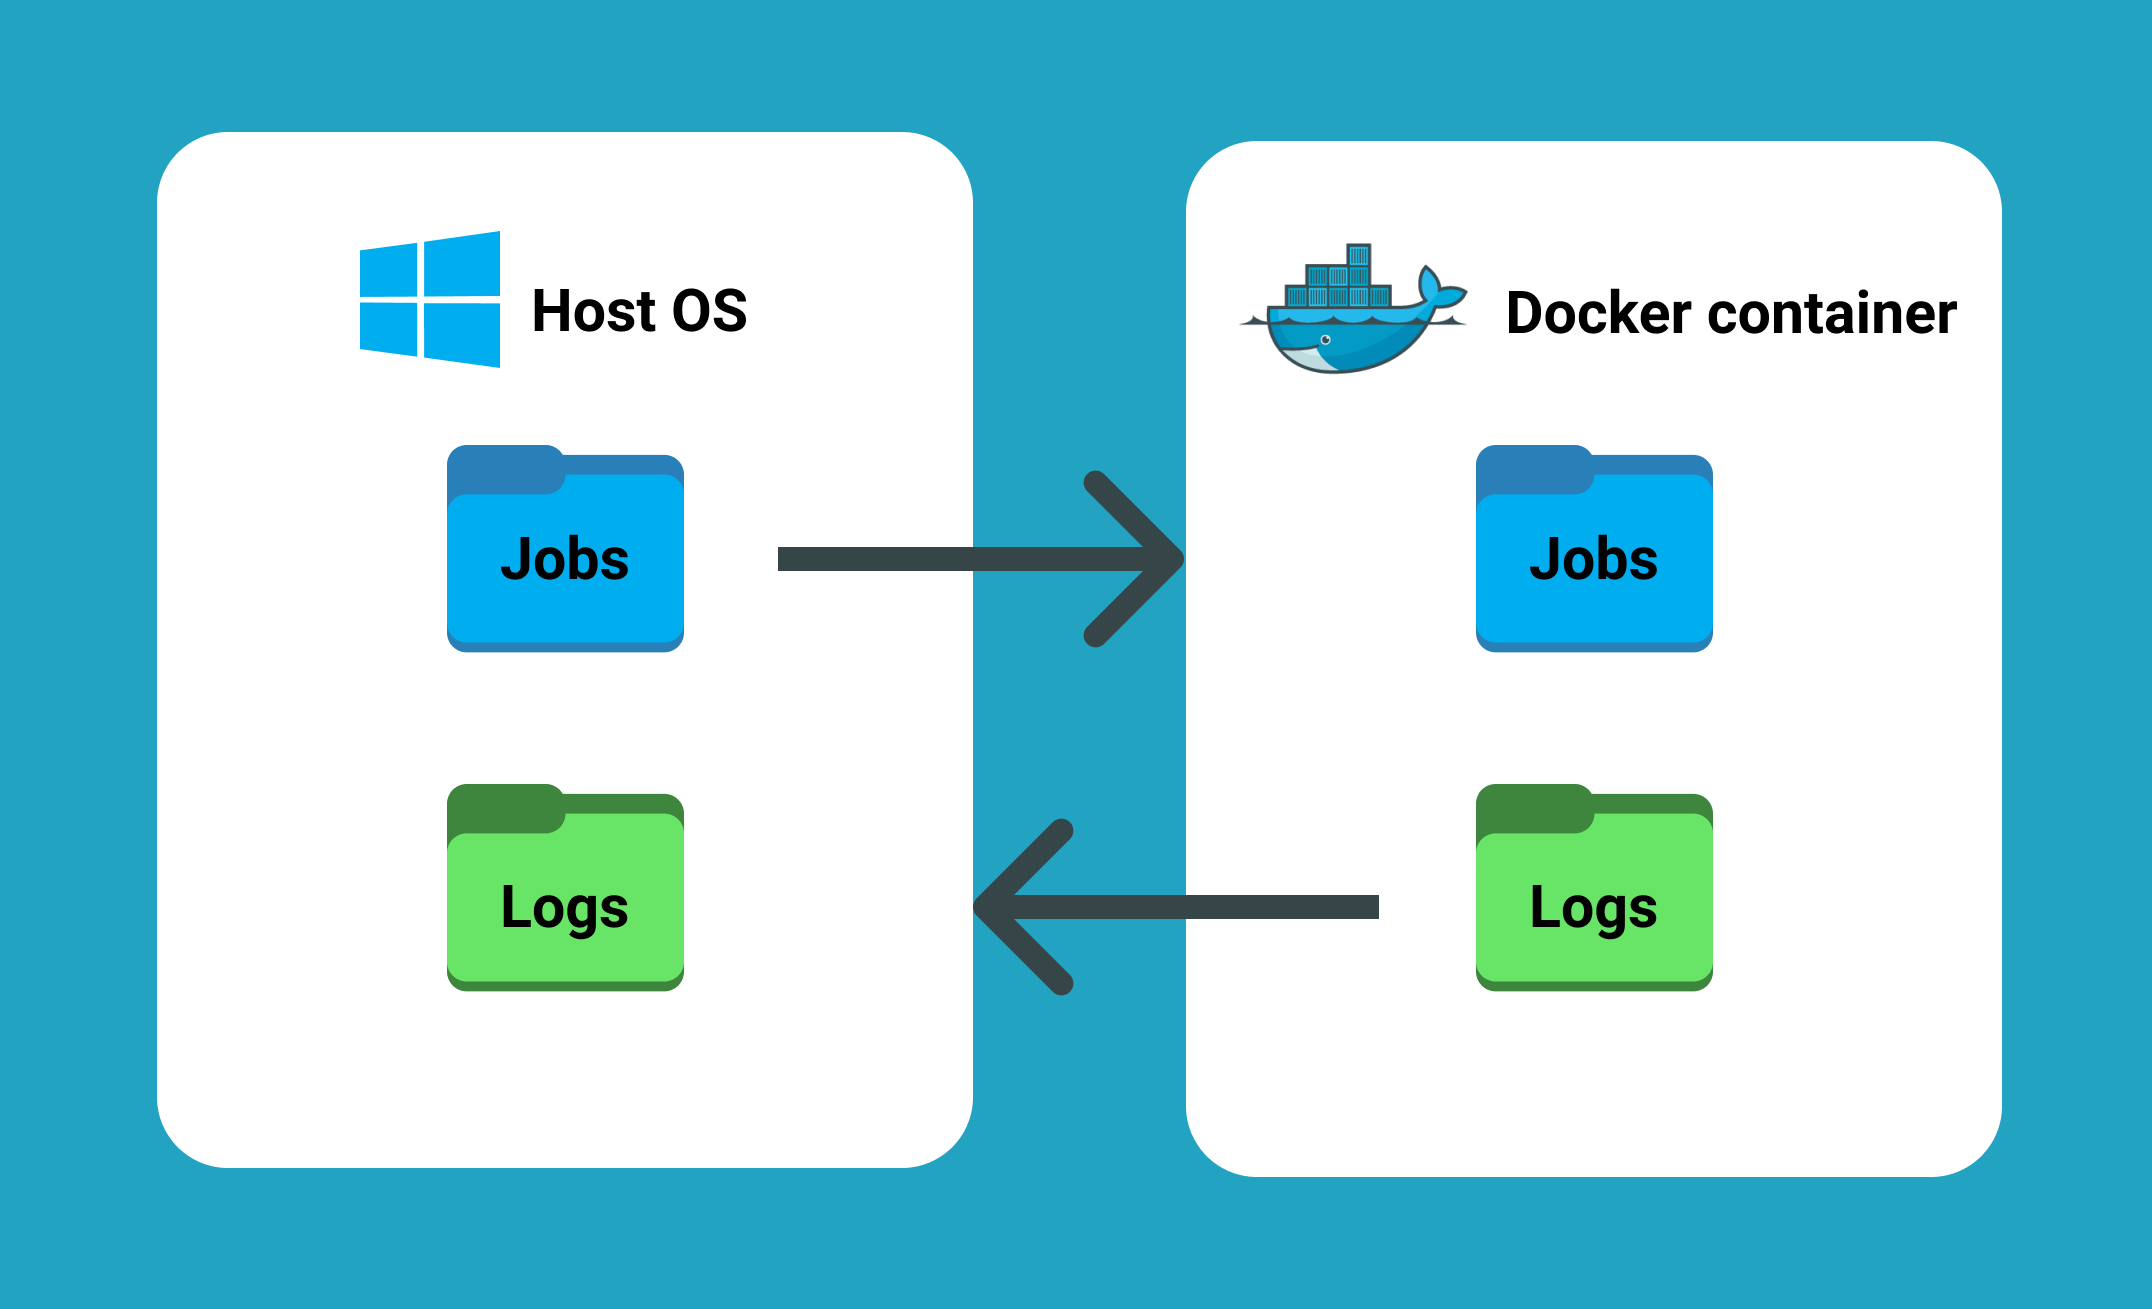
-v flag mounts c:\dbconvert-docker\studio\workSettings directory on the host machine into the folder C:\PROGRAM FILES\DBCONVERT\DBConvert Studio x64\workSettings inside the running container.
- This way we can feed DBConvert Studio with jobs located outside of the container.
- Another advantage of directory binding is that it works and vice versa. When a process completes, a log file is generated. It appears both inside the container directory and on the host computer.
Check out the GitHub repository with the Dockerfile from this article here!
Conclusion
- Typically, the core business logic of a legacy monolithic application is tightly coupled to its GUI.
- Legacy applications may not scale well enough to meet new customer needs, resulting in decreased performance and increased customer frustration.
- Developers often get stuck in old code when there are so many exciting new technologies available to innovate.
The good news is that moving from a legacy desktop application to a microservice architecture stops the monolithic nightmare. Dividing a monolithic application into subsystems that can be scaled, developed, and deployed individually is your entry point into the microservices realm. If there is a requirement to run multiple copies of a single application, Docker is a perfect choice for packaging Windows applications.
This is why we ourselves adopted this concept when migrating existing Windows-based DBConvert products to the cloud infrastructure.
Docker (software)
application
Cloud computing
Build (game engine)
Desktop (word processor)
In this tutorial, I will demonstrate how to host an ASP.NET Core 2.2 application on Windows Containers by using a Docker image. A Docker image will be packaged with an ASP.NET Core application that will be run when a container is spun up.
Before we get started with creating a Docker image. Let’s make sure we have prerequisites done.
Prerequisites
- Installing docker-cli and other components to get started
- Visual Studio code.
- Docker extension for visual studio code.
Once you have the prerequisites, we will use a publicly available ASP.NET Core base image from Microsoft. Microsoft maintains their Docker images on Docker hub. Docker hub is a container registry to manage your Docker images either by exposing the image publicly or maintaining it privately. Private image responsibilities cost money. Visit Docker Hub website to learn more about image repository management.
Step 1: Open the PowerShell console as an administrator
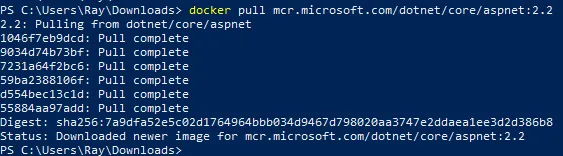
Step 2: Let’s get started by pulling ASP.NET Core 2.2 Docker image from Docker hub by executing the below command.
docker pull mcr.microsoft.com/dotnet/core/aspnet:2.2Your output should look similar to what is shown below:
Step 3: Create a folder with your preference name whatever you prefer. I will use c:\docker\ for demonstration purposes.
Step 4: Download ASP.NET Core application package from this URL.
Invoke-WebRequest -UseBasicParsing -OutFile c:\docker\WebAppCore2.2.zip https://github.com/rahilmaknojia/WebAppCore2.2/archive/master.zipWhat we are doing in the above command is downloading packaged code that is already built to save time on building a package.
Step 5: Extract WebAppCore2.2.zip by using the PowerShell 5.0 native command. If you do not have PowerShell 5.0 and above, you will have to manually extract the package.
Expand-Archive c:\docker\WebAppCore2.2.zip -DestinationPath c:\docker\ -Force Step 6: Now let’s create a Docker file in c:\docker folder.
New-Item -Path C:\docker\Dockerfile -ItemType FileStep 7: Go ahead and open C:\docker folder path in Visual Studio Code.
Step 8: Now we will open Dockerfile by double-clicking on the file in Visual Studio Code to start writing the required steps to build an image.
Copy and paste the code below into Dockerfile.
# Pull base image from Docker hub
FROM mcr.microsoft.com/dotnet/core/aspnet:2.2

# Create working directory
RUN mkdir C:\\app

# Set a working directory
WORKDIR c:\\app

# Copy package from your machine to the image. Also known as staging a package
COPY WebAppCore2.2-master/Package/* c:/app/

# Run the application
ENTRYPOINT ["dotnet", "WebAppCore2.2.dll"]
What we told the
Dockerfileis to pull an asp.net core base image from Docker hub. Then we ran a command to create a directory calledappinc:\apppath. We also told the container to setc:\appas a working directory. That way we can access binary directly when the container is spun up. We also added a step to copy all the binaries fromc:\docker\WebAppCore2.2-master\Package\to destination path in containerc:\app. Once we had the package staged in the container, we told it to run the application by executingdotnet WebAppCore2.2.dllso that the app would be accessible from outside the container. To learn more aboutDockerfilefor Windows, check out this Microsoft documentation.Now that you have the required steps to build an image, let’s go ahead with the below steps.
Step 9: Navigate to Dockerfile working directory from PowerShell console. If you are already in that path, you can ignore it.
Step 10: Execute the below command to build a container image.
docker build -t demo/webappcore:2.2.0The above command will create a Docker image under demo path. With the image name called as webappcore and version 2.2.0.
Your output should look like below once it is successful:
PS C:\docker> docker build -t demo/webappcore:2.2.0 .
Sending build context to Docker daemon  9.853MB
Step 1/5 : FROM mcr.microsoft.com/dotnet/core/aspnet:2.2
 ---> 36e5a01ef28f
Step 2/5 : RUN mkdir C:\\app
 ---> Using cache
 ---> 8f88e30dcdd0
Step 3/5 : WORKDIR c:\\app
 ---> Using cache
 ---> 829e48e68bda
Step 4/5 : COPY WebAppCore2.2-master/Package/* c:/app/
 ---> Using cache
 ---> 6bfd9ae4b731
Step 5/5 : ENTRYPOINT ["dotnet", "WebAppCore2.2.dll"]
 ---> Running in 4b5488d5ea5f
Removing intermediate container 4b5488d5ea5f
 ---> 9729270fe1ac
Successfully built 9729270fe1ac
Successfully tagged demo/webappcore:2.2.0
Step 11: Once the image has been built, you are now ready to run the container. Execute the below command.
docker run --name webappcore --rm -it -p 8000:80 demo/webappcore:2.2.0The above command will create a new container called webappcore with parameters.
--rmis used to automatically remove the container after it is shutdown.-itwill open a session into your container and output all the logs.-pis used for creating an external port and assigning it to the internal port of a container. Port 8000 is exposed to outside containers, and port 80 is used to access the app within the container.demo/webappcore:2.2.0is the path to the Docker image to run as a container.
Output of a running container
Step 12: Browsing your application from your local machine localhost:8000.
This is it! You ran your first Docker container in your local environment. Thank you for following the tutorial. Please comment below for any issue or feedback you would like to share.