
Summary:
It is time to create and optimize the golden image that we will use to deploy all our desktops. The primary purpose of this golden image is to run a basic test with the Login VSI benchmark tool, so I will optimize a Windows 10 VM to get the best performance (low latency) and user experience (low applications response times). Only some basic applications and MS office 2016 will be installed. Nevertheless, it could be used as an essential guide for any deployments with Horizon View.
Note for Login VSI testers: To date, I can guarantee that if you follow all the steps in this guide (part), you’ll have no issues when testing any worker with Login VSI 4.1.
Note: This is a massive post (the most extensive post of this series), I want to keep my step-by-step format as much as I can, even though many images are not necessary for an average (IT) user.
Note: This guide will also work with vSphere 6.7, some configurations aren’t needed.
This is part 11 out of 12 of the VDI LAB series. Check out the introduction first.
The ultimate VDI deployment guide (from scratch) with VMware vSphere 6.5 and Horizon View 7.3 – 2018. 😉
1. Prerequisites
- Windows Server 2016. Domain Controller server previously created in Part 5 of this series
- Download Windows 10 64-bits and MS office 2016 ISO file and upload it to an accessible datastore.
- Create/upload an ISO with all the programs you will install or, make sure you can obtain them after connecting the VM to the internet.
2. VM configuration
First off is to create and configure this new VM to be used as a template.
@vSphere Client
Note: This is the vSphere Client set in part 7 of this series, due to our desktop infrastructure will be deployed here. If you are interested in only the tune-up of the golden image and you are not following the whole VDI-LAB series, don’t mind this, any ESXi host will do.
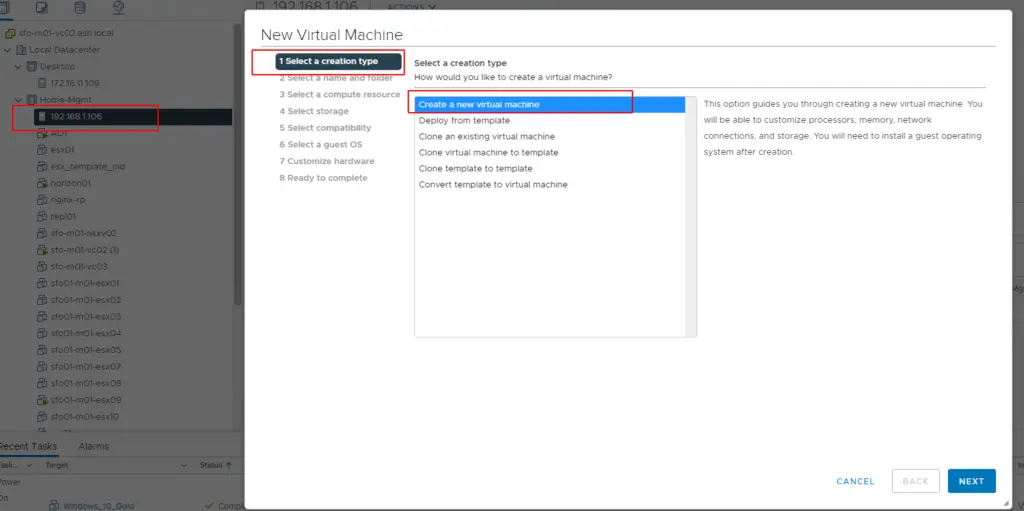
- Right-click on your host and select New Virtual Machine
- Select: Create a New virtual machine.
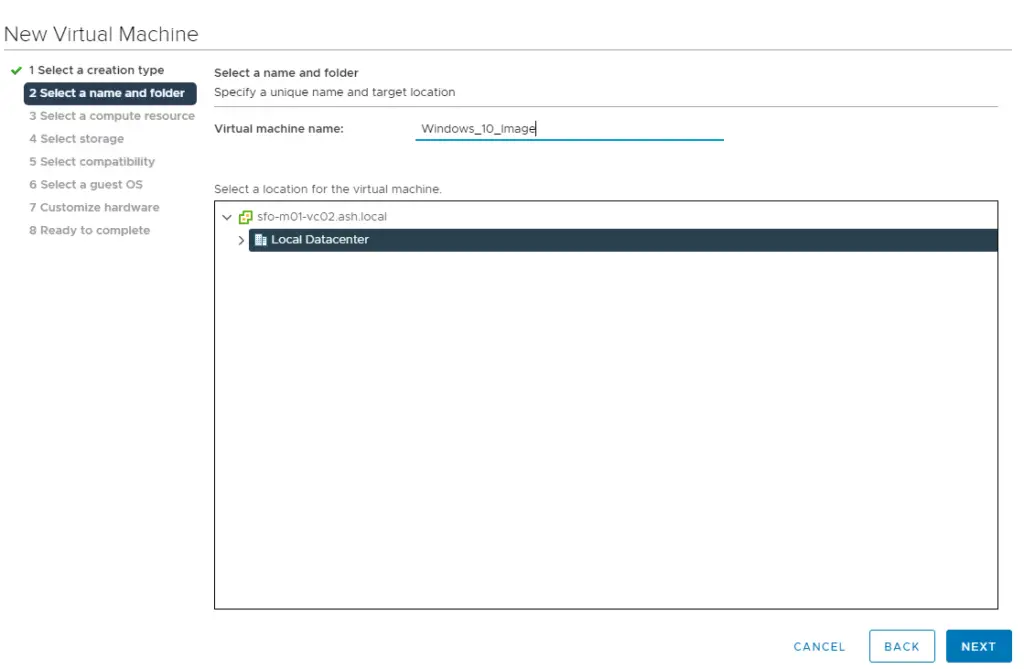
- Name your VM. A recommendation is to use an easy VM pattern.
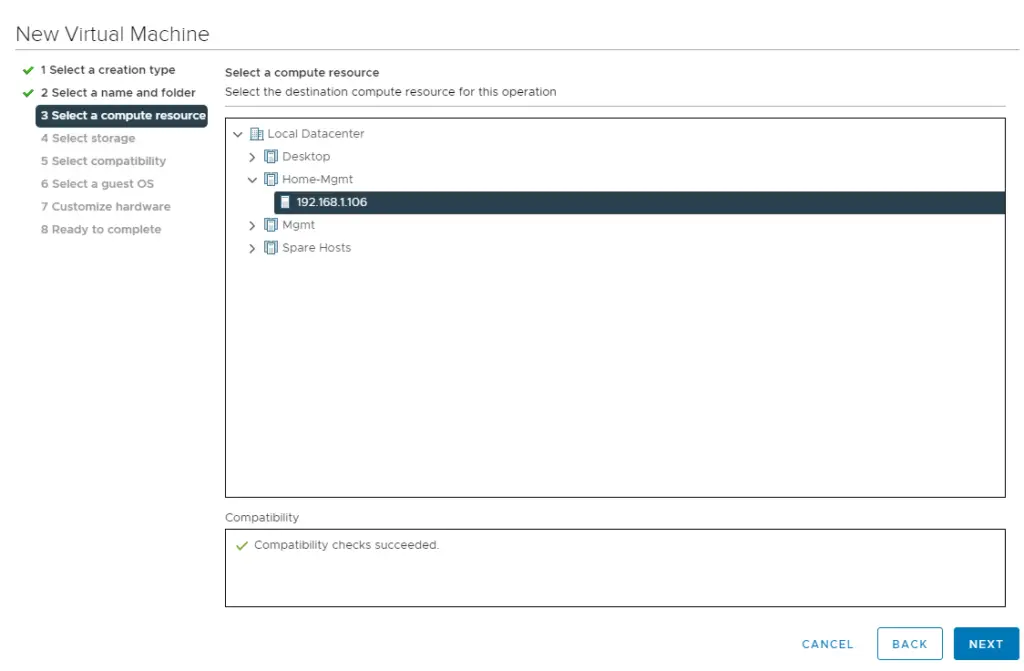
- Select your host (or cluster).
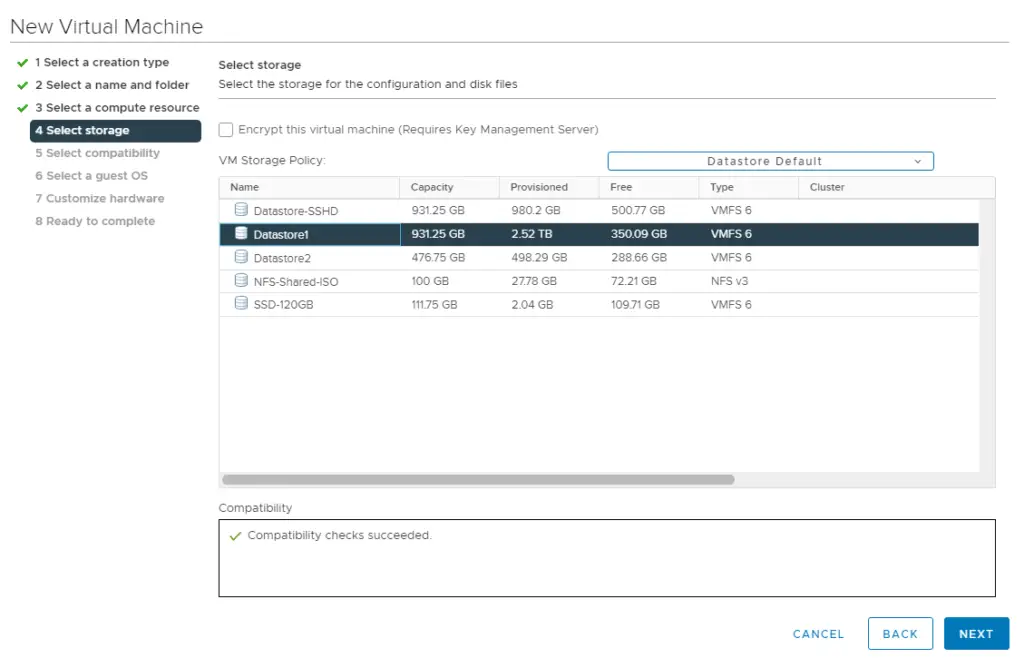
- Select your datastore.
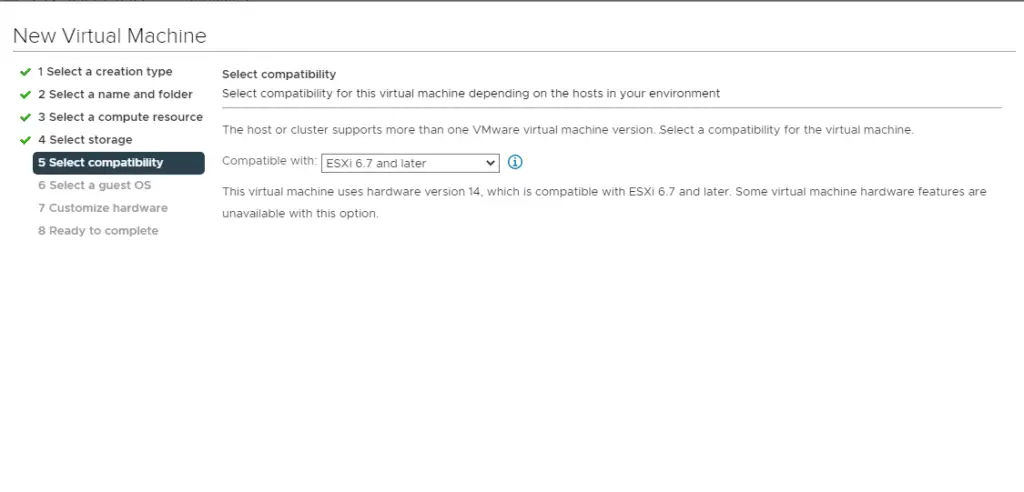
- Leave by default or select ESXi 6.5 and later.
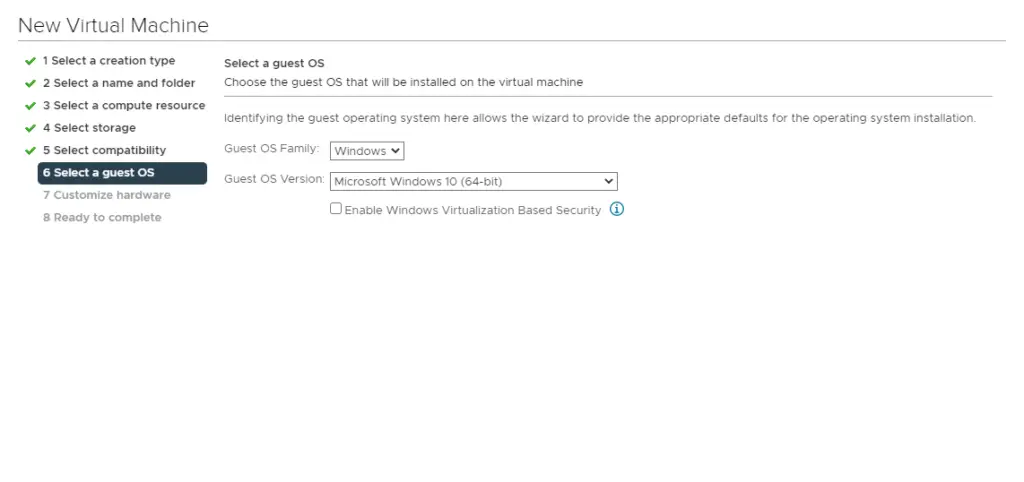
- Select Windows as OS family and Microsoft Windows 10 (64-bit) as the OS version.
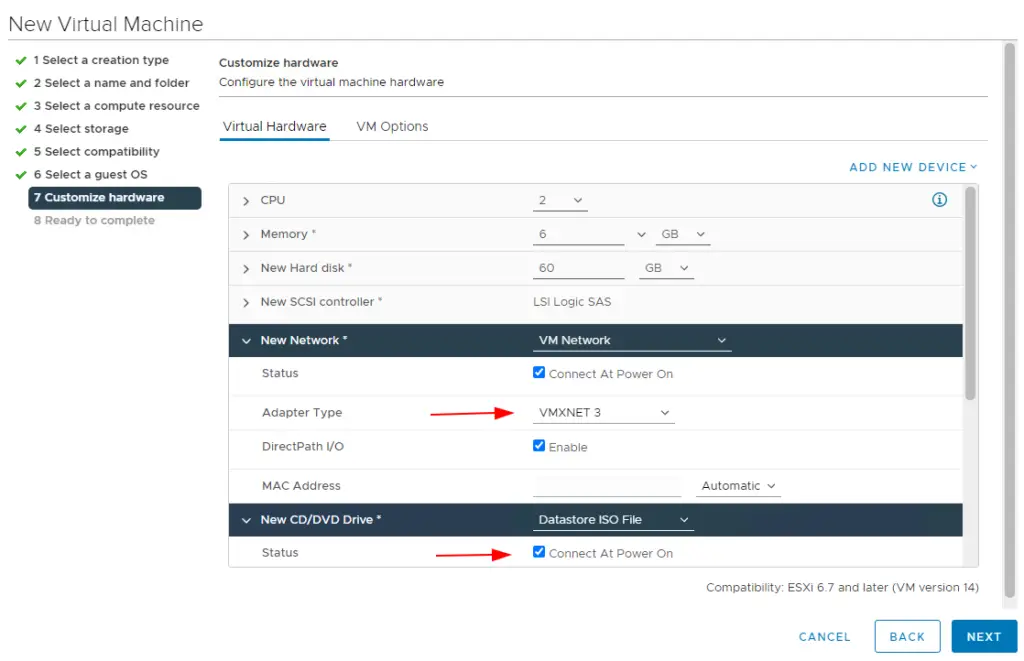
- From Virtual Hardware, change:
- CPU to 2
- Memory to 4096 MB
- Check Reserve all guest memory (All locked).
- Note: This is recommended to avoid performance issues in large environments, but this depends on the available resources and isn’t a must for a lab.
- New Hard disk to 50 GB
- Make sure you have the network available and is connected.
- Still on Virtual Hardware…
- Expand the network and change the Adapter Type to VMXNET 3
- Select Datastore ISO File under New CD/DVD Drive, then select your Windows 10 image and make sure that Connect At Power On is checked.
- Remove Floppy Drive
- Still on Virtual Hardware…
- Go to Video card, and change Number of displays to 4 and Total video memory to 64 MB.
- Note: Total video memory is usually configured up to 128 MB, but for my scenario, I do think is not necessary. Also, Number of displays can be set to only 2.
- Do not check Enable 3D Support unless you have Graphics Card support on your ESXi hosts.
- Move to VM Options tab
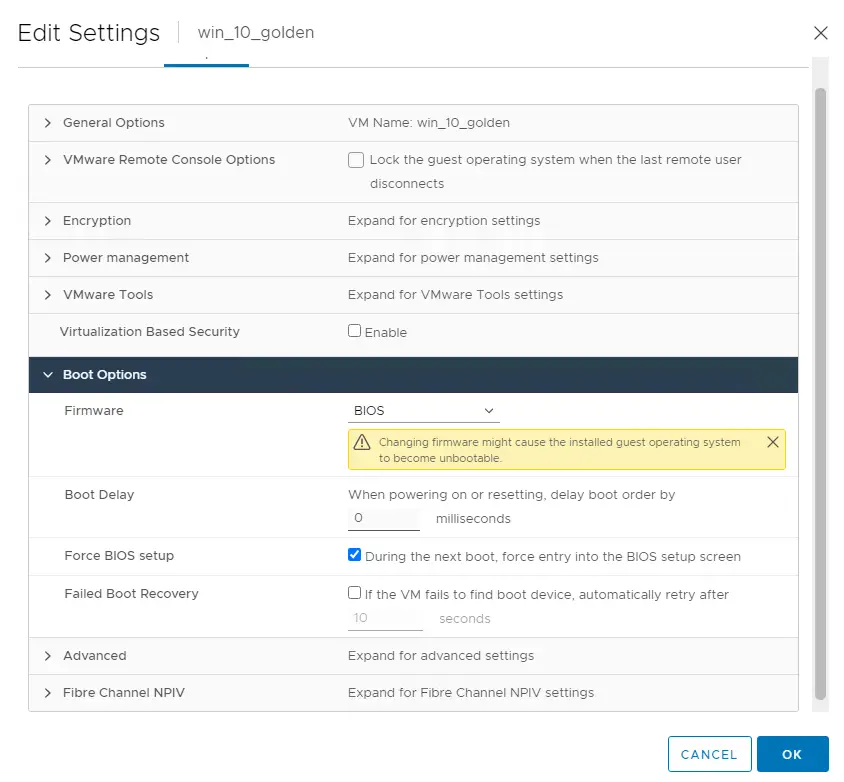
- From Boot Option, check Force BIOS setup — The next time the virtual machine boots…
- Still on VM Options…
- Go to Advance, and from Settings uncheck Enable logging
- Then go to Edit Configuration…
Note: Steps 13 to 16 are not needed on vSphere 6.7.
- On the new window, Configuration Parameters, add a new parameter:
- Name: devices.hotplug
- Value: false
- Click Add, OK and then Next.
- Finally, review your configuration and click Finish.
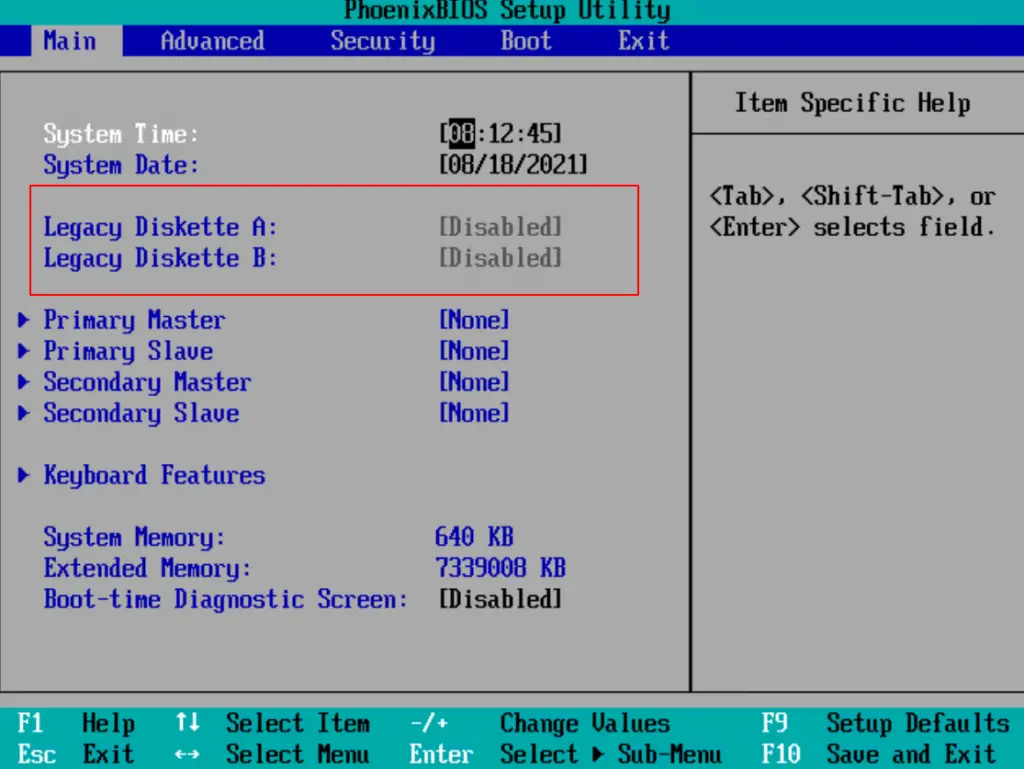
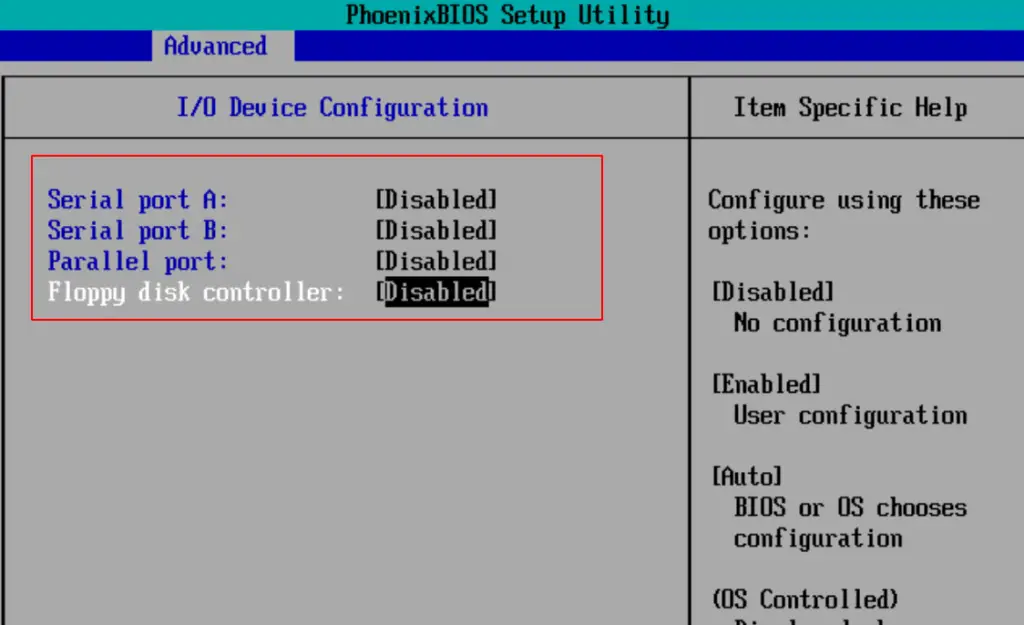
- Now power on the VM and open the VM remote console. Wait to get to the BIOS and from the Advanced tab, go to I/O Device Configuration and disable the Floppy drive, also the Serial, Parallel, and Floppy Controllers.
- Now to Exit tab and click Exit Saving Changes (or hit F10 ) to save the settings and reboot.
3. OS installation
After the VM is rebooted, you will reach the first screen of the Windows installer.
- Press Shift-F10 to open a command prompt to create a partition for reserved space compatible with VDI.
- Type and hit Enter in the following order:
- diskpart
- Select Disk 0
- Create Partition Primary
- Exit
- Exit
- You will be returned to the previous screen of windows installer, leave everything by default, we can change this later.
- Click on Install now.
- Select Windows 10 pro, or the available version according to your region/image and click Next.
- Check to accept license terms and Next.
- Select Custom: Install Windows only.
- Select the available partition and Next.
- Wait few minutes for the Windows installation files.
- Wait for windows to start.
- Select your region and click Yes.
- Select a keyboard layout and click Yes.
- Skip adding a second keyboard layout.
- Skip Connect to a network.
- This is an important step, let’s create a “user” to use for the initial configuration, later this user will be deleted. I created an user named “user” (Original…)
- Create and confirm a password and add a hint.
- Turn off all “privacy setting for your device.”
- Wait to windows gets ready.
- Finally, we will get to the Windows 10 desktop.
4. OS customization
It is time to do all necessary tweaks and tunings to boost the performance of this precious golden image.
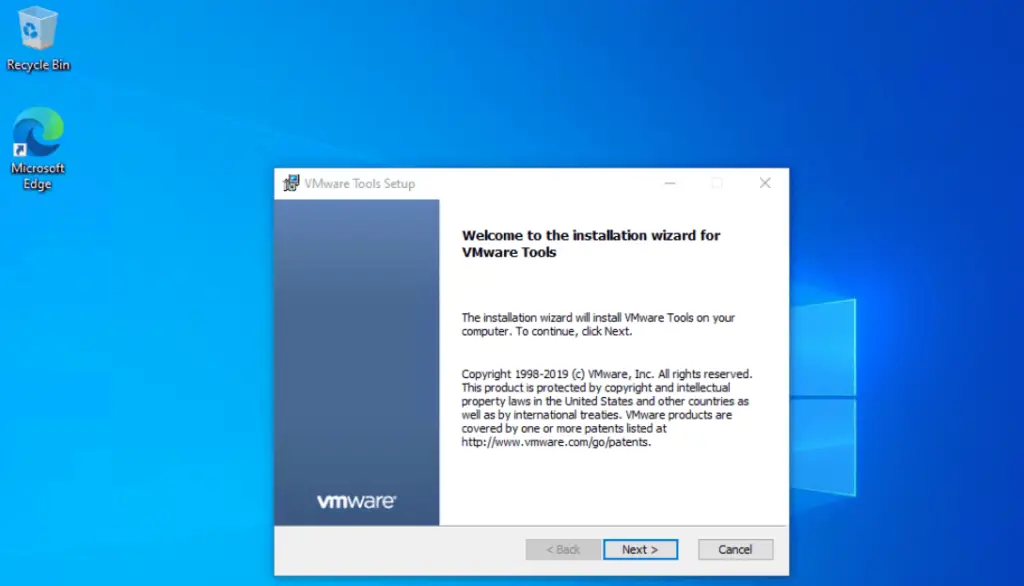
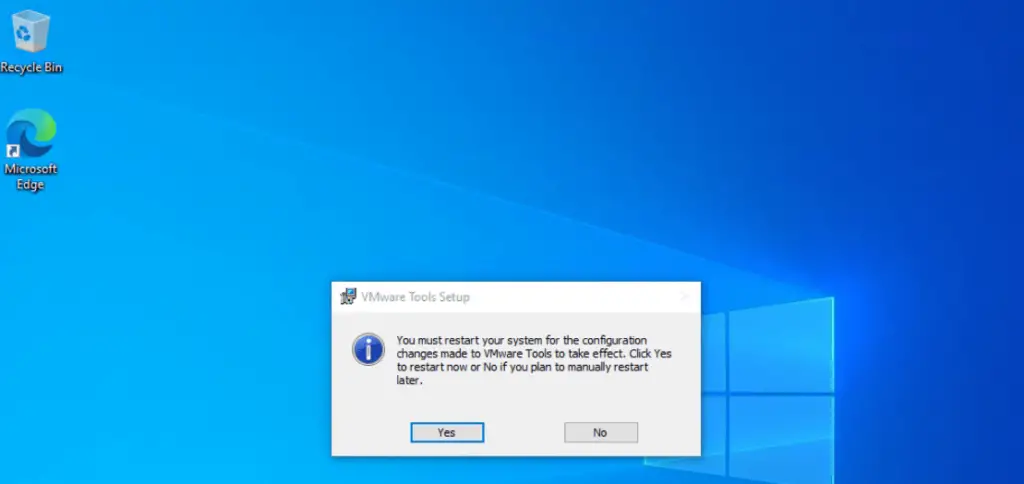
4.1 Install VMware tools.
- Mount the ISO from VMware Web Client.
- Double-click Drive DVD (D:) VMware Tools
- Follow the installation wizard, select Typical setup, click install and finish, then reboot the OS.
4.2 Enable the Administrator account
- Log in to the desktop using the created “user” and password.
- Enable a local administrator account. Right-click on the start button and go to Computer Management.
- Go to: Local User and Groups / User, Right-click on Administrator / Properties.
- Uncheck Account is disabled. Make sure Password never expires is checked. Click OK. (No password need to be set)
- Sign out the desktop and sign on using the administrator account.
4.3 Delete the “user” profile and account
- Go to: Control Panel — System and Security — System
- Then go to Advanced system settings / Advanced, from User Profiles, select Settings… Select “user” profile — Delete — OK
- Right Click on Start / Computer Management / Local Users and Groups / Users
- Right Click on “user” and choose Delete
- Click OK to the warning messages.
4.4 Change computer name
- Go to Control Panel / System and Security / System
- Then go to Remote settings / Computer Name / Change / Input new computer name (keep it simple) / OK.
- Restart the computer. We will add the machine to the domain later.
- Also, change/adjust date and right (proper) time zone.
4.5 Install .NET Framework 3.5
- Go to: Control Panel – Programs – Programs and Features – Turn Windows Features on or off
- Check .NET Framework 3.5 and click OK
- Download and install the files
4.6 Run Windows update, install all the latest patches
- Click on the Start button – Settings – Update & Security – Check for Updates.
- Install all available Windows updates.
- Reboot the VM and repeat this process until all Windows updates have been installed.
4.7 Run cleanup manager:
- Click Start, and then click Run.
- Type cleanmgr to open Disk Cleanup for (C:)
- Check all items you want to delete
- Click OK
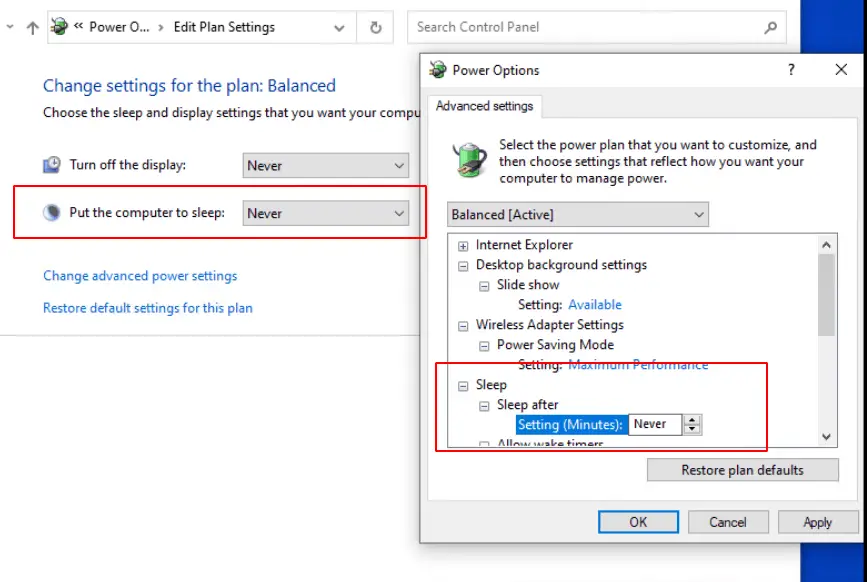
4.8 Set Power Options to high
- GO to: Control Panel – Hardware and Sound – Power Options.
- Click Show Additional Power Plans, Choose High Performance, and Click Create a Power Plan.
- Choose “High Performance,” for a plan name type “VDI” or whatever name you want. Click Next.
- Select Never to: Turn off the display and Put the computer to sleep. Click Create.
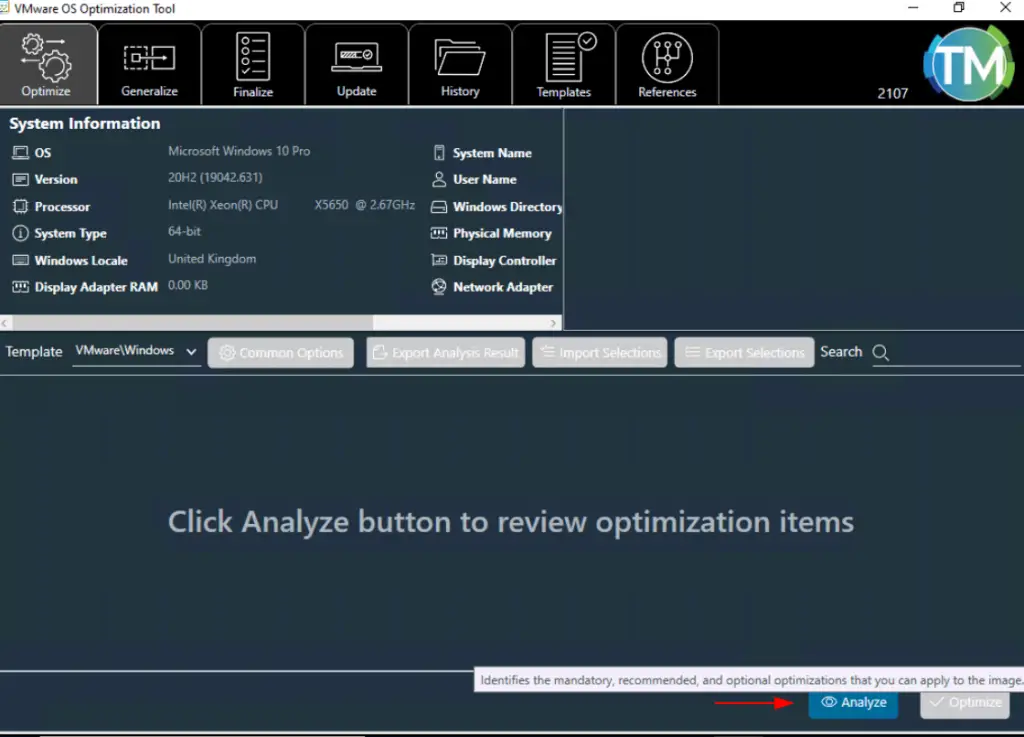
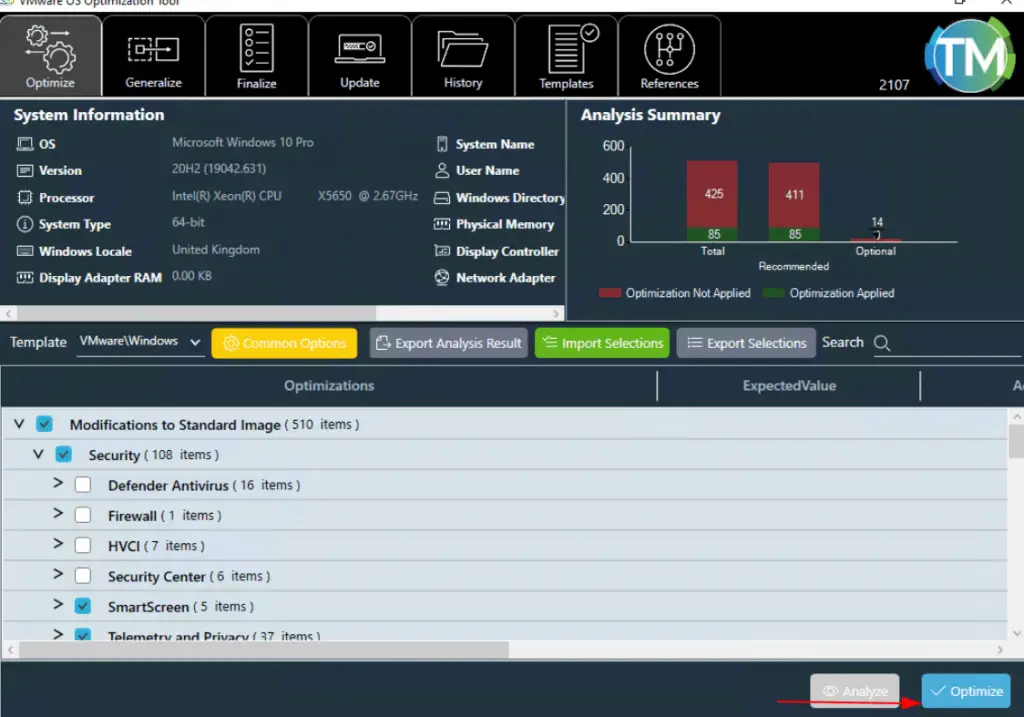
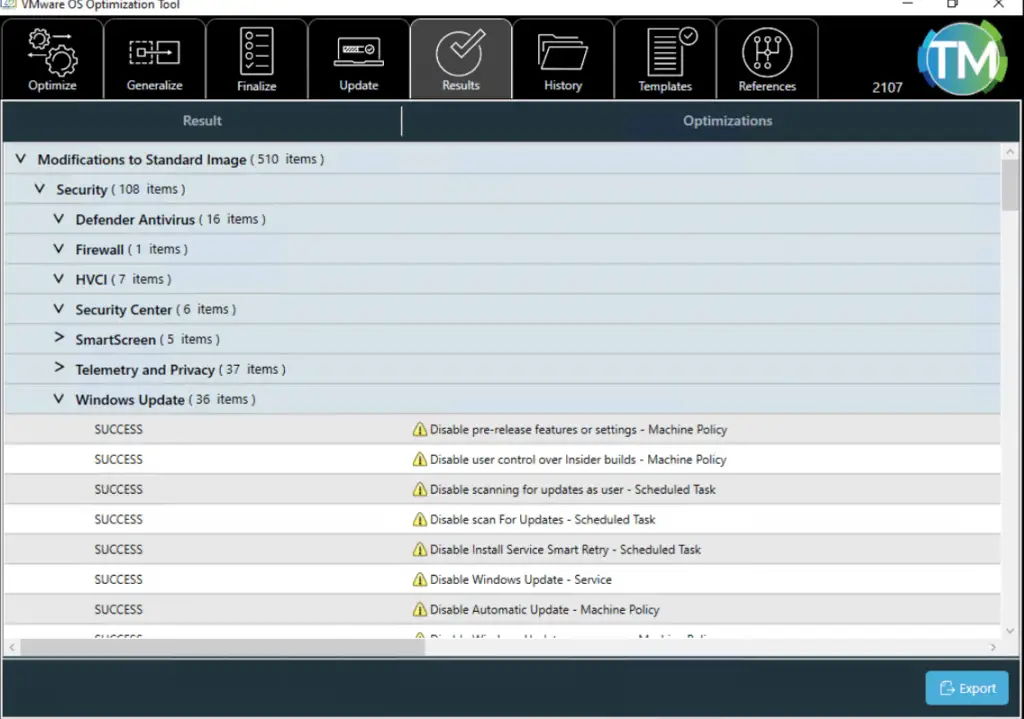
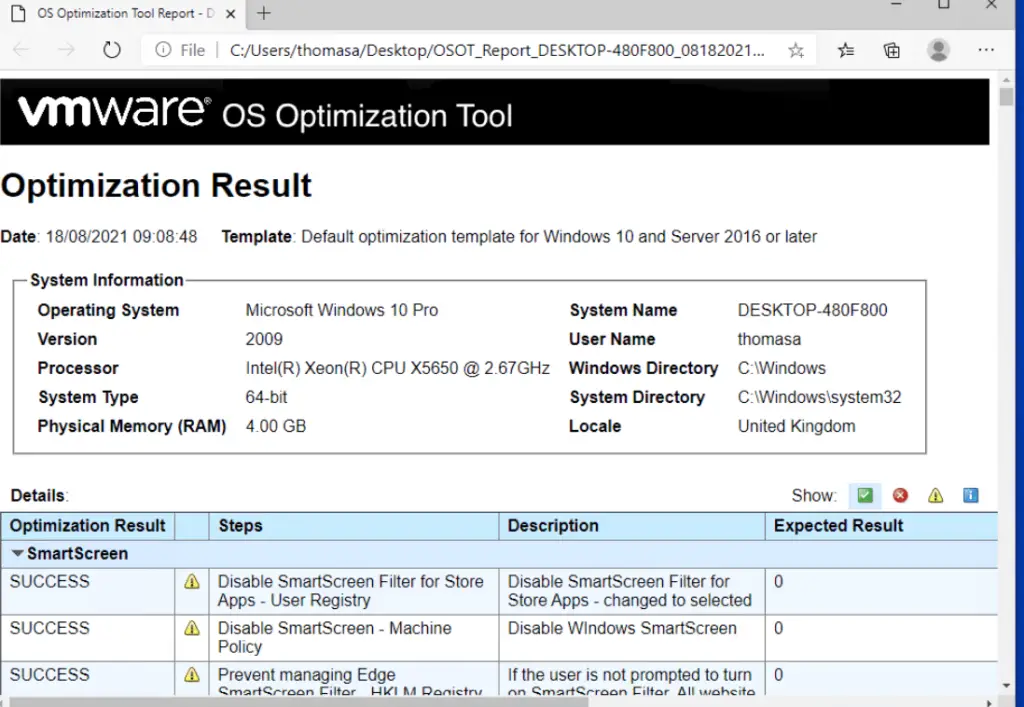
4.9 Install and run VMware OS Optimization tool.
- Install and run the VMware OS Optimization tool. As mentioned before, I am optimizing for Login VSI test with Windows 10, so I am using a template provided by them.
- Download VMware OS optimization tool: https://labs.vmware.com/flings/vmware-os-optimization-tool
- Get the template by Login VSI. This is optional. There are pre-configured templates provided by VMware that could be used.
- Run VMware OSOT and open the My Templates tab
- Click Import Template at the right bottom of the window
- Browse to the VDILIKEAPRO / Login VSI tuning template xml file
- Open the Analyze tab and select the My Templates\Windows 10 — Login VSI — VDILIKEAPRO template
- Click analyze to compare your system to the tuning template
- Apply tuning where needed
4.10 Improve login time for floating desktops on Horizon View
- Click on the Start button – type Run.
- Type regedit
- Delete a registry key named StubPath from these directories:
HKLM\SOFTWARE\Microsoft\Active Setup\Installed Components\{2C7339CF-2B09-4501-B3F3-F3508C9228ED}
HKLM\SOFTWARE\Microsoft\Active Setup\Installed Components\{2D46B6DC-2207-486B-B523-A557E6D54B47}
HKLM\SOFTWARE\Microsoft\Active Setup\Installed Components\{44BBA840-CC51-11CF-AAFA-00AA00B6015C}
HKLM\SOFTWARE\Microsoft\Active Setup\Installed Components\{6BF52A52-394A-11d3-B153-00C04F79FAA6}
HKLM\SOFTWARE\Microsoft\Active Setup\Installed Components\{89820200-ECBD-11cf-8B85-00AA005B4340}
HKLM\SOFTWARE\Microsoft\Active Setup\Installed Components\{89820200-ECBD-11cf-8B85-00AA005B4383}
HKLM\SOFTWARE\Microsoft\Active Setup\Installed Components\{89B4C1CD-B018-4511-B0A1-5476DBF70820}
HKLM\SOFTWARE\Microsoft\Active Setup\Installed Components\{22d6f312-b0f6-11d0-94ab-0080c74c7e95}
- In my case, just 4 out of these 8 keys are present, just delete the ones you have
4.11 Join the machine to the domain.
- Follow the same steps as number 7 but now join the machine a domain and restart the VM
Note: This could be done in the corresponding previous step, I consider is better to wait to avoid some permissions issues (Depends on your domain configuration).
4.12 Configure PageFile.
- This varies depending on your configuration and purpose. Visit these links for more information:
- http://myvirtualcloud.net/vdi-windows-pagefile-done-right/
- https://www.simonlong.co.uk/blog/2012/01/25/vdi-paging-files-big-small-or-non-at-all/
- Go to: Control Panel / System and Security / System
- Then go to Advanced system settings / Advanced, and from Performance, select Settings…
- Go to Advanced Tab / Change… Uncheck the first option and check «Custom size«
- Initial size (MB): 2048
- Maximum size (MB): 4096
- Click Set and then OK until all windows are closed.
- Restart the VM
5. Install MS office 2016 and essential apps
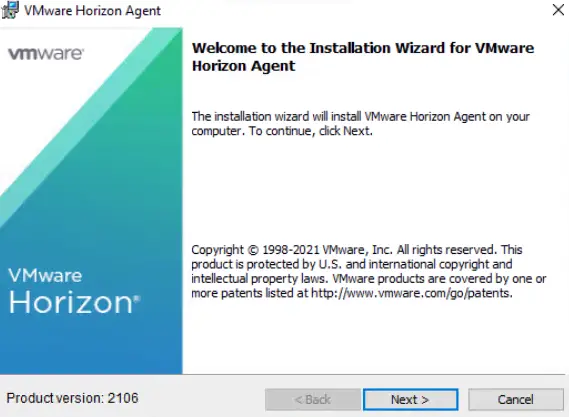
5.1 Install Horizon View 7 agent.
- Mount ISO files or download latest version of Horizon View. The version I am using for this series is 7.3.2.
- From the installation wizard, I am leaving as default everything.
- Reboot the VM after installation.
5.2 Install MS office 2016
- Mount MS office 2016 ISO.
- Download office deployment tool for MS office 2016 from this link: https://www.microsoft.com/en-us/download/details.aspx?id=49117
- Open the installer and accept the Microsoft license to continue. Install the files on your desktop.
- Three files will be created: Configuration, EULA, and setup.
- Change the name of the folder to a shorter/easy one, like only “office” and copy this folder to the desktop.
- Right click on Configuration / Open with / Notepad
Note: Depends on what you want to install this must be changed, I will keep a basic configuration without all necessary MS office application that I won’t need for testing.
- For this test, I want to install Office 32-bits with Word, Excel, Powerpoint, and Outlook. Make sure the right source path is selected.
- Replace/Edit the configuration file as following and save it:
<Configuration>
<Add SourcePath=»D:\» OfficeClientEdition=»32″ >
<Product ID=»ProPlusRetail»>
<Language ID=»en-us» />
<ExcludeApp ID=»OneDrive» />
<ExcludeApp ID=»OneNote» />
<ExcludeApp ID=»Groove» />
<ExcludeApp ID=»Lync» />
<ExcludeApp ID=»Access» />
<ExcludeApp ID=»Publisher» />
</Product>
</Add>
<Display Level=»None» AcceptEULA=»TRUE» />
<Property Name=»AUTOACTIVATE» Value=»1″ />
<Updates Enabled=»TRUE» Channel=»Monthly» />
</Configuration>
- Open command prompt as administrator.
- Run:
- cd desktop/office
- setup /configure configuration.xml
- MS Office will start the installation.
- Wait until the installation is completed.
- Click Close to finish the installation.
5.3 Tune up the MS office 2016 installation
Important: To avoid “First-thing-first” and other unwanted messages after cloning this image, copy the following Reg paths in notepad, save it as .bat and the run it.
- Notice that this is configured for Office 2016 32-bits.
- For office 2013 or 365. Use the number 15 instead of 16.
- For office 64-bits versions, delete the “Wow6432Node” path.
reg add «HKLM\SOFTWARE\Wow6432Node\Microsoft\Office\16.0\Registration» /v AcceptAllEulas /t REG_DWORD /d 1 /f >nul
reg add «HKLM\SOFTWARE\Wow6432Node\Microsoft\Office\16.0\User Settings\MyCustomUserSettings» /v Count /t REG_DWORD /d 1 /f >nul
reg add «HKLM\SOFTWARE\Wow6432Node\Microsoft\Office\16.0\User Settings\MyCustomUserSettings\Create\Software\Microsoft\Office\16.0\FirstRun» /v BootedRTM /t REG_DWORD /d 1 /f >nul
reg add «HKLM\SOFTWARE\Wow6432Node\Microsoft\Office\16.0\User Settings\MyCustomUserSettings\Create\Software\Microsoft\Office\16.0\FirstRun» /v disablemovie /t REG_DWORD /d 1 /f >nul
reg add «HKLM\SOFTWARE\Wow6432Node\Microsoft\Office\16.0\User Settings\MyCustomUserSettings\Create\Software\Microsoft\Office\16.0\Registration» /v AcceptAllEulas /t REG_DWORD /d 1 /f >nul
reg add «HKLM\SOFTWARE\Wow6432Node\Microsoft\Office\16.0\User Settings\MyCustomUserSettings\Create\Software\Microsoft\Office\16.0\Common\General» /v shownfirstrunoptin /t REG_DWORD /d 1 /f >nul
reg add «HKLM\SOFTWARE\Wow6432Node\Microsoft\Office\16.0\User Settings\MyCustomUserSettings\Create\Software\Microsoft\Office\16.0\Common\General» /v ShownFileFmtPrompt /t REG_DWORD /d 1 /f >nul
reg add «HKLM\SOFTWARE\Wow6432Node\Microsoft\Office\16.0\User Settings\MyCustomUserSettings\Create\Software\Microsoft\Office\16.0\Common\PTWatson» /v PTWOptIn /t REG_DWORD /d 1 /f >nul
reg add «HKLM\SOFTWARE\Wow6432Node\Microsoft\Office\16.0\User Settings\MyCustomUserSettings\Create\Software\Microsoft\Office\16.0\Common» /v qmenable /t REG_DWORD /d 1 /f >nul
- Test office and check that no welcome message is present at start it.
- After setting above paths, there is no reason to set group policies for this, but for domain joined machines, is better to use it as well, so we can avoid any issue after cloning.
- Download, Install and configure Office 2016 Administrative Template files.
- Open the installer and accept Microsoft license to continue. Install the files on your desktop.
- Go to: C: / Windows / PolicyDefinition
- Two folders and one Excel file will be created: the “admx” folder is the one we need.
- Copy all the files (not folders) from this folder to the PolicyDefinition folder
- Also, copy all the files (not folders) from en-us (or current system language) folder and copy them to the PolicyDefinition\en-US folder
- Click Start, and then click Run, type gpedit.msc, and then click OK.
- @Local Group Policy Editor: User Configuration / Administrative Templates / Microsoft Office 2106 / First Run and enable “Disable First Run Movie”
Note: Go back to step 4 of this section and do the same configuration in your domain controller!
5.4 Install additional programs
For Login VSI test purpose, I will install their required apps. You could use these, add or ignore as needed:
- Doro PDF
- Adobe Reader XI
- Adobe Flash
- Java
5.5 Set Adobe PDF as a default app
Note: Windows 10, uses MS Edge as default PDF viewer, we need to force to use Adobe Reader XI. I tried Adobe Reader DC, but it will create some extra initial messages that are difficult to handle when testing with Login VSI, so I decided to move back to Adobe Reader XI
- First off, set the current files as a default from windows setting.
- Go to: Windows Settings / Apps / Default apps / Set defaults by app.
- Go to: Windows Settings / Apps / Default apps / Set defaults by app.
- Click Adobe Reader XI and then click Manage.
- Find and click on the .pdf association file and select Adobe Reader.
- Choose: Switch anyway
- Change all the desired file association. It would look like the image below.
- Now, open the command prompt as administrator. Make sure your system is updated, or you might have issues with these commands.
- Run:
- Dism.exe /online /export-defaultappassociations:C:\CustomFileAssoc.xml
- Dism.exe /online /import-defaultappassociations:C:\CustomFileAssoc.xml
- Go to: C: / Windows / System32 and search for OEMDefaultAssociations
- Right-click and select to open with Notepad
- From a fresh windows installation, it will look something like this:
<?xml version=»1.0″ encoding=»UTF-8″?>
<DefaultAssociations>
<Association Identifier=».acrobatsecuritysettings» ProgId=»Applications\AcroRd32.exe» ApplicationName=»Adobe Reader» />
<Association Identifier=».epub» ProgId=»AppXvepbp3z66accmsd0x877zbbxjctkpr6t» ApplicationName=»Microsoft Edge» />
<Association Identifier=».htm» ProgId=»htmlfile» ApplicationName=»Internet Explorer» />
<Association Identifier=».html» ProgId=»htmlfile» ApplicationName=»Internet Explorer» />
<Association Identifier=».pdf» ProgId=»AcroExch.Document.11″ ApplicationName=»Adobe Reader» />
<Association Identifier=».pdfxml» ProgId=»Applications\AcroRd32.exe» ApplicationName=»Adobe Reader» />
<Association Identifier=».tif» ProgId=»PhotoViewer.FileAssoc.Tiff» ApplicationName=»Windows Photo Viewer» />
<Association Identifier=».tiff» ProgId=»PhotoViewer.FileAssoc.Tiff» ApplicationName=»Windows Photo Viewer» />
<Association Identifier=».txt» ProgId=»txtfile» ApplicationName=»Notepad» />
<Association Identifier=».url» ProgId=»IE.AssocFile.URL» ApplicationName=»Internet Browser» />
<Association Identifier=».website» ProgId=»IE.AssocFile.WEBSITE» ApplicationName=»Internet Explorer» />
<Association Identifier=»bingmaps» ProgId=»AppXp9gkwccvk6fa6yyfq3tmsk8ws2nprk1p» ApplicationName=»Maps» />
<Association Identifier=»http» ProgId=»IE.HTTP» ApplicationName=»Internet Explorer» />
<Association Identifier=»https» ProgId=»IE.HTTPS» ApplicationName=»Internet Explorer» />
<Association Identifier=»mailto» ProgId=»Outlook.URL.mailto.15″ ApplicationName=»Outlook 2016″ />
</DefaultAssociations>
- Reboot the VM and make sure that there is not “An app default was reset” message like the image below:
- If you follow previous steps in the proper order, you still may have the PDF issue.
- Now, to ignore Windows Security Service notification, go to Windows Settings / System / Notifications & actions
- Turn off all notification.
6. Final tweaks
6.1 Run VDI clean-up script
- Run a VDI clean-up script after all updates and configurations.
Note: Credits to https://www.plonius.com/single-post/2017/07/20/VDI-cleanup-script—the-decisive-factor
- Copy this into a Notepad and save it as .bat and run it. This will take about 10 minutes.
REM *********************
REM Force .net Runtime Optimization Service
REM *********************
%windir%\microsoft.net\framework64\v4.0.30319\ngen.exe update /force
REM *********************
REM Delete update tasks Google
REM *********************
SchTasks /Delete /TN «GoogleUpdateTaskMachineCore» /F
SchTasks /Delete /TN «GoogleUpdateTaskMachineUA» /F
REM *********************
REM Stop and disable Windows update service
sc stop wuauserv
sc config wuauserv start= disabled
REM *********************
REM Stop and disable Google update service
REM *********************
sc stop gupdate
sc config gupdate start= disabled
sc stop gupdatem
sc config gupdatem start= disabled
REM *********************
REM Stop and disable Windows Telemetry service
REM *********************
sc stop DiagTrack
sc config DiagTrack start= disabled
sc stop dmwappushservice
sc config dmwappushservice start= disabled
REM *********************
REM Delete any existing shadow copies
REM *********************
vssadmin delete shadows /All /Quiet
REM *********************
REM delete files in c:\Windows\SoftwareDistribution\Download\
REM *********************
del c:\Windows\SoftwareDistribution\Download\*.* /f /s /q
REM *********************
REM delete hidden install files
REM *********************
del %windir%\$NT* /f /s /q /a:h
REM *********************
REM delete prefetch files
REM *********************
del c:\Windows\Prefetch\*.* /f /s /q
REM *********************
REM Run Disk Cleanup to remove temp files, empty recycle bin
REM and remove other unneeded files
REM Note: Makes sure to run c:\windows\system32\cleanmgr /sageset:1 command
REM on your initially created parent image and check all the boxes
REM of items you want to delete
REM *********************
c:\windows\system32\cleanmgr /sagerun:1
REM ********************
REM Defragment the VM disk
REM ********************
sc config defragsvc start= auto
net start defragsvc
defrag c: /U /V
net stop defragsvc
sc config defragsvc start = disabled
REM *********************
REM Clear all event logs
REM *********************
wevtutil el 1>cleaneventlog.txt
for /f %%x in (cleaneventlog.txt) do wevtutil cl %%x
del cleaneventlog.txt
REM *********************
REM release IP address
REM *********************
ipconfig /release
REM *********************
REM Flush DNS
REM *********************
ipconfig /flushdns
REM *********************
REM Shutdown VM
REM *********************
shutdown /s /f /t 0
- The VM will shut down after this (as you can see in the last lines)
- Run this .bat every time the Windows is updated.
6.2 Remove «vmware-viewcomposer-ga» entry
- For Windows 10 Build 1709, creating a desktop pool will get stuck in customizing state. At the moment of writing this post, this hasn’t been solved by Horizon/Window. To solve this, follow the steps below.
- Removed the entry “vmware-viewcomposer-ga” from the value: DependOnService:
- HKEY_LOCAL_MACHINE\SYSTEM\CurrentControlSet\Services\BFE
- Deleted Subkey Security:
- HKEY_LOCAL_MACHINE\SYSTEM\CurrentControlSet\Services\BFE\Security
- After deleting it, should look like the image below.
6.3 Take the snapshot
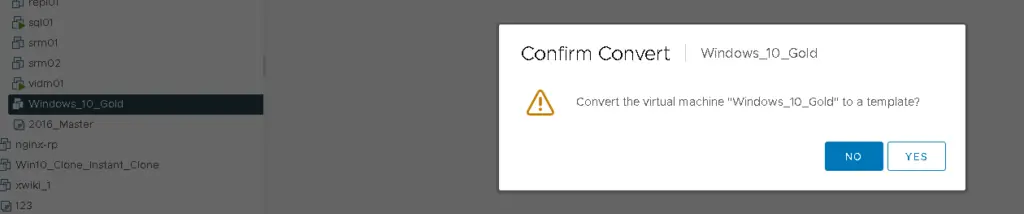
Note: I want to create linked-clone VMs, if full clones are desired, convert this machine to a template instead of taking the snapshot.
- Make sure the machine is on the domain with a dynamic IP address.
- Make sure you don’t have any ISO file attached to the VM. Change CD/DVD to Client Device or disconnect/remove the device.
- Powered off the VM.
- Finally, take your precious snapshot!
Happy testing… 🙂
Juan Mulford
Hey there! I’ve been in the IT game for over fifteen years now. After hanging out in Taiwan for a decade, I am now in the US. Through this blog, I’m sharing my journey as I play with and roll out cutting-edge tech in the always-changing world of IT.
microsoft-windows:windows-10:enterprise-deployment-windows-10-with-sccm-2012-r2:sccm-create-gold-os-image
Создание “золотого” образа для развёртывания ОС Windows 10 в SCCM 2012 R2
Для создания «золотого» образа нам потребуется «чистая» система без установленных приложений.
Выполним следующие действия:
-
Включим и установим пустой пароль на учётную запись «Администратор»;
-
Удалим профили лишних учётных записей и их учётные записи;
-
Установим Net.Framework 3.5 с помощью PowerShell:
Enable-WindowsOptionalFeature -Online -FeatureName "NetFX3" -Source "D:\sources\sxs"
-
Вызовем утилиту C:\Windows\system32\Sysprep\sysprep.exe
Укажем параметры:-
Переход в окно приветствия системы (OOBE)
-
Установим галочку «Подготовка к использованию»
-
Параметры завершения работы: «Завершение работы»
-
В SCCM создадим Последовательность задач «Capture Windows», в ней 2 шага:
-
Добавляем шаг «Задать переменную последовательности задач».
Указываем переменную: «OSDTargetSystemRoot» с значением «D:\Windows» -
Добавляем шаг «Записать образ операционной системы».
Указываем сетевой каталог, где будет создаваться образ и учётную запись, которая имеет доступ к этому каталогу.
В SCCM создадим Коллекцию «Windows Capture» и развернём на неё ранее созданную Последовательность задач.
Добавим эталонный компьютер в Коллекцию и включим виртуальную машину.Запустится Последовательность задач, которая создаст WIM-образ для последующих развёртываний ОС.
Полученные образы необходимо добавить в консоли SCCM и распространить по необходимым Точкам распространения.
Образы добавляются на сайт-сервер 1 раз и распространяется для всех.
Автор первичной редакции:
Виталий Якоб
Время публикации: 28.01.2017 18:00
· Последнее изменение: 24.02.2017 00:11 —
Алексей Максимов
В этом гайде мы разберемся как создать собственный установочный образ с Windows 10/11 с предустановленными программами, необходимыми файлами, другими настройками среды и приложений. Превалирующий сейчас подход предполагает развертывания чистого образа Windows, после чего на компьютер устанавливаются необходимые программы: через GPO, командами загрузки и установки приложений в
AutoUnattend.xml
или в скрипте
%WINDIR%\Setup\Scripts\SetupComplete.cmd
, логон скриптами Windows, средствами автоматизации (SCCM, Intune, Ansible, и пр). Однако в некоторых случаях особенности бизнеса требуют, чтобы на компьютер сразу разворачивался готовый образ Windows со всеми необходимыми программами.
Содержание:
- Подготовка эталонного образа Windows с установленными программами
- Захват настроенного образа Windows с помощью DISM
- Замена оригинального образа Windows (Install.wim) на USB флешке
Процесс создания собственного установочного образа Windows с предустановленным софтом будет состоять из следующих этапов:
- Развертывание чистой Windows на эталонном компьютере (виртуальной машине);
- Вход в режим аудита, установка необходимых приложений, настройка окружения;
- Загрузка в среде WinPE и захват WIM образа Windows с помощью DISM;
- Замена оригинального install.wim на установочной USB флешке (ISO образе).
Если вы развертываете Windows на компьютеры в корпоративной сети, удобнее использовать MDT, который позволяет добавлять/обновлять программы в установочный процесс без модификации каждый раз установочного WIM образа.
Подготовка эталонного образа Windows с установленными программами
На первом этапе вы должны создать эталонный образ Windows со всем необходимым набором программ, файлов и настроек. Для этого нужно выполнить чистую установку Windows на виртуальную машину или компьютер
Итак, начните с получения оригинального установочного образа Windows 10/11 в виде ISO файла или сразу запишите его на загрузочную USB флешку с помощью Media Creatin Tool или Rufus.
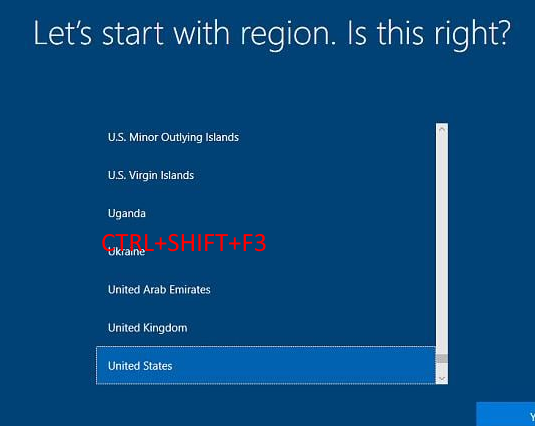
Выполните ручную установку Windows и на этапе OOBE (когда вам предлагают выбрать региональные настройки и создать учетную запись), нажмите
CTRL + SHIFT + F3
. Это переведет компьютер в режим аудита (Audit Mode), в котором будет выполнен автоматический вход под встроенной учётной записью Administrator.
После появления рабочего стола, сверните окно утилиты sysprep (не закрывая его) и можете приступить к установке программ, обновлений, настройке нужных параметров Windows.
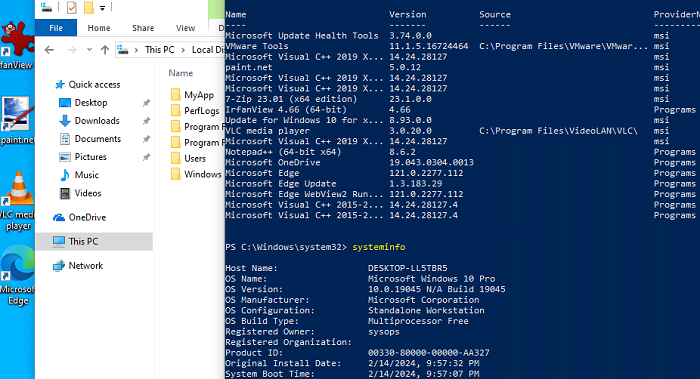
В этом примере я воспользуюсь пакетным менеджером WinGet для установки программ в Windows:
winget install --id=7zip.7zip -e ; winget install --id=Notepad++.Notepad++ -e ; winget install --id=VideoLAN.VLC -e ; winget install --id=WinDirStat.WinDirStat -e ; winget install --id=dotPDNLLC.paintdotnet -e ; winget install --id=IrfanSkiljan.IrfanView -e ; winget install --id=Microsoft.PowerToys -e
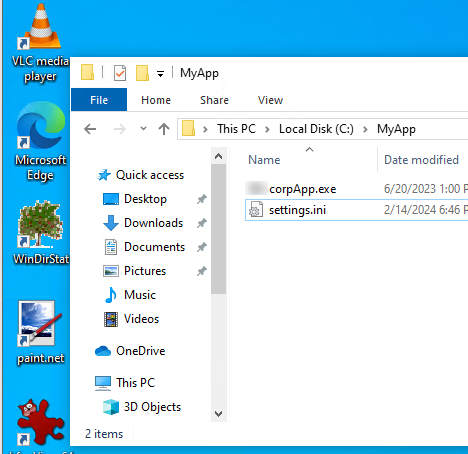
Дополнительно я вручную создал каталоги и скопировал файлы для некоторых корпоративных приложений.
Настройте ярлыки на рабочем столе, плитки в меню Start, фоновые рисунки, заставки, цветовые схемы и прочее. Настройте параметры локальной групповой политики с помощью редактора
gpedit.msc
. Эти настройки в дальнейшем будут применены ко всем пользователям на компьютерах, которые вы развернете из вашего образа.
После того, как вы завершили настройку операционной и приложений, нужно выполнить очистку Windows для уменьшения итогового размера образа.
Удалите имеющиеся теневые копии и точки восстановления:
vssadmin delete shadows /All /Quiet
Очистите неиспользуемые файлы компонентов и обновлений в папке WinSxS:
Dism.exe /Online /Cleanup-Image /StartComponentCleanup /ResetBase
Удалите загруженные файлы обновлений Windows:
del %windir%\SoftwareDistribution\Download\*.* /f /s /q
Для очистки папок Temp, Downloads и кэша в профиле пользователя можно использовать этот PowerShell скрипт.
Выполните очистку диска с помощью утилиты cleanmgr:
Cleanmgr /sagerun:1
Очистите логи Windows:
for /F "tokens=*" %1 in ('wevtutil.exe el') DO wevtutil.exe cl "%1"
Очистите корзину:
Clear-RecycleBin -Force
Чтобы применить настройки текущего пользователю к шаблонному пользователю Default, создайте файл ответов unattend.xml в каталоге C:\Windows\System32\Sysprep:
<?xml version="1.0" encoding="utf-8"?>
<unattend xmlns="urn:schemas-microsoft-com:unattend">
<settings pass="specialize">
<component name="Microsoft-Windows-Shell-Setup" processorArchitecture="amd64" publicKeyToken="31bf3856ad364e35" language="neutral" versionScope="nonSxS" xmlns:wcm="http://schemas.microsoft.com/WMIConfig/2002/State" xmlns:xsi="http://www.w3.org/2001/XMLSchema-instance">
<CopyProfile>true</CopyProfile>
</component>
</settings>
</unattend>
Осталось подготовить ваш настроенный образ Windows к развертыванию с помощью утилиты sysprep.exe. Разверните окно sysprep и выберите в ней опции:
- Enter System Out-of-Box Experience (OOBE)
- Generalize
- Shutdown
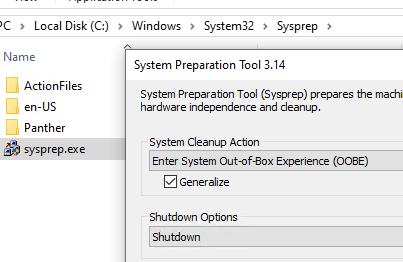
После завершения этой операции, компьютер выключиться автоматически.
Захват настроенного образа Windows с помощью DISM
На этом этапе нужно выполнить офлайн захват образа установленной Windows в WIM файл и поместить его на отдельный диск (мы подключили отдельный диск емкостью 60 Гб к компьютеру)
Загрузите компьютер с эталонной версией Windows с загрузочного диска в среде WinPE (WinRE). Можно загрузиться с установочной USB флешки с Windows и на этапе начала установки нажать
Shift+F10
, чтобы открыть командную строку.
Вам нужно идентифицировать буквы диска, которые назначены разделу с Windows и чистому разделу, куда будет скопирован WIM файл. Выполните команды:
diskpart
list disk
exit
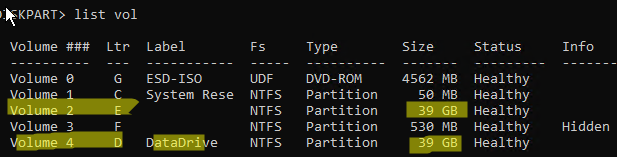
В нашем примере диску с Windows присвоена бука E:, а чистому диску – буква D:.
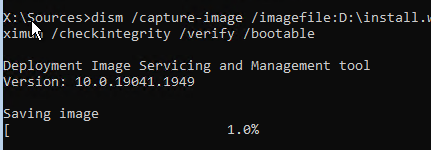
Чтобы выполнить захват офлайн образа Windows на диске E и поместить полученный WIM образ на D, выполните команду:
dism /capture-image /imagefile:D:\install.wim /capturedir:E:\ /ScratchDir:D:\ /name:"MyWinImage" /compress:maximum /checkintegrity /verify /bootable
В моем случае захват образа длился около 30 минут.
Замена оригинального образа Windows (Install.wim) на USB флешке
После того, как вы захватили ваш настроенный образ Windows, вы можете заменить файл с оригинальным установочным образов install.wim или install.esd (ESD это формат с максимальным сжатием образа WIM) на установочной USB флешке (каталог
\sources
).
В моем случае, я переименовал старый образ в install.esd_bak и скопировал на флешку новый образ install.wim.
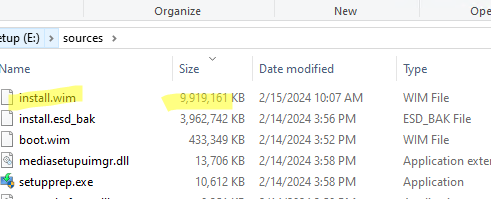
Обратите внимание, что размер WIM образа с предустановленными программами существенно увеличился (с 4 до 10 Гб).
Если у вас USB флешка с FAT32 для установки Windows на UEFI компьютерах, вы не сможете разместить файл больше 4 Гб на этой файловой системе. В этом случае большой WIM файл нужно разбить на несколько мелких SWM:
Dism /Split-Image /ImageFile:D:\sources\install.wim /SWMFile:c:\tmp\install.swm /FileSize:3500
В данном случае DISM создаст четыре файла install.swm, install2.swm, install3.swm, install4.swm, которые нужно скопировать в папку
\sources
. Установщик Windows сам соберет SWM файлы при развертывании операционной системы.
Теперь вы можете с USB флешки развернуть на любой компьютере созданный вами образ Windows. После завершения установки Windows убедитесь, что все предустановленные программы доступны:
Get-Package
Недостаток такого подхода с развёртыванием преднастроенного образа Windows в том, что для обновления любого приложения в образе вам придется пересобрать его заново.
High-level Steps for our Golden VM
- Download a supported Windows 10 Image
- Install Windows 10 on our vCenter
- Choose Network card as VXNet3
- Enable CPU/vMemory Hot add
- Disconect floppy drive
- Install VMware Tools
- Connect VM to Domain to get the dll files
- Download the Fling here and run OS optimizations
- Install View Agent
- Install Apps if any ater OS optimizations
- Clean up temp files if any, empty recycle bin, turn off windows OS updates, browsing history
- Turn off Windows Updates
- Release IP
- Shutdown VM
- Snapshot VM
Creating our Golden VM
I’ve downloaded a supported Windows Image and uploaded the ISO file into a datastore
With the OS image now on our datastore, we will spin up a Windows VM as per normal process
Give the VM a Name
Give a location to deploy the VM to
Choose the datastore to deploy the VM to
I’ll select the compatibility to my VM hardware
As we are deploying a Windows 10 VM, we will select the Guest OS version as Windows 10
Ensure we select network adapter type as VMXNET3
Once the ISO is mounted, click finish
Open the VM settings and Enable Force BIOS setup from Customize hardware tab.
Customizing the BIOS
Once newly created VM boots up, from the BIOS screen select Main tab and all the Legacy Diskette A/B to disabled
From the Advanced tab, let’s also disable all I/O ports under I/O Device Configuration.
Save BIOS configuration and continue to boot the machine and proceed with default Windows 10 OS installation as usual.
Install VMware Tools
Once the VM has been fully installed, we will add VMtools to it. In order to install VMtools, Right-click on VM > Guest OS > Install VMware Tools.
Once VMware tools installation is completed, reboot the virtual machine.
Connect VM to Domain
Optimize the OS
If you are not using IPv6 make sure you are disabling it and IPv4 should be in DHCP.
Optimize VDI Master Image using VMware OS Optimization Tool
A Windows OS was always designed for physical workloads like laptops thus there are plenty of services on it we don’t need for VDI, With more services and features, we will need to provide additional resources such as CPU/memory etc.VMware optimization tool can be used to easily disable unnecessary services and features to improve VDIperformance.
I have downloaded and opened the OS Optimization tool on the newly deployed Windows 10 VM. Open the tool and Click Analyse
Click on Optimize
At the end of optimization, we will be getting a report suggesting what all services are disabled on the VM.
Install Apps
Once the OS is installed, we can go for installing additional apps if any. Most of our apps are going to be provisioned with AppStacks but for now, we will just install basic apps.
There are few more tweaks we need to do from our control panel to optimize our Windows 10 VM which are all related to power settings. By default Windows 10 systems goes into sleep mode if the system is not in use for a while. Even though this is good for laptops as it increases its longevity, it’s, however, an odd feature for VDI so we will turn it off here.
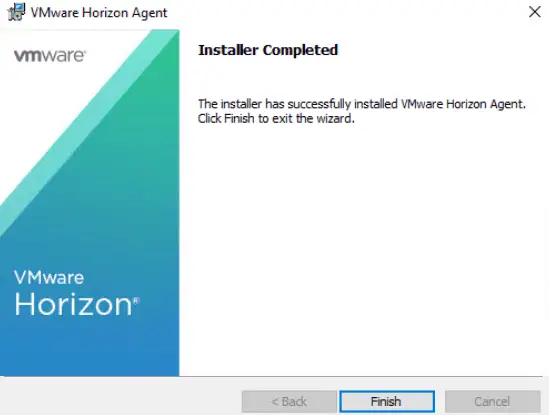
VMware Horizon Agent Installation
Horizon View Agent on virtual machines is needed so our connection server can communicate with them. Installation of view agent is a straightforward process
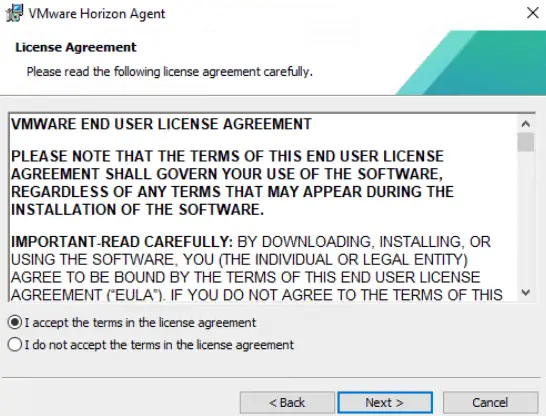
Launch the view agent software we downloaded earlier and choose to run as Administrator
Accept EULA and click Next.
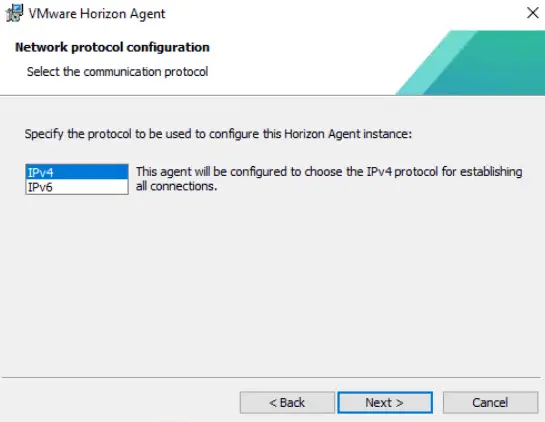
Select IPv4 as the network protocol, click Next.
Click Next.

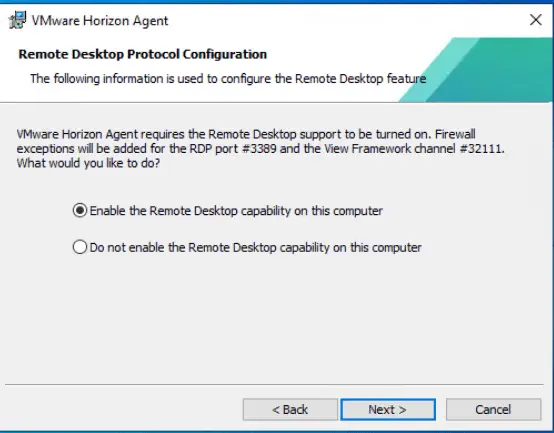
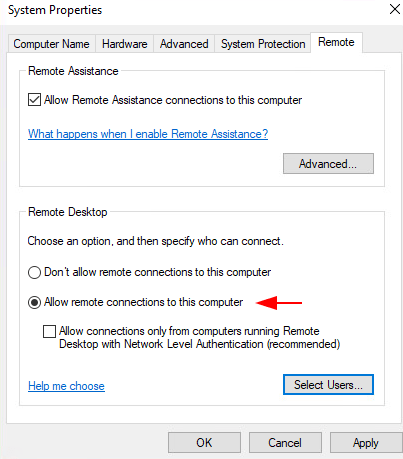
Enable Remote desktop capability so we can access this machine over RDP
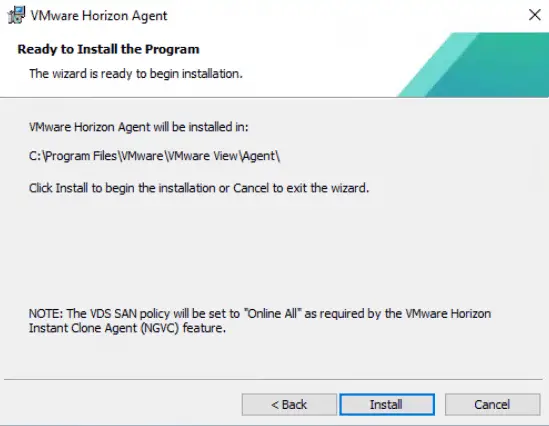
Click Install
After Horizon Agent installation, reboot the virtual machine.
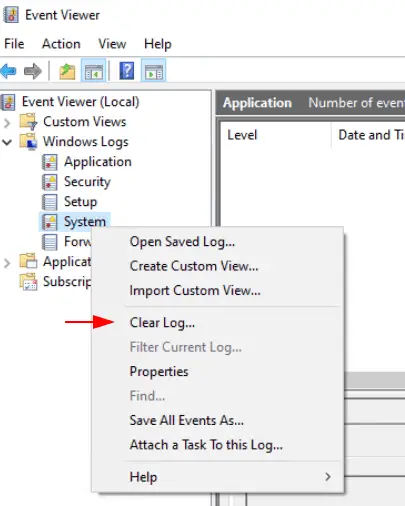
Clean up Image
After the reboot is complete, we will need to ensure we clear logs from Event Viewer and remove any unnecessary kinds of stuff like the software we downloaded etc from the system
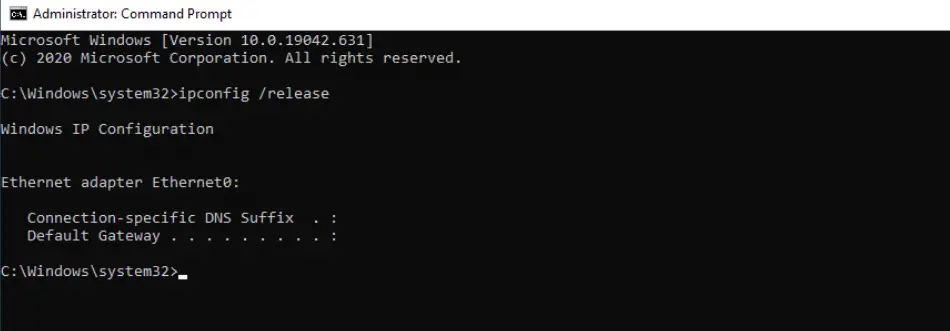
Release IP address
Open cmd and use ipconfig /release command to release our DHCP provided IP
Turn off Windows Updates
Open cmd – type services.msc and press Enter.
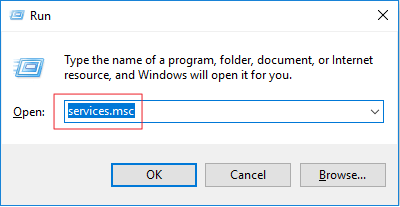
Scroll down to Windows Update, and double-click it.
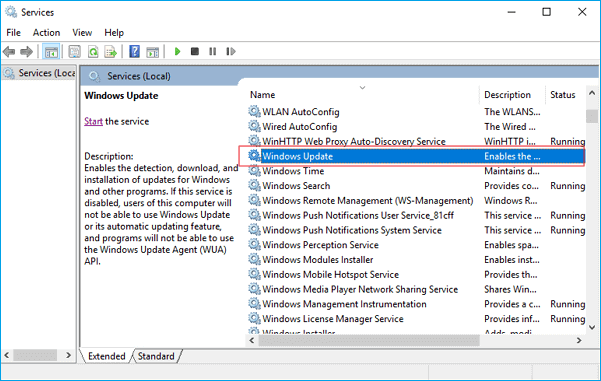
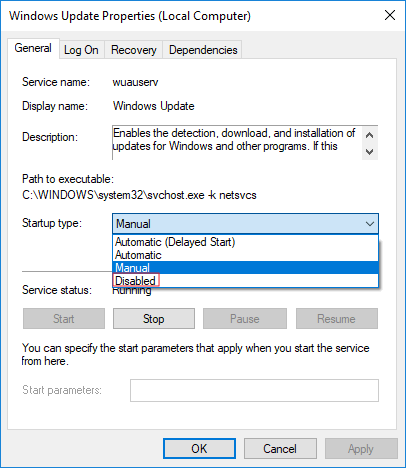
In Startup type, select “Disabled”. Then click “Apply” and “OK” to save the settings
Empty Browsing History
Verify if RDP is enabled
We will now Empty Recycle Bin as well as it may have software we downloaded and move there post-install.
Verify all required configurations, and shut down our VM
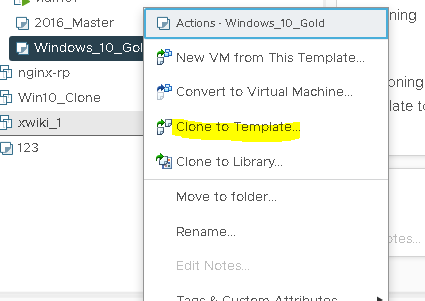
We will now create a clone of this VM which then becomes a new VM with a new GUUID, we will use this clone for our instant clones. We will also create a snapshot of the base image which we are going to use for dedicated desktops ( full-blown images ).
Clone VM
We will now clone this VM so we can later use this for our linked clones
Give the clone a name
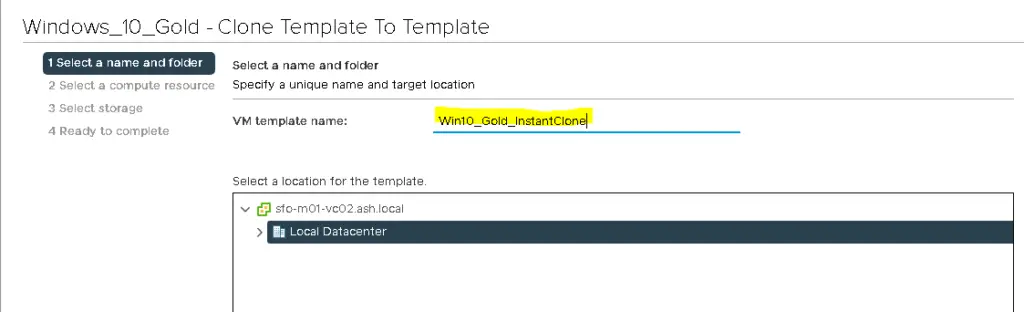
Run through the wizard and finish the config
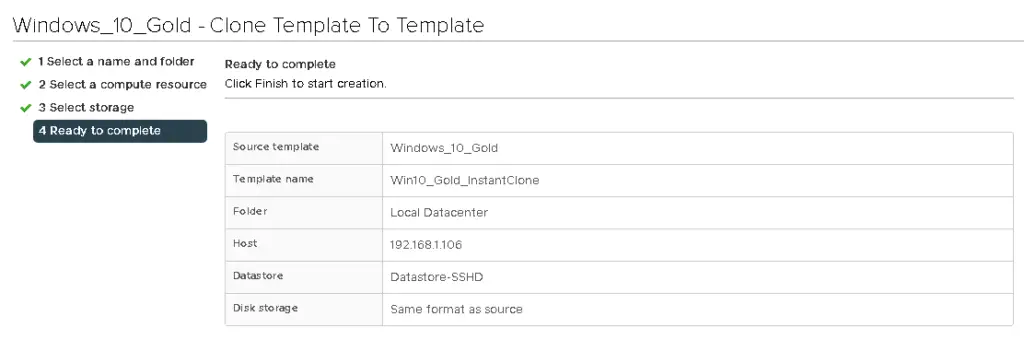
We are going to use our base Image for building all our VDI desktops so we will create a template.
Now that we have a master template and guest customizations in place, we are ready to create our View Desktop Pool
(Visited 557 times, 1 visits today)
In this blog post I describe the steps required to create a Virtual Machine template using Windows 10 from scratch. (the same procedure also works for Windows 7)
Only optimizations of the core OS are described, the impact of installed applications within the guest will also need to be evaluated.
Below are the steps to follow to create an optimized golden image for VDI
STEP 1: VMware Template Configuration
Create a new Virtual Machine using the vSphere Web client
-
- Name: depending on naming convention standards (Note: use a name of less then 15 characters)
- Location: depending on the environment
- Compute Resource: depending on the environment
- Storage: depending on the environment
- Compatibility (=Hardware version): choose the highest available for your environment (depends on your version of ESXi)
-
- Reference: https://docs.vmware.com/en/VMware-vSphere/6.5/com.vmware.vsphere.vm_admin.doc/GUID-789C3913-1053-4850-A0F0-E29C3D32B6DA.html
- Guest OS Family: Windows
- Guest OS Version: Microsoft Windows 10 (64-bit) or Microsoft Windows 7 (64-bit)
- Customise Hardware – Virtual Hardware Tab
-
- vCPUs: 2
-
- Memory: 3072 MB
-
- Reserve all guest memory
-
- HDD: 32 GB (disk size depends on the size of expected locally installed applications)
-
- SCSI Controller: LSI Logic SAS
-
- Network:
-
- VLAN depending on the environment
-
- Connect at Power On: YES
-
- Adapter Type: VMXNET3
-
- CD/DVD Drive:
-
- Select “Datastore ISO File”
-
- browse to the appropriate OS iso file
-
- Connect at Power On: YES
-
- Floppy Drive: Remove
-
- Video Card:
-
- Select “Specify Custom Settings”
-
- Number of displays: 4
-
- Total Video Memory: 128 MB
-
- Enable 3D support: ONLY enable when you have a GPU card installed in the ESXi hosts
-
- 3D renderer: Automatic
-
- 3D Memory: 256 MB
- Customise Hardware – VM Options tab
-
- Boot options:
-
- Force BIOS setup: Enable “The next time the virtual machine boots, force entry into the BIOS setup screen”
-
- Advanced:
-
- Settings:
-
- Ensure “Enable logging” is unchecked
-
- Configuration Parameters:
-
- Edit Configuration Parameters
-
- Add Row
-
- Name: devices.hotplug
-
- Value: false
- Reference: See VMware KB 1012225
- Click Finish
Power on the newly created VM and open the console from within the vSphere client to change the BIOS settings
- Go to the Advanced tab – I/O Device Configuration and disable Serial Ports, Parallel Ports and Floppy Disk Controllers
- Go to the Boot tab and change the boot order so the Hard Disk is 1st and the CD-ROM drive is the 2nd boot device
- Save and exit (F10)
STEP 2: OS Installation
Boot the VM from the Windows iso file
Ensure the language, time/currency format and keyboard/input method selections are correct and click “Next”
Click “Install Windows”
Accept License terms and click “Next”
Select “Custom – Install Windows only”
Select the drive where you want to install Windows (There will be only one”) and click “Next”
Follow the Wizard to finalise a default Windows installation (using the “Express Settings”)
- When asked to create a user, create a user with the name “temp”
STEP 3: Base Image Customizations
Install VMware Tools (default installation) and reboot VM
- Note: If you intend to use a vShield Endpoint based solution to protect your Virtual Machines from viruses makes sure to also install the “NSX Network Introspection Driver” (previously called the “vShield Endpoint Thin Agent driver” or “Guest Introspection Driver”) which is not installed by default during a typical VMware Tools installation process. (Custom Install – Add VMCI driver\NSX Network Introspection Driver)
Reboot the desktop
Logon to the desktop using the “temp” user
Enable the local Administrator account
- Right Click on the Start button – Computer Management – Local Users and Groups – Users
- Check properties of the Administrator account
- Uncheck “Disable account”
- Check “Password never expires”
- Click OK
- Set a password
Logoff the desktop
Logon to the desktop using the local administrator account
Change Computer Name
- Right Click on the Start button – Control Panel – System and Security – System
- Click on “Change Settings” in the section “Computer name, domain and workgroup settings”
- Click on “Change” next to “To rename this computer or change …”
- Type the computername (depending on naming convention standards (Note: use a name of less then 15 characters))
- Click OK
- Reboot the desktop
Logon to the desktop using the local administrator account
Delete “temp” user profile
- Right Click on the Start button – Control Panel – System and Security – System – Advanced System Settings – Advanced
- Click the “Settings” button under the User Profile section
- Highlight the “temp” account and click Delete
Delete “temp” user
- Right Click on the Start button – Computer Management – Local Users and Groups – Users
- Right Click “temp” user and choose Delete
Add/Remove he following features (if they are enabled) from the OS (unless you really need them) and reboot VM:
- Right Click on the Start button – Control Panel – Programs – Programs and Features – Turn Windows Features on or off
- Unselect the following default installed features:
- Print and Document Services – Internet Printing Client
- Print and Document Services – Windows Fax and Scan
- Select the following features that are not installed by default
- .NET Framework 3.5
- Telnet Client
Reboot the desktop
Logon to the desktop using the local administrator account
Cleanup manager:
- Open a command prompt
- Run c:\windows\system32\cleanmgr /sageset:1
- check all the boxes of items you want to delete
- Click “OK”
Copy file vdi_cleanup.bat to c:\windows\system32
- The content of vdi_cleanup.bat can be found at https://ituda-com.apache23.websrv.be/vmware-horizon-view-recomposing-dont-forget-to-cleanup-after-you-finished/
Run Windows update, install all the latest patches and service packs and reboot VM
- Click on the Start button – Settings – Update & Security – Check for Updates
- Install the necessary Windows updates
- Reboot VM
- Note: Repeat this process until all Windows updates have been installed)
As described in the VMware Horizon 7.2 documentation some additional hot fixed need to be applied (only required for Windows 7)
- Install Microsoft hotfix http://support.microsoft.com/kb/2550978 (see also VMware KB 2007319). Download here
- Install Microsoft hotfix http://support.microsoft.com/kb/2578159. Download here
- Install Microsoft hotfix http://support.microsoft.com/kb/2661332. Download here
VMware OS Optimization tool:
- Run the VMware OS Optimization tool (run as administrator): https://labs.vmware.com/flings/vmware-os-optimization-tool
- Adjust the template as needed for your environment
- Install .NET Framework 3.5 when asked for it
Shutdown the desktop
Disconnect the installation media in the VM properties in the VMware vSphere (web) Client (set to “Client Device”)
Power on the desktop
Logon to the desktop using the local administrator account
Pre-compile .NET framework assemblies
- Open an elevated Windows command prompt.
- Navigate to the C:\Windows\Microsoft.NET\Framework\v4.0.30319 directory.
- Type ngen.exe update /force
- Type ngen.exe executequeueditems
Set Power Options to high
- Right Click on the Start button – Control Panel – Hardware and Sound – Power Options
- Click “Show Additional Power Plans”
- Choose “High Performance”
- Click “Create a Power Plan”
- Choose “High Performance”
- Plan name: type “VDI”
- Click Next
- Turn off the display: Select “Never”
- Put the computer to sleep: Select “Never”
- Click “Create”
Enable VerboseStatus
- Open a command prompt
- REG ADD HKLM\Software\Microsoft\Windows\CurrentVersion\Policies\System /v verbosestatus /t REG_DWORD /d 1 /f
Disable some Active Setup components of Windows
- As per VMware KB 2100337 logon time will be a lot faster when disabling all the Active Setup components of Windows.
- Delete stubpath under
- “HKLM\SOFTWARE\Microsoft\Active Setup\Installed Components\{2C7339CF-2B09-4501-B3F3-F3508C9228ED}”
- “HKLM\SOFTWARE\Microsoft\Active Setup\Installed Components\{2D46B6DC-2207-486B-B523-A557E6D54B47}”
- “HKLM\SOFTWARE\Microsoft\Active Setup\Installed Components\{44BBA840-CC51-11CF-AAFA-00AA00B6015C}”
- “HKLM\SOFTWARE\Microsoft\Active Setup\Installed Components\{6BF52A52-394A-11d3-B153-00C04F79FAA6}”
- “HKLM\SOFTWARE\Microsoft\Active Setup\Installed Components\{89820200-ECBD-11cf-8B85-00AA005B4340}”
- “HKLM\SOFTWARE\Microsoft\Active Setup\Installed Components\{89820200-ECBD-11cf-8B85-00AA005B4383}”
- “HKLM\SOFTWARE\Microsoft\Active Setup\Installed Components\{89B4C1CD-B018-4511-B0A1-5476DBF70820}”
- “HKLM\SOFTWARE\Microsoft\Active Setup\Installed Components\>{22d6f312-b0f6-11d0-94ab-0080c74c7e95}”
Configure paging file size
-
- Right Click on the Start button – Control Panel – System and Security – System – Advanced System Settings – Advanced
- Click the “Settings” button in the “Performance” section
- Select “Advanced” tab
- Click the “Change” button under the “Virtual Memory” section
- De-select “Automatically manage paging file size for all drives”
- Select “Custom Size”
-
- Initial size (MB): 3072 (equals the amount of memory of the VM)
- Maximum Size (MB): 3072 (equals the amount of memory of the VM)
- Click “Set”
- Click “OK”
- Reboot VM
STEP 4: Install Horizon View Agent
Logon to the desktop using the local administrator account
Install the VMware Horizon View Agent
-
- Note: Make sure that the version of the VMware Horizon View Agent you are using is compatible with the View Connection server version you will be using. Version 7.01 was used in this article.
- Network Protocol Communication: IPv4
- Features to be installed (depending on the environment. The displayed options also depend on the Agent version):
-
- Core: Yes
-
- USB redirection: Yes
-
- Real-Time Audio-Video: Yes
-
- VMware Horizon View Composer Agent:
- “Yes” if View Composer will be used
- “No” if Instant Clone technology will be used
- VMware Horizon View Composer Agent:
-
- VMware Horizon Instant Clone Agent:
- “No” if View Composer will be used
- “Yes” If Instant Clone technology will be used
- VMware Horizon Instant Clone Agent:
-
- Client Drive Redirection: Yes
-
- Virtual Printing: Yes
-
- vRealize Operations Desktop Agent:
- “Yes” if vRops for Horizon will be used
- “No” if vRops for Horizon will not be used
- vRealize Operations Desktop Agent:
-
- VMware Horizon View Persona Management:
- “Yes” if Horizon View Persona Management will be used
- “No” if another persona management solution will be used (e.g. UEM)
- VMware Horizon View Persona Management:
-
- Scanner Redirection: No
-
- Smartcard Redirection: No
-
- Serial Port Redirection: No
-
- VMware Audio: Yes
-
- Flash Redirection: Yes
-
- Note: An explanation of all these above features for Horizon View 7.2.x can be found here
- Remote Desktop Protocol Configuration
- Select “Enable the Remote Dekstop capability on this computer”
Reboot VM
Optional : Join the VM to your Active Directory Domain
Optional: Add an Active Directory group containing the users/groups which will be allowed to open Remote Desktop connections to the VM (= all users/groups which will be allowed to connect to a VMware View Desktop)
- Note: This can also be done (and is preferred to be done) via an Active Directory Group Policy: Restricted Groups GPO – Remote Desktop Users

Reboot VM
STEP 5: Installation of some standard applications (OPTIONAL STEP)
Install the latest version of Adobe Flash Player:
- Browse to http://get.adobe.com/flashplayer with Internet Explorer
- Do not select the option to install “McAfee Security Scan Plus”, “Google Toolbar”, …
- Update method: Never check for updates (see http://kb2.adobe.com/cps/167/16701594.html for instructions)
- Edit %WINDIR%\SysWow64\Macromed\Flash\mms.cfg and ensure that “AutoUpdateDisable=1” is included in the mms.cfg file
- Adobe Flash Player test: http://www.adobe.com/software/flash/about/
Install the latest version of Adobe Reader
- Browse to http://get.adobe.com/reader with Internet Explorer
- Do not select the option to install “McAfee Security Scan Plus”, “Google Toolbar”, …
- Manually check for and install updates
- Enable the “Adobe PDF LInk Helper” add-on
- Delete shortcut which was added to the desktop
- REG ADD “HKLM\SOFTWARE\Policies\Adobe\Acrobat Reader\DC\FeatureLockDown” /v bUpdater /t REG_DWORD /d 0 /f
- REG ADD “HKLM\SOFTWARE\Policies\Adobe\Acrobat Reader\DC\FeatureLockDown” /v Mode /t REG_DWORD /d 0 /f
- sc stop AdobeARMservice
- sc config AdobeARMservice start= disabled
- Adobe Reader test: https://courses.worldcampus.psu.edu/public/diagnostics/Acrobat.html
Install the latest version of Adobe Shockwave player
- Browse to http://get.adobe.com/shockwave with Internet Explorer
- Do not select the option to install “McAfee Security Scan Plus”, “Google Toolbar”, …
- Disable updates: https://helpx.adobe.com/shockwave/kb/disable-auto-update-setting-shockwave.html
- Shockwave test: http://www.adobe.com/shockwave/welcome/
Install the latest version of Java (install both 32 and 64 bit on a Win7 64-bit OS)
- Browse to http://www.java.com/en/download/manual.jsp with Internet Explorer
- Do not select the option to install “Ask Toolbar”, …
- Delete registry key HKLM\SOFTWARE\Microsoft\Windows\CurrentVersion\Run\SunjavaUpdateShed
- Java test: http://www.java.com/en/download/testjava.jsp
Install Microsoft Silverlight
- Go to http://www.microsoft.com/getsilverlight/ and follow the instructions
- Do not enable Microsoft Update when asked for
- Silverlight test: http://bubblemark.com/silverlight2.html
Reboot VM
Shutdown VM
STEP 6: Clean up
Open an elevated Windows command prompt
Run vdi_cleanup.bat
Take a Snapshot of your golden image