
Через короткое время после выхода Windows 11, известная программа для создания загрузочных установочных флешек Rufus была первой, которая встроила возможность установки без доверенного платформенного модуля TPM 2.0. К сегодняшнему дню количество доступных в утилите опций для образов Windows 11 стало ещё более широким.
В этой инструкции подробно о том, как отключить проверку на наличие модуля TPM 2.0 и включенной безопасной загрузки (Secure Boot), минимальных требований к объему оперативной памяти и места на диске, а также экран настройки сбора персональных данных, создав загрузочную флешку в Rufus последней версии. Дополнительная возможность — установка Windows 11 с локальной учётной записью. Также может быть полезным: способы создания загрузочной флешки Windows 11, Создание мультизагрузочной флешки в Ventoy (также отключает требования к системе для Windows 11).
Опции при создании загрузочной флешки Windows 11, доступные в Rufus
Сам процесс записи установочного накопителя в Rufus не изменился по сравнению с тем, что было описано в статье про одну из предыдущих версий программы: Создание загрузочной флешки Windows в Rufus.

Однако в новой версии (скачать можно на официальном сайте — https://rufus.ie/ru/), при использовании образа ISO Windows 11 (Как скачать Windows 11 оригинальные ISO образы), возможно включение дополнительных опций в программе.
Ранее обход требований Windows 11 включался в поле «Параметры образа», теперь в главном окне программы такие настройки отсутствуют. Вместо этого, после того как заданы все параметры создания загрузочной флешки, достаточно нажать кнопку «Старт», чтобы появилось следующее окно с дополнительными параметрами:

В текущей версии текст в окне представлен на английском языке, а потому поясню каждый из пунктов:
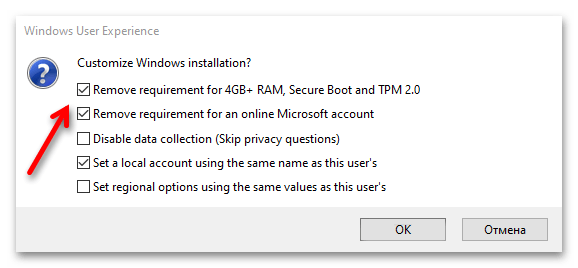
- Remove requirement for 4Gb RAM, Secure Boot and TPM 2.0 — отключить требование наличия модуля TPM 2.0 и включенной безопасной загрузки Secure Boot, а также наличия нужного объема оперативной памяти.
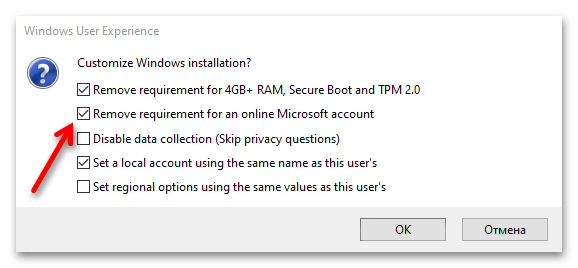
- Remove requirement for an online Microsoft account — отменить требования обязательного создания учетной записи Майкрософт. Также вы можете создать локальную учетную запись при установке Windows 11 другими способами или удалить учетную запись Майкрософт уже после установки.
- Create a local account with username — автоматическое создание локальной учётной записи с указанным именем при установке Windows 11 с созданного USB-накопителя.
- Set regional options to the same values as this user’s — установить региональные параметры такими же, как у текущего пользователя. Пропускает настройку языков и клавиатур при установке системы.
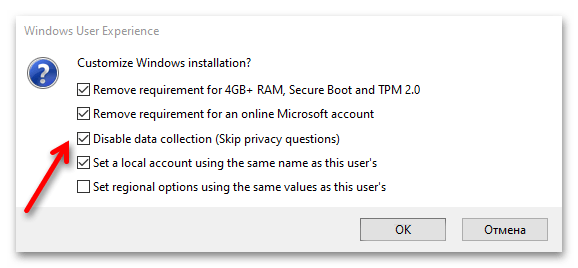
- Disable data collection (Skip privacy questions) — опция для отключения экрана настройки параметров конфиденциальности при установке (отключает сбор данных во всех пунктах).
Используя эти опции при создании загрузочной флешки Windows 11, вы можете не только отключить нежелательные вам требования к установке, но и сильно сократить время, необходимое для первоначальной настройки после копирования файлов.
Частый вопрос пользователей касается также требований новой ОС к поколению процессора. Здесь всё просто: эти требования не учитываются при чистой установке Windows 11 с флешки, то есть установка возможна даже при использовании очень старых CPU (при условии, что они в принципе с этим могут справиться).
Шаг 1: Скачивание образа ОС
Сразу отметим, что данный шаг не является обязательным, так как приложение Rufus, с помощью которого мы будем создавать загрузочную флешку далее, позволяет скачивать образы Windows 11 и других версий. Однако если вы хотите получить именно «чистый», официальный вариант ОС от Microsoft, рекомендуем ознакомиться с отдельной статьей на нашем сайте, в которой рассказывается о том, как это сделать.
Подробнее: Скачивание образа Виндовс 11 с официального сайта
Шаг 2: Создание загрузочного накопителя
Основная и по сути единственная функция Руфус заключается именно в создании загрузочного накопителя, который и будет использоваться в дальнейшем для установки операционной системы.
Примечание: Объем флешки для записи образа должен быть не менее 8 Гб. Если на ней есть важные данные, переместите их в безопасное место на диске ПК или другое устройство хранения данных, так как они будут стерты в процессе форматирования.
Скачать Rufus
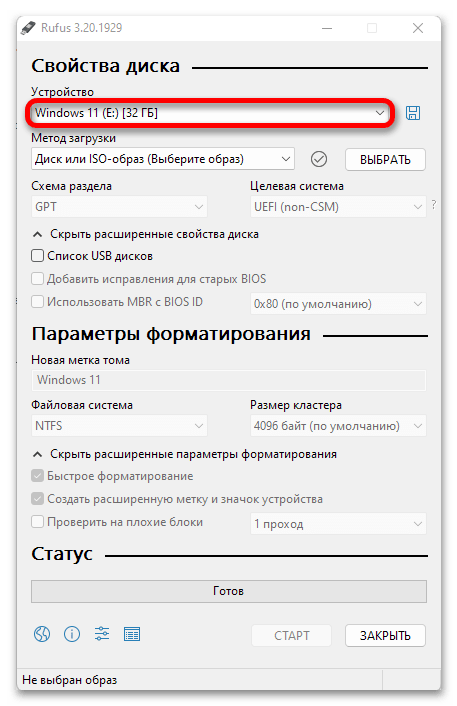
- После того как приложение будет скачано, запустите его и подключите к компьютеру/ноутбуку USB-накопитель. Если таковых используется несколько, выберите нужный в выпадающем списке «Устройство».

Дальнейшие действия зависят от того, есть ли у вас образ Windows 11 или нет.
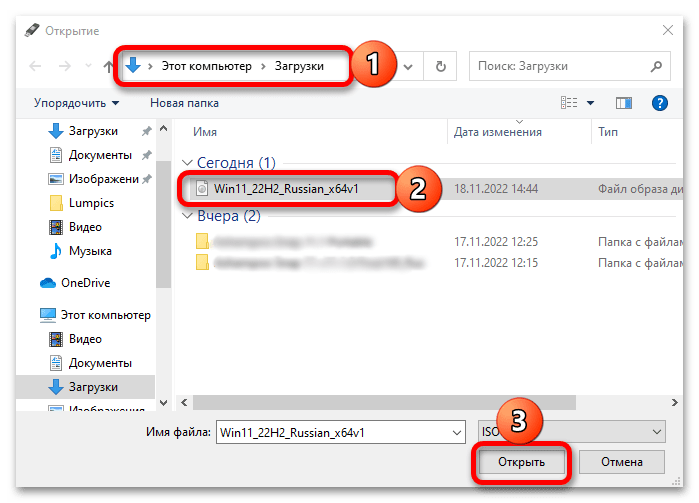
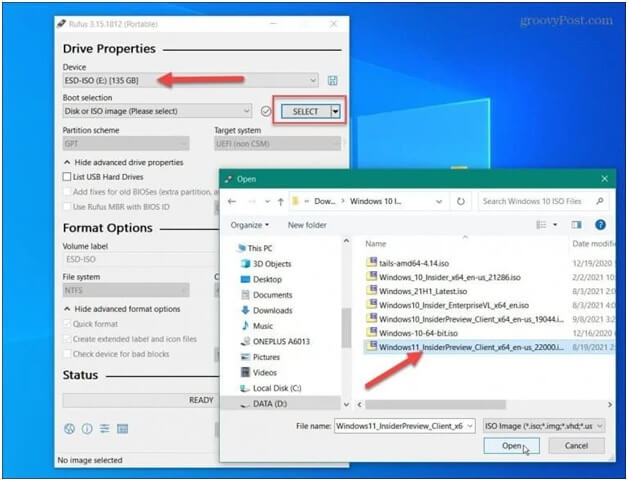
- Если ISO-файл с Windows 11 имеется, нажмите на кнопку «Выбрать»,

перейдите к его расположению, выделите и «Откройте».
- Если образа нет:

- Если ISO-файл с Windows 11 имеется, нажмите на кнопку «Выбрать»,
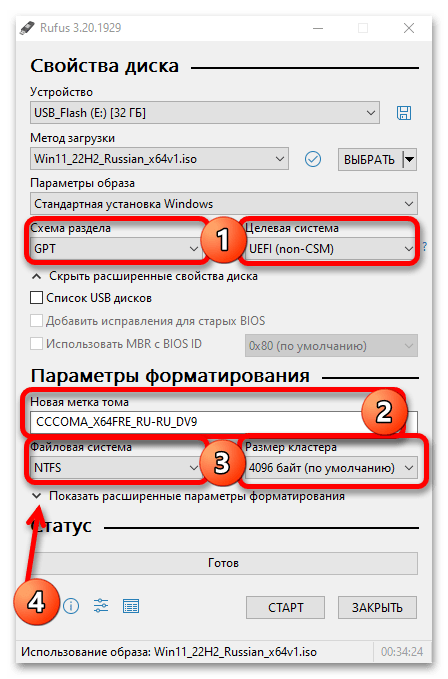
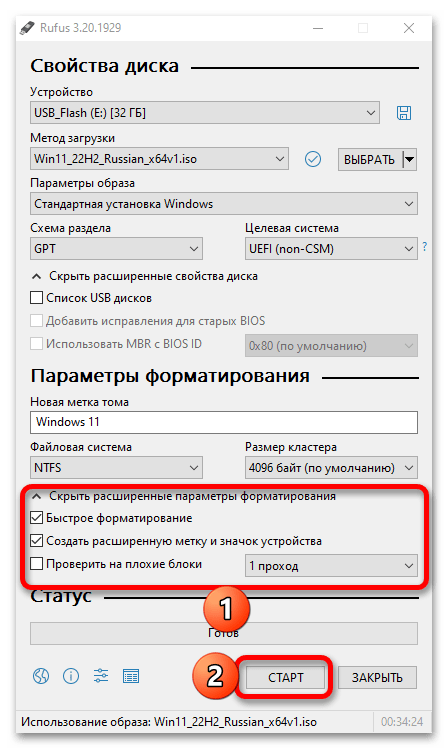
- После того как образ операционной системы будет добавлен в приложение или им скачан, убедитесь, что в выпадающем списке «Параметры образа» указано «Стандартная установка Windows».

Остальные опции лучше оставить без изменения, но и перепроверить не будет лишним – все должно выглядеть так, как показано на изображении ниже. Единственное, что можно изменить, это «Новая метка тома» — название, которое будет присвоено флешке.
По необходимости также можете развернуть выпадающий список «Показать расширенные параметры форматирования» и определить особенности данной процедуры. Для перехода к следующему шагу нажмите «Старт».
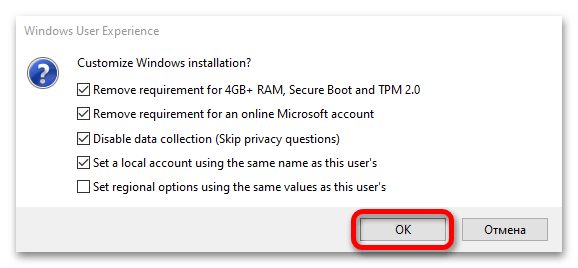
- Далее, если ваш компьютер не соответствует минимальным требованиям Windows 11 (4 Гб и более оперативной памяти, наличие модуля TPM 2.0 и поддержка функции Secure Boot), отметьте галочкой первый пункт в окне «Windows User Experience» — это отключит проверку.

Помимо требований к железу, при установке актуальных версий Виндовс 11 (а нами рассматривается именно такая) обязательным условием является необходимость подключения к интернету и наличие или регистрация учетной записи Майкрософт. Если вы хотите обойти и это ограничение, отметьте галочкой второй пункт во всплывающем окне.
Читайте также: Как установить Windows 11 без интернета
По желанию можете отметить и третий пункт – по заверениям разработчиков Rufus, это отключит сбор персональных данных системой и отправку их в Microsoft.
Два последних параметра оставим на ваше усмотрение, так как (субъективно) они являются малозначимыми. Определившись с выбором, нажмите «ОК».
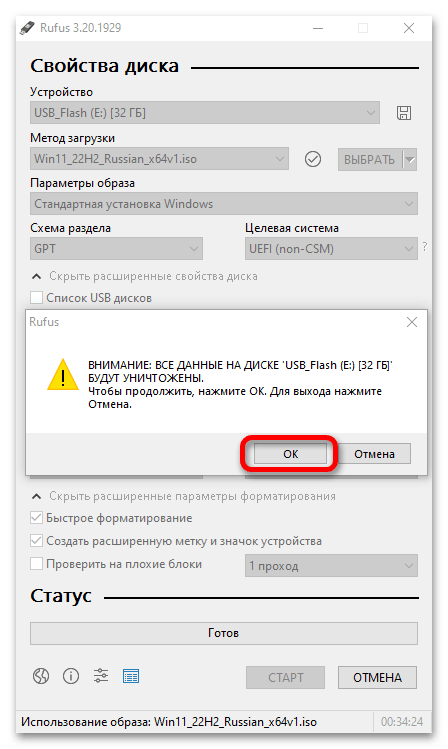
- Ознакомьтесь с предупреждением о том, что все данные с флешки будут удалены, и кликните «ОК».
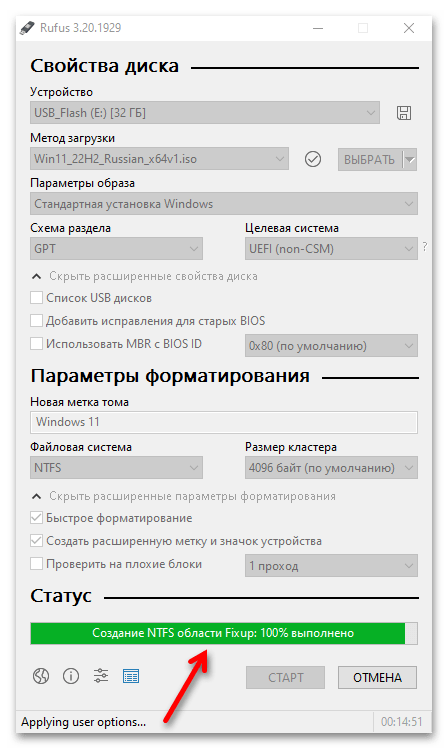
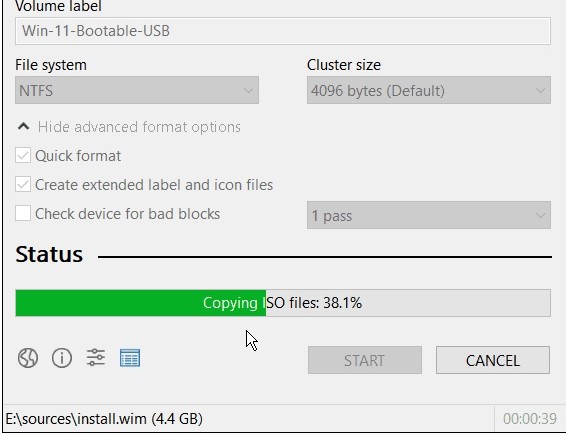
- Все что остается далее – ждать, пока будет выполнена очистка накопителя,

копирование ISO-файлов (непосредственная запись образа)
и некоторые другие операции.
По завершении (на заполненной шкале появится надпись «Готово») нажмите «Закрыть».


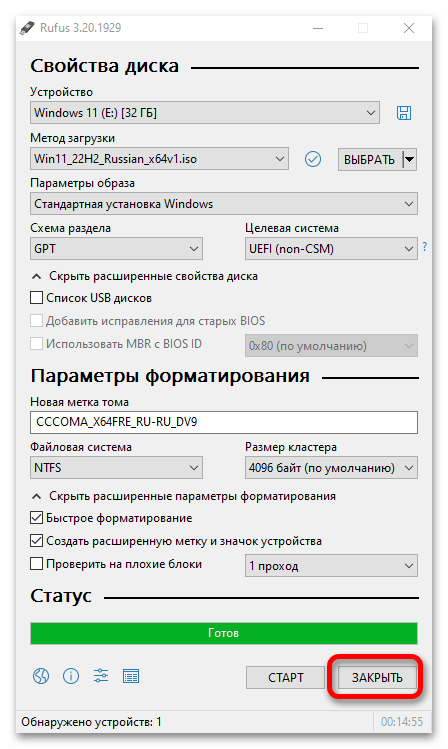
На этом возложенная на Руфус считается решенной – приложение нам больше не понадобится, можно переходить к последнему этапу. Если устанавливать ОС вы планируете на другой компьютер, извлеките флешку и переходите к следующему шагу.
Шаг 3: Установка ОС
Непосредственную установку Windows 11 нельзя назвать сложной процедурой, так как благодаря встроенному Мастеру заключается она в простом следовании инструкциям на экране и выполнении некоторых действий – по сути, представляющих собой интуитивно понятную настройку и определение дополнительных параметров. Однако если вы считаете, что с решением данной задачи могут возникнуть трудности, рекомендуем ознакомиться с отдельной статьей на нашем сайте, где все рассмотрено максимально подробно.
Подробнее: Как установить Виндовс 11 с флешки
Наша группа в TelegramПолезные советы и помощь
Друзья, если вы из числа тех, кто ещё не обновил своё железо компьютера до соответствия Windows 11, приводим для вас простейший способ создания установочной флешки Windows 11 для компьютеров без UEFI, Secure Boot и TPM 2.0 — с помощью утилиты Rufus. Утилита при записи ISO-образа установки Windows 11 предусматривает настройки, в числе которых — возможность снятия ограничений на установку Windows 11 на компьютерах без UEFI, Secure Boot и TPM 2.0. Давайте посмотрим, как с помощью Rufus создать установочную флешку Windows 11 для компьютеров, которые не соответствуют системным требованиям этой операционной системы.
Итак, друзья, Windows 11 с её системными требованиями, которым не соответствует большая половина компьютеров в мире. Возможно, вы проверили свой компьютер на совместимость в Windows 11, и он показал проседание компонентов, принципиально важных для официального использования операционной системы, а это:
- 2 ядра процессора,
- 4 Гб оперативной памяти,
- 64 Гб места на диске,
- UEFI,
- Secure Boot,
- TPM 2.0.
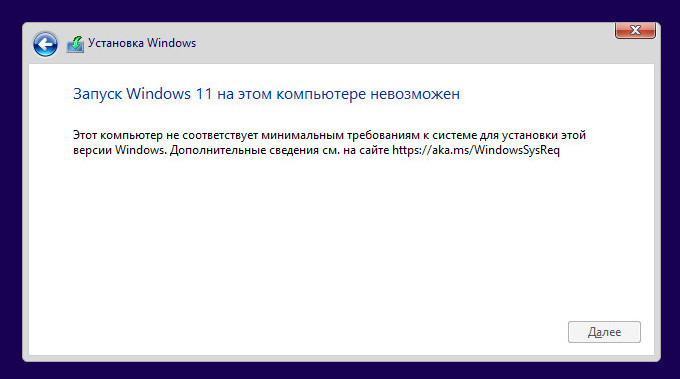
В таком случае устанавливать Windows 11 на свой компьютер вам необходимо неофициально. Есть масса способов это сделать, все они приведены в статье сайта «Как установить Windows 11 без TPM 2.0, Secure Boot и UEFI». Приводимый в этой статье способ с использованием утилиты Rufus безоговорочно выигрывает у всех остальных простотой и лёгкостью. Этот способ убирает проверку соответствия компьютера системным требованиям Windows 11. Такая проверка при обычной установке Windows 11 блокирует дальнейшую установку с выдачей ошибки «Запуск Windows 11 на этом компьютере невозможен».
Созданная с помощью Rufus установочная флешка Windows 11 установит операционную систему на компьютеры, не отвечающие любым системным требованиям Windows 11. Т.е. на компьютеры с несовместимым процессором, с оперативной памятью меньше 4 Гб, с местом на диске меньше 64 Гб, без модуля безопасности TPM 2.0 и даже без UEFI и Secure Boot. Т.е. с такой флешкой, друзья, вы даже сможете установить Windows 11 как Legacy-систему на компьютер со старым BIOS Legacy.
Rufus является продуктом проекта энтузиастов с GitHub, это бесплатная портативная утилита для создания загрузочной флешки. Скачать утилиту можно:
- На её сайте rufus.ie/ru;
- В магазине Microsoft Store.
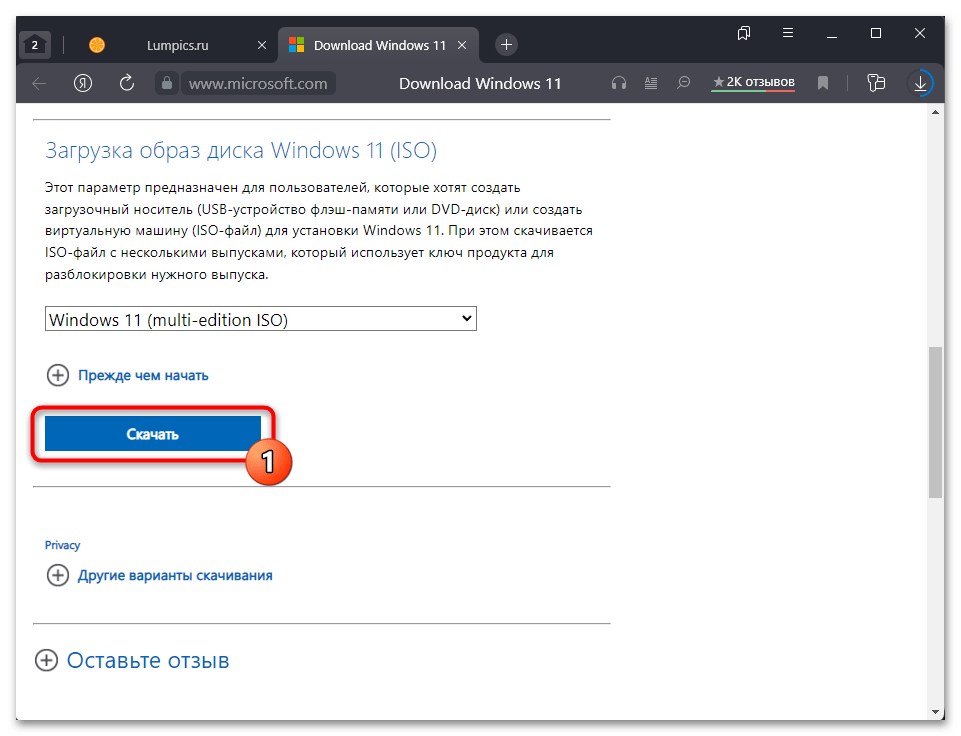
Запускаем утилиту. Если у вас скачан установочный ISO-образ Windows 11 с официального сайта, указываете его в блоке «Метод загрузки».
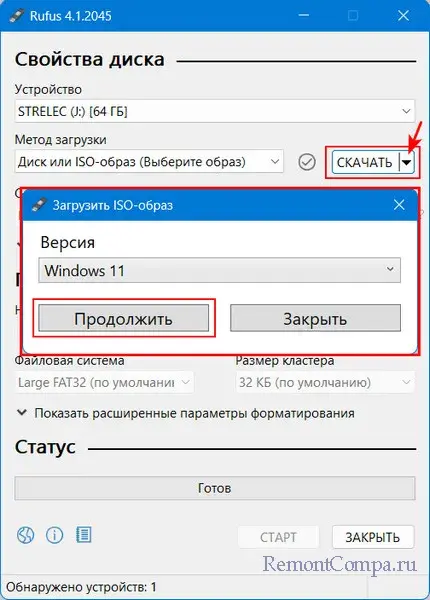
Если не скачан, можете скачать с помощью Rufus. В окне утилиты выбираем «Скачать», указываем Windows 11 и скачиваем.
В блоке «Схема раздела» указываем стиль разметки диска:
- GPT для современных компьютеров с BIOS UEFI;
- MBR для старых компьютер с BIOS Legacy.
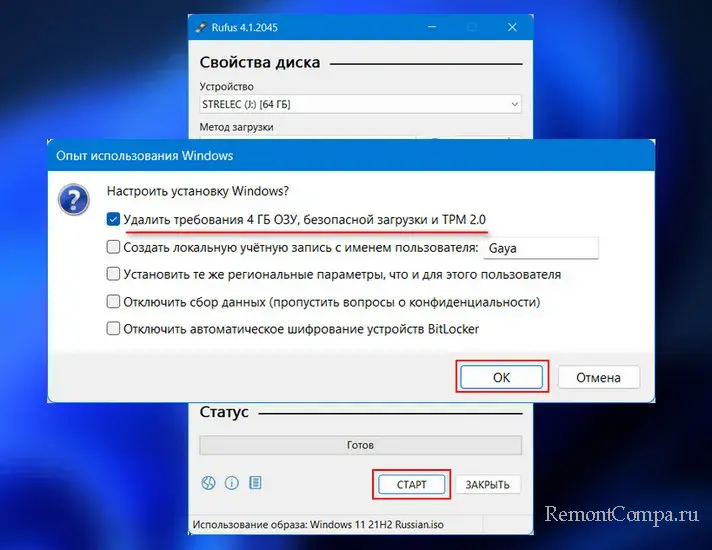
Нажимаем «Старт». Перед нами появляются настройки создания установочной флешки Windows 11. Первая настройка «Удалить требования 4 ГБ ОЗУ, безопасной загрузки и TPM 2.0» — это и есть снятие ограничений на установку Windows 11 на несоответствующих ей компьютерах. Эта настройка предустановлена. Мы просто жмём «Ок» для старта создания установочной флешки.
Дожидаемся завершения записи флешки. И всё – у нас есть установочная флешка Windows 11 для компьютеров, которые не отвечают требованиям этой операционной системы.
Увы, друзья, использовать такую флешку для обновления до Windows 11 путём запуска файла setup.exe, не получится. Снятие блокировки на установку Windows на не отвечающих её требованиям компьютерах работает только в процессе установки операционной системы с нуля. Так что если вы планируете обновиться до Windows 11 вообще или новой её версии на неподдерживаемом ею компьютере, вам в помощь статья сайта «Как обновиться до Windows 11 на не отвечающих системным требованиям компьютерах».
Напоследок, друзья, лайфхак: если вы до сих пор используете Windows 7, которую Rufus не поддерживает, либо у вас проблемы с запуском актуальной версии Rufus, запустите Rufus в среде WinPE 11-10-8 Sergei Strelec.
Creating a bootable USB drive with Windows 11 is a crucial skill for anyone looking to install or repair their operating system. Whether you have supported or unsupported hardware, this guide will walk you through the steps using Rufus, a popular free tool. By the end of this tutorial, you’ll have a bootable USB drive ready to install Windows 11, bypassing any hardware limitations.
Key Takeaways
- Rufus allows you to create a bootable USB for Windows 11, even on unsupported hardware.
- You’ll need a USB flash drive of at least 8GB and the latest Windows 11 ISO file.
- Customizing your installation through Rufus can help bypass hardware requirements and other setup steps.
Step 1: Download Rufus
Start by downloading Rufus, the tool you’ll use to create your bootable USB drive.

- Open your web browser and go to the official Rufus download page.
- Scroll down to find the download links.
- Choose the standard 64-bit version for most installations. However, if you have specific requirements, you can select the portable version or other alternatives.

Once downloaded, open Rufus to begin the setup process.
Step 2: Get the Windows 11 ISO File

Before you proceed, you’ll need the latest Windows 11 ISO file. If you don’t have it yet, follow this guide to download the Windows 11 ISO from Microsoft’s website. Once you have it saved on your computer, come back to Rufus to continue.
Step 3: Plug in Your USB Flash Drive

Ensure your USB flash drive is at least 8GB in size. Plug it into your computer, and Rufus should automatically detect it.

If it doesn’t appear, ensure the drive is properly inserted and try again. Once detected, you can proceed to select the ISO file.
Step 4: Select the Windows 11 ISO File

- In Rufus, click on the “Select” button.
- Navigate to where you saved the Windows 11 ISO file.
- Double-click the ISO file to load it into Rufus.

Step 5: Choose Partition Scheme and Target System
Rufus offers two main partition schemes: GPT and MBR. Here’s how to choose:
- GPT: Suitable for most modern systems with UEFI BIOS (typically computers made after 2012).
- MBR: Necessary for older systems that still use Legacy BIOS (pre-2012 hardware).

If you’re unsure, start with GPT. If your computer fails to boot from the USB, repeat the process with MBR selected.
Step 6: Adjust Volume Label and File System
Next, you’ll want to adjust some settings related to the USB drive formatting:

- Volume Label: Give your USB drive a name (e.g., “Windows 11”). This helps you easily identify it later.
- File System: Leave this option set to NTFS, which is the default and appropriate for most installations.
- Cluster Size: Leave this on the default setting as well.
These default settings work well in most situations, so unless you have specific needs, there’s no need to change them.

Finally, click on “Start” to proceed.
Step 7: Advanced Formatting and Customization Options
Rufus offers additional customization options that can help streamline the installation process, particularly if you’re working with unsupported hardware:

- Remove Windows 11 Hardware Requirements: This option bypasses the minimum hardware checks, so it’s recommended to keep this enabled even if your hardware is supported.
- Remove Microsoft Account Requirement: If you want to avoid using a Microsoft account during installation, enable this option.
- Skip User Account Creation: You can skip creating a user account during setup by checking this option and entering a default username (optional).
- Regional Options: You can set the regional settings (time, date, language) for the installation to match those of your current computer. If you prefer this, check the box.
- Disable Data Collection: Check this to avoid privacy questions during setup.
- Disable BitLocker Encryption: Disabling this option prevents automatic encryption of your drive by BitLocker.
After adjusting these options, click “OK” to proceed.
Step 8: Start the Bootable USB Creation Process

Next, a warning will pop up, informing you that all data on your USB drive will be erased. If you have any important files on the drive, back them up now. If you’re sure you’re ready, click OK to begin

The process will typically take around 10 minutes, depending on the speed of your system and USB drive. You can monitor the progress in Rufus through the status bar.
Step 9: Finalize and Test Your Bootable USB

Once Rufus completes the process, the status bar will turn fully green, indicating that your bootable USB is ready. The name of your USB drive will also change to the volume label you set earlier (e.g., “Windows 11”).

To confirm, you can open “This PC” or “File Explorer” on your computer, locate the USB drive, and ensure that the necessary Windows 11 files are present. Your bootable USB is now ready to install Windows 11 on any supported or unsupported system.
Conclusion
Creating a bootable USB drive for Windows 11 using Rufus is a straightforward process, even for beginners. With this guide, you can customize your installation and bypass hardware limitations. Now, you’re ready to install or repair Windows 11 on any system, supported or not. Good luck, and happy computing!
Frequently Asked Questions (FAQs)
How large should my USB drive be for a Windows 11 installation?
Your USB drive should be at least 8GB to accommodate the Windows 11 ISO file and installation tools.
Can I create a Windows 11 bootable USB on unsupported hardware?
Yes, by using Rufus, you can bypass the hardware requirements, allowing you to install Windows 11 on unsupported PCs.
What is the difference between GPT and MBR in Rufus?
GPT is used for newer systems with UEFI BIOS, while MBR is for older systems with Legacy BIOS. Use GPT unless your hardware is older (pre-2012).
Do I need an internet connection to install Windows 11?
By using Rufus to remove the Microsoft account requirement, you can skip the need for an internet connection during setup.
Is Rufus safe to use?
Yes, Rufus is widely used and considered safe for creating bootable USB drives. Just ensure you download it from the official website.
What is Rufus?
If you are looking for a clean install of the Windows 11 operating system on your PC and wondering how to use Rufus to install Windows 11, then the best way to do so is by creating a bootable USB drive. Rufus utility will help you create a bootable USB drive on your PC.
Rufus is a utility software that helps users to create or format bootable USB flash drives. Rufus is used when you need a USB installation media from bootable ISO, which includes Linux, UEFI, and Windows, to install on a PC without any operating system.
* Do you know how to create a Windows bootable USB with Rufus?
How to use Rufus to install Windows 11
To reduce the chance of getting stuck in the process of the bootable USB creation with Rufus, get to know the four basic requirements and prepare for them in advance.
1. An empty USB stick, flash drive
Once the installation process of the Rufus utility is complete, users will now need an empty flash drive to burn the ISO image. Make sure the USB device you are using is empty. Format the drive before going on to the next step.
2. Download Windows 11 ISO image
There are multiple Windows 11 files available on the internet, so downloading it is quite simple. All you have to do is open the internet and look for Windows 11 ISO images. Make sure to download the file from a renowned website to be sure that the file is not corrupt.
*This guide tells you how to download Windows 11 automatically without searching iso around.
3. Download and install Rufus on your PC
If you want to download and install Windows 11 with the help of Rufus, then you have to download and install the Rufus utility on your PC. When you are downloading Rufus if you are asked to download the update, make sure to do that as well.
4. Burn ISO image to the USB drive in Rufus
Launch the Rufus application and select the USB flash drive you want to use under devices. Click on the Select button on the right-hand side of the application. This will open up a new window where you need to select the Windows 11 ISO file you have downloaded from the internet.
Full guide for how to create and install Windows 11 with Rufus
Step 1. Now go to the third option available on the Rufus utility called «Image Option». Select on the dropdown to Standard Windows Installation. Go to the partition option and select GPT. Click on the Volume Label and type the name of the USB drive as you like.
Step 2. Keep all the rest options as it is and click on the Start button. You will see a warning come up on the screen which says all data on the flash drive will be wiped, so make sure you click on the OK button.
Step 3. Wait for the USB drive to get created. You can check on the Status section to stay updated on how much the installation has been completed.
Once the process is complete, you would get to see the following media bar.
Step 4. Once the USB drive is completed, insert the USB drive on the computer you are looking to install the OS and reboot the system. This will start up the installation process. Proceed ahead, and your OS will be installed in a very short time.
How to run Windows 11 from a bootable USB drive
The other case is that you need a bootable Windows 11 USB drive from other computers. Rufus can help you clean install a Windows 11 operating system on a computer, but with EaseUS OS2Go, you can try to copy a Windows 11 operating system to a USB drive and then make it bootable on any device, including another PC and Mac.
What’s EaseUS OS2Go?
EaseUS OS2GO is a popular Windows bootable USB creation tool that helps in creating a portable USB drive from an Already installed Microsoft Windows operating system. It helps in cloning an already installed OS into a USB drive.
A simple comparison between OS2Go and Rufus
EaseUS OS2GO and Rufus are utility software that helps in creating bootable USB drives, but both of them are quite different from each other. Rufus is used when you already have an ISO file of the operating system, and all you have to do is creating the bootable USB drive. Whereas EaseUS OS2Go is used to directly clone and make a USB bootable drive from a previously installed operating system. Both of the utility software have their uses.
Guide for how to create a bootable Windows 11 bootable drive with OS2Go
Step 1. Install EaseUS OS2Go on your Windows computer, it will display your system drive’s used space. Plug in a USB drive that is larger than the system drive used space. Choose the target USB drive and click Next to continue.

Step 2. EaseUS OS2Go will notify you that the following operation would delete all data on your drive. Make sure that you have backed up all the important data. Click the Continue button to proceed.

Step 3. Adjust disk layout. The default disk layout on the target drive will be exactly the same as the resource drive. You could also edit the layout according to your needs. Tick the option there if you’re using a Solid State Drive as the Windows bootable drive. Next, click Proceed.

Step 4. Then EaseUS OS2Go will start to create the portable USB drive. It usually takes a while depending on your OS and Network condition. When the progress reaches 100%, the USB drive should be bootable now.

Step 5. Insert the portable Windows USB and start your computer. Press the required key (F2, DEL, F10…) to access BIOS. Choose to boot from the USB disk.
Note: Please make sure that the boot mode (UEFI or Legacy) of the portable USB and your target computer are the same, otherwise you may not be able to boot.
Both Rufus and EaseUS OS2GO are popular in the market when creating a bootable USB drive. They are just used in different scenarios. You can choose the process you want depending on how and where you are creating a bootable drive.