
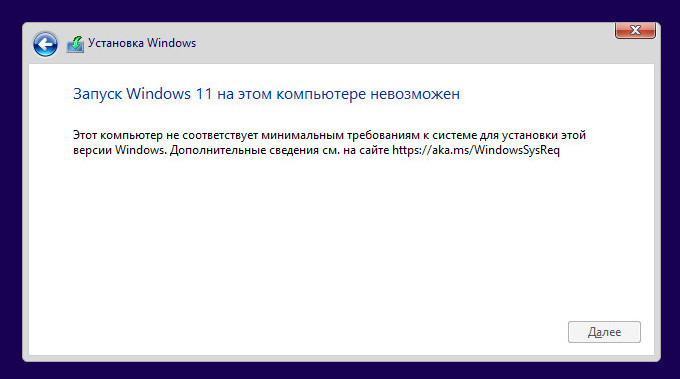
Если скачать оригинальный ISO образ с Windows 11 или создать загрузочную флешку с его использованием, а затем использовать для чистой установки системы на компьютер без доверенного платформенного модуля TPM 2.0 или TPM 1.2 (для чистой установки он также подходит), вы получите сообщение «Запуск Windows 11 на этом компьютере невозможен. Этот компьютер не соответствует минимальным требованиям к системе для установки этой версии Windows». Однако проверку наличия TPM при чистой установке можно пропустить.
В этой инструкции описан простой способ создания загрузочной флешки с Windows 11 или, при необходимости — образа ISO для выполнения чистой установки. Поколение процессора и состояние безопасной загрузки также не проверяется. Однако, установка возможна только в режиме UEFI, при Legacy загрузке сообщение о невозможности установки останется. Сам процесс установки описан в инструкции Как установить Windows 11 с флешки на компьютер или ноутбук.
Автоматическое создание образа или флешки Windows 11 для чистой установки на несовместимом компьютере

Возможные различные способы создания установочного образа ISO или USB накопителя для чистой установки на неподдерживаемых компьютерах, но почти все они предполагают ручное редактирование образа. Однако, задачу можно выполнить автоматически с помощью новой версии Rufus или бесплатного скрипта Universal Media Creation Tool. Во втором случае достаточно использовать следующие шаги:
- Скачайте архив со скриптом Universal Media Creation Tool со страницы разработчика и распакуйте в удобное расположение. Кнопка загрузки «Download ZIP» доступна если нажать по стрелке справа от кнопки «Code».
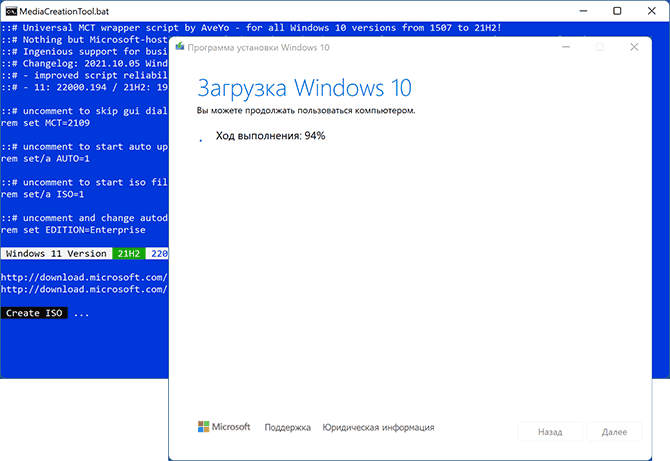
- Из папки с распакованным архивом запустите файл MediaCreationTool.bat. В случае появления предупреждения фильтра SmartScreen нажмите «Подробнее», а затем — «Выполнить в любом случае».
- Через некоторое время откроется окно со списком доступных версий Windows, выберите Windows 11.
- Следующий шаг — выбор действия. Если нам требуется образ ISO, выбираем «Create ISO». В случае, если нужна загрузочная флешка — «Create USB».
- При выборе пункта создания ISO-образа, весь процесс будет выполнен автоматически (возможна пауза после закрытия окна «Создание носителя Windows 11», после чего откроется окно консоли, в которой процесс продолжится). А по завершении процесса вы найдёте созданный ISO образ в папке со скриптом. Внимание: не смотрим на то, что в окне указано, что выполняется загрузка файлов Windows 10, по факту образ будет содержать Windows 11 с установщиком предыдущей системы.

- Если был выбран пункт для создания загрузочной флешки, вы увидите окно Media Creation Tool, где нужно будет выбрать «USB-устройство флэш-памяти», указать подключенную флешку и дождаться завершения процесса скачивания файлов и записи на накопитель, после чего загрузочная флешка Windows 11 будет готова. Как и в предыдущем случае, в процессе будет указано, что загружается Windows 10, но по факту — это файлы Windows 11.


Полученный образ или флешку можно использовать для простой чистой установки на ПК и ноутбук или в виртуальную машину.
Установку следует обязательно выполнять с режимом загрузки UEFI. Другие параметры: поколение процессора, наличие TPM 2.0 или TPM 1.2, состояние безопасной загрузки Secure Boot проверяться не будут.
Если вам требуются оригинальные образы или установочный USB-накопитель, инструкции вы найдёте здесь:
- Способы скачать Windows 11 (оригинальный образ ISO)
- Создание загрузочной флешки Windows 11
Друзья, если вы из числа тех, кто ещё не обновил своё железо компьютера до соответствия Windows 11, приводим для вас простейший способ создания установочной флешки Windows 11 для компьютеров без UEFI, Secure Boot и TPM 2.0 — с помощью утилиты Rufus. Утилита при записи ISO-образа установки Windows 11 предусматривает настройки, в числе которых — возможность снятия ограничений на установку Windows 11 на компьютерах без UEFI, Secure Boot и TPM 2.0. Давайте посмотрим, как с помощью Rufus создать установочную флешку Windows 11 для компьютеров, которые не соответствуют системным требованиям этой операционной системы.
Итак, друзья, Windows 11 с её системными требованиями, которым не соответствует большая половина компьютеров в мире. Возможно, вы проверили свой компьютер на совместимость в Windows 11, и он показал проседание компонентов, принципиально важных для официального использования операционной системы, а это:
- 2 ядра процессора,
- 4 Гб оперативной памяти,
- 64 Гб места на диске,
- UEFI,
- Secure Boot,
- TPM 2.0.
В таком случае устанавливать Windows 11 на свой компьютер вам необходимо неофициально. Есть масса способов это сделать, все они приведены в статье сайта «Как установить Windows 11 без TPM 2.0, Secure Boot и UEFI». Приводимый в этой статье способ с использованием утилиты Rufus безоговорочно выигрывает у всех остальных простотой и лёгкостью. Этот способ убирает проверку соответствия компьютера системным требованиям Windows 11. Такая проверка при обычной установке Windows 11 блокирует дальнейшую установку с выдачей ошибки «Запуск Windows 11 на этом компьютере невозможен».
Созданная с помощью Rufus установочная флешка Windows 11 установит операционную систему на компьютеры, не отвечающие любым системным требованиям Windows 11. Т.е. на компьютеры с несовместимым процессором, с оперативной памятью меньше 4 Гб, с местом на диске меньше 64 Гб, без модуля безопасности TPM 2.0 и даже без UEFI и Secure Boot. Т.е. с такой флешкой, друзья, вы даже сможете установить Windows 11 как Legacy-систему на компьютер со старым BIOS Legacy.
Rufus является продуктом проекта энтузиастов с GitHub, это бесплатная портативная утилита для создания загрузочной флешки. Скачать утилиту можно:
- На её сайте rufus.ie/ru;
- В магазине Microsoft Store.
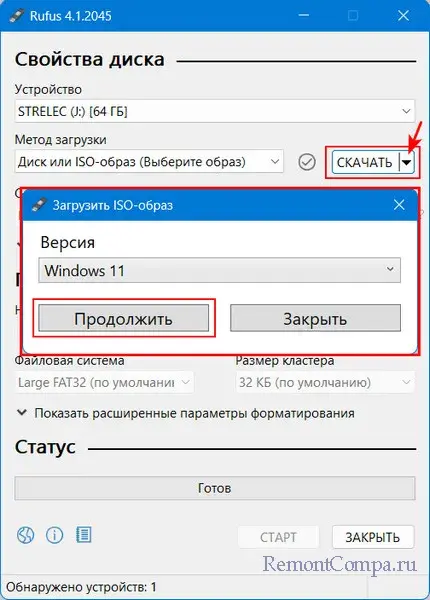
Запускаем утилиту. Если у вас скачан установочный ISO-образ Windows 11 с официального сайта, указываете его в блоке «Метод загрузки».
Если не скачан, можете скачать с помощью Rufus. В окне утилиты выбираем «Скачать», указываем Windows 11 и скачиваем.
В блоке «Схема раздела» указываем стиль разметки диска:
- GPT для современных компьютеров с BIOS UEFI;
- MBR для старых компьютер с BIOS Legacy.
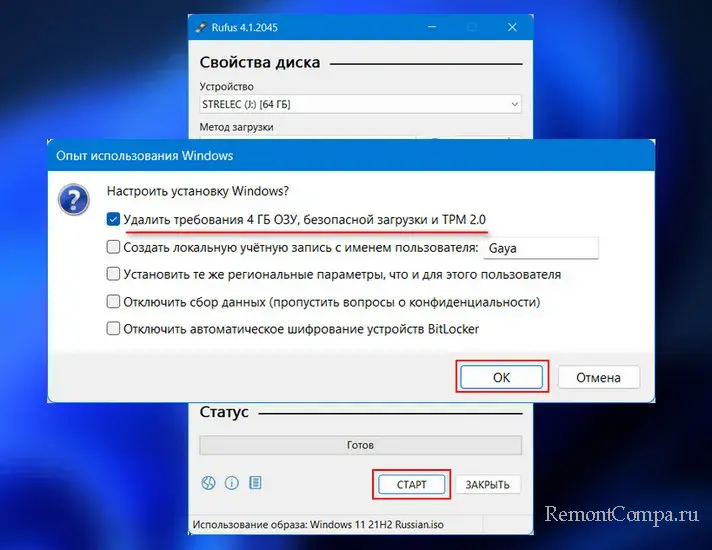
Нажимаем «Старт». Перед нами появляются настройки создания установочной флешки Windows 11. Первая настройка «Удалить требования 4 ГБ ОЗУ, безопасной загрузки и TPM 2.0» — это и есть снятие ограничений на установку Windows 11 на несоответствующих ей компьютерах. Эта настройка предустановлена. Мы просто жмём «Ок» для старта создания установочной флешки.
Дожидаемся завершения записи флешки. И всё – у нас есть установочная флешка Windows 11 для компьютеров, которые не отвечают требованиям этой операционной системы.
Увы, друзья, использовать такую флешку для обновления до Windows 11 путём запуска файла setup.exe, не получится. Снятие блокировки на установку Windows на не отвечающих её требованиям компьютерах работает только в процессе установки операционной системы с нуля. Так что если вы планируете обновиться до Windows 11 вообще или новой её версии на неподдерживаемом ею компьютере, вам в помощь статья сайта «Как обновиться до Windows 11 на не отвечающих системным требованиям компьютерах».
Напоследок, друзья, лайфхак: если вы до сих пор используете Windows 7, которую Rufus не поддерживает, либо у вас проблемы с запуском актуальной версии Rufus, запустите Rufus в среде WinPE 11-10-8 Sergei Strelec.
Время на прочтение2 мин
Количество просмотров15K

21 октября 2024 года состоялся релиз открытой утилиты для создания загрузочных накопителей (включая возможности для кастомизированной настройки установщиков) Rufus 4.6 с обходом неподдерживаемых процессоров в ПК для Windows 11 24H2. Исходный код проекта написан на C и опубликован на GitHub под лицензией GNU General Public License v3.0. Выпуск Rufus 4.0 без поддержки Windows 7 состоялся в апреле прошлого года.

Основные изменения и дополнения в Rufus 4.6 также включают в себя исправления ошибок, доработанную поддержку загрузки ReactOS (там были некоторые проблемы, связанные с загрузкой, и переход на FreeLdr.SYS исправил их) и установку паролей локальных учетных записей по умолчанию так, чтобы они не истекали.

Теперь пользователи ПК со старыми процессорами могут устанавливать Windows 11 24H2. Предыдущие стабильные версии Rufus, а также текущий вариант Media Creation Tool не позволяют это сделать.
В начале октября разработчик проекта Пит Батард встал на защиту утилиты Rufus и пообещал помочь в обходе системных требований новой версии ОС от Microsoft в обновлении утилиты и попросил пользователей ПК со старыми процессорами принять проблему с невозможностью запустить их системы на Windows 11 24H2.
Сборка Windows 11 24H2 (вышла в общий доступ в начале октября) имеет в требованиях к процессору необходимость поддержки инструкции PopCnt (Population count — count number of bits set to 1, входит в набор SSE4.2 в Intel или Advanced Bit Manipulation (ABM) для AMD), которой нет в старых CPU. При попытке загрузить Windows 11 24H2 на ПК с процессором без поддержки инструкции PopCnt система не запускается, а зависает на экране загрузки с логотипом Windows.
Процессоры AMD поддерживают инструкцию PopCnt с 2006 года после выпуска архитектуры Barcelona, Intel добавила поддержку PopCnt в микроархитектуре Nehalem в 2008 году (в первое поколение серии Core i). Например, в ПК на AMD Turion II и Intel Core 2 Duo нет такой инструкции, и запуск новой версии Windows 11 на них будет недоступен, если не найти обходной путь для этого ограничения. Фактически Windows 11 24H2 не получится запустить на ПК с Intel Core 2 Quad Q9650, но система заработает на Celeron J4005.
Обычным пользователям Microsoft советует купить новый компьютер или ноутбук с Windows 11 вместо своего устаревшего устройства или продолжать использовать Windows 11 23H2.
Примечательно, что, помимо Rufus 4.6, вышла новая утилита Flyby11, разработчики которой тоже обещают обход системных требований для Windows 11 24H2 всего за несколько щелчков мыши.

UPDATED 5/9/2025: If you have a computer that doesn’t meet the minimum system requirements, you can still install Windows 11, but not through Windows Update. Instead, you must use a bootable USB flash drive or ISO file to manually perform a clean installation or in-place upgrade. In this guide, I’ll explain how to complete this configuration.
Microsoft strongly discourages installing Windows 11 on unsupported hardware due to concerns about security, system stability, and long-term reliability. However, for advanced users and tech enthusiasts, there are workarounds. You can use third-party tools like Rufus or Ventoy to create a custom bootable media that bypasses the hardware checks. Alternatively, it’s possible to modify the Registry during setup using a USB flash drive to skip system requirement validations.
If your computer is already running Windows 10 or an older version of Windows 11, you also have the option to launch an in-place upgrade. This can be done by editing the Registry before setup or by launching the upgrade process from the Command Prompt. Alternatively, you can use tools like Rufus to build custom installation media specifically designed to ignore Microsoft’s hardware restrictions.
Microsoft defines “unsupported state” as any device that fails to meet the official Windows 11 minimum system requirements. These systems are not eligible for support and may not receive updates through Windows Update. While some unsupported devices do continue to receive patches and driver updates, the company explicitly states there are no guarantees for security updates, driver compatibility, or technical support.
If you’re moving forward with Windows 11 on unsupported hardware, a clean installation is highly recommended. It offers the best chance for a stable experience and minimizes upgrade issues. However, keep in mind that no matter which method you choose, installing Windows 11 on incompatible hardware carries inherent risks. Since the device isn’t officially supported, problems during or after installation are more likely, and Microsoft won’t help fix them.
Also, you can always automate the installation with an answer file that can be integrated into the Windows 11 USB flash drive.
In this guide, I will teach you how to install Windows 11 on a computer that doesn’t meet the minimum requirements. Since the device does not officially support the new version of Windows, using these workarounds is not recommended unless you know the risks and understand that stability, compatibility, and updates are not guaranteed.
- Clean install Windows 11 on unsupported hardware using Rufus
- Clean install Windows 11 on unsupported hardware using Ventoy
- Clean install Windows 11 on unsupported hardware using USB drive
- Upgrade to Windows 11 on unsupported hardware using Command Prompt
- Upgrade to Windows 11 on unsupported hardware using Rufus
- Upgrade to Windows 11 on unsupported hardware using Registry
Important: The clean installation process will erase everything on the computer, and the in-place upgrade will make significant changes to the system. As such, it’s recommended to create a full backup before proceeding. You can use these instructions to create a backup of Windows 10. Also, Microsoft now requires the POPCNT instruction inside the processor to install Windows 11 24H2 and higher releases. Otherwise, the computer will fail to boot. However, you will continue to be able to install it on unsupported processors. The only exclusion will be processors from AMD and Intel released before 2008.
Clean install Windows 11 on unsupported hardware using Rufus
If you plan to install the latest version of the operating system, downloading the ISO file and using the Rufus tool is perhaps the easiest way to proceed on unsupported hardware.
Also, you must ensure the computer can boot from a USB flash drive, which means you may need to change the UEFI settings or start the device in the boot menu. Since the firmware settings are different on every computer, you must check your manufacturer’s support website for more specific details.
Follow these instructions to perform a clean installation of Windows 11 using Rufus with incompatible hardware.
1. Download Windows 11 ISO file
To download the official Windows 11 ISO file, use these steps:
-
Open the Microsoft Support website.
-
Select the Windows 11 option under the “Download Windows 11 Disk Image (ISO) for x64 devices” section.

-
Click the Download button.
-
Select the installation language.
-
Click the Confirm button.
-
Click the Download button to save the ISO file on the computer.


Once you complete the steps, you can use the image of Windows 11 to create an installation media.
2. Create Windows 11 bootable media
To create a Windows 11 bootable media, connect a USB flash drive of at least 8GB and use these steps:
-
Open the Rufus website.
-
Click the link to download the latest version under the “Download” section.
-
Choose the USB flash drive from the “Device” setting.
-
Double-click the executable to launch the tool.
-
Click the Select button.

-
Select the Windows 11 ISO file.
-
Click the Open button.
-
Continue with the default settings after the download.
-
(Optional) Specify a name for the drive under the “Volume label” setting.
-
Click the Start button.
-
Check the “Remove requirement for 4GB+ RAM, Secure Boot and TPM 2.0” option to install Windows 11 on unsupported hardware.

-
Check the “Remove requirement for an online Microsoft account” option to bypass the internet and Microsoft account requirements and create a local account.
-
(Optional) Check the “Create a local account with username” option and specify an account name to create a local account automatically.
-
Check the “Disable BitLocker automatic device encryption” option to prevent the setup from enabling BitLocker during the installation (if applicable).
-
Click the OK button.


Once you complete the steps, the tool will create a bootable media for unsupported hardware.
If you choose the option to create a local account automatically, the setup will create the account without a password. After the installation, don’t forget to create a password and PIN from the “Sign-in options” settings page.
3. Windows 11 unsupported hardware install process with Rufus
To perform a clean install of Windows 11 on unsupported hardware, use these steps:
-
Start the PC with the Windows 11 USB flash drive created with Rufus.
-
Press any key to continue.
-
Choose the installation language and format.

-
Click the Next button.
-
Choose the keyboard and input method.

-
Click the Next button.
-
Select the “Install Windows 11” option.

-
Check the “I agree everything” option to confirm this process will delete everything on the computer.
-
Click the Next button.
-
Click the “I don’t have a product key” option.

Quick note: The computer will activate automatically if you’re reinstalling the operating system. If this is a new computer that never included a version of Windows, you will have to provide a product key.
-
Select the edition of Windows your license key activates (if applicable).
-
Click the Next button.
-
Click the Accept button
-
Select each partition on the hard drive where you want to install Windows 11 and click the Delete button. (Usually, “Drive 0” is the drive that contains all the installation files.)
-
Select the hard drive (Drive 0 Unallocated Space) to install the latest version of the operating system.
-
Click the Next button.
-
Click the Install button.

-
Choose your region setting on the first page of the out-of-the-box experience (OOBE) after the installation.
Quick note: The initial setup experience may be slightly different as Microsoft is constantly making changes and offering different options, depending on your region and the capabilities of the device.

-
Click the Yes button.
-
Select your keyboard layout setting.
-
Click the Yes button.
-
Click the Skip button if you do not need to configure a second layout.
-
The computer will automatically connect to the network using an Ethernet connection. You must set up the connection manually on a wireless connection (a security key may be required).
-
(Optional) Confirm a name for the computer.
Quick note: This is an optional step, but I recommend setting a name to make it easier to identify the device in the network, on your Microsoft account, and when restoring your computer from backup. Also, after completing this step, the setup will restart to apply the new name, but it’ll start where you left off to continue with the settings.
-
Click the Next button. (The device will restart automatically.)
-
Select the “Set up for personal use” option for Windows 11 Pro. This option is not available for the “Home” edition.
Quick tip: Use the “Set up for work or school” option to skip the Microsoft account and create a local account.
-
Click the Next button.
-
Click the Sign in button.
-
Confirm your Microsoft account email to create a Windows 11 account.
-
Click the Next button.
-
Confirm your Microsoft account password.
-
Click the Next button.
-
Click the Create PIN button.
-
Create a new four-digit Windows Hello PIN.
-
Click the OK button.
-
Turn on or off the toggle switch for each privacy setting to confirm the one that best suits your situation.
-
Click the Next button.
-
Click the Next button again.
-
Click the Accept button.
-
Click the More options setting.
Quick tip: You can also click the “Restore from this PC” button to restore your files, apps, settings, and credentials from the system backup available in your OneDrive account. You can learn more about the Windows Backup app in this guide.
-
Click the “Set up as a new PC” option.
-
Click the “Set up as a new PC” option again.
-
(Optional) On the “Let’s customize your experience” page, select one or more ways you plan to use the device to allow the operating system to suggest tools and service customization during this experience.
-
Click the Accept button to continue. Or click the Skip button to skip this part of the setup.
-
(Optional) Use the code to link your Android phone, or click the “Skip” option.
-
(Optional) Use the code to download OneDrive on your phone, or click the “Skip” option.
-
Click the “Not now” button if you will be using a browser other than Microsoft Edge.


Once you complete the steps, Windows 11 24H2 will finish the clean installation on the computer with unsupported hardware.
You can also follow these instructions in my video tutorial on my channel.
Clean install Windows 11 on unsupported hardware using Ventoy
Alternatively, you can also create a USB bootable media with Ventoy to perform a clean installation of a device that doesn’t meet the minimum hardware requirements.
Ventoy is a free and open-source tool for creating bootable USB drives for ISO, WIM, and IMG. Unlike traditional tools, you don’t need to format the USB drive repeatedly for each new operating system or tool. Instead, you copy the ISO files to the USB drive, and Ventoy presents you with a boot menu to select the desired image when you start your computer.
When using this method, remember that the device has to be able to boot from a USB flash drive. This means you may need to change the UEFI settings or start the device in the boot menu. Check your manufacturer’s support website for more specific details.
Follow these instructions to perform a clean installation of Windows 11 using Ventoy.
1. Download Windows 11 ISO file
To download the official Windows 11 ISO file, use these steps:
-
Open the Microsoft Support website.
-
Select the Windows 11 option under the “Download Windows 11 Disk Image (ISO) for x64 devices” section.
-
Click the Download button.
-
Select the installation language.
-
Click the Confirm button.
-
Click the Download button to save the ISO file on the computer.
Once you complete the steps, you can use the image of Windows 11 to create an installation media.
2. Create Windows 11 USB with Ventoy
To create a Windows 11 USB with Ventoy, connect a flash drive with enough space (8GB or more) and use these steps:
-
Open the Ventoy GitHub page.
-
Click the ventoy-x.x.xx-windows.zip file under the “Assets” section and download it to your computer.

Quick note: You may need to force and keep the file as the browser may detect it as malicious.
-
Open File Explorer.
-
Open the Zip folder location.
-
Double-click to open the ventoy-x.x.xx-windows.zip file.
-
Click the Extract all button from the command bar.

-
Click the Browse button.
-
Select a location to extract the files.
-
Click the Select Folder button.
-
Click the Extract button.
-
Open the ventoy-x.x.xx folder.
-
Double-click the Ventoy2Disk.exe file to launch the installer.
-
Choose the USB flash drive from the “Device” setting.
-
Click the Install button.

-
Click the OK button.
-
Click on This PC from the left pane of File Explorer.
-
Open the Ventoy drive.
-
Copy and paste the Windows 11 ISO file to make it bootable.


After you complete the steps, you can use the USB flash drive to start the computer with the Ventoy tool to launch the Windows 11 installation.
3. Windows 11 unsupported hardware install process with Ventoy
To perform a clean install of Windows 11 with Ventoy, use these steps:
-
Start the PC with the Ventoy USB flash drive.
-
Select the Windows 11 ISO file from the Ventoy menu and press Enter to continue with the setup.
-
Press any key to continue.
-
Choose the installation language and format.
-
Click the Next button.
-
Choose the keyboard and input method.
-
Click the Next button.
-
Select the “Install Windows 11” option.
-
Check the “I agree everything” option to confirm this process will delete everything on the computer.
-
Click the Next button.
-
Click the “I don’t have a product key” option.
Quick note: The computer will activate automatically if you’re reinstalling the operating system. If this is a new computer that never included a version of Windows, you will have to provide a product key.
-
Select the edition of Windows your license key activates (if applicable).
-
Click the Next button.
-
Click the Accept button
-
Select each partition on the hard drive where you want to install Windows 11 24H2 and click the Delete button. (Usually, “Drive 0” is the drive that contains all the installation files.)
-
Select the hard drive (Drive 0 Unallocated Space) to install the latest version of the operating system.
-
Click the Next button.
-
Click the Install button.
-
Choose your region setting on the first page of the out-of-the-box experience (OOBE) after the installation.
Quick note: The initial setup experience may be slightly different as Microsoft is constantly making changes and offering different options, depending on your region and the capabilities of the device.
-
Click the Yes button.
-
Select your keyboard layout setting.
-
Click the Yes button.
-
Click the Skip button if you do not need to configure a second layout.
-
The computer will automatically connect to the network using an Ethernet connection. You must set up the connection manually on a wireless connection (a security key may be required).
-
(Optional) Confirm a name for the computer.
Quick note: This is an optional step, but I recommend setting a name to make it easier to identify the device in the network, on your Microsoft account, and when restoring your computer from backup. Also, after completing this step, the setup will restart to apply the new name, but it’ll start where you left off to continue with the settings.
-
Click the Next button. (The device will restart automatically.)
-
Select the “Set up for personal use” option for Windows 11 Pro. This option is not available for the “Home” edition.
Quick tip: Use the “Set up for work or school” option to skip the Microsoft account and create a local account.
-
Click the Next button.
-
Click the Sign in button.
-
Confirm your Microsoft account email to create a Windows 11 account.
-
Click the Next button.
-
Confirm your Microsoft account password.
-
Click the Next button.
-
Click the Create PIN button.
-
Create a new four-digit Windows Hello PIN.
-
Click the OK button.
-
Turn on or off the toggle switch for each privacy setting to confirm the one that best suits your situation.
-
Click the Next button.
-
Click the Next button again.
-
Click the Accept button.
-
Click the More options setting.
Quick tip: You can also click the “Restore from this PC” button to restore your files, apps, settings, and credentials from the system backup available in your OneDrive account. You can learn more about the Windows Backup app in this guide.
-
Click the “Set up as a new PC” option.
-
Click the “Set up as a new PC” option again.
-
(Optional) On the “Let’s customize your experience” page, select one or more ways you plan to use the device to allow the operating system to suggest tools and service customization during this experience.
-
Click the Accept button to continue. Or click the Skip button to skip this part of the setup.
-
(Optional) Use the code to link your Android phone, or click the “Skip” option.
-
(Optional) Use the code to download OneDrive on your phone, or click the “Skip” option.
-
Click the “Not now” button if you will be using a browser other than Microsoft Edge.
Once you complete the steps, the latest version of Windows 11 will install on the computer with unsupported hardware.
Clean install Windows 11 on unsupported hardware using USB drive
You can also make changes to the Registry using a Windows 11 USB flash drive to bypass the requirements and complete the clean installation of the operating system.
In addition, you must make sure the device can start from USB, which means you will have to change the UEFI settings. Since most computers have different settings, check your manufacturer’s support website for more specific details.
1. Cerate bootable USB with the Media Creation Tool
To create a bootable Windows 11 USB with the Media Creation Tool, use these steps:
-
Open the Microsoft support website.
-
Click the Download Now button under the “Create Windows 11 installation media” section.
-
Double-click the MediaCrationTool.exe file to launch the tool.
-
Click the Accept button.
-
Click the Next button.

Quick note: If you want to create a Windows 11 USB for another device, you can also clear the “Use the recommended options for this PC” option to select the correct language, architecture, and edition.
-
Select the USB flash drive option.
-
Click the Next button.
-
Select the USB flash drive from the list, but ensure it does not contain important files, as this process will erase everything on it.
-
Click the Next button.
-
Click the Finish button.


Once you complete the steps, you can start the UEFI-compatible device with the USB drive to install Windows 11.
2. Windows 11 unsupported hardware install from USB
To install Windows 11 on an unsupported PC from a USB flash drive, use these steps:
-
Start the unsupported PC with the Windows 11 USB flash drive.
-
Press any key to continue.
-
Use the “Shift + F10” keyboard shortcut to open Command Prompt on the first “Windows Setup” page.
-
Type the following command and press Enter:
regedit

-
Navigate the following path:
HKEY_LOCAL_MACHINE\SYSTEM\Setup
-
Right-click the Setup (folder) key, select New, and then the Key option.

-
Name the key LabConfig and press Enter.
-
Right-click the LabConfig (folder) key, select New, and then the DWORD (32-bit) Value option.
-
Name the key BypassTPMCheck and press Enter.
-
Double-click the newly created key and set its value from 0 to 1.

-
Click the OK button.
-
Right-click the LabConfig (folder) key, select New, and then the DWORD (32-bit) Value option.
-
Name the DWORD BypassSecureBootCheck and press Enter.
-
Double-click the newly created key and set its value from 0 to 1.

-
Click the OK button.
-
Close the Registry.
-
Close the Command Prompt console.
-
Choose the installation language and format.
-
Click the Next button.
-
Choose the keyboard and input method.
-
Click the Next button.
-
Select the “Install Windows 11” option.
-
Check the “I agree everything will be deleted including files, apps, and settings” option.
-
Click the “I don’t have a product key” option.
-
Select the “Windows 11 Pro” or “Windows 11 Home” option, depending on whether the license key that activates.
-
Click the Next button.
-
Click the Accept button
-
Select each partition on the hard drive where you want to install Windows 11 24H2 and click the Delete button. (Usually, “Drive 0” is the drive that contains all the installation files.)
-
Select the hard drive (Drive 0 Unallocated Space) to install the operating system.
-
Click the Next button.
-
Click the Install button.
-
Choose your region setting on the first page of the out-of-the-box experience (OOBE) after the installation.
Quick note: The initial setup experience may be slightly different as Microsoft is constantly making changes and offering different options, depending on your region and the capabilities of the device.
-
Click the Yes button.
-
Select your keyboard layout setting.
-
Click the Yes button.
-
Click the Skip button if you do not need to configure a second layout.
-
The computer will automatically connect to the network using an Ethernet connection. You must set up the connection manually on a wireless connection (a security key may be required).
-
(Optional) Confirm a name for the computer.
Quick note: This is an optional step, but I recommend setting a name to make it easier to identify the device in the network, on your Microsoft account, and when restoring your computer from backup. Also, after completing this step, the setup will restart to apply the new name, but it’ll start where you left off to continue with the settings.
-
Click the Next button. (The device will restart automatically.)
-
Select the “Set up for personal use” option for Windows 11 Pro. This option is not available for the “Home” edition.
Quick tip: Use the “Set up for work or school” option to skip the Microsoft account and create a local account.
-
Click the Next button.
-
Click the Sign in button.
-
Confirm your Microsoft account email to create a Windows 11 account.
-
Click the Next button.
-
Confirm your Microsoft account password.
-
Click the Next button.
-
Click the Create PIN button.
-
Create a new four-digit Windows Hello PIN.
-
Click the OK button.
-
Turn on or off the toggle switch for each privacy setting to confirm the one that best suits your situation.
-
Click the Next button.
-
Click the Next button again.
-
Click the Accept button.
-
Click the More options setting.
Quick tip: You can also click the “Restore from this PC” button to restore your files, apps, settings, and credentials from the system backup available in your OneDrive account. You can learn more about the Windows Backup app in this guide.
-
Click the “Set up as a new PC” option.
-
Click the “Set up as a new PC” option again.
-
(Optional) On the “Let’s customize your experience” page, select one or more ways you plan to use the device to allow the operating system to suggest tools and service customization during this experience.
-
Click the Accept button to continue. Or click the Skip button to skip this part of the setup.
-
(Optional) Use the code to link your Android phone, or click the “Skip” option.
-
(Optional) Use the code to download OneDrive on your phone, or click the “Skip” option.
-
Click the “Not now” button if you will be using a browser other than Microsoft Edge.


Once you complete the steps, Windows 11 will install in an unsupported state, so you may not get security or driver updates.
Upgrade to Windows 11 on unsupported hardware from Commnand Prompt
You can also perform an in-place upgrade from Windows 11 23H2 or 22H2 to version 24H2 by running a special command that bypasses the restrictions with Command Prompt. If you have a device running Windows 10, I recommend using the clean installation process instead.
Follow these steps to use commands to upgrade your unsupported computer to Windows 11.
1. Download Windows 11 ISO file
To download the ISO file for the new feature update, use these steps:
-
Open the Microsoft Support website.
-
Select the Windows 11 option under the “Download Windows 11 Disk Image (ISO) for x64 devices” section.
-
Click the Download button.
-
Select the installation language.
/li>
-
Click the Confirm button.
-
Click the Download button to save the ISO file on the computer.
Once you complete the steps, you can use the ISO file of Windows 11 to create an installation media.
2. Windows 11 unsupported hardware upgrade using commands
To upgrade a computer that doesn’t meet the Windows 11 requirements, use these steps:
-
Open File Explorer.
-
Open the Windows 11 ISO file location.
-
Right-click the ISO file, select the Open with submenu, and choose the Windows Explorer option.
-
Confirm the letter for the drive with the installation files.
-
Open Start.
-
Search for Command Prompt, right-click the top result, and choose the Run as administrator option.
-
Type the following command to open the location with the installation files and press Enter:
J:
In the command, change the letter “J” to the letter that corresponds to your drive.
-
Type the following command to run the Windows 11 setup, bypassing the hardware requirements, and press Enter:
setup.exe /product server
Quick tip: If the command doesn’t work, in the installation drive, open the “Sources” folder with the
cd sourcescommand and run thesetupprep /product servercommand to launch the setup again.
-
(Optional) Click the “Change how Windows Setup downloads updates” option.
-
Select the “Not right now” option.
-
Click the Next button.
-
Check the “Keep files, settings, and apps” option.
-
Click the Install button to upgrade while keeping files and apps.


After you complete the steps, the setup will upgrade the system to Windows 11 without going through the Out-of-box Experience (OOBE) and keeping your files and apps.
Also, note that the setup will now be labeled as “Windows Server,” but it’ll install the client version of the operating system.
While this command works to upgrade a device running Windows 10 or an older version of Windows 11, it’s important to mention that there will be times when it may not work, and you may end up with a message about the setup not being able to determine if your computer is compatible. You can try the command a few more times, but if it doesn’t work, you should try a different method.
Upgrade to Windows 11 on unsupported hardware using Rufus
Follow these instructions to create a custom USB installation media to upgrade your computer to version 24H2.
1. Create Windows 11 USB with Rufus
To create a USB media installer for unsupported hardware, connect a USB flash drive of at least 8GB and use these steps:
-
Open the Rufus website.
-
Click the link to download Rufus 4.x or higher under the “Download” section.
-
Double-click the executable to launch the tool.
-
Click the Settings button (third button from the left) at the bottom of the page.

-
Use the “Check for updates” drop-down menu and select the Daily option under the “Settings” section.

-
Click the Close button.
-
Click the Close button again.
-
Open Rufus again.
-
(Optional) Use the drop-down menu and select the USB flash drive to create the installation media under the “Device” section.
-
Use the drop-down menu and select the “Disk or ISO image” option under the “Boot selection” section.
-
Click the down-arrow button (on the right side) and select the Download option.

-
Click the Download button.
-
Select the Windows 11 option.

-
Click the Continue button.
-
Select the “24H2” option to choose the Windows 11 2024 Update under the “Release” section.
-
Click the Continue button.
-
Select the Windows 11 Home/Pro/Edu option.
-
Click the Continue button.
-
Select the language of Windows 11.
-
Click the Continue button.
-
Select the x64 architecture option.
-
Click the Download button.
-
Select the location to save the Windows 11 ISO file automatically.
-
Continue with the default settings after the download.
-
(Optional) Specify a name for the drive under the “Volume label” setting.
-
Click the Start button.
-
Check the “Remove requirement for 4GB+ RAM, Secure Boot and TPM 2.0” option to install version 24H2 on unsupported hardware.
-
Check the “Remove requirement for an online Microsoft account” option to bypass the internet requirement and create a local account.
-
(Optional) Check the “Create a local account with username” option and specify an account name to create a local account automatically.
-
Check the “Disable BitLocker automatic device encryption” option to prevent the setup from enabling BitLocker during the installation.
-
Click the OK button.


2. Windows 11 unsupported hardware upgrade using Rufus
To upgrade a computer that doesn’t meet the Windows 11 requirements with a Rufus USB installer, use these steps:
-
Connect the custom Windows 11 USB to your computer.
-
Open File Explorer (Windows key + E).
-
Select the USB flash drive from the left navigation pane.
-
Right-click the Setup.exe file and choose the Run as administrator option.

-
Click the Yes button to continue (if applicable).
-
Click the Accept button.
-
Click the Next button.
-
Check the “Keep files, settings, and apps” option.
-
Click the Install button to upgrade while keeping files and apps.

After you complete the steps, the modified setup will proceed with the upgrade without going through the Out-of-box Experience (OOBE) and keeping your files and apps.
Upgrade to Windows 11 on unsupported hardware using Registry
Although it’s not supported, Microsoft previously posted a workaround to bypass the Windows 11 requirements to continue the setup by editing the Registry. However, the computer needs a TPM 1.2 chip and UEFI firmware with Secure Boot enabled.
1. Edit the Registry to bypass official checks
To bypass the minimum system requirements to upgrade to Windows 11, use these steps:
-
Open Start.
-
Search for regedit and click the top result to open the Registry Editor.
-
Navigate to the following path:
HKEY_LOCAL_MACHINE\SYSTEM\Setup\MoSetup
-
Right-click the MoSetup (folder) key, select the New submenu, and choose the “DWORD (32-bit) Value” option.
-
Name the key AllowUpgradesWithUnsupportedTPMOrCPU and press Enter.
-
Double-click the newly created key and set its value from 0 to 1.


Once you complete the steps, you can mount an ISO file or connect a USB media to begin the installation of Windows 11 on unsupported hardware.
2. Upgrade to Windows 11 using ISO file
To begin the Windows 11 upgrade process, use these steps:
-
Open the Microsoft Support website.
-
Under the “Download Windows 11 Disk Image (ISO)” section, select the Windows 11 option.
-
Click the Download button.
-
Select the installation language.
-
Click the Confirm button.
-
Click the Download button to save the Windows 11 ISO file on the device.
-
Right-click the ISO file, select the Open with submenu, and choose the Windows Explorer option.
-
Click on the mounted drive from the left navigation pane.
-
Double-click the Setup file to begin the Windows 11 upgrade process.
-
(Optional) Click the “Change how Windows Setup downloads updates” option.
-
Select the “Not right now” option.
-
Click the Next button.
-
Click the Accept button to agree to the terms.
-
Click the Install button to upgrade while keeping your files and apps.

If you want to start fresh with a clean installation of Windows 11, click the “Change what to keep” option, select the “Nothing” option, click the “Next” button, and then click the “Install” button.
Once you complete the steps, the setup will continue with the upgrade on your device to Windows 11.
What installation methods did you choose, and have you come across any issues? Let me know in the comments.
Update May 9, 2025: This guide has been updated to ensure accuracy and reflect changes to the process.
Более года назад, в октябре 2021 года, была выпущена новейшая операционная система от компании Microsoft – Windows 11. За прошедшее время компания выявила и устранила большое количество ошибок, что представив пользователям наиболее стабильную версию системы.
Несмотря на то, что стабильный образ системы был опубликован еще несколько месяцев назад, большое количество пользователей все еще не пользуются Windows 11 по причине высоких аппаратных требований. Как оказалось, их можно обойти, но делать это следует на свой страх и риск. Безусловно, система может стабильно работать, открывать необходимые вам программы и приложения, но никто не может гарантировать безопасность личных данных.
Дело в том, что для установки Windows 11 на неподдерживаемое железо, необходимо отключить ряд функций в оригинальном дистрибутиве. Среди них — требование наличия модуля TPM 2.0 и включенной безопасной загрузки Secure Boot. Отключение данных функций не повлияет на работоспособность, но повышает уязвимость операционной системы.
На какое железо можно установить Windows 11
Если ваш компьютер оснащен 64-разрядным процессором (у него должно быть как минимум два ядра), то, скорее всего, вам удастся установить на него Windows 11. На текущий момент точно определено, что новая операционная система от Microsoft стабильно работает на процессорах серий i3, i5 и i7 первого поколения, выпущенные в 2010 году.
Мы рекомендуем соблюдать другие аппаратные требования со стороны Microsoft для установки Windows 11. Ваш компьютер должен быть оснащен 4 Гб оперативной памяти, а на жестком диске должно быть не менее 64 Гб свободного места.

Как установить Windows 11 на неподдерживаемый компьютер с помощью Rufus
Для того чтобы установить Windows 11 на неподдерживаемый ПК, вам потребуется оригинальный дистрибутив Windows 11 и последняя версия программы Rufus.
Загрузить дистрибутив Windows 11 с нашего сайта.
Загрузить программу Rufus с официального сайта разработчика: https://rufus.ie/ru/
Для создания «универсальной» загрузочной флешки с установщиком Windows 11, активным на всех компьютерах, необходимо установить ряд параметров в программе Rufus. Следуйте следующей инструкции:
- Подключите USB-накопитель и убедитесь, что в первой настройке «Устройство» выбрана необходимая флешка.
- В настройке «Метод загрузки» нажмите на кнопку «Выбрать» и выберите скачанный дистрибутив Windows 11.
- Выберите схему раздела (параметры по умолчанию подойдут для большинства устройств).
- Нажмите на кнопку «Старт» и дождитесь появления всплывающего окна.
- В окне «Windows User Experience» активируйте галочку напротив параметра «Remove requirement for Secure Boot and TPM 2.0». Она отключит требование наличия модуля TPM 2.0 и включенной безопасной загрузки Secure Boot. Также, вы можете отменить требование к оперативной памяти, свободному месту на диске и отключить экран параметров конфиденциальности.
- Подтвердите выбор с помощью кнопки «ОК».
- После создания загрузочной флешки установите Windows 11 на ваш компьютер.
.png "Как установить Windows 11 на неподдерживаемый ПК через Rufus")
Таким простым способом вы можете установить новейшую операционную систему от Microsoft даже на неподдерживаемый компьютер. Не забудьте ее активировать – выгодные ключи активации Windows 11 по цене от 890 рублей доступны в интернет-магазине </el:store>.