
There are a few reasons why you might want to create a macOS Monterey bootable USB. Maybe you want to perform a clean install of macOS Monterey as macOS Monterey was just released, or you want to create a backup in case your Mac’s hard drive fails or if you want to install it on multiple Macs. Whatever the reason, it’s a good idea to know how to create a bootable macOS Monterey USB drive.
The process of creating a macos monterey bootable USB on Windows 11 is very simple, but if you want to try the command tool to do it, you will be responsible for data loss and system damage. Be sure to follow the instructions in the text exactly to avoid any possible setbacks. In this blog post, we will show you how to create a bootable USB for macOS Monterey on a Windows 10/11 PC.
What You Need
In order to create a bootable USB of macOS Monterey, you will need the following:
– A Windows 10/11 PC
– A USB flash drive that is at least 16 GB in size
– A copy of macOS Monterey
Download macOS Monterey
There are many ways to donwload macOS the installer DMG for macOS Monterey.
1.The first method is that you can download macOS Monterey from the Mac App Store. You can do this by opening the App Store and searching for «macOS Monterey.» Once the results come up, simply click on the «Download» button.
2. If you want to download the installer DMG for macOS Monterey, you also can find it on the Apple website. Just go to the Apple website, click on the «Downloads» tab, and then scroll down to the «macOS Monterey» section. There, you will find a link to the installer DMG.
3. Alternatively, you can also find the installer DMG on various other websites that offer macOS downloads. Just make sure that you download it from a reputable source, as there are many scams out there.
You can download MacOS Monterey 12 from here: (Direct link to InstallAssistant.pkg, App Store link)
Format Your USB Flash Drive
Assuming you’re going to use a Windows computer to make a Mac installation disk, then I suggest you format your USB on Windows.
1. Plug your USB flash drive into your PC.
2. On your PC, open up My Computer and take a look at the drives listed. One of them should say «Removable Disk» and have the size of your USB flash drive next to it. If you don’t see it, try unplugging and re-plugging in your USB flash drive.
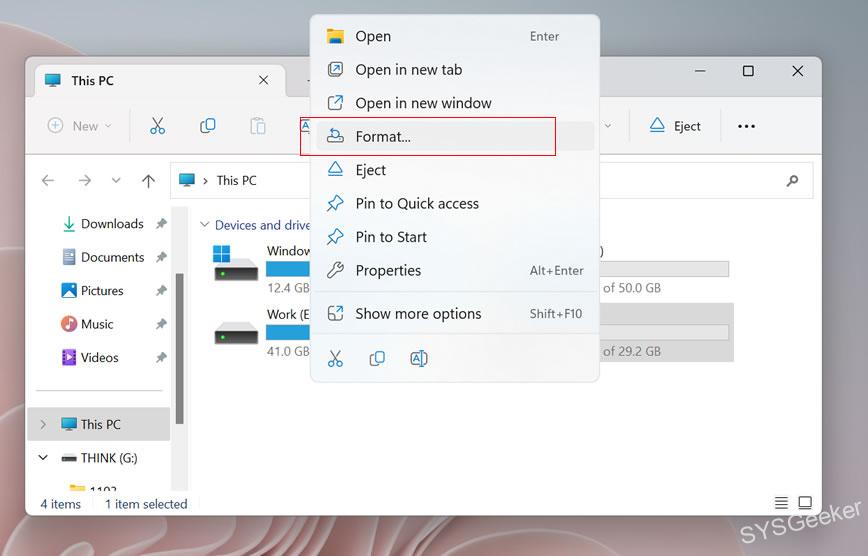
3. Right-click on the Removable Disk and select «Format…«
4. In the Format window that pops up, make sure that the «File System» drop-down menu is set to «FAT32«. You can leave the «Allocation Unit Size» field alone. Then, click the «Start» button.
5. A warning message will pop up asking if you’re sure you want to format the drive. Click «OK«.
6. The formatting process will now start and should only take a few seconds. Once it’s done, click «OK» and then «Close«.
Basically, there are two ways to create a bootable USB drive for macOS Monterey. The first way is to use the Terminal application that is built into macOS, and the second way is to use a third-party application.
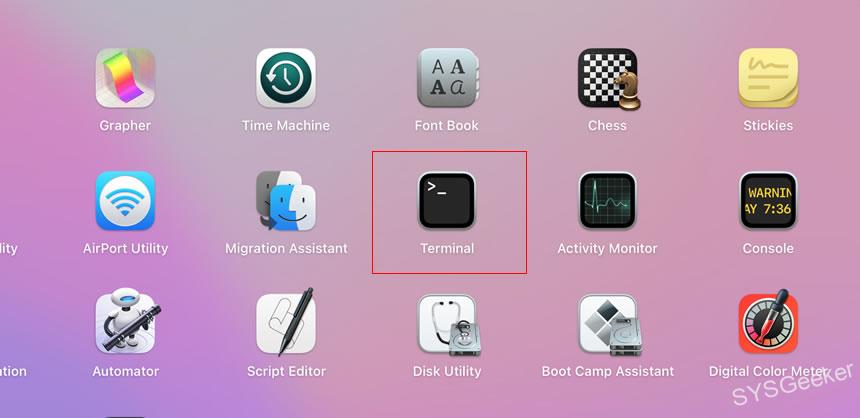
Part 1. How to Create macOS Monterey Bootable USB on Mac using Terminal
However, using Terminal is a little more complicated and requires you to know some basic commands, but it is also free. Let’s see how it works. If you want to create a bootable USB drive for macOS, you can use the createinstallmedia tool. This tool is included with the macOS installer, and it can be found in the /Applications/Utilities folder.
1. To use createinstallmedia, you will need a USB drive that is at least 8 GB in size. The drive will be erased, so make sure to back up any important data before proceeding.
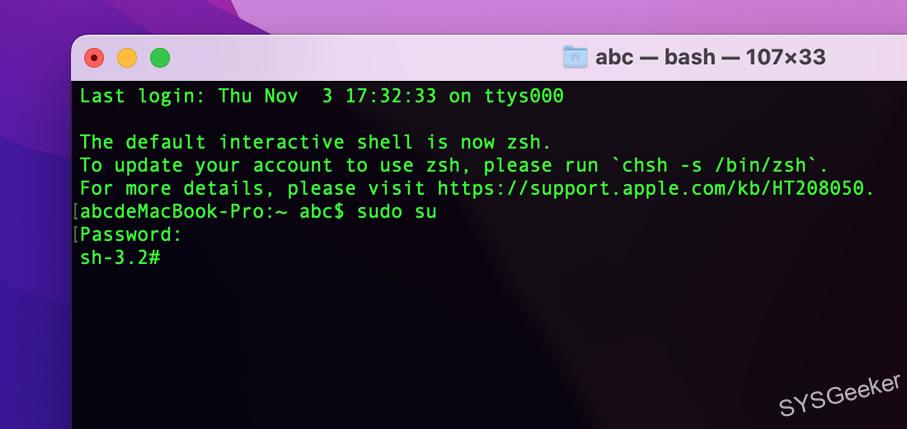
2. Once you have the USB drive, open the Terminal app and use the following command:
2. You need to enter the following command line to switch to the root account, then type the password.
sudo su
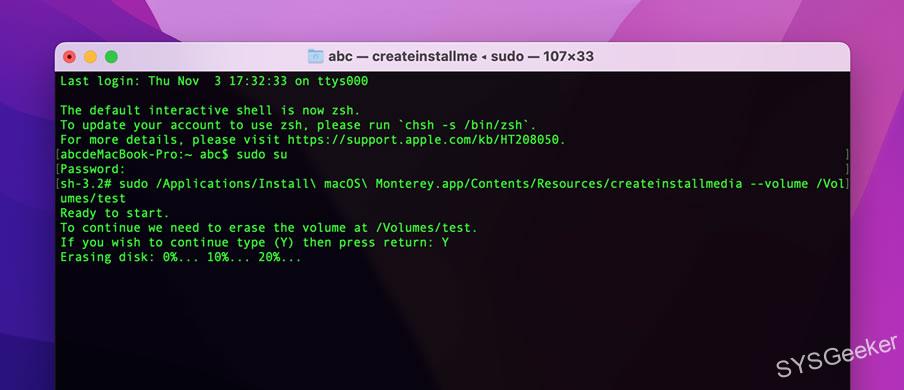
3. Copy the following command or paste it to the Terminal window. You can also drag the file createinstallmedia into the Terinmal window. It should bed located in Applications/Install\ macOS\ Catalina.app/Contents/Resources/.
sudo /Applications/Install\ macOS\ Catalina.app/Contents/Resources/createinstallmedia –volume /Volumes/test –nointeraction

4. After you paste the above command, then connect your USB drive into your Mac computer. You need to replace MyVolume with the name of your USB drive.
Then hit «Enter«, you will be asked to enter the «Y» letter to erase the USB drive. This will take a while.
4. After the Erasing process is complete, the createinstallmedia tool will now create a bootable macOS installer on the USB drive.
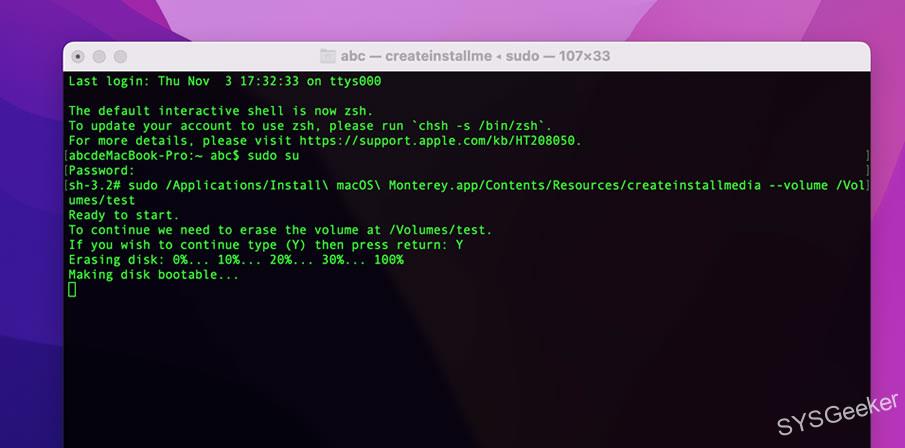
Once the process is complete, you can use the USB drive to install macOS on a Mac.
Part 2. How to Create macOS Monterey Bootable USB on Windows 11/10
If you want to make a macOS Moneterey on Windows computer, you need to have a tool that can create a bootable USB drive for macOS, and that tool is called UltraDMG. UltraDMG is a tool that can create bootable USB drives for macOS. It is very easy to use, and it can create a bootable USB drive for macOS in just a few minutes. you don’t have to deal with commands and Terminal.
So, here’s how you create bootable macOS Monterey USB drive on Mac step by step:
Step 1. You need to download the UltraDMG software from the website, and then install it on your Windows computer.
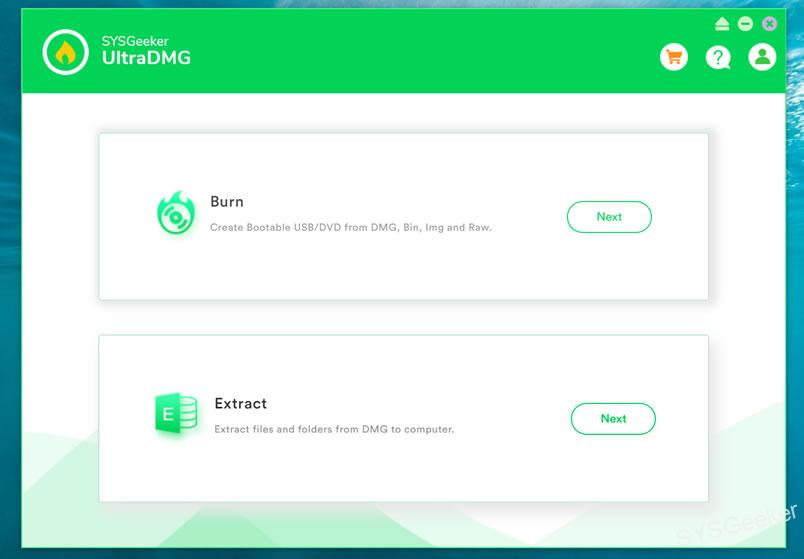
Step 2. Once you have installed UltraDMG, launch it and select the «BURN» option.
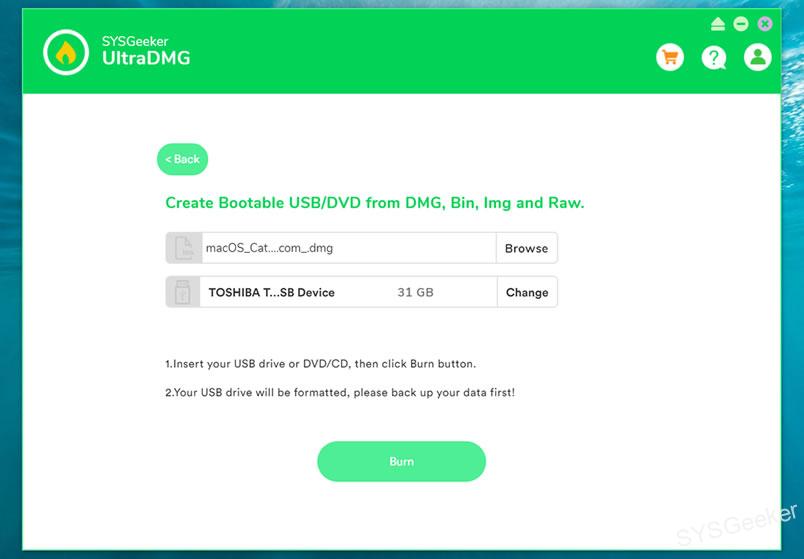
Step 3. In the next screen, you need to select the macOS DMG file and the USB drive that you want to use to create the bootable macOS USB drive.
Step 4. Once you have selected the USB drive, click on the «BURN» button, and UltraDMG will start creating the bootable macOS USB drive.
The process will take a few minutes to complete, and once it is done, you will have a bootable macOS USB drive that you can use to install macOS on your Mac.
Part 3. How to Create macOS Monterey Bootable USB on Windows 10 using TransMac
Transmac is a software application that enables users to read, write, and format Apple Macintosh disk drives, flash drives, and other drives with HFS (Mac OS Standard) or HFS+ (Mac OS Extended) file systems. Transmac can also create, compress, and expand dmg disk images.
There are some risks associated with using Transmac, as it is not a free application. In order to use Transmac, you must purchase a license, which costs $54.95 USD. There is also a risk that data could be lost or corrupted when using Transmac to write to HFS+ formatted drives, so it is important to backup any important data before using the software.
Here are the steps to create a bootable macOS USB drive using TransMac:
1. Download and install TransMac on your Windows 10 computer.
2. Launch TransMac and insert your USB drive into the computer.
3. In TransMac, click on the USB drive in the left sidebar and then click on the «Format Disk for Mac» option in the right sidebar.
4. In the format options, choose the «MS-DOS (FAT)» option and then click on the «Format Disk» button.
5. Once the formatting is complete, close the format window and click on the «Restore with Disk Image» option in the TransMac right sidebar.
6. In the restore window, click on the «…» button and browse for the macOS disk image file (DMG file).
7. Select the DMG file and then click on the «Open» button.
8. Click on the «Restore» button and wait for the process to complete.
9. Once the restore is complete, you will have a bootable macOS USB drive that you can use to install macOS on your Mac computer.
Boot from A USB Flash Drive on an Intel-based or M1 Mac
Once you have created the bootable USB, you can boot from it and install Monterey on your computer. The installation process is pretty straightforward and you should have no problems getting it up and running. Booting from a USB flash drive is a great way to troubleshoot your Mac, or to install a fresh copy of macOS. Here’s how to do it on both Intel-based and M1 Macs.
For Intel-based Macs
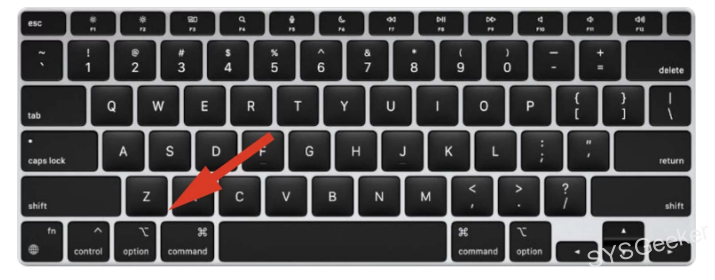
- Connect the USB flash drive to your Mac.
- Restart your Mac, and hold down the Option key while it boots.
- Select the USB flash drive from the list of boot options.
- Follow the prompts to install macOS, or to boot from a macOS recovery image.
For Apple Silicon:
- Connect the newly created USB installer to your Mac.
- Turn off your Mac.
- Press and hold the power button until you see a boot menu.
- Select the macOS Monterey installer USB from the boot menu.
There are actually many other ways to reinstall macOS, such as the Mac App Store or macOS Recovery, but I prefer to keep the macOS USB installer in hand so I can upgrade or reinstall on a colleague or friend’s Mac on the go.
- How to Create a Bootable MacOS Catalina 10.15 Installer Drive from Windows?
- 4 Ways to Burn Mac os x DMG to USB on Windows 10
- How to Create A Bootable MacOS Mojave USB Installer on Windows?
- How to Install macOS Big Sur on An Unsupported Mac?
Frequently Asked Questions:
Q1. How do I know if my Mac USB is bootable?
You can use the Disk Utility application to check if a USB drive is bootable. To do this, open Disk Utility and select the USB drive from the list of drives. If the drive is bootable, you will see the option to «Create Boot Disk.«
Q2. Can you put the macOS installer in USB?
Yes, it is possible to put the macOS installer on a USB drive. This is useful if you want to install macOS on a computer that does not have a DVD drive or if you want to create a bootable installer to use for multiple computers.
Q3. Why won’t my Mac recognize my bootable USB?
There are a few possible reasons why your Mac won’t recognize a bootable USB. One possibility is that the USB is not formatted correctly. Another possibility is that the USB is not configured correctly as a bootable device. Finally, it is also possible that there is a problem with the USB port itself.
Q4. Can I install macOS without Internet?
Yes, it is possible to install macOS without Internet. One way to do this is to create a bootable USB drive with the macOS installer on it. This can be done by downloading the macOS installer from the App Store, then using the createinstallmedia tool that is included with the installer or third-party tools like ULtraDMG. Once you have created the bootable USB drive, you can boot your Mac from it and install macOS without needing an Internet connection.
Q5. Can I use an external SSD as a boot drive Mac?
Yes, you can use an external SSD as a boot drive Mac. You will need to format the drive to be compatible with MacOS, and you will need to set up the drive to be bootable. Once you have done this, you will be able to boot your Mac from the SSD.
Monterey is the latest release of Apple’s macOS operating systems. If you are the one who is passionate about new things, then it is really a great move to test macOS Monterey out as many new features are introduced.
However, things become more challenging if you want to build a Monterey Hackintosh or plan to install Monterey on an unsupported or crashed Mac as Apple does not provide an official solution to let users create bootable macOS USB installer on a Windows PC. Instead, we solely rely on third-party software to get it done.
No worries! It could be a super pleasant experience with the right software. In this dedicated post, we will tell you how to make a macOS Monterey bootable USB on a Windows PC.
Exciting New Features in macOS Monterey
There are a couple of amazing new features in macOS Monterey that we can’t wait to try it out. Some of the ones we like most are:
SharePlay: Continue FaceTime conversation and do multiple other tasks at the time without disruption. It is one of the best ways to communicate with family members and friends on a Mac. You can also share computer screens with other users while on FaceTime calls.
Focus Mode: Turn off unnecessary notifications when you focus on something. You will only see specific notifications set by yourself. This will reduce noises when you are working on something.
Quick Note: You can now put anything in a Quick Note, such as links, tags, pictures and highlights.
AirPlay to Mac: Directly play or present content shared by another Apple device. This is great for a better viewing experience for content on a small-screen device like iPhone.
Shortcuts: Automatically complete tasks that require multiple steps. Save more time for the things you do regularly.
For a full list of macOS new features, you can check the macOS Monterey page on Apple’s website.
What You Should Prepare for
To create a macOS Monterey bootable USB on Windows, you need to prepare for three things:
Monterey DMG File: A macOS DMG file is a compressed and bootable disk image that contains all the necessary files to run macOS.It is an essential media to create a macOS USB installer on Windows PC.
Download link for macOS Monterey DMG file
USB Flash drive (at least 16GB): Usually, a macOS DMG file is larger than 10 GB. You have to get a USB drive larger than that.
SysGeeker UltraDMG: The software program to make a bootable macOS USB installer from the dmg file. Currently, this is the easiest solution to make Mac bootable USB. No command is involved and the user interface is self-explanatory. What’s more, it works perfectly on various Windows versions, including the latest Windows 11.
Once you have everything ready, and then follow the steps listed below to create a bootable USB installer for macOS Monterey on a Windows PC.
The first step is to make a full backup of your USB drive as it will be erased during the burning process.
Next, download SysGeeker UltraDMG from this link:
https://www.sysgeeker.com/dmg-burner.html
Once the installation is finished, open SysGeeker UltraDMG app from the desktop and you will see the following screenshot:
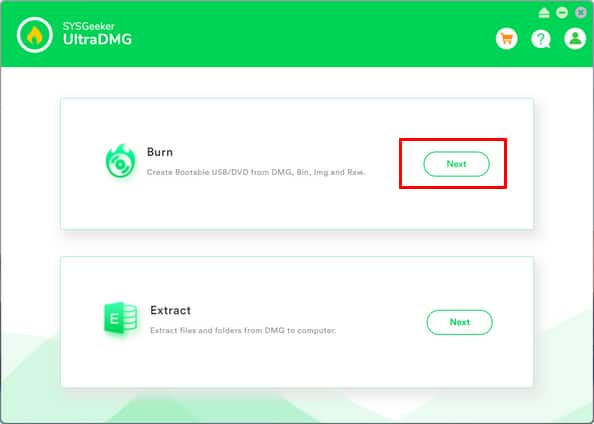
Now, insert a USB drive into the computer that is running UltraDMG software. And click the Next button on the right side of the Burn tab. This will be lead to a new window.
You need to configure two things in Burn Window. The first one is to import the macOS DMG file you downloaded earlier. The second one is to choose the USB drive you plugged into the computer. We recommend ejecting other USB devices to avoid full data loss for wrong device selection.
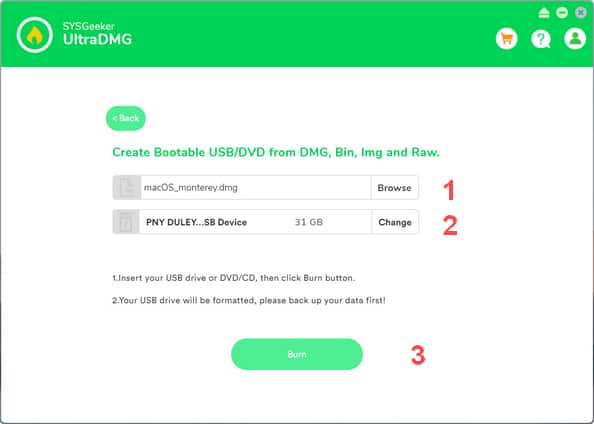
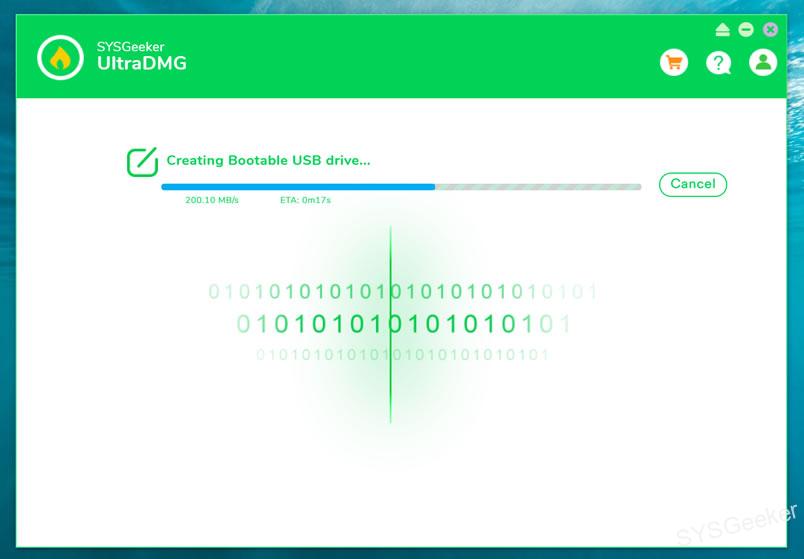
After the above settings, click the Burn icon at the bottom to format the USB drive and copy Monterey OS files to the USB drive. This will take about 5 minutes on a USB 3.0 flash drive. It would be slower for USB 2.0 devices.
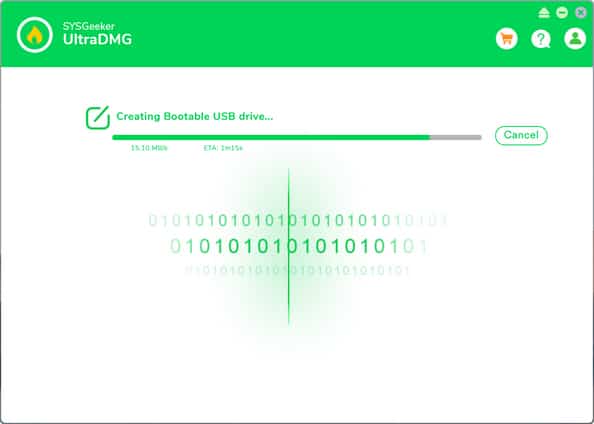
When the flashing process is done, the USB drive will be disconnected from the computer automatically.
Honestly, you won’t find any method better than this one if you really need to create macOS Monterey bootable USB on a Windows PC. The steps are clear and have no complex settings/operations.
Finally, you can use this bootable USB to upgrade or clean install macOS Monterey on a target PC or Mac.
Tip: To boot Mac from a USB drive, please hold the Option key for a few seconds during startup on an Intel Mac. This will open up Boot Manager Utility, where you can select a temporarily booting device this time. For Apple Silicon Mac, you need to shut down the computer and press the Power button for 1-2 minutes to launch Boot Manager.
Here you are to download macOS Monterey and to later make that macOS bootable on a USB drive on your Windows. Even though it was quite impossible in the past, especially after Apple announced that they will release only the installer for Mac only.
However, thanks to advanced tools like GibmacOS that enable us to download macOS on Windows too. Before we start the procedure to create a bootable macOS Monterey USB drive on your Windows, let’s know a little bit about GibmacOS.
Why GibmacOS?
GibmacOS is a small script that was developed using Python 2 and 3. The script can be used to download macOS El Capitan to the latest versions of macOS on Windows OS. It is not limited to only Windows OS, but can also be used inside macOS too. The only drawback the app has is that GibmacOS downloads any macOS in multiple files.
To run the files on Mac, you will need to combine them and make a single installer. Whereas, on other hand, if you want to use the macOS file for virtualization purposes then you can use them without combining them.
Related: How to Enable Virtualization in BIOS?
How to create macOS Monterey bootable USB on Windows?

Here are some steps to create macOS Monterey Bootable USB on Windows OS.
Download GibmacOS
The first and the basic step is to download GibmacOS. This will enable you to proceed with the first step to creating a bootable USB. Here is a direct link to the setup file:
https://github.com/corpnewt/gibMacOS
Download macOS Monterey
Once you have downloaded GibmacOS, you will need to extract it using WinRAR. Extract the file and run the GibmacOS.bat file. For those who are using Mac, they will find GibmacOS.command file.
Run the file and a window will appear. Select the version of macOS that you will need to download and the downloading procedure will start. Users who are on Windows, for some unknown reasons; will need to download macOS Snow Leopard and Leopard combine to proceed with the download of the latest macOS versions.
Here is the link to download Snow Leopard and Leopard: https://swscan.apple.com/content/catalogs/others/index-10.15-10.14-10.13-10.12-10.11-10.10-10.9-mountainlion-lion-snowleopard-leopard.merged-1.sucatalog
Related: How to Download macOS Monterey on Windows 10?
Related: Download macOS Monterey DMG, ISO Image, and VMDK
Build Installer
This step is only for Mac users. Now go to GibmacOS and find the BuildmacOSInstallApp.command file. Once the file is started, you will need to drag the folder of macOS (the macOS Monterey folder that you have downloaded) to this window.
Soon the procedure will start. This step will combine all of your macOS Monterey files and make a single installer.
Create a bootable USB of macOS Monterey
Now is the time to create the USB bootable. First, you will need to drag your macOS Monterey (and any other macOS installer that you possess) to the Application directory.
Insert your USB flash drive (the USB drive should be at least 16 GB). Go to Disk Utility and select your USB drive. Select the drive and format it. Try to keep the drive type/properties as below:
Name: (according to you)
Format: Mac OS Extended (Journaled)
Scheme: Master Boot Record
Related: How to Create macOS Monterey ISO File?
Install macOS Monterey to your USB
Now type one of the following codes below in your terminal. Remember here, you are going to install macOS Monterey so change the name accordingly. We have brought code for numerous types of macOS to fully understand the concept. Still, if you can’t understand then this will help:
How to create macOS Monterey Bootable USB drive with Terminal
macOS Big Sur
sudo /Applications/Install\ macOS\ Big\ Sur.app/Contents/Resources/createinstallmedia –volume /Volumes/USBName
macOS Catalina
sudo /Applications/Install\ macOS\ Catalina.app/Contents/Resources/createinstallmedia –volume /Volumes/USBName
macOS Mojave
sudo /Applications/Install\ macOS\ Mojave.app/Contents/Resources/createinstallmedia –volume /Volumes/USBName
macOS High Sierra
sudo /Applications/Install\ macOS\ High\ Sierra.app/Contents/Resources/createinstallmedia –volume /Volumes/USBName
Related: How to Download macOS Monterey on Windows 10?
UPDATED 3/5/2024: It doesn’t matter whether you use macOS, Windows 11, or Windows 10. It’s a matter of time until the device refuses to start, which could happen for many reasons, including (but not limited to) file corruption, hardware failure, or buggy update. If the unexpected happens with an Apple computer, you can resolve the problem using a macOS bootable USB with the installation media.
This is one of the main reasons you should consider creating a macOS bootable USB when your computer is working correctly. However, if none of your devices (MacBook, MacBook Air, MacBook Pro, iMac, Mac Pro, or Mac Mini) are working when you need them the most, it’s possible to use a Windows computer to rescue your Apple device. You can use a Windows 11, 10, 8.1, or 7 computer to quickly create a USB bootable installation media to reinstall macOS Ventura, Monterey, Big Sur, Catalina, Mojave, or Sonoma on your Mac.
This guide will teach you the steps to create a macOS bootable USB installation on Windows 10 (or 11), which you can use to reinstall or upgrade the Apple OS.
- Requirements
- Create macOS bootable USB installation media
- Create a GPT partition on a USB flash drive
Requirements
To perform this task, you’ll need:
- Broken Mac computer running macOS (optional).
- A trial copy of the TransMac software.
- One high-quality USB flash drive with 16GB of storage.
- Copy of macOS (DMG file).
Create macOS bootable USB installation media
To create a bootable USB drive with macOS, use these steps:
-
Download and install TransMac on Windows 10.
Quick note: This is a paid piece of software, but it gives you a 15-day trial, which is more than enough time. (If this works and you want to support the developer, purchase the full version.)
-
Connect the USB flash drive.
Important: If you have any data on the flash drive, remember to back it up since this process will erase everything on it.
-
Right-click the TransMac app and select the Run as administrator option.
-
Click the Run button. (If you use the trial version, wait 15 seconds.)
-
Right-click the USB flash drive and select the “Format Disk for Mac” option from the left pane.

Quick note: You want to perform this task before creating the bootable media because there is a good chance that the drive was formatted using a Windows device. If this is the case, the chances are it’s using an MBR partition, and the USB drive needs a GPT partition to work on a Mac.
-
Click the Yes button to format the drive on the warning message.

-
Confirm a name for the drive. For example, “macOS bootable USB.”
-
Click the OK button.
-
Click the Yes button.
-
Click the OK button.
-
Right-click the USB flash drive and select the “Restore with Disk Image” option from the left pane.
-
Click the Yes button to confirm the deletion of the USB flash drive data.

-
Click the browse button on the right.
-
Select the “.dmg” file with the macOS installation files.
-
Click the Open button.
-
Click the OK button.
-
Click the Yes button.


Once you complete the steps, insert the USB flash drive on your Mac to install, reinstall, or upgrade the operating system to the latest macOS version (Ventura, Monterey, Big Sur, Catalina, or Mojave).
Create a GPT partition on a USB flash drive
If the USB flash drive is not working with TransMac, it could still be a partition problem. In this case, you may need to redo the entire process. However, this time, you should follow these steps to use the Diskpart command-line utility on Windows 10 (or 11) to create the appropriate GPT partition, and then follow the above instructions.
To create a GPT partition on a removable drive, use these steps:
-
Open Start.
-
Search for Command Prompt, right-click the top result, and select the Run as an administrator option.
-
Type the following command and press Enter:
diskpart
-
Type the following command to view all drives connected to your computer and press Enter:
list disk
-
Type the following command with the number assigned for the USB flash drive and press Enter:
select disk 4
In the command, change “4” to the number corresponding to the USB flash drive.
-
Type the following command to clean the drive and press Enter:
clean
-
Type the following command to convert the drive to the GPT style and press Enter:
convert gpt
-
Type the following command to create a primary partition and press Enter: create partition primary
create partition primary
Once you have formatted the USB flash drive with a GPT partition, you can use the instructions mentioned above to use TransMac to create a bootable media, but this time, skip steps 5 through 10 and continue on step 11.
After the process, which could take up to an hour, connect the USB flash drive, turn on your Mac by holding down the “Option” key, and select the USB drive to install macOS.
Уровень сложностиПростой
Время на прочтение3 мин
Количество просмотров80K
Описываю свой рабочий опыт установки macOS на старенький macbook, так как другие способы описанные в интернете не дали результатов, либо привели к новым ошибкам.
Для начала скачиваем дистрибутив в формате *.dmg. Сделать это можно из App Store со второго macbook, либо с торрент (важно чтобы это была чистая копия из App Store).
Берем флешку на 8Гб и более, вставляем в компьютер с Windows, нажимаем Win+R, пишем cmd.
Запускается консоль и в ней уже пишем diskpart потом list disk, на экран выводиться список дисков windows, теперь важно не перепутать диски и выбрать именно диск с флешкой. Пишем select disk (номер флешки):

Теперь нам нужно преобразовать загрузочную область в формат GPT, набираем по очереди команды:
clean, convert GPT, create partition primary, exit.
C сайта https://www.acutesystems.com/ скачиваем программу TransMac, она платная, но работает 15 дней которых должно хватить. Запускаем, выбираем наш флеш накопитель, сначала выбираем пункт Format Disk fo Mac. И после завершения процесса выбираем Restore with Disk Image где нам нужно будет указать наш дистрибутив с macOS в формате *.dmg.

Все флешка готова, но загрузиться с нее не выйдет. Если загрузить мак удерживая клавишу alt, слоты загрузки будут пустые. Поэтому загружаем Recovery system удерживая клавиши cmd+R (нажимать нужно сразу после кнопки включения до появления яблока или земного шара).
Тут нам понадобиться дисковая утилита, запускаем ее, смотрим что флешка определилась и далее нам нужно отформатировать основной диск (Тут я подразумеваю что все ваши нужные файлы лежат в облаке, важных файлов на самом маке нет, так как после форматирования все файлы будут УТЕРЯНЫ).
Нажимаем в меню пункт вид-показывать все устройства. Выбираем APPLE SSD, нажимаем кнопку стереть. Вводим имя, Mac OS Extended, Схема разделов GUID.

Ну а теперь можно и загрузочную флешку сделать. Выходим из дисковой утилиты и в меню выбираем пункт Утилиты-Терминал. Пишем команду df -h и смотрим что в файловой системе есть флеш накопитель с названием который был в дисковой утилите (у меня это /Volumes/Install macOS Mojave) после этого копируем дистрибутив на жесткий диск командой
cp -R "/Volumes/Install macOS Mojave/Install macOS Mojave.app" "/Volumes/Macintosh HD"
После копирования закрываем терминал cmd+Q. Выбираем флешку и форматируем также как форматировали жесткий диск (Имя: USB, Mac OS Extended, Схема разделов GUID.).
Теперь запускаем терминал и создаем загрузочный образ:
"/Volumes/Macintosh HD/Install macOS Mojave.app/Contents/Resources/createinstallmedia" --volume /Volumes/USB
Соглашаемся, вводим y и возможно потребуется пароль от системы.
Теперь можно перезагрузить мак с зажатой клавишей alt и в пункте загрузки мы увидим картинку Install macOS Mojave. Теперь можно нажать пункт Установить macOS.
Если в процессе установки вылетела ошибка “Экземпляр программы установка macOS Mojave поврежден и не может быть использован.”
Нужно найти в интернете дату выпуска дистрибутива, отключить WiFi, запустить терминал ввести команду установки даты date: месяц-число-время-год в формате ммддччммгггг
Например, 12 декабря 10:00 2017 будет выглядеть так:
date 120110002017
Если не помогло, перезагружаем, отключаем интернет, ставим дату и после этого только запускаем установку.
После этого устанавливаем mac OS как обычно.
P.S.1: Чтобы восстановить флешку для пользования под Windows скачиваем программу SD Memory Card Formatter for Windows с сайта https://www.sdcard.org/ так как в проводнике вряд ли получиться отформатировать.
P.S.2: У других дистрибутивов названия путей будут другие, так что смотрите по возможности название папок например командой ls в терминале.
парпар