
Время на прочтение6 мин
Количество просмотров27K
Доброго времени суток!
В данной статье я опишу создания своих элементов для C# Windows Form.
Для примера буду создавать таблицу со всем функционалом DataGridView. Позже перейдем на свои элементы. Создание первого элемента разобьем на несколько уроков. В данном уроке произведем от рисовку таблицы, а также: создание столбцов, строк, ячеек.
Для написания будем использовать .Net FrameWork 4.7.x, среда разработки Visual Studio 2019.
В первую очередь создадим обычный проект Windows Form. Думаю не нужно это показывать. А уже потом создаем проект «Библиотека элементов управления Windows Form»(Назовем его CustomControl).
Далее у нас будет создан файл UserControl.cs. Удаляем его и создаем обычный класс TableCustoms.cs.Наш класс будет наследоваться от класса Control.
Далее в этом же файле создадим еще несколько классов, а именно:Column,Row,Cell. Рассмотрим каждый по отдельности. Начнем с Column:
    [Serializable]
    public class Column
    {
        public string Name { get; set; } = "NameColumn";//Наименование Столбца
        public string Caption { get; set; } = "CaptionColumn";//Текст заголовка
        public int Width { get; set; } = 100;//Стандартная ширина
        public Color Back { get; set; } = Color.White;//Цвет фона

        public Column()
        {

        }
    }
Класс Row:
    [Serializable]
    public class Row
    {
        public int Heigth { get; set; } = 20;// Высота строки
        public List<Cell> Cells { get; set; } = new List<Cell>();//список ячеек
        public Row()
        {

        }
        public Row(List<Cell> cells)
        {
            Cells = cells;
        }

    }
Класс Cell(Для поддержки копирования добавляем интерфейс ICloneable):
    [Serializable]
    public class Cell : ICloneable
    {
        public object Value { get; set; } = null;//значение ячейки
        public Cell()
        {
        }
        public object Clone()
        {
            return MemberwiseClone();
        }
    }
Теперь настроим наш основной класс TableCustoms:
   public class TableCustoms : Control
    {
        #region Перемененные
        public ObservableCollection<Column> Columns { get; set; } = new ObservableCollection<Column>();//Список столбцов таблицы
        private ObservableCollection<Row> rows = new ObservableCollection<Row>();//Список строк
        private int countRow = 0;//количество строк
        #endregion
        #region Свойства
        public int CountRow // гетер и сетер при увеличении переменной на N раз
        {
            get { return countRow; }
            set
            {
                //При увеличении добавляем
                if (value > countRow)
                {
                    int iteration = value - countRow;
                    for (int i = 0; i < iteration; i++)
                    {
                        rows.Add(new Row());
                    }
                }
                //при уменьшении удаляем с конца
                if (value < countRow)
                {
                    int iteration = countRow - value;
                    for (int i = 0; i < iteration; i++)
                    {
                        rows.Remove(rows[rows.Count - 1]);
                    }
                }

                countRow = value;
            }
        }
        //гетер и сетер для списка строк, будет использоваться позже
        public ObservableCollection<Row> Rows
        {
            get { return rows; }
            set { }
        }

        public int ColumnHeaderHeigth { get; set; } = 20;//высота шапки таблицы
        public int RowHeaderWidth { get; set; } = 20;//высота заголовков строк
        public Color ColumnHeaderBack { get; set; } = SystemColors.Control;//Основной цвет фона заголовков таблицы
        public Color BorderColor { get; set; } = Color.Black;//Стандартный цвет границ таблицы
        public bool NumerableRows { get; set; } = false;//Флаг автоматической нумерации
        #endregion
        //Метода изменения столбцов, будет использоваться в следующем уроке
        private void EditColumn()
        {

        }
        //Метод изменения строк
        private void EditRows()
        {
            if (countRow < rows.Count)//Увеличение количества строк
            {
                rows[rows.Count - 1].Cells = CreatCells(Columns.Count);//Добавление пустых ячеек в строку
                countRow++;
            }
            if (CountRow > rows.Count)//уменьшение количества строк
            {
                countRow--;
            }

        }
        //метод создания N количества ячеек
        private List<Cell> CreatCells(int Count)
        {
            // return Enumerable.Repeat(new Cell(), Count).ToList();
            List<Cell> result = new List<Cell>();
            for (int i = 0; i < Count; i++)
            {
                result.Add(new Cell());
            }
            return result;
        }
        public TableCustoms()
        {
            rows.CollectionChanged += (e, v) => EditRows();//проверка изменения списка
            Columns.CollectionChanged += (e, v) => EditColumn();//проверка изменения списка
            BackColor = SystemColors.AppWorkspace;//Стандартный фон
            PanelTable panelTable = new PanelTable(this);//Создание основной панели
            panelTable.Dock = DockStyle.Fill;//Растягиваем основную панель по Control
            Controls.Add(panelTable);//Добавление панели на Control
        }
    }
Для того, чтобы у нас были полосы прокрутки нужно использовать ScrollableControl, поэтому создадим класс PanelTable наследуем ScrollableControl и помещаем его на Control(в следующем уроке объясню почему создаем два разных контрола, а не используем сразу ScrollableControl):
 internal class PanelTable : ScrollableControl//Control со ScrolLbar
        {
            private TableCustoms BParent;//переменная основного класса, для работы с свойствами
            public PanelTable(TableCustoms bParent)
            {
                HScroll = true;//Отображение ползунка по горизонтали
                VScroll = true;//Отображение ползунка по вертикали
                AutoScroll = true;//Автоматическое появление полос прокрутки
                BParent = bParent;
            }
            //переопределение метода
            protected override void OnPaint(PaintEventArgs e)
            {
                Matrix m = new Matrix();
                m.Translate(this.AutoScrollPosition.X, this.AutoScrollPosition.Y, MatrixOrder.Append);
                e.Graphics.Transform = m;
                Graphics graf = e.Graphics;
                int maxWidth = 0;//Высота AutoScrollMinSize
                int maxHeight = 0;//Ширина AutoScrollMinSize
                                  //расчитываем ширину
                foreach (Column item in BParent.Columns)
                {
                    maxWidth += item.Width;
                }
                //расчитываем высоту
                foreach (Row item in BParent.Rows)
                {
                    maxHeight += item.Heigth;
                }
                AutoScrollMinSize = new Size(maxWidth + 100, maxHeight + 100);//назначаем AutoScrollMinSize относительно этого будут появляться полосы прокрутки
                graf.Clear(BParent.BackColor);
                DrawHeaderColumns(graf);//Отрисовка заголовков столбцов таблицы
                DrawHeaderRows(graf);//Отрисовка заголовков строк таблицы
                DrawCells(graf);//Отрисовка ячеек
                base.OnPaint(e);
            }
            /// <summary>
            /// Отрисока заголовков столбцов
            /// </summary>
            /// <param name="graf"></param>
            private void DrawHeaderColumns(Graphics graf)
            {
                int x = 2;
                Rectangle rect;
                rect = new Rectangle(x, 1, BParent.RowHeaderWidth, BParent.ColumnHeaderHeigth);
                graf.DrawRectangle(new Pen(BParent.BorderColor), rect);
                graf.FillRectangle(new SolidBrush(BParent.ColumnHeaderBack), rect);
                x += BParent.RowHeaderWidth + 1;
                foreach (Column item in BParent.Columns)
                {
                    rect = new Rectangle(x, 1, item.Width, BParent.ColumnHeaderHeigth);
                    graf.DrawRectangle(new Pen(BParent.BorderColor), rect);
                    graf.FillRectangle(new SolidBrush(BParent.ColumnHeaderBack), rect);
                    if (item.Caption.Length != 0)
                    {
                        StringFormat sf = new StringFormat();
                        sf.Alignment = StringAlignment.Center;
                        sf.LineAlignment = StringAlignment.Center;
                        graf.DrawString(item.Caption, new Font("Times", 9), Brushes.Black, rect, sf);
                    }
                    x += item.Width + 1;
                }
            }
            //Отрисовка заголовков строк
            private void DrawHeaderRows(Graphics graf)
            {
                int y = 1;
                int i = 0;
                Rectangle rect;
                y += BParent.RowHeaderWidth + 1;
                foreach (Row item in BParent.Rows)
                {
                    rect = new Rectangle(2, y, BParent.RowHeaderWidth, item.Heigth);
                    graf.DrawRectangle(new Pen(BParent.BorderColor), rect);
                    graf.FillRectangle(new SolidBrush(BParent.ColumnHeaderBack), rect);
                    if (BParent.NumerableRows)
                    {
                        StringFormat sf = new StringFormat();
                        sf.Alignment = StringAlignment.Center;
                        sf.LineAlignment = StringAlignment.Center;
                        graf.DrawString(i.ToString(), new Font("Times", 9), Brushes.Black, rect, sf);
                    }
                    i++;
                    y += item.Heigth + 1;
                }
            }
            //отрисовка ячеек
            private void DrawCells(Graphics graf)
            {

                int x = 2 + BParent.RowHeaderWidth + 1;
                int y = 2 + BParent.ColumnHeaderHeigth;
                Rectangle rect;
                int i = 0;
                foreach (Row itemRow in BParent.Rows)
                {
                    foreach (Column itemColumn in BParent.Columns)
                    {
                        rect = new Rectangle(x, y, itemColumn.Width, itemRow.Heigth);
                        graf.DrawRectangle(new Pen(BParent.BorderColor), rect);
                        graf.FillRectangle(new SolidBrush(Color.White), rect);
                        if (itemRow.Cells[i].Value != null)
                        {
                            StringFormat sf = new StringFormat();
                            sf.Alignment = StringAlignment.Center;
                            sf.LineAlignment = StringAlignment.Center;
                            graf.DrawString(itemRow.Cells[i].Value.ToString(), new Font("Times", 9), Brushes.Black, rect, sf);
                        }
                        x += itemColumn.Width + 1;
                        i++;
                    }
                    i = 0;
                    y += itemRow.Heigth + 1;
                    x = 2 + BParent.RowHeaderWidth + 1;
                }
            }
        }
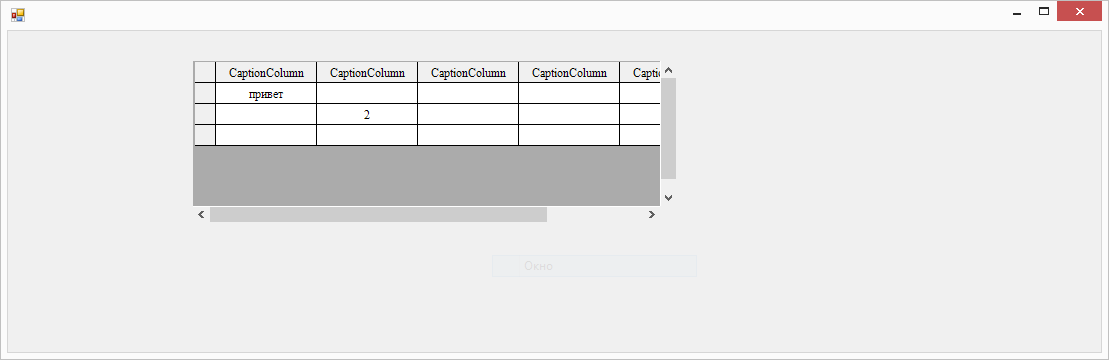
После этого «Пересобираем проект» элемента и добавляем элемент на форму(в основном проекте):

Теперь проверим некоторые методы нашего элемента:
  public partial class Form1 : Form
    {
        public Form1()
        {
            InitializeComponent();
             tableCustoms1.Rows.Add(new Row());//добавление строки
             tableCustoms1.Rows.Add(new Row());
             tableCustoms1.Rows[0].Cells[0].Value = "1";//Изменение значения ячейки
             tableCustoms1.Rows[1].Cells[1].Value = "2";
            tableCustoms1.CountRow++;//увеличение числа строк
            tableCustoms1.Rows[0].Cells[0].Value = "привет";
        }
    }
Запускаем наш проект:
C#: Табличные компоненты Windows Forms и работа с ними
Табличное представление данных повсеместно используется в приложениях. В этой лекции рассмотрены основные приёмы работы со следующими компонентами:
- DataGridView – табличный редактор для отображения данных из файла XML или из БД (доступен в группе «Данные» Панели Элементов);
- DataGrid – базовая табличная компонента для отображения связанных таблиц (щёлкнуть правой кнопкой мыши в Панели Элементов, команда «Выбрать элементы», дождаться загрузки списка, на вкладке «Компоненты .NET Framework» включить DataGrid из пространства имён System.Windows.Forms. После этого DataGrid можно добавить на форму).
Проект Lab4_1. Напишем простейший проект для редактирования таблицы и сохранения её в формате XML.
На форму добавим dataGridView1, установив ему свойство Dock = Fill, а объекты DataTable и DataSet создадим программно.
Для этого опишем глобально в классе формы следующие величины:
  private String BaseName;
  private DataTable Table;
  private DataSet Set;
На загрузку формы реализуем такой код (обработчик события Load):
   BaseName = "table.xml";
   Table = new DataTable ();
   Set = new DataSet ();
   if (System.IO.File.Exists (BaseName) == false) {
    //Если файл не существует - создать таблицу и DataSet
    dataGridView1.DataSource = Table;
    Table.Columns.Add ("Имена");
    Table.Columns.Add ("Номера телефонов");
    Set.Tables.Add (Table);
   }
   else {
    //Если файл существует - загрузить и показать данные
    Set.ReadXml (BaseName);
    String StringXML = Set.GetXml ();
    dataGridView1.DataMember = "Название таблицы";
    dataGridView1.DataSource = Set;
   }
Перед закрытием формы выполним следующий код (обработчик события FormClosing):
   Table.TableName = "Название таблицы";
   Set.WriteXml (BaseName);
Данные сохраняются в формате XML, после выполнения приложения найдите файл данных в папке с исполняемым файлом проекта.
Объект DataSet представляет собой кэш данных, расположенный в оперативной памяти. DataSet состоит из коллекции объектов класса DataTable.
Доступ к ячейкам таблицы можно получить, используя свойства класса DataTable (Rows, Cols, Item) — но «прямая» запись поля таблицы в файл может быть некорректной из-за того, что технология ADO.NET предусматривает кэширование данных (особенно если данные сохраняются посредством SQL-транзакций).
Пример такого кода:
   System.Data.DataRow newRow = Table.NewRow ();
   Table.Rows.Add (newRow);
Поэтому следует пользоваться методами объекта DataSet.
Скачать пример Lab4_1 в архиве .zip с проектом C# Visual Studio 2019 (11 Кб)
Проект Lab4_2. Напишем простой проект для редактирования связанных отношением «один ко многим» таблиц.
Компонента DataGrid — решение для показа связанных таблиц в одной компоненте, в DataGridView такой возможности нет. Разместим компонент на форме, можно установить свойство Dock = Fill. Также предусмотрим пункты или кнопки меню «Переключить вид», «Сохранить», «Загрузить».
Эти данные описаны глобально в классе формы:
  private Boolean ShowClients; //Флажок-переключатель таблиц
  private System.Data.DataSet dataSet1; //Кэш данных
  private System.Data.DataTable Table, Table2; //Родительская и дочерняя таблицы
На загрузку формы (в обработчике её события Load) будем выполнять следующий код:
   ShowClients = true;
   if (System.IO.File.Exists ("data.xml") == true) {
    //Если файл существует - загрузить и показать данные
    загрузитьToolStripMenuItem_Click (this, e); //Обработчик команды "Загрузить"!
   }
   else { //Иначе создать предустановленные данные
    //Создадим таблицу:
    Table = new DataTable ("Клиенты");
    //Создадим и настроим столбец программно:
    DataColumn Column = new DataColumn ("Название организации");
    Column.ReadOnly = true;
    Column.Unique = true;
    Table.Columns.Add (Column);
    //Добавим столбцы с настройками по умолчанию, указав только названия:
    Table.Columns.Add ("Контактное лицо");
    Table.Columns.Add ("Телефон");
    //Создадим DataSet и добавим туда таблицу:
    dataSet1 = new DataSet ();
    dataSet1.Tables.Add (Table);
    //Добавим в таблицу предустановленные записи об организациях-заказчиках
    Table.Rows.Add ("НГАСУ", "Иванов Максим", "3234566");
    Table.Rows.Add ("НГТУ", "Сидорова Ксения", "3630313");
    //Создадим вторую таблицу - "Заказы"
    Table2 = new DataTable ("Заказы");
    DataColumn Column2 = new DataColumn ("Номер заказа");
    Column2.DataType = System.Type.GetType ("System.Int32");
    Column2.AutoIncrement = true; //Автоматический счётчик заказов
    Column2.ReadOnly = true; Column2.Unique = true; //Название организации - уникально!
    Table2.Columns.Add (Column2);
    Table2.Columns.Add ("Объем заказа");
    Table2.Columns.Add ("Организация-заказчик");
    //Добавим в DataSet вторую таблицу:
    dataSet1.Tables.Add (Table2);
    Table2.Rows.Add (1, "100000", "НГАСУ");
    Table2.Rows.Add (2, "200000", "НГАСУ");
    //Обеспечим отношение 1:N между первой и второй таблицами:
    DataColumn Parent = dataSet1.Tables ["Клиенты"].Columns ["Название организации"];
    DataColumn Child = dataSet1.Tables ["Заказы"].Columns ["Организация-заказчик"];
    DataRelation Link1 = new DataRelation ("Ссылка на заказы клиента", Parent, Child);
    // В Parent значения в связываемом столбце должны быть уникальными, в Child - нет
    dataSet1.Tables ["Заказы"].ParentRelations.Add (Link1);
   }
   dataGrid1.SetDataBinding (dataSet1, "Клиенты");
   dataGrid1.CaptionText = "Родительская таблица \"Клиенты\"";
   dataGrid1.CaptionFont = new System.Drawing.Font ("Consolas", 11);
На нажатие кнопки или выбор пункта меню «Переключить вид» будем переключаться между родительской и дочерней таблицами:
   if (ShowClients == true) {
    dataGrid1.SetDataBinding (dataSet1, "Клиенты");
    dataGrid1.CaptionText = "Родительская таблица \"Клиенты\"";
   }
   else {
    dataGrid1.SetDataBinding (dataSet1, "Заказы");
    dataGrid1.CaptionText = "Дочерняя таблица \"Заказы\"";
   }
   dataGrid1.Collapse (-1); //Свернуть все ветви
   ShowClients = !ShowClients;
На выбор команды «Сохранить» будем сохранять все данные в файле типа .xml текущей папки:
dataSet1.WriteXml ("data.xml", XmlWriteMode.WriteSchema);
На выбор команды «Загрузить» будем обновлять все данные из файла, сбросив несохранённые изменения, если таковые есть:
   dataSet1 = new DataSet ();
   dataSet1.ReadXml ("data.xml");
   ShowClients = true;
   переключитьВидToolStripMenuItem_Click (this, e);
Приложение запускается и редактирует связанные таблицы.
Скачать пример Lab4_2 в архиве .zip с проектом C# Visual Studio 2019 (12 Кб)
Проект Lab4_3. Реализуем больше возможностей компоненты DataGridView. Форма приложения будет такой же, как в проекте 4.1, а действия можно запрограммировать как реакцию на выбор пунктов верхнего меню.
Она представляет собой прямоугольный массив ячеек, который можно рассматривать как коллекцию строк или столбцов.
- Rows — это коллекция строк, имеет тип DataGridRowCollection.
- Columns — это коллекция столбцов типа DataGridColumnCollection.
Оба свойства индексируются как массивы для доступа к конкретной строке/столбцу, нумерация производится с нуля. - Cells — это коллекция ячеек из объекта DataGridRowCollection, приведём пример доступа к конкретной ячейке:
try { MessageBox.Show (dataGridView1.Rows [1].Cells [1].Value.ToString ()); } catch (Exception) { MessageBox.Show ("Нет такой ячейки"); } - RowCount, ColumnCount — количество строк и столбцов.
В несвязанном режиме компонента может отображать любые табличные данные.
Методы для добавления/удаления/редактирования строк и столбцов относятся к коллекциям Rows и Columns и имеют типовые имена: Add, Insert, Clear, AddCopy, InsertCopy, Remove, RemoveAt, а также могут иметь по несколько перегрузок каждая, например, для метода Add добавления строки есть версии Add(), Add(int count), Add (DataGridViewRow row), Add (object []values).
  private static int Cnt; //Счётчик столбцов в классе формы
  //...

   if (dataGridView1.ColumnCount < 1) { //Сначала нужно создать столбец
    dataGridView1.Columns.Add ("Столбец " + Cnt, "Заголовок " + Cnt);
    Cnt++;
   }
   dataGridView1.Rows.Add ();
Настройка внешнего вида компонента также типовая: такие свойства, как BackColor, Alignment, Font и т.д. находятся в объекте типа DataGridViewCellStyle.
Каждая ячейка представлена объектом System.Windows.Forms.DataViewCell, за «личный» внешний вид ячейки отвечает свойство InheritedStyle, а за вид по умолчанию — DefaultCellStyle.
Очередной командой перекрасим фон таблицы в розовый цвет:
dataGridView1.DefaultCellStyle.BackColor = Color.Pink;
А теперь поменяем фон только выбранной ячейки:
   if (cell_y > -1 && cell_x > -1)
    dataGridView1.Rows[cell_y].Cells[cell_x].Style.BackColor = Color.Green;
Предполагается, что значения cell_y, cell_x описаны глобально в классе формы:
private int cell_y, cell_x;
и инициализируются в обработчике её события Load:
cell_y = cell_x = -1;
а затем получают значения в обработчиках событий KeyUp и MouseUp компоненты dataGridView1 (одинаковым кодом):
   cell_y = dataGridView1.CurrentCell.RowIndex;
   cell_x = dataGridView1.CurrentCell.ColumnIndex;
Когда требуется форматирование содержимого ячейки DataGridView для отображения, возникает событие CellFormatting, вот пример его обработчика:
   e.CellStyle.SelectionBackColor = Color.Yellow;
   e.CellStyle.SelectionForeColor = Color.Black;
Сделаем в dataGridView1 таблицу со значениями функции. Вот код соответствующей команды:
   dataGridView1.Columns.Clear ();
   dataGridView1.ColumnCount = 2;
   dataGridView1.Rows.Add (10); //Добавили 10 строк
   dataGridView1.Columns [0].Name = "X";
   dataGridView1.Columns [1].Name = "Y(X)";
   double x; int i;
   for (x = 1.5, i = 0; i < 10; x += 0.1, i++) {
    dataGridView1.Rows [i].Cells [0].Value = Convert.ToString (x);
    dataGridView1.Rows [i].Cells [1].Value = Math.Round (x * x, 2).ToString ();
    //или dataGridView1.Rows[i].Cells[1].Value = (x*x).ToString("f");
   }
Существует также множество событий, связанных с редактированием ячейки: CellBeginEdit, CellEndEdit, CellParsing, CellValidating, CellValidated и т.д.
Например, по умолчанию наша таблица редактируется. Чтобы разрешить в первом столбце (Y(X)) ввод только числовых значений, напишем следующий код, выполняемый по событию CellValueChanged компоненты DataGridView:
   String Val =
    dataGridView1.Rows[e.RowIndex].Cells[e.ColumnIndex].Value.ToString ();
   if (e.ColumnIndex == 1) {
    double val;
    bool A = Double.TryParse (Val,
     System.Globalization.NumberStyles.Number,
     System.Globalization.NumberFormatInfo.CurrentInfo, out val);
    if (A == false) {
     dataGridView1.Rows[e.RowIndex].Cells [e.ColumnIndex].Value = lastValue;
     MessageBox.Show ("Неверное число: " + Val, "Ошибка");
    }
   }
Здесь предполагается, что величина lastValue описана в классе формы:
private double lastValue;
и по событию CellBeginEdit, сохраняет предыдущее значение, хранимое в ячейке:
   if (e.ColumnIndex == 1) lastValue =
    Convert.ToDouble (dataGridView1.Rows[e.RowIndex].Cells[e.ColumnIndex].Value);
Запретить редактирование данных можно стандартно – с помощью свойства ReadOnly. Чтобы запретить редактирование конкретной ячейки, строки или столбца, также воспользуйтесь этим свойством:
   if (dataGridView1.ColumnCount > 0) {
    dataGridView1.Rows [0].Cells [0].ReadOnly = true;
    dataGridView1.Columns [0].ReadOnly = true;
   }
Скачать пример Lab4_3 в архиве .zip с проектом C# Visual Studio 2019 (12 Кб)
Проект Lab4_4. Пример выполнения варианта задания. Написать табличный редактор ведомости студенческой группы со столбцами: Фамилия, 1, 2, …, 17 (номера недель), итого (отметка о зачете)
Данные автоматически загружаются из файла и сохраняются в файле формата xml.
Поддерживаются редактирование, в том числе, произвольное добавление и удаление строк, проверка правильности ввода данных.
Первый вариант решения — создать таблицу dataGridView, не связанную с DataSet и работать непосредственно с ячейками через методы класса dataGridView. Сложности такого подхода – придётся «вручную» писать поддержку сохранения и загрузки таблицы.
Второй вариант – связать таблицу с DataSet, чтобы легко загружать и сохранять данные XML, но тогда работа с добавлением/удалением ячеек делается через методы кэша DataSet, иначе компилятор и не разрешит выполнять этого.
Создав новый проект Windows Forms с главной формой Form1, добавим на неё компоненту DataGridView и растянем на всю форму (свойство Dock = Fill). Также добавим к проекту контекстное меню contextMenuStrip с пунктами «Добавить», «Удалить», «Вычислить» и укажем его в свойстве ContextMenuStrip компоненты dataGridView1.
Пропишем в классе формы глобальные величины:
  private String BaseName;
  private DataTable  Table;
  private DataSet Set;
  private String Val; //предыдущее значение из текущей ячейки
  private int Column; //текущий столбец
  private bool Changed; //признак изменения текущей ячейки
Столбцы таблицы (фамилия, 17 граф для оценок или иных отметок, графа «зачёт») создадим программно по событию Load формы:
   BaseName = "table.xml";
   Table = new DataTable ();
   Set = new DataSet ();
   Table.Columns.Add ("ФИО");
   for (int i = 1; i <= 17; i++) Table.Columns.Add ("" + i);
   Table.Columns.Add ("Итого");
   Set.Tables.Add (Table);
   dataGridView1.DataSource = Set;
   Table.TableName = "Успеваемость";
   if (System.IO.File.Exists (BaseName) == true) {
    Set.ReadXml (BaseName);
   }
   dataGridView1.DataMember = "Успеваемость";
   dataGridView1.Columns [0].Width = 100;
   for (int i = 1; i <= 17; i++) dataGridView1.Columns [i].Width = 25;
«Подогнать» ширину столбцов под ширину формы можно, например, в обработчике события SizeChanged формы (при старте приложения ширина «подогнана» не будет):
   Rectangle Rect = this.ClientRectangle;
   int w = Rect.Width; //клиентская ширина формы
   if (w < 400) w = Rect.Width = 400;
   int border = dataGridView1.Columns [0].DividerWidth,
    left = dataGridView1.Rows [0].HeaderCell.Size.Width;
   //ширина разделителя столбцов и закрепленного столбца слева
   int w1 = 100,
       w2 = (int) Math.Floor (( w - 2 * w1 - 19 * border - left ) / 17.0);
   //под 1-й и последний столбец по 100 пикселей, остальное место делим поровну
   dataGridView1.Columns [0].Width = dataGridView1.Columns [18].Width = w1;
   for (int i = 1; i <= 17; i++) dataGridView1.Columns [i].Width = w2;
Также будем автоматически сохранять данные при выходе из программы (событие формы FormClosing):
   Table.TableName = "Успеваемость";
   Set.WriteXml (BaseName);
По выбору пункта меню «Добавить» выполняется следующее:
   DataRow newR = Set.Tables ["Успеваемость"].NewRow ();
   newR [0] = "Студент";
   try {
    int i = dataGridView1.CurrentCell.RowIndex;
    Set.Tables ["Успеваемость"].Rows.InsertAt (newR, i);
    Set.Tables ["Успеваемость"].AcceptChanges ();
   }
   catch (Exception) { }
А пункт «Удалить» проще всего запрограммировать так:
   try {
    if (dataGridView1.CurrentCell == null) return;
    int i = dataGridView1.CurrentCell.RowIndex;
    Set.Tables ["Успеваемость"].Rows [i].Delete ();
    Set.Tables ["Успеваемость"].AcceptChanges ();
   }
   catch (Exception) { }
Применение метода AcceptChanges нужно, чтобы изменение данных немедленно отобразилось в таблице.
Контроль правильности ввода (не более 1 символа в графы отметок, не более 20 символов в графы «ФИО» и «Итого») сделаем следующими обработчиками событий компоненты dataGridView1:
CellBeginEdit(на начало редактирования):
   Column = e.ColumnIndex; //запоминаем  столбец
   Val = dataGridView1.Rows[e.RowIndex].Cells[e.ColumnIndex].Value.ToString ();
    //что было в ячейке
   Changed = false; //ячейка не изменена
CellValueChanged (по изменению ячейки):
   String newVal =
    dataGridView1.Rows[e.RowIndex].Cells[e.ColumnIndex].Value.ToString ();
   if (e.ColumnIndex > 0 && e.ColumnIndex < 18) {
    if (newVal.Length > 1) newVal = Val;
   }
   else if (newVal.Length > 20) newVal = newVal.Substring(0,20);
   dataGridView1.Rows[e.RowIndex].Cells [e.ColumnIndex].Value = newVal;
EditingControlShowing (для установки своих обработчиков в дополнение к стандартным обработчиками событий компоненты):
   if (Column > 0 && Column < 18) {
    TextBox tb = (TextBox)e.Control;
    tb.MaxLength = 1;
    tb.KeyPress += new KeyPressEventHandler (tb_KeyPress);
   }
В проект добавлен метод tb_KeyPress – дополнение к обработке KeyPress, разрешающее вводить буквы, цифры, Backspace и пробел:
  void tb_KeyPress (object sender, KeyPressEventArgs e) {
   char c = e.KeyChar;
   if (!( Char.IsLetterOrDigit (c) || c == (char) Keys.Back ||
     c == (char) Keys.Space )) e.Handled = true;
   //а вот обработчик KeyDown так не сделать
  }
CellLeave (покидая ячейку, изменим правила перехода к следующей ячейке, по умолчанию это вниз, а мы хотим вправо):
   //конечно, "костыль", по идее, надо писать класс-наследник
   //DataGridView и там управлять клавиатурой
   if (!Changed) {
    Changed = true;
    int c = dataGridView1.CurrentCell.ColumnIndex;
    if (c == dataGridView1.Columns.Count - 1) {
     SendKeys.Send ("{Home}");
    }
    else {
     SendKeys.Send ("{Up}");
     SendKeys.Send ("{Right}");
    }
   }
Проблема состоит в том, что DataGridView обрабатывает многие клавиши своими собственными событиями и «не пускает» коды до уровня KeyPress или KeyDown (KeyUp выполняется).
Как пример расчёта добавим вычисление среднего балла по выставленным отметкам, код можно выполнить по соответствующему пункту меню:
   for (int i = 0; i < dataGridView1.RowCount - 1; i++) {
    int sum = 0, cnt = 0, val = 0;
    for (int j = 1; j < dataGridView1.ColumnCount - 1; j++) {
     String str = dataGridView1.Rows [i].Cells [j].Value.ToString ().Trim();
     try {
      if (str.Length > 0) val = Int32.Parse (str);
      else continue;
     }
     catch (Exception) {
      continue;
     }
     sum += val;
     cnt++;
    }
    if (cnt > 0) {
     double avg = (sum + 0.0) / cnt; //чтобы результат был double
     dataGridView1.Rows [i].Cells [dataGridView1.ColumnCount - 1].Value =
      String.Format ("{0:f2}", avg);
    }
   }
Мы выбираем для обработки только оценки (не проверяя их корректность), так как в ведомости могли быть другие отметки, например «б» (болен), «н» (отсутствует) и т.п.
Границей внешнего цикла, равной dataGridView1.RowCount — 1, мы исключаем при обработке пустую строку в конце таблицы, не содержащую данных.
Скачать пример Lab4_4 в архиве .zip с проектом C# Visual Studio 2019 (12 Кб)
Задание: реализовать табличный редактор в соответствии с вариантом задания. Предусмотреть в приложении следующие возможности:
- загрузка табличных данных из файла и их сохранение в файл;
- редактирование, добавление, удаление записей;
- при необходимости – поиск и выделение (или отображение в новом окне) записей, отвечающих заданным условиям;
- реализация расчётов, указанных в варианте задания.
Разработка базового редактора несвязанной таблицы на основе DataGridView (файл .pdf) (483 Кб)
Проект C# (Visual Studio 2019) из статьи .pdf, развернуть архив .zip в новую папку (12 Кб)
09.03.2023, 10:49 [6597 просмотров]
К этой статье пока нет комментариев, Ваш будет первым
создание и заполнение таблицы программно
заполнение таблицы динамически
запись и мгновенное отображение данных
заполнение dataGridView из текстового файла
запись из dataGridView в текстовый файл
создание и заполнение таблицы программно
Скрыть
Показать
Копировать
Form1.cs
usingSystem;usingSystem.Collections.Generic;usingSystem.ComponentModel;usingSystem.Data;usingSystem.Drawing;usingSystem.Linq;usingSystem.Text;usingSystem.Threading.Tasks;usingSystem.Windows.Forms;namespace_0070 {-
publicpartialclassForm1 : Form { -
DataGridView dataGridView1 =newDataGridView(); -
voidFuntcion() { -
dataGridView1.Size =newSize(400, 200); -
DataGridViewTextBoxColumn column0 =newDataGridViewTextBoxColumn(); -
column0.Name ="id"; -
column0.HeaderText ="ID"; -
DataGridViewTextBoxColumn column1 =newDataGridViewTextBoxColumn(); -
column1.Name ="brand"; -
column1.HeaderText ="Brand"; -
DataGridViewImageColumn column2 =newDataGridViewImageColumn(); -
column2.Name ="image"; -
column2.HeaderText ="Image"; -
dataGridView1.Columns.AddRange(column0, column1, column2); -
DataGridViewCell id0 =newDataGridViewTextBoxCell(); -
DataGridViewCell brand0 =newDataGridViewTextBoxCell(); -
DataGridViewCell image0 =newDataGridViewImageCell(); -
id0.Value ="1"; -
brand0.Value ="BMW"; -
image0.Value = imageList1.Images[0]; -
DataGridViewRow row0 =newDataGridViewRow(); -
row0.Cells.AddRange(id0, brand0, image0); -
dataGridView1.Rows.Add(row0); -
DataGridViewCell id1 =newDataGridViewTextBoxCell(); -
DataGridViewCell brand1 =newDataGridViewTextBoxCell(); -
DataGridViewCell image1 =newDataGridViewImageCell(); -
id1.Value ="2"; -
brand1.Value ="Bentley"; -
image1.Value = imageList1.Images[1]; -
DataGridViewRow row1 =newDataGridViewRow(); -
row1.Cells.AddRange(id1, brand1, image1); -
dataGridView1.Rows.Add(row1); -
DataGridViewCell id2 =newDataGridViewTextBoxCell(); -
DataGridViewCell brand2 =newDataGridViewTextBoxCell(); -
DataGridViewCell image2 =newDataGridViewImageCell(); -
id2.Value ="3"; -
brand2.Value ="Mercedes"; -
image2.Value = imageList1.Images[2]; -
DataGridViewRow row2 =newDataGridViewRow(); -
row2.Cells.AddRange(id2, brand2, image2); -
dataGridView1.Rows.Add(row2); -
} -
publicForm1() { -
InitializeComponent(); -
this.Controls.Add(dataGridView1); -
Funtcion(); -
} -
} }
заполнение таблицы динамически
Скрыть
Показать
Копировать
Form1.cs
usingSystem;usingSystem.Collections.Generic;usingSystem.ComponentModel;usingSystem.Data;usingSystem.Drawing;usingSystem.Linq;usingSystem.Text;usingSystem.Threading.Tasks;usingSystem.Windows.Forms;namespace_0071 {-
publicpartialclassForm1 : Form { -
intcounter = 0; -
publicForm1() { -
InitializeComponent(); -
} -
privatevoidbuttonBrowse_Click(objectsender, EventArgs e) { -
openFileDialog1.Filter ="Images (*.jpg; *.jpeg; *.gif; *.bmp; *.ico; *.png) | *.jpg; *.jpeg; *.gif; *.bmp; *.ico; *.png"; -
if(openFileDialog1.ShowDialog() == DialogResult.OK) { -
imageList1.Images.Add(Image.FromFile(openFileDialog1.FileName)); -
} -
} -
privatevoidbuttonAdd_Click(objectsender, EventArgs e) { -
DataGridViewCell brand =newDataGridViewTextBoxCell(); -
DataGridViewCell image =newDataGridViewImageCell(); -
brand.Value = textBoxBrend.Text; -
image.Value = imageList1.Images[counter++]; -
DataGridViewRow row =newDataGridViewRow(); -
row.Cells.AddRange(brand, image); -
dataGridView1.Rows.Add(row); -
textBoxBrend.Clear(); -
dataGridView1.Refresh(); -
textBoxBrend.Select(); -
} -
privatevoidbuttonClear_Click(objectsender, EventArgs e) { -
dataGridView1.Rows.Clear(); -
} -
} }
запись и мгновенное отображение данных
Создайте базу данных «abc» и таблицу «Avto».
Скрыть
Показать
Копировать
*.sql
CREATE DATABASE abc
GO
USE abc
GO
CREATE TABLE [dbo].[Avto] (
 [Id]           INT             IDENTITY (1, 1) NOT NULL,
 [Brand]        VARCHAR (255)   NOT NULL,
 [ImageBrand]   VARBINARY (MAX) NOT NULL,
 [Country]      VARCHAR (255)   NOT NULL,
 [ImageCountry] IMAGE           NOT NULL,
 CONSTRAINT [PK_Avto] PRIMARY KEY CLUSTERED ([Id] ASC)
);
Скрыть
Показать
Копировать
Form1.cs
using System;
using System.Collections.Generic;
using System.ComponentModel;
using System.Data;
using System.Drawing;
using System.Linq;
using System.Text;
using System.Threading.Tasks;
using System.Windows.Forms;

using System.Data.SqlClient;
using System.IO;

namespace _0072 {
 public partial class Form1 : Form {
  string pathImageBrand = string.Empty;
  string pathImageCountry = string.Empty;
  public Form1() {
   InitializeComponent();
  }
  //кнопка Brand / Browse
  private void buttonBrowseBrand_Click(object sender, EventArgs e) {
   openFileDialog1.Filter = "Images (*.jpg; *.jpeg; *.gif; *.bmp; *.ico; *.png) | *.jpg; *.jpeg; *.gif; *.bmp; *.ico; *.png";
   if(openFileDialog1.ShowDialog() == DialogResult.OK) {
    pathImageBrand = openFileDialog1.FileName.ToString();
   }
  }
  //кнопка Country / Browse
  private void buttonBrowseCountry_Click(object sender, EventArgs e) {
   openFileDialog2.Filter = "Images (*.jpg; *.jpeg; *.gif; *.bmp; *.ico; *.png) | *.jpg; *.jpeg; *.gif; *.bmp; *.ico; *.png";
   if(openFileDialog2.ShowDialog() == DialogResult.OK) {
    pathImageCountry = openFileDialog2.FileName.ToString();
   }
  }
  //кнопка Add
  private void buttonAdd_Click(object sender, EventArgs e) {
   string stringConnect = @"Data Source=BISEM\MSSQLSERVER2012;Initial Catalog=abc;Integrated Security=True";
   string sql = "INSERT INTO Avto VALUES("+null+" '"+textBoxBrand.Text+"', @imgBrands, '"+textBoxCountry.Text+"', @imgCountries)";

   byte[] imgBrands = null;
   FileStream fsBrand = new FileStream(pathImageBrand, FileMode.Open, FileAccess.Read);
   BinaryReader brBrand = new BinaryReader(fsBrand);
   imgBrands = brBrand.ReadBytes((int)fsBrand.Length);

   byte[] imgCountries = null;
   FileStream fsCountry = new FileStream(pathImageCountry, FileMode.Open, FileAccess.Read);
   BinaryReader brCountry = new BinaryReader(fsCountry);
   imgCountries = brCountry.ReadBytes((int)fsCountry.Length);

   using(SqlConnection connect = new SqlConnection(stringConnect)) {
    try {
     connect.Open();
     SqlCommand command = new SqlCommand(sql, connect);
     command.Parameters.Add(new SqlParameter("@imgBrands", imgBrands));
     command.Parameters.Add(new SqlParameter("@imgCountries", imgCountries));
     int x = command.ExecuteNonQuery();
     MessageBox.Show(x.ToString() + " Record added");
    }
    catch(Exception exc) {
     MessageBox.Show("Error connection with a database {0}", exc.Message);
    }
   }

   textBoxBrand.Clear();
   textBoxCountry.Clear();
   this.avtoTableAdapter.Fill(this.abcDataSet.Avto);
   textBoxBrand.Select();
  }

  private void Form1_Load(object sender, EventArgs e) {
   // TODO: This line of code loads data into the 'abcDataSet.Avto' table. You can move, or remove it, as needed.
   this.avtoTableAdapter.Fill(this.abcDataSet.Avto);
  }
 }
}
База данных находится в папке «database» в архиве.
заполнение dataGridView из текстового файла
Скрыть
Показать
Копировать
Form1.cs
using System;
using System.Collections.Generic;
using System.ComponentModel;
using System.Data;
using System.Drawing;
using System.Linq;
using System.Text;
using System.Threading.Tasks;
using System.Windows.Forms;

using System.IO;

namespace _0073 {
 public partial class Form1 : Form {
  //метод заполняет dataGridView данными из текстового файла
  public void Function() {
   DataSet ds = new DataSet();
   //создаем временную таблицу
   ds.Tables.Add("Temp");

   //путь к текстовому файлу
   string path = @"a.txt";
   StreamReader sr = new StreamReader(path);

   /*создаем колонки в таблице и заполняем их названиями*/
   //считываем первую строку из файла, в ней названия столбцов
   string firstLine = sr.ReadLine();
   //массив имен колонок из файла
   string[] arraNameColumn = System.Text.RegularExpressions.Regex.Split(firstLine, ",");
   for(int i=0; i<arraNameColumn.Length; i++) {
    ds.Tables[0].Columns.Add(arraNameColumn[i]);
   }

   /*заполняем строки в таблице*/
   string Line = sr.ReadLine();
   while(Line != null) {
    string[] arraCell = System.Text.RegularExpressions.Regex.Split(Line, ",");
    ds.Tables[0].Rows.Add(arraCell);
    Line = sr.ReadLine();
   }

   //привязываем dataGridView к таблице
   dataGridView1.DataSource = ds.Tables[0];
  }
  public Form1() {
   InitializeComponent();
   Function();
  }
 }
}
запись из dataGridView в текстовый файл
Скрыть
Показать
Копировать
Form1.cs
using System;
using System.Collections.Generic;
using System.ComponentModel;
using System.Data;
using System.Drawing;
using System.Linq;
using System.Text;
using System.Threading.Tasks;
using System.Windows.Forms;

using System.IO;

namespace _0074 {
 public partial class Form1 : Form {
  string path = string.Empty;
  public Form1() {
   InitializeComponent();
  }
  //кнопка Browse file
  private void button1_Click(object sender, EventArgs e) {
   openFileDialog1.Filter = "Text (*.txt) | *.txt";
   if(openFileDialog1.ShowDialog() == DialogResult.OK) {
    path = openFileDialog1.FileName;
   }
  }
  //кнопка Record into file
  private void button2_Click(object sender, EventArgs e) {
   using(StreamWriter sw = new StreamWriter(path, true)) {
    for(int i = 0; i < Convert.ToInt32(dataGridView1.Rows.Count-1); i++) {
     sw.WriteLine(dataGridView1.Rows[i].Cells[0].Value.ToString() + "\t" + dataGridView1.Rows[i].Cells[1].Value.ToString());
    }
   }
  }
 }
}
Содержание
- Создание таблиц подстановки в приложениях Windows Forms Create lookup tables in Windows Forms applications
- Привязка элемента управления «Уточняющий запрос» To databind a lookup control
- Шаг 1. Создание проекта и добавление таблицы в форму Step 1: Create a project and add a table to your form
- Создание проекта и добавление таблицы в форму To create a project and add a table to your form
- Задание свойств формы To set properties for a form
- Продолжить или повторить пройденный материал To continue or review
- Пошаговое руководство. Создание таблицы данных в конструктор наборов данных Walkthrough: Create a DataTable in the Dataset Designer
- Создание приложения Windows Forms Create a new Windows Forms application
- Добавление нового набора данных в приложение Add a new Dataset to the application
- Добавить новый объект DataTable в набор данных Add a new DataTable to the Dataset
- Добавить столбцы в таблицу данных Add columns to the DataTable
- Задание первичного ключа для таблицы Set the Primary Key for the table
- Сохранение проекта Save Your Project
- Практическое руководство. Создание таблицы подстановок с помощью компонента BindingSource в формах Windows Forms How to: Create a Lookup Table with the Windows Forms BindingSource Component
- Создание пользовательского интерфейса To create the user interface
- Подключение к данным и их привязка к элементам управления To connect to the data and bind it to controls
Создание таблиц подстановки в приложениях Windows Forms Create lookup tables in Windows Forms applications
Таблица Уточняющий запрос термина описывает элементы управления, привязанные к двум связанным таблицам данных. The term lookup table describes controls that are bound to two related data tables. Эти элементы управления «Уточняющий запрос» отображают данные из первой таблицы на основе значения, выбранного во второй таблице. These lookup controls display data from the first table based on a value selected in the second table.
Таблицы подстановки можно создать, перетащив главный узел родительской таблицы (из окна Источники данных) на элемент управления в форме, который уже привязан к столбцу в связанной дочерней таблице. You can create lookup tables by dragging the main node of a parent table (from the Data Sources window) onto a control on your form that is already bound to the column in the related child table.
Привязка элемента управления «Уточняющий запрос» To databind a lookup control
Для таблиц подстановки необходимо, чтобы в окне Источники данных были доступны две связанные таблицы или объекты. Lookup tables require that two related tables or objects are available in the Data Sources window. Дополнительные сведения см. в разделе связи в наборах данных. For more information, see Relationships in datasets.
Узел дочерней таблицы — это узел, который отображается как развертываемый дочерний узел в родительской таблице. The child table node is the node that appears as an expandable child node in the parent table.
Нахождение узла, связывающего две таблицы ( CustomerID узел из предыдущего примера). Locate the node that relates the two tables (the CustomerID node in the previous example). Измените тип перетаскивания на, ComboBox выбрав поле со списком в списке элементов управления. Change its drop type to a ComboBox by selecting ComboBox from the control list.
Перетащите главный узел дочерней таблицы из окна Источники данных на форму. Drag the main child table node from the Data Sources window onto your form.
Элементы управления с привязкой к данным (с описательными метками) и панель инструментов ( BindingNavigator ) отображаются в форме. Databound controls (with descriptive labels) and a tool strip (BindingNavigator) appear on the form. Набор данных, TableAdapter, BindingSource и BindingNavigator отображается в области компонентов. A DataSet, TableAdapter, BindingSource, and BindingNavigator appear in the component tray.
Теперь перетащите главный узел родительской таблицы из окна Источники данных непосредственно в элемент управления Уточняющий запрос ( ComboBox ). Now, drag the main parent table node from the Data Sources window directly onto the lookup control (the ComboBox).
Привязки подстановки теперь установлены. The lookup bindings are now established. Конкретные свойства, заданные для элемента управления, см. в следующей таблице. Refer to the following table for the specific properties that were set on the control.
Источник
Шаг 1. Создание проекта и добавление таблицы в форму Step 1: Create a project and add a table to your form
Первым шагом создания игры «Подбери пару!» является создание проекта и добавление таблицы в форму. The first step in creating a matching game is to create the project and add a table to your form. Таблица помогает равномерно распределить значки по сетке 4×4. The table helps align the icons into an orderly 4×4 grid. Можно также задать несколько свойств, чтобы улучшить внешний вид игрового поля. You also set several properties to enhance the appearance of the game board.
Создание проекта и добавление таблицы в форму To create a project and add a table to your form
В строке меню щелкните Файл > Создать > Проект. On the menu bar, choose File > New > Project.
Выберите Visual C# или Visual Basic в левой области диалогового окна Новый проект, а затем — Классическое приложение Windows. Choose either Visual C# or Visual Basic on the left side of the New Project dialog box, and then choose Windows Desktop.
В списке шаблонов выберите шаблон Приложение Windows Forms (.NET Framework), назовите его MatchingGame, а затем нажмите кнопку ОК. In the list of templates, choose the Windows Forms App (.NET Framework) template, name it MatchingGame, and then choose the OK button.
Появится форма с именем Form1.cs или Form1.vb, в зависимости от выбранного языка программирования. A form that’s named Form1.cs or Form1.vb appears, depending on the programming language that you chose.
Дополнительные сведения см. в разделе Установка Visual Studio. For more information, see the Install Visual Studio page.
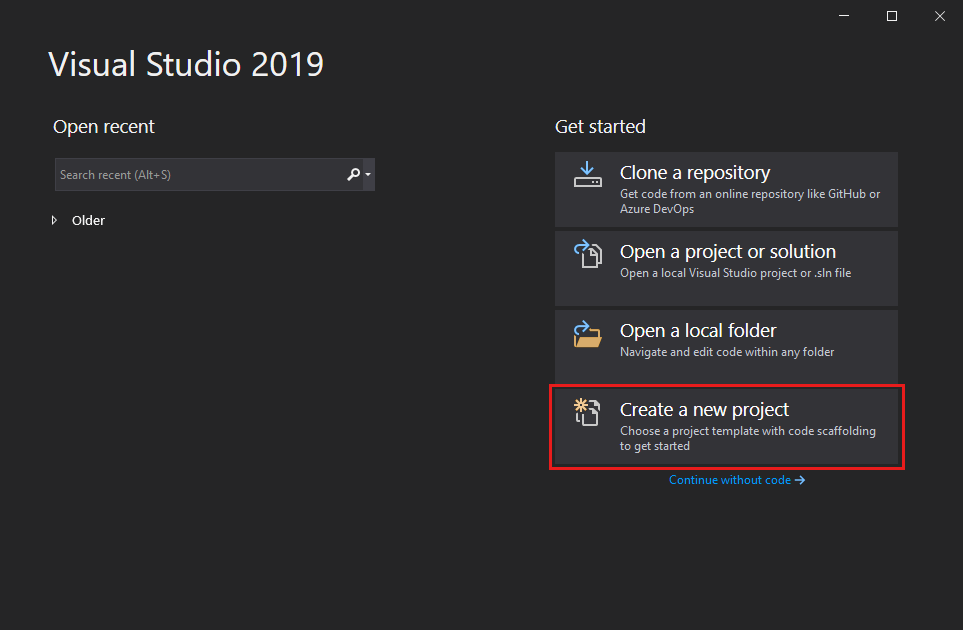
На начальном экране выберите Создать проект. On the start window, choose Create a new project.
В поле поиска окна Создание проекта введите Windows Forms. On the Create a new project window, enter or type Windows Forms in the search box. Затем в списке Тип проекта выберите Рабочий стол. Next, choose Desktop from the Project type list.
Применив фильтр Тип проекта, выберите шаблон Приложение Windows Forms (.NET Framework) для C# или Visual Basic и нажмите кнопку Далее. After you apply the Project type filter, choose the Windows Forms App (.NET Framework) template for either C# or Visual Basic, and then choose Next.

Если шаблон Приложение Windows Forms (.NET Framework) отсутствует, его можно установить из окна Создание проекта. If you do not see the Windows Forms App (.NET Framework) template, you can install it from the Create a new project window. В сообщении Не нашли то, что искали? выберите ссылку Установка других средств и компонентов. In the Not finding what you’re looking for? message, choose the Install more tools and features link.

Затем нажмите кнопку Изменить в Visual Studio Installer. After that, choose the Modify button in the Visual Studio Installer. Вам может быть предложено сохранить результаты работы; в таком случае сделайте это. You might be prompted to save your work; if so, do so. Выберите Продолжить, чтобы установить рабочую нагрузку. Next, choose Continue to install the workload.
В окне Настроить новый проект введите MatchingGame в поле Имя проекта. In the Configure your new project window, type or enter MatchingGame in the Project name box. Затем нажмите Создать. Then, choose Create.
Задание свойств формы To set properties for a form
В окне Свойства задайте следующие значения свойств формы. In the Properties window, set the following form properties.
Измените свойство формы Text с Form1 на Matching Game. Change the form’s Text property from Form1 to Matching Game. Этот текст отображается в верхней части окна игры. This text appears at the top of the game window.
Установите размер формы на 550 пикселей в ширину и 550 пикселей в высоту. Set the size of the form to 550 pixels wide by 550 tall. Для этого установите для свойства Size значение 550, 550 или перетащите угол формы, чтобы требуемый размер отобразился в правом нижнем углу интегрированной среды разработки (IDE). You can do this either by setting the Size property to 550, 550, or by dragging the corner of the form until you see the correct size in the lower-right corner of the integrated development environment (IDE).
Откройте панель элементов, выбрав вкладку Панель элементов в левой части интегрированной среды разработки. Display the toolbox by choosing the Toolbox tab on the left side of the IDE.
Перетащите элемент управления TableLayoutPanel из категории Контейнеры панели элементов, а затем установите для него следующие свойства. Drag a TableLayoutPanel control from the Containers category in the toolbox, and then set the following properties for it.
Задайте для свойства BackColor значение CornflowerBlue. Set the BackColor property to CornflowerBlue. Для этого откройте диалоговое окно BackColor, щелкнув стрелку раскрывающегося списка рядом со свойством BackColor в окне Свойства. To do this, open the BackColor dialog box by choosing the drop-down arrow next to the BackColor property in the Properties window. Затем перейдите на вкладку Веб в диалоговом окне BackColor, чтобы просмотреть список доступных имен цветов. Then, choose the Web tab in the BackColor dialog box to view a list of available color names.
Цвета упорядочены не по алфавиту, и цвет CornflowerBlue находится в нижней части списка. The colors are not in alphabetical order, and CornflowerBlue is near the bottom of the list.
Задайте для свойства Dock значение Fill, нажав кнопку раскрывающегося списка рядом со свойством и щелкнув большую среднюю кнопку. Set the Dock property to Fill by choosing the drop-down button next to the property and choosing the large middle button. Таблица будет растянута по всей форме. This spreads the table out so that it covers the entire form.
Для свойства CellBorderStyle установите значение Inset. Set the CellBorderStyle property to Inset. Между ячейками поля появятся видимые границы. This provides visual borders between each cell on the board.
Нажмите треугольную кнопку в правом верхнем углу элемента управления TableLayoutPanel для отображения меню задач этой панели. Choose the triangle button in the upper-right corner of the TableLayoutPanel to display its task menu.
В меню задач дважды щелкните Добавить строку для добавления двух дополнительных строк, а затем дважды щелкните Добавить столбец для добавления двух дополнительных столбцов. On the task menu, choose Add Row twice to add two more rows, and then choose Add Column twice to add two more columns.
В меню задач выберите команду Изменить строки и столбцы, чтобы открыть окно Стили столбцов и строк. On the task menu, choose Edit Rows and Columns to open the Column and Row Styles window. Выберите каждый из столбцов, нажмите кнопку Процент и установите ширину каждого столбца равной 25 процентам от общей ширины. Choose each of the columns, choose the Percent option button, and then set each column’s width to 25 percent of the total width. Затем в раскрывающемся списке в верхней части окна выберите Строки и задайте высоту каждой строки равной 25 процентам. Then select Rows from the drop-down box at the top of the window, and set each row’s height to 25 percent. По завершении нажмите кнопку ОК. When you’re done, choose the OK button.
Теперь на панели макета таблицы должна быть видна сетка размером 4х4, состоящая из шестнадцати одинаковых по размеру квадратных ячеек. Your TableLayoutPanel should now be a 4×4 grid, with sixteen equally sized square cells. Эти строки и столбцы задают места, в которых позже появятся изображения значков. These rows and columns are where the icon images will appear later.
Убедитесь, что TableLayoutPanel выбран в редакторе формы. Be certain that the TableLayoutPanel is selected in the form editor. На это будет указывать надпись tableLayoutPanel1 в верхней части окна Свойства. To verify this, you should see tableLayoutPanel1 at the top of the Properties window. Если этот элемент управления не выбран, выберите элемент управления TableLayoutPanel в форме или в раскрывающемся списке в верхней части окна Свойства. If it is not selected, choose the TableLayoutPanel on the form, or choose it in the dropdown control at the top of the Properties window.
При выбранном элементе управления TableLayoutPanel откройте панель элементов и добавьте элемент управления Label (находится в категории Стандартные элементы управления) в левую верхнюю ячейку TableLayoutPanel. While the TableLayoutPanel is selected, open the toolbox and add a Label control (located in the Common Controls category) to the upper-left cell of the TableLayoutPanel. Теперь элемент управления Label должен быть выбран в интегрированной среде разработки. The label control should now be selected in the IDE. Задайте для него следующие свойства. Set the following properties for it.
Убедитесь, что свойство BackColor имеет значение CornflowerBlue. Be sure that the label’s BackColor property is set to CornflowerBlue.
Задайте свойству AutoSize значение False. Set the AutoSize property to False.
Задайте для свойства Dock значение Fill. Set the Dock property to Fill.
Задайте для свойства TextAlign значение MiddleCenter, нажав кнопку раскрывающегося списка рядом со свойством, а затем щелкнув среднюю кнопку. Set the TextAlign property to MiddleCenter by choosing the drop-down button next to the property, and then choosing the middle button. Это необходимо, чтобы значок отображался в середине ячейки. This ensures the icon appears in the middle of the cell.
Выберите свойство Font. Choose the Font property. Должна появиться кнопка с многоточием (…). An ellipsis (. ) button should appear.
Нажмите кнопку с многоточием и установите для параметра Font значение Webdings, для параметра Font Style — значение Bold, а для параметра Size — значение 48. Choose the ellipsis button, and set the Font value to Webdings, the Font Style to Bold, and the Size to 48.
Установите свойство Text равным букве с. Set the Text property of the label to the letter c.
Теперь в левой верхней ячейке TableLayoutPanel должен располагаться черный квадрат на синем фоне, который выравнивается по центру. The upper-left cell in the TableLayoutPanel should now contain a black box centered on a blue background.
Шрифт Webdings является шрифтом значков, который поставляется с операционной системой Windows. The Webdings font is a font of icons that ships with the Windows operating system. В вашей игре «Подбери пару!» игроку необходимо найти пары одинаковых значков, поэтому используйте этот шрифт для отображения значков. In your matching game, the player needs to match pairs of icons, so you use this font to display the icons to match. Вместо ввода буквы с в свойство Text попробуйте вводить разные буквы, чтобы увидеть, какие значки отображаются. Instead of putting c in the Text property, try entering different letters to see what icons are displayed. Восклицательный знак соответствует пауку, прописная буква N — глазу, а запятая — перцу чили. An exclamation point is a spider, an uppercase N is an eye, and a comma is a chili pepper.
Выберите элемент управления Label и скопируйте его в следующую ячейку TableLayoutPanel. Choose your Label control and copy it to the next cell in the TableLayoutPanel. (Нажмите сочетание клавиш CTRL+C или в строке меню выберите Правка > Копировать.) Затем вставьте его. (Choose the Ctrl+C keys, or on the menu bar, choose Edit > Copy.) Then paste it. (Нажмите сочетание клавиш CTRL+V или в строке меню выберите Правка > Вставить.) Во второй ячейке элемента управления TableLayoutPanel появится копия первого элемента управления Label. (Choose the Ctrl+V keys, or on the menu bar, choose Edit > Paste.) A copy of the first Label appears in the second cell of the TableLayoutPanel. Вставьте его снова, и в третьей ячейке появится еще один элемент управления Label. Paste it again, and another Label appears in the third cell. Продолжайте вставлять элементы управления Label, пока все ячейки не будут заполнены. Keep pasting Label controls until all of the cells are filled.
Если выполнить команду вставки слишком много раз, интегрированная среда разработки добавит новую строку в TableLayoutPanel, чтобы появилось место для добавления нового элемента управления Label. If you paste too many times, the IDE adds a new row to the TableLayoutPanel so that it has a place to add your new Label control. Можно выполнить откат. You can undo it. Чтобы удалить новую ячейку, нажмите сочетание клавиш CTRL+Z или в меню выберите Правка > Отменить. To remove the new cell, choose the Ctrl+Z keys, or on the menu bar, choose Edit > Undo.
Теперь ваша форма готова. Она будет выглядеть примерно так, как показано на рисунке ниже. Now your form is laid out. It should look similar to the following picture.
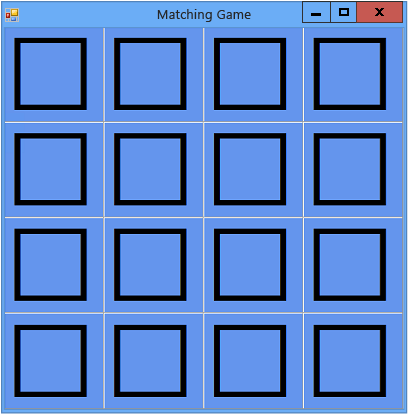
Исходная форма игры «Подбери пару!» Initial matching game form
Продолжить или повторить пройденный материал To continue or review
Предыдущая статья с общими сведениями: Руководство 3. Создание игры «Подбери пару!». To return to the overview topic, see Tutorial 3: Create a matching game.
Источник
Пошаговое руководство. Создание таблицы данных в конструктор наборов данных Walkthrough: Create a DataTable in the Dataset Designer
В этом пошаговом руководстве объясняется, как создать DataTable (без адаптера таблицы) с помощью Конструктор наборов данных. This walkthrough explains how to create a DataTable (without a TableAdapter) using the Dataset Designer. Сведения о создании таблиц данных, которые включают TableAdapter, см. в разделе Создание и настройка адаптеров таблиц. For information on creating data tables that include TableAdapters, see Create and configure TableAdapters.
Создание приложения Windows Forms Create a new Windows Forms application
В Visual Studio в меню Файл выберите пункты Создать > Проект. In Visual Studio, on the File menu, select New > Project.
Назовите проект дататаблевалксраугх и нажмите кнопку ОК. Name the project DataTableWalkthrough, and then choose OK.
Проект дататаблевалксраугх создается и добавляется в Обозреватель решений. The DataTableWalkthrough project is created and added to Solution Explorer.
Добавление нового набора данных в приложение Add a new Dataset to the application
В меню Проект выберите команду Добавить новый элемент. On the Project menu, select Add New Item.
Откроется диалоговое окно Добавление нового элемента. The Add New Item dialog box appears.
На панели слева выберите данные, а затем выберите набор данных в средней области. In the left-hand pane, select Data, then select DataSet in the middle pane.
Выберите Добавить. Choose Add.
Visual Studio добавит файл с именем dataSet1. xsd в проект и откроет его в Конструктор наборов данных. Visual Studio adds a file called DataSet1.xsd to the project and opens it in the Dataset Designer.
Добавить новый объект DataTable в набор данных Add a new DataTable to the Dataset
Перетащите объект DataTable с вкладки набор данных на панели элементов на Конструктор наборов данных. Drag a DataTable from the DataSet tab of the Toolbox onto the Dataset Designer.
Добавить столбцы в таблицу данных Add columns to the DataTable
В окне Свойства присвойте свойству DataType значение System.Int16. In the Properties window, set the DataType property to System.Int16.
Повторите эту процедуру и добавьте следующие столбцы: Repeat this process and add the following columns:
Задание первичного ключа для таблицы Set the Primary Key for the table
Все таблицы данных должны иметь первичный ключ. All data tables should have a primary key. Первичный ключ однозначно определяет определенную запись в таблице данных. A primary key uniquely identifies a specific record in a data table.
Чтобы задать первичный ключ, щелкните правой кнопкой мыши столбец сонгид и выберите пункт Задать первичный ключ. To set the primary key, right-click the SongID column, and then click Set Primary Key. Рядом со столбцом сонгид появится значок ключа. A key icon appears next to the SongID column.
Сохранение проекта Save Your Project
Источник
Практическое руководство. Создание таблицы подстановок с помощью компонента BindingSource в формах Windows Forms How to: Create a Lookup Table with the Windows Forms BindingSource Component
Таблица подстановки — это таблица данных, в одном из столбцов которой отображаются данные из записей в связанной таблице. A lookup table is a table of data that has a column that displays data from records in a related table. В следующих процедурах для отображения поля с отношением по внешнему ключу от родительской к дочерней таблице используется элемент управления ComboBox. In the following procedures, a ComboBox control is used to display the field with the foreign-key relationship from the parent to the child table.
Чтобы вы могли представить это отношение, приведем пример родительской и дочерней таблицы. To help visualize these two tables and this relationship, here is an example of a parent and child table:
CustomersTable (родительская таблица) CustomersTable (parent table)
| CustomerID CustomerID | CustomerName CustomerName |
|---|---|
| 712 712 | Павел Кох Paul Koch |
| 713 713 | Тамара Иванова Tamara Johnston |
OrdersTable (дочерняя таблица) OrdersTable (child table)
| OrderID OrderID | OrderDate OrderDate | CustomerID CustomerID |
|---|---|---|
| 903 903 | 12 февраля 2004 г. February 12, 2004 | 712 712 |
| 904 904 | 13 февраля 2004 г. February 13, 2004 | 713 713 |
В данном случае одна таблица, CustomersTable, содержит актуальную информацию, которую необходимо отобразить и сохранить. In this scenario, one table, CustomersTable, stores the actual information you want to display and save. Для экономии места в таблице опущены пояснения. But to save space, the table leaves out data that adds clarity. Другая таблица, OrdersTable, содержит только внешнюю информацию о том, какой номер идентификатора клиента соответствует тем или иным данным и идентификатору заказа. The other table, OrdersTable, contains only appearance-related information about which customer ID number is equivalent to which order date and order ID. При этом имена клиентов не указываются. There is no mention of the customers’ names.
Чтобы создать таблицу подстановки, в элементе управления ComboBox устанавливаются четыре важных свойства. Four important properties are set on the ComboBox Control control to create the lookup table.
Свойство DataSource содержит имя таблицы. The DataSource property contains the name of the table.
Свойство DisplayMember содержит столбец данных таблицы, из которого нужно взять текст для элемента управления (имя клиента). The DisplayMember property contains the data column of that table that you want to display for the control text (the customer’s name).
Свойство ValueMember содержит столбец данных таблицы, в которой хранится информация (номер идентификатора в родительской таблице). The ValueMember property contains the data column of that table with the stored information (the ID number in the parent table).
Свойство SelectedValue предоставляет значение подстановки для дочерней таблицы на основании свойства ValueMember. The SelectedValue property provides the lookup value for the child table, based on the ValueMember.
Представленные ниже процедуры показывают, как разместить форму в виде таблицы подстановки и привязать данные к ее элементам управления. The procedures below show you how to lay out your form as a lookup table and bind data to the controls on it. Для успешного завершения процедур необходим источник данных с родительской и дочерней таблицами, связанными по внешнему ключу, как это уже говорилось выше. To successfully complete the procedures, you must have a data source with parent and child tables that have a foreign-key relationship, as mentioned previously.
Создание пользовательского интерфейса To create the user interface
Перетащите элемент управления из панели элементов на ComboBox форму. From the ToolBox, drag a ComboBox control onto the form.
Этот элемент управления будет отображать столбец из родительской таблицы. This control will display the column from parent table.
Перетащите другие элементы управления для отображения сведений из дочерней таблицы. Drag other controls to display details from the child table. Формат данных в таблице следует определить, исходя из выбранных элементов управления. The format of the data in the table should determine which controls you choose. Дополнительные сведения см. в разделе Функциональная классификация элементов управления Windows Forms. For more information, see Windows Forms Controls by Function.
Перетащите в форму элемент управления BindingNavigator. Это позволит перемещаться по данным в дочерней таблице. Drag a BindingNavigator control onto the form; this will allow you to navigate the data in the child table.
Подключение к данным и их привязка к элементам управления To connect to the data and bind it to controls
Выберите элемент управления ComboBox и нажмите на глиф «Быстрые действия», чтобы открыть одноименное диалоговое окно. Select the ComboBox and click the Smart Task glyph to display the Smart Task dialog box.
Выберите элемент Использовать элементы, привязанные к данным. Select Use data bound items.
Щелкните стрелку рядом с раскрывающимся списком Источник данных. Click the arrow next to the Data Source drop-down box. Если источник данных ранее был настроен для проекта или формы, он отобразится. В противном случае выполните следующие действия (в этом примере используются таблицы Customers и Orders учебной базы данных Борей, а ссылки на них приводятся в круглых скобках). If a data source has previously been configured for the project or form, it will appear; otherwise, complete the following steps (This example uses the Customers and Orders tables of the Northwind sample database and refers to them in parentheses).
Щелкните элемент Добавить источник данных проекта, чтобы подключиться к данным и создать источник данных. Click Add Project Data Source to connect to data and create a data source.
На странице приветствия Мастер настройки источника данных нажмите кнопку Далее. On the Data Source Configuration Wizard welcome page, click Next.
На странице Выбор типа источника данных выберите элемент База данных. Select Database on the Choose a Data Source Type page.
На странице Выбор подключения к базе данных выберите тип подключения данных из списка доступных подключений. Select a data connection from the list of available connections on the Choose Your Data Connection page. Если необходимое подключение данных недоступно, выберите элемент Создать подключение, чтобы создать новое подключение данных. If your desired data connection is not available, select New Connection to create a new data connection.
Нажмите кнопку Да, сохранить подключение, чтобы сохранить строку подключения в файле конфигурации приложения. Click Yes, save the connection to save the connection string in the application configuration file.
Выберите объекты базы данных, чтобы перенести их в приложение. Select the database objects to bring into your application. В данном случае выберите родительскую и дочернюю таблицы (например, таблицы Customers и Orders) с отношением по внешнему ключу. In this case, select a parent table and child table (for example, Customers and Orders) with a foreign key relationship.
Если необходимо, замените имя набора данных по умолчанию. Replace the default dataset name if you want.
Нажмите кнопку Готово. Click Finish.
В раскрывающемся списке Отобразить участника выберите имя столбца (например, ContactName) для его отображения в поле со списком. In the Display Member drop-down box, select the column name (for example, ContactName) to be displayed in the combo box.
В раскрывающемся списке Значение участника выберите столбец (например, CustomerID), чтобы выполнить операции подстановки в дочерней таблице. In the Value Member drop-down box, select the column (for example, CustomerID) to perform the lookup operation in the child table.
Свяжите элемент управления BindingNavigator с элементом BindingSource дочерней таблицы (например, OrdersBindingSource ). Bind the BindingNavigator control to the BindingSource of the child table (for example, OrdersBindingSource ).
Свяжите элементы управления, кроме ComboBox и BindingNavigator, с полями сведений из элемента BindingSource дочерней таблицы (например, OrdersBindingSource ), которые необходимо отобразить. Bind the controls other than the ComboBox and BindingNavigator control to the details fields from the child table’s BindingSource (for example, OrdersBindingSource ) that you want to display.
Источник
November 2005
Objectives
- To explain how to use Table layout engine to organize and order
WinForms in tabular format
Contents
- Introduction
- Basics
- Advanced operations with table
- Creation of nested tables
- Conclusion
Introduction
Did you find yourself wasting time in reordering controls while
designing user interface layout? Isn’t be much simple if you use table
(like table in Word, Excel or HTML table)? In this article I
will explain how to use the power of table layout engine
which is part of LidorSystems.Collector library.
Basics
To start working with table you need to insert Page control from the
toolbox on Form. After that, right click on the
Page to insert table. A dialog is shown in which
you enter basic parameters of the table, and a
new table object is created.
Page control can have only one table object present. Table consist of
cells ordered in columns and rows. Each cell can contain only
one control at a time, but you can move controls from one cell
to another with drag&drop.
Cells can be resized, merged, split to form another cells.
They have the ability to align their content in nine positions
and most important they can lock content position and size.
Content of cells can be control of any type that can be accepted
by the Form, including Collector controls.
To add controls to the table simply drop it from the toolbox to
the selected cell or copy/paste existing controls on your Form.
When control is added, cell automatically adjust the size to
the control size. This is because by default every cell has SizeType property
value set to AutoSize. This property can receive two more
values:
Fixed and Free. Additionaly when you resize
cells, their content will also resize. To prevent cells from
resizing, SizeType
property value of column or row, in which cell belong, must be
set to Fixed.
For additional space you can insert columns or rows before or after
selected cell. Selection of cells can be done either from
the context menu by selection of columns or rows or with mouse
dragging. After some cells are selected they can align their content in nine
positions by setting their alignment type.
Advanced operations with table
The power of table lies in cells abillity to be resized, merged, splitted,
autosized to accomodate their content. This way you can quickly and
easily adjust positions and size of your controls that maintain
persistent. Further more cell content can be locked with setting
the SizeType property
value to Fixed.
Some controls need more space and cannot be added only in one cell. To
create space for this controls first select some cells and then click
on the Merge
cells item from the context menu. Sometimes you will need
to split cell to create additional cells. This can be done
by selecting the cell that you want to split and click
on the Split
cell option
from the context menu, upon which you will be asked of whether
you want to split cell in number of rows or columns.
When you resize cells, if you feel that autosizing of controls is annoying
to you, change SizeType of cells to Free.
This way the size of controls will not be affected by resizing
operations and in each cell you can set control to occupy smaller
space of cell and further make control alignment to any side of the
cell.
When you are done with placement of controls to the table and you want
cells to have persistent size while changing the size of parent
Page control (in which table object is placed), from the properties
window expand the TableObject
property and set the AutoSize property value to True.
Further more lock rows or columns to prevent their cells from
resizing.
Creation of nested tables
Sometimes the desired layout cannot be arranged by using simple table
structure, even if there is merged or splitted cells. Solution
to this problem is in creation of nested tables within cells.
To create nested table, add Page control to selected cell. Then in this
page create table with custom number of columns and rows. Put
some controls to this table. This way you can manage tables
separatelly from one another, although they are nested.
Conclusion
Table layout engine through operations with each cell, row and
column gives you possiblity to quickly form, align and arrange WinForms
in tabular format in order to achieve the best look for your application.