
Creating an SMB (Server Message Block) shared folder on Windows Server 2022 allows multiple users to access and share files efficiently within an organization. This guide will walk you through the steps to set up a secure and effective SMB shared environment, streamlining file sharing and collaboration within your business.
Understanding SMB on Windows Server 2022
SMB is a network file sharing protocol that allows applications to read and write to files and request services from server programs in a computer network. In Windows Server 2022, SMB facilitates resource sharing, such as files and printers, making it easier for users to collaborate and share information.
Visit Microsoft to learn in detail how to set up SMB sharing on Server 2022.
Key Features of Windows Server 2022 for SMB:
- Enhanced Security: Advanced security features, including SMB over QUIC, to protect data in transit.
- Performance Improvements: Optimized for better file sharing performance, especially in distributed networks.
- Ease of Management: Simplified management tools to streamline the creation and management of shared resources.
Table of Contents
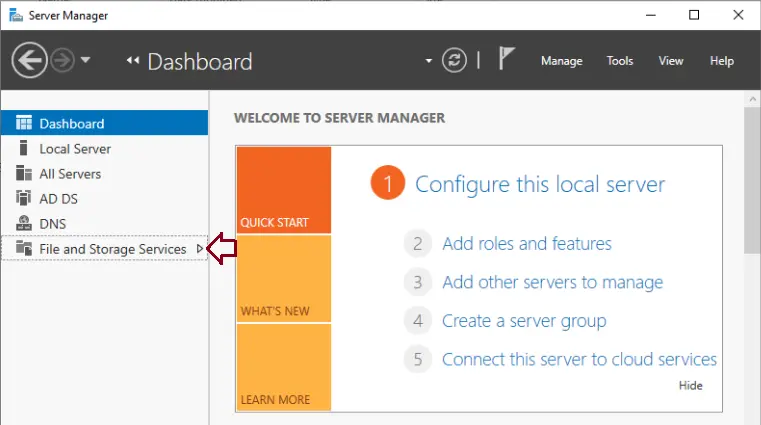
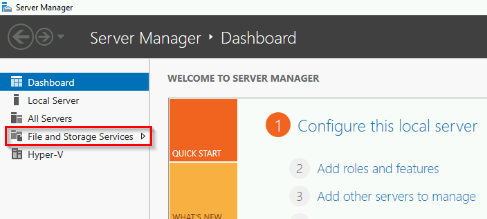
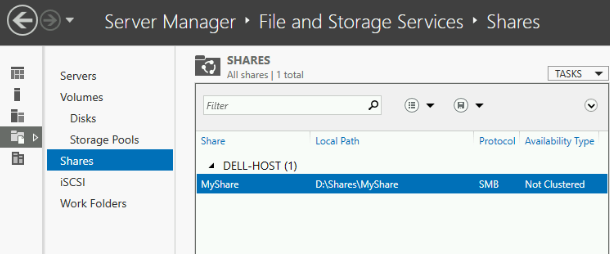
Step 1: Open Server Manager
- Launch Server Manager:
- Click on the Start menu and select Server Manager from the list of available applications.
- In the Server Manager dashboard, navigate to File and Storage Services.
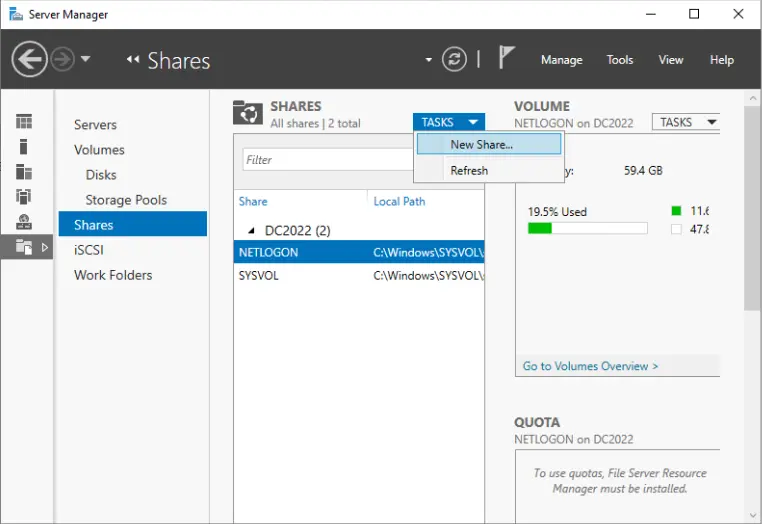
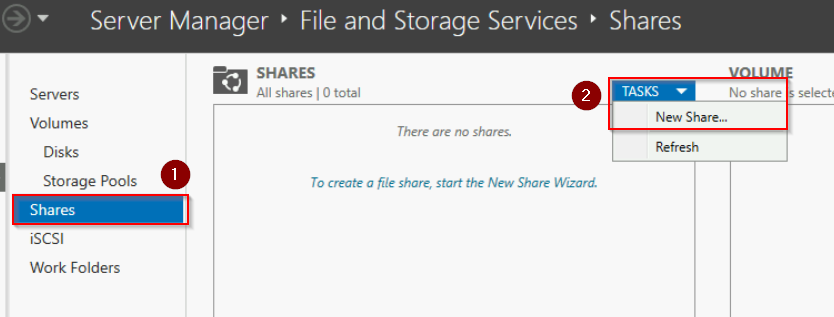
- Navigate to Shares:
- In the File and Storage Services section, click on Shares to view all existing shared folders.
- Click on Tasks and select New Share to initiate the process.
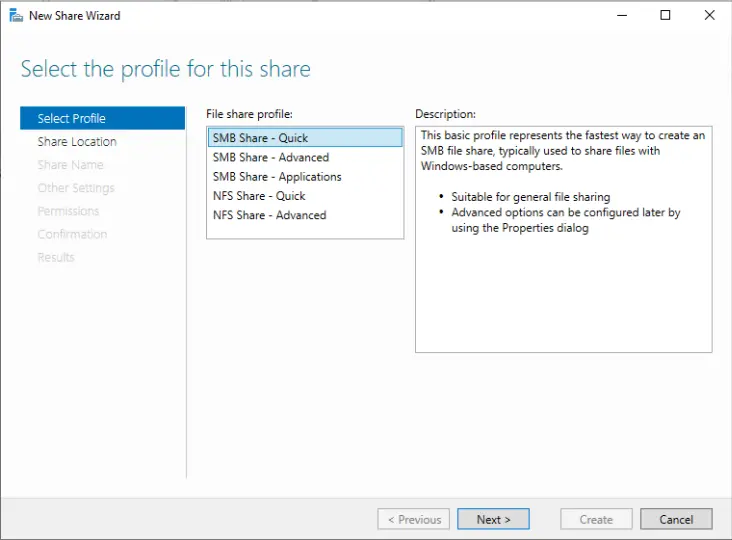
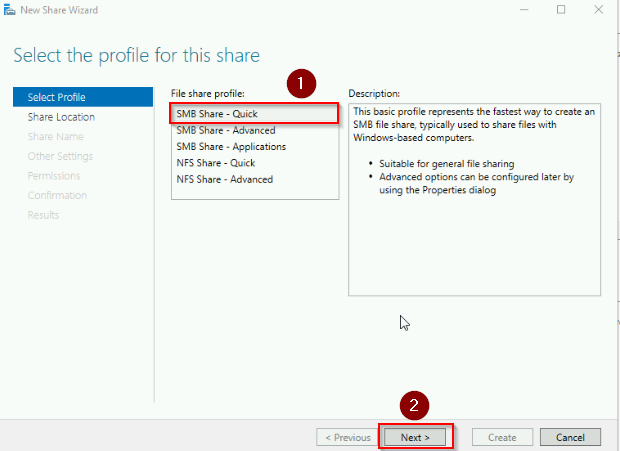
- Select Share Profile:
The New Share Wizard will appear. Choose SMB Share – Quick as the profile for creating a standard SMB share and click Next.
Click on Shared and click on Tasks and New Shared.
The new share wizard will be displayed; select SMB Shared – quick and click next.
In the share location window, tick the box “Type a custom path” to select the folder to share.
Find your shared folder and choose select folder.
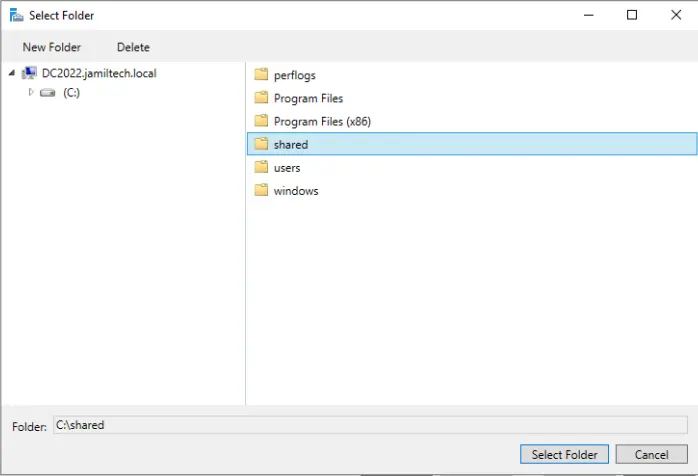
Click next.

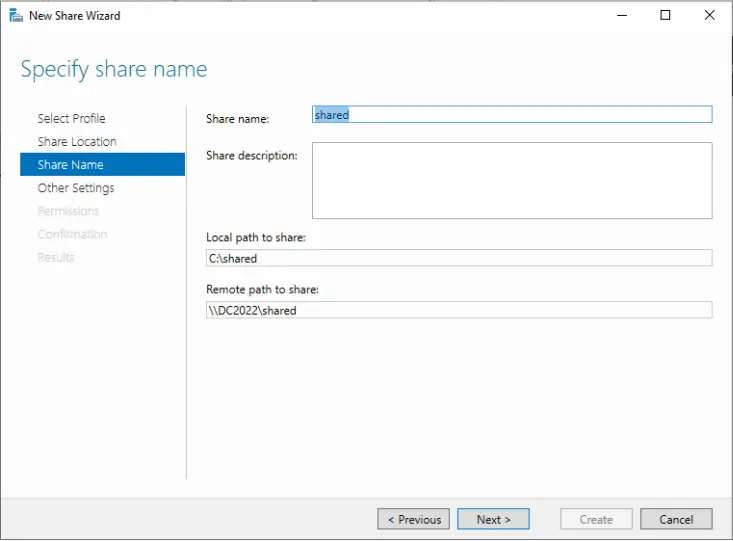
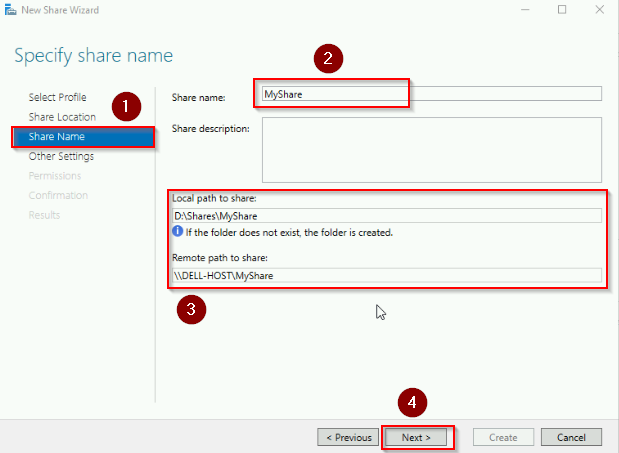
Specify a share name and click next.
Verify the configured share settings and click next.
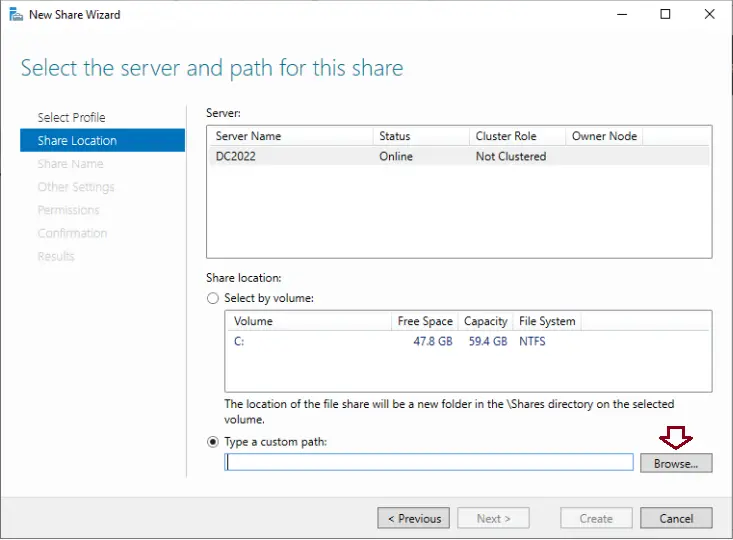
- Select the Folder to Share:
- In the Share Location window, select Type a custom path to manually choose the folder you want to share.
- Click Browse to navigate to the folder on your server that you want to share. Once selected, click Next.
- Name Your Share:
- In the Share Name window, enter a name for the shared folder. This name will be used by users to access the share over the network.
- Click Next to proceed.
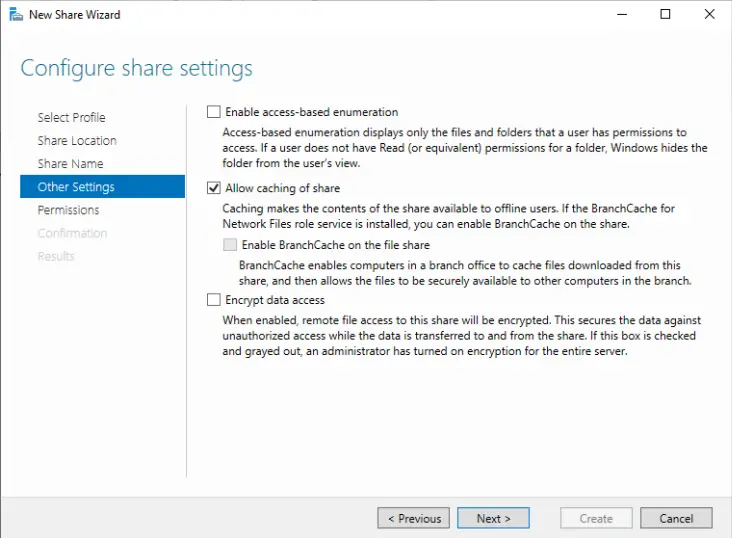
- Review and Configure Settings:
- Review the default share settings. If needed, adjust the settings according to your requirements.
Click Next to continue.

Click on the share tab.
In the Share tab, click on Add.
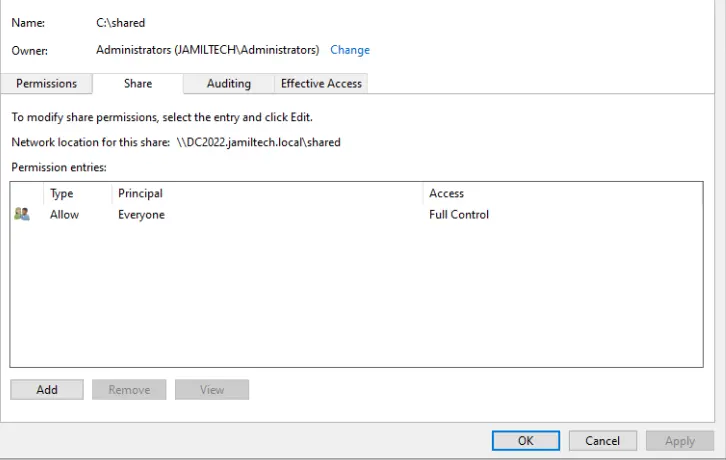
Click on Select a principal link.
Type domain users and click OK.
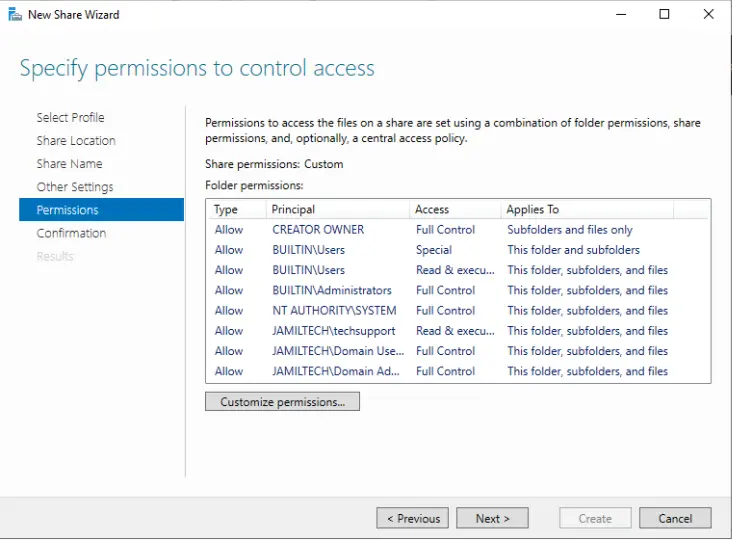
Step 5: Specify Permissions to Control Access
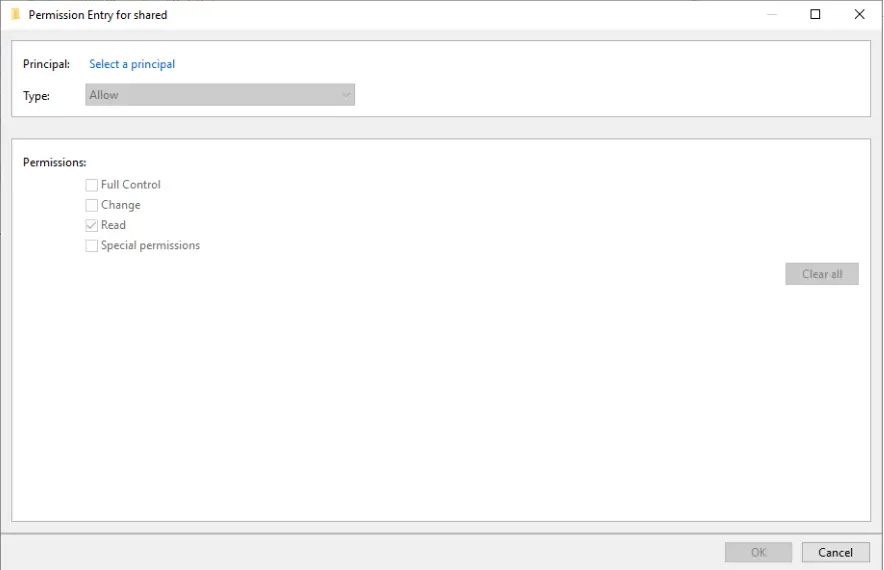
- Set Access Permissions:
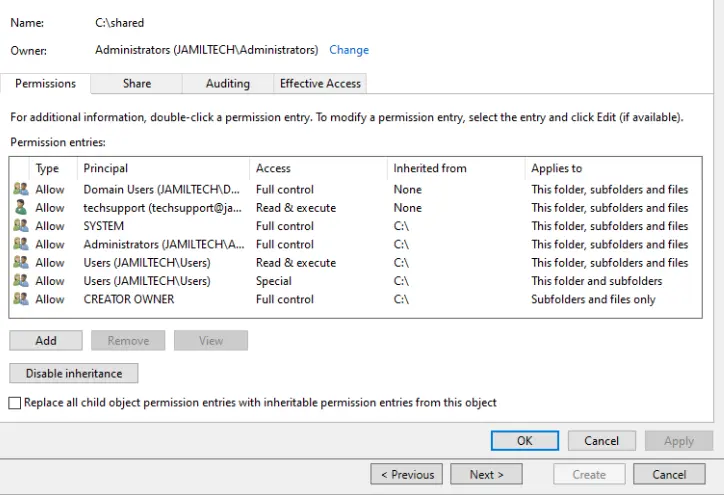
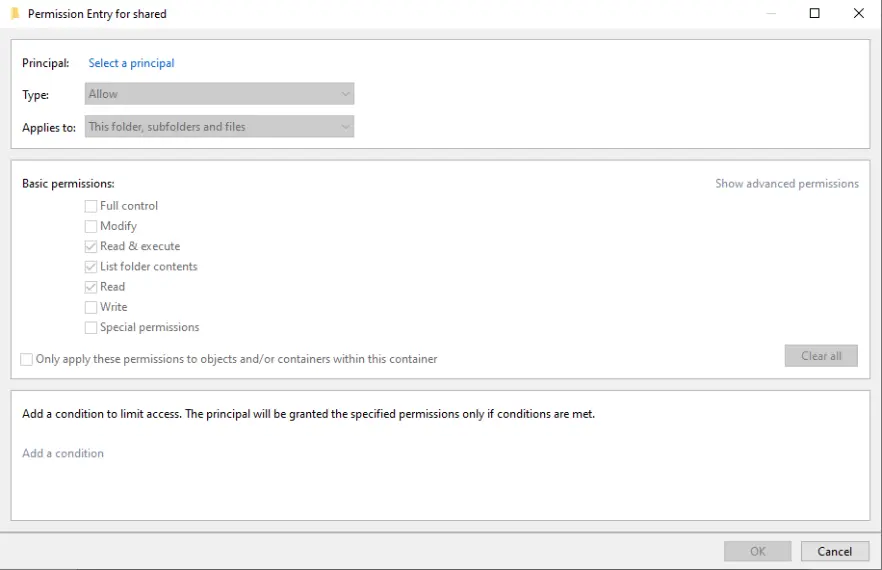
- In the Specify Permissions window, click on Customize Permissions to define who can access the shared folder and what actions they can perform (read, write, etc.).
- Modify Share Permissions:
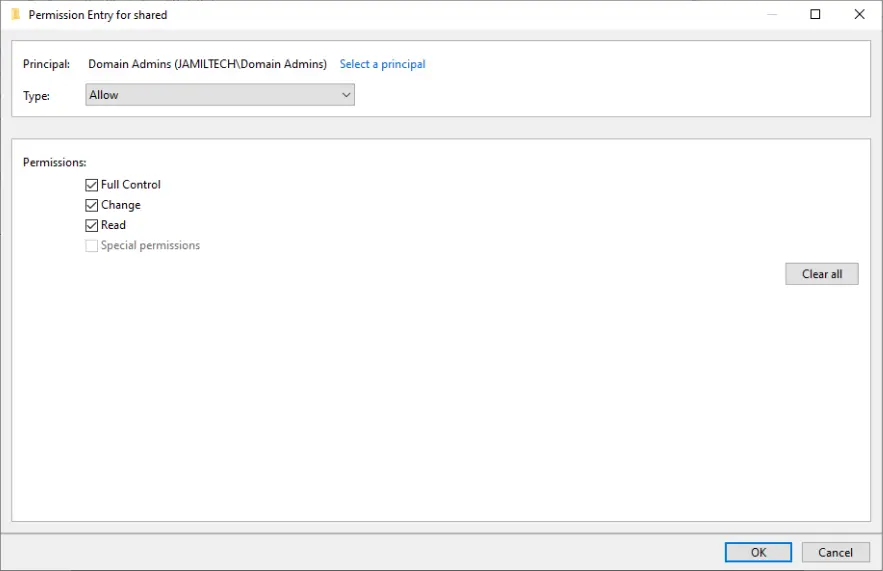
- Under the Share tab, click Add to include users or groups who will have access to this shared folder.
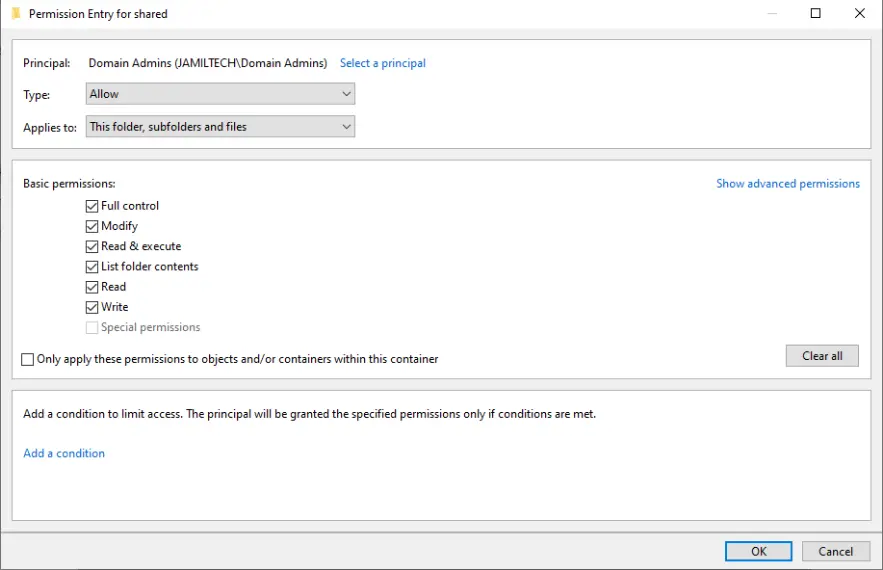
- Click on Select a Principal to choose the users or groups. For example, you might type Domain Users for general access and Domain Admins for administrative control.
- Set the required permissions (e.g., read, write) and click OK to apply the changes.
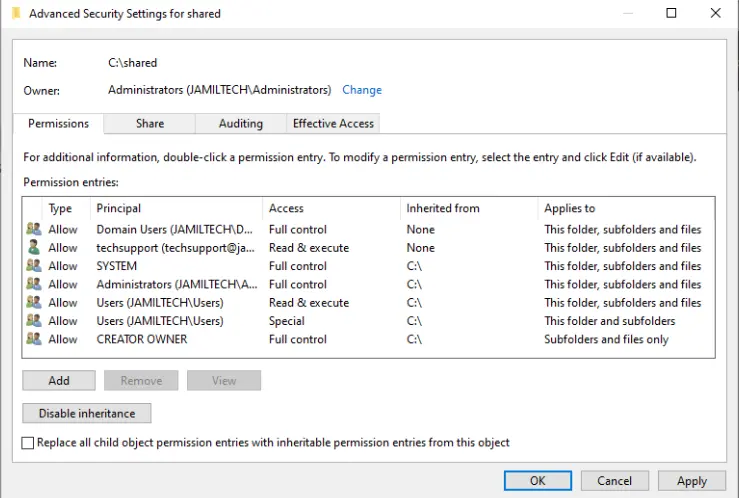
- Advanced Security Settings:
If you need to set more granular permissions, click on the Advanced Security Settings link. Here you can modify permissions at a more detailed level.
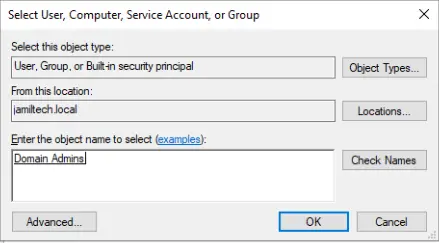
Click on the change link.
Choose to select a principal.
Type domain admins and click OK.
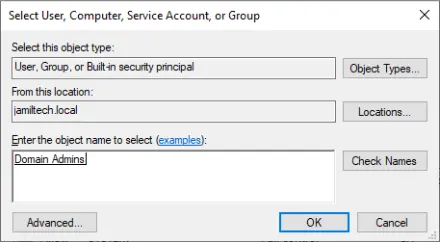
Click ok
- Finish and Create the Share:
- After configuring permissions, review the settings once more and click Create to finalize the setup.
- A confirmation page will appear. Click Close to exit the wizard.
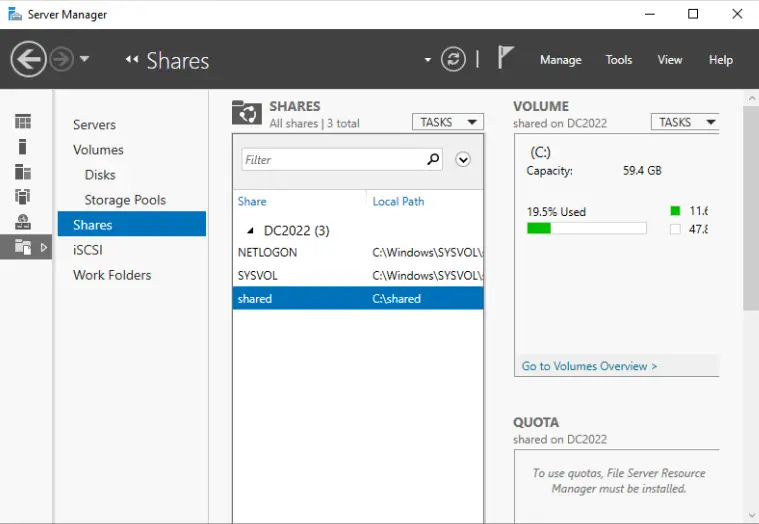
- Verify the Shared Folder:
- The new shared folder should now appear under the Shares section in Server Manager.
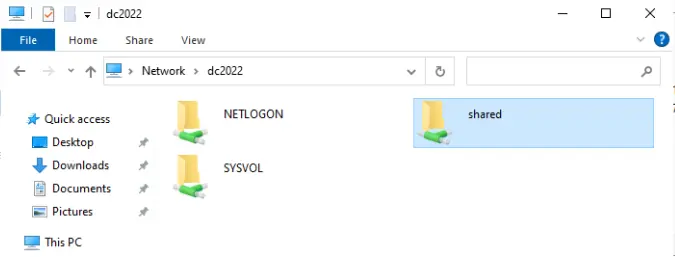
You can also verify its creation by navigating to Network in File Explorer. The shared folder should be visible and accessible to the users you have granted permissions.
Click Create to complete the process.
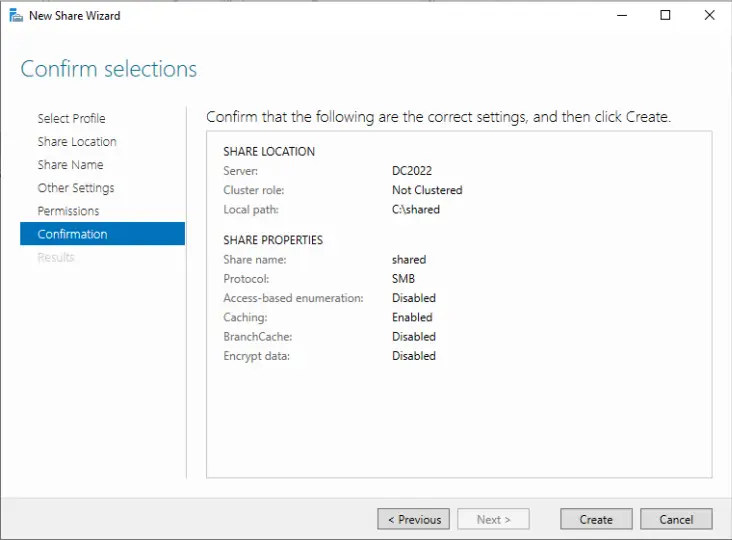
Choose Close.

We see the shared folder.
In File Explorer, go to Network Options, and there you will see the shared folder.
Conclusion
By following these steps, you can create an SMB shared folder on Windows Server 2022, enabling efficient and secure file sharing within your organization. This setup not only improves collaboration but also ensures that your shared resources are managed effectively. For more detailed information on setting up SMB sharing on Windows Server 2022.
With any of the above methods, we are able to create shared folders on Windows Server 2022.
Jamilhttp://jamiltech.com
A Professional Technology Blog Writer | An energetic professional with more than 20+ years of rich experience in Technology, Planning, Designing, Installation, and Networking.
Introduction
In Windows or Windows Server environment, SMB (Server Message Block) shares are essential for seamless network file sharing, allowing users and applications to access files remotely. This post explores several methods to create an SMB share, including using Server Manager, File Explorer, PowerShell, and Computer Management.
Understanding Permissions
When creating an SMB share in Windows Server, understanding how permissions work is crucial for securing access to your shared resources. Windows Server uses two types of permissions: NTFS permissions and Share permissions. These permissions control what actions users can perform on the files and folders, both locally and over the network.
NTFS Permissions
NTFS (New Technology File System) permissions are applied directly to the files and folders on the disk and determine what users can do when accessing the folder locally or over the network.
The permissions can be ranked from least restrictive (most permissive) to most restrictive (least permissive) based on the level of access they grant to files and folders. In other words:
- More Actions Allowed = Less Restrictive: The more actions a permission allows, the less restrictive it is.
- Fewer Actions Allowed = More Restrictive: The fewer actions a permission allows, the more restrictive it is.
Here’s the order from least restrictive to most restrictive:
- Full Control: Allows users to do everything, including modifying permissions and taking ownership.
- Modify: Users can read, write, and delete files, but cannot manage permissions.
- Read & Execute: Users can view and execute files, but cannot modify them.
- Read: Users can only view the contents of the folder.
- Write: Users can create and modify files, but cannot delete them.
Share Permissions
Share permissions control what users can do when they access the folder over the network. Unlike NTFS permissions, these are applied only when the folder is accessed as a network share.
Combining NTFS and Share Permissions
Windows Server determines a user’s effective permissions by combining NTFS and Share permissions, with the most restrictive permission applying. For example, if a user has “Read” permission on the Share level but “Modify” permission on the NTFS level, their effective permission will be “Read” when accessing the folder over the network.
Methods to Create an SMB Share
Windows Server provides multiple methods for creating an SMB share, each offering different advantages depending on your administrative needs. Below, we’ll walk through some common approaches:
Using Server Manager
Server Manager is a powerful tool that simplifies the process of managing server roles and features, including creating SMB shares. Here is the step by step guide:
- Make sure you have “File and iSCSI Services” Role installed first.
- Open Server Manager and navigate to “File and Storage Services.”
- Select “Shares,” then click on the “Tasks” menu and choose “New Share.”
- On the New Share Wizard window, under File share profile section, select “SMB Share – Quick”. Then click “Next”.
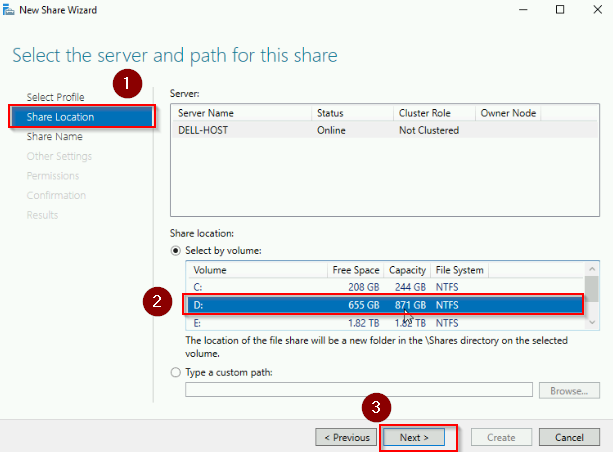
- Under the Share location section, choose the volume you want, in this case, we choose “D” volume. Click “Next”.
- Under Share Name, give it a name, the “Local path to share” and “Remote path to share” text boxes will automatically filled. Click “Next”.
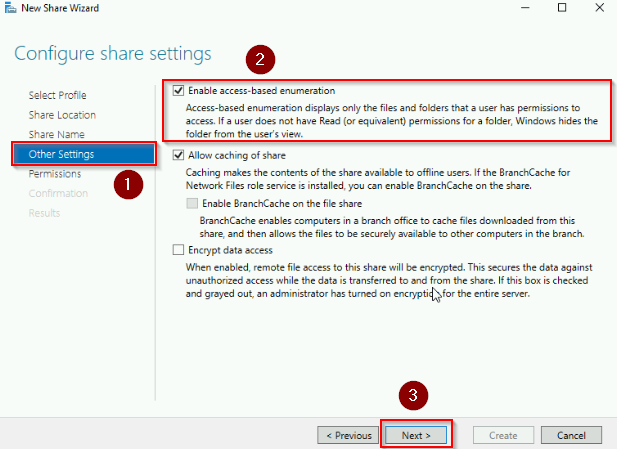
- Under Other Settings , select “Enable access-based enumeration” checkbox. Click “Next”.
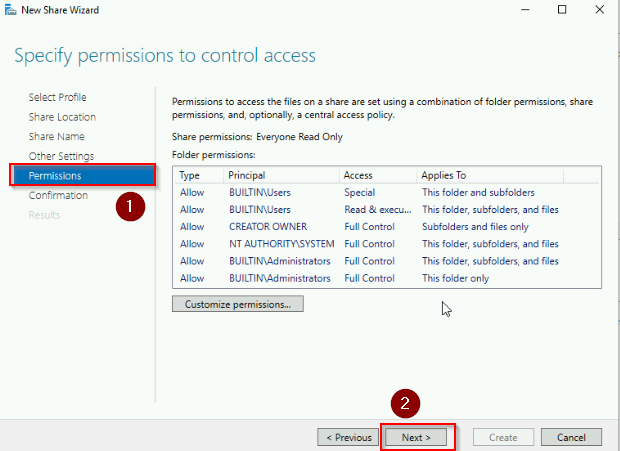
- Under Permission, keep things as default. Click “Next”.
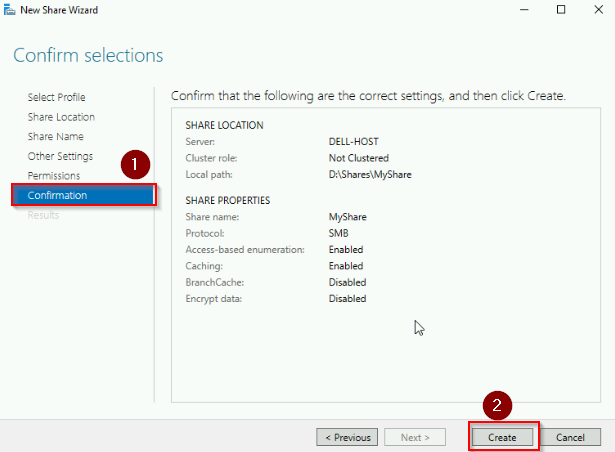
- Under Confirmation, review and click “Create”.
See screenshots of all the steps below:
Using File Explore
File Explorer offers a quick and straightforward way to create an SMB share, making it accessible even for those with minimal server management experience:
- Right-click on the folder you want to share and select “Properties.”
- Go to the “Sharing” tab and click “Advanced Sharing.”
- Check “Share this folder,” set the share name, and configure permissions as needed.
See screenshots below:
Using PowerShell
PowerShell provides a versatile and scriptable method to create and manage SMB shares, perfect for automation or bulk operations:
- Open PowerShell with administrative privileges.
- Use the
New-SmbSharecmdlet to create the share. For example:
New-SmbShare -Name "MyShare" -Path "D:\Share\MyShare" -Read "Everyone"
PowerShell is excellent for administrators who need to automate tasks or manage shares across multiple servers.
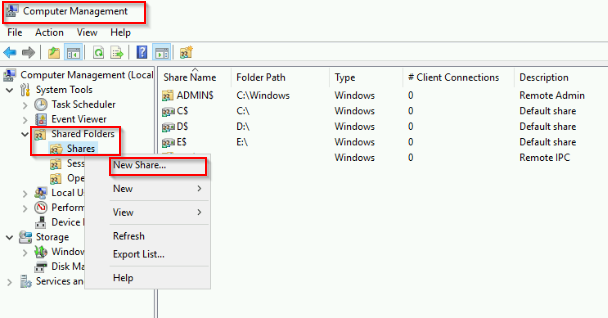
Using Computer Management
Computer Management is a versatile console that allows you to manage system tools, including shared folders, from a single interface. Here are the steps:
- Open Computer Management and navigate to “Shared Folders” > “Shares.”
- Right-click on “Shares” and select “New Share.”
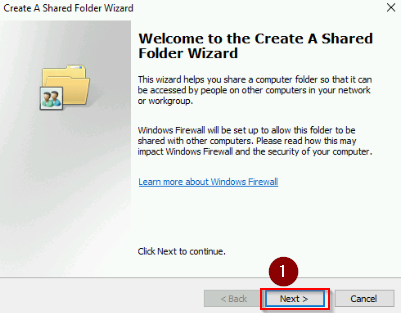
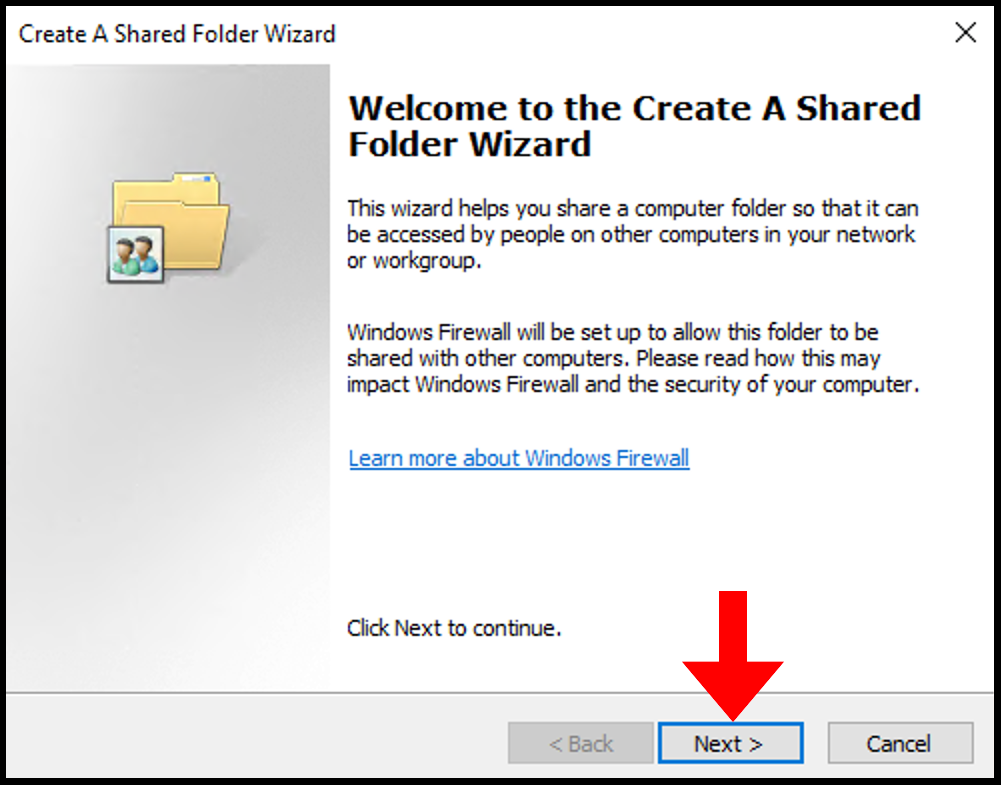
- On the Create a Shared Folder Wizard, Click “Next“.
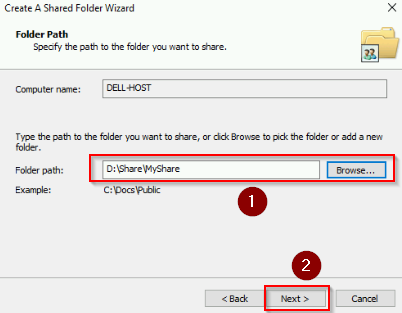
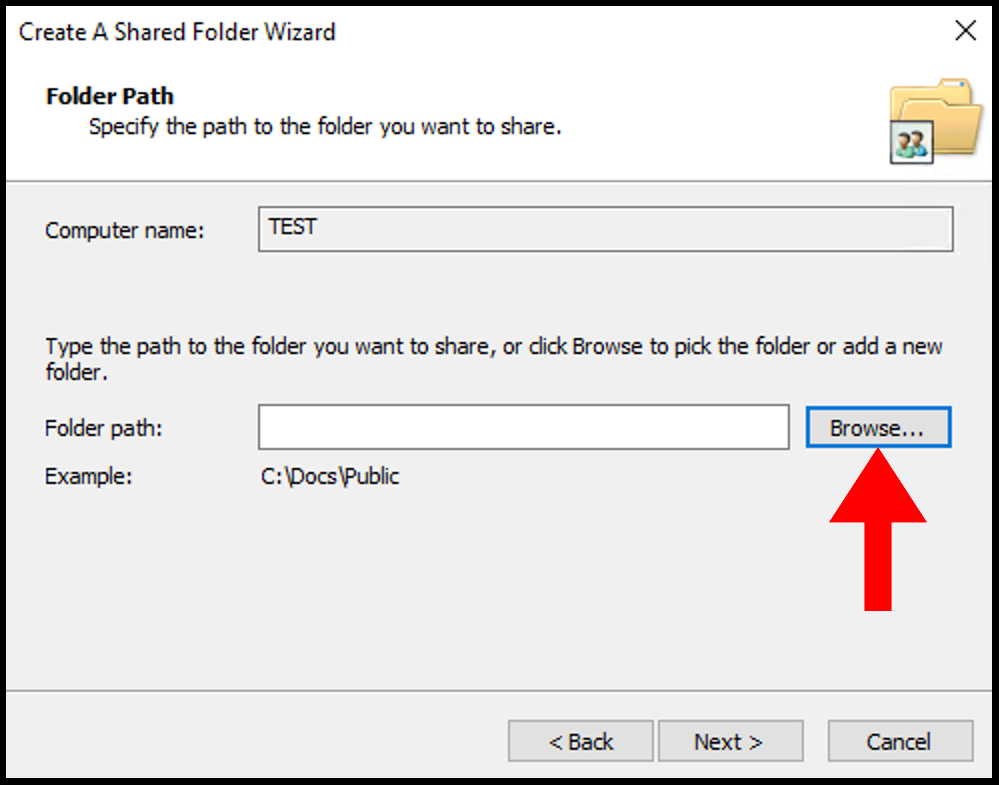
- Choose the path for the folder under “Folder path“. Click “Next“.
- Next you will specify Name, and Description for the share folder. We keep it as default for this case. Click “Next“.
- On the Shared Folder Permissions. We choose “All users have read-only access“. Click “Finish“.
This method is useful for managing existing shares as well as creating new ones.
See screenshots below:
Conclusion
To sum up, creating and managing SMB shares in Windows Server can be done through various methods, each suited to different administrative needs. Whether you prefer the GUI of Server Manager or the automation capabilities of PowerShell, understanding the interplay between NTFS and Share permissions is key to ensuring your shared resources are both accessible and secure.
Companies and workgroups may need to share documents or files within one network. Windows includes a network-based File Sharing/Directory Sharing option in the Windows Servers Operating System to solve this problem. Only network-connected users can access shared folders. At the setup time, the administrator must assign specific permissions within the workgroup and secure the network with proper security practices. In this article, we will cover how to create and access shared folders in Windows server through computer management.
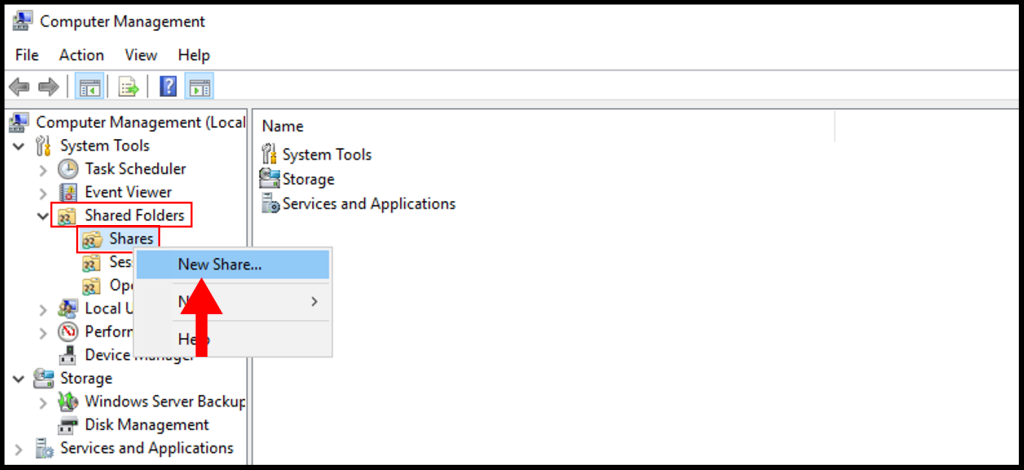
1. To start off, log in to your Windows server then search and open Computer Management.
2. Once the Computer Management window is open, expand System Tools and Shared Tools, then right-click Shares and click New Share.
3. Next, the Create A Shared Folder Wizard window will open, and click Next to move forward.
4. In this step, you can select a folder you’d like to share or create a new folder. You can do this by clicking Browse.
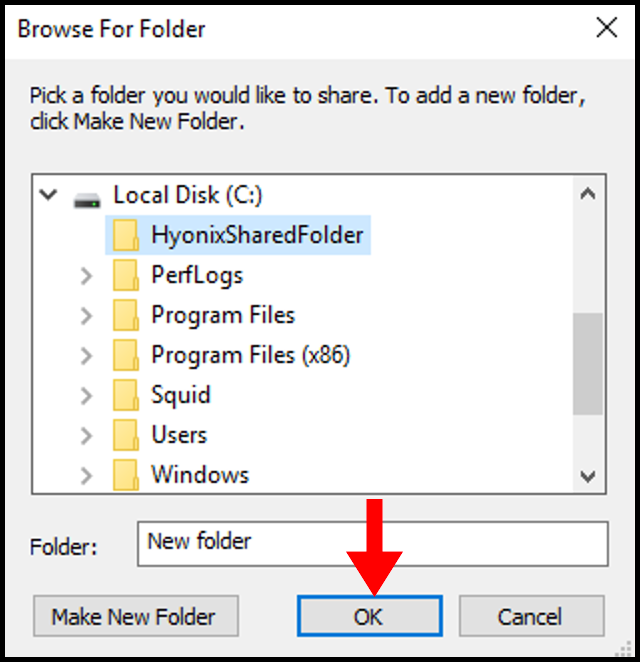
5. For the purposes of this guide, we will be creating a new folder in the Local Disk (C:) as seen below but you may select a folder to share. Click OK once you have selected or created a folder to share.
6. Once you are done selecting the folder, click Next
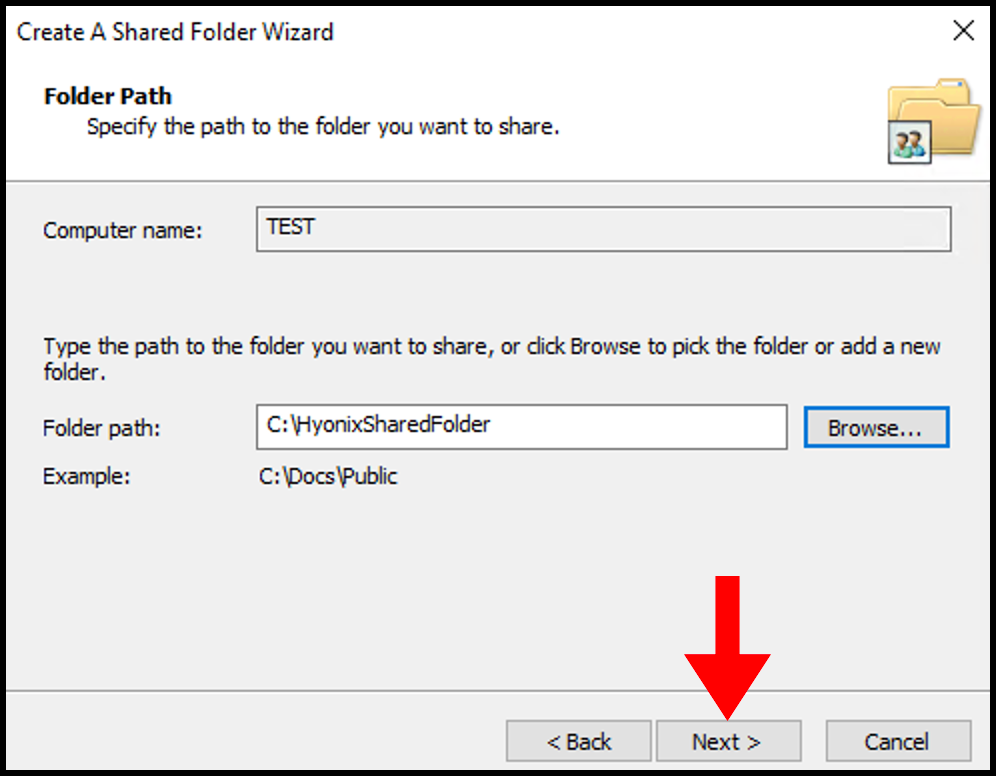
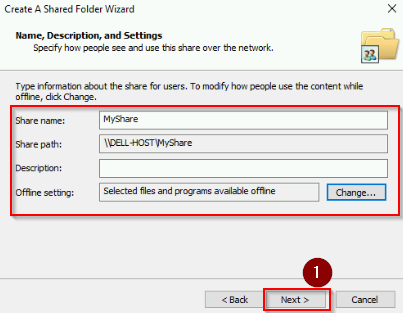
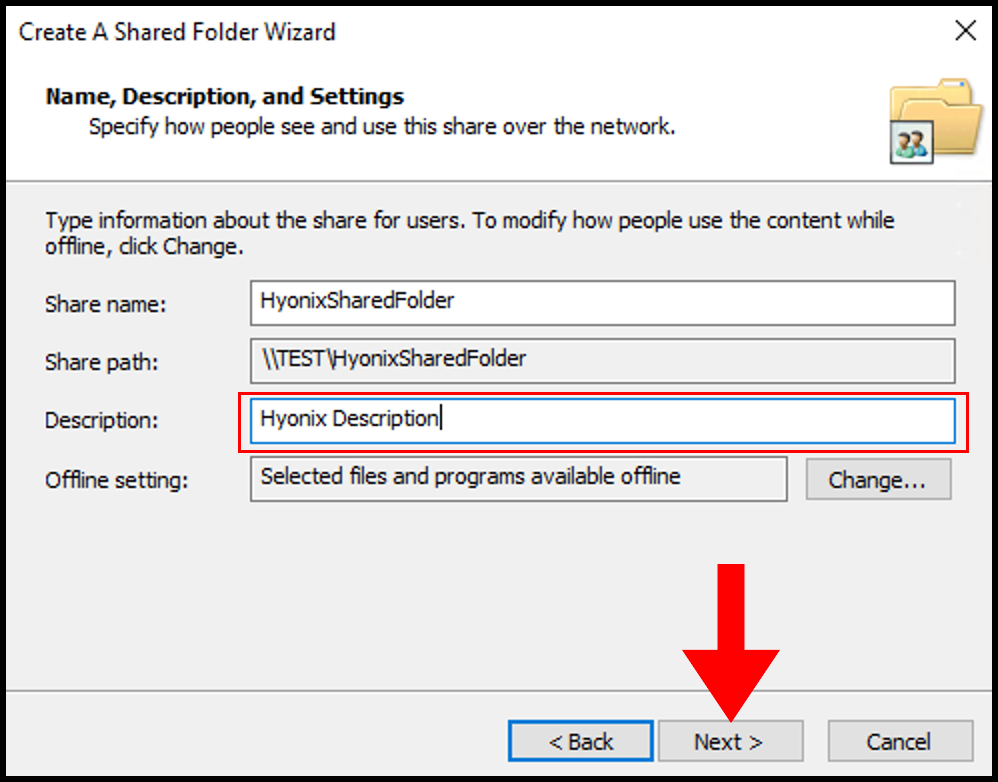
7. Here, you can find Share Name, Share Path, Description, and offline settings. You can also fill out a description in the description text field, once done click Next to move on.
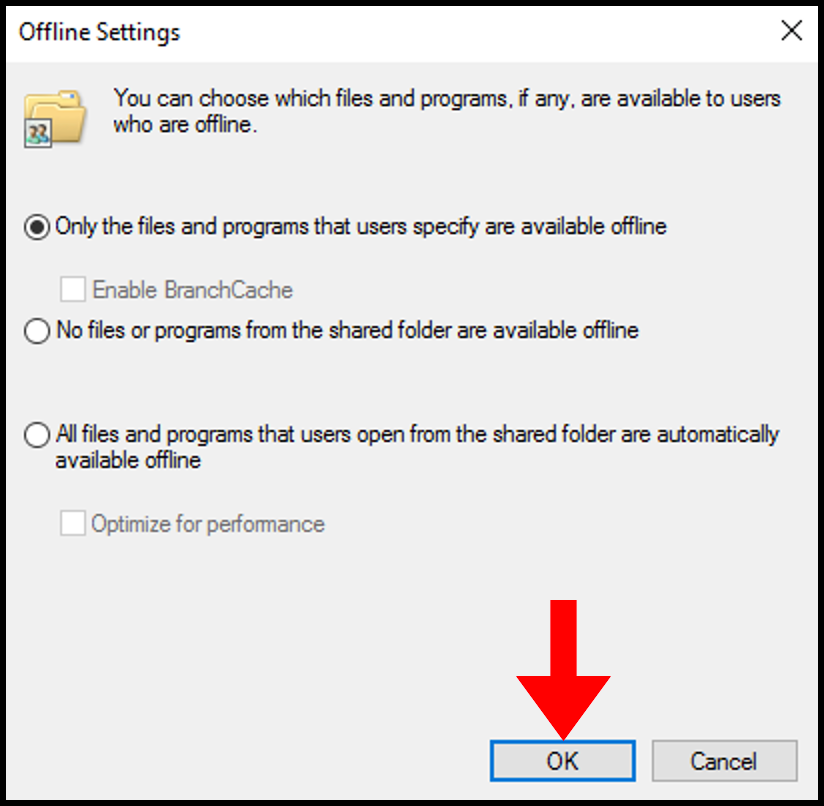
8. (Optional) You can change the offline settings if files and/or programs are accessible offline by users and/or administrators.
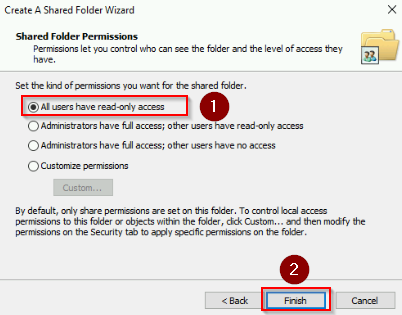
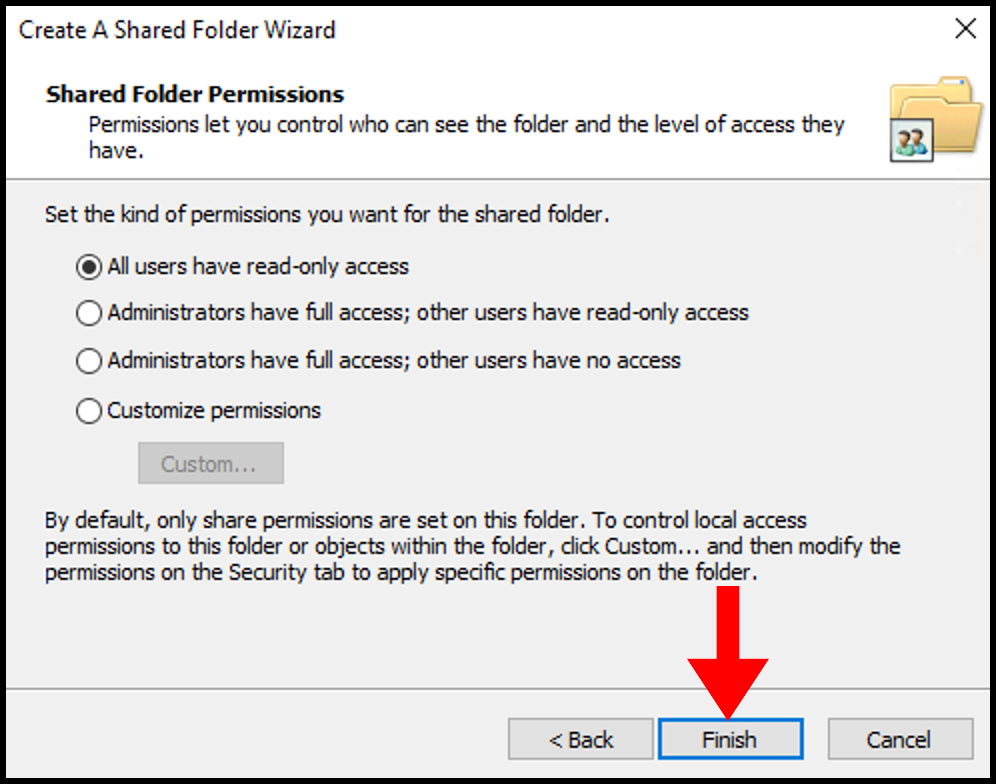
9. In the Shared Folder Permissions tab, you can select the appropriate permissions for the end-user who can access the shared folder in Windows once you are done click Finish.
- All users have read-only- access.
- Administrators have full access; other users have read-only access.
- Administrators have full access; other users have no access.
- Customize Permissions: Using this option, you can grant all the (Full Access) permissions to the users. We recommend knowingly carefully choosing the permission options.
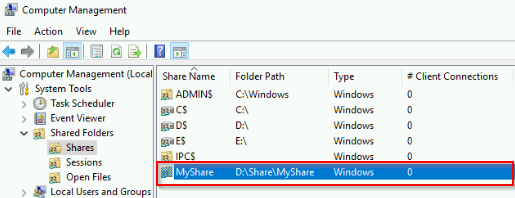
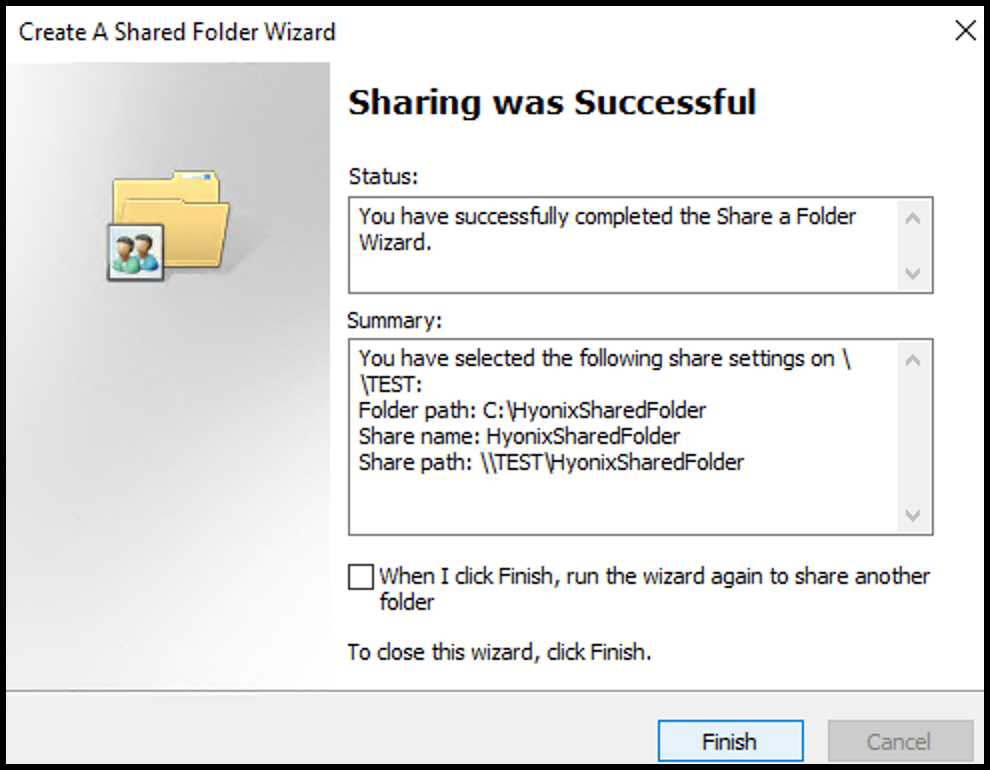
10. Congratulations! You have successfully created Shared Folder in the Windows Server. You may close out of the wizard by clicking Finish.
Now we have created a shared folder that is accessible by every other user associated with this windows server. To access the shared folder, you need to map it as a drive in the windows machine providing the path. Want to know how? Follow the below steps,
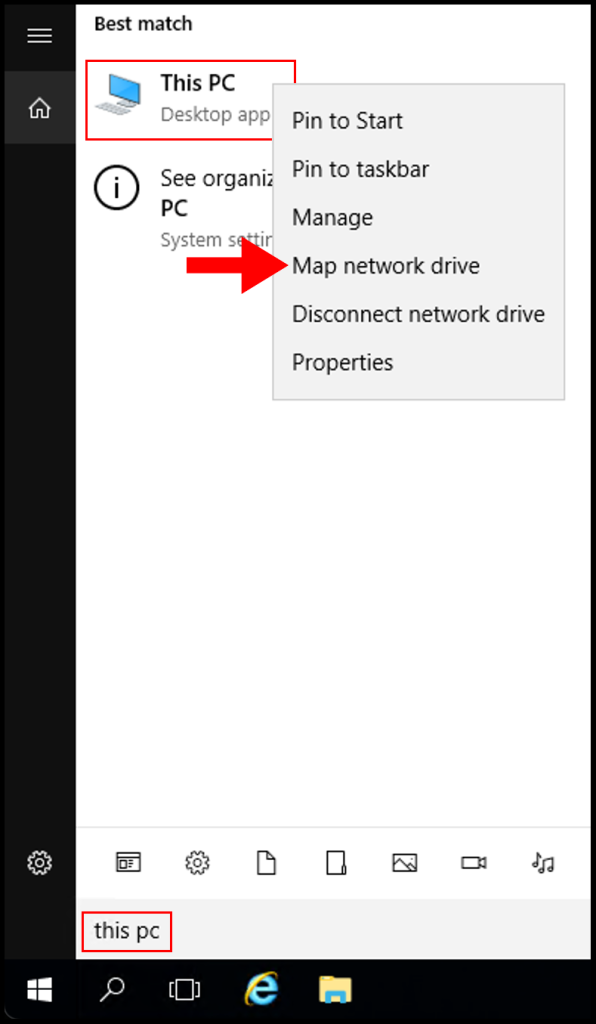
1. To start off, log in to your Windows server then search and right-click This PC. From the menu that appears, click Map network drive.
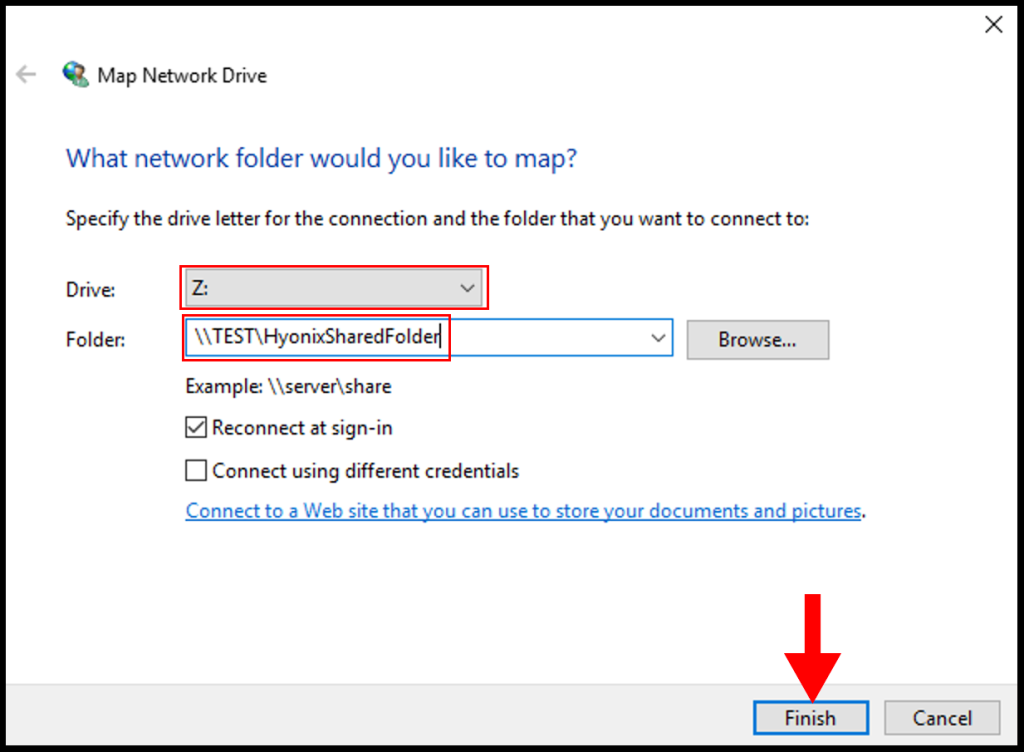
2. On the Map Network Drive window, you can specify a drive letter and you will need to specify the folder in the format \serversharedfoldername. Once you’re done click Finish.
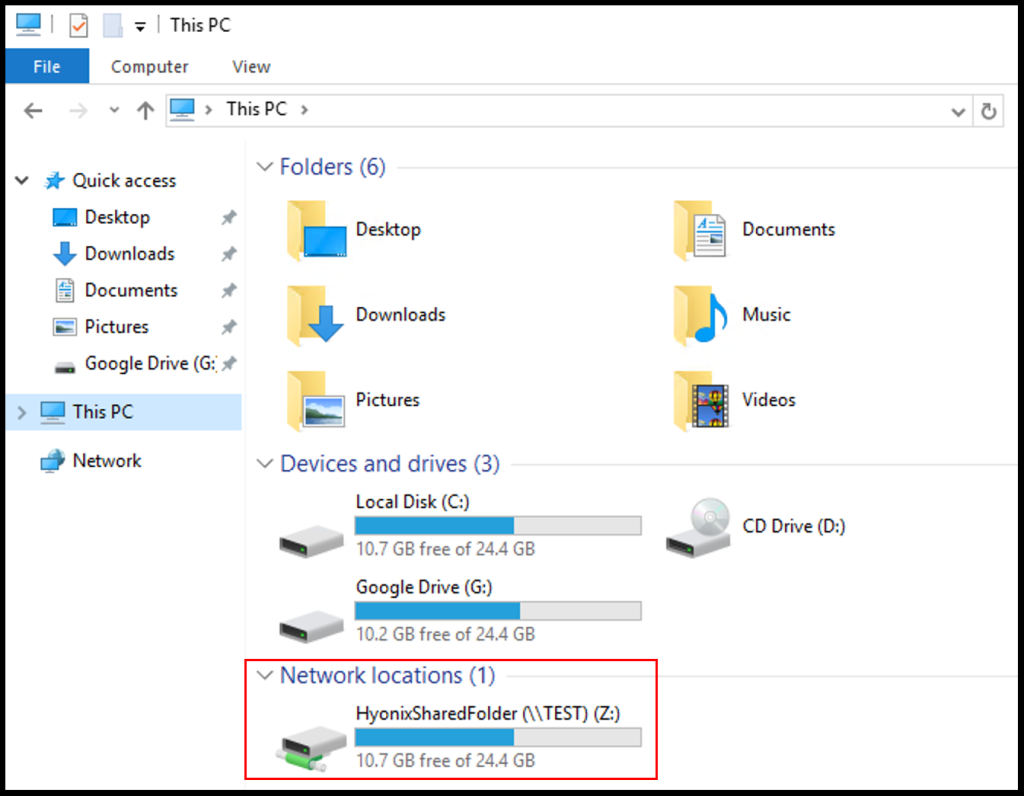
3. Now you can find the shared folder by going to File Explorer and clicking This PC and it will appear similar to the below image.
Updated on February 15, 2023
Was this article helpful?
Need Support?
Can’t find the answer you’re looking for? Don’t worry we’re here to help!
CONTACT SUPPORT

One of the easiest ways to access your media and files over a network is to setup an SMB file share on Windows. With the proper setup, you can access your media files through other devices using the SMB protocol. Windows has SMB file sharing built into its operating system.
With a few quick configurations on Windows, you will be fully setup with SMB file share enabled so you can access your files or media from other devices on your network. First, ensure SMB is enabled on your Windows operating system. After confirming SMB is enabled, select the folders and files to share over the network. Follow this guide for step-by-step instructions to get SMB file share working on Windows.
How to Enable SMB on Windows
By default, SMB should be enabled on Windows 10 and 11. The SMB feature on Windows is called SMB Direct and is Windows’ name for the SMB 3.x file sharing protocol. The first step is to ensure this feature is enabled. If for some reason it is disabled, follow these steps to enable it. If you don’t have the SMB Direct feature available, make sure your Windows operating system is fully up to date.
Launch the Control Panel and select the Programs and Features option.

Once you have clicked on Programs and Features, on the left menu bar, at the top, look for Turn Windows Features On or Off. Go ahead and click into that.

Clicking on Turn Windows Features On or Off will bring up a new small window with a list of checkboxes. These should be listed alphabetically. Scroll down and find SMB Direct. Make sure this box is checked. You may also see SMB 1.0/CIFS File Sharing Support.
If you do have this option, make sure it is unchecked. This is how you enable SMB 1.0, but SMB 1.0 has some vulnerabilities associated with it. If this feature is enabled, your machine and entire network could become compromised. I highly suggest turning this feature off, if enabled, and leaving it off, it disabled.

After turning SMB Direct on by checking the box, your Windows machine should be good to go and have SMB enabled. Now all we need to do is setup SMB file shares on Windows and assign the correct users to the shares.
Before beginning with setting up the SMB file share, I would strongly encourage you to create a new user on Windows specifically for sharing. It only takes about 30 seconds and provides a lot of extra security. You can choose to skip creating a new user, but then anyone who has access to your network will have access to the SMB file shares you create.
If you are not going to create a new user, you will need to go into Control Panel -> Network and Sharing -> Change Advanced Sharing Options -> All Networks ->then enable Turn Off Password Protected Sharing. Again, this is not ideal and exposes you to anyone who may have, or will have access to your network. Replace the word kodi in my screenshots with the word Everyone (that is a preexisting user you can select).
I am using a user I named kodi to setup SMB file shares. Use the user’s name that you created in place of kodi as seen in the provided screenshots.
First navigate to the folder you wish to share. Go ahead and right click on the folder and select Properties at the bottom.
Once the folder’s Properties window is open, navigate to the Sharing tab.
From there, go ahead and click the Share button to open another window.
Another window will open and you will want to click on the dropdown bar and select your user. I selected the user I created named kodi.

Once you have selected your user, click the Add button to the right of the dropdown bar.

Once your user has been added to the list, click on the Share button.

This folder you just set up is now ready to be shared via the SMB protocol. Repeat this process for any other folders you want to share. Once all folders are shared, you are finished with setting up SMB file share on Windows.
With that, a congratulations are in order, you have officially setup SMB file share on Windows. You can now move on to the devices you wish to access files on. Remember to use the user you created as the credentials when setting up SMB on those devices.
If you chose to use Everyone rather than create a new user, that user does not have a password. Some applications, such as Kodi, for example, require a password even if there isn’t an actual password. For cases such as this, use a single space as the password. If you have any questions or get stuck, please leave a comment and I’ll do my best to assist!
Уровень сложностиПростой
Время на прочтение4 мин
Количество просмотров7.7K
16 июня 2024 г.
Получается, что у 10-й платформы АльтЛинукса репозитарий один на все дистрибутивы, только набор программного обеспечения разный. Т.е. можно на текущий дистрибутив спокойно установить не устанавливаемое по умолчанию ПО. Только нужно точно знать, что требуется. И документация тоже подходит. Подходящий пример: установка на сервер виртуализации не типичной для него роли файлового сервера. И документация по серверу виртуализации в этом деле не поможет. Зато отлично подойдет документация по Альт Линукс Сервер 10. На текущий момент актуальной версией является версия 10.2.
Читаем и делаем: https://docs.altlinux.org/ru-RU/alt-server/10.2/html/alt-server/protocol.html
Ниже подробно разберем настройку доступности по сети для новой папки «NET», созданной по пути «/var» как для клиентов на ОС Линукс, так и для клиентов на ОС Виндовс.
Считаем, что сервер виртуализации уже установлен. Если нет, то можно воспользоваться пошаговой инструкцией по установке: АльтЛинукс Сервер виртуализации10.1 (Proxmox)
Для клиентов Линукс необходимо установить, настроить и запустить NFS-сервер
Для клиентов Виндовс необходимо установить, настроить и запустить Samba-сервер (SMB, если кратко)
Обычно Линукс умеет подключаться к серверу Samba, но, считаю, что лучше использовать родной протокол.
Создаем папку /var/NET
Первым делом нужно создать папку, которую планируется сделать доступной по сети. В нашем случае требуются права суперпользователя. Поэтому запускаем терминал, пишем «su — » вводим пароль root и набираем команду «mc» для запуска «Midnight Commander»:

В открывшемся миднайт командере переходим в папку /var и нажимаем F7 в появившемся окне вводим «NET» и нажимаем ENTER два раза. См. скрин ниже:

И тут же выдаем на эту папку права всем через меню MC. На меню можно переключиться мышью или с помощью клавиши F9. «Файл» — > «Права (расширенные)» в русском mc или «File» -> «Advanced chown» в английском. См. скрин ниже:

Выставляем в «другие» значение «rwx» и «установить» («other» в «rwx», и «Set» для английского):

Важно это не забыть.
Hidden text
Так, создав с правами суперпользователя папку и настроив сервисы сетевого доступа к файлам, я довольно долго не мог понять, почему из сети регистрируюсь, в папку захожу, а ничего записать в неё не получается. Получаю ошибку о недостаточности прав. Пытался и из Линукс и из Виндовс. Искал проблему в файлах конфигурации сервисов NFS и SMB. А, оказывается, нет прав на папку в локальной файловой системе.
Знатокам командной строки, конечно, создание папки и выдачу на неё прав сделать быстрее.
Нажав CTRL+o можно временно скрыть панели mc, повторное нажатие CTRL+o вернет панели. Клавиша F10 закроет командер совсем. Для его запуска надо будет набирать mc.
NFS
Переходим в терминал и под суперпользователем устанавливаем пакет nfs-server:
apt-get install nfs-server
После установки nfs-сервера следует отредактировать файл /etc/exports. В mc есть встроенный редактор, с помощью которого и можно внести изменения в файл. Для этого нужно переместить курсор на нужный файл и нажать клавишу F4. Для вставки можно использовать комбинацию клавишу SHIFT+Insert (Ctrl+C — в нем не работает)
Моё содержимое файла /etc/exports:
# See also /etc/sysconfig/rpcbind (control rpcbind).
/var/NET 192.168.1.0/24(rw,subtree_check)
Где первая строка — комментарий, т.к. начинается с символа «#». Во второй строке указано, что папка /var/NET для всех подключений из подсети 192.168.1. доступна для всего набора манипуляций с файлами (чтение, запись, выполнение)
Теперь дадим команду запустить NFS-сервер и включим его по умолчанию:
systemctl enable --now nfsSMB
Переходим в терминал и под суперпользователем устанавливаем пакет samba:
apt-get install samba
После установки следует отредактировать файл /etc/samba/smb.conf. Я добавил в него раздел «NET» и предоставил доступ пользователю «vvk». В файле это выглядит следующим образом:
[NET]
	comment = NET
	path = /var/NET
	public = yes
	browseable = yes
	read only = no
	writable = yes
	valid users = vvk
	quest ok = no
Также есть тут заморочки с пользователями. Лучше официальной документации не скажешь: Samba использует отдельную от системной базу данных пользователей. Для возможности доступа пользователя к папке (если запрещен гостевой доступ) необходимо внести его в базу данных Samba и установить пароль для доступа к общим ресурсам (он может совпадать с основным паролем пользователя). Следует учитывать, что в базу данных Samba можно добавлять только тех пользователей, которые уже есть в системе. Добавить пользователя в базу данных Samba можно, выполнив команду (должен быть установлен пакет samba-common-client): «smbpasswd -a <имя_пользователя>»
Потому выполняю команду для пользователя «vvk» и дважды указываю пароль в точности такой же, как и при входе в систему.
smbpasswd -a vvkСистема должна ответить, что пользователь добавлен. См.скрин ниже:

После чего дадим команду запустить SMB-сервер и включить его по умолчанию:
systemctl enable --now smbДействия на госте с ОС «АльтЛинукс Рабочая станция К» 10-й платформы.
Затем на госте с ОС Альт линукс в консоле под правами root делаем для проверки что всё работает:
создать точку монтирования:
mkdir /mnt/NET
примонтировать файловую систему:
mount -t nfs 192.168.1.50:/var/NET /mnt/NET
проверить наличие файлов в каталоге /mnt/NET
ls -al /mnt/NET
Для автоматического монтирования к NFS-серверу при загрузке необходимо добавить следующую строку в файл /etc/fstab:
192.168.1.50:/var/NET /mnt/NET nfs intr,soft,nolock,_netdev,x-systemd.automount 0 0
Теперь при регистрации пользователя в виртуальной машине «АльтЛинукс Рабочая станция К» сетевая папка будет примонтирована и будет выглядеть примерно следующим образом:

Действия на госте с ОС «Windows 10 Pro»
Открываем проводник и в строке адреса вводим полный путь до вашей папке. В моем случае это \\192.168.1.60\NET\ и нажимаем ENTER. В появившемся окне вводим имя пользователя и пароль. При необходимости выставляем флажок «Запомнить учетные данные» и нажимаем кнопку «OK». См. скрин ниже:

После успешной регистрации сетевая папка добавиться слева в группе «Сеть». Отсюда через меню по правой кнопке можно подключить её как сетевой диск:

В появившемся окне выбираем букву диска и, при необходимости, выставляем флажок, чтобы этот диск всегда был:

Как-то так.