
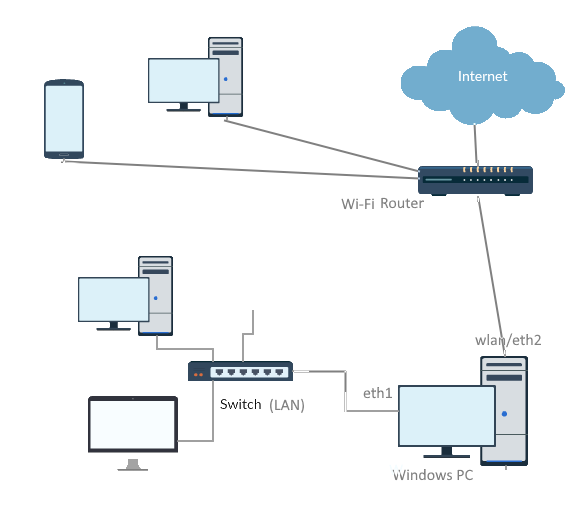
В этой статье, мы рассмотрим, как настроить сетевой мост на компьютере под управлением Windows. Такой сетевой мост, работающий на канальном уровне модели OSI (L2), используется для прозрачного объединения двух и более сетей в одну общую сеть. Все версии Windows поддерживают объединение сетевых адаптеров в мост, никакое дополнительное ПО не потребуется.
В нашем примере у нас есть компьютер Windows с двумя сетевыми картами, подключенными в два разных сетевых сегмента. WLAN адаптер подключен к Wi-Fi сети (роутер с доступом в интернет), и Ethernet адаптер подключен к изолированной проводной локальной сети (LAN), построенной на коммутаторе. С помощью сетевого моста на Windows-компьютере вы прозрачно объединить две сети и все клиенты из изолированной сети (LAN) смогут получать доступ к ресурсам в основной сети и выходить в интернет через маршрутизатор.
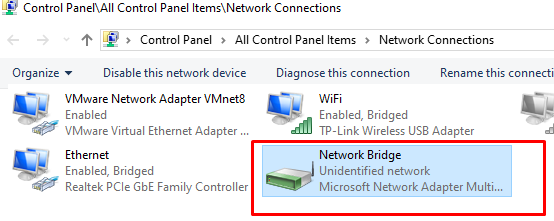
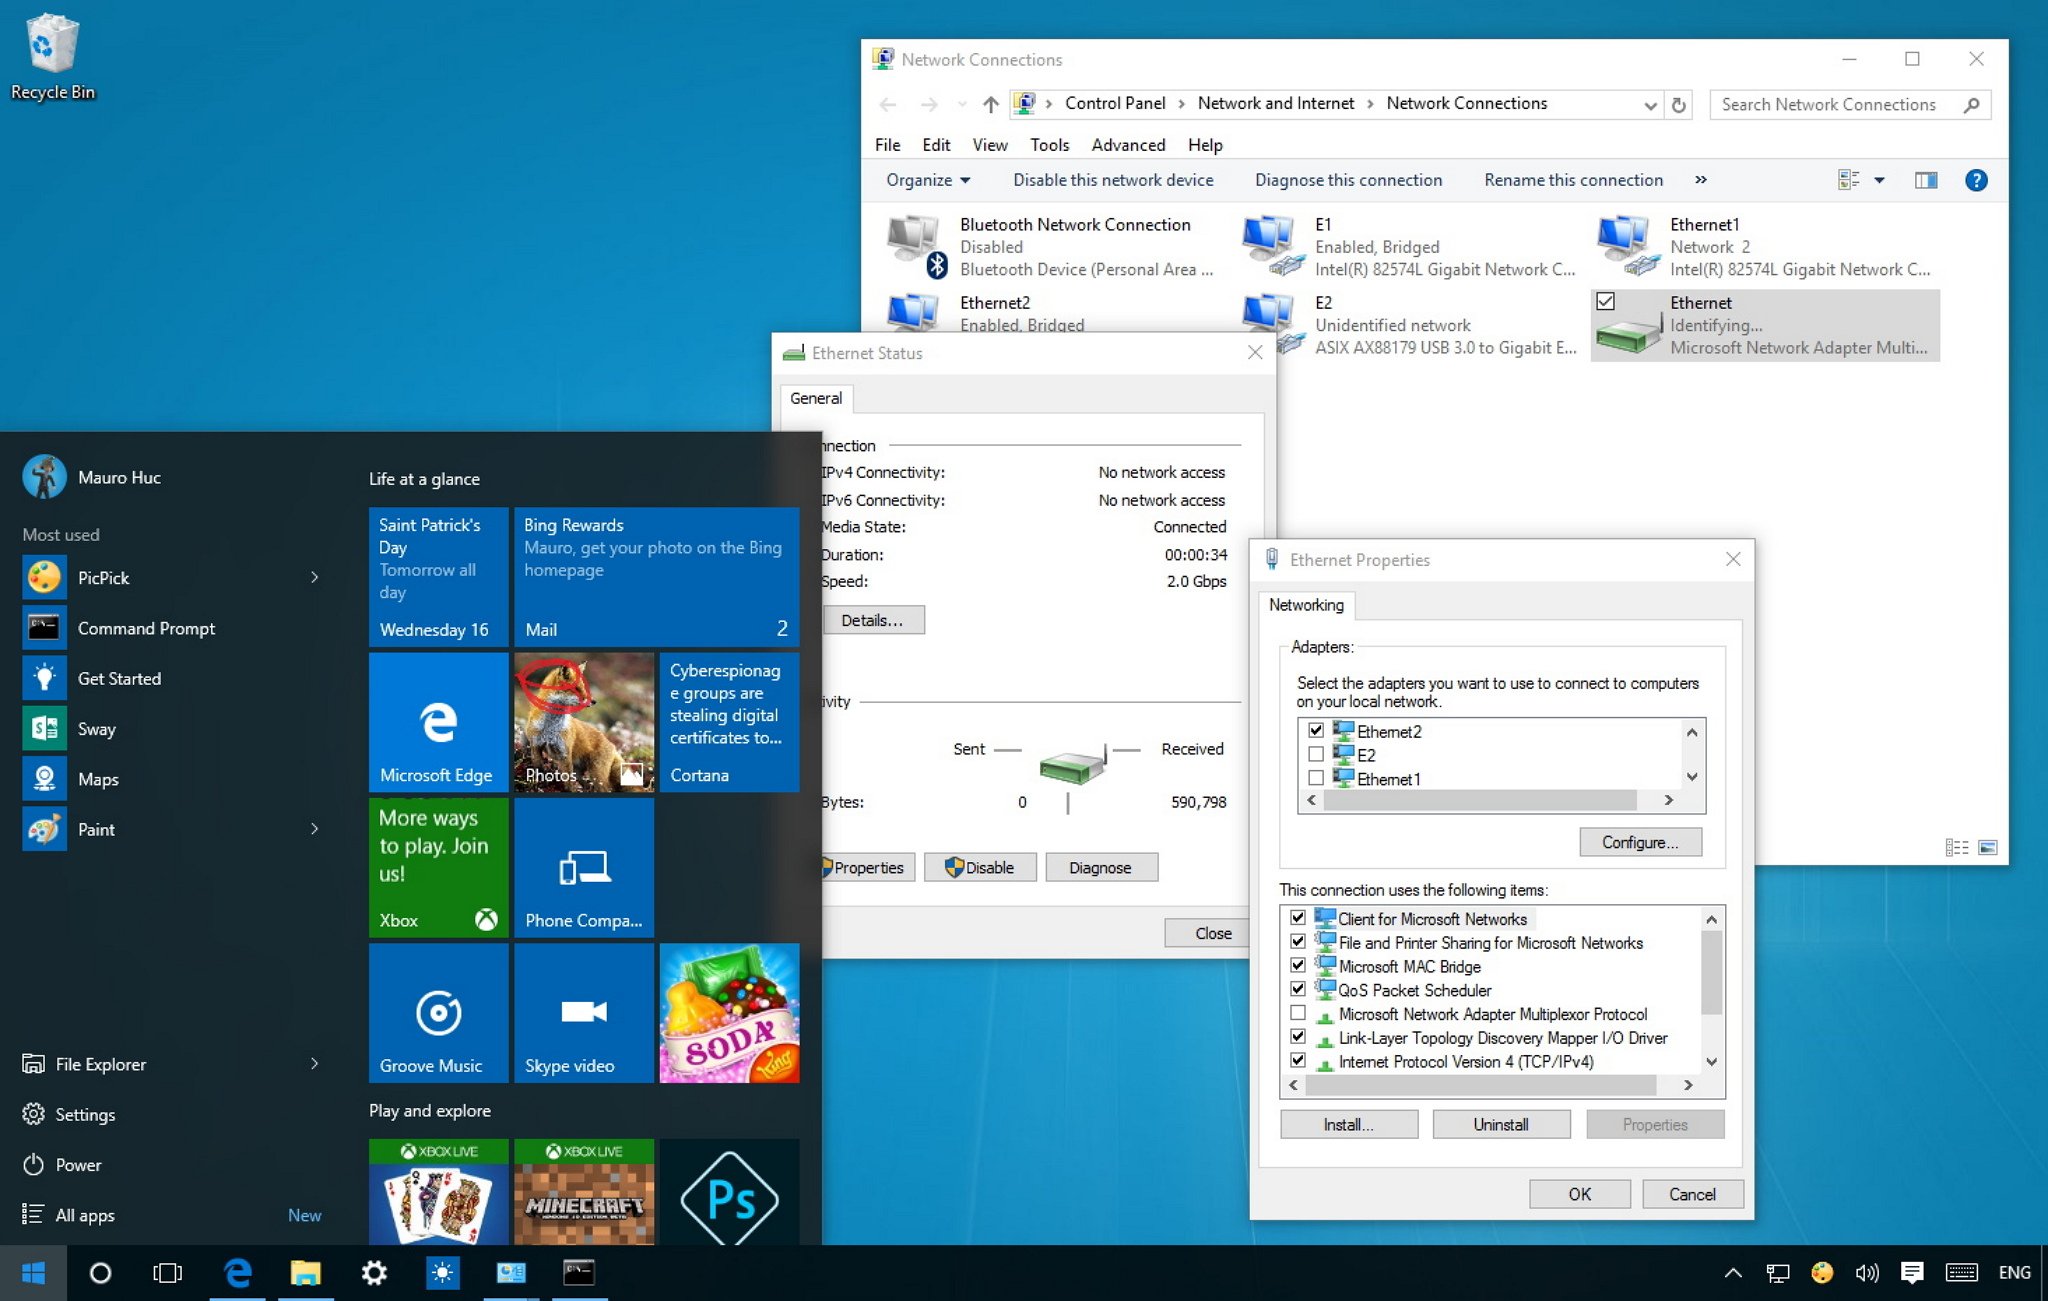
Создать сетевой мост в Windows можно из стандартной панели управления сетевыми подключениями (
ncpa.cpl
). Выберите два (или) более сетевых адаптера, которые вы хотите объединить мост, и в меню выберите Bridge Connections.

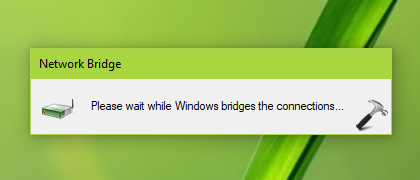
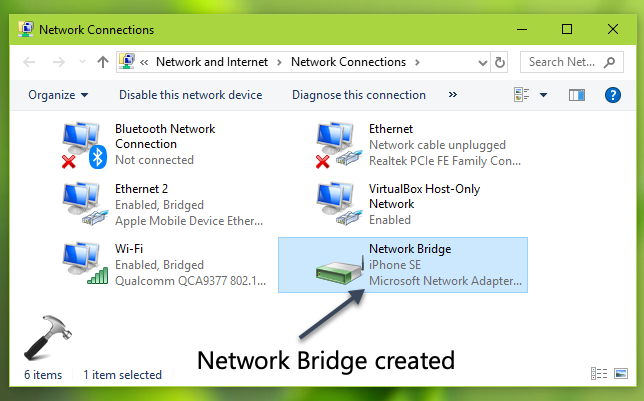
Через некоторое время в списке сетевых адаптеров появится новый сетевой адаптер типа Microsoft Network Adapter Multiplexor Driver с именем Network Bridge.
При создании моста может появится ошибка:
An unexpected error occurred while configuring the Network Bridge.
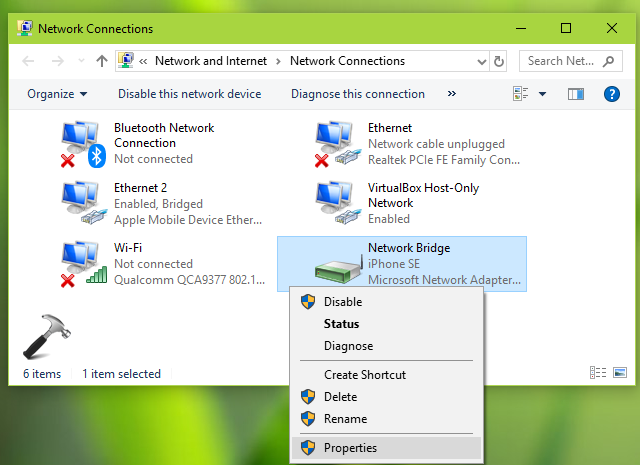
В этом случае откройте свойства бриджа и отметьте сетевые адаптеры, которые должны объединяться вашим мостом.
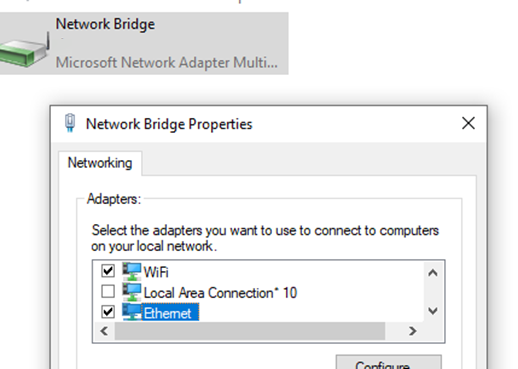
После этого любые участвующих в мосте сетевых адаптеров, включая TCP/IP, станут недоступны для редактирования, а в описании адаптеров появится статус Bridged. Сетевой мост может включать в себя более двух сетевых адаптеров.
Теперь, если на роутере включен DHCP сервер, все клиенты в LAN получат IP адреса из внешней сети (на клиентских компьютерах должно быть включено автоматическое получение IP адресов от DHCP, либо IP адреса из одного сегмента нужно задать вручную). Таким образом вы прозрачно объедините две сети с помощью сетевого моста.
Если в сети отсутствует DHCP сервер, статические IP адреса для интерфейса bridge и на устройствах в объединенной сети можно назначить вручную.
Чтобы удалить сетевой мост, щелкните по немы и выберите Delete.
В старых версиях Windows сетевое подключение типа мост можно было только из графического интерфейса. При попытке выполнить команду
netsh bridge install
появлялась ошибка:
Not supported.
Please go to the Network Connections folder to install.

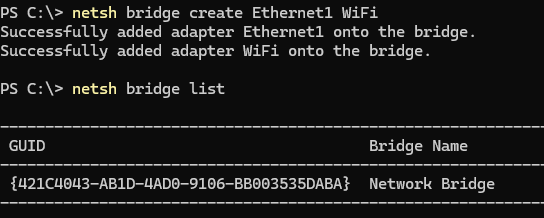
В Windows 11 22H2 после установки кумулятивного обновления от 2023-09, можно создать сетевое подключение типа мост из командной строки с помощью утилиты netsh.
Выведите с помощью PowerShell имена сетевых интерфейсов в Windows:
Get-NetAdapter
Вывести доступные для добавления в мост сетевые адаптеры:
netsh bridge show adapter

Чтобы создать мост из двух интерфейсов, укажите из имена в следующей команде:
netsh bridge create Ethernet1 WiFi
После того как мост создан, получите его GUID:
netsh bridge list
Добавить или удалить сетевой адаптер в бридж:
netsh bridge add <Adapter_Name> to <bridge_guid>
netsh bridge remove <Adapter_Name> from <bridge_guid>
Удалить мост:
netsh bridge destroy <bridge_guid>
При объединении в мост Ethernet и Wi-Fi адаптеров, в Windows бридж работает некорректно, если одновременно оба устройства были отключены от сети, а потом подключены. В качестве обходного решения можно добавить в сетевой мост отдельное устройство, которое никогда не отключается. Проще всего это сделать, создав фиктивный Microsoft loopback adapter (в современных версиях Windows это устройство
Microsoft KM-TEST Loopback Adapter
). Можно создать адаптер из Device Manager или с помощью утилиты devcon:
./devcon.exe -r install $env:windir\Inf\Netloop.inf *MSLOOP
Для организации общего доступа к интернет-подключению в Windows можно использовать службу Internet Connection Sharing (ICS). В этом случае Windows компьютера будет выступать в качестве роутера (уровень L3/L4 OSI), а адреса клиентов буду скрываться за NAT. См. как создать точку доступа Wi-Fi и раздать интернет в Windows.
Network Bridge is a feature that has been part of Windows for a long time. A bridge allows you to connect two or more network segments together allowing devices to join the network when it’s not possible to connect them directly to a router or switch.
For example, on an Xbox 360 without a wireless adapter, an Xbox One that no longer connects to Wi-Fi, or when a computer is far away from the router, you can use Network Bridge to share your computer’s connection (e.g., Ethernet or Wireless) with these devices to allow access the network. Once devices connect using a bridge, they will appear as if they were physically connected to the router.
In this Windows 10 guide, we’ll walk you through the steps to properly set up a bridge connection on your desktop or laptop to allow other devices to join your local network and to access the internet.
Before you begin
Before you start setting up a bridge connection on Windows 10, you will need at least two network adapters. One that is connected to the internet and a second adapter that will be used to connect another computer.
Additionally, as a result of setting up a bridge on Windows 10 (or on previous versions of the operating system), the primary network adapter on the host computer will lose internet connectivity.
To regain access to the internet, you will need to set a static IP address to your computer manually. The first thing you want to do is to save to a text file the current IP address information assigned by the DHCP server on your local network.
To get the IP address information from your computer follow these steps:
All the latest news, reviews, and guides for Windows and Xbox diehards.
- Use the Windows key + X keyboard shortcut to open the Power User menu and select Command Prompt.
- Type the following command and press Enter:
ipconfig /all - Make note of the IP address configuration of the network adapter connected to the internet. You need to record the following information: IPV4, subnet mask, default gateway, and DNS servers addresses.
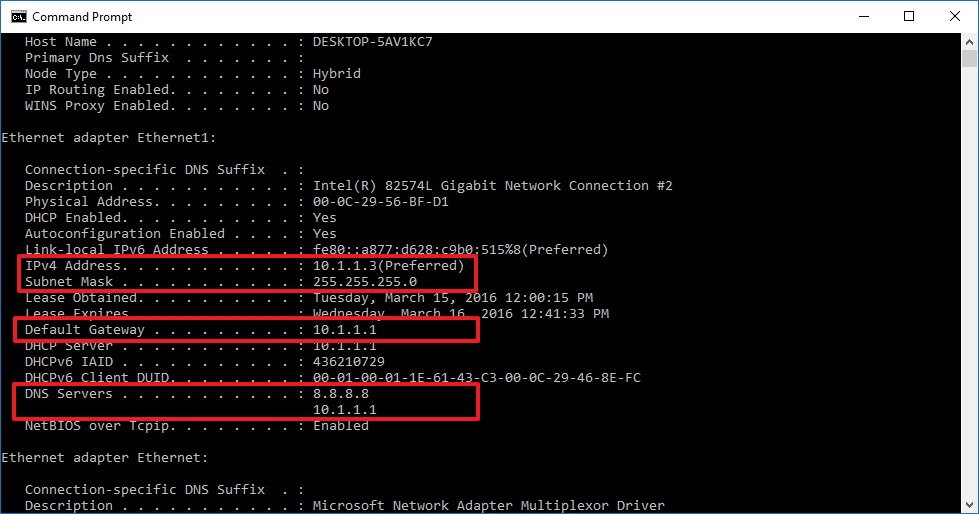
Note: You can use an IP address dynamically assigned by the DHCP server as static only as a temporary solution. On best practice you should assign an IP address in the range that doesn’t belong to the DHCP address pool on your router. For more information on how to find the DHCP server configuration make sure to check your router’s manufacturer support website.
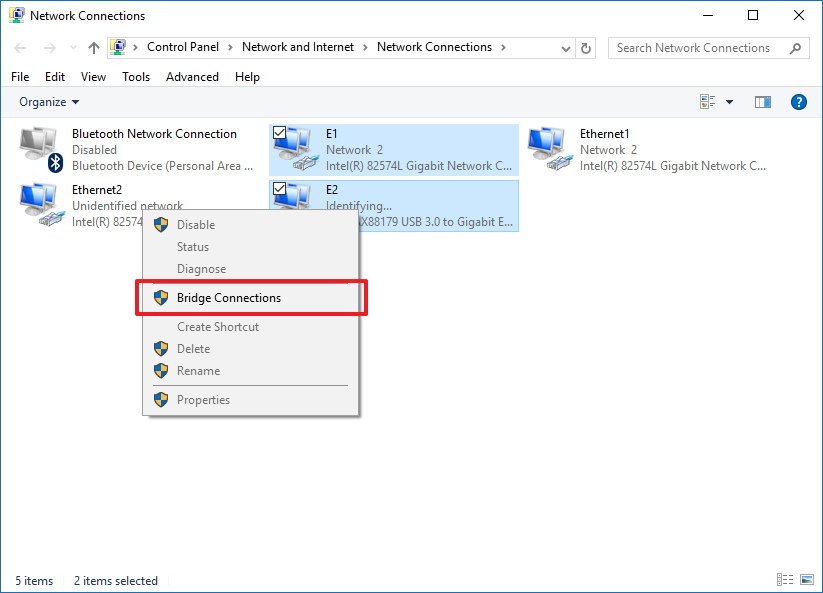
How to create a Network Bridge on Windows 10
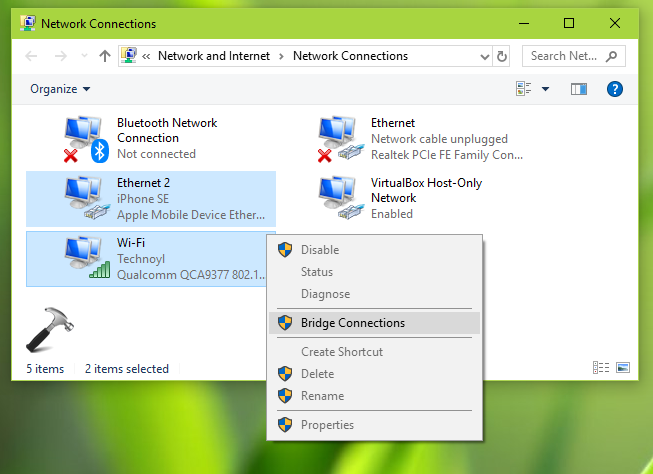
- Use the Windows key + X to open the Power User menu and select Network Connections.
- Select both, the network adapter that connects to the internet and the adapter you want to use in the bridge connection.
- Right-click the selection and click Bridge Connections.
At this point, the device connected to the bridge port should have access to the network and internet with the IP address information coming from the router, but the computer hosting the bridge won’t be able to access the internet unless you have a third network adapter that is also connected to the network or a static IP address .
How to regain internet access after setting up a bridge connection
To regain access to the internet from the host computer do the following:
- Use the Windows key + X to open the Power User menu and select Network Connections.
- Right-click the bridge adapter and select Properties.
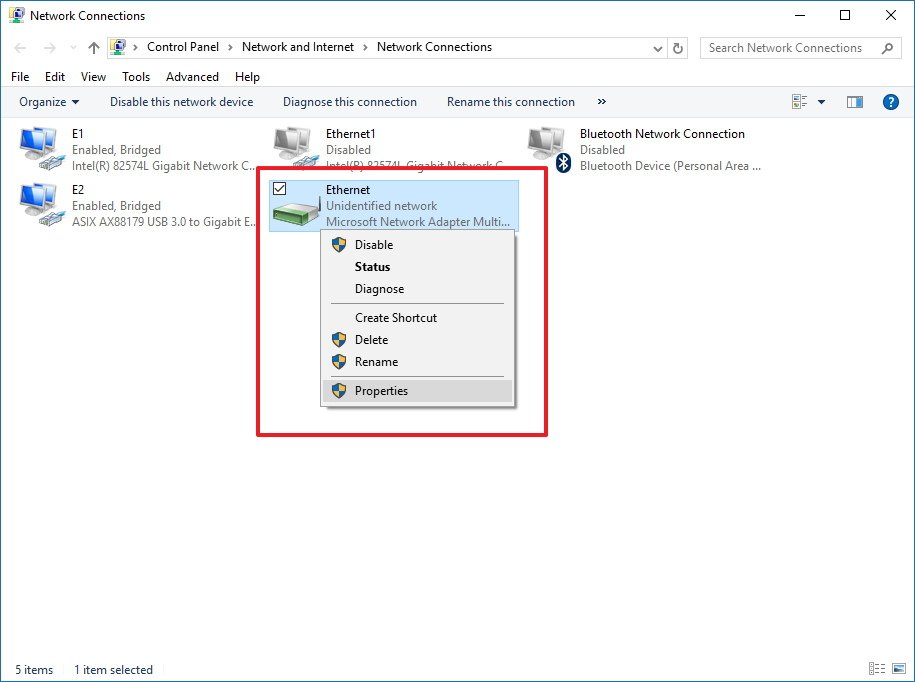
- Select the network adapter that connects to the internet.
- Select Internet Protocol Version 4 (TCP/IPv4).
- Click Properties.
- Select the Use the following IP address option.
- Use the IP address information you collected at the beginning of this guide to assign a static IP address like is shown in the screenshot below.
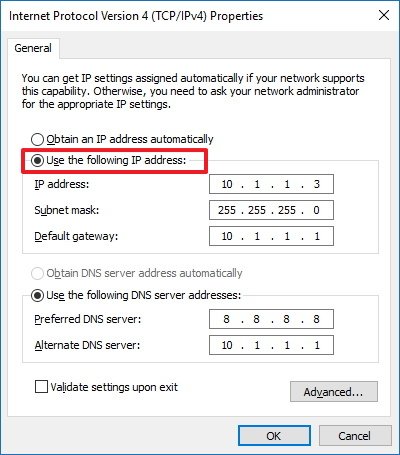
- Click OK.
- Click Close to complete the task.
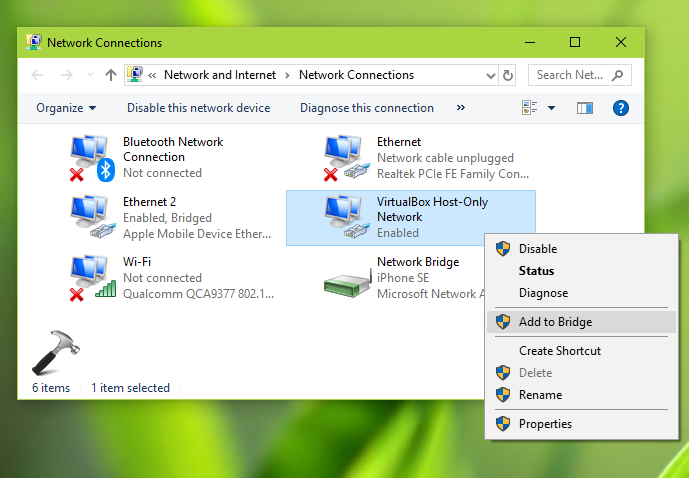
How to add more network adapters to a bridge connection
You’re not limited only to offer bridge connectivity to a single network adapter. At any time, you can add multiple adapters.
- Right-click the network adapter and select Add to Bridge.
- Connect a game console or another computer and the device will automatically acquire the network settings from the local router.

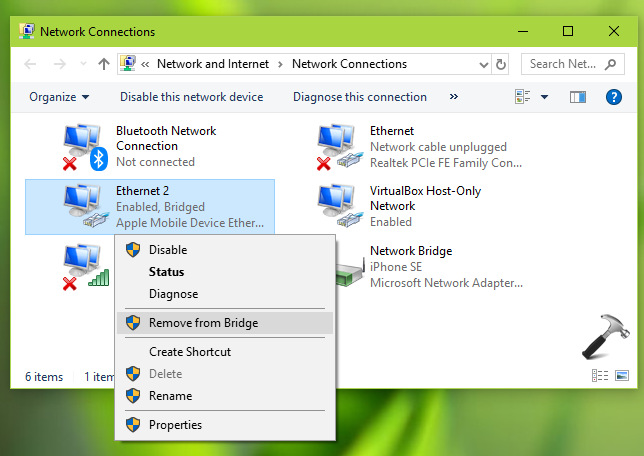
How to remove a bridge connection from your computer
When you no longer need a bridge connection, select one or all the participating network adapters, and select Remove from Bridge.
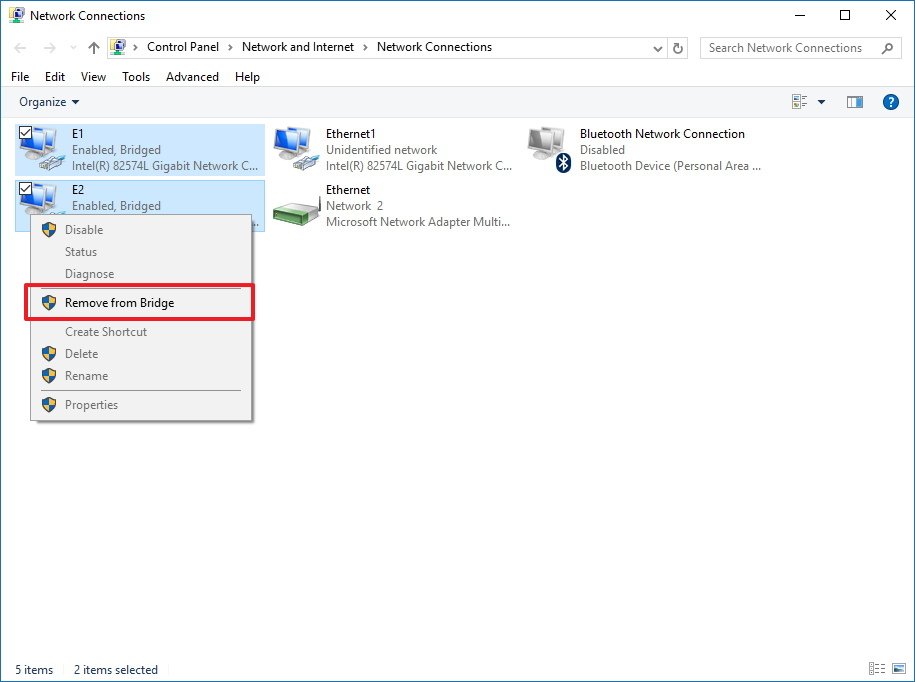
At this point, the bridge adapter should disappear from Network Connections, but if it doesn’t, simply reboot your computer.
The last thing left to do is to remove the IP address static settings and let your PC once again get this information automatically from the router.
- Right-click the network adapter and select Properties.
- Select Internet Protocol Version 4 (TCP/IPv4).
- Click Properties.
- Select the Obtain an IP address automatically option.
- Select the Obtain DNS server address automatically option.
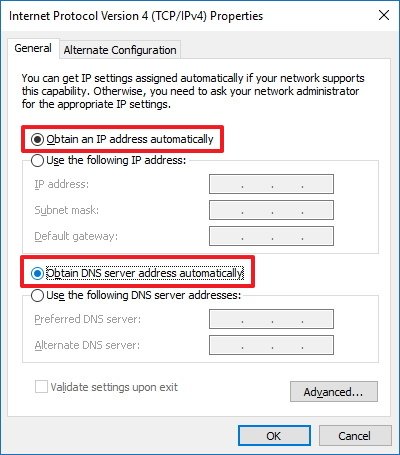
- Click OK.
- Click Close to complete the task.
Network Bridge or Internet Connection Sharing?
It’s important to note that Network Bridge is very similar to the Internet Connection Sharing (ICS) feature, but they’re not the same.
When you use Internet Connection Sharing (ICS), you will convert your computer into a router, which uses a built-in DHCP server to assign IP addresses to computers participating in ICS. It also offers Network Address Translation (NAT) that allows multiple devices to connect to the network using the ICS host as the middle man.
On the other hand, Network Bridge doesn’t turn the host computer into a router and you won’t get Network Address Translation. It only provides a medium (bridge) in which other devices can connect directly to the network and obtain the same IP address scheme every other computer connected to the network is using.
Which feature you should use? The answer to the question is: «depends». Both features offer similar benefits. If your local network already includes a router connected to the internet and you want a seamless network integration where all devices share the same network addressing scheme, then you should consider using Network Bridge.
If you need a router-like feature, and you want to keep the network segments separated while taking advantage of the security benefits of Network Address Translation, then you’ll be better suited using Internet Connection Sharing.
In theory, a bridge connection is more efficient, because the host is only a pass-through, and all the routing process will occur in the local router and not on the host computer.
Remember that Network Bridge and Internet Connection Sharing have been designed only for home and small office networks, and for scenarios, where a wireless connection can’t be established, or a cable run to the main router or switch is not possible. These features are not recommended as networking solutions for businesses. In addition, there can only be one Network Bridge or one Internet Connection Sharing per-computer.
Windows 10 resources
For more tips, coverage, and answers on Windows 10, you can visit the following resources:
- Windows 10 on Windows Central – All you need to know
- Windows 10 help, tips, and tricks
- Windows 10 forums on Windows Central
Mauro Huculak has been a Windows How-To Expert contributor for WindowsCentral.com for nearly a decade and has over 15 years of experience writing comprehensive guides. He also has an IT background and has achieved different professional certifications from Microsoft, Cisco, VMware, and CompTIA. He has been recognized as a Microsoft MVP for many years.
Возможно ли реализовать посредством моста следующее подключение: компьютер № 1 с Windows 10 подключен к роутеру через Wi-fi, в LAN порт компьютера № 1 по проводу подключаем компьютер № 2. Нужно, чтобы у второго компьютера был доступ к сети.
-
Вопрос задан
-
12914 просмотров
Пригласить эксперта
Есть 2 пути:
1. Создание новой сети с доступом к основной. Для этого надо зайти в свойства сетевого адаптера Wi-Fi, выбрать пункт «Доступ» и поставить галочку: «Разрешить другим пользователям сети использовать подключение к Интернету данного компьютера». В выпадающем списке выбрать LAN-сетевую карту.
2. Мост между сетями. Для этого нужно выделить два адаптера, нажать правой кнопкой мыши и выбрать «Настройка моста». Всё сразу заработает.
Войдите, чтобы написать ответ
-
Показать ещё
Загружается…
Минуточку внимания
Network Bridging is a process of connecting two individual network connections to act as single. If you have different type of networks and you want to connect them so you can exchange information, you need to create network bridge.
You must be thinking how creating a network bridge would be beneficial for me. Let us understood this with an example. Imagine you’ve multiple systems with some have wired or Ethernet connection, while others are connected to wireless network. In this situation, wired machines will only communicate with other wired machines. Similarly, wireless machines will only communicate with other wireless machines. If you create a network bridge between wired and wireless connections, all machines will be able to communicate with each other and this is the biggest benefit of network bridge.
AFAIK, you can create a single network bridge on a computer and the network bridge can include a number of connections available on system. In this article, we’ll see how to setup and configure network bridge in your Windows.
Page Contents
How To Bridge Network Connections In Windows 10/8/7
Part 1 – Setup Network Bridge In Windows
1. Press + R to open Run, type ncpa.cpl and click OK.

2. In the Network Connections window, manually select networks to bridge with control-click and then right click, select Bridge Connections.
3. You should be then wait for a moment so Windows configures network bridge.
4. In few seconds, you should have the network bridge created.
5. To check information about the network created so far, right click on select Properties.
6. On the network bridge property sheet, you can configure the settings for the bridge in same manner as you configure for an individual network. For example, you can select Internet Protocol Version (TCP/IPv4), click Properties and proceed to set a static IP for the network bridge.
7. To add participation of new networks to network bridge, simply right click on them and select Add to Bridge.
So this is how you can setup network bridge in your Windows.
Part 2 – Remove A Network From Bridge
To remove an either participating connection from network bridge, simply right on this network and select Remove from Bridge.
That’s it!
RELATED ARTICLES
When you are working in a small home or office networks, the exchange of data and sharing of information amongst all the machines on those networks becomes quite a tedious task. Bridge Connection is a significant solution for these circumstances.
In Windows 10, bridging an internet connection is done so that you can connect two or more networks and make it workable for the machines under those networks to exchange data with one and all. For example, let us consider you have two networks – in one, the machines A, B, and C are connected with cables whereas, in the other one, machines D, E, and F are operating on wireless. So, by building a bridge connection you make it possible for all the five machines A, B, C, D, and E to work on the same network channel. So let us now head towards the steps and see How to Setup Bridge Connections on Windows 10 to attach the PCs functioning on multiple unassociated home or office networks for inter-exchanging information.
How to Setup Bridge Connections on Windows 10
- First of all, on the right end of the taskbar look for the Network symbol and move on with a right click on it and thereon opt for Network and Sharing Center.
- In the next window, pick up the link that is described as Change adapter options in right flank.
- In the emerged window, press and hold the Ctrl key and hit those two or more networks simultaneously that you would wish to Setup in the Bridge connections.
- Perform a right click on either of the networks and hit Bridge Connections option.
- A pop up will inform about the progress in the bridge connections.
- Bridge connection will thus be set up.
There are many other users who confront yellow warning signal with a note that is written as “To create a network bridge, you must select at least two LAN or High-Speed Internet connections that are not being used by Internet Connection Sharing”. Pursue the below steps to get a proper connection –
- Be in the window where you can see all the adapters (see the below screenshot), do a right-click on the wireless adapter and from the arrived contextual menu, select Properties.
- Shift yourself to the Sharing tab and untick the first square cell that is expressed as “Allow other network users to connect through this computer’s Internet Connection” and thereupon click Ok button.
- Attempt the steps mentioned above and the bridge connection will be done.
Microsoft clearly stated that the bridge between internet and network connection should never be attempted as it will generate an unsafe link between the internet and your network and anyone can get through your network which is definitely not a great thing in terms of security.