
In this tutorial, you will learn how to use the net user command to create, delete and change user accounts in the Windows command prompt (CDM).
We can perform the following tasks using the net user command:
- View user accounts.
- Add and Remove user accounts.
- Activate and Deactivate user accounts.
- Change the user password.
If you are operating in an Active Directory domain environment, always use the /domain command switch to execute the net user command on the domain controller rather than on the local computer.
Examples
List users on the local computer:
net userList users on the domain controller:
net user /domainThis command displays detailed information about the Administrator account:
net user AdministratorCreate a user named user1 with a password of strongPassword:
net user /add user1 "strongPassword"Delete the user user1 from the computer:
net user /delete user2This command enables the built-in Administrator account on Windows 10/11:
net user Administrator /active:yesThis command sets (changes) the Administrator account password:
net user Administrator "adminPassWord"Execute the following command to disable the Administrator account on Windows 10/11:
net user Administrator /active:noThis command forces the user user1 to change the password at the next logon:
net user user1 /logonpasswordchg:yesCreate a user; the user must change the password at the next logon:
net user /add user1 "strongPassword" /logonpasswordchg:yesCreate a new user; the account expires on January 31st:
net user /add user1 "strongPassword" /expires:01/31/2023Command Options
| username | The name of the user to create, delete, view, or modify. |
| password | Password for the user. |
| * | Use this option to produce a prompt for the password. |
| /add | Use this option when you want to create a new user. |
| /delete | Use this option to remove a user from the Windows system. |
| /active:{yes | no} | Activates or Deactivates a user. The default is yes when creating a new user. |
| /expires:{date | never} | Use this option to set the expiration date (mm/dd/yy) for an account. The default is never. |
| /fullname:»name» | Full name of the user. |
| /passwordchg:{yes | no} | Specifies whether users can change their own password. The default is yes. |
| /passwordreq:{yes | no} | No means the user can log in without a password. The default is YES. |
| /logonpasswordchg:{yes|no} | Specifies whether the user should change the password at the next logon. The default is NO. |
| /homedir:path | The home directory location. |
| /comment:»text» | Use this option to add a description to the user’s account. |
You can view the manual page by typing net help user at the command prompt.
View a User
When you execute the net user command without any options, it displays a list of user accounts on the computer.
net userYou will see an output similar to the following:
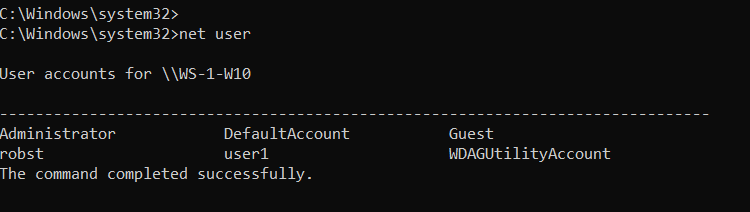
Add the /domain command switch if you want to list users on the Active Directory Domain controller.
net user /domainTo see detailed information about a particular user, execute the command net user Username, where the Username is the name of the user you want to view. For example, you can view the Administrator account by running the following command:
net user AdministratorCreate and Delete User Accounts
To create a user account, use the following syntax:
net user /add UserName PasswordFor example, the following command creates a user named user1 with a password of strongPassword:
net user /add user1 "strongPassword"Use an asterisk (*) in place of the password to produce a prompt, as shown in the following example:
net user /add user1 *
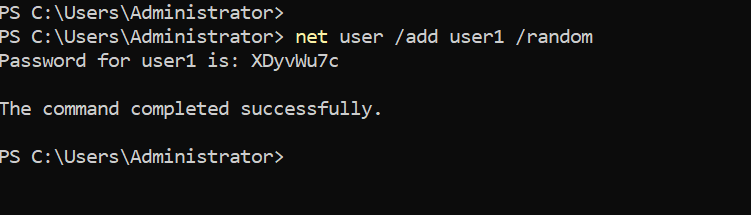
Alternatively, you can also use the /random option to generate a strong random password, as shown in the following example:
net user /add user1 /randomThe randomly generated password will be displayed on the command prompt after you execute the command.
To delete a user, use the following syntax:
net user /delete UserNameThe following command deletes the user user1 from the computer:
net user /delete user2Change Passwords
To change passwords, use the following syntax:
net user UserName New-PasswordUse an asterisk (*) or /random in place of the password to produce a prompt or generate a random password:
net user UserName *
net user user1 /random
Notes
The net user command is most of the time used in Windows Server to manage Active Directory users.
Windows 10/11 uses a new Settings pane to manage users, but the net user command is still useful for some tasks. For example, if you want to activate the built-in Administrator account, it is easy to do that using this command.
While working at the command prompt, run the net help user command to see all available command options.
In the next tutorial, we are going to learn how to manage Windows groups using the net localgroup CMD command.
Adding users from command line is much easier rather than going through UI. It saves lot of time for Windows admins to add users in bulk using CLI commands/script. Net user command is the one that Windows users can use to manage user accounts, read on to know how to add users from CMD.
To add a new user account on local computer:
net user username password /ADD
Example: To add a new user account with the loginid John and with password fadf24as
net user John fadf24as /ADD
Hide password
If you do not want the password to be visible while adding new user account, you can use ‘*’ as shown below.
C:\>net user /add John *
Type a password for the user:
Retype the password to confirm:
The command completed successfully.
C:\>
To add a new user account to the domain:
net user username password /ADD /DOMAIN
Note that the command does not include the name of the domain, it automatically adds to the domain the computer belongs to.
Example:
net user John fadf24as /ADD /DOMAIN
Rename a user account
Net use command does not have any switches to rename a user account. But we can do that using wmic commands. Please check this – Rename user accounts on Windows
Few more advanced uses of net user command.
To set user full name while creating the user account
net user username password /ADD /FULLNAME:"User_Fullname"
To allow user to change password:
net user username password /ADD /PASSWORDCHG:Yes
To restrict user not to change the password:
net user username userpasswd /ADD /PASSWORDCHG:NO
To set account expiry time we can use /EXPIRES switch. This can also be used to set that the account never expires.
To specify if the user must have a password set we can use /PASSWORDREQ switch. For more information on all net user options, read this – Net user command: syntax and examples
How to create a new administrator account?
An administrator account can’t be created directly. We first need to create a user account and then add the user to the administrators group.
Errors:
- If you don’t have privileges to add new user account to the system, you would get an error like below.
C:\>net user John /add
System error 5 has occurred.
Access is denied.
C:\>
- While adding user to domain, make sure that your computer is connected to the domain. Otherwise it throws up below error.
C:\>net user testuser testpassword /ADD /DOMAIN
The request will be processed at a domain controller for domain mydomain.com.
System error 1355 has occurred.
The specified domain either does not exist or could not be contacted.
Related Posts:
Remove user from group
Прочитано: 5 293
Продолжаем тему настройки текущего домена polygon.local
Сейчас я покажу каким образом можно создать пользователя, активировать его и включить к примеру в группу доменных администраторов и всё это посредством командной строки.
Из предыдущего поста по созданию организационного подразделения у нас есть контейнер IT.
Нажать сочетание клавиш “Win+R” для вызова диалогового окна “Run” (Выполнить) и набрать в нем команду “cmd“.
Для создания учетных записей нужно обладать правами “Domain Admins” или быть делегированным администратором.

Перед нам откроется окно командной строки, в нем наберем:
Вывод пути где распологается подразделение IT:
C:\Users\Administrator>dsquery ou -name IT
“OU=IT,DC=polygon,DC=local”
Создаем пользователя в указанном подразделении:
C:\Users\Administrator>dsadd user “cn=ekzorchik,ou=IT,dc=polygon,dc=local”
Создаем пароль для учетной записи:
C:\Users\Administrator>dsmod user “cn=ekzorchik,ou=IT,dc=polygon,dc=local” -pwd Aa1234567
dsmod succeeded:cn=ekzorchik,ou=IT,dc=polygon,dc=local
Активируем учетную запись:
C:\Users\Administrator>dsmod user “cn=ekzorchik,ou=IT,dc=polygon,dc=local” -disabled no
dsmod succeeded:cn=ekzorchik,ou=IT,dc=polygon,dc=local
Добавляем учетную запись в группу Domain Admins:
C:\Users\Administrator>dsmod group “CN=Domain Admins,CN=Users,DC=polygon,DC=local” -addmbr “CN=ekzorchik,OU=IT,DC=polygon,DC=local”
dsmod succeeded:CN=Domain Admins,CN=Users,DC=polygon,DC=local
Для наглядного просмотра, что мы только, что сейчас сделали предлагаю воспользоваться Active Directory Users and Computers.
Из меню “Start” – “Control Panel” – “Administrative Tools” – запускаем оснастку “Active Directory Users and Computers”.

Такой способ более удобен если нужно создать структуру с помощью скрипта без запуска GUI интерфейса оснасток.
Загрузить PDF
Загрузить PDF
Учетные записи пользователей управляются через Панель управления Windows. Если у вас нет доступа к Панели управления, прочитайте эту статью.
-

Откройте «Мой компьютер» и в строке поиска введите «Панель управления» (без кавычек). Если это не сработало, переходите к шагу 2.
-
Если это не сработало (или Панели управления нет в меню), переходите к шагу 3.
-

Введите Control Panel. Если это не сработало, переходите к шагу 4.
-

Нажмите «Пуск» — «Выполнить» и введите cmd. В окне командной строки введите Control Panel. Если это не сработало, переходите к шагу 5, но окно командной строки не закрывайте.
-

В командной строке введите net для получения информации об этой команде.
- Чтобы изменить пароль, введите net user (имя_пользователя) * (не забудьте про символ «звездочка»).
- Для добавления пользователя введите net user (имя_пользователя) /ADD
- Для удаления пользователя введите net user (имя_пользователя) /DELETE
- Введите net accounts/? Для получения информации о команде net accounts. Вы можете использовать эту команду для принудительного выхода из системы и установления сроков действия учетных записей пользователей.
- Если вам нужны дополнительные опции, в конце каждой описанной команды введите /?. Или поищите в интернете информацию об использовании той или иной команды.
Реклама


-
![Step 1 net user [username [password | *] [options]] [/domain]](data:image/svg+xml,%3Csvg%20xmlns='http://www.w3.org/2000/svg'%20viewBox='0%200%20460%20341'%3E%3C/svg%3E)
-
-
Реклама
![Step 1 net user [username [password | *] [options]] [/domain]](https://www.wikihow.com/images_en/thumb/f/f0/Add-Users-from-CMD-Step-6-Version-4.jpg/v4-460px-Add-Users-from-CMD-Step-6-Version-4.jpg)
![Step 2 username {password | *} /add [options] [/domain]](https://www.wikihow.com/images_en/thumb/0/0e/Add-Users-from-CMD-Step-7-Version-4.jpg/v4-460px-Add-Users-from-CMD-Step-7-Version-4.jpg)
![Step 3 username [/delete] [/domain]](https://www.wikihow.com/images_en/thumb/b/b6/Add-Users-from-CMD-Step-8-Version-4.jpg/v4-460px-Add-Users-from-CMD-Step-8-Version-4.jpg)
Советы
- Вы должны войти в систему как администратор, чтобы создать еще одну учетную запись с правами администратора.
Реклама
Об этой статье
Эту страницу просматривали 26 479 раз.
Была ли эта статья полезной?
Windows — Create a domain user account using the command-line
Windows — Create a domain user account using the command-line
Would you like to learn how to create a domain user account using the command-line? In this tutorial, we are going to show you how to use the command-line to create a user account on the Active Directory.
• Windows 2012 R2
• Windows 2016
• Windows 2019
• Windows 10
• Windows 7
Equipment list
The following section presents the list of equipment used to create this tutorial.
As an Amazon Associate, I earn from qualifying purchases.
Windows Related Tutorial:
On this page, we offer quick access to a list of tutorials related to Windows.
Tutorial Windows — Create a domain user account using the command-line
As an Administrator, start a new command-line prompt.

Create a domain user account.
Here is the command output:
In our example, we created a domain user account named Gohan.
The new user account will be created in the Active Directory organizational unit named Users.
Keep in mind that you need to change the username and password.
List all domain user accounts.
Verify the existence of the new user account.
Here is the command output:
Configure the new user account as a member of a domain group.
In our example, the user was configured as a member of the domain admins group.
Verify if the user account is a member of the domain group.
Here is the command output:
Congratulations! You are able to create a domain user account on the Active Directory using the command-line.
VirtualCoin CISSP, PMP, CCNP, MCSE, LPIC22021-03-23T23:30:59-03:00
Related Posts
Page load link
Ok