
This tutorial will be showed how to create a simple graphical interface using C++ and Visual Studio 2019.
This tutorial can be a good kickstart for the future development of Graphical User Interfaces, using C++, Visual Studio 2019, and .Net Framework.
Parts Required
- Microsoft Visual Studio 2019;
- .NET Framework (automatically installed with Visual Studio).
Note: Below you can check a possible install configuration of Visual Studio. If you want to use the file you change the file (from “vsconfig.txt” to “.vsconfig“) and import when install or modify Microsoft Visual Studio 2019.
Create a new Project
1. Open Visual Studio 2019.

2. Select the type of project.

3. Type the desired name of the project.

Create a design
In order to have a graphical appearance, it is necessary to add Windows Forms to the project.
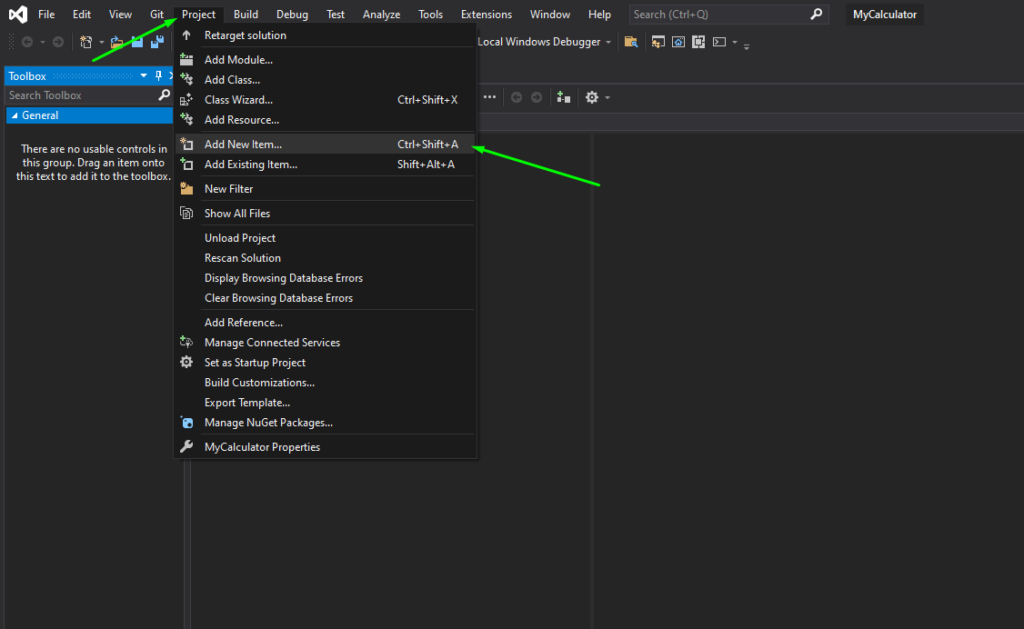
1. Go to “Project” and click on “Add New Item…“.
2. Select “Windows Form“, change the name of the file if you like, and press “Add“.

Note: If this message appears, restart the Visual Studio should get it away.


Design Configurations
Now it is necessary to add the necessary visual components in order to get the desired result. You will need 3 labels, 2 textbox, 1 button, 1 flow layout, and 4 checker boxes.
1. In “Toolbox” search for “label“. Then select the “Label” and drag it to “Design” and drop it wherever you want. (In all, 3 labels will be needed.)


2. Repeat the process for two “TextBox” and one button.

3. Add a “FlowLayoutPannel“.

4. Search for “CheckBox” and drop it inside of the “FlowLayoutPannel” (you will need 4 in total).


5. Select the “checkBox1” and go to “Properties” and change the “Name“. This name should not have spaces, because is the name used when coding to reference the checkbox.
6. Change “Text” to “+” because is this checkbox that will match the sum operation.
7. Repeat the process to others checkboxes.

8. Change the “Text” of “label1” to “My Calculator”.
9. Change the “Text” of “label2” to “Result:”.
10. Change the “Text” of “label3” to “No Input” and the “Name” to “result_output”.
11. Change the “Name” of “textBox1” to “value1_input” and the “Name” of “textBox2” to “value2_input”.
12. Change the “Text” of “button1” to “Calculate”.
On click event configuration
As the objective is to present the result of a certain operation, it is necessary to create an event that performs the desired operations.
1. Double click on the “Calculate” button, to generate a click event on “MyForm.h“.

2. After double click on the button “MyForm.h” file will open and the event will appear.

3. The button click event must have the following code, as it is in this event that the desired operations will be performed. Since the objective is to change the status of the label “result_output” and display the result of the operation in it.
private: System::Void button1_Click(System::Object^ sender, System::EventArgs^ e) {

		//Assign the value from TextBox to a float variable
		float value1 = (float)System::Convert::ToDouble(value1_input->Text);
		float value2 = (float)System::Convert::ToDouble(value2_input->Text);

		float result;

		//Check the CheckBoxes values and excute the respective operation
		if (bool(check_sum->CheckState)) {
			//Do the sum operation
			result = value1 + value2;
		}
		if (bool(check_sub->CheckState)) {
			//Do the subtraction operation
			result = value1 - value2;
		}
		if (bool(check_mult->CheckState)) {
			//Do the multiplication operation
			result = value1 * value2;
		}
		if (bool(check_div->CheckState)) {
			//Do the division operation
			result = value1 / value2;
		}

		//Update output label
		result_output->Text = System::Convert::ToString(result);

	}
Build configuration
Before building the project, it is necessary to perform some configurations. In the example case, the solution configuration corresponds to Debug mode and an x86 platform. But if you want to develop this project for another configuration (Release Mode, for example), or another platform (x64, for example), just change these fields and carry out the following procedures.
1. Before performing the project settings, there must be the main function so that the windows forms application can be executed. A simple way to do this is to copy and paste the following code into the “MyForm.cpp” file. This indicates how the form should be executed.
#include "MyForm.h"

using namespace System;
using namespace System::Windows::Forms;
[STAThreadAttribute]

void main(array<String^>^ args)
{
	Application::EnableVisualStyles();
	Application::SetCompatibleTextRenderingDefault(false);
	MyCalculator::MyForm form;
	Application::Run(% form);
}
2. On “Solution Explorer“, select your project and right-click on it.
3. In this pop-up, click on “Properties“.

4. Expand “Linker” configurations and click on “Advanced“. On “Entry Point” type “main“, because in this field it is necessary to specify the name of the input function, as an entry point for the file .exe or DLL (it is located in the file “MyForm.cpp”).

5. Select the “System” property on “Linker“. In the option “SubSystem“, select the “Windows” option. After that, click on “OK“.

6. Know it is possible to start without debugging and the GUI should pop up.


Results
Enjoy it!!!
Некогда мы уже создавали подобный калькулятор, но он был довольно простенький и не имел общего TextBox’a для всех чисел.
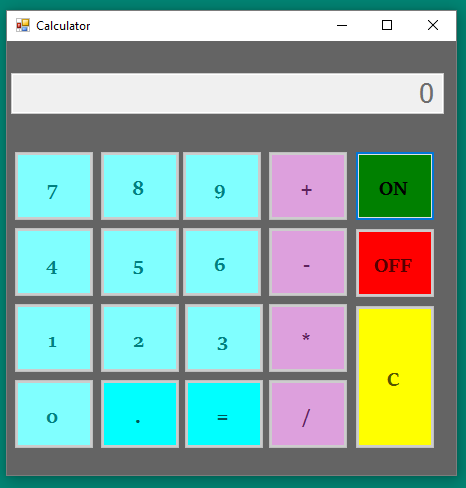
В данной статье же мы создадим более усовершенствованный калькулятор Windows Forms.Итак, выглядеть у нас он будет вот так:
Здесь у нас 19 кнопок Button, 1 Textbox и ещё 1 пустой Label (на рисунке он выделен). Применение его будет описано ниже.
Итак, создаём такую или похожую форму. Мы увеличили ширину TextBox’a, используя MultiLine:

Также в Свойствах мы увеличили размер шрифта в TextBox’e и Label’e до 12 пт.
Теперь делаем так, чтобы при нажатии на цифровые кнопки, в TextBox’e появлялась соответствующая цифра.
Для этого дважды кликаем на кнопке «0» и в открывшемся коде пишем:
|
private void button17_Click(object sender, EventArgs e) { textBox1.Text = textBox1.Text + 0; } |
Проверяем, несколько раз нажав на кнопку «0» у нас в форме.
Работает. Делаем то же самое с остальными цифровыми кнопками:
|
1 2 3 4 5 6 7 8 9 10 11 12 13 14 15 16 17 18 19 20 21 22 23 24 25 26 27 28 29 30 31 32 33 34 35 36 37 38 39 40 41 42 43 44 |
private void button13_Click(object sender, EventArgs e) { textBox1.Text = textBox1.Text + 1; } private void button14_Click(object sender, EventArgs e) { textBox1.Text = textBox1.Text + 2; } private void button15_Click(object sender, EventArgs e) { textBox1.Text = textBox1.Text + 3; } private void button9_Click(object sender, EventArgs e) { textBox1.Text = textBox1.Text + 4; } private void button10_Click(object sender, EventArgs e) { textBox1.Text = textBox1.Text + 5; } private void button11_Click(object sender, EventArgs e) { textBox1.Text = textBox1.Text + 6; } private void button5_Click(object sender, EventArgs e) { textBox1.Text = textBox1.Text + 7; } private void button6_Click(object sender, EventArgs e) { textBox1.Text = textBox1.Text + 8; } private void button7_Click(object sender, EventArgs e) { textBox1.Text = textBox1.Text + 9; } |
Таким же образом кликаем дважды на кнопку «.» в форме. Она будет использоваться для создания десятичной дроби. Пишем следующий код:
|
private void button18_Click(object sender, EventArgs e) { textBox1.Text = textBox1.Text + «,»; } |
Кнопки нажимаются, в TextBox’e отображаются нажатые цифры. Теперь надо научить программу производить с ними какие-либо операции. Как видно из формы, наш калькулятор сможет производить стандартные математические операции: сложение, вычитание, умножение и деление. Для начала мы создадим в самом начале программы несколько переменных, которые нам для этого понадобятся:
|
float a, b; int count; bool znak = true; |
Первым двум переменным будут присваиваться значения, набранные пользователем в калькуляторе. В последствии с ними будут производиться нужные математические операции. Тип float — это тип с плавающей точкой, позволяющий работать с десятичными дробями, что нам, безусловно, нужно при наличии кнопки «.» .
Благодаря второй переменной мы будем давать программе указания, какую именно операцию производить с переменными, описанными выше. Здесь нам не нужна дробь, поэтому обойдёмся целочисленным типом int.
Последняя переменная znak нам понадобится для того, чтобы менять знаки у введённых чисел. Тип bool может иметь два значения — ture и false. Мы представим, что если znak имеет значение true в программе, то это означает, что у числа знак +, если false — число отрицательное и перед собой имеет знак —. Изначально в калькуляторе вбиваются положительные числа, поэтому мы сразу присвоили переменной значение true.
Далее мы дважды нажимаем на кнопку «+», обозначающую сложение, на форме и пишем следующий код:
|
private void button4_Click(object sender, EventArgs e) { a = float.Parse(textBox1.Text); textBox1.Clear(); count = 1; label1.Text = a.ToString() + «+»; znak = true; } |
В строке 3 мы присваиваем первой переменной a то, что будет написано в TextBox’e (а именно число, которое введёт пользователь перед тем, как нажать кнопку «+»).
Затем TextBox очищается, число, введённое пользователем, в нём пропадает (но остаётся в переменной a)
Переменной count присваивается число 1, которая потом укажет программе, что именно операцию сложения надо будет произвести с числами.
Затем в Label записывается число из переменной a (то самое, которое изначально ввёл пользователь) и знак плюса. Выглядеть в форме это будет так, как описано ниже.
Пользователь вводит какое-либо число:
Затем нажимает на кнопку «+» и после этого видит:
Кроме того, как бы не было странным с первого взгляда, мы присваиваем переменной znak значение true, хотя выше, в начале кода, мы и так присваивали это же значение. Подробнее данную переменную мы опишем ниже, но смысл в том, что мы присваиваем значение true, когда хотим сделать введённое число отрицательным, если оно положительно, а значение false, когда хотим сделать число положительным, если оно отрицательное. Изначально у нас вводятся положительные числа, сначала первое, потом второе. И если первое число мы сделаем отрицательным, то значение у znak перейдёт в false и тогда получится, что второе слагаемое как бы отрицательное (на практике, просто чтобы поставить перед ним минус, придётся нажать дважды на соответствующую кнопку, чтобы с false значение перешло в true, а затем обратно с true в false, и появился знак минуса).
Подобным образом заполняем код для кнопок «-«, «*» и «/»:
|
1 2 3 4 5 6 7 8 9 10 11 12 13 14 15 16 17 18 19 20 21 22 23 24 25 26 |
private void button8_Click(object sender, EventArgs e) { a = float.Parse(textBox1.Text); textBox1.Clear(); count = 2; label1.Text = a.ToString() + «-«; znak = true; } private void button12_Click(object sender, EventArgs e) { a = float.Parse(textBox1.Text); textBox1.Clear(); count = 3; label1.Text = a.ToString() + «*»; znak = true; } private void button16_Click(object sender, EventArgs e) { a = float.Parse(textBox1.Text); textBox1.Clear(); count = 4; label1.Text = a.ToString() + «/»; znak = true; } |
Разница лишь в значении переменной count и в том, какой знак добавляется в Label’e.
Далее нам понадобится создать функцию, которая будет применять нужные нам математические операции к числам. Назовём её calculate. Но перед этим мы кликнем дважды на кнопку «=» на форме и в коде к ней мы запишем:
|
private void button19_Click(object sender, EventArgs e) { calculate(); label1.Text = «»; } |
То есть, при нажатии пользователем на кнопку «=», как раз выполнится наша функция подсчёта calculate, и, заодно, очистится Label, так как результат мы в будущем коде выведем в TextBox.
Теперь-таки создаём нашу функцию calculate и пишем следующий код:
|
1 2 3 4 5 6 7 8 9 10 11 12 13 14 15 16 17 18 19 20 21 22 23 24 25 26 |
private void calculate() { switch(count) { case 1: b = a + float.Parse(textBox1.Text); textBox1.Text = b.ToString(); break; case 2: b = a — float.Parse(textBox1.Text); textBox1.Text = b.ToString(); break; case 3: b = a * float.Parse(textBox1.Text); textBox1.Text = b.ToString(); break; case 4: b = a / float.Parse(textBox1.Text); textBox1.Text = b.ToString(); break; default: break; } } |
Здесь мы используем конструкцию switch-case.
Switch — это оператор управления. Он может включать в себя несколько case’ов. Case — метки, от значения которых зависит, какие операции будут происходить.
Строка switch(count) означает, что именно от значения count будет зависеть, какое действие будет происходить в коде switch’a.
Итак, если count=1 (в коде case 1:), то произойдёт следующее:
После того, как пользователь нажал «+», он, естественно, должен ввести второе слагаемое, что он и делает по стандартному сценарию, а затем нажать кнопку «=» (и в ней, как мы помним, как раз выполнится наша функция).
Как только кнопка «=» будет нажата, программа сложит число из переменной a с тем вторым слагаемым, которое записал пользователь в TextBox, и запишет результат в переменную b (строка 6 кода функции). В строке 7 программа выведет в TextBox результат сложения — переменную b.
Оператор break (строка  завершает исполнение кода switch при выполнении кода метки case 1, так как больше нам в нём делать нечего.
Точно так же строится алгоритм при case 2, case 3 и case 4 с той разницей, что в них происходит не сложение, а вычитание, умножение и деление соответственно.
Оператор default срабатывает, если вдруг что-то пойдёт не по плану и count примет какое-либо иное значение, не описанное в switch. Тогда срабатывает лишь оператор break.
Львиная доля программы готова. Нам надо лишь написать код для трёх оставшихся нетронутыми до этого время кнопок.
Дважды жмём в форме на кнопку «С». Она будет очищать все записи из TextBox’a и Label’a.
Код у неё элементарный:
|
private void button3_Click(object sender, EventArgs e) { textBox1.Text = «»; label1.Text = «»; } |
На очереди у нас кнопка «<—«. Она будет удалять последнюю цифру записанного в TextBox’e числа. Код:
|
private void button2_Click(object sender, EventArgs e) { int lenght = textBox1.Text.Length — 1; string text = textBox1.Text; textBox1.Clear(); for (int i = 0; i < lenght; i++) { textBox1.Text = textBox1.Text + text[i]; } } |
Мы вводим новую переменную lenght целочисленного типа и записываем в неё количество символов в TextBox’e минус один символ.
Также мы вводим новую переменную text, в которую полностью заносим текст из TextBox’а. Затем мы очищаем TextBox и вводим цикл for, через который записываем в TextBox строку text, но уже на символ короче.
Например, в TextBox’e записано число 504523
При нажатии на кнопку «<—« в переменную lenght записывается число 5 (6 цифр — 1), в переменную text записывается строка «504523», TextBox очищается, а затем в него по одному записываются символы из text, но в этот раз их будет не 6, а 5, то есть в TextBox’e появится число 50452.
У нас остаётся последняя кнопка, которая отвечает за знак первого слагаемого. Переходим к её коду. Тут мы будет работать с переменной znak, которую описывали выше. Код выглядит вот так:
|
private void button1_Click(object sender, EventArgs e) { if(znak==true) { textBox1.Text = «-« + textBox1.Text; znak = false; } else if (znak==false) { textBox1.Text=textBox1.Text.Replace(«-«, «»); znak = true; } |
Изначально, как мы помним, у переменной znak стоит значение true. Если мы нажмём на кнопку первый раз, то в TextBox’e перед числом появится знак «-«, а переменной znak будет присвоено значение false.
Если второй раз нажать на данную кнопку, то, так как znak у нас false, произойдёт второе условие. Здесь используется метод Replace, который заменяет какой-либо кусок строки на другой. В скобках после метода вначале пишется, что будет заменено в строке, а после запятой, то, на что заменять. В данном случае мы заменяем в TextBox’e минус на пустое значение.
Вот и всё, наш калькулятор Windows Forms готов! Можно его тестировать!
Если у Вас возникнут вопросы или просьбы по данной программе, можете оставить комментарий под этой записью. А исходный код калькулятора можно скачать ниже:
Скачать исходник
This tutorial shows you how to create calculator in visual studio using c# windows form application. This calculator work with +,-,*,/ functions. You can open, run and edit these codes using visual studio. Use the below download link to download all resource of create calculator in visual studio project.
Source codes of this project create calculator in visual studio project
using System;
using System.Collections.Generic;
using System.ComponentModel;
using System.Data;
using System.Drawing;
using System.Linq;
using System.Text;
using System.Threading.Tasks;
using System.Windows.Forms;

namespace SimpleCalculator
{
    public partial class Form1 : Form
    {
        public Form1()
        {
            InitializeComponent();
            btnoff();
        }

        Double answer = 0;
        string cal_operation = "";
        bool oper_pressed = false;
        string fnum = "";

        int number = 0;


        private void operator_click(object sender, EventArgs e)
        {
            Button b = (Button)sender;
            cal_operation = b.Text;
            answer = Double.Parse(display.Text);
            oper_pressed = true;

            display.Text = answer + " " + cal_operation;
            fnum =  answer + " " + cal_operation;

        }

        private void button_click(object sender, EventArgs e)
        {
            if ((display.Text == "0") || (oper_pressed))
            {
                display.Clear();
                number = 0;
            }

            oper_pressed = false;
            Button b = (Button)sender;
            if(b.Text=="." && number<1)
            {
                number++;
                display.Text = display.Text + b.Text;
            }
            if(b.Text!=".")
            {
                display.Text = display.Text + b.Text;
            }

        }

        private void clear_click(object sender, EventArgs e)
        {
            display.Text = "0";
            number = 0;
        }

        private void clear_all(object sender, EventArgs e)
        {
            display.Text = "0";
            answer = 0;
            number = 0;
        }

        private void equal_click(object sender, EventArgs e)
        {

            switch (cal_operation)
            {
                case "+":
                    display.Text = (answer + Double.Parse(display.Text)).ToString();
                    break;
                case "-":
                    display.Text = (answer - Double.Parse(display.Text)).ToString();
                    break;
                case "*":
                    display.Text = (answer * Double.Parse(display.Text)).ToString();
                    break;
                case "/":
                    display.Text = (answer / Double.Parse(display.Text)).ToString();
                    break;
                default:
                    break;
            }
            double ans = double.Parse(display.Text);
            if(ans==(double)ans)
            {
                number = 1;
            }
            else
            number = 0;

        }

        private void button21_Click(object sender, EventArgs e)
        {
            display.Text = "0";
            answer = 0;
            number = 0;
        }

        private void button19_Click(object sender, EventArgs e)
        {
            btnon();
            display.Text = "0";
            answer = 0;
            number = 0;
            display.Enabled = true;

        }

        private void off_Click(object sender, EventArgs e)
        {
            btnoff();
            display.Text = "0";
            answer = 0;
            number = 0;

        }

        private void btnoff()
        {
            button1.Enabled = false;
            button2.Enabled = false;
            button3.Enabled = false;
            button4.Enabled = false;
            button5.Enabled = false;
            button6.Enabled = false;
            button7.Enabled = false;
            button8.Enabled = false;
            button9.Enabled = false;
            button10.Enabled = false;
            button11.Enabled = false;
            button12.Enabled = false;
            button13.Enabled = false;
            button14.Enabled = false;
            button15.Enabled = false;
            button16.Enabled = false;
            off.Enabled = false;
            button21.Enabled = false;
            on.Enabled = true;
            display.Enabled = false;


        }

        private void btnon()
        {
            button1.Enabled = true;
            button2.Enabled = true;
            button3.Enabled = true;
            button4.Enabled = true;
            button5.Enabled = true;
            button6.Enabled = true;
            button7.Enabled = true;
            button8.Enabled = true;
            button9.Enabled = true;
            button10.Enabled = true;
            button11.Enabled = true;
            button12.Enabled = true;
            button13.Enabled = true;
            button14.Enabled = true;
            button15.Enabled = true;
            button16.Enabled = true;
            off.Enabled = true;
            button21.Enabled = true;
            on.Enabled = false;


        }
    }
}
What are the languages, technologies and platform used to develop this system?
C# programming language
Visual Studio IDE
How to use this
You can download create calculator in visual studio project file using the below link.
The goals of providing this project:
- To provide an example for students to develop their own projects.
- helping people create their projects.
- sharing knowledge and codes for educational purpose.
This project is not for:
- You cannot use this project or project source codes for commercial purposes
- You cannot re-upload this project or project source code to web internet or any kind of space.
Copyright © codeguid
Do you need help to remotely set up my any project on your machine or customize any project with your requirement please contact syntech1994@gmail.com
Check more projects>>
C# Projects Free Projects
When learning how to code, it can be useful to gain experience by re-creating apps that already exist. One common beginner app that you can start with is a calculator.
You can create a desktop calculator app using a Windows Forms project in Visual Studio. In a Windows Forms application, you can click and drag UI elements onto a canvas, to visualize the design of your calculator.
You can then add code logic to the underlying C# files to determine what should happen when the user clicks on a number, operator, clear, or equals button.
How to Add UI Elements to the Calculator
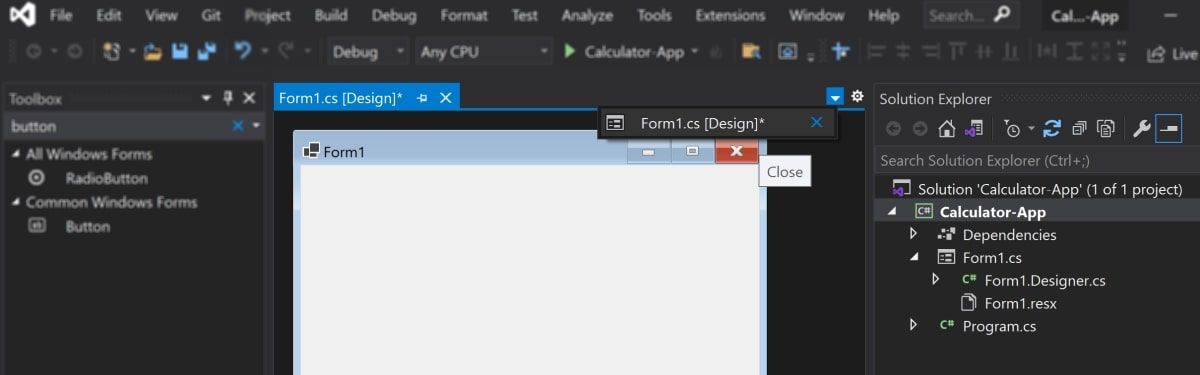
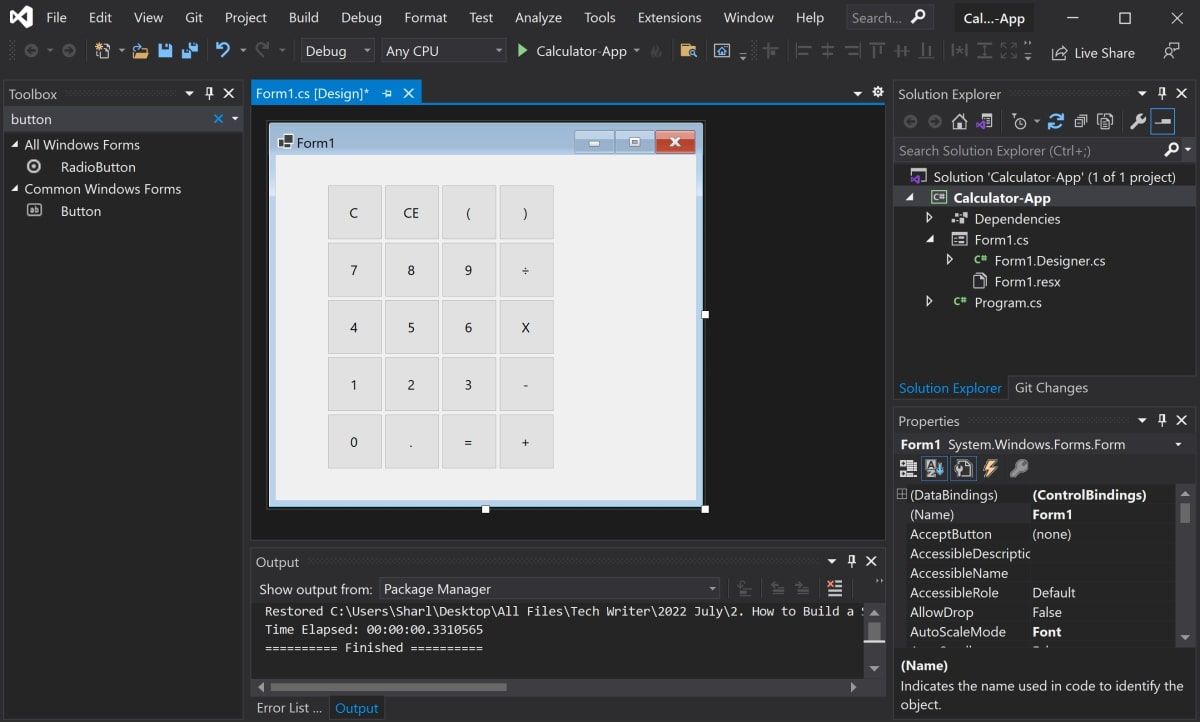
Start by creating a new Windows Form Application in Visual Studio. Then, add UI elements to the canvas to create the calculator’s user interface.
How to Add the Number and Operator Buttons
Add buttons to represent the numbers and operators (+, -, etc.) that the user will click on.
-
Navigate to the canvas, which should be open by default. If it isn’t, click on the .cs file for the form (e.g. Form1.cs). Click the dropdown and switch to design mode.

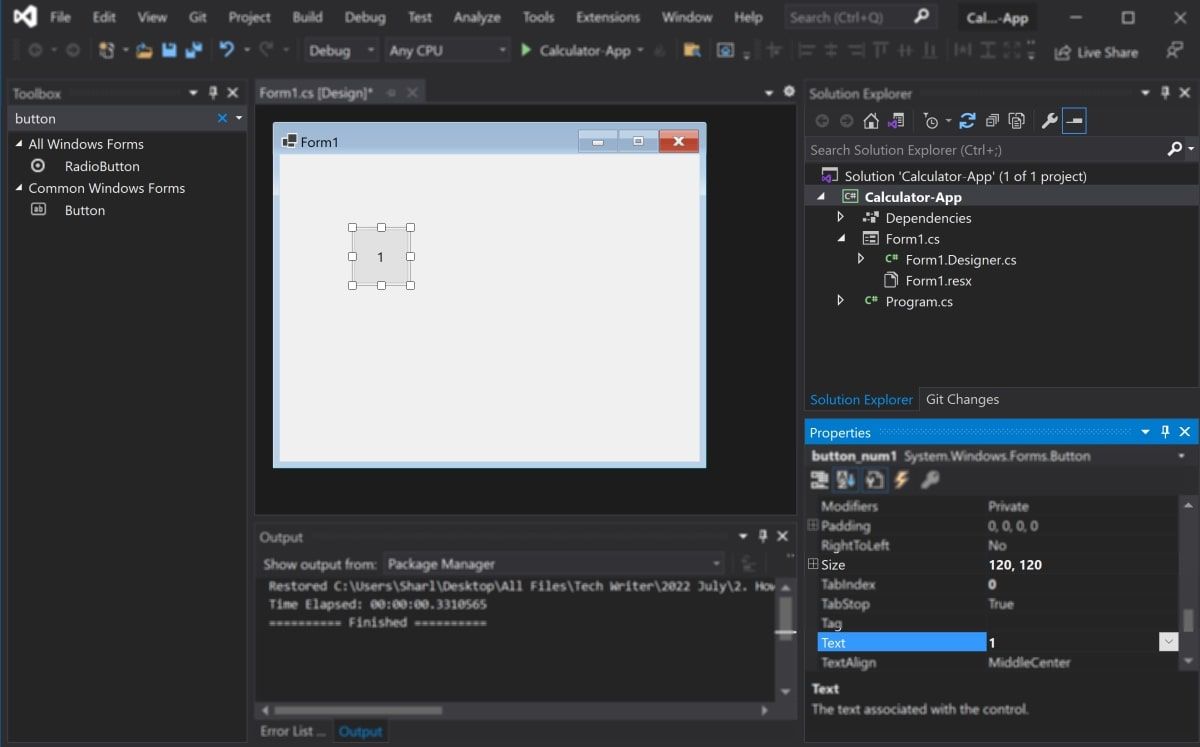
- In the Toolbox, search for a Button UI element. Click and drag a button onto the canvas.
-
Highlight the button. In the properties window, change each of the following button properties to its corresponding new value:
Property
New Value
Name
button1
Size
120, 120
Text
1

- Add 19 more buttons to the canvas to represent the other numbers, operators, and functions of the calculator.
-
For each button, highlight the button and change the text and name property in the property window. Change the values to match the button’s number or function.
Button
Name Property
Text Property
2
button2
2
3
button3
3
4
button4
4
5
button5
5
6
button6
6
7
button7
7
8
button8
8
9
button9
9
0
button0
0
Addition
buttonAddition
+
Subtraction
buttonSubtraction
—
Multiplication
buttonMultiplication
X
Division
buttonDivision
÷
Decimal Point
buttonDecimal
.
Equals Sign
buttonEquals
=
Right Bracket
buttonRightBracket
)
Left Bracket
buttonLeftBracket
(
Clear
buttonClear
C
Clear Entry
buttonClearEntry
CE
-
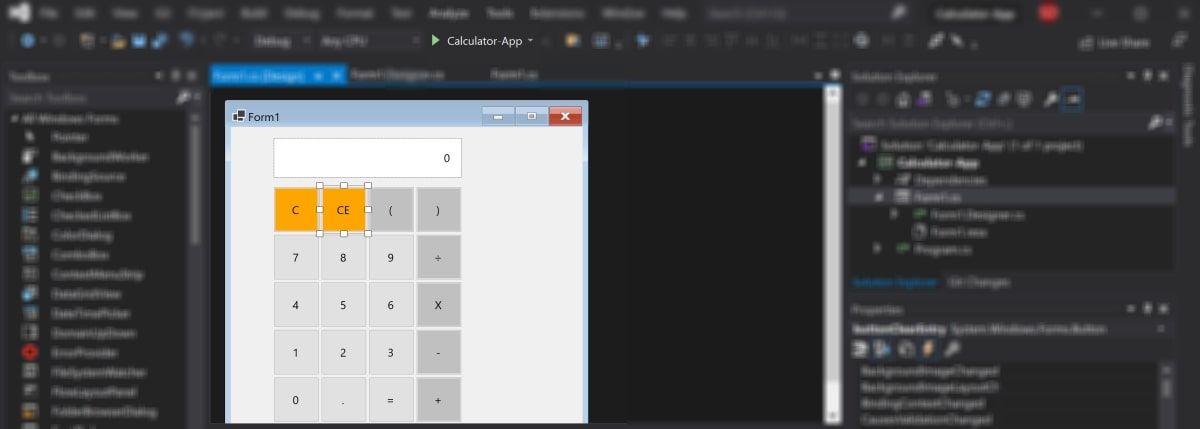
Rearrange the order of the buttons to replicate the look of a standard calculator. Keep all the buttons the same size.

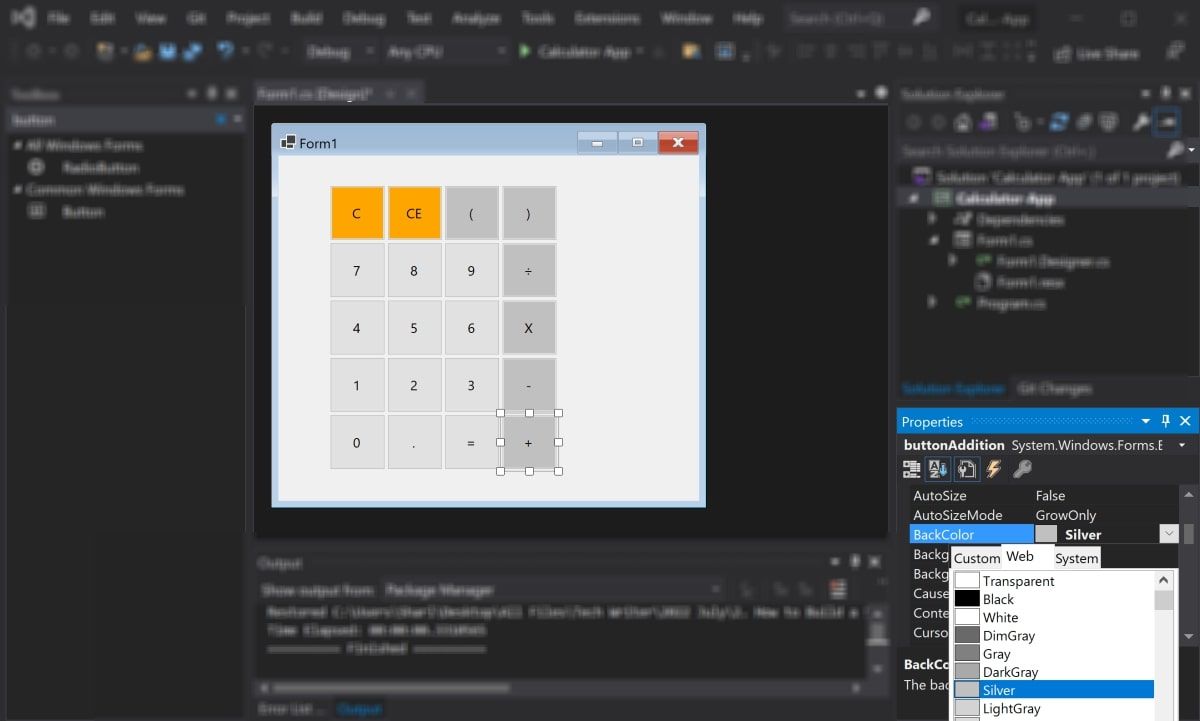
- You can also highlight some buttons and change their color to one of your choice, using the BackColor property in the properties window.
-
For example, highlight the addition button. Go into the properties window and find the BackColor property. Choose Silver from the list of options in the dropdown. You can make operator buttons silver, and the C and CE buttons orange.

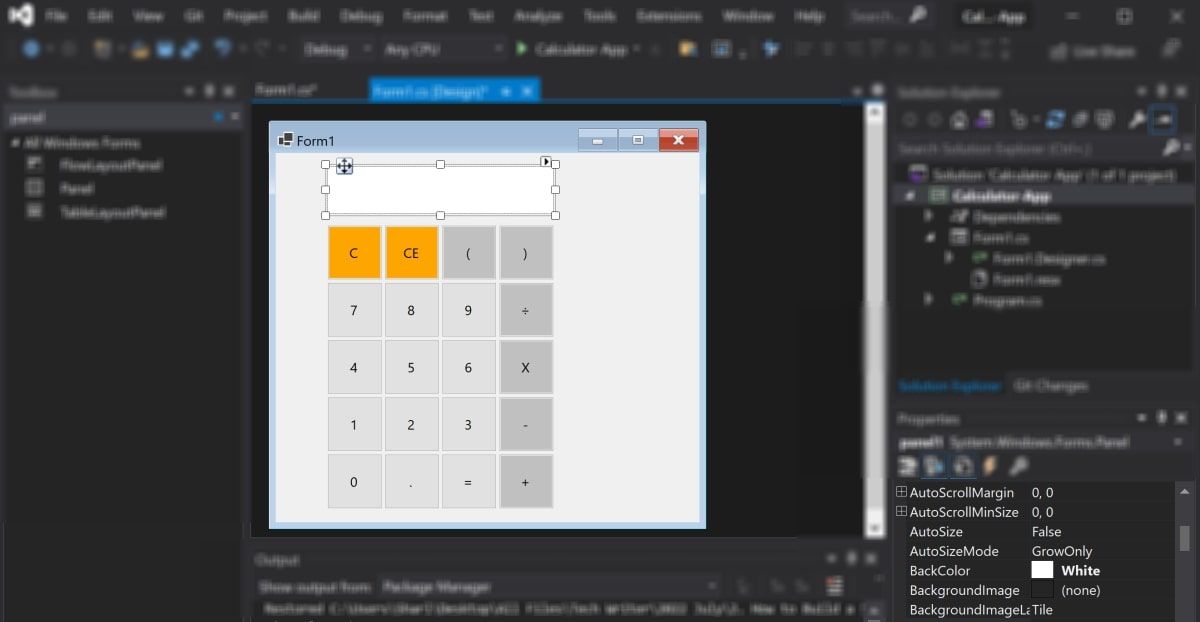
How to Add the Output Result Label
Add a textbox UI element to represent the result that the calculator will display to the user.
- In the Toolbox, drag a Panel UI element onto the canvas.
-
Highlight the panel, and find the BackColor property in the properties window. Change this to white. You can also re-size and re-position the panel to make it look more like a calculator.

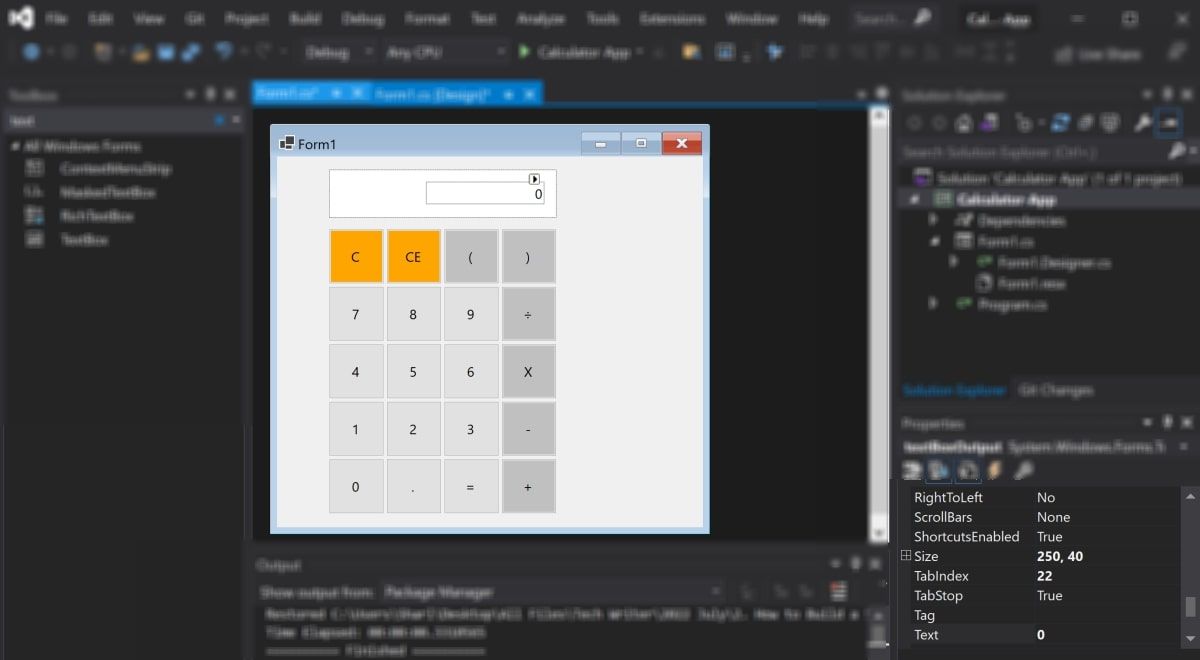
- In the Toolbox, drag a TextBox UI element onto the canvas.
-
Highlight the textbox. In the properties window, change the following properties to the new value:
Property
New Value
name
textBoxOutput
BorderStyle
None
Text
0
TextAlign
Right
Enabled
False
BackColor
White
-
Position the textbox inside the panel.

How to Add the Calculation Logic
Add code to execute the calculation logic when the user clicks on the buttons.
- Open your .cs file for the form (for example, Form1.cs).
-
Declare a variable called currentCalculation, at the top of the class. You can learn how to create classes in C# if you’re not familiar with them.
public partial class Form1 : Form
{
private string currentCalculation = "";public Form1()
{
InitializeComponent();
}
} -
Underneath the constructor, create a new function called button_Click(). This will execute every time the user clicks on a number (0-9) or operator (+, -, X, ÷, etc.) button.
private void button_Click(object sender, EventArgs e)
{}
-
One of the arguments passed to the button_Click() function is the object of the button the user clicks on. Add the text property of the button object to the string calculation. As the user clicks on buttons, this will build a string for the calculation, such as «22+5-7».
private void button_Click(object sender, EventArgs e)
{
// This adds the number or operator to the string calculation
currentCalculation += (sender as Button).Text;// Display the current calculation back to the user
textBoxOutput.Text = currentCalculation;
} -
Go back to the canvas. Highlight each button (excluding the C, CE, and equals buttons) and navigate to the Events window. Find the Click event, and select the button_Click() function. This will trigger the function to execute when you click the button.

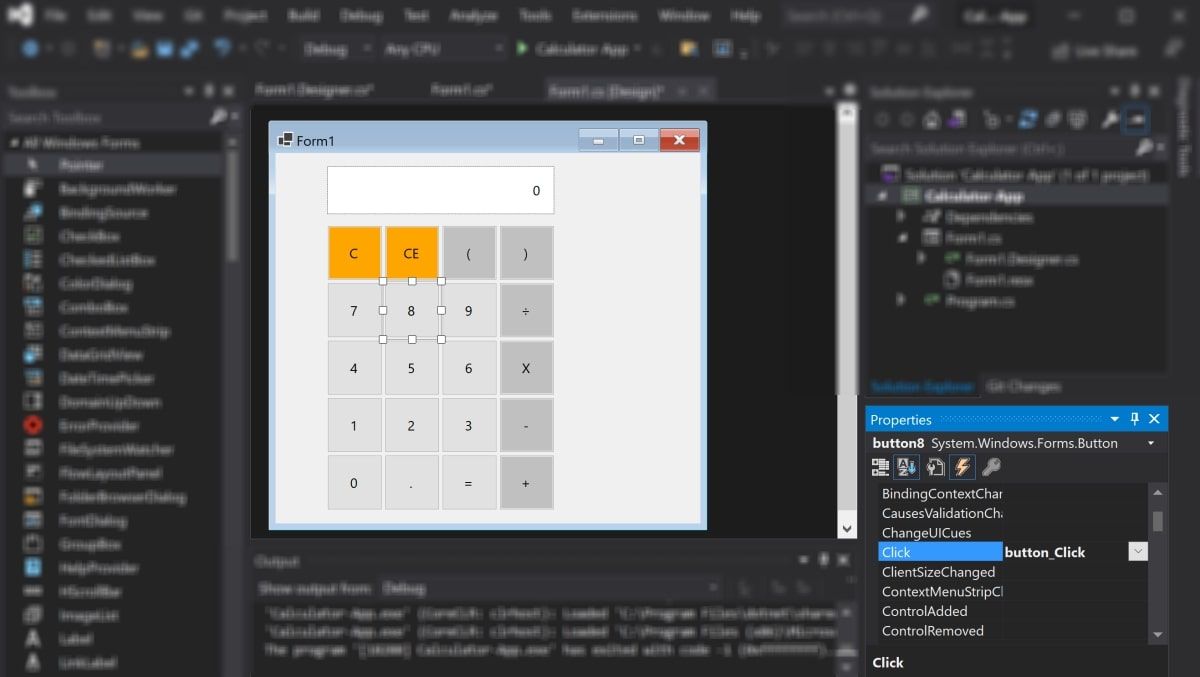
How to Calculate the Result and Display It to the User
Create another function to calculate the final result when the user clicks on the equals button.
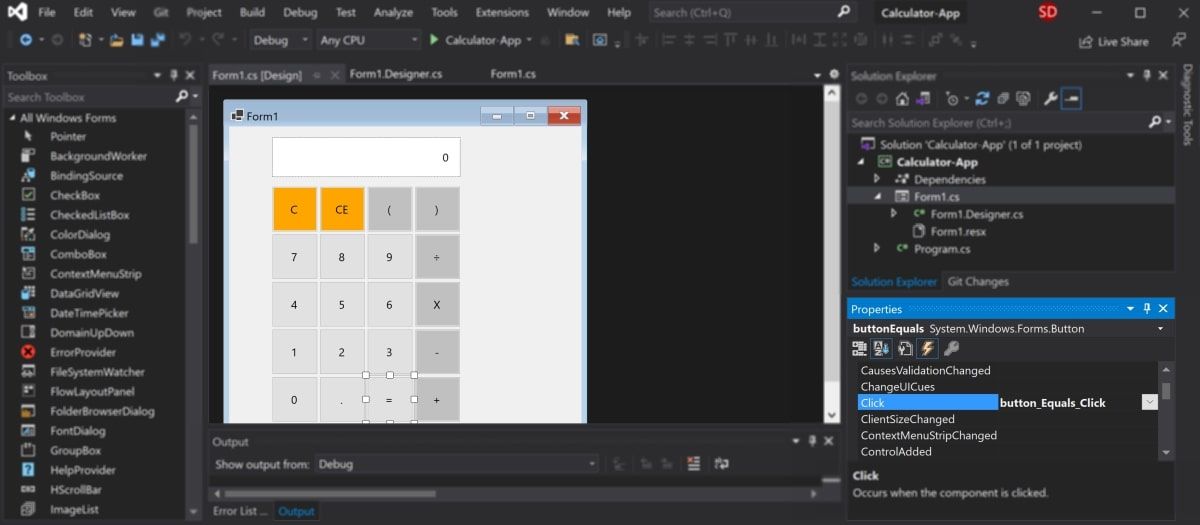
-
Create a new function called button_Equals_Click(). First, you will need to format the string to replace the X and ÷ characters with * and /. Then, use the Compute() function to calculate the result. Display the result back to the user.
private void button_Equals_Click(object sender, EventArgs e)
{
string formattedCalculation = currentCalculation.ToString().Replace("X", "*").ToString().Replace("÷", "/");try
{
textBoxOutput.Text = new DataTable().Compute(formattedCalculation, null).ToString();
currentCalculation = textBoxOutput.Text;
}
catch (Exception ex)
{
textBoxOutput.Text = "0";
currentCalculation = "";
}
} - Make sure you include the try-catch block around the Compute() function to capture any invalid inputs, such as «123++7». In this case, if the user enters an invalid calculation, the result will always return 0.
-
The Compute() function is part of the System.Data namespace. Add the using statement to include it at the top of the class, if it is not already there.
using System.Data; -
Go back to the canvas. Highlight the equals button, and navigate to the Events window. Find the Click event, and select the button_Equals_Click() function. This will trigger the function to execute when you click the equals button.

How to Clear the Calculator
Add the functionality for the C (Clear) and CE (Clear Entry) buttons. The Clear button will completely erase the current calculation. The Clear Entry button will only erase the last entered number or operator.
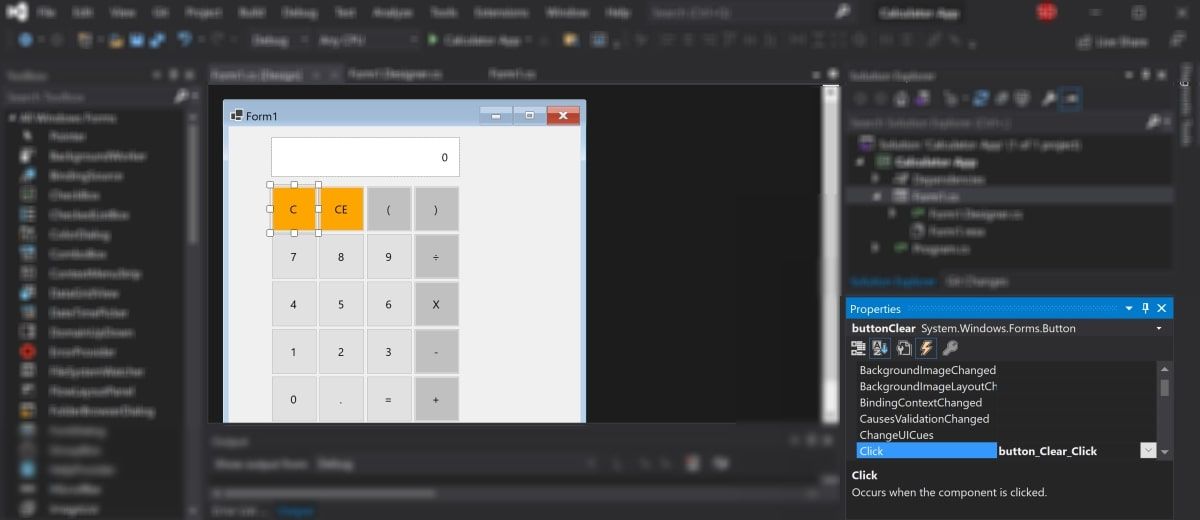
-
Create another function called button_Clear_Click(). This will execute when the user clicks on the Clear button on the calculator. Inside the function, reset the calculation and the value inside the results textbox.
        private void button_Clear_Click(object sender, EventArgs e)
{
    // Reset the calculation and empty the textbox
    textBoxOutput.Text = "0";
    currentCalculation = "";
} - On the canvas, highlight the Clear button, and navigate to the Events Window.
-
Find the Click event. Change the value to button_Clear_Click.

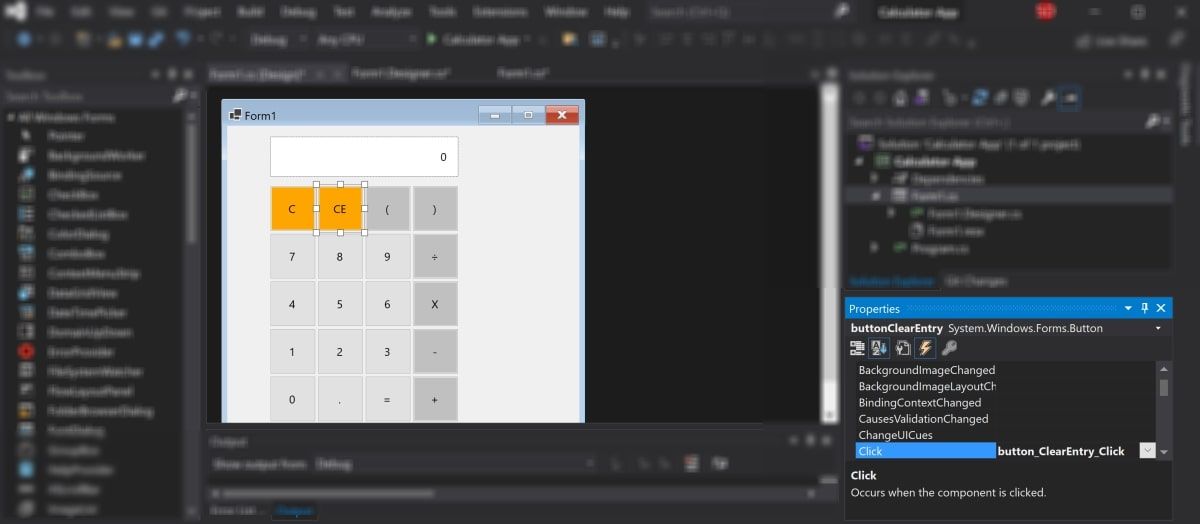
-
Create another function called button_ClearEntry_Click(). This will execute when the user clicks on the Clear Entry button on the calculator. Inside the function, remove the last character from the current calculation string.
private void button_ClearEntry_Click(object sender, EventArgs e)
{
// If the calculation is not empty, remove the last number/operator entered
if (currentCalculation.Length > 0)
{
currentCalculation = currentCalculation.Remove(currentCalculation.Length - 1, 1);
}// Re-display the calculation onto the screen
textBoxOutput.Text = currentCalculation;
} - On the canvas, highlight the Clear Entry button, and navigate to the Events Window.
-
Find the Click event. Change the value to button_ClearEntry_Click.

How to Run the Calculator Application
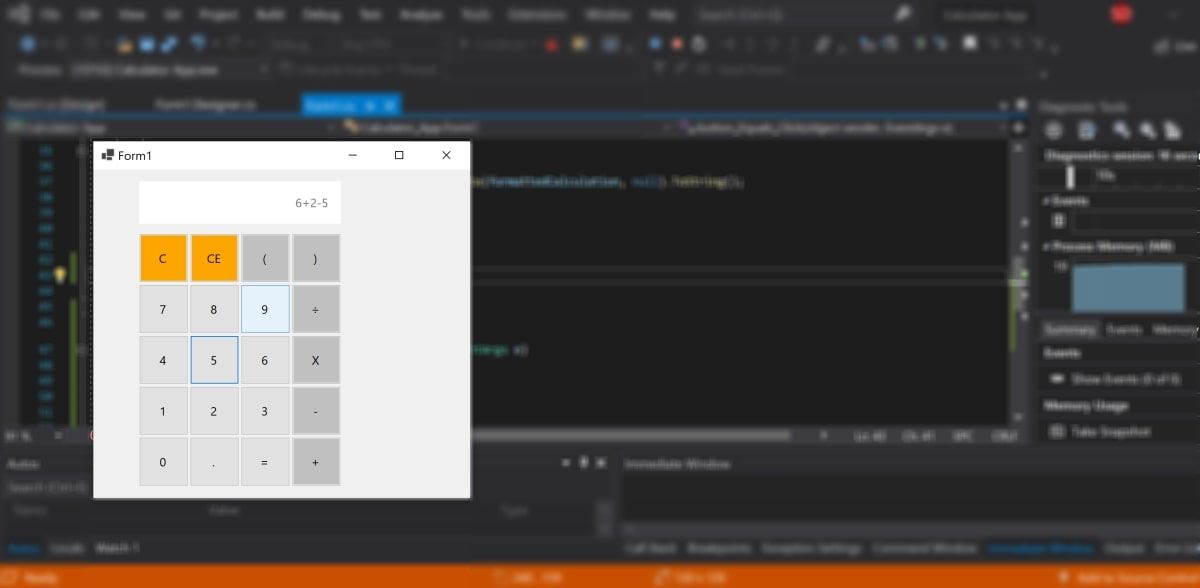
You can run the calculator in Visual Studio to test its functionality.
-
Click on the green play button at the top of the Visual Studio application.

-
Click on the buttons of the calculator. The calculation will show in the white space at the top of the calculator. Pressing the equals button will replace it with the answer. The Clear and Clear Entry buttons will also clear the calculation or entry.

Creating Desktop Applications Using Windows Forms
You can create a desktop calculator app using a Windows Forms project in Visual Studio. Use the canvas and Toolbox to drag and drop UI elements to make up the design of the calculator. Add your code logic and functionality in the C# code behind files.
A calculator is just one of many simple beginner apps that you can make while learning to code. Other beginner apps you can create include converters, file managers, dice games, or flag generators. You can create these from scratch using a Windows Forms application.
В этом видео вы увидите процесс создания приложения на C++
Так же заходи на наш Игровой канал, там Ты сможешь найти Прохождения игр, смешные кооперативы и много чего другого! Ссылка: / @gentlemengames2970
🎵 Track Info:
Track: Seum Dero — Stories
Link: • Seum Dero — Stories
—
Track: Tobu — Seven [NCS Release]
NCS Spotify: http://spoti.fi/NCS
Music provided by NoCopyrightSounds
Watch: • Video
—
Track: Distrion & Alex Skrindo — Entropy [NCS Release]
Music provided by NoCopyrightSounds
Watch: • Distrion & Alex Skrindo — Entropy | H…
NCS Spotify: http://spoti.fi/NCS
On this page of the site you can watch the video online Создание оконного приложения С++ (Калькулятор)/Windows Form/Visual Studio 2019 with a duration of hours minute second in good quality, which was uploaded by the user ChannelOf TwoGentlemen 12 October 2019, share the link with friends and acquaintances, this video has already been watched 57,932 times on youtube and it was liked by 718 viewers. Enjoy your viewing!