
Все способы:
- Способ 1: Активация модуля TPM
- Способ 2: Смена в BIOS режима на UEFI
- Способ 3: Проверка поддержки современного режима ожидания
- Способ 4: Восстановление системы
- Способ 5: Чистая установка ОС с преобразованием типа раздела диска
- Вопросы и ответы: 0
Способ 1: Активация модуля TPM
Для использования безопасной загрузки устройство должно соответствовать аппаратным требованиям, которые обеспечивают безопасность компьютера или ноутбука. Одним из основных условий является наличие модуля TPM 2.0, или доверенного платформенного модуля, обеспечивающего безопасное создание и хранение криптографических ключей. Для начала проверьте, поддерживает ли его ваше устройство, а также посмотрите, активен ли модуль в данный момент. Разберем эти действия по порядку ниже:
- Запустите встроенное средство «Безопасность Windows», введя соответствующий запрос в строку системного поиска.
- Выберите вкладку «Безопасность устройства» и справа нажмите на пункт «Сведения об обработчике безопасности».
- Отобразится новое окно, где следует обратить внимание на строчку «Версия спецификации».
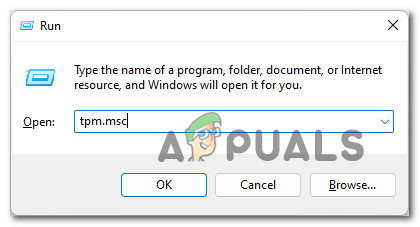
- Если ваше устройство поддерживает модуль TPM 2.0, проверьте, работает ли он. Для этого сначала вызовите диалоговое окно «Выполнить», одновременно нажав на клавиши «Win + R», затем пропишите команду
tpm.mscи нажмите на клавишу «Enter». - Вы увидите оснастку, где в блоке «Состояние» можно посмотреть, включен ли доверенный платформенный модуль.


Если в окне с информацией о TPM 2.0 отображается уведомление, что совместимый модуль не найден, значит, его нужно включить. Делается это через BIOS:
- Зайдите в BIOS вашего компьютера. Алгоритм действий для разных материнских плат ПК и моделей ноутбуков разный, поэтому обратитесь к нашим отдельным руководствам, где разобраны наиболее распространенные варианты.
Подробнее: Как попасть в BIOS на ноутбуке / компьютере
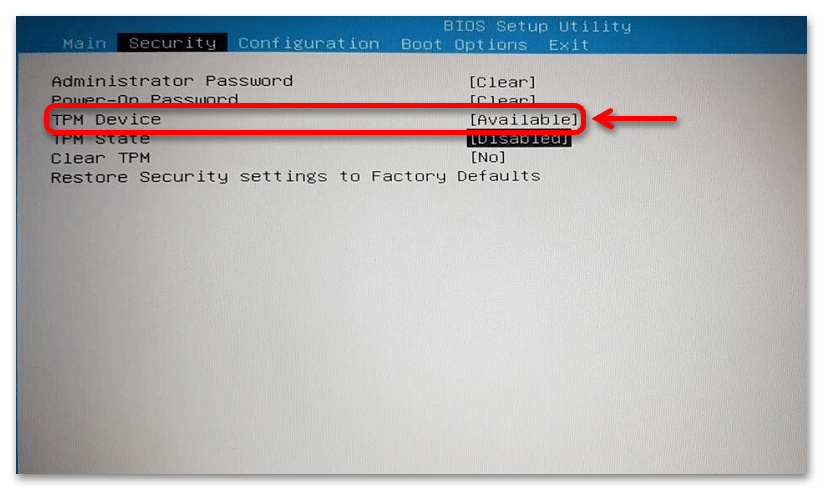
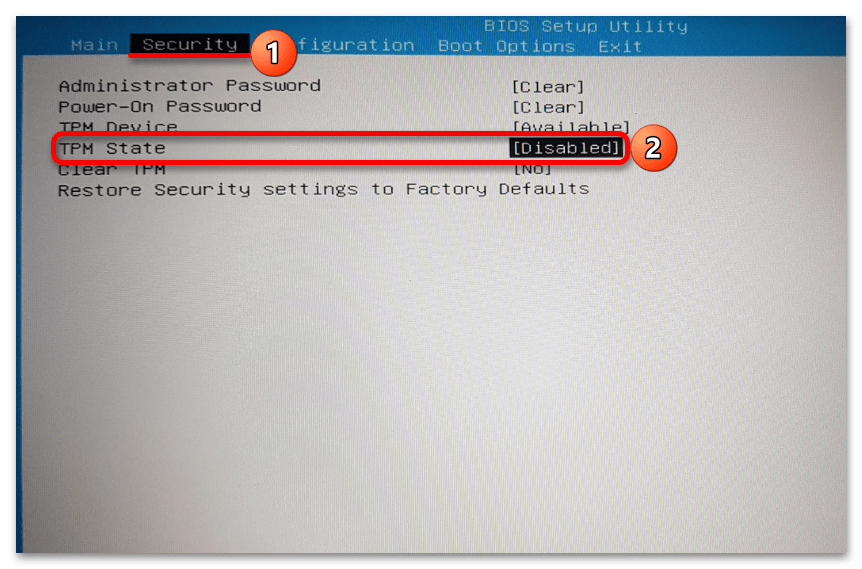
- Перейдите на вкладку «Security» (здесь располагаются настройки безопасности). В окне отыщите опцию, связанную с TPM, – как правило, это «TPM Device». Включите ее, выбрав значение «Available».
- Также следует активировать еще один параметр, который может называться по-разному: «TPM State», «Trusted Platform Module», «Security Chip», «fTPM».
- Переключитесь на вкладку «Exit» и выберите пункт «Save Changes and Exit», чтобы выйти из BIOS, сохранив настройки.

После выхода система загрузится в обычном режиме – проверьте, решилась ли проблема с поддержкой безопасной загрузки.
Способ 2: Смена в BIOS режима на UEFI
Если у вас современное устройство, то почти наверняка оно должно поддерживать UEFI – расширяемый интерфейс, который используется в качестве посредника между встроенным ПО и операционной системой. Нередко проблема с поддержкой безопасной загрузки в Windows 11 связана с тем, что в BIOS выбран не тот режим. Для исправления ситуации попытайтесь сменить Legacy на UEFI, о чем более детально мы писали ранее в отдельном руководстве.
Подробнее: Включение режима UEFI в BIOS

Способ 3: Проверка поддержки современного режима ожидания
Также причиной рассматриваемой проблемы может быть выключенный современный режим ожидания или вовсе его отсутствие. Такой режим представляет собой новый метод управления электропитания, который заменил классический режим пониженного энергопотребления на новых моделях ноутбуков. Узнайте о наличии поддержки режима на вашем ПК и активируйте его при необходимости.
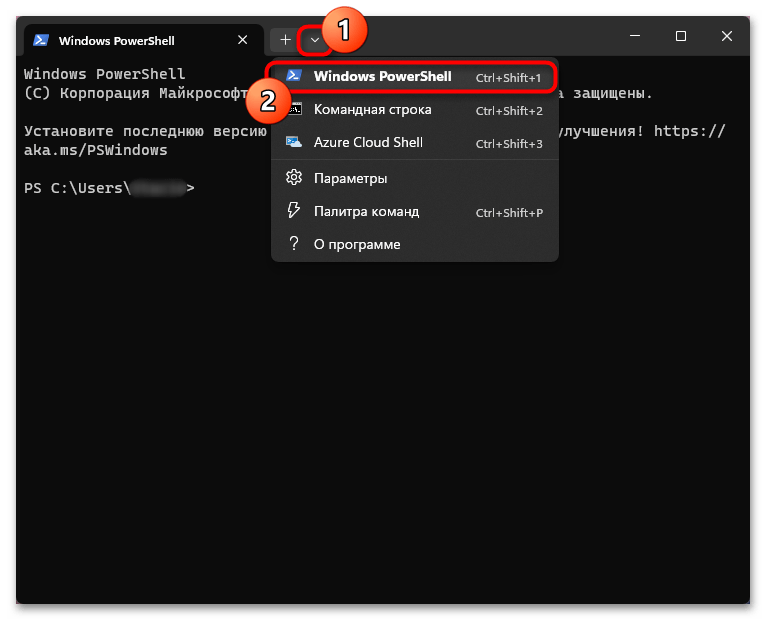
- Запустите консоль «Терминал» от имени администратора. В Windows 11 для этого достаточно щелкнуть правой кнопкой мыши по кнопке «Пуск» и выбрать пункт «Терминал (Администратор)».
- Вызовите дополнительное меню, из которого выберите вариант «Windows PowerShell».
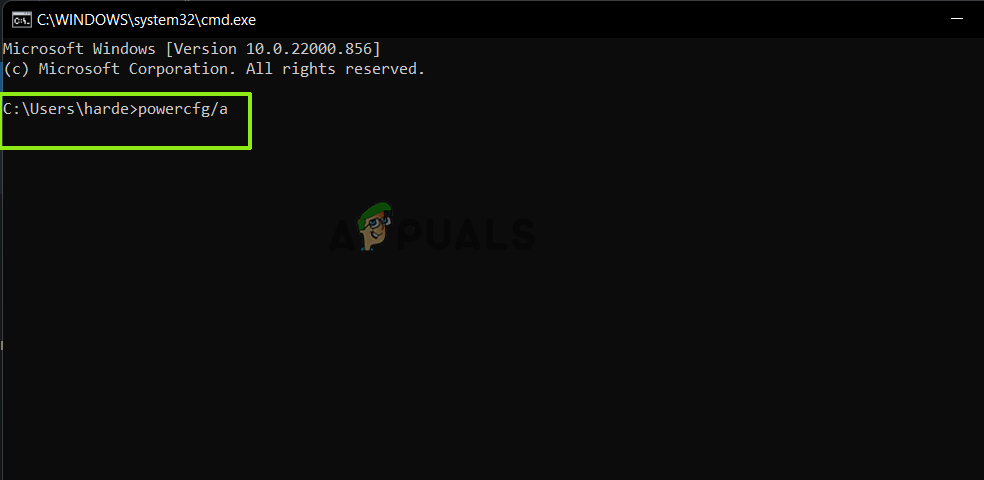
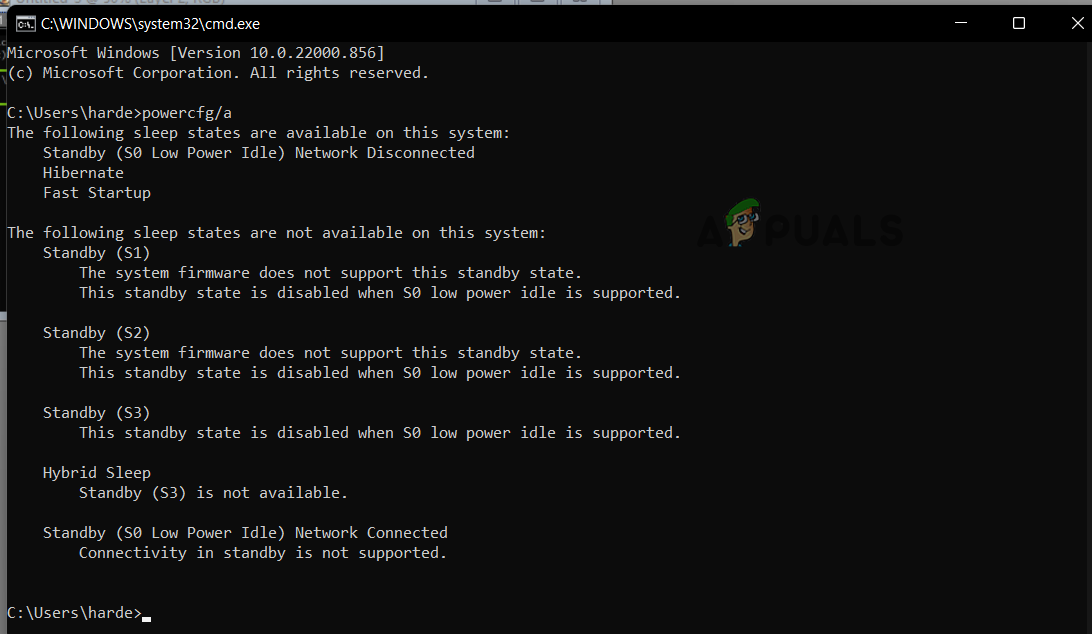
- Используйте команду
powercfg /а, чтобы посмотреть сведения о параметрах питания. Изучите данные – если «S0 для пониженного энергопотребления» отмечен, как поддерживающийся системой, значит, ваш на ПК доступен современный режим ожидания.

Как правило, такая функция встречается лишь у современных лэптопов, и в нашем отдельном руководстве описаны способы включения и настройки электропитания в Windows 11.
Подробнее: Настройка электропитания в Windows 11
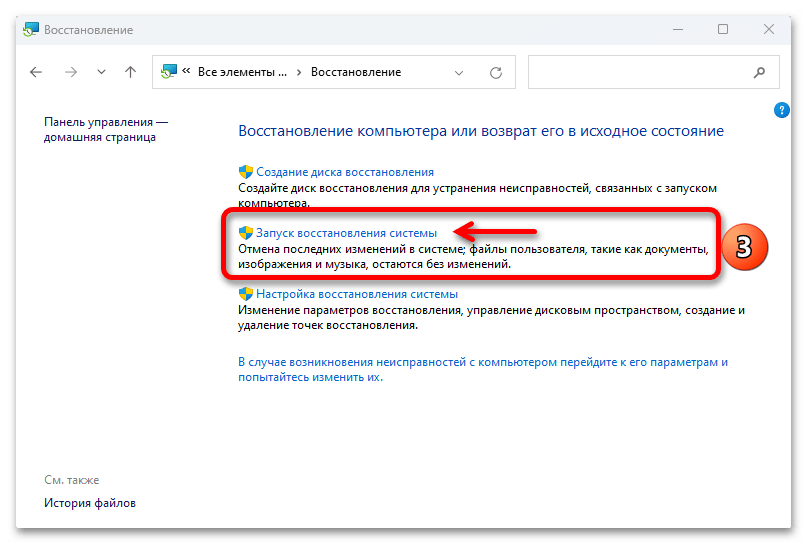
Способ 4: Восстановление системы
В случае если ранее проблем с поддержкой безопасной загрузки не было замечено, тогда есть вероятность, что это случилось в результате каких-либо системных ошибок или конфликта программного обеспечения. При наличии активной функции автоматического создания точек восстановления попробуйте откатиться до предыдущего состояния операционной системы. Чаще всего появившиеся в ходе использования ОС неисправности удается решить именно таким образом. Переходите по ссылке ниже, чтобы узнать, как правильно провести процедуру по восстановлению Windows.
Подробнее: Восстановление системы Windows 11 с помощью точек восстановления
Способ 5: Чистая установка ОС с преобразованием типа раздела диска
Мы уже писали в статье, на которую дана ссылка в Способе 2, о том, что для смены режима в BIOS на UEFI требуется новый стиль раздела диска (GPT). Тем, у кого используется устаревшая версия MBR, сменить режим в БИОС не получится, и также будет появляться ошибка, сообщающая об отсутствии поддержки состояния безопасной загрузки.
К сожалению, исправить такую ситуацию поможет лишь преобразование стиля раздела диска с MBR на более современный GPT. Поскольку том будет конвертироваться, его придется отформатировать, а это приводит к удалению с него всех данных, приложений и настроек. Как правило, смена режима происходит на этапе установки операционной системы с помощью консольных команд или встроенных возможностей инсталлятора.
То есть придется переустановить операционную систему с изменением MBR на GPT, что может быть нежелательным для многих пользователей. Однако порой только этот вариант помогает исправить ошибку с безопасной загрузкой.
Подробнее: Преобразование MBR в GPT при установке Windows 11

Наша группа в TelegramПолезные советы и помощь
Secure Boot is an important security feature designed to prevent malicious software from loading when your PC starts up (boots). Most modern PCs are capable of Secure Boot, but in some instances, there may be settings that cause the PC to appear to not be capable of Secure Boot. These settings can be changed in the PC firmware. Firmware, often called BIOS (Basic Input/Output System), is the software that starts up before Windows when you first turn on your PC.
Note: This article is intended for users who are not able to upgrade to Windows 11 because their PC is not currently Secure Boot capable. If you are unfamiliar with this level of technical detail, we recommend that you consult your PC manufacturer’s support information for more instructions specific to your device.
How to enable Secure Boot on my PC
To access these settings, you can consult your PC manufacturer’s documentation or follow these instructions:
-
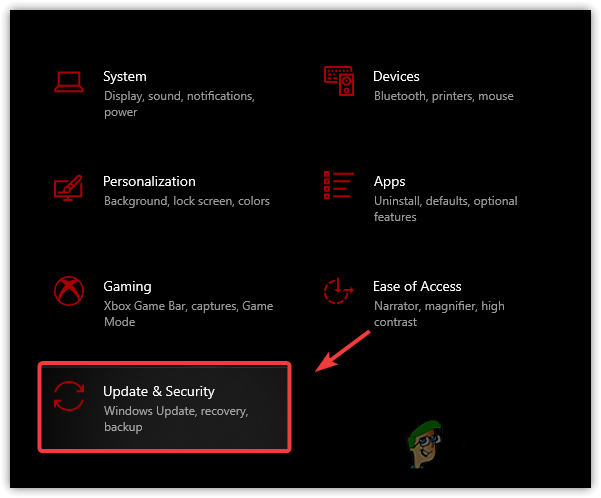
Go to Settings > Update & Security > Recovery and select Restart now under Advanced startup.
-
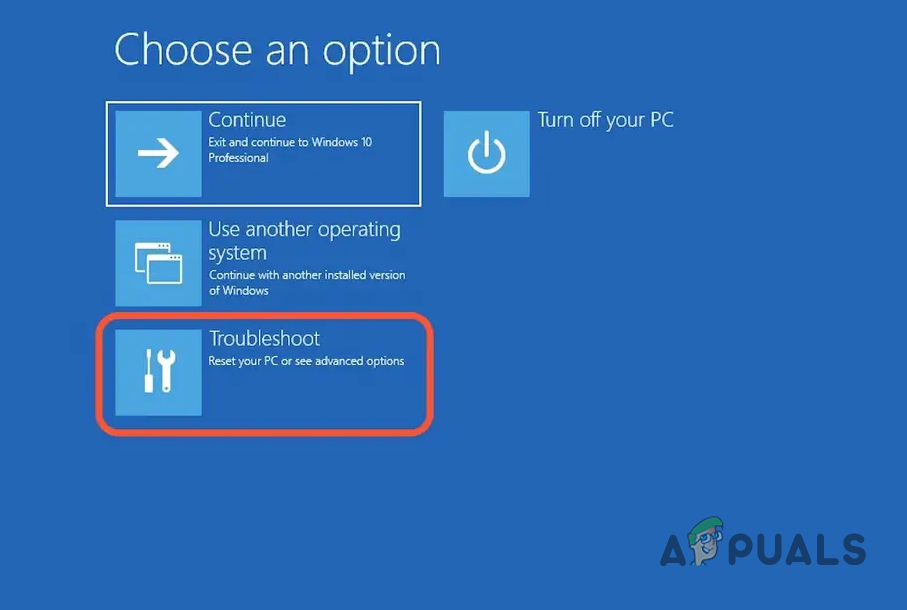
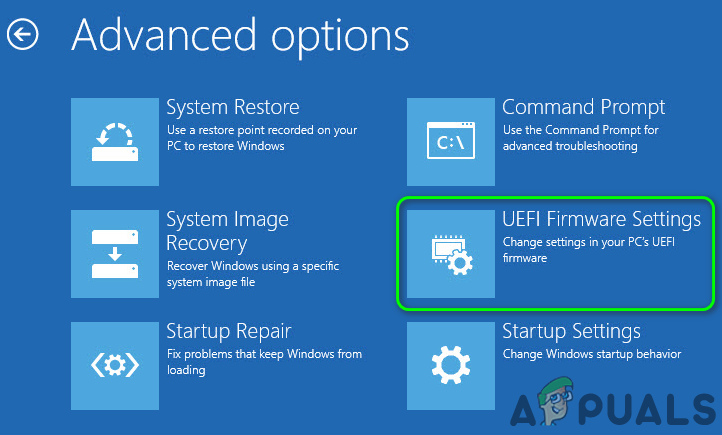
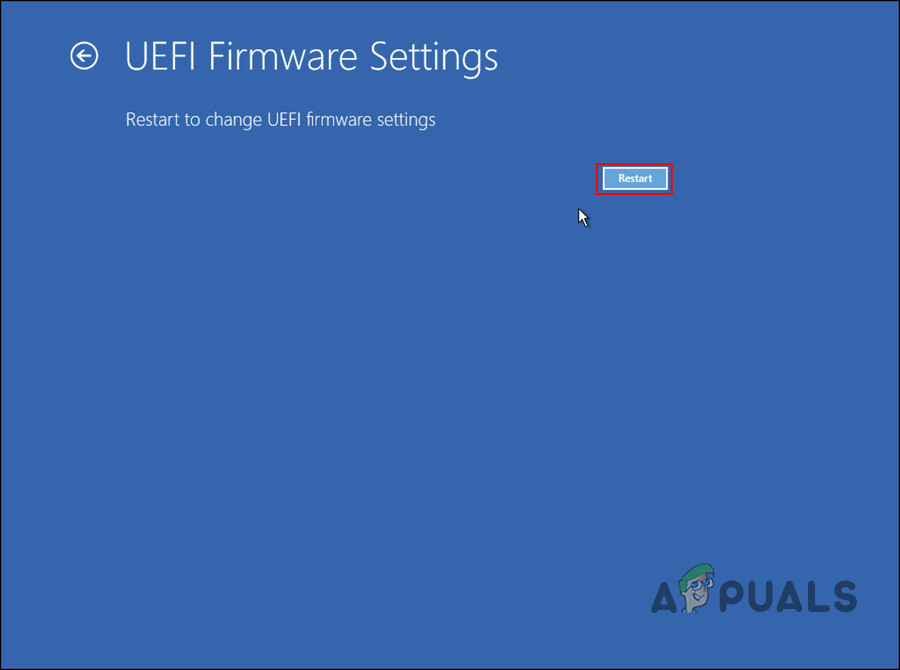
On the next screen, select Troubleshoot > Advanced options > UEFI Firmware Settings > Restart to make changes.
To change these settings, you will need to switch the PC boot mode from one enabled as “Legacy” BIOS (also known as “CSM” Mode) to UEFI/BIOS (Unified Extensible Firmware Interface). In some cases, there are options to enable both UEFI and Legacy/CSM. If so, you will need to choose for UEFI to be the first or only option. If you are unsure how to make any necessary changes to enable the UEFI/BIOS, we recommend that you check your PC manufacturer’s support information on their website. Here are a few links to information from some PC manufacturers to help get you started:
Dell | Lenovo | HP
While the requirement to upgrade a Windows 10 device to Windows 11 is only that the PC be Secure Boot capable by having UEFI/BIOS enabled, you may also consider enabling or turning Secure Boot on for better security.
Related articles
Windows 11 System Requirements
Ways to install Windows 11
Windows help & learning
Need more help?
Want more options?
Explore subscription benefits, browse training courses, learn how to secure your device, and more.
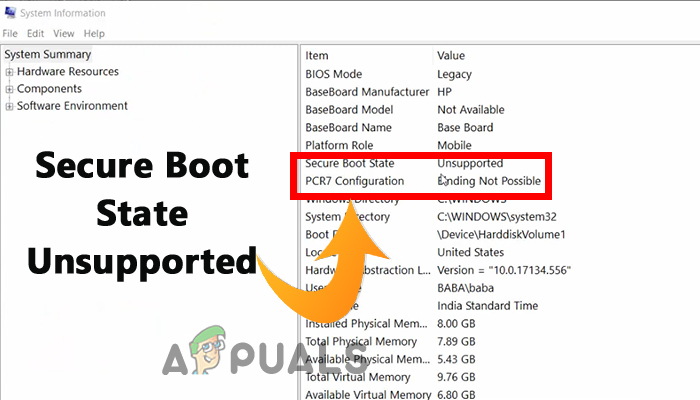
Secure Boot State Unsupported problem is generally seen while looking into the system information panel on the Windows 11 system. The problem appears due to the problem with the Secure boot, and as a result, users cannot enable device encryption on their system. The error is commonly seen on Windows 11 computers.
You can see this message on your Windows screen for several reasons. Here learn some of the most common ones:
- Hardware incompatibility: If your Windows system won’t meet the hardware requirements for enabling Device Encryption.
- Some required features are disabled: In your system, some of the features like Secure boot, TPM Module 2.0, etc. are disabled you are more likely to see this error message. In this case, enabling the secure boot, TPM Module 2.0, and others may help you to solve the problem.
As we know the potential reasons behind the Secure Boot State Unsupported problem, let’s try the troubleshooting methods to fix this problem.
1. Check if your Device Meets the Hardware Requirements for Device Encryption
Before applying any fixes, check if your device supports PCR7 binding or not.
- TPM Module 2.0 (Trusted Platform Module) Enabled.
- Modern Standby support.
- UEFI firmware (legacy BIOS is not supported)
You can also check if your device supports PCR7 binding by just following the steps mentioned below:
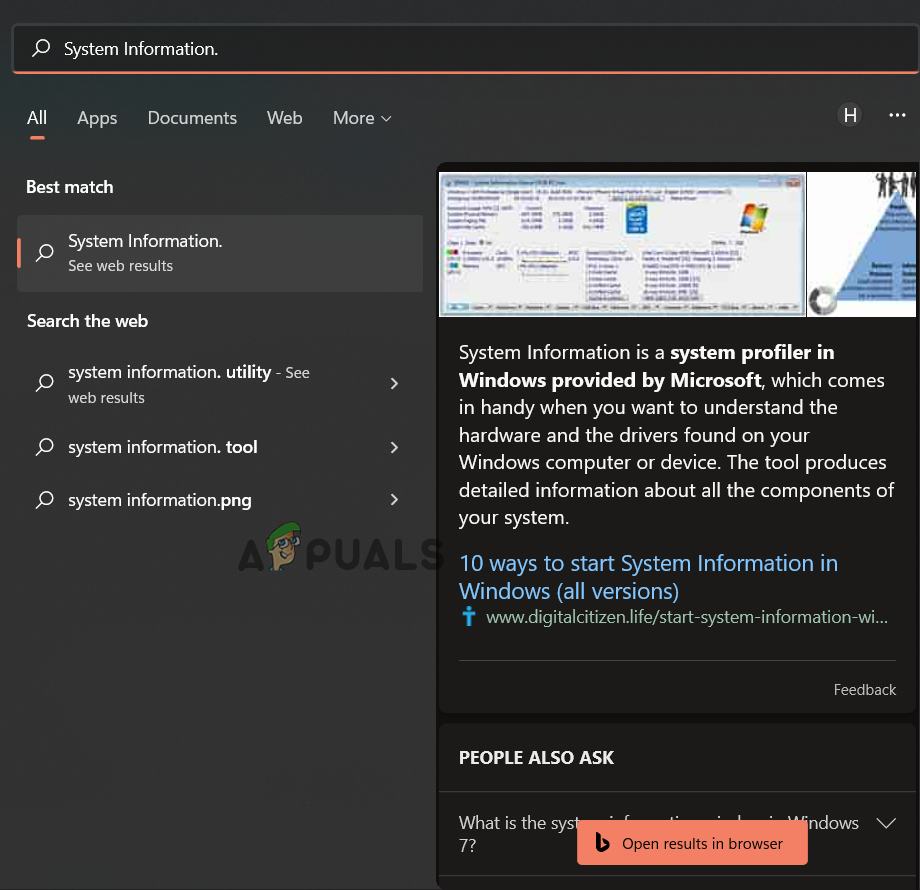
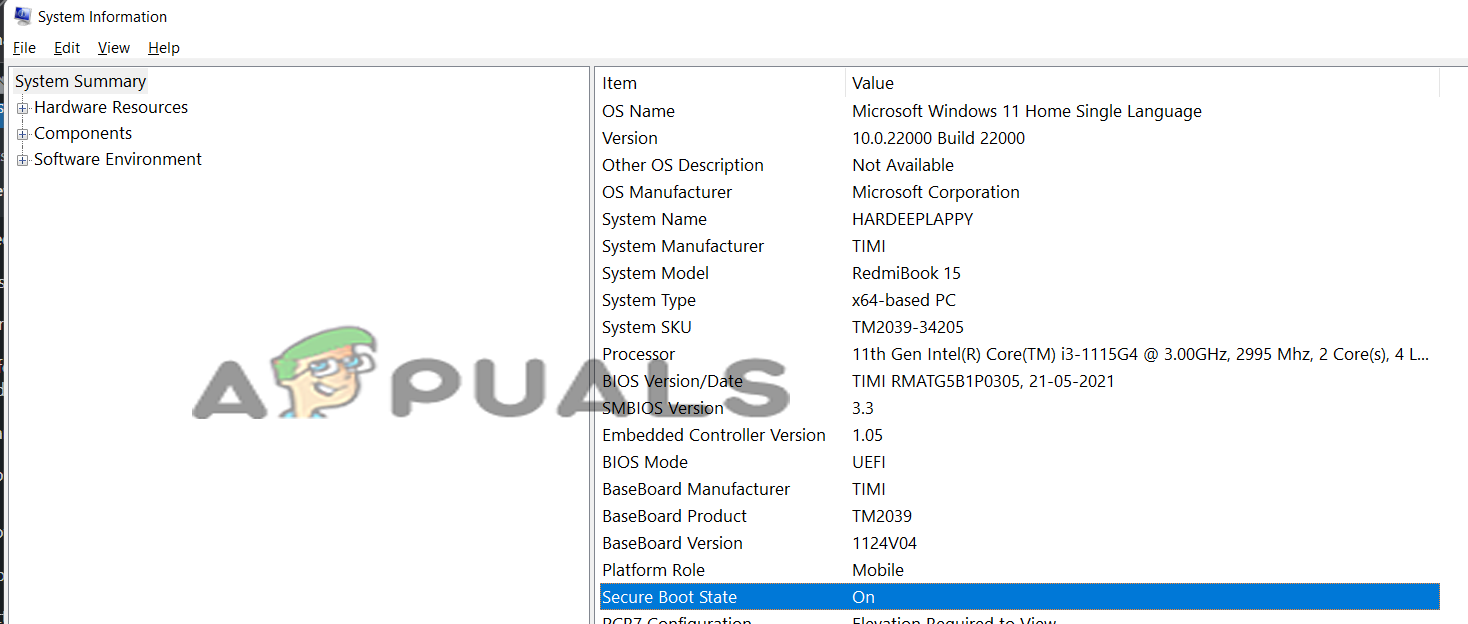
- Click on the Start button, and in the search box, type System Information.

Type System Information in the search box. - Now, click on the System Information app and the Run as administrator option from the list right.
- Then in the UAC pop-up, click on Yes.
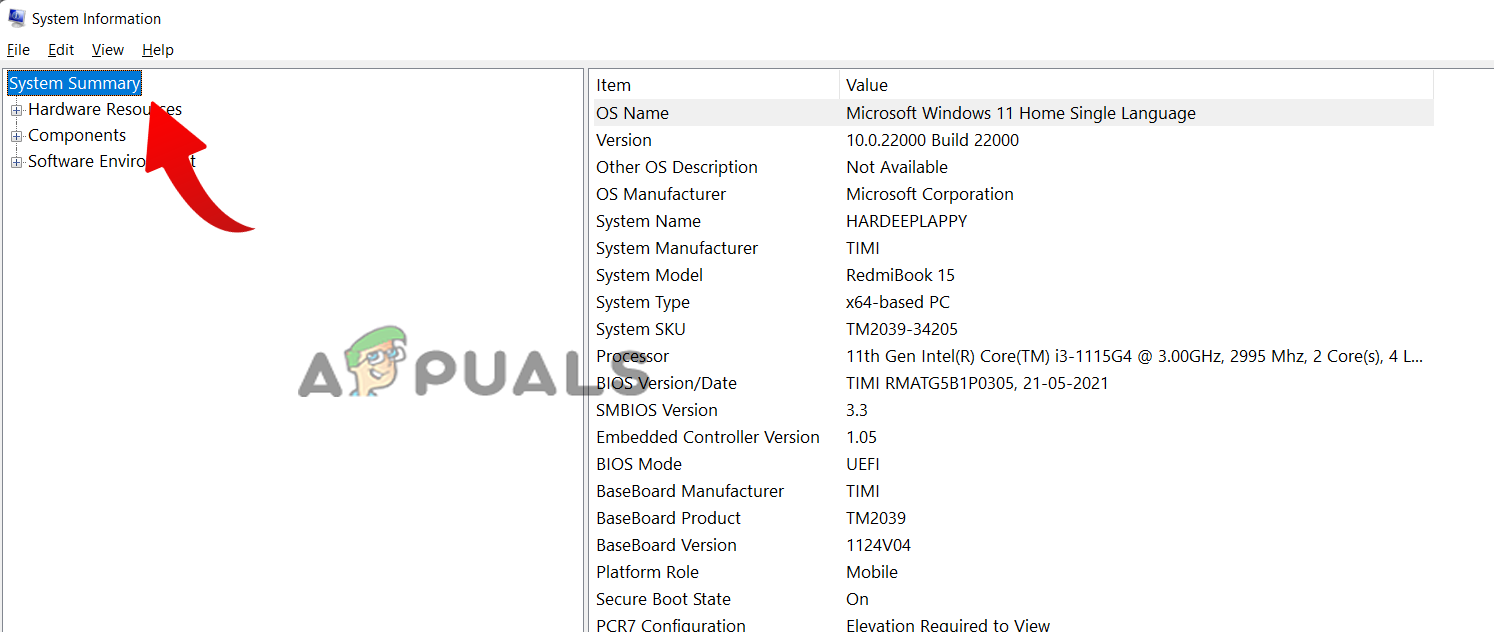
- Then click on the System Summary option available on the left side.

Click on the System Summary option. - Now, if you see Binding is possible besides the PCR7 configuration option, then your device is supported.
But if you see a message “Reasons for failed automatic device encryption: Hardware Security Test Interface failed, and the device is not Modern Standby” besides device encryption support, you need to try the below-given workaround to solve the problem.
2. Check Secure Boot
Secure boot is necessary for device encryption on Windows devices, and if this feature is disabled, you are more likely to see the error message. In this case, you need to enable the secure boot state in the BIOS settings.
Note: Entering into the PC BIOS might differ per your PC brand. Different brands’ PCs have different function keys to enter into the BIOS. It is best to refer to your user manual to learn how to get into the BIOS.
Here follow the steps to do so:
- Click on the Start icon and type System information in the search bar.
- From the results list, right-click on it and click on the Run as administrator option.
- Then click on the System Summary option available on the left side.
Click on the System Summary option. - Now check if the secure boot state is on or not. If not, follow the steps mentioned below to turn it on:

Check if the secure boot state is on. - Restart your device and enter the BIOS menu by pressing F9 or F12.
- Now go to the System Configuration tab and enable the secure boot option.
Boot up your device and check if the issue is resolved or not.
3. Check TPM (Trusted Platform Module)
Like the Secure boot feature, a TPM chip is also required for device encryption, solving the Secure Boot State Unsupported problem. Check if your Windows system has a TPM chip installed or not.
Follow the steps mentioned:
- Press Windows + R on your keyboard to open the run dialog box.
- Now in the run box, type tpm.msc and press ok.

Open up the Trusted Platform Module menu. - If it shows that Compatible TPM cannot be found on this computer, then there is no TPM available on your computer, and if it is showing TPM is ready to use, then your computer has TPM installed. You can also read our guide to fixing TPM device is not detected issue.
4. Change Your BIOS Mode from Legacy to UEFI
Another requirement to run the PCR7 binding properly is that your BIOS should be UEFI, not legacy. So, do check if your BIOS mode is UEFI or Legacy or UEFI by following the instructions given:
- Click on the Start button and type system information in the search bar.
- Now right-click on it and click on the Run as administrator option.
- Then click on the System Summary option available on the left side.
- Now check if your BIOS mode is UEFI or Legacy.

Check your BIOS mode.
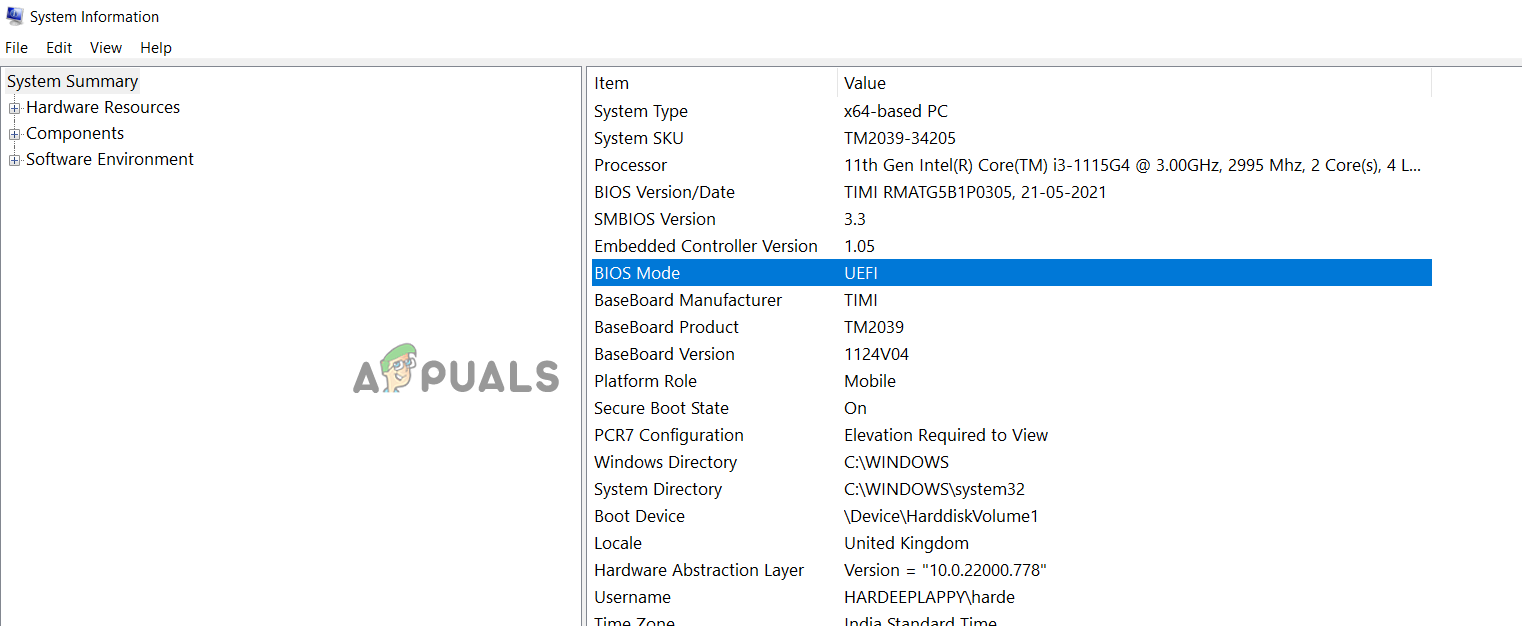
If it is Legacy, follow the instructions given to change it to UEFI
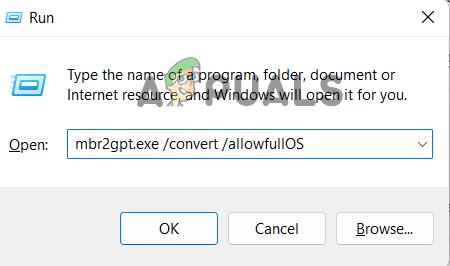
- Press Windows + R key altogether to open the Run dialog box.
- Now in the run box, type mbr2gpt.exe /convert /allowfullOS and press OK.

Type the command in the Run box - Then click the Windows Settings, the Update & Security option, and the Advanced Startup options.

Go to Update & Security - Click on the Restart now option.
- Then in the Advanced Options, choose the Troubleshoot option.

Open the Troubleshoot tab. - Now click on the UEFI firmware settings option, which will take you to the BOOT settings.

Open UEFI Firmware Settings in Advanced Options - Click on the Boot tab, then click the Boot configuration option and set it to UEFI.

Restart to Set it UEFI - Save the changes, restart your PC, and check if the issue is resolved.
5. Check Modern Standby Support
If you can still not use PCR7 Binding, then the Modern Standby Support is the last feature to check if it is enabled. Check that your device supports Modern Standby Support, which should be enabled too. To check if it is supported and enabled, follow the instructions given:
- Press Windows + R key together to open the Run box, and here type cmd and click ok
- Now in the command prompt, type powercfg/a and hit Enter

Type powercfg/a command in CMD - If it shows S0 Low Power Idle Mode, your computer supports the Modern Standby Support feature and is enabled.

Check the Modern Standby Support feature is enabled
These solutions may work for you to fix the Secure Boot State Unsupported problem in Windows 10/11. If you are still facing the problem, ensure your device is compatible with encryption technology.
Also, if your device is not meeting the device encryption hardware requirements, you can switch to a third-party application to encrypt your device.
If none of these methods work for you, you can try to repair install Windows first; if that doesn’t work, clean installing Windows is your best option.
Hardeep Kaur
Hardeep is a passionate technical writer with more than 7 years of experience. She has a keen interest in PC games, Windows OS and everything surrounding it. She is a technology enthusiast and fascinated with technology since her childhood days.
,
If you try to install Windows 11 and you can’t because Secure Boot is Unsupported or Not Available, continue reading below. Microsoft, starting with Windows 8, supports a new security feature called Secure Boot. Secure boot is available on almost all modern computers and is built into the UEFI (Unified Extensible Firmware Interface), to prevent malware from taking over the computer during the boot process.
Windows 7, Vista and XP used to operate in Legacy boot mode (also known as «CSM» Mode), which uses the Master Boot Record (MBR) Partition table.
Windows 8, 8.1 & 10 are designed to operate also in UEFI boot mode, which uses the GUID Partition Table (GPT), in order to take advantage of the advanced features offered by the UEFI, such as the «Secure Boot» security feature.
Microsoft has made secure boot a prerequisite for users who want to upgrade to Windows 11. So, if you get the error «Secure boot is not supported» or «Secure boot is not available», then one of the following is probably happening:
-
- Your computer is set to UEFI boot mode but Secure Boot is OFF (Disabled).
- Your computer is set to Legacy boot mode, which does not support either Secure Boot or GPT partition style.
- Your computer is not UEFI & Secure Boot capable.
In this tutorial you’ll find step-by-step instructions to fix the following problems when you try to install Windows 11:
- Secure Boot is unsupported
- Secure Boot is not available
- Secure Boot is Off
- Related article: How to Install Windows 11 without TPM on Unsupported CPUs.
How to FIX: Secure Boot Unsupported or Off (Disabled) & Cannot Install Windows 11.
Step 1. Check the state of Secure Boot & BIOS Mode.
To know if Secure Boot is On, OFF or Unsupported on your device, follow the instructions below:
1. Press Windows + R keys to open the run command box.
2. Type msinfo32 and click OK to open System Information.

3. On the System Information page, check the BIOS Mode and the Secure Boot Status.
4. Now according your case, proceed as follows:
- CASE A: If the BIOS Mode is UEFI & the Security Boot State is Off, means that your PC boot mode is set to UEFI, but the Secure Boot feature is disabled on your system. At this case skip to Part-1, to enable Secure Boot in BIOS/UEFI firmware settings.

- CASE B: If the BIOS mode is Legacy and the Secure Boot State is Unsupported or Unavailable, go to step-2 below because it means one of the following: *
-
- Your computer supports UEFI boot mode, but it is disabled because it is running in Legacy Boot mode, which does not support Secure Boot and GPT, or…
- …your computer does not support UEFI boot mode, and therefore does not support secure boot (and TPM 2.0, which is required for Windows 11 installation).

Step 2. Find Out if your Computer Supports UEFI.
At this point and before continuing further, you must ensure that your device supports UEFI & Secure Boot by doing one the following:
-
Navigate to the support website of your computer or motherboard manufacturer and check the specifications to see if it supports UEFI boot mode. If yes, proceed to Part-2.
-
Check if the UEFI boot mode is available in BIOS/UEFI settings. To do that:
-
-
Shutdown your PC.
-
Power On your PC and immediately press the DEL or F2, F10, F12 keys to get into the BIOS/UEFI Firmware Settings. (For more specific details on how to get into BIOS settings, visit your computer’s/motherboard’s manufacturer support website).
-
In the BIOS settings, check in Boot Options if you can enable the UEFI boot mode or if you can disable the Legacy support. If you can, then your computer supports UEFI. At this case exit from BIOS settings without saving and proceed to Part-2. If you cannot, then your computer/motherboard does not support UEFI and needs to be replaced. *
-
* Note: The safest way to check if your device supports UEFI is from the manufacturer’s website. Especially for users who want to upgrade their system to Windows 11 the computer must support also TPM version 2.0.
Part 1. Enable Secure Boot in BIOS/UEFI.
If your computer is running in UEFI boot mode but Secure boot is disabled/OFF (Case A), proceed and activate Secure Boot in BIOS/UEFI settings, by using one of following methods:
Method 1: Change Secure Boot State in UEFI/BIOS Settings.
1. As soon as you turn ON the PC, press the DEL or F2, F10, F12 keys to get into the BIOS/UEFI Firmware Settings. (For more specific details on how to get into BIOS settings, visit your computer’s manufacturer support website).
2. Go to Security Options or to Boot Options & Change the Secure Boot to Enabled. *
* Note: If you want to install/upgrade to Windows 11, you must enable also the TPM in BIOS Settings. The TPM can be called (depending on the manufacturer) as: Intel Platform Trusted Module, Intel TPM, Intel Platform Trust Technology, Intel PTT, Security Device, Security Device Support, TPM State, AMD fTPM switch, AMD PSP fTPM.
3. Save and Exit from BIOS settings.
Method 2. Activate Secure Boot in UEFI Firmware settings from Windows RE.
To second way to get into the BIOS/UEFI settings, is by using the Windows Recovery Environment (WinRE) options:
1. Hold down the Shift key and from the Power icon select Restart to boot your system in Windows Recovery Environment (WinRE).

2. Then select Troubleshoot -> Advanced options -> UEFI Firmware Settings and select Restart.

3. Navigate to the System Configuration tab, select Boot Options.

4. In Boot options, Change Secure Boot and select Enabled. *
* Note: If you can’t find the Secure Boot option here, go to the manufacturer’s support website for guidance. (The BIOS/UEFI firmware settings varies among difference computer manufacturers)

5. Save and Exit from BIOS Settings.
6. Restart the PC and open System Information (msinfo.exe), to verify that Secure Boot is On now.
Part 2. Convert DISK to GPT & Enable UEFI and Secure Boot.
As mentioned at the beginning of this article, secure boot is only supported on modern computers where the boot mode of the computer is set to UEFI and the partition table is GPT.
So, if your computer’s boot mode is set to Legacy and the partition table is MBR (Case B), then to enable secure boot, you must first convert the partition schema from MBR to GPT, and then switch from Legacy boot mode to UEFI boot mode.*
* Warning: Before you continue to the steps below, backup your data, to avoid data loss if something goes wrong, and ensure that your device supports UEFI (see step-2 above).
Step 1. Ensure that the current Partition Style is MBR.
Before you convert the partition scheme, first ensure that the partition style on your main disk is MBR and NOT GPT.
1. Press the Windows + R keys to load the Run dialog box.
2. Type diskmgmt.msc and press Enter.

3. Right-click the drive with Windows OS and select Properties.

4. Select the Volumes tab.
5. Now look at the «Partition style» and make sure it is Master Boot Record (MBR). *
* Note: If the Partition style states GUID Partition Table (GPT), you don’t need to proceed to further. Just follow the instructions on Part-1 above to enable the Secure Boot in BIOS.

6. Once you confirm that the partition style is «MBR», proceed to step-2 below to convert the partition style to GPT.
Step 2. Convert MBR partition style to GPT.
Windows Creator Update (1703) or later allows you to convert the partition scheme without losing data. Microsoft designed the MBR2GPT.exe tool for easy conversion and data retention. However, it is safer to convert the partition scheme when Windows is Offline (not running). To do that:
1. Hold down the Shift key and from the Power icon select Restart to boot your system in Windows Recovery Environment (WinRE).

2. Then go to Troubleshoot -> Advanced options -> Command Prompt. (If asked choose an administrator account and type its password to proceed).

3. Type the command below to convert the disk from MBR to GPT and hit Enter:
- mbr2gpt /convert

4. When the process completes, close command prompt and shut down the PC.
5. Proceed to step-3 below.
Step 3. Enable UEFI and Secure Boot in BIOS/UEFI firmware settings.
After converting the partition style from MBR to GPT, the computer will not be able to boot normally until the PC boot mode is changed from Legacy to UEFI. So, proceed as follows before booting to Windows.
1. As soon as you turn ON the PC, press the DEL or F2, F10, F12 keys to get into the BIOS/UEFI Firmware Settings. (For more specific details on how to get into BIOS settings, visit your computer’s manufacturer support website).
2. Navigate to the System Configuration tab and select Boot Options.

3. In Boot options, apply the follow actions:
a. Set the Legacy Support to UEFI or Disabled (This will automatically enable UEFI)
b. Change the Secure Boot to Enabled. *
* Note: If you can’t find the Secure Boot option here, go to the manufacturer’s support website for guidance. (The BIOS/UEFI firmware settings varies among difference computer manufacturers)

4. Save and Exit from BIOS Settings.
5. Boot to Windows and check in System Information to be sure that secure boot is ON. You will also notice that BIOS Mode is UEFI.

6. At this point you can proceed to upgrade your device to Windows 11, if that was the goal you wanted to achieve with these changes.
That’s it! Let me know if this guide has helped you by leaving your comment about your experience. Please like and share this guide to help others.
If this article was useful for you, please consider supporting us by making a donation. Even $1 can a make a huge difference for us in our effort to continue to help others while keeping this site free:
- Author
- Recent Posts
Konstantinos is the founder and administrator of Wintips.org. Since 1995 he works and provides IT support as a computer and network expert to individuals and large companies. He is specialized in solving problems related to Windows or other Microsoft products (Windows Server, Office, Microsoft 365, etc.).