
В этой простой инструкции — два способа получить текстовый список всех программ, установленных в Windows 10, 8 или Windows 7 встроенными средствами системы или с помощью стороннего бесплатного ПО.
Для чего это может потребоваться? Например, список установленных программ может пригодиться при переустановке Windows или при приобретении нового компьютера или ноутбука и его настройке «под себя». Возможны и другие сценарии — например, для выявления нежелательного ПО в списке.
Получаем список установленных программ с помощью Windows PowerShell
В первом способе будет использоваться стандартный компонент системы — Windows PowerShell. Для его запуска вы можете нажать клавиши Win+R на клавиатуре и ввести powershell или же использовать поиск Windows 10 или 8 для запуска.
Для того, чтобы отобразить полный список установленных на компьютере программ достаточно ввести команду:
Get-ItemProperty HKLM:\Software\Wow6432Node\Microsoft\Windows\CurrentVersion\Uninstall\* | Select-Object DisplayName, DisplayVersion, Publisher, InstallDate | Format-Table -AutoSize
Результат будет выдан прямо в окне PowerShell в виде таблицы.

Для того, чтобы автоматически экспортировать список программ в текстовый файл, команду можно использовать в следующем виде:
Get-ItemProperty HKLM:\Software\Wow6432Node\Microsoft\Windows\CurrentVersion\Uninstall\* | Select-Object DisplayName, DisplayVersion, Publisher, InstallDate | Format-Table -AutoSize > D:\programs-list.txt
После выполнения указанной команды список программ будет сохранен в файл programs-list.txt на диске D. Примечание: при указании корня диска C для сохранения файла вы можете получить ошибку «Отказано в доступе», если вам нужно сохранить список именно на системный диск, создайте на нем какую-либо свою папку на нем (и сохраняйте в него), либо запускайте PowerShell от имени администратора.
Еще одно дополнение — вышеописанный способ сохраняет список только программ для рабочего стола Windows, но не приложений из магазина Windows 10. Для получения их списка используйте следующую команду:
Get-AppxPackage | Select Name, PackageFullName |Format-Table -AutoSize > D:\store-apps-list.txt
Подробнее о списке таких приложений и операциях над ними в материале: Как удалить встроенные приложения Windows 10.
Получение списка установленных программ с помощью стороннего ПО
Многие бесплатные программы деинсталляторы и другие утилиты также позволяют экспортировать список установленных на компьютере программ в виде текстового файла (txt или csv). Один из самых популярных таких инструментов — CCleaner.
Для получения списка программ Windows в CCleaner выполните следующие действия:
- Зайдите в раздел «Сервис» — «Удаление программ».

- Нажмите «Сохранить отчет» и укажите место сохранения текстового файла со списком программ.


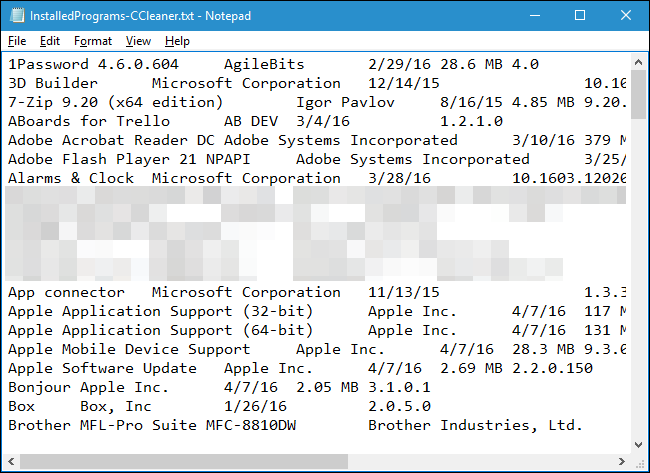
При этом, CCleaner сохраняет в списке как программы для рабочего стола, так и приложения магазина Windows (но только те, которые доступны для удаления и не интегрированы в ОС, в отличие от способа получения этого списка в Windows PowerShell).
Вот, пожалуй, и всё на эту тему, надеюсь, для кого-то из читателей информация окажется полезной и найдет свое применение.
If your Windows operating system fails regularly and you want to reinstall your Windows 11/10/8/7 on your computer or laptop, you may want to note down the currently installed software so you can install it after installing the Windows 11/10/8/7. If you have installed a lot of software and want to reinstall it again after a successful installation of the operating system, there is a way to get the lists of the installed apps in a notepad file. To get the list of the installed apps in Windows 11/10/8/7, we will execute commands in the Command Prompt, which will serve our purpose.
In this post, we will guide you to export a list of installed apps in Windows 11/10/8/7.
To export the installed apps list in a Notepad file, perform the following steps:-
Step 1. Open Command Prompt with the elevated rights.
To open the Command Prompt with administrative rights, press the Windows Logo + R keys to open the Run dialog box. Type cmd in the Run box and press Ctrl + Shift + Enter to open the command prompt with admin rights.
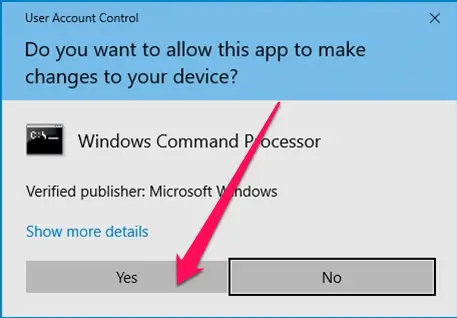
Step 2. If User Account Control (UAC) prompts, click Yes to continue.
Step 3. Command Prompt window with admin privilege opens. Type the following command and press Enter from the keyboard to execute it:-
WMIC
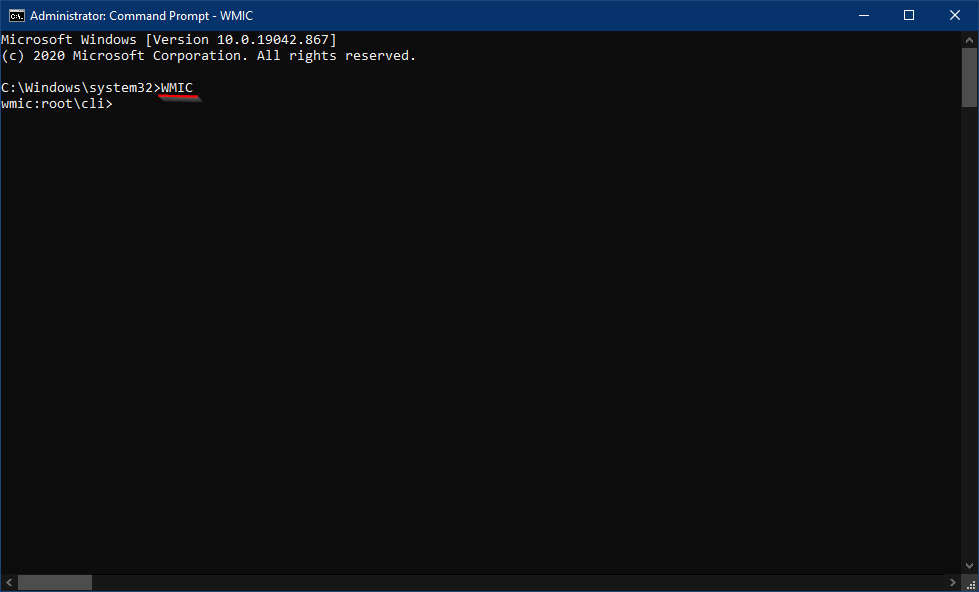
Step 4. Next, type the following and hit Enter from the keyboard:-
/output:C:\InstallList.txt product get name,version

Step 5. Once you execute the above command, you will see a new file in the “C” drive with the name InstallList. Double-click to open and see the list of the installed programs.
Note: If you want to see the output in any other drive, change the path from “C:\InstallList.txt” to “D:\InstallList.txt” or any other drive as you wish.

Once you complete the above steps, you should see a list of installed apps on your computer or laptop.
The above-mentioned procedure works in Windows 11/10/8/7/Vista/XP/2000.
Conclusion
In conclusion, reinstalling the operating system on your computer or laptop can be a daunting task, especially when you have numerous installed apps. However, creating a list of installed apps can make the process a lot easier. By following the simple steps mentioned in this post, you can easily export a list of installed apps in Windows 11/10/8/7 without the need for any additional software. This method works on all Windows operating systems, making it a versatile and convenient option for users. Creating a list of installed apps can save you a lot of time and effort during the reinstallation process, ensuring that you have all the necessary apps installed on your system.
If you own a Windows PC, you’ll likely have a list of go-to software that you use all the time, whether it’s Chrome, Outlook, or Steam. Outside of these favorites, there’ll be other programs you’ve forgotten about or have never even used. That can be problematic—forgotten software takes up disk space and can be a security risk.
We absolutely recommend you properly uninstall programs on Windows that you don’t use, but that doesn’t help you if you don’t know what software you have installed, especially if you’re managing multiple PCs at once. Here are several ways to generate a list of installed programs in Windows 10.

Using The Windows PowerShell (Get-RemoteProgram)
If you want a list of installed programs in Windows 10 that you can export, the best solution is to use a built-in tool to create it. Few tools exist to do this, but one option is to use the Windows PowerShell (or command prompt, if you’re feeling old school).
For those who don’t know, the PowerShell has largely replaced the command prompt as the default terminal on Windows PCs. A script exists for PowerShell users to automatically list all installed programs called Get-RemoteProgram. This queries the Windows registry for a full and complete list of installed software on your PC.
- You’ll need to download the Get-RemoteProgram script for the PowerShell from the Microsoft TechNet website first. Download this, then place the file in your C:WindowsSystem32 folder.

- Next, you’ll need to open a PowerShell window. You can do that by right-clicking the Windows Start menu and pressing Windows PowerShell (Admin) to open a new PowerShell window.
- You’ll need to make sure that Windows can run scripts like this—type Set-ExecutionPolicy Unrestricted to ensure that you can, hit enter, then press A to confirm.
- If that is successful, type Get-RemoteProgram to run the script, then hit enter. If you want to export the list to a file, type Get-RemoteProgram > list.txt instead.

Using The Windows PowerShell (WMIC)
You can use either the PowerShell or cmd to run the Windows Management Instrumentation Command-Line Utility (WMIC) to generate a list of installed programs in Windows 10. As the PowerShell is the default command-line tool for Windows 10 users, we’ll be using that here.
Using the WMIC tool to view or export a list of your installed Windows software will create a similar list to the Get-RemoteProgram script.
- In an open PowerShell window or command line terminal with administrative privileges, type wmic. Once the WMIC prompt opens, type /output:C:list.txt product get name, version then hit enter. You can replace C:list.txt with another file name or output directory.

- Type exit to close the WMIC tool once you’re done. A list of your installed software should be available in the text file at the location you provided for the output file.

Using Print Screen (Apps & Features)
If you want a visual list of your installed software, you could use the print screen key to take a screenshot in Windows of the Apps & Features menu in Windows Settings, where Windows displays a list of your installed software for you to modify or remove.
- To access this menu, right-click the Windows Start menu and press Settings. From here, press Apps > Apps & features. A list of your installed software will be visible in a scrollable list.

It’s unlikely that your installed PC software will fit in just one screenshot. You’ll need to press the PrtScrn button on your keyboard (or use third-party screenshot tools like Snagit), then paste your screenshots into a third-party image editor to save (or into a Word document).
You’ll need to scroll through the list and repeat this step to make sure you save the full and complete list of installed software on your PC.
Using NirSoft UninstallView
NirSoft UninstallView is a quick, third-party alternative that can help you generate a list of installed programs in Windows 10. Like the Get-RemoteProgram script, it will query the Windows registry for a complete list of installed software.
- To start, download NirSoft UninstallView and extract the ZIP file (the 64-bit version is recommended). Once that’s done, run the extracted UninstallView.exe file.
- UninstallView will scan your PC for installed software. Once that process has completed, the full list of software will be available in the UninstallView window. To export the list, press View > HTML Report – All Items.

- A file called report.html will be created in the same folder as the UninstallView.exe file, showing a formatted list of your installed software. Pressing HTML Report – All Items will open this file in your default web browser.

Using Belarc Advisor
Belarc Advisor has been a must-have tool in the arsenal of local PC repair shops for years, and it remains a useful tool for Windows 10 users. It generates a breakdown of your PC software, hardware, settings, installed updates, and more to allow you to fully audit your Windows installation.
Like UninstallView, this will be visible in a formatted HTML file that you can export elsewhere.
- To start, download Belarc Advisor and install it. Once it’s installed, Belarc Advisor will begin an immediate audit of your PC—this will take a few moments to complete.
- Your default web browser will open once Belarc has finished its audit of your PC. To view a list of your installed software, press the Software Versions and Usage link in the side menu, or scroll to that section manually. This file will be available in the C:Program Files (x86)BelarcBelarcAdvisorSystemtmp folder, should you wish to export it.

Using Geek Uninstaller
Geek Uninstaller is a third-party tool for uninstalling software. Like UninstallView, however, it also allows you to view and export a list of your installed programs in Windows 10.
- Download Geek Uninstaller to begin—you can choose the free version or the paid, Pro version. It comes as a ZIP file, so unzip the contents, then run the geek.exe file to launch the tool.
- The Geek Uninstaller window will show your installed software in an alphabetical list. To export the list, press File > Export to HTML or press Ctrl + S on your keyboard.

- Geek Uninstaller will ask you where to save the file—choose a location and a filename, then press Save to save the file.

- The generated list of your installed software will be saved, with the file automatically opened in your default web browser for you to view.

CCleaner (Last Resort Option)
There are plenty of reasons why you shouldn’t download CCleaner anymore. Once a go-to and essential piece of maintenance software for Windows users, many of its core features have been rendered useless or ineffective due to Windows changes, or have been incorporated into Windows itself (or into other, better third-party apps).
CCleaner also suffered a rather unfortunate incident back in 2017, when a malware-injected version of the CCleaner installer was uploaded and installed by millions of users. For most users, the trust is gone and the message is clear—avoid CCleaner.
However, CCleaner can export a list of installed programs, but we’re not going to recommend downloading it to do so. This is a last resort option, but if you already have CCleaner installed, you could use it to generate and export a list of your installed programs. That is, of course, before you rush to remove it.
- To do that, open CCleaner and press the Tools tab on the left, then click Uninstall. At the bottom of the window, press the Save to text file button. This will allow you to export a list of your installed software.

- Choose a location and filename for your exported list, then press Save to save it.

This will export your installed files as a file formatted using tab delimiters. Opening the file using Microsoft Excel will allow you to view the list in a more manageable way.

Removing Or Updating Windows Software
If you prefer to stay organized, or if you have too many PCs to maintain, generating a list of installed programs in Windows 10 can help you find the software you need to remove or update to give you more disk space and improve your security.
If you don’t need to remove it, make sure you find ways to keep your software updated automatically to get the latest security patches and bug fixes. You may end up with software that you just don’t want on your PC, however. If that’s the case, be sure to remove unwanted software from your PC as soon as you find it.
Related Posts
- How to Fix a “This file does not have an app associated with it” Error on Windows
- How to Fix an Update Error 0x800705b4 on Windows
- How to Resolve “A JavaScript error occured in the main process” Error on Windows
- How to Fix the Network Discovery Is Turned Off Error on Windows
- How to Change Folder Icons in Windows
Как составить список приложений, установленных на вашем компьютере

Я думаю, что все наши читатели сталкивались с необходимостью переустановки Windows. Иногда это происходит из-за возникших критических ошибок и проблем, иногда вызвано апгрейдом, иногда продиктовано желанием сбросить весь накопившийся в системе хлам и начать компьютерную жизнь с “чистого листа”.
Сразу после установки новой системы вы ставите необходимые драйвера и системные компоненты, а потом приступаете к восстановлению привычного программного окружения. Для этой задачи вам очень пригодится заранее составленный список приложений, особенно если он насчитывает несколько десятков элементов. Сейчас мы научимся его составлять без ручки и бумаги.
Метод 1. Используем командную строку
Откройте меню Пуск и введите в строку поиска слово “сmd”. Щелкните правой кнопкой по найденному элементу и выберите в контекстном меню Запустить как администратор. В Windows 8 примерно то же самое, только вместо Пуск нажмите кнопку Win на клавиатуре.
Введите последовательно две команды:
WMIC
product get name,version
После непродолжительного ожидания вы увидите в окне список всех установленных в вашей системе программ.
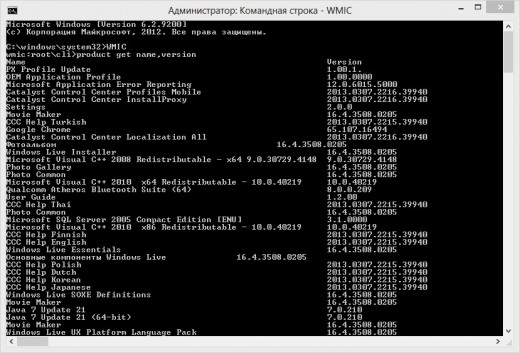
Список программ
Для того, чтобы сохранить этот список в текстовый файл, введите далее следующую команду:
/output:D:\installedapps.txt product get name,version
Теперь вам остается только открыть в файловом менеджере диск D (вы можете, разумеется, указать и другой путь сохранения) и вы увидите там текстовый файл installedapps.txt со списком всех установленных программ.

Список программ
Метод 2. CCleaner
Для тех пользователей, которые еще в детстве получили испуг от черной-пречерной командной строки, есть более простой способ, но требующий дополнительной программы. В ее роли выступит популярная утилита CCleaner, которая установлена практически на любом компьютере. К тому же, этот метод позволяет сгенерировать более полный список вашего программного обеспечения.
Откройте CCleaner и перейдите в раздел Сервис. Здесь вы увидите полный список программ и вам потребуется только нажать кнопку Сохранить отчет в правом нижнем углу, чтобы сохранить его в текстовый файл.
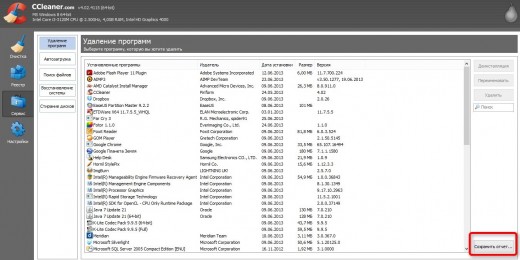
Список программ
После этого вам необходимо выбрать путь для сохранения и имя файла. Созданный таким образом список несет больше информации, чем сгенерированный с помощью командной строки, так как содержит данные о издателе, размер и дату установки.
Фото: Shutterstock
Quick Links
-
The Easy Way: Use a PowerShell Command
-
The No-Command-Line Way: Create a List of Installed Programs Using CCleaner
Reinstalling Windows is a good way to fix serious problems with your computer, or just to get a fresh slate. But before you reinstall Windows, you should make a list of programs you currently have installed on your PC so you know what you want to reinstall on the new system.
Having a list of installed programs is also useful if you just bought a new computer and you want to install the same programs you had on your old computer. Here are a few different methods for doing so on Windows 10, 8/8.1, and 7.
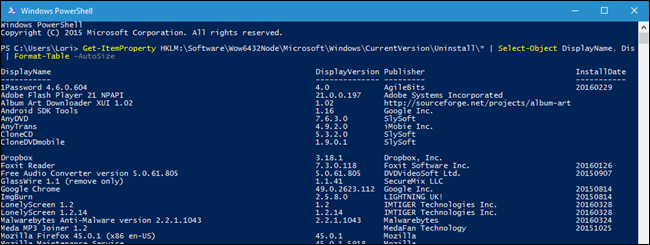
The Easy Way: Use a PowerShell Command
PowerShell is one of the most powerful things built into Windows, so of course it can do something as simple as list your installed programs. In fact, all you need is one command, which you can copy and paste right from this page.
First, open PowerShell by clicking on the Start menu and typing «powershell». Select the first option that comes up and you’ll be greeted with an empty PowerShell prompt.
Copy and paste the following command, pressing Enter when you’re done:
Get-ItemProperty HKLM:\Software\Wow6432Node\Microsoft\Windows\CurrentVersion\Uninstall\* | Select-Object DisplayName, DisplayVersion, Publisher, InstallDate | Format-Table –AutoSize
PowerShell will give you a list of all your programs, complete with the version, name of the developer, and even the date you installed it.
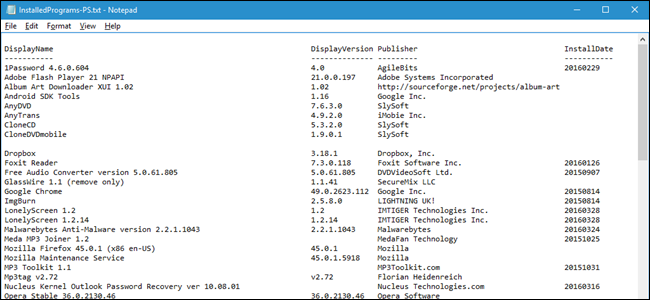
You will probably want to export that to a file though, which is also easy enough. You can just send the output using the > symbol and adding the path to a new text file that you want to create. For example:
Get-ItemProperty HKLM:\Software\Wow6432Node\Microsoft\Windows\CurrentVersion\Uninstall\* | Select-Object DisplayName, DisplayVersion, Publisher, InstallDate | Format-Table –AutoSize > C:\Users\Lori\Documents\InstalledPrograms-PS.txt
Obviously, replace C:\Users\Lori\Documents\InstalledPrograms-PS.txt with the path and name you want to use for your file.
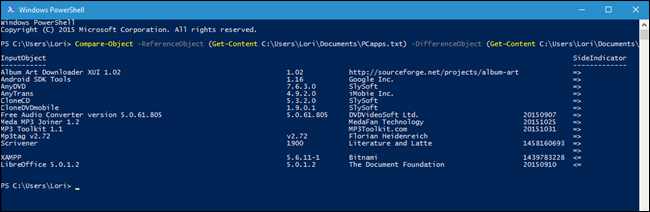
What makes using PowerShell really neat is that if you do this on two different machines, you can easily compare the software installed on them. Just take your two text files and add them to this command:
Compare-Object -ReferenceObject (Get-Content C:\Users\Lori\Documents\PCapps.txt) -DifferenceObject (Get-Content C:\Users\Lori\Documents\LAPTOPapps.txt)
In this example, one text file has programs from my PC, and the other has programs from my laptop. Any entries with a side indicator pointing to the right (=>) mean that the software is installed on my laptop but not on my PC, and any entries with a side indicator pointing to the left (<=) mean that the software is installed on my PC but not on my laptop.
The No-Command-Line Way: Create a List of Installed Programs Using CCleaner
CCleaner is a Windows application designed to free up space on your PC by deleting temporary files and erasing private data, such as your browsing and download history and lists of recent documents in various programs. However, it can also give you a list of all the programs on your computer, which is particularly useful if you already have CCleaner installed (or are very uncomfortable using the command line).
To create a list of installed programs using CCleaner, either double-click on the CCleaner icon on your desktop or right-click on the Recycle Bin and select “Open CCleaner” from the popup menu.
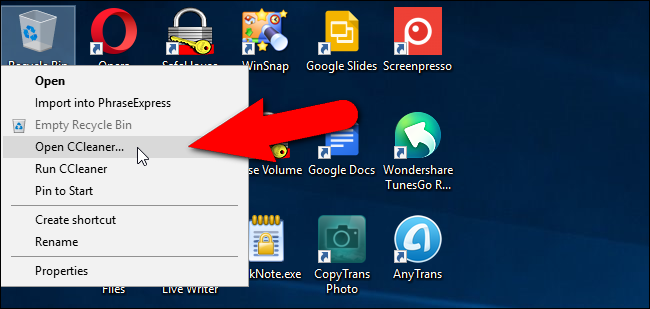
Click “Tools” on the toolbar in the left pane on the main CCleaner window.
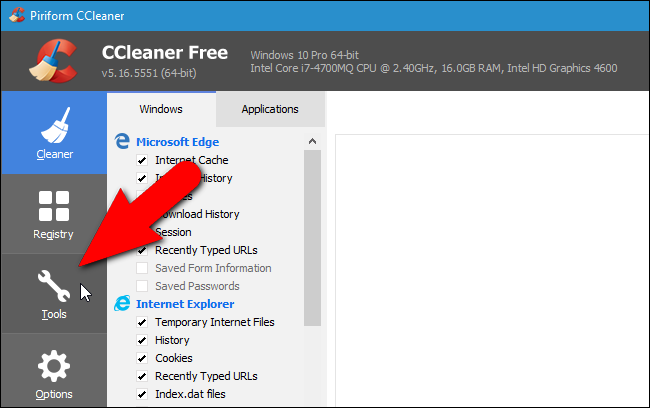
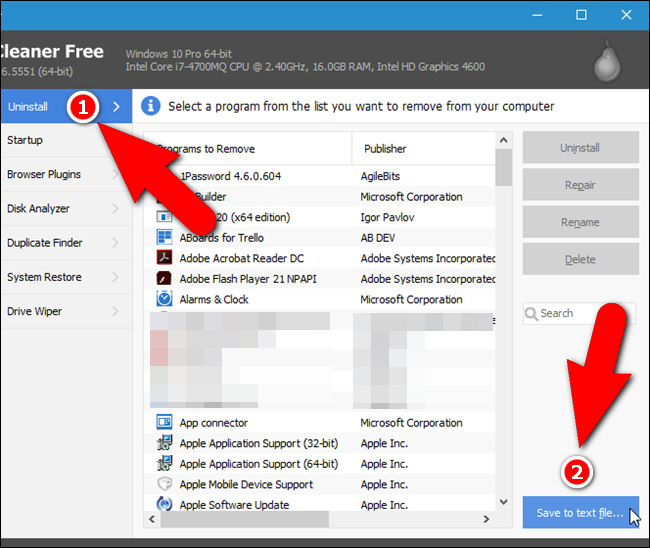
Make sure the Uninstall screen is active. You’ll see a list of programs installed on your PC. You can use CCleaner to uninstall, repair, rename, and delete programs, but you can also save the list of installed programs to a text file by clicking the “Save to text file” button in the lower-right corner of the window.
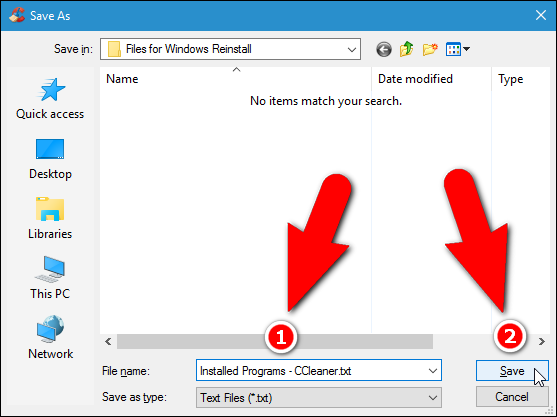
On the Save As dialog box, navigate to where you want to save the text file containing the list of installed programs, enter a name for the file in the “File name” edit box, and then click “Save”.
You now have a list of programs currently installed on your computer.
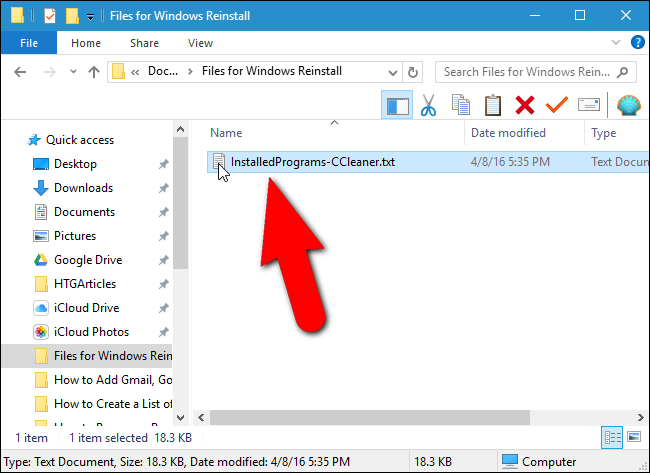
The list of installed programs includes the company, date installed, size, and version number for each program. The text is tab-delimited, which means you can open the text file in Word and easily convert the text to a table to make it more readable. Note, however, if you convert the text file to a Word file, that you will have to install Word on your new or redone PC before you can access your list of installed programs.
Save this text file (or the Word file) to an external hard drive or a cloud service, so you can access it on your new PC or after you reinstall Windows on your current PC.