
Теперь необходимо создать папку, в которую будут сохраняться видеозаписи, и создать локального пользователя для доступа. Можно конечно использовать и свою повседневную учетную запись, но на неё придется обязательно ставить пароль и в случае его смены перенастраивать хранилище, поэтому проще создать отдельную.
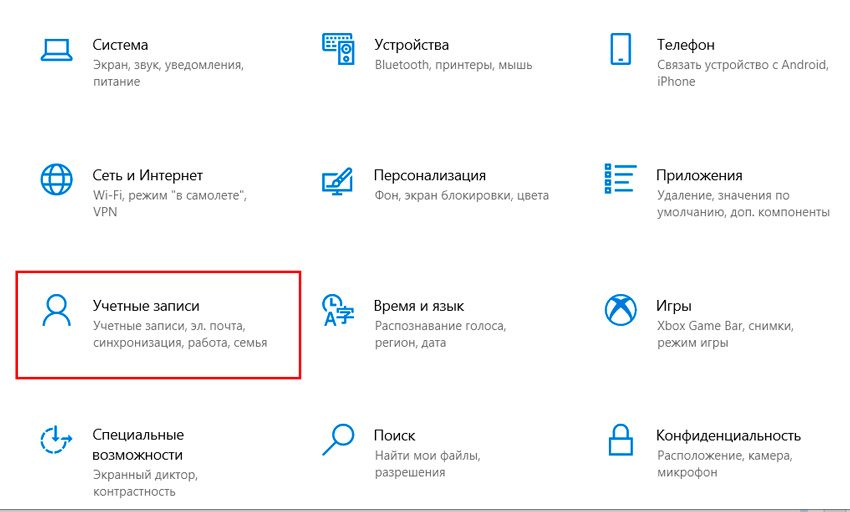
В параметрах находим пункт «Учетные записи»:
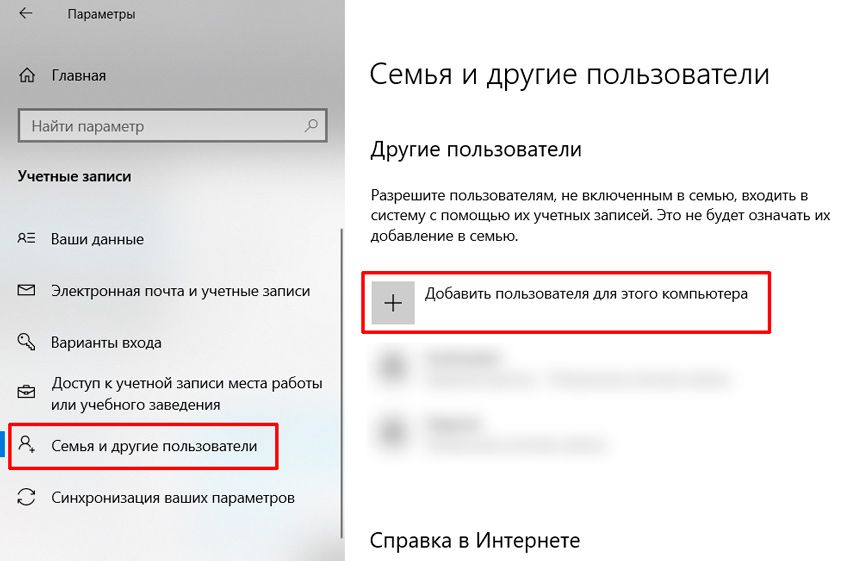
В разделе «Семья и другие пользователи» нажимаем кнопку «Добавить пользователя для этого компьютера»:
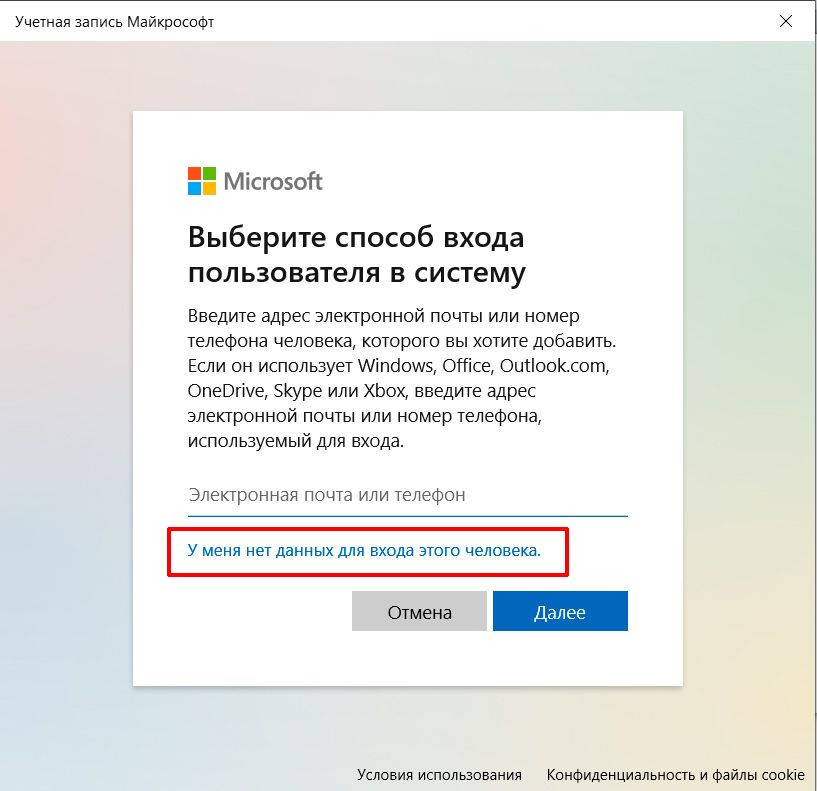
Microsoft будет активно предлагать вам завести облачную учетную запись, но нам такая не подходит. Поэтому сначала выбираем пункт «У меня нет данных для входа этого человека»:
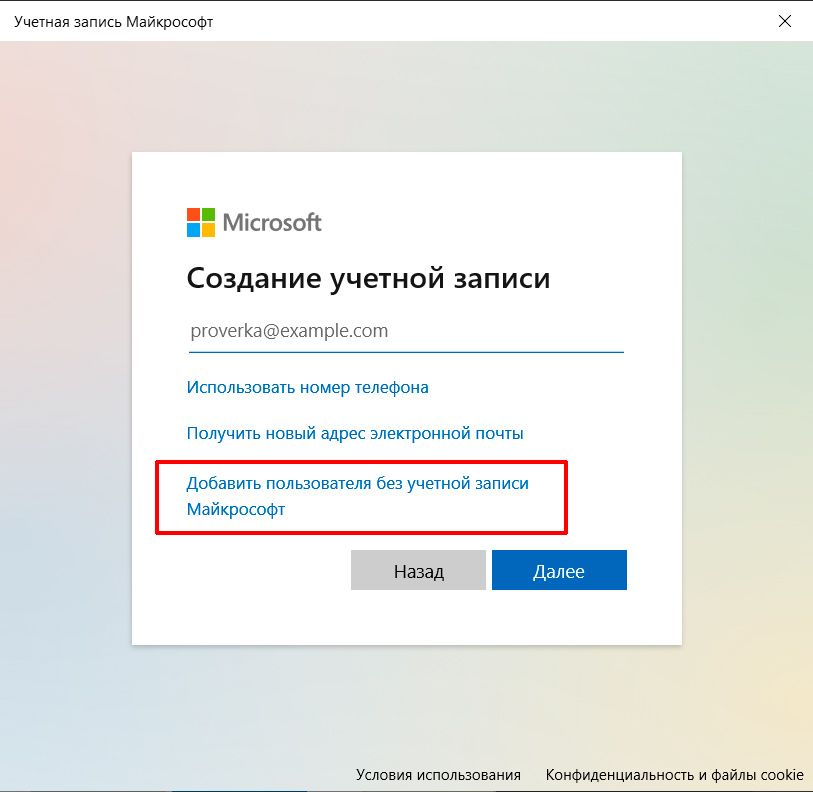
А потом «Добавить пользователя без учетной записи Майкрософт». Это и есть создание локальной учетной записи на Windows.
Вводим имя учетной записи и пароль (пустым оставлять нельзя):
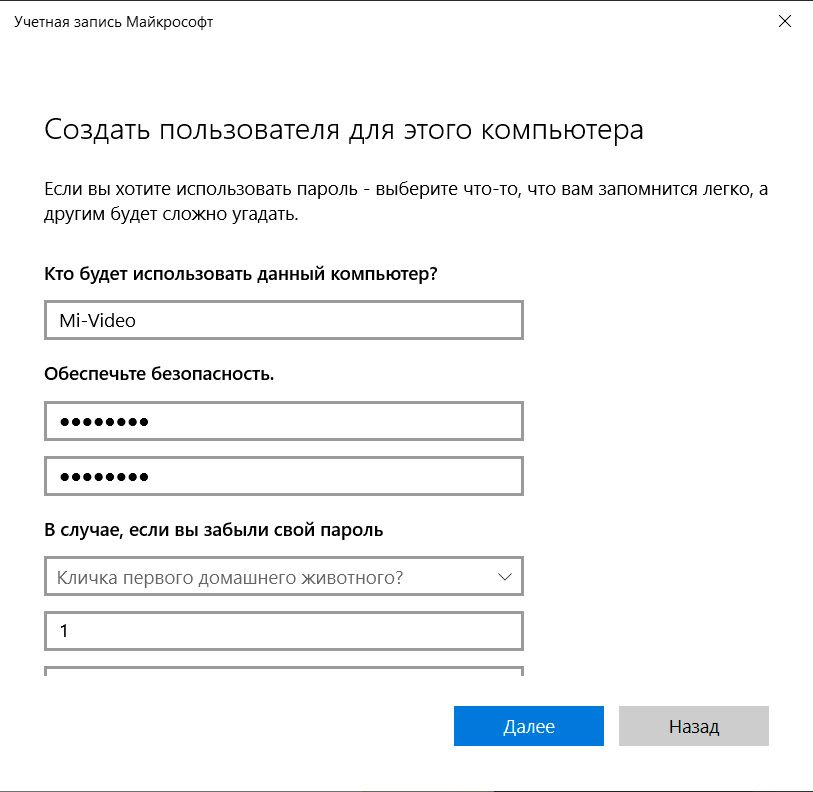
Пользователя создали. Права администратора этой учетной записи не нужны, просто надо правильно дать доступ к папке для записей.
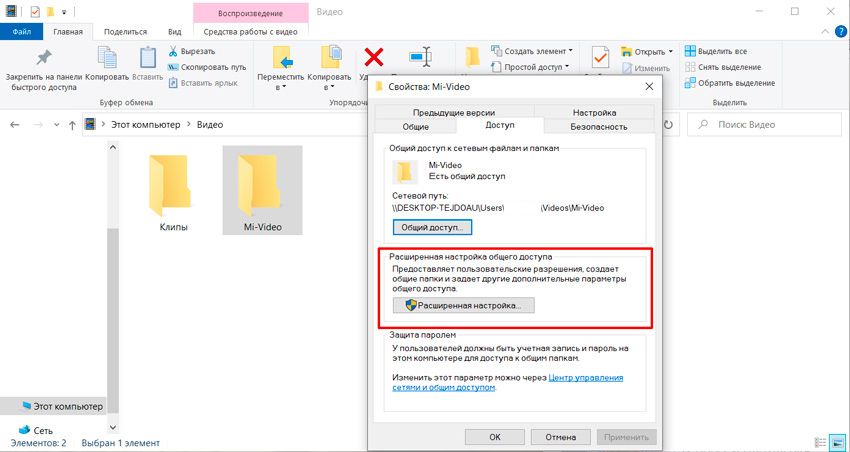
Создаем новую папку, кликаем по ней правой кнопкой мыши и переходим в свойства. Во вкладке Доступ нажимаем кнопку «Общий доступ» и добавляем туда созданную ранее учетную запись (уровень разрешений Чтение и запись).
Потом необходимо дать доступ в Расширенных настройках:
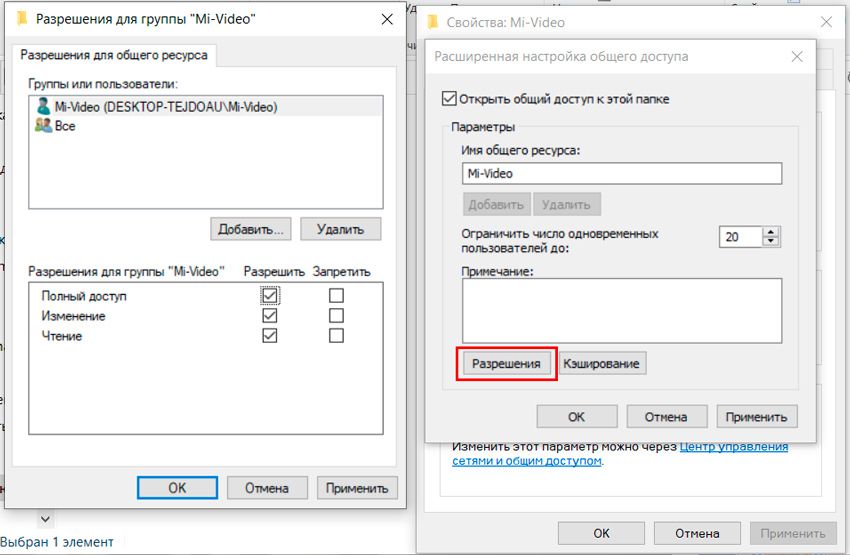
В разделе разрешения добавляем учетную запись с полным доступом:
Готово, остается только привязать хранилище в приложении.
30.01.2022
В экосистеме Xiaomi MiHome уже насчитывается не один десяток Wi-Fi камер. Приобретая такую камеру, перед владельцем сразу возникает вопрос, куда будет происходить запись данных и как все это будет храниться в дальнейшем. Самый простой способ, который предлагает производитель, запись на карту памяти MicroSD, устанавливаемую непосредственно в саму камеру. Но у данного способа есть большие минусы: объем записанных данных, ограниченный размером карты памяти (при заполнении карты данные будут перезаписываться) и кража самой камеры вместе с флешкой (тут уже мы полностью потеряем данные). Имеется конечно и облачное хранилище, где можно оплатить тариф с месячным хранением данных, но в этом случае нужно будет каждый месяц оплачивать облако (бесплатно в облако записываются видео до 15 секунд по автоматизации тревоги), но и в этом способе есть подводные камни. Есть также и третий способ, но не во всех камерах он реализован — это собственное NAS хранилище, о нем и поговорим в данной статье.
Что такое NAS хранилище?
NAS (Network Attached Storage) — сервер для хранения данных. На простом языке — это место (какая-то определенная папка) на жестком диске (SSD, HDD или даже какая-либо карта памяти), которое располагается внутри одной сети с другими устройствами.
Данное хранилище может быть в виде отдельного устройства, подключенного к сети, но в этом случае цена будет значительно дороже. Мы же будет реализовывать NAS на обычном ПК или ноутбуке, который есть практически у каждого. Самой распространенной операционной системой на данный момент является Windows 10, на ней и будем настраивать хранилище.
Как работает?
В нашем случае, видеоролики будут записываться на карту памяти MicroCD, установленной в камеру, а уже с карты данные будут копироваться в NAS хранилище. Все это будет происходить автоматически и не требует дополнительных операций со стороны пользователя.
Подготовка камеры
- Камера должна иметь поддержку NAS хранилища.
- Камера должна быть подключена к Wi-Fi сети, к которой подключен Ваш ПК или ноутбук.
- В камеру должна быть установлена карта памяти MicroSD.
Подготовка Windows 10
Включение протокола SMB
Именно по этому протоколу работает NAS для всех камер Xiaomi, которые поддерживают этот вид хранилища. По умолчанию SMB в Windows 10 отключен, поэтому первым делом включаем его по следующему пути:
«Параметры» (Win+i) > Приложения > Дополнительные компоненты > Другие компоненты Windows. В появившемся окне находим «Поддержка общего доступа к файлам SMB 1.0/CIFS», активируем чекбокс и нажимаем «ОК».


После установки SMB перезагружаем Windows.
Включить сетевое обнаружение
Чтобы камера смогла увидеть наш компьютер по сети, нужно включить сетевое обнаружение в параметрах общего доступа:
«Параметры» (Win+i) > Приложения > Сеть и Интернет > Центр управления сетями и общим доступом > Изменить дополнительные параметры общего доступа > Активировать чекбокс «Сетевое обнаружение».


Пользователь для входа в NAS
Чтобы камера могла зайти и копировать данные в наше будущее хранилище есть одно условие. У пользователя на ПК обязательно должен быть установлен пароль. Варианта тут может быть два:
- У вас на компьютере один пользователь и тот без пароля. Просто задаете ему пароль и в дальнейшем указываете его данные.
Что бы создать пароль для текущего пользователя переходим по следующему пути: «Параметры» (Win+i) > Учетные записи > Варианты входа > Пароль


- Создаем нового пользователя с паролем, который будет использоваться только для Камеры и доступа в NAS хранилище.
Для создания нового пользователя проделываем следующие шаги: «Параметры» (Win+i) > Учетные записи > Семья и другие пользователи > Добавить пользователя для этого компьютера

В появившемся окне нужно нажать «У меня нет данных для входа этого человека».

Теперь выбираем «Добавить пользователя без учетной записи Майкрософт».

Заполняем все поля и нажимаем далее для создания нового пользователя.

Папка для записи видео данных
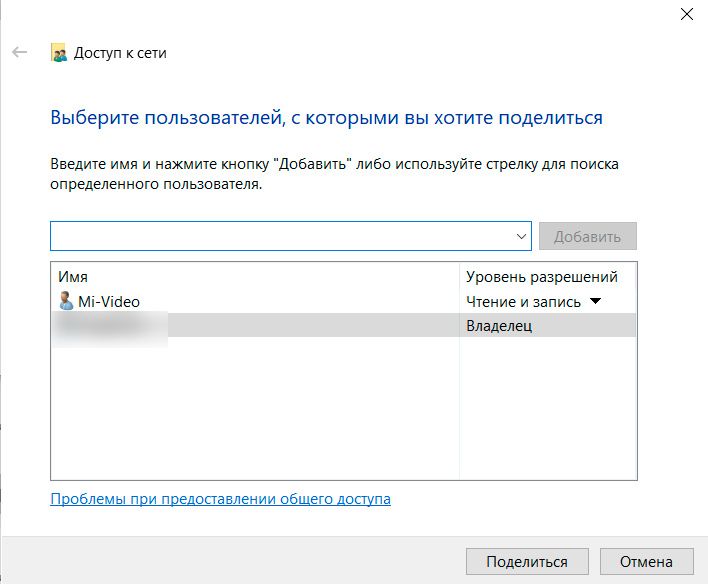
- На жестком диске нашего ПК нужно создать папку, в которую будут копироваться ролики с MicroSD карточки камеры. В нашем случае создадим папку «NAS-Camera» в корне диска «D:\» После этого правой кнопкой мыши кликаем на папку и выбираем свойства. Далее идем во вкладку доступ и выбираем «Общий доступ».

- В открывшемся окне нужно выбрать пользователя, через которого будет доступ к нашей «расшаренной» папке. После выбора пользователя нажимаем «Поделиться», нас встретит окно с информацией о сетевом адресе нашей папки, кликаем на «Готово».

- Теперь нужно проверить есть ли у нашего пользователя права на чтение и запись в нашей папке. Кликаем по кнопке «Расширенная настройка» > в появившемся окне нажимаем «Разрешения». Теперь перед нами открылось окно со списком пользователей и групп пользователей, а также при клике на любого из пользователей видны его права. Если в списке нет нужного пользователя или группы, в которую он входит, то нажимаем «Добавить», выбираем нужное и выставляем права на «Полный доступ». На этом этапе настройка компьютера закончена.

Активация NAS в MiHome
Настройку будем производить на примере камеры Xiaomi Mijia Smart Camera Security (SXJ02ZM), которая уже снята с производства.
- Открываем MiHome > Заходим в плагин камеры > Переходим в настройки (три точки в правом верхнем углу) > Управление хранилищем

- На странице управление хранилищем переходим в сетевое храрнилище NAS. Теперь перед нами должны появиться устройства в нашей сети к которым есть доступ. В нашем случае ПК называется «ANONYMOUS», его и выбираем.

- Теперь мы должны ввести имя пользователя и пароль, речь о которых была выше. После ввода данных нажимаем «Готово» и попадаем в список мест, которые расшарены на этом ПК. Как видно на скриншоте имеется в списке и наша папка «NAS-Camera», выбраем ее.

- Если все предыдущие шаги были выполнены верно, то перед нами откроется страница сетевого хранилиша NAS. Здесь можно управлять настройками нашего NAS.

На этом этапе настройка NAS закончена.
Копирование видео роликов в папку начнется не сразу, примерно через 5-10 минут процесс запустится и в папке появятся видео записи.
Остается только контролировать место на жестком диске ПК, что бы видео архив не занял все оставшееся свободное место.
Комментарии для сайта Cackle
ЦЕЛИ КУРСА
После прохождения этого курса вы получите следующие умения:
- Сохраните видеофайлы с камеры Xiaomi в сетевом хранилище ASUSTOR.
- Воспроизведение видеофайлов с камеры Xiaomi на сетевом хранилище ASUSTOR.
ПРЕДВАРИТЕЛЬНЫЕ УСЛОВИЯ
Предварительные условия курса:
Нет
Слушатели должны получить следующие практические знания:
Нет
ПЛАН КУРСА
1. Введение
2. Сохранение видеофайлов с веб-камер в ASUSTOR NAS
3. Воспроизведение видеофайлов с веб-камер на ASUSTOR NAS
1. Введение
Некоторые веб-камеры, представленные на рынке, не поддерживают стандартные спецификации и функции камер наблюдения и поэтому не могут использоваться непосредственно в Surveillance Center. Веб-камеры такого типа сохраняют файлы записи на локальное устройство хранения внутри веб-камеры, но его емкость ограничена и не позволяет сохранять записываемые видеофайлы в течение многих дней.
На примере камеры Xiaomi мы расскажем, как создать резервную копию видеофайлов камеры Xiaomi в сетевом хранилище ASUSTOR по протоколу SAMBA (SMB). NAS обеспечивает большую емкость и более комплексный механизм защиты данных, что позволяет более эффективно хранить важные видеофайлы и воспроизводить видеофайлы непосредственно в ASUSTOR NAS.
2. Сохранение видеофайлов с веб-камер в ASUSTOR NAS
Шаг 1
- Убедитесь, что SD-карта вставлена в камеру.
Шаг 2
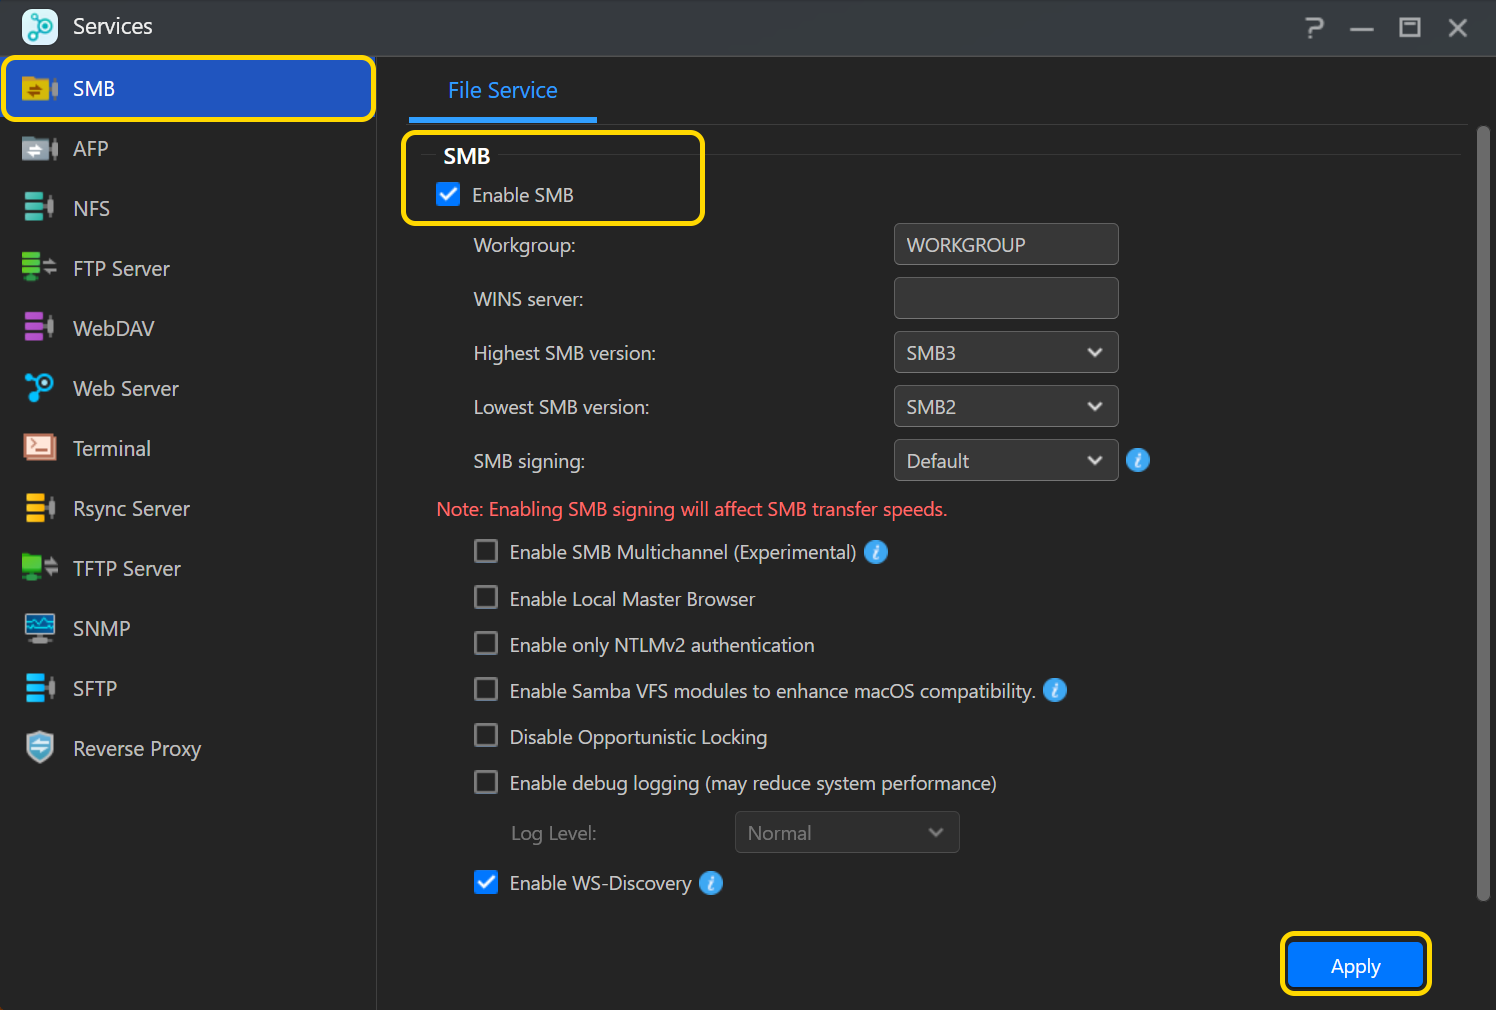
- Убедитесь, что протокол SAMBA включен на ASUSTOR NAS.
- Войдите в операционную систему ADM с помощью веб-браузера.
- Выберите [Службы] [SMB].
- Выберите [Включить протокол SMB] и нажмите [Применить].
Некоторые старые веб-камеры поддерживают только SMB 1. Если вы используете такие камеры, установите для параметра «Наименьшая версия SMB» значение SMB 1.
Шаг 3
- Откройте приложение Mi Home APP на своих мобильных устройствах.
- Откройте приложение Xiaomi Camera.
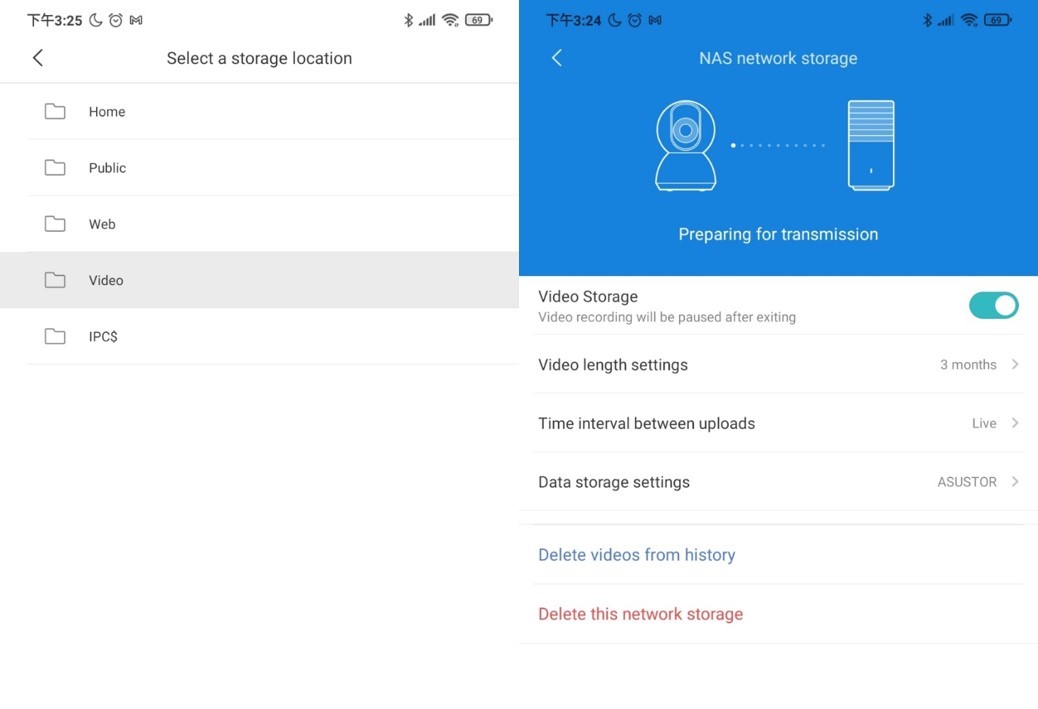
- Откройте настройки, расположенные в правом верхнем углу . Нажмите [Manage storage] [NAS network storage].
- Выберите сетевое хранилище и введите учетную запись и пароль для входа в систему.

Шаг 4
- Выберите общую папку на NAS, в которой вы хотите хранить видеофайлы, например: «Video».
- Завершите соединение между камерой Xiaomi и NAS.
Шаг 5
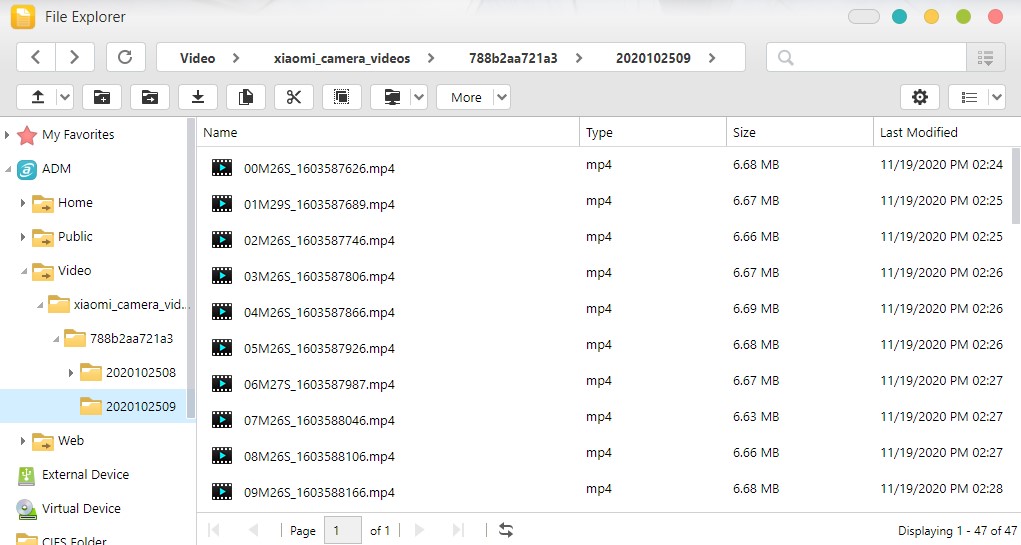
- Войдя в ADM, откройте Файловый менеджер.
- Выберите папку, в которой хранятся видеофайлы Xiaomi, например: «Video».
- Проверьте, появилась ли папка с именем «xiaomi_camera_videos».
3. Воспроизведение видеофайлов с веб-камер на ASUSTOR NAS
Видео и аудио форматы файлов записи большинства веб-камер популярны и могут быть воспроизведены непосредственно в Файловый менеджер ADM.
Шаг 1
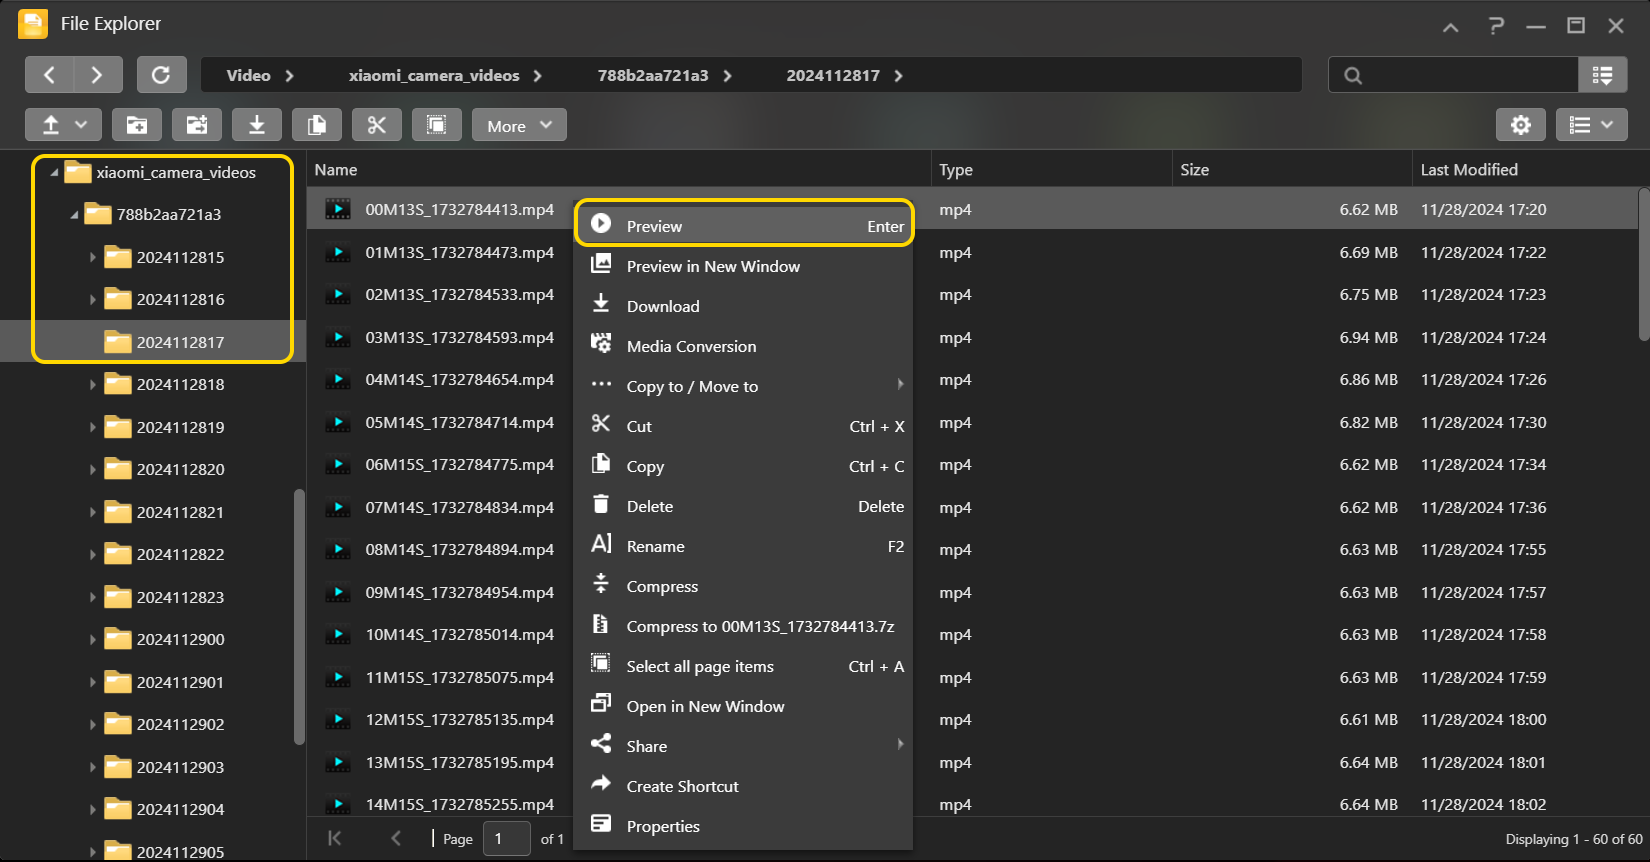
- Войдите в операционную систему ADM с помощью веб-браузера.
- Найдите ярлык [Файловый менеджер] на рабочем столе ADM и нажмите на него.
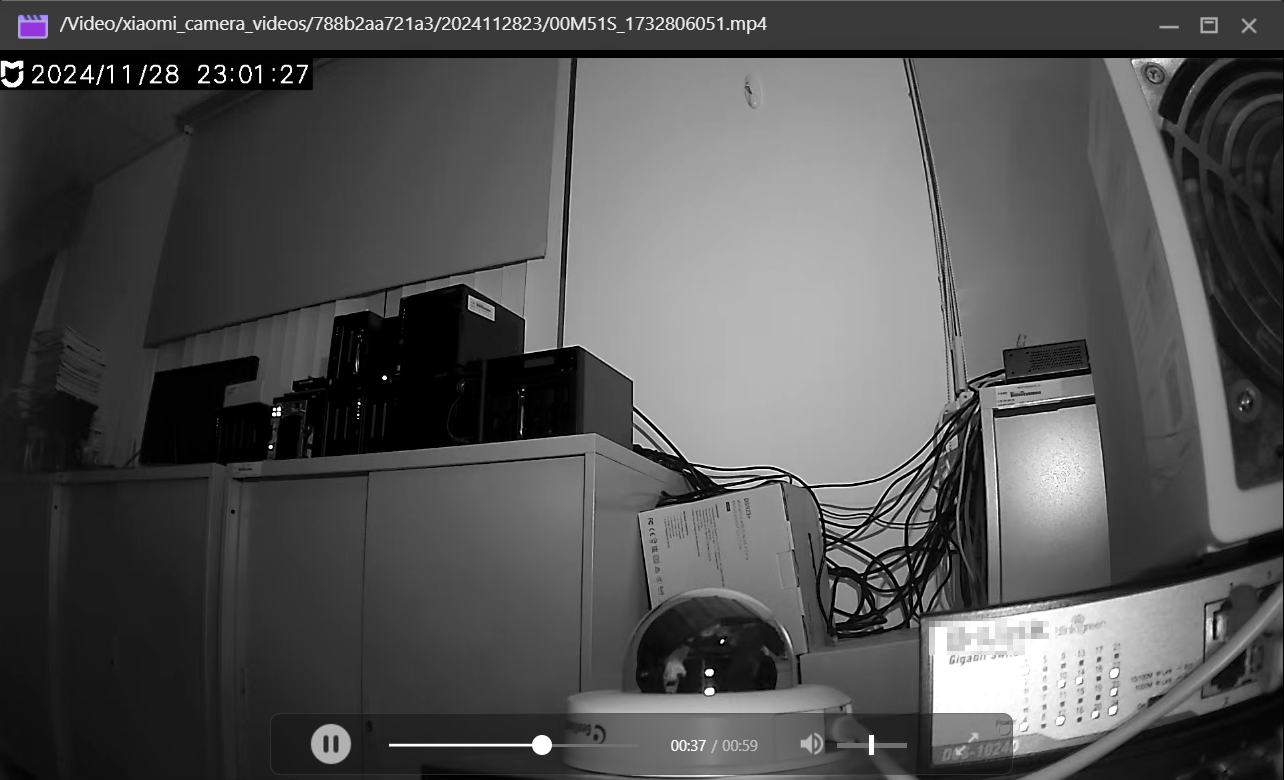
- Выберите папку «xiaomi_camera_videos» и нужный видеофайл, дважды щелкните файл напрямую или щелкните правой кнопкой мыши, чтобы открыть меню, и нажмите на «Предварительный просмотр».
Шаг 2
- ADM воспроизведет видеофайл с помощью видеоплеера по умолчанию.
Если видеоплеер ADM по умолчанию не может воспроизвести видеофайл, пожалуйста, попробуйте конвертировать медиафайл в проводнике, или обратитесь к здесь, чтобы установить LooksGood и использовать медиаконвертер для конвертации видеофайлов.
Была ли эта статья полезной? Да / Нет
Не связано с моей проблемой
Слишком сложно
Неправильная информация
Недостаточно информации
У вас есть другое отзывы об этой статье?
Предложите тему
Пройти тест
Checking System Requirements
Before connecting your Xiaomi camera to your PC, it’s crucial to ensure that your system meets the necessary requirements for a seamless setup. By verifying the system compatibility, you can avoid potential issues and enjoy a smooth connection process.
Here are the essential system requirements to consider:
-
Operating System Compatibility: Ensure that your PC’s operating system is compatible with the Xiaomi camera. The Mi Home App, which facilitates the connection between the camera and your PC, is compatible with Windows 7 and above, as well as macOS 10.10 and later. It’s important to check the specific version requirements to guarantee compatibility with your system.
-
Hardware Specifications: Verify that your PC meets the hardware specifications required for the Mi Home App and the Xiaomi camera. This includes sufficient RAM, processor speed, and available storage space. While the app itself is not resource-intensive, having a well-performing PC can enhance the overall experience of accessing and managing the camera feed on your computer.
-
Network Connectivity: A stable internet connection is essential for connecting the Xiaomi camera to your PC. Ensure that your PC is connected to a reliable Wi-Fi network with adequate signal strength. This is crucial for seamless live streaming and remote access to the camera’s feed.
-
Mi Home App Compatibility: Check for any specific requirements or recommendations provided by Xiaomi for using the Mi Home App on a PC. This may include additional software dependencies or settings that need to be configured on your PC to ensure compatibility with the app and the Xiaomi camera.
By confirming that your PC meets these system requirements, you can proceed with confidence, knowing that your system is well-equipped to support the seamless integration of the Xiaomi camera for convenient access and monitoring.
Ensuring system compatibility is the first step toward a successful setup, and it lays the foundation for a smooth and reliable connection between your Xiaomi camera and your PC.
Installing Mi Home App
To initiate the seamless integration of your Xiaomi camera with your PC, the first step is to install the Mi Home App, which serves as the bridge for connecting and managing the camera’s functionalities. The Mi Home App offers a user-friendly interface and a range of features that enable you to access and control your Xiaomi camera from your PC with ease.
Here’s a detailed guide on installing the Mi Home App for a streamlined setup process:
-
Visit the Official Website: Begin by visiting the official Xiaomi website or the dedicated Mi Home App download page. Ensure that you are accessing the official source to download the app, as this guarantees the authenticity and security of the software.
-
Download the App: Locate the download section for the Mi Home App and select the version compatible with your PC’s operating system. Whether you are using Windows or macOS, there are specific versions of the app tailored to each platform. Click on the download link to initiate the download process.
-
Installation Process: Once the download is complete, navigate to the downloaded file and double-click to initiate the installation process. Follow the on-screen instructions to proceed with the installation. The installation wizard will guide you through the necessary steps, including selecting the installation directory and agreeing to the terms and conditions.
-
Launch the App: After the installation is complete, launch the Mi Home App on your PC. Upon launching the app for the first time, you may be prompted to create an account or log in with your existing Xiaomi account. This account will serve as the central hub for managing your Xiaomi camera and accessing its features.
-
App Configuration: Upon logging in, you will have the opportunity to configure the app settings according to your preferences. This may include language preferences, notification settings, and other personalized options to enhance your user experience.
-
Pairing the Camera: Follow the on-screen instructions within the Mi Home App to pair your Xiaomi camera with the app. This typically involves scanning a QR code or following a specific pairing process outlined by the app. Once paired successfully, your Xiaomi camera will be accessible through the Mi Home App on your PC.
By following these steps, you can effortlessly install the Mi Home App on your PC, paving the way for a seamless connection with your Xiaomi camera. The app serves as a central platform for managing and accessing the camera’s features, allowing you to monitor your space conveniently from your PC. With the Mi Home App installed and configured, you are now ready to proceed with connecting your Xiaomi camera to your PC and accessing its live feed and settings effortlessly.
Installing the Mi Home App marks a pivotal stage in the setup process, bringing you closer to the convenience of monitoring your space through your Xiaomi camera on your PC.
Once the Mi Home App is successfully installed on your PC, the next crucial step is to establish the connection between your Xiaomi camera and your computer. This pivotal phase sets the stage for seamless access to the camera’s live feed and settings, empowering you to monitor your space conveniently from your PC. Here’s a detailed guide on connecting your Xiaomi camera to your PC:
-
Power On the Camera: Begin by powering on your Xiaomi camera and ensuring that it is in a ready state for the connection process. This involves plugging in the camera and allowing it to initialize, ready to be paired with the Mi Home App on your PC.
-
Access Camera Settings: Open the Mi Home App on your PC and navigate to the camera settings section. This is where you can initiate the process of adding a new device, specifically your Xiaomi camera, to your account within the app.
-
Add New Device: Within the Mi Home App, locate the option to add a new device and select the category that corresponds to your Xiaomi camera. This prompts the app to search for nearby devices that are ready to be paired.
-
Pairing Process: Follow the on-screen instructions to pair your Xiaomi camera with the Mi Home App. This typically involves scanning a QR code displayed on the camera or following a specific pairing process outlined by the app. Once the pairing is successful, the camera will be linked to your account within the Mi Home App.
-
Network Configuration: During the pairing process, you may be prompted to configure the network settings for the camera, ensuring that it is connected to the same Wi-Fi network as your PC. This is essential for seamless communication between the camera and your computer.
-
Confirmation and Testing: Once the pairing and network configuration are complete, you will receive a confirmation within the Mi Home App that the Xiaomi camera has been successfully connected to your PC. At this stage, you can test the connection by accessing the live feed from the camera on your computer.
By following these steps, you can effectively connect your Xiaomi camera to your PC, establishing a direct link that enables you to monitor your space conveniently from your computer. This seamless connection paves the way for accessing the camera’s live feed, adjusting settings, and utilizing its features directly from the Mi Home App on your PC. With the camera successfully connected, you are now ready to proceed with setting up the camera within the Mi Home App and accessing its functionalities effortlessly.
Setting Up Camera on Mi Home App
After successfully connecting your Xiaomi camera to your PC, the next crucial step is to set up the camera within the Mi Home App. This pivotal phase allows you to access and manage the camera’s functionalities directly from the app on your computer, enhancing your ability to monitor your space seamlessly. Here’s a detailed guide on setting up your Xiaomi camera within the Mi Home App:
-
Camera Configuration: Upon connecting the Xiaomi camera to the Mi Home App on your PC, navigate to the camera settings section within the app. Here, you can access a range of configuration options tailored to your specific camera model. This may include adjusting video quality, enabling motion detection, setting up night vision, and customizing other essential parameters to align with your monitoring preferences.
-
Device Customization: The Mi Home App offers a user-friendly interface for customizing your Xiaomi camera’s settings. You can personalize the camera’s name, assign specific locations, and create customized schedules for monitoring and recording. This level of customization empowers you to tailor the camera’s behavior to suit your unique surveillance requirements, ensuring optimal functionality and convenience.
-
Notification Settings: Within the Mi Home App, you can configure notification settings related to the Xiaomi camera. This includes enabling motion alerts, sound detection notifications, and other relevant alerts that keep you informed about potential events within the camera’s field of view. By customizing notification preferences, you can stay updated on critical activities while using the camera for monitoring purposes.
-
Remote Access Configuration: The Mi Home App facilitates seamless remote access to your Xiaomi camera from your PC. You can configure remote access settings within the app, enabling you to view the live feed, playback recorded footage, and adjust camera settings from anywhere with an internet connection. This level of accessibility enhances the camera’s usability, allowing you to stay connected to your space at all times.
-
Firmware Updates: The Mi Home App provides a streamlined platform for managing firmware updates for your Xiaomi camera. Regular firmware updates introduce new features, enhancements, and security patches, ensuring that your camera remains up-to-date and equipped with the latest capabilities. Within the app, you can check for available firmware updates and initiate the installation process effortlessly.
By following these steps, you can effectively set up your Xiaomi camera within the Mi Home App on your PC, unlocking a range of customization and management options that elevate your monitoring experience. With the camera configured within the app, you can seamlessly access its features, receive timely notifications, and maintain a secure connection to your space directly from your computer. The setup process within the Mi Home App marks a pivotal stage in maximizing the utility of your Xiaomi camera for PC-based surveillance and monitoring.
Accessing Camera on PC
Once your Xiaomi camera is successfully connected to the Mi Home App on your PC and configured to your preferences, accessing its live feed and settings becomes a seamless process. The ability to monitor your space conveniently from your computer enhances your surveillance capabilities and provides peace of mind. Here’s a detailed guide on accessing your Xiaomi camera on your PC:
Live Feed Access
Upon launching the Mi Home App on your PC, you can effortlessly access the live feed from your Xiaomi camera. The app provides a user-friendly interface that displays the real-time video stream from the camera, allowing you to monitor your space with clarity and precision. The live feed access empowers you to stay connected to your surroundings, whether you are monitoring a residential property, office space, or any other environment under surveillance.
Camera Control and Settings Adjustment
The Mi Home App offers comprehensive control over your Xiaomi camera’s settings directly from your PC. You can adjust parameters such as video quality, motion detection sensitivity, night vision settings, and other essential configurations to optimize the camera’s performance. This level of control ensures that you can tailor the camera’s behavior to suit specific monitoring requirements, enhancing its effectiveness in capturing and recording relevant events.
Event Playback and Recording Management
In addition to accessing the live feed, the Mi Home App enables you to review recorded footage and manage the camera’s recording settings from your PC. Whether you need to review past events or adjust the camera’s recording schedule, the app provides intuitive controls for seamless playback and management. This feature is particularly valuable for analyzing past occurrences and maintaining a comprehensive record of activities within the camera’s field of view.
Remote Monitoring and Accessibility
One of the key advantages of accessing your Xiaomi camera on your PC is the ability to monitor your space remotely. The Mi Home App facilitates secure remote access, allowing you to view the live feed, review recordings, and adjust camera settings from anywhere with an internet connection. This level of accessibility ensures that you can stay connected to your space at all times, enhancing your ability to respond to events and maintain a vigilant presence, even when away from the physical location of the camera.
Firmware Updates and Maintenance
The Mi Home App serves as a centralized platform for managing firmware updates for your Xiaomi camera. By accessing the camera’s settings on your PC, you can easily check for available firmware updates and initiate the installation process. Keeping the camera’s firmware up to date is crucial for ensuring optimal performance, receiving new features, and addressing potential security vulnerabilities, making this aspect of accessing the camera on your PC essential for its long-term functionality.
By leveraging the capabilities of the Mi Home App on your PC, you can seamlessly access and manage your Xiaomi camera, enhancing your monitoring experience and ensuring that you stay connected to your space with ease. The ability to access the camera’s live feed, adjust settings, review recordings, and maintain remote accessibility directly from your PC empowers you to monitor your surroundings effectively and proactively respond to events as they unfold.

The Security App you need
Do More With
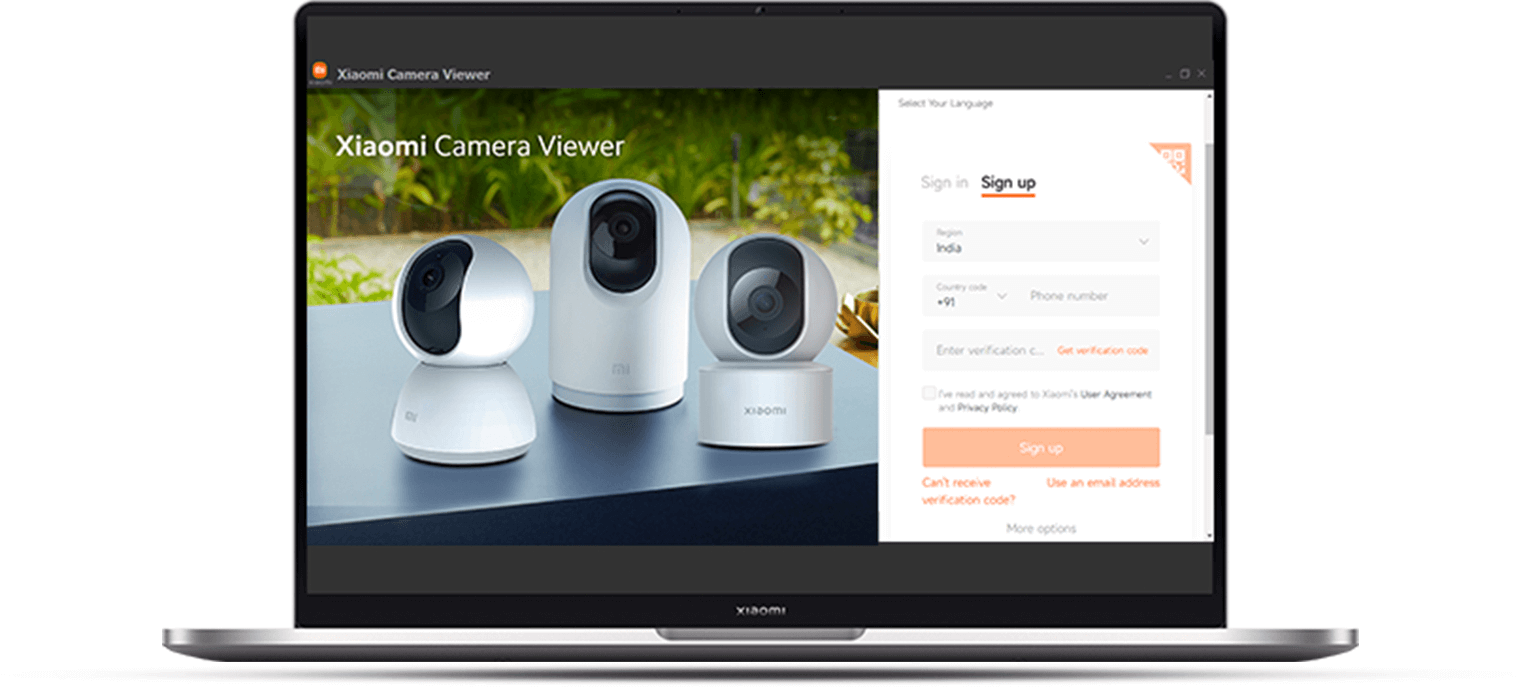
Xiaomi Camera Viewer
The whole new desktop app for a better
viewing experience.
Be it your house or your workplace this camera app allows you to monitor multiple cameras, record videos, take snapshots,
and many more things.
One can use the same login credentials as Mi Home App.
Follow the steps for easy setup:
Step 1:Download the .exe file for the app through the mi.com app page.
Step 2:Install and log in with the same credentials used for Mi Home App.Step 3:Activated cameras linked with Mi Home App will directly appear on the screen when the login is done.
Download Now
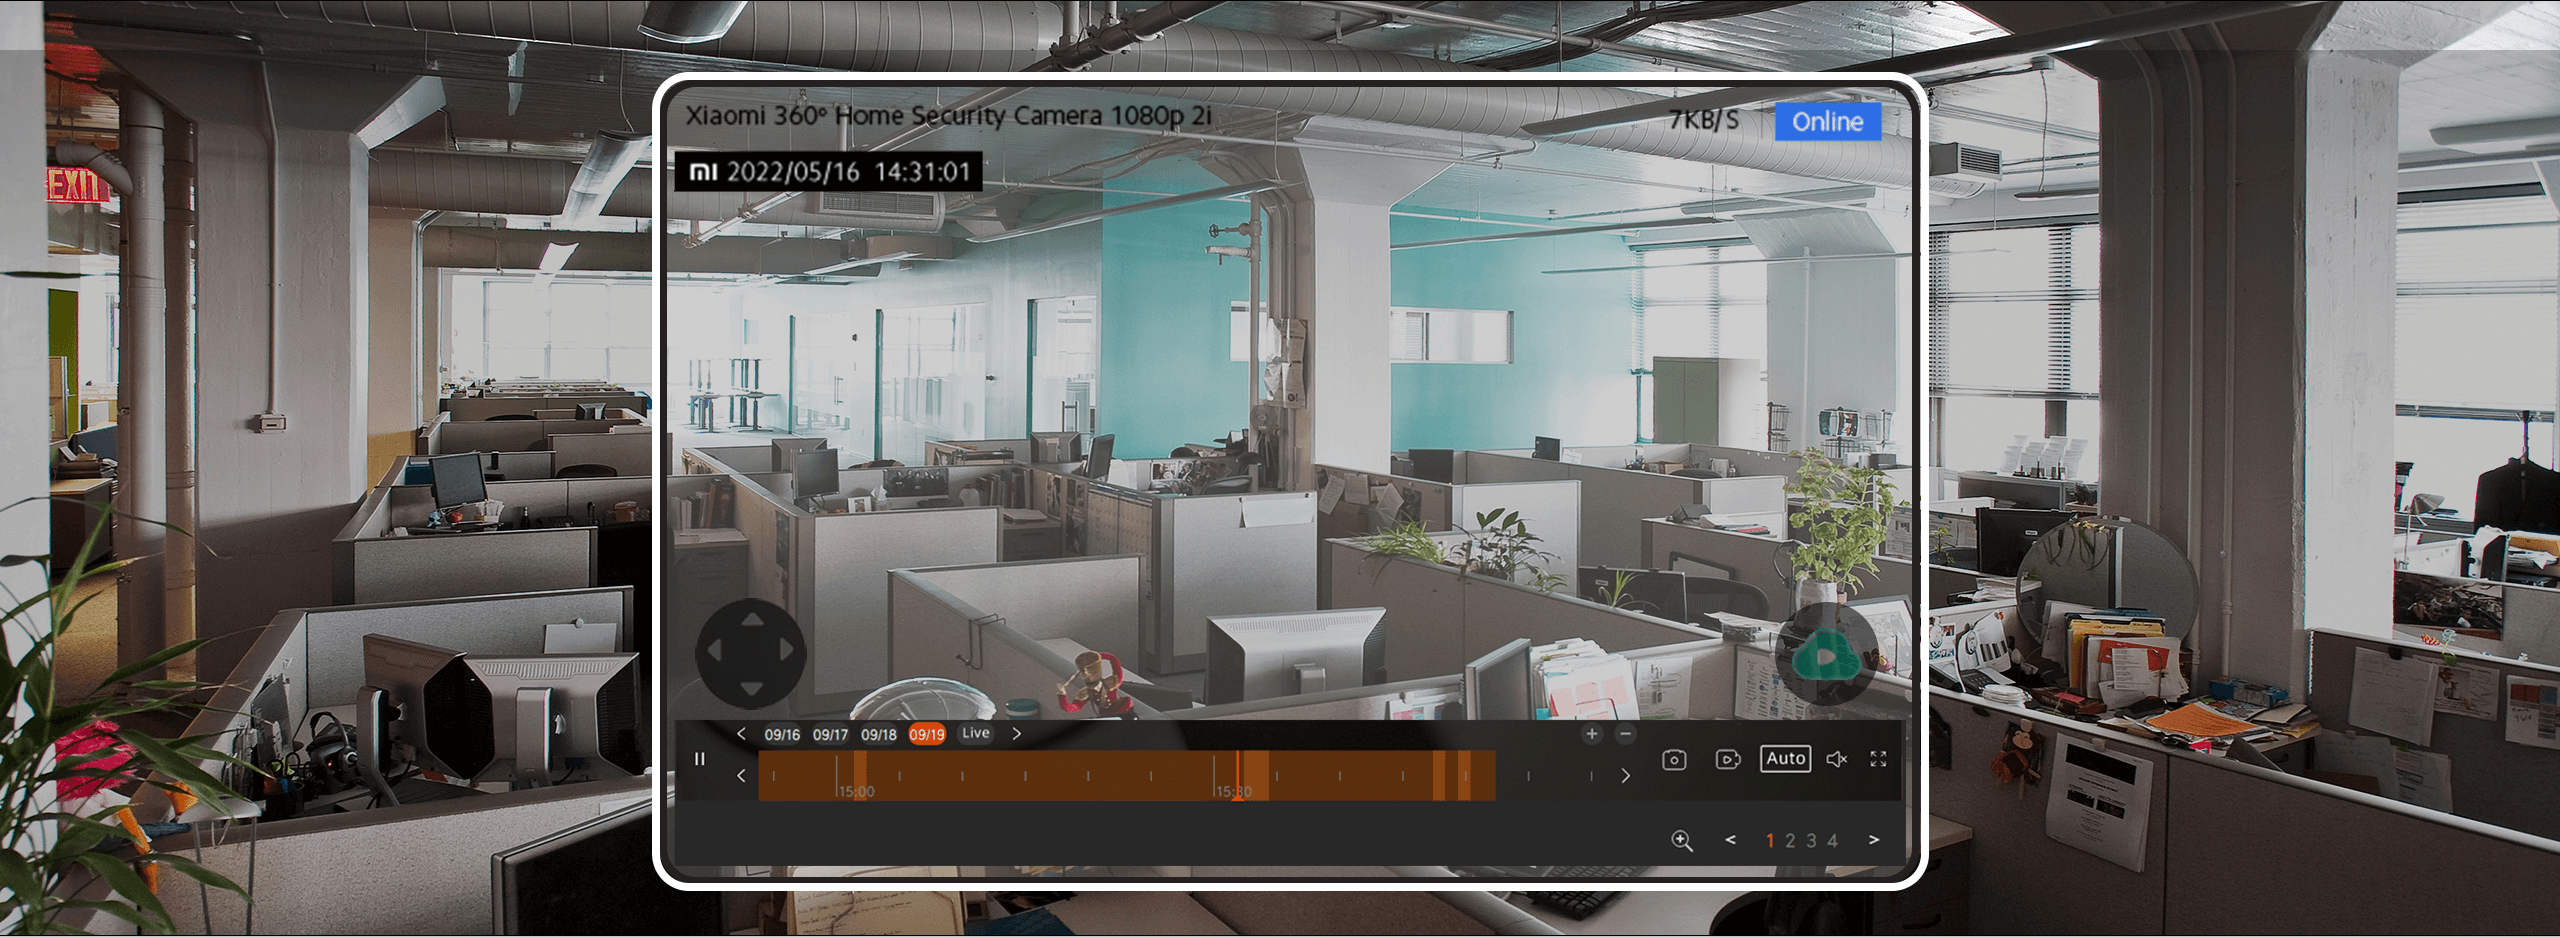
Designed to intelligently identify every detail.
Now get up to 9 windows of screen playback at the same time
so you do not miss out on any movement.
Double clicking on any sub-window on the app,
makes the view window bigger.
Real-time screen view and
video playback
You can view real-time pictures and historical videos from
anywhere and anytime.
Important pictures and videos can be saved locally through screenshots and video recordings.
Features that make your life easy
With the app, you can filter the camera videos by date and event
for viewing.
A short clip of any human detection gets automatically stored
on the app.
You can even scroll back to the live footage and check footage without any lag.

Compatible with all
Xiaomi 360° Home Security Cameras
The app works smoothly with all your Xiaomi 360° Home
Security Cameras.
Now you can see what’s happening on your front porch or inside the home, even if you’re hundreds of miles away.
Keeps an eye on
what’s important
The app is suitable for multi-camera homes, small and medium-sized supermarkets, shops, and factories.
Other scenarios with indoor tutorial centers and outdoor security
can use this app.

Notes:1.Xiaomi Camera Viewer App is a useful and simple standalone laptop camera app for Windows. It allows you to record videos and take snapshots. App will support all the three 360 degree cameras launched in Indian market.
2.Login with the Mi Id / Email Id / Phone number that already is registered on Mi. Home App, it integrates all the camera which are linked on mi home app to give you the functionality of multiple camera view at a given point of time.
3.An easy-to-use, app only requires you to run the EXE file to connect with the camera.
4.No need to go through installation process, just download the file and login, it will directly integrate with your Mi. home app instantly.
5.You can use this app on a laptop or desktop without any restrictions. The updated software can be downloadable from mi.com Xiaomi camera viewer page and mi home app.
6.Using the latest beta release of this camera app, you can have up-to 9 Camera feed at a same time, take pictures, record videos, open and play video/image files.
7.Ensure the region is selected as India on Desktop app — (The region also will be determined by your laptops region settings.)
8.The current software of Xiaomi Camera Viewer app is the beta version and upgrades will be available for download from https://www.mi.com/in/