
RAID is a very efficient way to protect your data, improve performance, and balance your input and output operations.
Users can perform RAID operations directly from the hardware or with the help of software.
When it comes to hardware, the process is performed utilizing your computer’s internal motherboard.
The software RAID is configured directly on your computer’s host server CPU, and even though the processing speed is slower than in the case of hardware RAID, it is more cost-efficient.
To manage every aspect of your RAID, you will need to use specialized software that allows dynamic disk management and partition management. Remember that you’ll have to choose the appropriate RAID level for your hardware.
In this article, we will explore some of the best software options that allow you to do that and a built-into-Windows alternative. Read on to find out more.
What’s the best RAID software for Windows 10 and 11?
Paragon Hard Disk Manager – Backup automation

Paragon Partition Manager allows you to create, resize, copy, or delete partitions. The interface is easy to use and very clean. You should have no problem quickly finding your way around it.
The performance of the storage device can be enhanced as well due to its fantastic feature called Automatic partition alignment.
If you have any free space, then you can allocate it to another partition in order to ensure more practical use of the disk space.
Paragon Hard Disk Manager is a good solution if you need a tool to help you both with basic and advanced partitioning tasks.
It supports file system conversion as follows: FAT to NTFS, NTFS to FAT, HFS to NTFS, and NTFS to HFS.
It also lets you allocate extra disk space with the redistribute feature. You can split or merge your partitions, edit sectors, and defragment.
Paragon Hard Disk Manager also supports data migration, allowing users to copy entire partitions and disks and also migrate operating systems.
Other key features of Paragon Hard Disk Manager include:
- Backup automation
- Restore partitions and separate files
- Recovery media builder
- Boot corrector
The tool is compatible with Windows operating systems, starting with Windows 7.
Paragon Hard Disk Manager
Easy-to-use and reliable software for data recovery and with great partition management features.
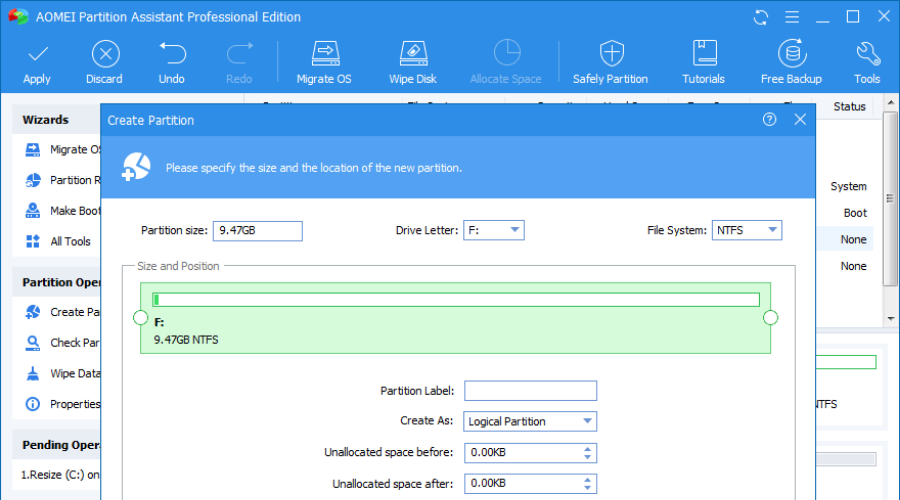
AOMEI Partition Assistant Professional – Multiple disk operations
There are also various third-party utilities that you can format flash drives with. You can benefit from third-party software if you can’t format a storage drive with File Explorer.
AOMEI Partition Assistant offers support for many types of hardware devices, from traditional HDDs, SSDs, and SSHDs to IDE, SATA, and FireWire.
The tool is able to format and manage RAID devices as well. It is compatible with multiple versions, including RAID 0, RAID 1, RAID 5, and RAID 10.
The software offers easy-to-follow controls that allow users to add drives to RAID arrays quickly.
The tool lets users gain full control over their partitions, supporting multiple actions including partition creation, formatting, deletion, and merging.
AOMEI Partition Assistant can also split and resize partitions and allocate free disk space. These features can help you tweak your available storage in order to make sure your partitions do not run out of free space.
AOMEI Partition Assistant Professional is a great software that allows you to format your hard drive and partitions without losing any data.
Although Windows already comes with a built-in partitioner it can take a lot more time than simply using a dedicated tool.
Let’s have a look at the key features of this software:
- Performs multiple disk/partition operations.
- Comes with additional features, such as bootable media creation or Windows PE.
- Data recovery tool.
Aomei Partition Assistant is a licensed-based program. It comes with a 90-day money-back guarantee, and you can also try it out beforehand as they provide a demo version.
AOMEI Partition Assistant Professional
The best partition software with multiple management functions. Get the best deal now!
Stellar RAID Data Recovery – Best at recovering data from RAID

Stellar Data Recovery is a very powerful tool. Although its main function is that of data recovery, it will also allow you to create a raid array.
With this software, you can manually enter the RAID parameter while configuring your raid array. Also, when it comes to recovery, you can do that if the RAID parameters are fully known, partially known, or unknown.
Stellar Data Recovery can work with Raid 0, 5, and 6. Moreover, this tool doesn’t even need the RAID controller card to be attached.
Besides the powerful RAID module, Stellar Data Recovery includes other amazing and useful features, such as video and photo repair.
This tool can help any technician with most of the data storing and recovering processes.
Some more key features of Stellar Data Recovery:
- Recover Data from an Inaccessible RAID Volume
- Recovers Data from SSD RAID array
- Formatted RAID array recovery
- Deleted RAID partition recovery
- Recovers Hardware and Software RAID
Stellar RAID Data Recovery
Create RAID array and recover data easily with this truly stellar software.
MiniTool Partition Wizard – An intuitive toolset
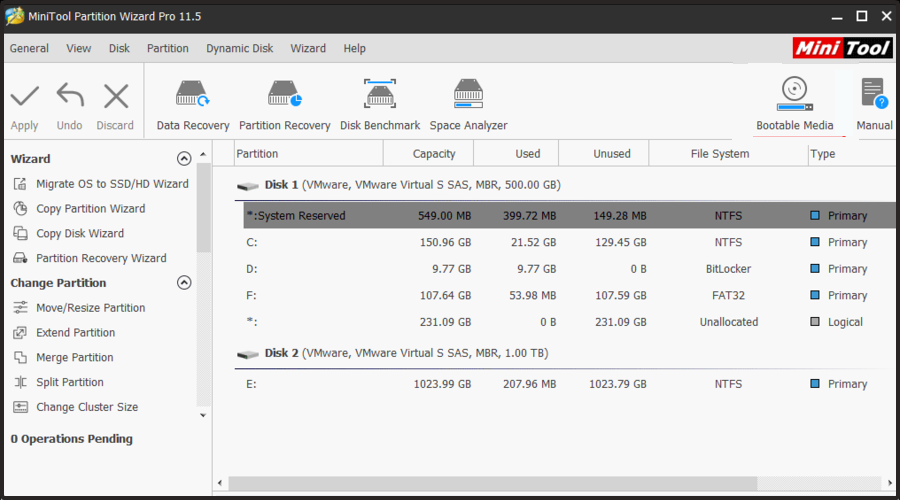
MiniTool Partition Wizard offers an intuitive approach to disk management, allowing users to easily execute advanced operations such as merging or extending their partitions.
The software has multiple versions available, including a free one, which is pretty resourceful when it comes to features.
MiniTool lets you manage RAID partitions with the help of its intuitive toolset. You can directly create a new partition, resize existing partitions, and even extend them.
The software also helps you migrate your operating system to SSD, convert disks without risking the loss of data, and more.
MiniTool Partition Wizard can copy both system and non-system partitions, set labels, change drive letters, and change partition type ID.
It also supports operating system migration to SSD or HDD data storage devices.
Other key features of MiniTool Partition Wizard include:
- Data recovery
- Disk clone
- System diagnosis and optimization
MiniTool is available in various packages which vary in features. If you want to check how the software operates, you can start with the free version.
MiniTool Partition Wizard
Use this intuitive tool to easily manage RAID partitions, clone disks, recover lost data, and more.
SnapRAID – Easily scalable

SnapRAID is another very useful RAID tool that allows you to manage every aspect of your disks and store the entire range of information locally.
This software can recover from up to six disk failures without compromising the data.
SnapRAID automatically hashes your data, keeping it safe from silent corruption.
In case the failed disks are not recoverable, it can isolate them so no other disk risks becoming corrupt as well.
The tool can recover accidental deletion and allows you to use different-sized disks with the ability to add new ones at any time.
If you stop using SnapRAID at any point in time, you will not have to reformat or move your data.
Other key features of SnapRAID include:
- Optimizes the way disks are used
- Lightweight and small footprint
- Easily scalable
SnapRAID is free software that is compatible with Windows operating systems as well as other popular platforms such as Linux or Mac.
⇒ Get SnapRAID
Storage Space – Windows Native

This built-in tool found in Windows 10 and Windows 11 protects the entire range of data stored on your hard drive, and it can customize how the storage is used.
You can set custom rules to group more drives in one storage pool and create virtual drives.
These drives store two copies of your data, allowing you not to worry about losing data even when one of the copies becomes corrupted.
The tool offers efficient disk management features and is a convenient solution as it is pre-installed into your system.
The tool lets you create storage spaces. The only condition is to have at least two extra drives in addition to the drive where Windows is installed.
These include internal and external drives. The tool can handle a variety of drives, including USB, SATA, and SAS drives.
Other key features of Storage Spaces include:
- Accessible and easy to use
- Driver usage optimization support
- Easy-to-follow usage guides provided by Microsoft
Although not as resourceful as other tools in this list, the built-in tool is proven to be very safe, easy to use, and completely free for Windows users.
Does Windows 10 have a built-in RAID?
No, Windows doesn’t have a built-in RAID, but since Windows, the OS comes with a feature that will let you combine multiple HDDs and SDDs into a RAID Array.
- Microsoft wants Windows 10 users to upgrade to Windows 11 or Copilot + PCs
- Deleting ‘inetpub’ folder lets hackers permanently stop Windows updates, Microsoft warns
This article explored some of the best software options that allow you to manage all your RAID hard disks easily.
And even though you can configure RAID manually, the software presented in this list covers all the tools you need to manage your hard disk creation, usage, and statistical gathering.
Before you choose to set up RAID, we suggest reading our guide on RAID 0 vs RAID 1 to learn about the differences between the two.
We also presented you with a built-in option that is almost as efficient as the software found in this article.
Please let us know what options you chose and how they worked by using the comment section below.
Don’t forget to bookmark our Troubleshooting Hub for more helpful articles and guides.
You can find more related articles in our Software Hub, so make sure to check it out.
Software RAID is widely popular due to its simplicity in setup and management. It allows you to create fault-tolerant disk configurations without additional hardware. However, with the transition of modern systems to UEFI, the process of creating software RAID has its own nuances that are important to consider to avoid boot issues in case of disk failure.
In this article, we’ll look at how to create a software RAID based on dynamic disks in UEFI systems, as well as disk preparation and bootloader configuration.
You can always purchase original Windows product keys in our catalog from 8 €
Windows Partition Configuration with UEFI
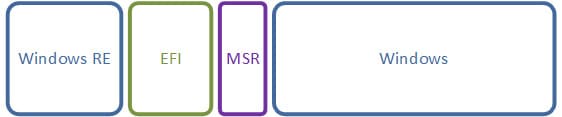
Modern versions of Windows (10, 11, Windows Server 2016/2019) automatically create a standard partition configuration on GPT disks:
1) Windows RE: System recovery partition (NTFS), 500 MB in size.
2) EFI: System boot partition (FAT32), 100 MB in size.
3) MSR (Microsoft System Reserved): Service partition, 16 MB in size.
4) Windows: Main system partition where the OS is installed.
Step 1: Preparing to Create a Software RAID
1) Install Windows on one of the disks.
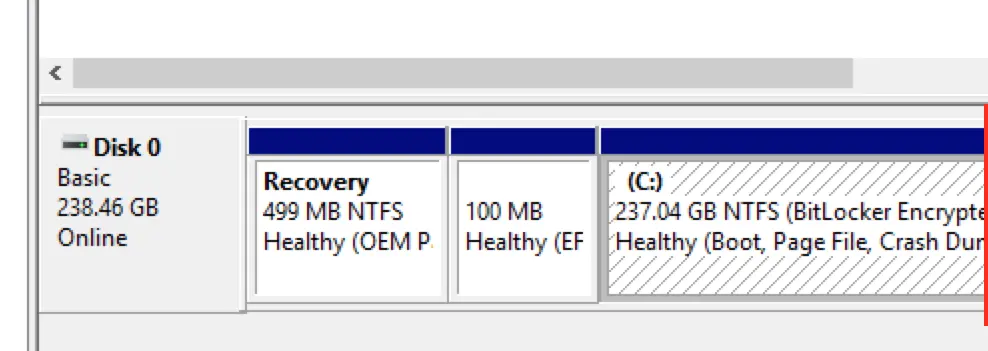
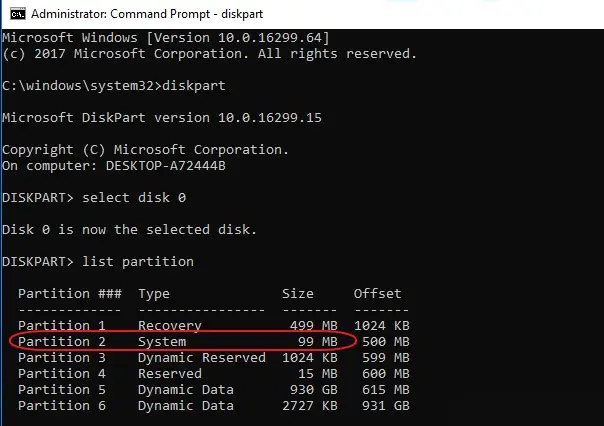
After installation, go to “Disk Management.” Here, the first partition is Windows RE, 499 MB in size, followed by the EFI partition, which is mistakenly labeled as encrypted. However, as mentioned earlier, this tool does not provide a complete picture of the partition structure.
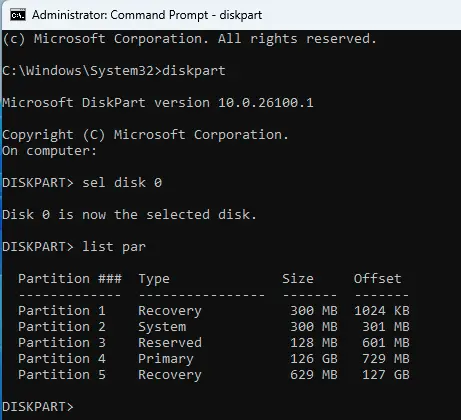
2) Launch Command Prompt as an administrator and run the following commands:
diskpart
sel disk 0
list par
This will display the partition structure on the first disk.
3) Prepare the second disk for mirroring:
sel disk 1
clean
Warning! The clean command will erase all data on the selected disk.
4) Convert the second disk to GPT:
convert gpt
During the conversion, an MSR partition will be automatically created on the disk. We don’t need it yet, so delete it with the command:
sel par 1
delete part override
After that, ensure the disk has no partitions.

5) Create partitions on the second disk identical to the first:
– For the recovery partition:
sel disk 1
create partition primary size=499
format quick fs=ntfs
Then assign the necessary GPT attributes:
set id=de94bba4-06d1-4d40-a16a-bfd50179d6ac
gpt attributes=0x8000000000000001
The identifier de94bba4-06d1-4d40-a16a-bfd50179d6ac sets the partition type as Windows RE, and the attribute 0x8000000000000001 prevents assigning a drive letter and marks the partition as essential for system operation to avoid its deletion from the disk management tool.
– For the EFI partition:
create partition efi size=99
format quick fs=fat32
– For the MSR partition:
create partition msr size=16
If everything is done correctly, you should get a partition layout that fully mirrors (except for the system partition) the layout of the first disk.
After that, restart the system.

Step 2: Creating a Software RAID
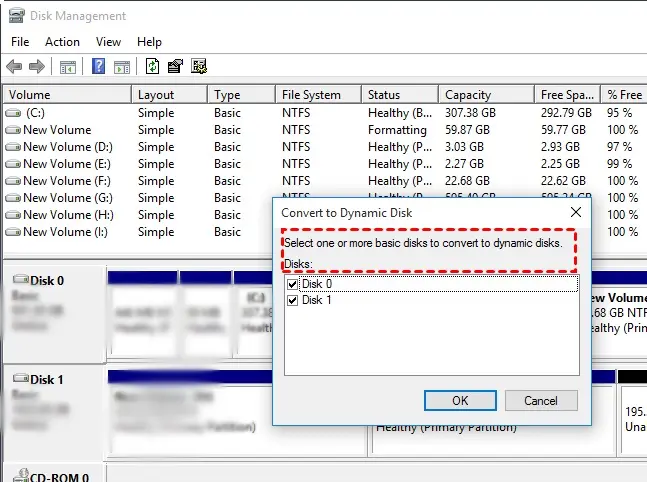
First, convert the disks to dynamic. This can be done in the Disk Management tool.
Or via diskpart:
1) Convert both disks to dynamic:
sel disk 0
convert dynamic
sel disk 1
convert dynamic
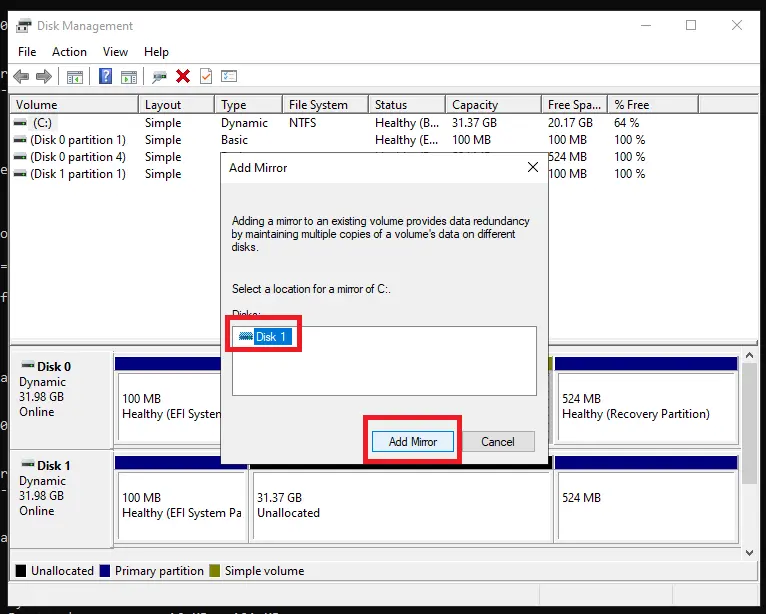
2) Create a mirrored array (RAID 1) for the system partition:
sel vol c
add disk 1
This can also be done via Disk Management.
3) Wait for the data resynchronization to complete. This may take some time depending on the disk size and speed.

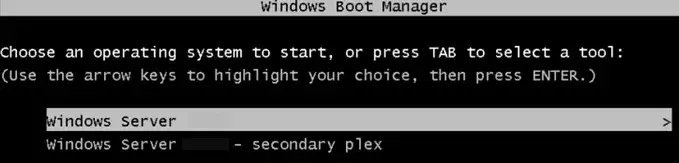
Now, during boot, a menu will appear allowing you to choose the partition. You can boot from either, but remember that the bootloader is still only present on the first disk, and changing the boot order in BIOS will prevent booting from the second disk.
Step 3: Configuring the EFI Bootloader and Copying It to the Second Partition
For full functionality of software RAID in a UEFI environment, the EFI bootloader must be configured on both disks. This ensures the system can boot in case one of the disks fails.
Step 4: Assigning Drive Letters to EFI Partitions
1) Launch diskpart via Command Prompt or PowerShell as an administrator.
2) Identify the location of the required partition on the first disk:
sel disk 0
list par
Find the EFI partition (usually partition number 2).
3) Select the partition and assign it a drive letter:
sel par 2
assign letter=P
4) Repeat the steps for the second disk:
sel disk 1
sel par 2
assign letter=S
Creating a Second Bootloader Instance
1) Navigate to the EFI partition of the first disk:
P:
cd EFI\Microsoft\Boot
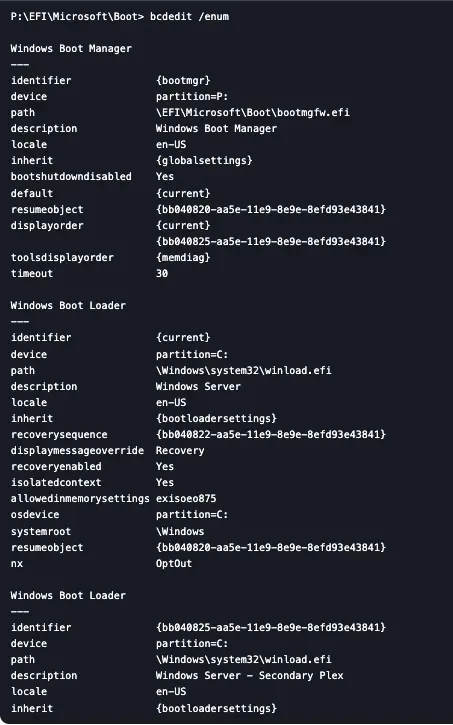
2) View the current boot entries:
bcdedit /enum
You will see a single boot manager entry and two Windows bootloader entries.
3) Create a second bootloader instance:
bcdedit /copy {bootmgr} /d "Windows Boot Manager 2"
Copy the identifier generated by the command.

4) Bind the new bootloader to the EFI partition of the second disk:
bcdedit /set {ID} device partition=s:
Replace {ID} with the identifier obtained earlier.
5) Export the BCD store of the bootloader:
bcdedit /export P:\EFI\Microsoft\Boot\BCD2
Copying the Bootloader
1) Copy the contents of the EFI partition from the first disk to the second:
robocopy P:\ S:\ /E /R:0
Note: Errors when copying the active BCD store instance are normal.

2) Rename the BCD copy on the second disk:
rename S:\EFI\Microsoft\Boot\BCD2 BCD
3) Delete the temporary copy from the first disk:
del P:\EFI\Microsoft\Boot\BCD2
Removing Drive Letters
1) Launch diskpart and run the commands:
sel vol P
remove
2) Repeat for the second disk:
sel vol S
remove
Testing Boot
Restart the system and select Windows Boot Manager 2 in the BIOS. Then choose to boot from the secondary disk. If all settings are correct, the system will boot successfully.
Now your system is ready to work with software RAID in a UEFI environment. With proper configuration, you’ll ensure data redundancy and the ability to boot from either disk. However, remember that RAID requires regular maintenance and monitoring of the array’s health.
Каким бы мощным ни был ваш компьютер, у него все же есть одно слабое место: жесткий диск. Он отвечает за целостность и безопасность ваших данных и оказывает значительное влияние на производительность вашего ПК. При этом жесткий диск – единственное устройство в системном блоке, внутри которого есть движущиеся механические части, что и делает его слабым звеном, способным полностью вывести из строя ваш компьютер.

Сегодня есть два способа ускорить работу вашего компьютера: первый – купить дорогой SSD, а второй – по максимуму использовать материнскую плату, то есть настроить массив RAID 0 из двух жестких дисков. Тем более RAID-массив можно использовать и для повышения безопасности ваших важных данных.
В этой статье мы рассмотрим, как создать программный RAID с помощью встроенных инструментов Windows.
Содержание
- Создание программного RAID с помощью встроенных инструментов Windows 8 или Windows 10
- Как создать программный RAID при помощи функции «Дисковые пространства»
- Как создать программный RAID при помощи функции «Управление дисками»
- Как добавить или удалить диск в уже существующем массиве RAID
- Как добавить диск в RAID
- Как удалить диск из RAID-массива
- Создайте программный RAID с помощью командной строки
- RAID 0
- RAID 1
- Программное создание RAID в Windows 7
- Как исправить ошибку «Can’t Add new drive, error 0x00000032»?
- Что делать, если вы потеряли важные данные на RAID-массиве
Современные материнские платы позволяют создавать дисковые RAID-массивы без необходимости докупать оборудование. Это позволяет значительно сэкономить на сборке массива в целях повышения безопасности данных или ускорения работы компьютера.
Создание программного RAID с помощью встроенных инструментов Windows 8 или Windows 10
Как создать программный RAID при помощи функции «Дисковые пространства»
Windows 10 имеет встроенную функцию «Дисковые пространства», которая позволяет объединять жесткие диски или твердотельные накопители в один дисковый массив, называемый RAID. Эта функция была впервые представлена в Windows 8 и значительно улучшена в Windows 10, что упростило создание многодисковых массивов.
Чтобы создать массив RAID, вы можете использовать как функцию «Дисковые пространства», так и командную строку или «Windows PowerShell».
Перед созданием программного RAID необходимо определить его тип и для чего он будет использоваться. Сегодня Windows 10 поддерживает три типа программных массивов: RAID 0, RAID 1, RAID 5 (Windows Server).
Вы можете прочитать о том, какие типы RAID существуют и какой RAID в каких целях лучше использовать, в статье «Типы RAID и какой RAID лучше всего использовать».
Итак, мы определились с типом RAID. Затем для создания дискового массива мы подключаем все диски к компьютеру и загружаем операционную систему.
Стоит отметить, что все диски будущего RAID должны быть одинаковыми не только по объему памяти, но желательно и по всем другим параметрам. Это поможет избежать многих неприятностей в будущем.
Далее, чтобы создать программный RAID-массив, выполните следующие действия:
- Откройте «Панель управления», щелкнув правой кнопкой мыши «Пуск» и выбрав «Панель управления» («Control Panel»).
- В открывшемся окне выберите «Дисковые пространства» («Storage Spaces»)

- Затем выберите «Создать новый пул и дисковое пространство» («Create a new pool and storage space»).
- Выберите диски, которые вы хотите добавить в массив RAID, и нажмите «Создание пула носителей» («Create pool»).
Важно: все данные на дисках, из которых создается RAID-массив, будут удалены. Поэтому заранее сохраните все важные файлы на другой диск или внешний носитель.
После того, как вы настроили массив, вы должны дать ему имя и правильно настроить.
- В поле «Имя» введите имя нашего RAID-массива.
- Затем выберите букву и файловую систему для будущего RAID

Именно с этим именем и буквой массив будет отображаться в системе Windows.
- Теперь вы должны выбрать тип устойчивости.
- Простой (без отказоустойчивости) – это RAID 0;
- Двустороннее зеркало — RAID 1;
- Трехстороннее зеркало – это тоже RAID 1 (с разницей только в количестве копий основного жесткого диска);
- Четность – RAID 5.
В зависимости от выбранного типа RAID мастер автоматически установит максимально доступную емкость дискового массива.
Обычно это значение немного ниже, чем фактический объем доступных данных, и вы также можете установить больший размер дискового пространства. Однако имейте в виду, что это сделано для того, чтобы вы могли установить дополнительные жесткие диски, когда массив будет заполнен, без необходимости перестраивать его.
- Нажмите «Create storage space».
После того, как мастер настроит ваш новый RAID, он будет доступен как отдельный диск в окне «Этот компьютер».

Новый диск не будет отличаться от обычного жесткого диска, и вы можете выполнять с ним любые операции, даже зашифровать его с помощью BitLocker.


Об использовании BitLocker вы можете прочитать в статье «Как зашифровать данные на жестком диске с помощью BitLocker».
Вы можете создать еще один программный RAID. Только количество жестких дисков, подключенных к ПК, ограничивает количество создаваемых RAID-массивов.
Как создать программный RAID при помощи функции «Управление дисками»
Еще одним способом создания программных RAID массивов в операционной системе Windows является использование встроенной утилиты под названием «Управление дисками». Она позволяет создавать все базовые типы RAID. Также, как и предыдущий, этот способ достаточно легкий и не требует глубоких знаний операционной системы. Итак, чтобы создать программный RAID 0 следует:
Шаг 1: Щелкните правой кнопкой мыши по «Пуск» и выберите «Управление дисками»
Шаг 2: Перед вами откроется «Управление дисками», в котором будут отображаться все подключенные диски. Щелкните правой кнопкой мышки и выберите «Создать чередующийся том»

Шаг 3: Откроется «Мастер создания чередующихся томов». Щелкните «Далее», затем выделите в левой части окна мастера диски, которые хотите добавить в массив RAID 0 и нажмите «Добавить». Когда все нужные диски будут добавлены нажмите «Далее»


Шаг 4: Назначьте букву массива, выбрав нужную из списка (буква устанавливается автоматически, так что вы можете оставить все так, как предлагает мастер создания массива) и снова нажмите «Далее»

Шаг 5: На этом этапе нужно выбрать файловую систему будущего массива. Выберите «NTFS» и снова нажмите «Далее»

Шаг 6: На этом этапе нажмите кнопку «Готово». Система покажет предупреждение, что выбранные диски будут конвертированы в динамические и что вся информация на них будет уничтожена. Нажмите «Да»

Начнется форматирование и синхронизация дисков, после чего наш массив RAID 0 будет создан.
Массив RAID 1 создается аналогичным образом, только на первом шаге вместо «Чередования» выберите «Зеркалирование».

Все остальные шаги выглядят аналогично.
Как добавить или удалить диск в уже существующем массиве RAID
Как добавить диск в RAID
Предположим, у вас уже есть программный RAID-массив, и вы его используете. Однажды может возникнуть ситуация, когда вам станет не хватать места на диске. К счастью, Windows 10 позволяет добавить еще один диск в уже существующий массив с помощью встроенных инструментов.
Чтобы добавить диск, вы должны открыть утилиту «Дисковые пространства», используя метод, описанный выше, и выбрать «Добавить диски».

В открывшемся меню выберите диск, который хотите добавить, и нажмите «Добавить диск». Жесткий диск будет добавлен к уже существующему массиву RAID.
Как удалить диск из RAID-массива
Чтобы удалить диск из RAID-массива, следуйте алгоритму:
- Откройте утилиту «Дисковые пространства», как описано выше, и нажмите кнопку «Изменить параметры».
- Откройте существующий массив RAID и выберите «Физические диски».
- Во всплывающем списке выберите диск, который вы хотите удалить, и нажмите «Подготовить к удалению».

Windows автоматически перенесет данные на другие диски, а кнопка «Подготовить к удалению» изменится на «Удалить».
После нажатия кнопки «Удалить» система удалит диск из RAID. Для дальнейшей работы с этим накопителем вам потребуется создать на нем новый раздел. Для этого вы можете использовать встроенную утилиту diskpart или утилиту Disk Management.

О том, как использовать утилиту «diskpart», вы можете прочитать в статье «Использование Diskpart для управления и восстановления жесткого диска, карты памяти или USB-накопителя».
Создайте программный RAID с помощью командной строки
Другой способ создать программный RAID – использовать командную строку или Windows PowerShell.
Чтобы создать программный RAID с помощью командной строки:
- Щелкните правой кнопкой мыши «Пуск» и выберите «Командная строка (Администратор)» или «Windows PowerShell (Admin)».
- В открывшемся окне введите команду «diskpart» и нажмите «Enter».

Чтобы отобразить список дисков, введите «list disk».
Утилита Diskpart отобразит все диски, подключенные к вашему ПК.

- Выберите диски, которые вы хотите добавить в массив RAID, один за другим, и превратите их в динамические диски с помощью команд:
- select disk 1 – где 1 – номер желаемого диска
- convert dynamic – преобразовать в динамический
- select disk 2
- convert dynamic
- select disk 3
- convert dynamic
Теперь, когда мы преобразовали наши диски, мы можем создать том RAID, введя следующие команды:
- select disk 1
- Create Volume RAID Disk 1, 2, 3
После этого следует убедиться, что массив создан.
Для этого введите команду «list disk».
Все диски будут объединены в один диск.
- Теперь все, что вам нужно сделать, это отформатировать диск и присвоить ему букву. Для этого введите следующие команды:
- select volume 2
- Format FS=NTFS Label=MyNewVolume
- Assign Letter=F
- Введите «exit» и нажмите Enter.
После этого выбранные диски будут объединены в RAID-массив.
Отметим, что с помощью этого метода будет создан RAID 5.


RAID 0
Если вы хотите создать RAID 0, в утилите Diskpart введите:
- list disk;
- create volume stripe size=n disk=1,2,3 – где n — размер в мегабайтах, а 1,2,3 — номера дисков, которые будут включены в массив RAID 0.
RAID 1
Чтобы создать RAID 1, вам необходимо ввести следующие команды одну за другой:
- list disk – для отображения подключенных дисков;
- select disk 0 — количество дисков, их которых создается зеркало;
- convert dynamic – преобразование диска в динамический.
Внимание! Иногда появляется сообщение «Вам следует перезагрузить компьютер, чтобы завершить эту операцию». Если оно появилось – перезагрузите компьютер.
Если есть сообщение об успешной конвертации – продолжайте работу и введите:
- select volume 0 – выбрать нужный диск;
- add disk=1 – добавить нужный диск для зеркалирования.
После этого будет создан массив RAID 1.
Программное создание RAID в Windows 7
В Windows 7 вы можете использовать утилиту «Управление дисками» для создания программного RAID. Следует отметить, что диск, с которого загружается система, нельзя использовать в RAID, так как он будет преобразован в динамический. Вы можете использовать любые диски, кроме системных.
Шаг 1. Откройте «Пуск», щелкните правой кнопкой мыши «Компьютер» и выберите «Управление».

Шаг 2: В появившемся мастере нажмите «Далее».

Шаг 3. В открывшемся меню вы должны выбрать диски, которые вы хотите объединить в массив RAID, и нажать «Далее».

Шаг 4: Выберите букву для созданного RAID-массива и нажмите «Далее».
- S (Striping) — соответствует RAID 0;
- M (Mirroring) — соответствует RAID 1;

Шаг 5: В следующем окне выберите тип файловой системы (NTFS), укажите размер блока и укажите имя тома. После этого нажмите «Далее».

Шаг 6: После того, как система создаст новый массив RAID, нажмите кнопку «Готово».

После нажатия кнопки «Готово» появится окно с предупреждением о том, что будет выполнено преобразование базового диска в динамический и загрузка ОС с динамического диска будет невозможна. Просто нажмите «ОК».
После этого созданный RAID-массив отобразится в окне «Мой компьютер» как обычный жесткий диск, с которым можно выполнять любые операции.
Как исправить ошибку «Can’t Add new drive, error 0x00000032»?
Иногда при добавлении диска в RAID массив может появляться ошибка «Can’t Add new drive, error 0x00000032». В некоторых случаях эта ошибка появляется при создании RAID массива. Причем, ошибка 0x00000032 может появится даже после того, как вы очистили и отформатировали ваш накопитель. Обычно она возникает на дисках, которые уже использовались в RAID массиве или в операционной системе.
В некоторых случаях RAID массив может сообщать о поломке диска, хотя на самом деле с ним все в порядке. Чтобы решить этот вопрос нужно сначала понять причину возникновения ошибки.
Причиной возникновения ошибки «Can’t Add new drive, error 0x00000032» являются неправильные метаданные, которые остаются на диске даже после очистки и форматирования накопителя. Кроме того, часто причиной ошибки являются данные в загрузочном секторе, которые форматирование и очистка диска не удалили.
Все дело в том, что очистка диска и форматирование не очищают диск физически, а только удаляют все «ссылки на файлы», и указывают операционной системе, что она может записывать информацию в новый раздел, стирая предыдущие данные.
Однако, физически файлы (в том числе и метаданные) остаются на диске и при добавлении диска в RAID массив вызывают ошибки.
Чтобы исправить ошибку «Can’t Add new drive, error 0x00000032» нужно «сбросить проблемный диск».
Для этого следует:
Шаг 1: Щелкните правой кнопкой мыши по «Пуск» и выберите «Windows PowerShell (Администратор)»
Шаг 2: В открывшемся окне введите команду:
Get-PhysicalDisk | ft FriendlyName, SerialNumber, UniqueId –auto
…и нажмите «Enter» для ее выполнения.

Шаг 3: Перед вами откроется список ваших дисков, в котором будет указано имя каждого диска (колонка FriendlyName) и его уникальный идентификатор (колонка UniqueID).
Выделите UniqueID нужного диска и скопируйте его при помощи комбинации клавиш «Ctrl + C»

Примечание: вы также можете использовать имя диска (FriendlyName), однако в некоторых случаях система можете отображать одинаковое имя для всех дисков. Поэтому для избегания ошибок лучше всего использовать UniqueID диска.
Шаг 4: Чтобы сбросить ваш диск используйте следующую команду:
Reset-PhysicalDisk -UniqueId "your-unique-id"
…заменив your-unique-id на идентификатор диска, который вы скопировали ранее (чтобы вставить идентификатор используйте комбинацию клавиш «Ctrl +V»). В результате ваша команда должна выглядеть примерно, как на скриншоте ниже.

Важно: уникальный идентификатор вашего диска должен находится в двойных кавычках. Иначе команда не будет работать.
После этого вы снова можете использовать этот диск в вашем RAID–массиве.
Что делать, если вы потеряли важные данные на RAID-массиве
Использование RAID-массивов может значительно повысить безопасность данных, что очень важно в современном мире. Однако нельзя исключать человеческий фактор.
Потеря важных файлов возможна из-за случайного удаления, форматирования, изменения логической структуры файловой системы и многих других причин. Кроме того, не исключен сбой RAID.
В этой ситуации лучше не принимать поспешных решений. Оптимальный вариант — обратиться к специалистам или воспользоваться специализированным ПО для восстановления данных.
RS RAID Retrieve способен восстановить любой тип RAID-массива, поддерживает все файловые системы, используемые в современных операционных системах.

Часто задаваемые вопросы
RAID1 — это массив, состоящий из двух и более дисков, являющихся полными копиями друг друга.
Да. Вы можете без проблем создать программный RAID 0 в Windows 10. О том, как это сделать, вы можете прочитать в нашей статье.
Максимальное количество дисков в RAID 1 ограничено только производительностью вашего компьютера/сервера/NAS, поскольку чем больше дисков используется, тем медленнее будет скорость записи. Если используется слишком много дисков, из-за нехватки вычислительной мощности контроллера скорость записи может упасть настолько, что пользоваться массивом будет очень неудобно.
Нет. В RAID 0 вообще нет избыточности, так как все дисковое пространство предназначено для хранения данных. Если один диск выйдет из строя, пользователь потеряет данные и на втором диске, потому что все файлы разделяются во время записи, которая записывается на оба диска одновременно.
-
-
#1
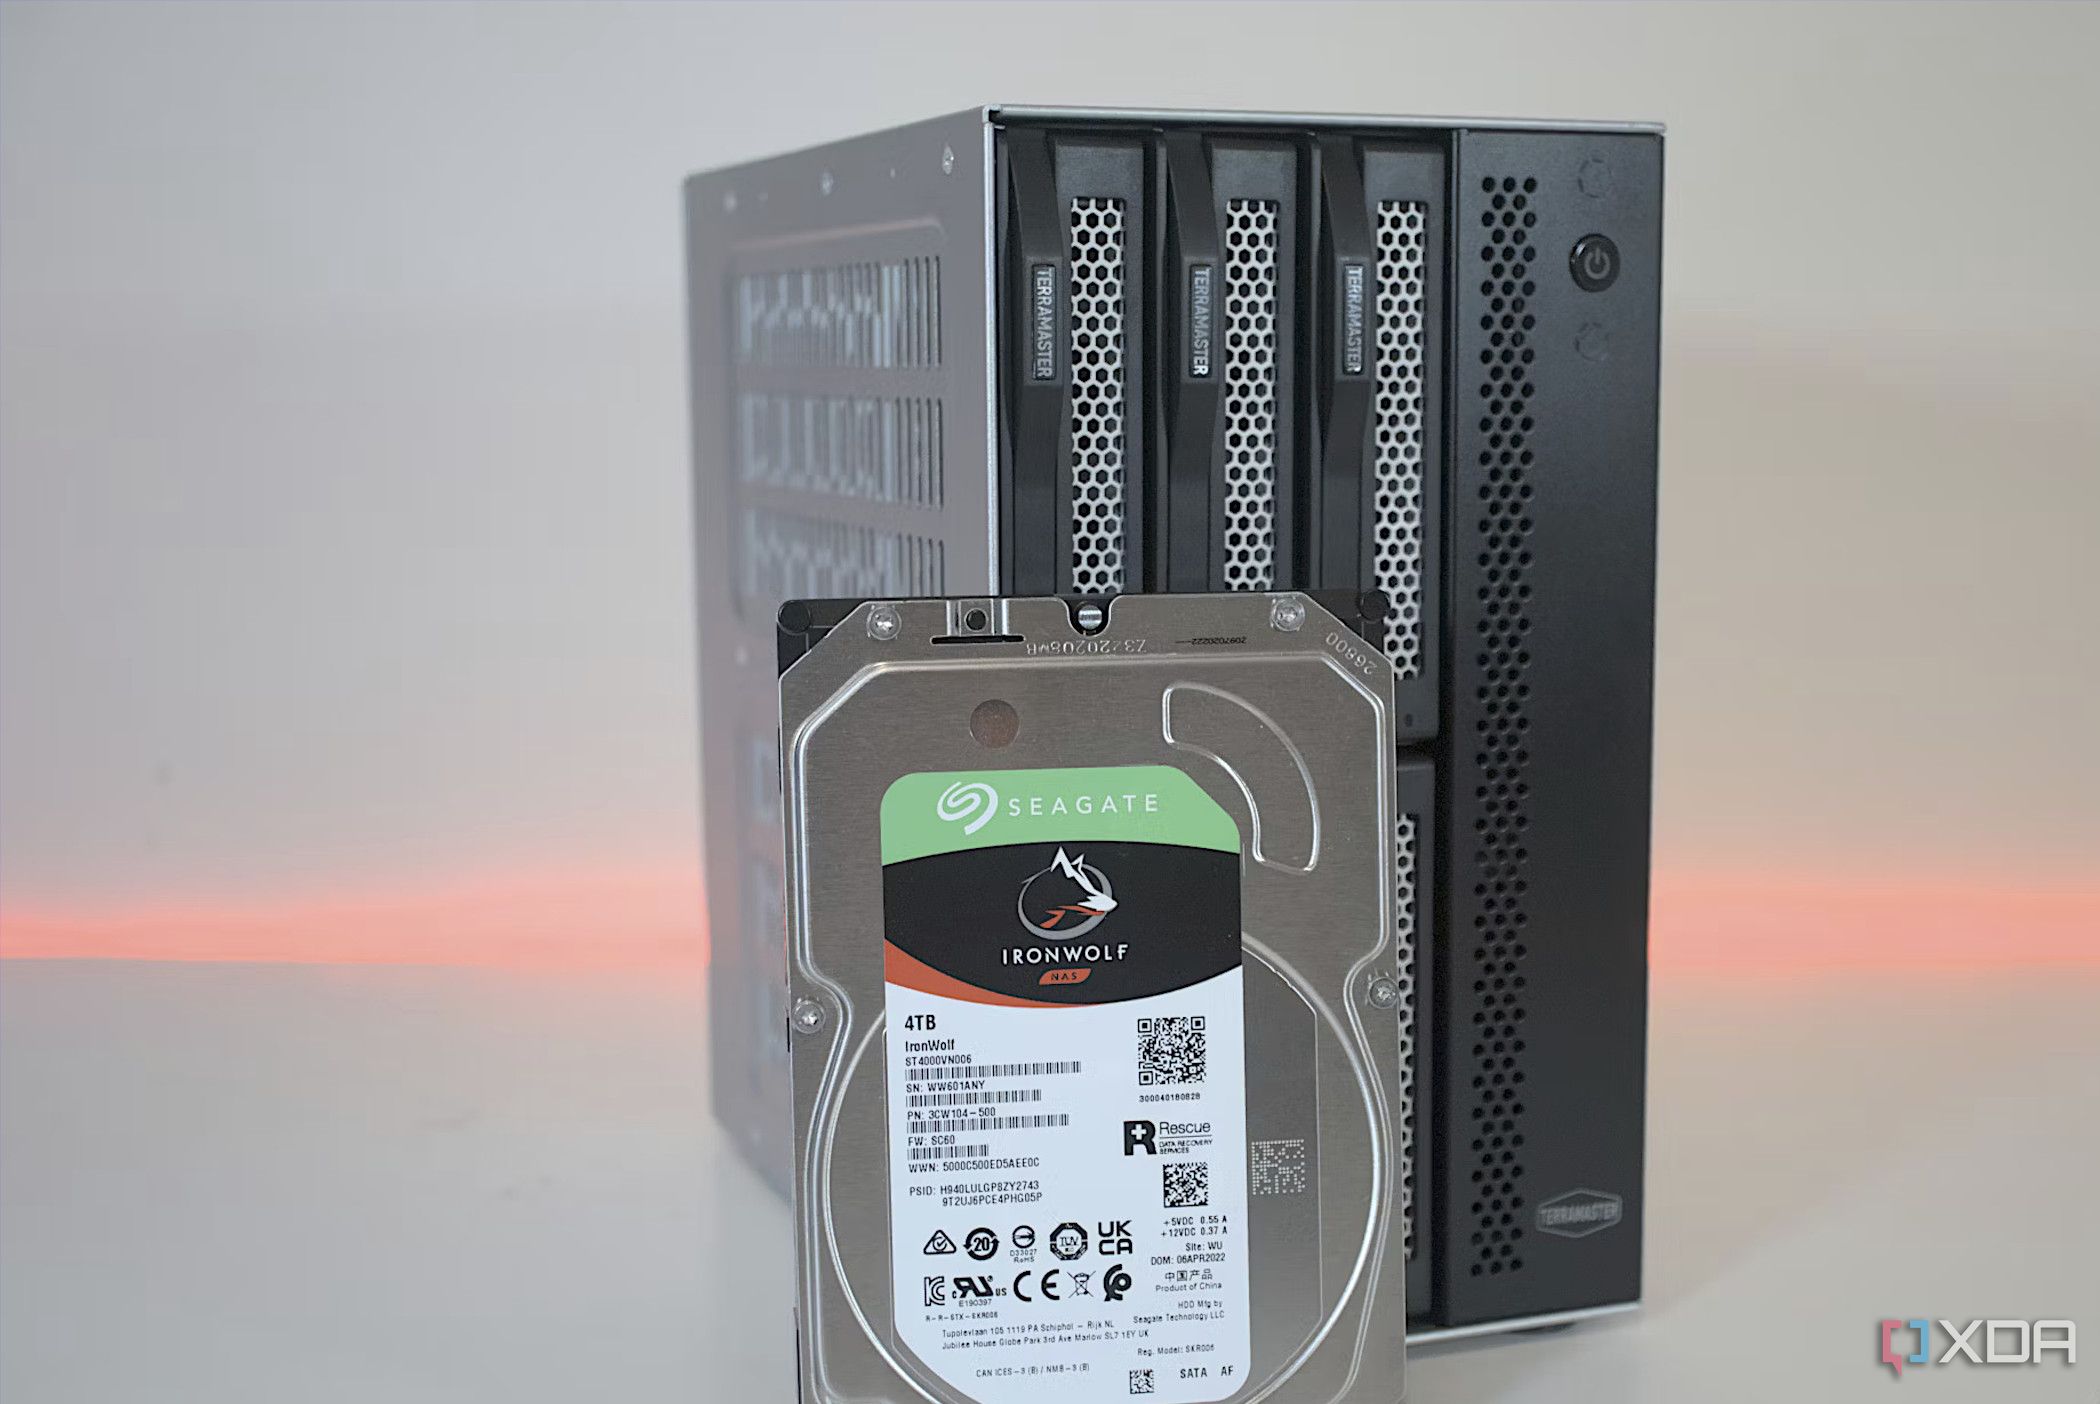
I have 4 x 18TB Seagate Ironwolf Pro hard drives and a TerraMaster D6-320 enclosure.
I have 18TB total combination of NVMe and SSDs internally within my desktop.
I am hoping to use the external enclosure and drives as an external backup and storage space.
What is the best way to set up with decent read and write speeds? The enclosure is USB 3.2 Gen 2 10Gbps and has no hardware RAID.
Is there any software RAID solution I can use? And ideally, one that will let me switch enclosure over to my laptop too and still be usable in the same way.
-
-
#2
if you want to keep it simple you can basic raid array1/10/5 with windows disk management and it will work on another windows system
for pool management windows got storage spaces which which is more advanced but may need some powershell commands to get what you want
what kind of raid depends what do you prefer, raid5 (3+1) for most capacity or raid10 for best write speed
-
-
#4
Storage Spaces
Stablebit Drivepool
DriveBender
SnapRAID
-
-
#5
Yeah I would also like to know. I’ve always just used computer management and its never failed on me, ever. But the thing is, then you can’t trim. I’ve heard you can trim with board level raids, but I also hear they break easier. While not the end of the world, I’d still rather avoid.
Also… what is with microsoft’s ‘manage storage spaces’ its supposed to be like raid I guess but I’ve never been able to get hardly and performance benefit out of it. Am I using it wrong? Idk.
Sign in to your XDA account
RAID or Redundant Array of Independent Disks combines multiple disks into a single storage pool that the operating system views as a single drive. While enterprise systems use hardware RAID with a dedicated RAID controller for better performance and more reliability, the average consumer can make use of software RAID on Windows to boost performance and introduce some data redundancy. This is what I did when I found out about Storage Spaces on Windows.
By using two or more of your hard drives or SSDs (or a mix of them), you can double your read/write speeds on your NAS or your regular PC with the right RAID configuration. And although RAID shouldn’t be relied on for data backup, per se, it does inject data redundancy into your home setup. Let’s look at how you can use Storage Spaces to set up software RAID on Windows.
Related
Why use software RAID instead of hardware RAID?
Simpler, cheaper, more flexible
Hardware-level RAID requires a dedicated RAID controller card to offload all the heavy lifting from the CPU, enabling faster performance. It also generally has a lot more features to enable redundancy and reliability, such as built-in cache and battery-backed write caches (BBWC). So, why use software RAID then?
The thing is, the average PC or DIY NAS user doesn’t require enterprise-level fault tolerance, performance, and uptime. Modern software RAID solutions enabled by operating systems like TrueNAS Scale and Unraid are advanced enough for home use, saving money while offering more simplicity and flexibility. You can easily migrate your software RAID setup to another system, and data recovery is relatively simpler too.
While Storage Spaces isn’t exactly the same as a dedicated NAS setup, it provides similar benefits by allowing you to create mirror and parity pools using multiple drives. You can combine the capabilities of multiple drives to boost read/write speeds (depending on the RAID configuration you choose) while also allowing you to recover data in case one of your drives encounters a failure.
Related
Why you should always back up your NAS, even if you use RAID
Using RAID alone isn’t enough to protect against data loss.
Setting up software RAID on Windows
Get ready to RAID
Using Windows’ built-in Storage Spaces (available on both Windows 11 and Windows 10), you can simplify the process of creating a storage pool on your PC. It’s not the same as a full-fledged RAID setup (software or hardware), but it’s a good starting point if you’re new to shared storage. It’s also less technical and much simpler to set up than a traditional software RAID setup. You can create an SSD-only or mixed storage pool, but you will get the maximum mileage by using multiple hard drives, since SSDs are already fast enough for most use cases.
Storage spaces will erase your drives, so back up any data that you aren’t comfortable losing. You can later copy it back to your newly created storage pool.
- Open Settings > System.
- Select Storage > Advanced storage settings.
- Select Storage Spaces, then click Add.
- Enter a custom name for the storage pool.
- Choose the connected drives you want to be part of the pool.
- Click Create.
- Set the desired pool size under Size & resiliency.
- Select a pool resiliency. Simple (RAID 0) indicates no data redundancy. Two-way mirror (RAID 1) requires at least 2 drives and can handle a single drive failure. Three-way mirror (RAID 1) requires at least 5 drives and can handle 2 parallel drive failures. Parity (RAID 5) requires at least 3 drives. Dual parity (RAID 6) requires at least 7 drives. I used Two-way mirror to combine the read/write speeds of two of my hard drives in a RAID 1 configuration, where all the data is copied to the second drive for redundancy. Your total capacity will be reduced by half, though.
- Click Create.
- Set a volume label of your choice.
- Set a drive letter (from the available options).
- Choose the file system. I recommend NTFS.
- Click Format.
- Open This PC to see your new storage pool (under the chosen drive letter and label).
Experiment with a speedier and safer PC
Setting up software RAID using Storage Spaces can be a simple and quick way to speed up your boot time, drive access time, and even game loading times, although the benefits might be minimal in some cases. You will have to sacrifice the total capacity, since using at least one drive for redundancy or parity is recommended. Users with more hard drives than SSDs will find this setup more useful, since they’ll be able to realize the largest performance benefits.