
Привет. Наверняка вы обращали внимание, что если вы запускаете bat скрипт из сетевой папки, то у вас выскакивает предупреждение безопасности.

Либо если вы заходите на какой-то сайт, например онлайн банк-клиент, то у этого сайта очень многие элементы заблокированы. Решить подобные проблемы можно, если добавить необходимые доменные имена ресурсов в определенные зоны безопасности в Internet Explorer. Как правило — это местная интрасеть, либо надежные сайты.
И если с добавлением единичных сайтов, для одного пользователя проблем нет, то в массовых случаях нужно что-то придумывать, что б не бегать по всем компьютерам.
Сегодня хочу показать вам как можно автоматически добавлять домены и сайты в зоны безопасности, при помощи групповых политик.
Покажу вам 2 способа.
Первый способ – воспользуемся административными шаблонами.
Для этого в редакторе групповых политик идем в User Settings – Administrative Templates – Windows Components – Internet Explorer – Internet Control Panel – Security Page. Тут нам нужен параметр Site to Zone Assignment List.

Включаем его, и задаем необходимые зоны. В поле Value name вписываем, например dc.test.loc или http://dc.test.loc, в зависимости от ваших нужд. Так же в Value можно задать IP адрес, или диапазон IP адресов. В поле Value – задаем цифровое значение, где 1 –Местная Интрасеть (Intranet Zone), 2 – Доверенные Сайты (Trusted Sites), 3 – Зона Интернета (Internet Zone) и 4 – Небезопасные Сайты (Restricted Sites).

После применения этой политики в свойствах зоны будут те домены, которые вы указали, но при этом пользователю самостоятельно будет запрещено редактировать эти зоны.
Если же вам нужно распространить зоны и при этом, дать пользователям возможность еще и самостоятельно добавлять необходимые им сайты, тогда нужно распространять их через реестр, а не через административные шаблоны.
Второй способ:
Для этого опять же идем в редактор групповой политики и идем по пути User Configuration – Preferences – Windows Settings – Registry. Тут добавляем новый элемент реестра.

Для области указываем HKEY_CURRENT_USER, для пути – Software\Microsoft\Windows\CurrentVersion\Internet Settings\ZoneMap\Domains\test.loc\dc Соотвественно тут я добавляю домен host.test.loc. Если нужно добавить целый домен, тогда добавляйте в конце строки просто \test.loc
В поле Value name указываем протокол (http, https и т.д.), если необходимо добавить все протоколы, тогда указываем *.
Value Type должен быть REG_DWORD.
В Value Data должна быть цифра. Цифры тут такие же, как и для зон при задании через административные шаблоны (1 –Местная Интрасеть (Intranet Zone), 2 – Доверенные Сайты (Trusted Sites), 3 – Зона Интернета (Internet Zone) и 4 – Небезопасные Сайты (Restricted Sites)).

Если вы хотите, чтобы для зоны стояла галка – Для всех сайтов зоны требуется проверка подлинности серверов (https), то нужно добавить следующую запись в реестр, так же для ветки пользователя (HKCU):
Software\Microsoft\Windows\CurrentVersion\Internet Settings\Zones\1\
Value name – Flags
Value type – REG_DWORD
Value Data – 71 – для того, что бы галка стояла, и 67 – что бы была отключена.

Если вы хотите добавить диапазон IP адресов, тогда нужно добавлять 2 параметра.
1ый:
SOFTWARE\Microsoft\Windows\CurrentVersion\Internet Settings\ZoneMap\Ranges\local
Value name – :Range
Value type – REG_SZ
Value Data – 192.168.1.0-254

2ой:
SOFTWARE\Microsoft\Windows\CurrentVersion\Internet Settings\ZoneMap\Ranges\local
Value name – * (или нужный вам протокол)
Value type – REG_DWORD
Value Data – 1 (номер зоны)

Надеюсь информация окажется вам полезной.
I recently had to assist a client with configuring a GPO to add sites in Internet Explorer 11’s trusted zones and disabling «Require server verification (https:) for all sites in this zone» so I thought I’d write this blog post to outline the registry keys required for the settings.
Note that this post will only demonstrate configuring the registry for HKEY_CURRENT_USER and it is also possible to apply the changes HKEY_LOCAL_MACHINE.
Enabling or Disabling «Require server verification (https:) for all sites in this zone»
The registry key that controls the Require server verification (https:) for all sites in this zone setting is the REG_DWORD setting named Flags located in the following registry + the # representing the zone (we’ll use zone 2 which represents Trusted Sites):
HKEY_CURRENT_USER\Software\Microsoft\Windows\CurrentVersion\Internet Settings\Zones\
The value to enable the configuration is:
Hex: 47
Decimal: 71


The value to disable the configuration is:
Hex: 43
Decimal: 67

You can use Group Policy preferences to configure this for the user:

Adding URLs of Trusted Sites
The registry path for adding URLs of trusted sites is:
Software\Microsoft\Windows\CurrentVersion\Internet Settings\ZoneMap\Domains\
Adding http://www.msn.com would look as such:

Notice how the site URL www.msn.com is an actual key under the Domains key:

To add the msn.com and all of its subdomain, you can add the following key:
Software\Microsoft\Windows\CurrentVersion\Internet Settings\ZoneMap\Domains\msn.com


If you saw my tweet or Darren Mar-Elia blog post you may be glad to know that the legacy Internet Explorer Maintenance section of group policy has now been removed in Windows 8. Unfortunately this means that you can now longer natively configured the IE Site to Zone mapping using native group policy setting without still allowing the user to customise the URL list. So below I will show you how you can still use Group Policy to configure the IE Zone via group policy while still allowing the user the ability to add additional sites.
Put simply we are going to setup the IE Zone registry keys manually using Group Policy Preferences…
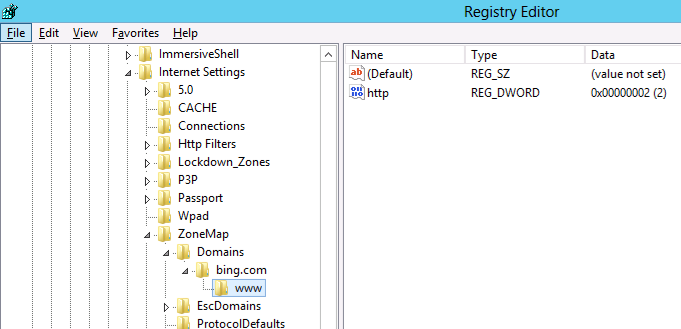
However it’s a little complicated as the URL that is in the Site to Zone mapping is actually stored as the name of the key. Finally the protocol is the registry value with a number that assigns it to the corresponding zone. In the example we use we will first look at the currently site that the users has setup in the trusted site list (www.bing.com). As you can see below the zone is store at HKCU\Software\Microsoft\Windows\CurrentVersion\Internet Settings\ZoneMap\Domains then the domain is stored as a key “Bing.com” then “www”. Within the “www” key the protocol (http and/or https) is the value name with the value representing what zone it should be a member.
Note: We are just using bing.com as an example as you would never add at search engine as a trusted site.
Now we will add the additional site www.google.com.au also to the trusted sites list using group policy.
Step 1. Edit a Group Policy that is targeted to the users that you want the IE Zones applied.
Step 2. Create a new Group Policy Preferences Registry Extension then select the “HKEY_CURRENT_USERS” Hive and then type “Software\Microsoft\Windows\CurrentVersion\Internet Settings\ZoneMap\Domains\google.com.au\www” in the Key path. Then enter the Value name of “HTTP” and selected the Value Type as “REG_DWORD” and set the value data as “00000002”.
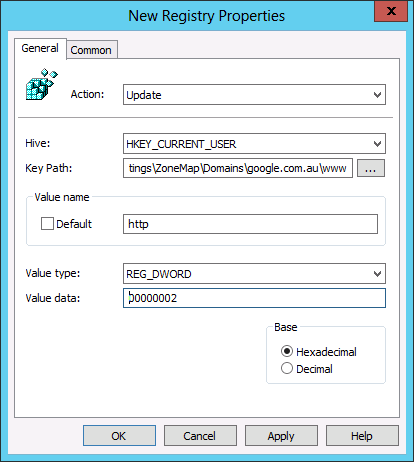
And you’re Done…
TIP: For your reference the values and their corresponding Zones are listed below in the table.
| Value | Zone Name |
| 00000000 | My Computer |
| 00000001 | Local Intranet |
| 00000002 | Trusted Site |
| 00000003 | Internet |
| 00000004 | Restricted |
As you can see below the IE zone will push out to your users and it will be added to the trusted zone list, while still allowing them to add and remove other zones from the list.
TIP: As always the native group policy settings will take precedence over Group Policy Preferences therefore if you have the “Site to Zone Assignment List” setting configured as well this will override (not merge) the above settings (See image below).
Related Articles
47 thoughts on “How to configuring IE Site Zone mapping using group policy without locking out the user”
-
-
Hi Alan,
Where on earth did you find this little gem?
Eric 😀
-
Yes!
-
-
I worked this one out on my own a few years back, Should have written a blog / guide back then! I’d be a millionnaire!!
But still – this is a great way to allow the users to add their own trusts, of on site to fix a broken site without returning to GPO Editor just for a single user!
Nice one.
-
I wasn’t able to get this to work. I tried it on both User and Computer settings. There was no sub folder under ‘hotmail.com’. The domain I’m trying to remove.
-
I’m unable to get this to work. Even the group policy results test shows it is successful, but it never shows up in the IE Internet settings. I’ve added a REG entry to also “uncheck” the require https: and that doesn’t show up either. I’ve test on both WinXP with IE8 and Win7 with IE9. Same results. I’ve looked at the registry and see nothing added. Plus, there are no errors in the event log.
Strange behavior.
-
I just troubleshooted with the same problem that it was not working with no error message to troubleshoot anywhere.
SOLUTION: I fired up regedit and navigated to “HKEY_CURRENT_USER\Software\Microsoft\Windows\CurrentVersion\Internet Settings\ZoneMap\” There I saw the site I wanted to add as a sub-key to “ZoneMap” and not as a subkey to “Domains” as it is supposed to be. The “Domains” subkey was empty. I deleted the site from “ZoneMap” and then did a gpupdate. When I then refreshed regedit the site was created no the correct location and everything was working. 🙂
-
Thanks for the info, but this isn’t my experience at all.
I’ve checked the registry for this same error and see nothing. I’ve even searched the entire registry for the domain name, and it finds nothing…
I’ve got a computer policy that is applied to the OU where the computer lives. All items in the policy are updating successfully, except for the registry entries. I’ve run the group policy results and see no errors. I’ve even created the policy by using the registry wizard and importing the items from my local registry. When I check the local registry on my test machines, I see nothing change. If I add the entries via IE, then they show up in the correct places. I’m stumped why this isn’t working…
-
Tough one. I often had typos in the GP preferences mess things up for me in the past, also the correct amount of \ signs in the key path is important. Personally I have never used it in computer policy, but I’ve always used user policy, perhaps that is worth a try? Also I always use “Replace” and not “update” in the GP Preference.
-
What do you mean by, “the correct amount of signs in the key path”? What is a sign?
I had the same thought about user policy yesterday and tried that as well. No luck. I haven’t tried the “Replace” option. I’ll test that next.
-
A bit clumsy explained, sorry about that. But I meant where you put the (slash) \ in the path. “Software\Microsoft\Windows\CurrentVersion\Internet Settings\ZoneMap\Domains\*.contoso.com” is the correct path, but if you write “\Software\Microsoft\Windows\CurrentVersion\Internet Settings\ZoneMap\Domains\*.contoso.com” or “Software\Microsoft\Windows\CurrentVersion\Internet Settings\ZoneMap\Domains\*.contoso.com\” then it will fail.
-
-
Not sure why but I can’t make this work at all. The GPP does not write the reg entries at all. I tried changing the action to create and also update, but no difference. Any suggestions?
-
well John, you don’t really tell me much of your setup so there is not much for me to go on here. But in general my checklist would be something like this:
1. It’s a GPP setting under the user (not computer) and it writes to the HKCU hive?
2. Use “replace”
3. Trippe-check that the path is written correctly. For example: “Software\Microsoft\Windows\CurrentVersion\Internet Settings\ZoneMap\Domains\*.contoso.com”
4. Use “gpresult -r” on the client computer to check that the user gets the GPP
5. If the user gets the GPP, check the application log on the computer. If a GPP fails you will see it in the application log at the time the user logs in and it usually tells you why.That’s my suggestions at the moment.
-
-
You nailed the problem – I was using a computer policy, not a user policy. As soon as a rebuilt it as a user policy, everything fell into place perfectly. Thanks for posting this, it was a huge timesaver!
-
You’re welcome, I’m glad I could help. 🙂
-
-
Excellent post. I was just trying to figure out the exact registry keys to modify when I found this page.
Nice work ! -
For the same case.. My user wants to add site to their trusted site list.. Please help…
-
Mahfuj: I’m not sure what you mean. If you use GPP to configure the IE zones then the users are allowed to add sites to them. Do you want ot prevernt them from adding sites to the trusted site list? Or do you want to allow them to add sites to the trusted site list?
-
-
Yes.. I want my user will add sites to trusted site list….. But “Add this website to the zone” field and “Add” button is gray out.. for all users.
-
Yes.. I want to allow my users to add sites to trusted site list….. But “Add this website to the zone†field and “Add†button is gray out.. for all users.
-
This means you have the administrative template still configured for the user so it will prevent them from editing their zone list. You have to be sure that you ONLY configure IE site zones via Group Policy Preferences…
-
-
I agree with Alan, it is most likely another GPO that contains settings for the IE zones, either in computer or user settings.
-
Thanks… I’ve figureout the issue.. Site to zone assignments list should be Not Configured for both Computer and user configuration settings….
-
-
You have a typo in the third paragraph that starts with “Hoever it’s a little complicted. Typo: “As you can see below the zone is store at HKCU\Software\Microsoft\CurrentVersion\Internet Settings\ZoneMap\Domains…” should be “As you can see below the zone is store at HKCU\Software\Microsoft\Windows\CurrentVersion\Internet Settings\ZoneMap\Domains…” The “Windows” part of the path is missing 😉
-
@KJS thanks.. I have corrected…
-
-
What versions of IE does this method support?
-
I have not tested it… but I think will work with all versions.
-
-
I am really loathing the decision by MS to go down the GPP route without replacing existing functionality with something equally simple.
With this Zone mapping and the amount of work with getting favourites working it is a nightmare trying to replace existing simple easily updated GPOs with GPPs, I am not looking forward to doing it for Office. -
Helpful.
Thanks -
Worked perfectly; delivering the following record helped the annoying windows security prompts for executing VBS/HTA files off network shares:
file://privateDomainName.FQDN 1
file://privateDomainName 1Many thanks,
-
My spouse and I absolutely love your blog and find a lot of your post’s to be exactly what I’m looking for.
Would you offer guest writers to write content for you personally?
I wouldn’t mind producing a post or elaborating on some of the subjects you
write concerning here. Again, awesome weblog! -
That brings us to quite possibly the most intriguing match-up
to that point of the season when Oregon comes to Rice-Eccles.
Alabama will try to rebound from their loss to the Sooners and rank fourth in the Sporting News
college football preseason rankings. Ole Miss and Mississippi State moving
the Egg Bowl away from Jackson, Miss. -
What’s up, always i used to check web site posts here in the
early hours in the morning, because i like to find out more and
more. -
Alan, great post. I’m having this issue my question is would this solution work for widows 7?
-
Yes it will
-
-
Very helpful posting, many thanks.
-
Has anyone had trouble getting this to work with Windows XP? It works well with all my Win& PC’s but is hit and miss on the XP.
Thanks,
-
-
Excellent work Alan.
I know it is mentioned, but I would re-emphasize http or https as required.
As Per-Torben Sørensen suggested, use Replace. I’ve had issues with update instead of replace so I always use replace. It seems update doesn’t add something if it is missing, but replace does.
Remember rsop.msc is your friend. It doesn’t show the registry changes, but does show if an additional policy is applied that overrides the registry settings. With these specific settings, you can do a C:\>gpupdate /force, close and re-open the browser or re-run rsop.msc to see if the changes took place. All without logging out and back in, or rebooting.
Best,
David -
Much appreciated. Need to retain as much of the admin aspects for people doing programming while still giving them the tools needed for internal sites.
-
I am able to get the GP to work fine, however the site I am adding still doesn’t come up under the Intranet Zone as I have set. I am trying to add the internal IP of the site – 192.0.0.25. When I add this manually in IE, it works fine. When done through GP, it shows in IE under the Intranet zone, but doesn’t get treated like an intranet zone (File > properties, shows it as Internet). Is there a way to use the IP address instead of the domain name?
-
We needed to add a list of no less than 10 sites to the trusted list. Rather than doing it individually as you have shown, I exported the “Domains” key to a shared drive and then created a logon script that copies it to the local machine and then imports it to the registry. Now, whenever we need to add more trusted sites, I can just update the reg key in the shared location.
-
Question on using Wild Cards in the URL. I just found your post yesterday and am very excited about testing out using preferences in place of policies for our list of trusted sites.
I have several URLs that I am using wildcards in. If I enter the wildcard in the key path (Software\Microsoft\Windows\CurrentVersion\Internet Settings\ZoneMap\Domains\*.contoso.com) I end up with this listed in trusted sites in IE: http://*.contoso.com.
Will this function properly for all domains that add a prefix to .contoso.com? Also, is there anyway to use a wildcard to it would work with either http or https sites? We have several of those.
Thank you!
-
Excellent article…..working for me.
One thing I want to mention that If you want to add just e.g., http://google.com it is working fine.
but if you want to add http://google.com/xyz then you should add google.com/xyz after \Domains\
e.g.
Software\Microsoft\Windows\CurrentVersion\Internet Settings\ZoneMap\Domains\google.com/xyz -
Thanks for posting.
Is this applicable for HKLM registry location via GPP?
Since we need to implement for machine level.
-
Brilliant, thanks for this blog, works like a treat. thanks for your effort putting this up 5 years later and people are still coming across these things 🙂
Leave a Reply
В Windows при попытке открыть или запустить исполняемый файл типа exe, vbs, msi, bat, cmd (и других типов файлов) с локального диска или сетевой папки может появиться предупреждение Открыть файл – предупреждение системы безопасности (Open file — Security Warning). Для продолжения выполнения программы пользователь должен вручную подтвердить запуск такого файла, нажав кнопку “Запустить” (Run). Такое предупреждение безопасности Windows обычно появляется при открытии файла, скачанного из интернета, запуске исполняемого файла из общей сетевой папки или подключенного сетевого диска, или запуске файла с недействительной цифровой подписью.
Содержание:
- Предупреждение системы безопасности Windows при запуске файлов
- Отключение окна предупреждения при запуске файла, скачанного из Интернета
- Предупреждение безопасности при запуске файла из сетевой папки
- Перенаправление папки AppData и предупреждение при открытии файлов
- Отключить предупреждение для некоторых типов файлов через GPO
Предупреждение системы безопасности Windows при запуске файлов
Предупреждение системы безопасности предназначено для защиты компьютера от запуска потенциально опасных исполняемых файлов, которые были скачаны из Интернета или получены недоверенных источников, и пытаетесь запустить.
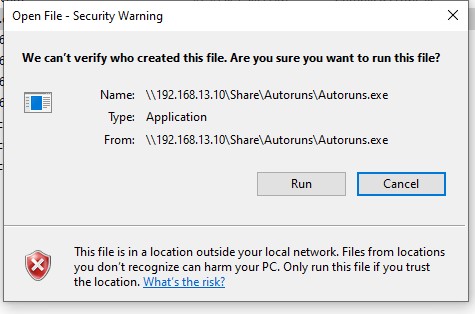
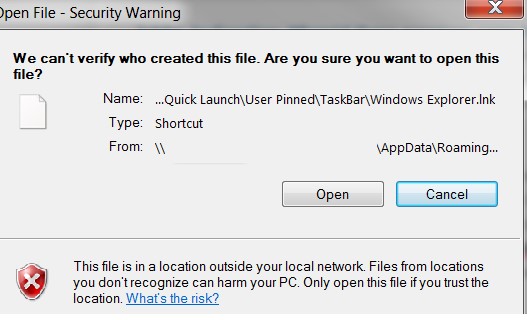
Например, при открытии файла из сетевого каталога окно предупреждения системы безопасности Windows выглядит так:
Открыть файл – предупреждение системы безопасности
Не удаётся проверить издателя. Вы действительно хотите запустить этот файл?
Этот файл не находится в вашей локальной сети. Файлы из неизвестных расположений могут причинить вред вашему компьютеру. Запускайте этот файл только в том случае, если вы доверяете его источнику.
Open File - Security Warning
The Publisher could not be verified. Are you sure you want to run this software?
This file is in location outside your local network. Files from locations you don’t recognize can harm your PC. Only run this file if you trust the location.
При запуске скачанного из Интернета файла с локального диска (или сетевого диска, подключенного через
net use
) текст предупреждения немного другой:
Open File - Security Warning

Do you want to run this file?
Открыть файл – предупреждение системы безопасности
Запустить этот файл?
Файлы из Интернета могут быть полезны, но этот тип файла может повредить компьютер. Запускайте только программы, полученные от доверенного издателя.
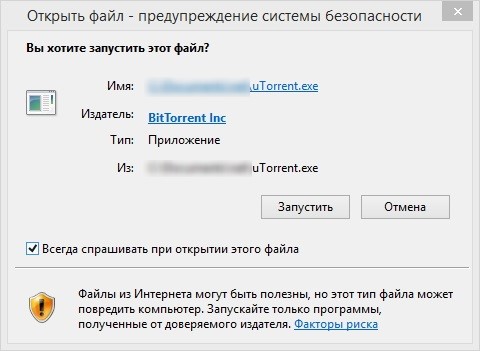
Если снять галку на опции Всегда спрашивать при открытии этого файла, то окно безопасности Windows не появится при следующем запуске этой программы. Но таким образом добавлять программы в исключения придется вручную.
Также наличие предупреждения системы безопасности может вызвать проблемы, если вы устанавливаете или запускаете программы на компьютерах пользователя в фоновом режиме (через скрипты планировщика, групповые политики, задания SCCM и т.д.). Дело в том, что в таких случаях предупреждающее окно системы безопасности Windows просто не отображается в сессии пользователя. Соответственно, установка или запуск таких приложений из скриптов становится невозможен.
Попробуем разобраться, как отключить предупреждение системы безопасности при запуске исполняемых или установочных файлов в Windows.
Важно. Отключение данного окна с предупреждением системы безопасности Windows в большинстве случаев не рекомендуется, так как уменьшает уровень защиты компьютера и повышает риск заражения системы пользователем.
Отключение окна предупреждения при запуске файла, скачанного из Интернета
Исполняемые файлы, скачанные из Интернета, браузеры автоматически помечают как потенциально опасные (загруженные из небезопасного источника). Реализуется этот функционал через альтернативные NTFS потоки файлов. Для упрощения, будем считать что это специальная метка файла, которая автоматически назначается скачанному из сети файлу (Как Windows определяет, что файл скачан из Интернета). Чтобы удалить эту метку, нужно разблокировать файл.
- Откройте свойства исполняемого файла;
- На вкладке Общие (General) нажмите кнопку или установите чекбокс Разблокировать (Unblock). У полученного из интернета файла рядом с кнопкой будет указано такое предупреждение:
Осторожно: Этот файл получен с другого компьютера и, возможно, был заблокирован с целью защиты компьютера. (This file came from another computer and might be blocked to help protect this computer)

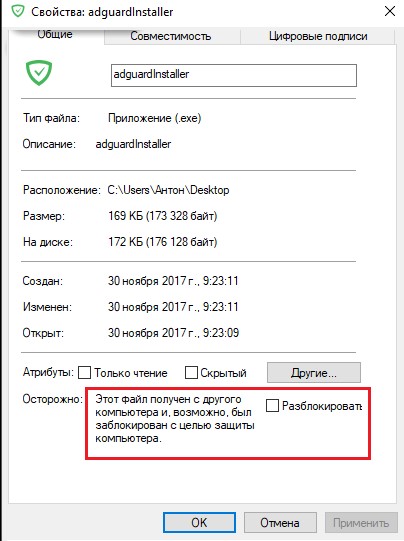
Сохраните изменения, нажав OK. Теперь файл разблокирован (NTFS метка снята) и будет запускаться без предупреждения.
Метку альтернативного NTFS потока Zone.Identifier можно сбросить с помощью PowerShell команды:
Unblock-File someinstallfile.exe
Чтобы отключить сохранение информации о зонах для скачанных из интернета файлов можно включить параметр GPO Не хранить сведения о зоне происхождения вложений/Do note preserve zone information in file attachments (User Configuration -> Administrative Templates -> Windows Components -> Attachment Manager) или создать параметр реестра:
reg add "HKCU\Software\Microsoft\Windows\CurrentVersion\Policies\Attachments" /v "SaveZoneInformation" /t REG_DWORD /d "1" /f
В результате файлы, скачанные браузерами (в том числе Edge, Chrome, Firefox и т.д.), не будут содержать метку потока Zone.Identifier.
Предупреждение безопасности при запуске файла из сетевой папки
Окно предупреждения безопасности также будет появляться при запуске исполняемых файлов из общего сетевого каталога (шары) при доступе по UNC пути, содержащего IP адрес или FQDN имя домена (NETBIOS имя домена клиента считается доверенным). Например,
\\server.domain.ru\share\file.exe
или
\\192.168.12.22\d\file.exe
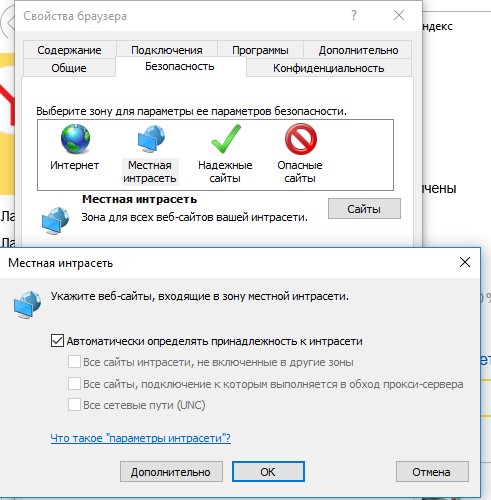
Чтобы сделать сетевой адрес доверенным, нужно добавить его имя и/или IP адрес удаленного сервера (NAS хранилища) в зону Местная интрасеть в настройках обозревателя Internet Explorer
- Перейдите в Панель управления -> Свойства обозревателя (Internet Option) – команда
inetcpl.cpl - Вкладка Безопасность (Security)
- Открыть Местная интрасеть (Local Intranet) -> Узлы (Sites) -> Дополнительно (Advanced)

- В открывшемся окне добавьте доверенные имя и /или ip-адрес сервера. Например
file://10.0.0.6
,
file://srvcontoso.com
или
file://127.0.0.1
для локального компьютера. Можно использовать знак подстановки *. Например, добавить в зону все IP адреса в подсети:
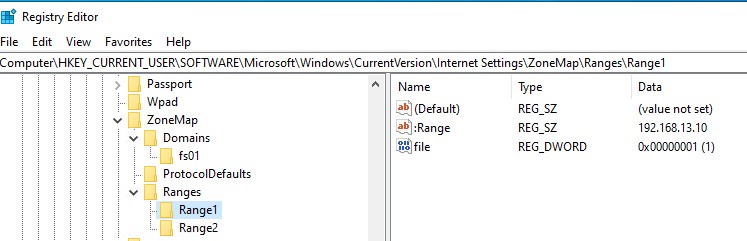
file://192.168.1.*Совет. Эти настройки хранятся в реестре в ветке HKEY_CURRENT_USER\Software\Microsoft\Windows\CurrentVersion\Internet Settings\ZoneMap. Доверенные IP адреса указывается в ветке реестра
Ranges
; доменные имена – в
Domains
.
Для добавление доверенных адресов в зону Местная интрасеть на компьютерах домена можно использовать групповые политики:
- Откройте редактор локальной (
gpedit.msc
) или доменных (
gpmc.msc
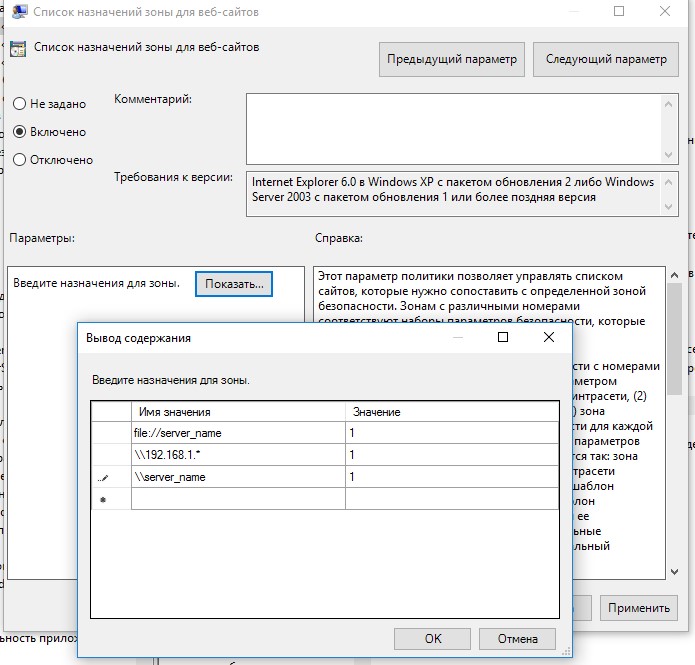
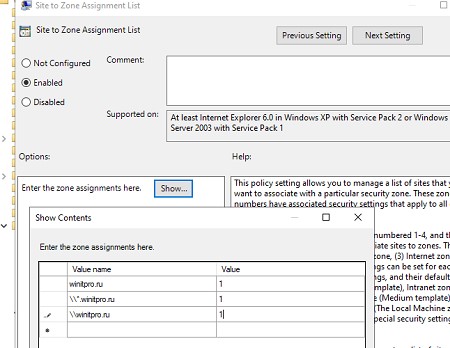
) политик. - Перейдите в раздел Computer Configuration -> Administrative Templates -> Windows Components -> Internet Explorer -> Internet Control Panel -> Security Page (Конфигурация компьютера -> Административные шаблоны -> Компоненты Windows -> Internet Explorer -> Панель управления браузером -> Вкладка безопасность).
- Включите политику Site to Zone Assignment List (Список назначений зоны безопасности для веб-сайтов). В настройках политики нужно указать список доверенных адресов в формате:
- Имя сервера (в виде
file://server_name
,
\\server_name
,
server_name
или
IP
) - Номер зоны (1 – Для местной интрасети)

- Имя сервера (в виде
- Сохраните изменения в политике и обновите настройки GPO на клиенте (
gpupdate /force
).
Теперь при запуске их сетевых каталогов на хостах, добавленных в местную интрасеть, не будет появляться предупреждение при открытии исполняемых файлов.
Для автоматического определения адресов в интрасети можно влачить следующие настройки в разделе User Configuration -> Administrative Templates -> Windows Components -> Internet Explorer -> Internet Control Panel -> Security Page (Конфигурация пользователя -> Административные шаблоны -> Компоненты Windows -> Internet Explorer -> Панель управления браузером -> Вкладка безопасность).
- Сайты Интрасети: все сайты, не перечисленные в других зонах Intranet Sites: Include all local (intranet) sites not listed in other zones
- Сайты Интрасети: все сетевые пути (UNC) Intranet Sites: Include all network paths (UNCs)
- Включить автоматическое определение интрасети
Перенаправление папки AppData и предупреждение при открытии файлов
Если вы используйте перенаправление папки AppData (в roaming profile сценариях), пользователи могут столкнуться с окном Открыть файл – предупреждение системы безопасности при запуске ярлыков приложений из профиля.
В этом случае нужно добавить ваш сервер (или целиком домен), где хранятся перемещаемые профили в доверенную зону.
Воспользуйтесь параметром GPO: User Configuration -> Policies -> Administrative Templates -> Windows Components -> Internet Explorer -> Internet Control Panel -> Security Page -> Site to Zone Assignment List. Добавьте имя сервера (домена) со значением 1.
На хостах Windows Server с ролью RDS, в некоторых случаях помогает только отключение усиленной безопасности IE.
- Откройте Server Manager -> Локальный сервер.
- Щелкните по параметру Конфигурация усиленной безопасности Internet Explorer
- Отключите усиленную безопасность для пользователей и администраторов.
Отключить предупреждение для некоторых типов файлов через GPO
Иногда бывает целесообразно отключить предупреждение безопасности для определенных типов (расширений) файлов (но список разрешенных расширений файлов нужно минимизировать).
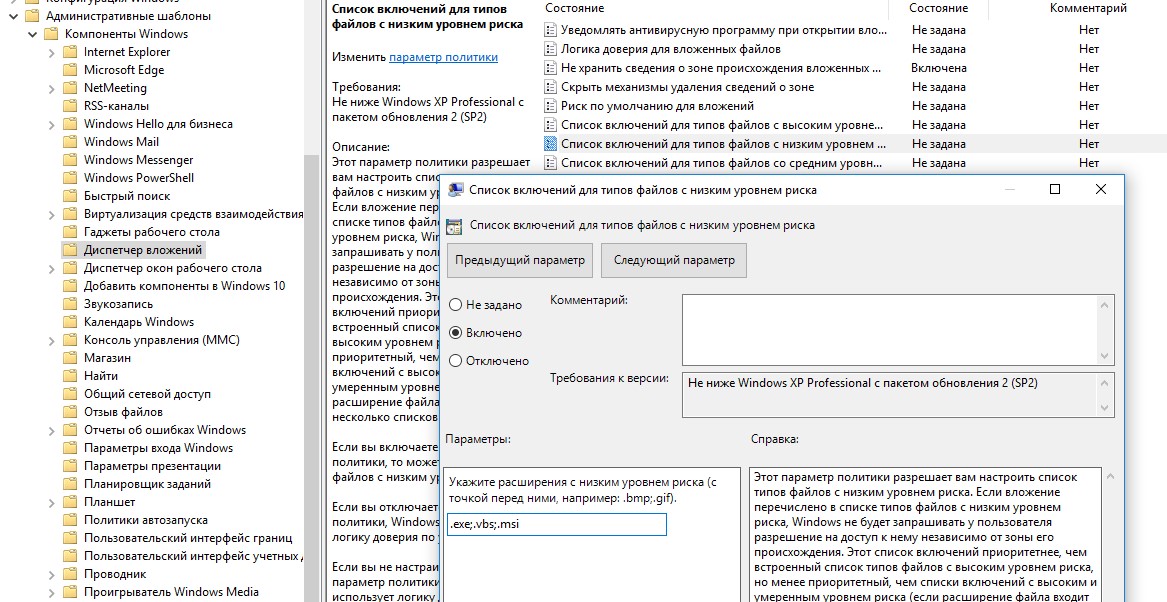
Для этого в редакторе GPO перейдите в раздел User Configuration-> Administrative Templates-> Windows Components-> Attachment Manager (Конфигурация пользователя -> Административные шаблоны -> Компоненты Windows -> Диспетчер вложений).
- Включите политику Не хранить сведения о зоне происхождения вложений (Do not preserve zone information in file attachments). Все скачанные из интернета исполняемые файлы будут запускаться без подтверждения на всех компьютерах.
- Включите политику Список включений для типов файлов с низким риском (Inclusion list for low file types), укажите в ее настройках список расширений файлов, для которых нужно отключить появления окна с предупреждением системы безопасности Windows, например: .exe;.vbs;.msi. Система будет игнорировать метки на файлах с этим расширением, и запускать их без подтверждения.
Примечание. Это добавит доверенные расширения файлов в параметр реестра LowRiskFileTypes:
[HKEY_CURRENT_USER\Software\Microsoft\Windows\CurrentVersion\Policies\Associations] "LowRiskFileTypes"=".exe;.vbs;.msi;.bat;"
После применения политики, при открытии исполняемых файлов с указанными расширениями не будет появляться окно безопасности (независимо от наличия NTFS атрибута Zone.Identifier).
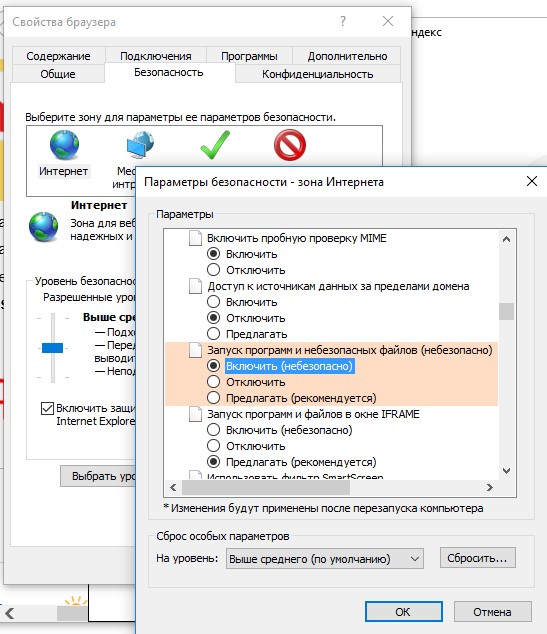
Можно также в параметрах обозревателя для зоны Интернета (Безопасность -> Интернет -> Другой -> Разное -> Запуск программ и небезопасный файлов) разрешить запуск любых файлов из интернета, но это небезопасно.
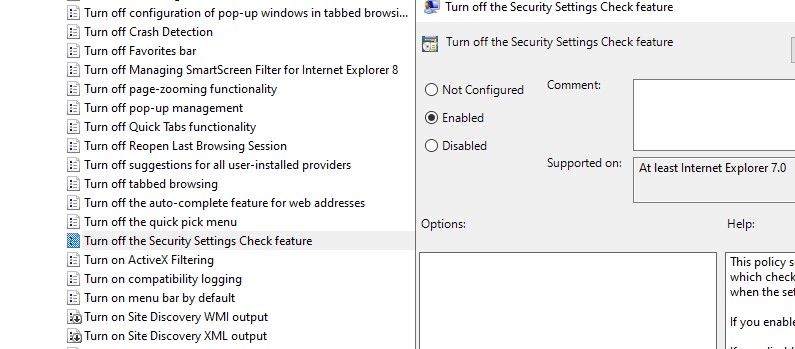
Можно полностью отключить вывод окна «Open File — Security Warning» с помощью параметра Turn off the Security Settings Check feature в разделе реестра Computer Configuration -> Administrative Templates -> Windows Components -> Internet Explorer.
Или с помощью следующих команд:
REG ADD "HKCU\Software\Microsoft\Windows\CurrentVersion\Internet Settings\Zones\3" /V "1806" /T "REG_DWORD" /D "00000000" /F
REG ADD "HKLM\Software\Microsoft\Windows\CurrentVersion\Internet Settings\Zones\3" /V "1806" /T "REG_DWORD" /D "00000000" /F
REG ADD "HKLM\SOFTWARE\Policies\Microsoft\Internet Explorer\Security" /V "DisableSecuritySettingsCheck" /T "REG_DWORD" /D "00000001" /F
Hi,
the internet explorers security zones affects more windows components then the internet explorer itself. For example the Windows File Explorer or the Windows Powershell.
To add an IP Address respectively IP Address range you have to create some registry keys. In this example the IP Address 10.10.200.3 should added to the local intranet zone.
These commands adds the domain to the local intranet zone (Value 1, of the third command)
C:\> reg add "HKCU\Software\Microsoft\Windows\CurrentVersion\Internet Settings\ZoneMap\Domains"
C:\> reg add "HKCU\Software\Microsoft\Windows\CurrentVersion\Internet Settings\ZoneMap\Domains\10.10.200.3"
C:\> reg add "HKCU\Software\Microsoft\Windows\CurrentVersion\Internet Settings\ZoneMap\Domains\10.10.200.3" /v "*" /d 1 /t REG_DWORD
Then allow all protocols (“*” value of the third command). Valid protocols are https, http, file, *
C:\> reg add "HKCU\Software\Microsoft\Windows\CurrentVersion\Internet Settings\ZoneMap\Ranges"
C:\> reg add "HKCU\Software\Microsoft\Windows\CurrentVersion\Internet Settings\ZoneMap\Ranges\Range1"
C:\> reg add "HKCU\Software\Microsoft\Windows\CurrentVersion\Internet Settings\ZoneMap\Ranges\Range1" /V "*" /D 1 /t REG_DWORD
C:\> reg add "HKCU\Software\Microsoft\Windows\CurrentVersion\Internet Settings\ZoneMap\Ranges\Range1" /v ":Range" /d "10.10.200.3" /t REG_SZ
C:\>
It’s also possible to define ip Ranges. Replace 10.10.200.3 in the previous commands by:
10.222.100-200.*

192.*.*.*

....
Not tested yet: Is a reboot or logoff/logon required after settings the keys?
Michael
My Knowledgebase for things about Linux, Windows, VMware, Electronic and so on…
This website uses cookies to improve your experience and to serv personalized advertising by google adsense. By using this website, you consent to the use of cookies for personalized content and advertising. For more information about cookies, please see our Privacy Policy, but you can opt-out if you wish. Accept Reject Read More