
В этой статье мы рассмотрим, как централизованно задать настройки прокси на компьютерах с Windows 10 в домене Active Directory с помощью групповых политик. Большинство распространенных браузеров (таких как Microsoft Edge, Google Chrome, Internet Explorer, Opera) и большинство приложений автоматически используют для доступа в интернет параметры прокси сервера, заданные в Windows. Также мы рассмотрим, как задать параметры системного WinHTTP прокси.
Содержание:
- Как задать параметры прокси сервера в Windows через GPO?
- Настройка параметров прокси через реестр и GPO
- Настройка параметров WinHTTP прокси групповыми политиками
В этой статье мы рассмотрим особенности настройки прокси сервера политиками в поддерживаемых версиях Windows (Windows 10, 8.1 и Windows Server 2012/2016/2019). Обратите внимание, что в снятых с поддержки Windows 7/Server 2008R2, Windows XP/Windows Server 2003 параметры прокси сервера задаются по другому.
Как задать параметры прокси сервера в Windows через GPO?
До выхода Windows Server 2012/Windows 8 для настройки параметров Internet Expolrer (и в том числе настроек прокси) использовался раздел Internet Explorer Maintenance (IEM) из пользовательской секции GPO (User configuration –> Policies –> Windows Settings –> Internet Explorer Maintenance). В современных версиях Windows 10 /Windows Server 2016/2019 этот раздел отсутствует.

В новых версиях Windows для настройки параметров IE и прокси в редакторе GPO нужно использовать предпочтения групповых политик GPP (Group Policy Preferences). Также есть вариант использования специального расширения Internet Explorer Administration Kit 11 (IEAK 11) – но применяется он редко.
Откройте консоль редактора доменных GPO (Group Policy Management Console –
GPMC.msc
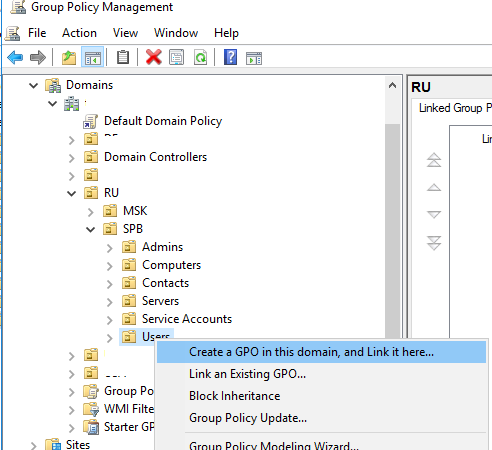
), выберите OU с пользователями, для которых нужно назначить параметры прокси-сервера и создайте новую политику Create a GPO in this domain, and Link it here.
Перейдите в раздел User Configuration -> Preferences -> Control Panel Settings -> Internet Settings. В контекстном меню выберите пункт New -> и выберите Internet Explorer 10.

Для настройки параметров прокси в Windows 10/Windows Server 2016 нужно использовать пункт Internet Explorer 10.
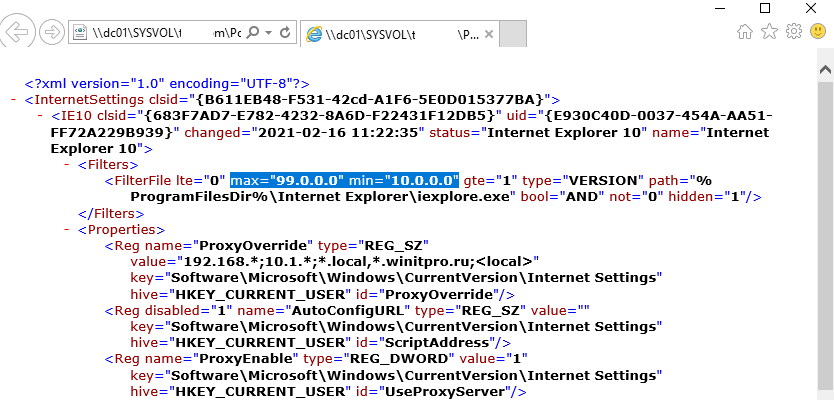
Совет. Несмотря на то, что отдельной настройки для Internet Explorer 11 нет, политика Internet Explorer 10 будет применяться на все версии IE >=10 (в файле политики InternetSettings.xml можно увидеть, что опция действительна для всех версии IE, начиная c 10.0.0.0 и заканчивая 99.0.0.0). Все версии Internet Explorer ниже 11 на данный момент сняты с поддержки Microsoft и более не обновляются.
<FilterFile lte="0" max="99.0.0.0" min="10.0.0.0" gte="1" type="VERSION" path="%ProgramFilesDir%\Internet Explorer\iexplore.exe" bool="AND" not="0" hidden="1"/>
Перед вами появится специальная форма, практически полностью идентичная настройкам параметра обозревателя в панели управления Windows. Например, вы можете указать домашнюю страницу (Вкладка General, поле Home page).
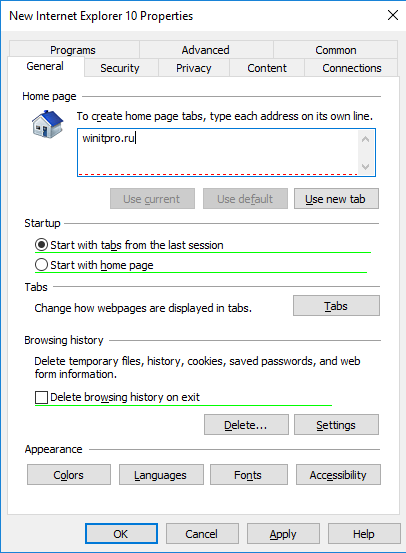
Важно. Не достаточно просто сохранить внесенные изменения в редакторе политики. Обратите внимание на красные и зеленые подчеркивания у настраиваемых параметров Internet Explorer 10. Красное подчеркивание говорит о том, что эта настройка политики не будет применяться. Чтобы применить конкретную настройку, нажмите F5. Зеленое подчеркивание у параметра означает, что этот параметр IE будет применяться через GPP.
Доступные функциональные клавиши
- F5 – Включить все настройки на текущей вкладке
- F6 – Включить выбранный параметр
- F7 – Отключить выбранный параметр
- F8 – Отключить все настройки на текущей вкладке
Чтобы указать параметры прокси-сервера, перейдите на вкладку Connections и нажмите кнопку Lan Settings). Прокси сервер можно настроить одним из следующих способов:
- Automatically detect settings — автоматическое определение настроек прокси с помощью файла wpad.dat;
- Use automatic configuration script — скрипт автоконфигурации (proxy.pac);
- Proxy Server – можно вручную указать IP адрес или DNS имя прокси сервера и порт подключения. Это самый простой способ настроить прокси в Windows, его и будем использовать.
Поставьте галку Use a proxy server for your LAN, а в полях Address и Port соответственно укажите IP/FQDN имя прокси-сервера и порт подключения.
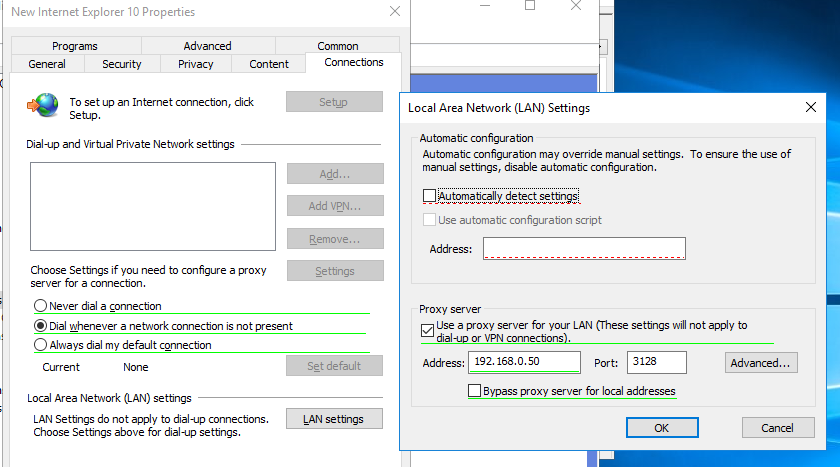
Включив опцию Bypass Proxy Server for Local Addresses можно запретить приложениям (в том числе браузеру) использовать прокси-сервер при доступе к локальным ресурсам (в формате
http://intranet
). Если вы используете адреса ресурсов вида
https://winitpro.ru
или
_http://192.168.20.5
, то эти адреса не распознаются Windows как локальные. Эти адреса и адреса других ресурсов, для доступа к которым не нужно использовать прокси, нужно указать вручную. Нажмите кнопку Advanced и в поле Exceptions введите адреса в формате:
10.*;192.168.*;*.loc;*.contoso.com
Совет. Параметры прокси-сервера в Google Chrome можно задать централизованно через GPO с помощью специальных административных шаблонов. Для Mozilla Firefox можно использовать такое решение.
После сохранения политики вы можете просмотреть XML файл с заданными настройками браузера в каталоге политики на контроллере домена \\DC1\SYSVOL\winitpro.ru\Policies\(PolicyGuiID)\ User\Preferences\InternetSettings\InternetSettings.xml

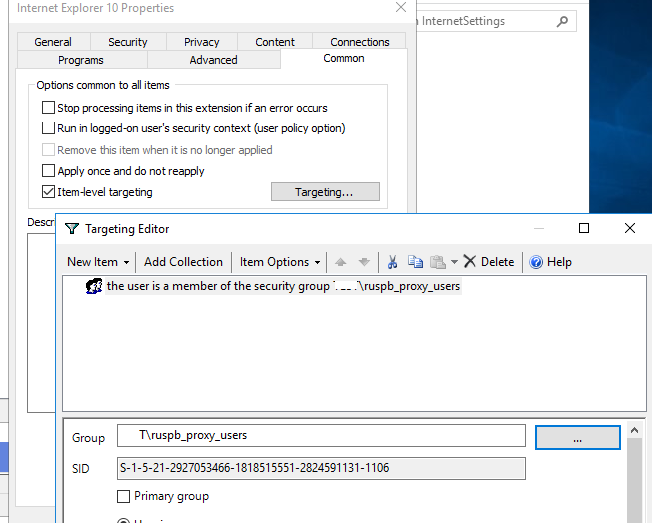
В GPP есть возможность более тонко нацелить политику на клиентов. Для этого используется GPP Item Level Targeting. Перейдите на вкладку Common, включите опцию Item-level targeting -> Targeting.
В открывшейся форме укажите условия применения политики. В качестве примера я указал, что политика настройки прокси будет применена только к пользователям, которые состоят в доменной группе ruspb_proxy_users. Вы можете использовать собственную логику назначения параметров прокси (в зависимости от IP подсети, сайта AD и т.д.).
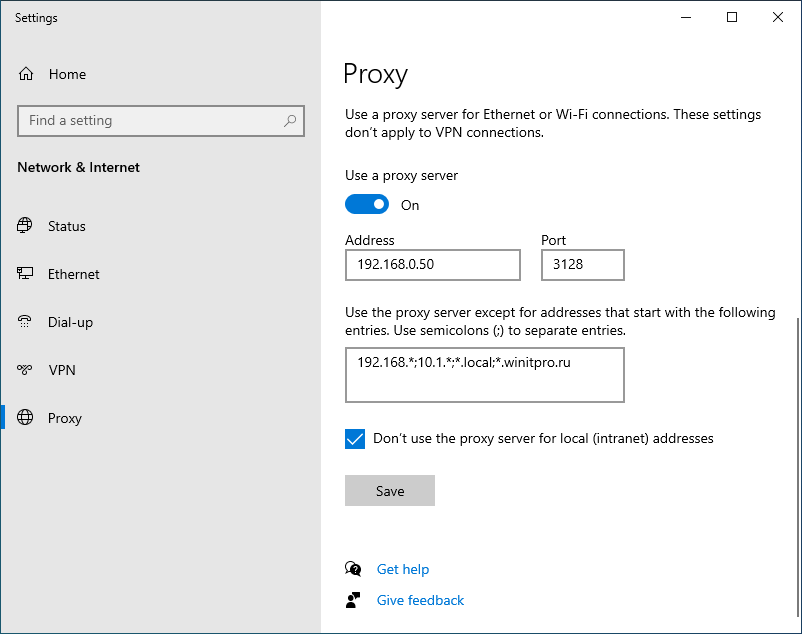
Осталось назначить политику IE на контейнер с пользователями и обновить политики на них. После обновления политики на компьютерах пользователей должны примениться новые настройки прокси в IE. В Windows 10 текущие параметры прокси можно посмотреть в разделе Settings -> Network and Internet -> Proxy. Как вы видите, на компьютере теперь заданы настройки прокси, указанные в доменной политике.
Чтобы запретить пользователям менять настройки прокси-сервера, воспользуйтесь этой статьей.
Настройка параметров прокси через реестр и GPO
Кроме того, настроить параметры IE можно и через реестр, политиками GPP. К примеру, чтобы включить прокси для пользователя нужно настроить следующие параметры реестра в ветке HKEY_CURRENT_USER\Software\Microsoft\ Windows\CurrentVersion\Internet Settings.
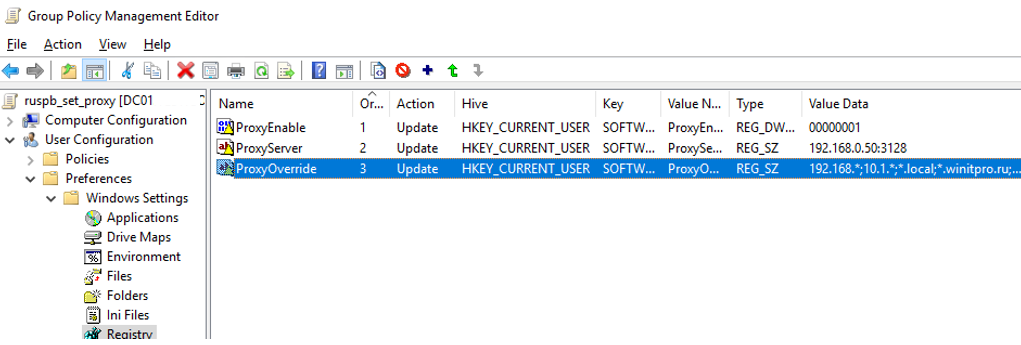
Перейдите в редакторе GPO в раздел User Configuration -> Preferences -> Windows Settings -> Registry и создайте три параметра реестра в указанной ветке:
-
ProxyEnable
(REG_DWORD) =
00000001 -
ProxyServer
(REG_SZ) =
192.168.0.50:3128 -
ProxyOverride
(REG_SZ) =
*winitpro.ru;https://*.contoso.com;192.168.*;<local>
Здесь также можно использовать Item level targeting для более тонкого нацеливания политик.
Если вам нужно создать политики не для каждого пользователя (per-user), а для всех пользователей компьютера (per-computer), используйте параметры GPP из раздела GPO Computer Configuration -> Preferences -> Windows Settings -> Registry. Используйте аналогичные параметры реестра в ветке HKEY_LOCAL_MACHINE\Software\Policies\Microsoft\Windows\CurrentVersion\Internet Settings.
Настройка параметров WinHTTP прокси групповыми политиками
Некоторые системные сервисы или приложения (например, служба обновлений Wususerv или PowerShell) по-умолчанию не используют пользовательские настройки прокси сервера из параметров Internet Explorer. Чтобы такие приложения работали корректно и получали доступ в интернет, вам нужно задать в Windows настройки системного прокси WinHTTP.
Чтобы проверить, настроен ли на вашем компьютере WinHTTP прокси, выполните команду:
netsh winhttp show proxy
Ответ “
Direct access (no proxy server)
” говорит о том, что прокси не задан, система использует прямой интернет доступ.
Вы можете задать на компьютере прокси для WinHTTP вручную командой:
netsh winhttp set proxy 192.168.0.50:3128 "localhost;192.168.*;*.winitpro.com"
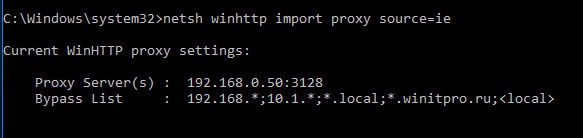
Или импортировать настройки прокси из параметров Internet Explorer теекщего пользователя:
netsh winhttp import proxy source=ie
Однако настроить WinHTTP через GPO не получится – в редакторе GPO нет соответствующего параметра, а в реестре параметры хранятся в бинарном виде и не подходят для прямого редактирования.
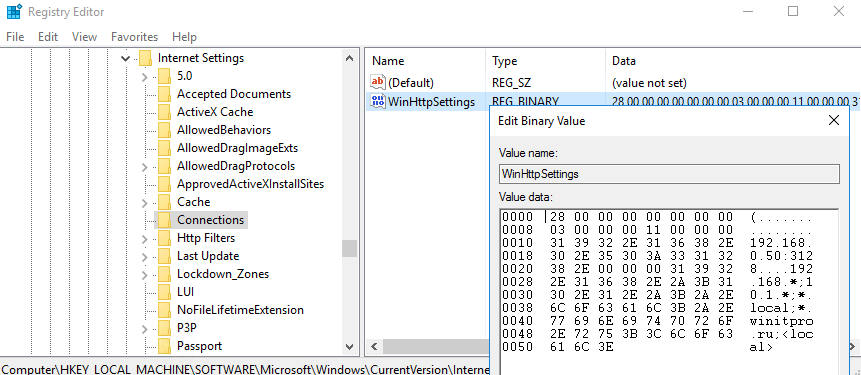
Единственный вариант задать параметры WinHTTP прокси – настроить их на эталонном компьютере, выгрузить значение параметра WinHttpSettings в ветке реестра HKLM\SOFTWARE\Microsoft\Windows\CurrentVersion\Internet Settings\Connections в reg файл и распространить этот параметр на компьютеры в домене через GPP registry.
Powershell — настройка прокси-сервера в Windows
Powershell — настройка прокси-сервера в Windows
Из этого подробного руководства вы узнаете, как настроить прокси-сервер в Windows с помощью PowerShell. Это пошаговое руководство предоставит вам всю необходимую информацию для успешной настройки конфигурации прокси-сервера с помощью Powershell.
• Windows 2012 R2
• Windows 2016
• Windows 2019
• Windows 2022
• Windows 10
• Окна 11
Список оборудования
Здесь вы можете найти список оборудования, используемого для создания этого учебника.
Эта ссылка будет также показать список программного обеспечения, используемого для создания этого учебника.
Похожий учебник — PowerShell
На этой странице мы предлагаем быстрый доступ к списку учебников, связанных с PowerShell.
Учебник Powershell — Настройка прокси-сервера в Windows
Запустите командную линию Powershell.
Настройте прокси-сервер с помощью Powershell.
Включите использование прокси-сервера.
Проверьте конфигурацию прокси-сервера с помощью Powershell.
Отключите использование прокси-сервера.
Поздравляю! Вы можете настроить прокси-сервер в Windows с помощью Powershell.
Учебник Powershell — настройка параметров прокси-сервера
Запустите командную линию Powershell.
Настройте так, чтобы прокси-сервер не использовался для локальных адресов.
Настройте список исключений прокси-сервера.
Настройте сценарий автоматической настройки прокси-сервера.
Отключите сценарий автоматической настройки прокси-сервера.
Сохраните учетные данные для проверки подлинности прокси-сервера.
Удалите сохраненные учетные данные для проверки подлинности прокси-сервера.
Поздравляю! Вы можете настроить прокси-сервер в Windows с помощью Powershell.
VirtualCoin CISSP, PMP, CCNP, MCSE, LPIC22023-02-06T23:10:43-03:00
Related Posts
Page load link
Ok
Download Windows Speedup Tool to fix errors and make PC run faster
This post will show you how to find the Proxy Server Settings of your Windows computer using PowerShell, CMD, Registry, etc. Also, if you are facing problems downloading Windows Updates, or other network connection issues, you may want to reset Proxy Settings on your Windows 10 computer and see if that helps you.
What is WinHTTP proxy
Says Microsoft, Windows HTTP Services (WinHTTP) is a technology for accessing HTTP that provides developers with a server-supported, high-level interface to the HTTP/1.1 Internet protocol. WinHTTP is designed to be used primarily in server-based scenarios by server applications that communicate with HTTP servers. WinHTTP is also designed for use in system services and HTTP-based client applications.
I do not use a Proxy, so some entries may not be visible in my screenshots.
1] Command line
You have to make use of the built-in netsh.exe tool in your Windows operating system.
To view your computer’s proxy information, open an elevated command prompt, type the following command, and then press Enter:
netsh.exe winhttp show proxy
There are other ways to find your PCs proxy settings.
2] Google Chrome
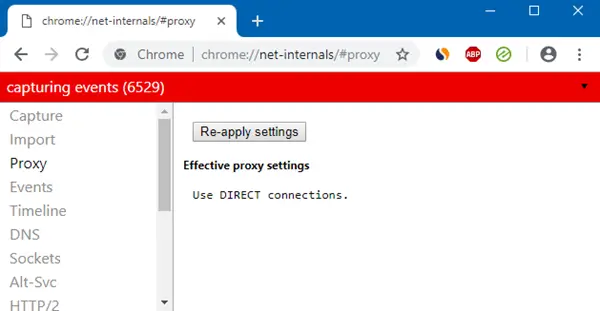
In the Chrome browser, type the following in the address bar and hit Enter:
chrome://net-internals/#proxy
You will see the proxy settings here.
3] Mozilla Firefox

In the Firefox browser, type the following in the address bar and hit Enter:
about:preferences#advanced
Scroll down and click the Network Proxy Settings button to see them.
4] Registry Editor
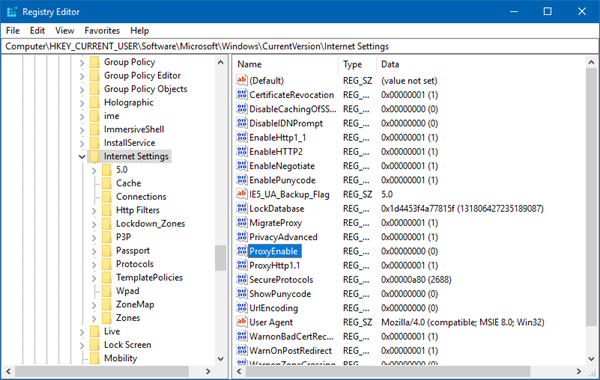
Open REGEDIT and navigate to the following key:
HKEY_CURRENT_USER\Software\Microsoft\Windows\CurrentVersion\Internet Settings
The ProxyEnable key controls the proxy settings. 0 disables them, and 1 enables them. If you are using a proxy, you will get its value under the ProxyServer key.
5] PowerShell

Run PowerShell as Administrator and execute the following command:
Get-ItemProperty -Path 'HKCU:\Software\Microsoft\Windows\CurrentVersion\Internet Settings' | findstr ProxyServer
6] Internet Options

Open Internet Options > Connections tab > Click the Lan settings button. You will see the Proxy server settings there.
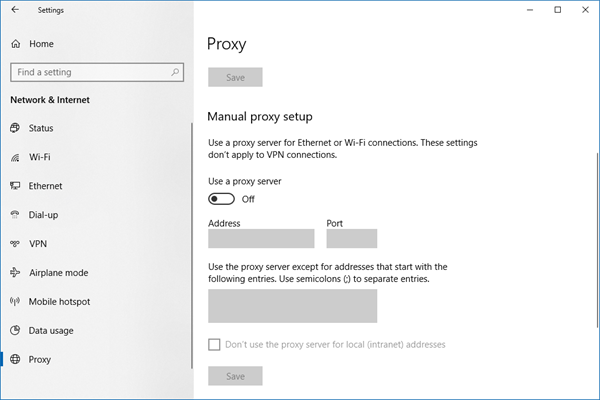
7] Windows Settings
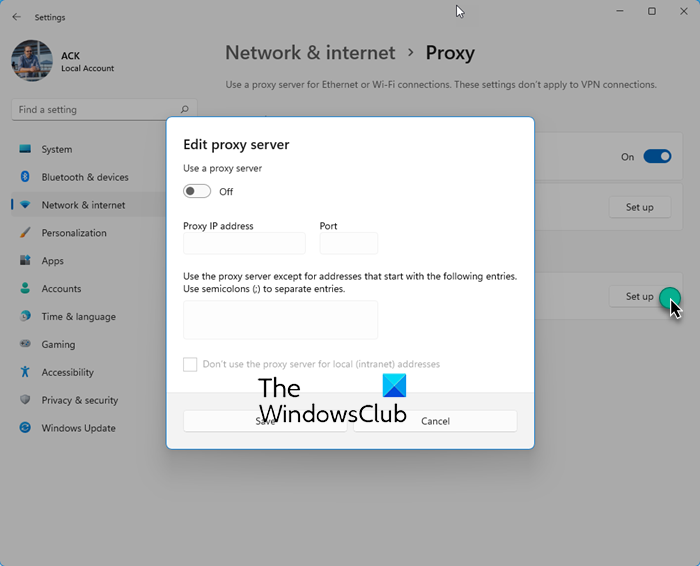
Open Windows 11 Settings > Network & Internet > Proxy. You will see the Proxy server settings here.
In Windows 10, you will see it here:
Reset WinHTTP Proxy Settings in Windows 11/10
If your system uses a proxy server and you wish to remove it, open an elevated command prompt, type the following command, and then press Enter:
netsh winhttp reset proxy
This will remove a proxy server and configure “direct access” to the Internet.
Speaking of resetting settings, here’s a bunch of posts on this website that will help you reset other functions:
Reset all Local Group Policy settings | Reset Windows Store apps | Reset Windows Store Cache | Reset Keyboard settings | Reset Touchpad settings | Reset Surface Pro devices | Reset Microsoft Edge browser settings | Reset Internet Explorer Settings | Reset Recycle Bin | Reset Chrome browser settings | Reset Firefox settings | Reset Windows Security settings | Reset Windows Firewall settings | Reset Winsock | Reset TCP/IP | Reset DNS cache | Reset Windows Update | Reset each Windows Update component | Reset Windows password.
Anand Khanse is the Admin of TheWindowsClub.com, a 10-year Microsoft MVP (2006-16) & a Windows Insider MVP (2016-2022). Please read the entire post & the comments first, create a System Restore Point before making any changes to your system & be careful about any 3rd-party offers while installing freeware.
- Setting proxy with GPO
- Windows 10 proxy settings
- Computer proxy settings
- Proxy settings for WinHTTP API
- Setting proxy using system environment variables
- Prevent user from changing browser settings
- Powershell and proxy settings
As of June 2022 Internet Explorer browser reached end of support in Windows OS, and users are advised to use Microsoft Edge in IE compatibility mode. Especially if they have legacy apps running only on IE. Many of the settings we will explain here, related to proxy, are based on usage of Internet Explorer. Despite it, we will address all aspects of configuring proxy settings even it will become “deprecated”.
I took a big byte with this one because I wanted to cover all aspects of working with proxy settings, but it wared me out to check all details. I didn’t want to copywrite things but i wanted really to check what is going on with ceratin settings and how they work. In short, I didn’t wont to give false or deprecated info, but exact and tested information. I don’t know if I succeeded. Please comment and correct me if I am wrong somewhere.
If you read part I , you realize there are two dll-s you can use for Internet access and proxying , with different capabilities. As explained WinINET is user interactive based proxy engine and it has certain capabilities that modern browsers doesn’t have. For example ftp protocol. If you type ftp address in IE you will open ftp site but if you use Microsoft Edge, you will get prompt to open another app for browsing ftp site. In next video you can see that behavior with IE as ftp app.
There is lot of ways how to configure proxy settings on your PC or server. In this article we will explain how to set proxy with GPO, registry or netsh command. Also we will explain some specific situations and bypassing it.
Setting proxy with GPO
We will start with configuring proxy settings with GPO. We will create GPO and link it to OU.
Note
In previous versions of Internet Explorer (6, 7, and 9) to configure Internet Explorer settings you needed to use the following section in the Group Policy Editor console: User configuration > Policies > Windows Settings > Internet Explorer Maintenance. In Internet Explorer 10 (firstly appeared on Windows Server 2012 and Windows
the Internet Explorer Maintenance (IEM) section was removed from GPO Editor.
 the Internet Explorer Maintenance (IEM) section was removed from GPO Editor.
After that we edit created GPO. Navigate to User Configuration > Preferences > Control Panel Settings > Internet Settings and create new Internet Explorer 10 policy (it works for IE 11 also). Navigate to Connections and go to LAN settings

Enter setting for your proxy server in picture. Check box Use a proxy server for your LAN, and then enter IP address and port. Check also Bypass proxy server for local addresses.

There is one thing that you probably noticed on picture. There are green and red lines under different settings presented. Green means that setting is on and will be applied, and red means it is disabled. To toggle this settings use function keys
- F6 – enable selected option
- F7 – disable selected option
- F5 – enable all options on selected tab
- F8 – disable all options on selected tab
Bypass proxy settings for local addresses
This is very misunderstood setting. It means if you type http://intranet in your browser it will not use proxy to access web site. Local addresses are all URLs that doesn’t have domain suffix.
Regarding bypass, if you type http://intranet.contoso.com or http://192.168.0.34 it is not local address, and browser will try to use proxy to access it. That’s why it is usual to list your local domain and local addresses in exceptions on advanced tab. Use wildcards presented on picture example.

After GPO is applied, settings are presented in IE. If you have different proxy for different branch office-s aka LAN subnets you can use Item level targeting to use different proxy settings for different subnets. (I will not go into that area, but sometimes it is necessary. For example when using wpad or pac scripts for configuring proxy you will see it is common part of script configuration. We will talk about that in separate posts)

Windows 10 introduced new modern settings Control Panel where you can set up different computer settings. But still, it is just presentation pane. If you enter manually proxy settings here, you will have new entries in registry user path we talk about in next chapter. If you use GPO, proxy settings will be presented here because it will be read from the same location in registry. You can see words in red “some settings are managed by your organization“, if GPO is applied. Just to explain Microsoft Edge is using these settings, despite it is using WinHTTP API for accessing Internet. It is that setting in browser “Use system proxy settings” you can see in Chrome, Mozilla and similar browsers.

Setting proxy -registry settings
What happens when GPO is applied? It change registry settings. If you browse to registry key on picture, you will see all the same settings you configured on GPO

It means that you can also set user proxy settings by editing/adding registry keys. For example you can run this PowerShell script and set proxy settings for user. If keys doesn’t exist, please use New-ItemProperty instead of Set-ItemProperty.
$reg = "HKCU:\Software\Microsoft\Windows\CurrentVersion\Internet Settings"
Set-ItemProperty -Path $reg -Name ProxyEnable -Value 1
Set-ItemProperty -Path $reg -Name ProxyServer -Value "10.0.40.50:9090"
Set-ItemProperty -Path $reg -Name ProxyOverride -Value '*.contoso.com;<local>'
Set-ItemProperty -Path $reg -Name AutoDetect -Value 0
It is possible to create same registry settings with GPO also. Navigate to GPP section in GPO and create same registry keys from script. Location of settings is User Configuration > Preferences > Registry. Add next values to HKCU:\Software\Microsoft\Windows\CurrentVersion\Internet Settings registry path
- ProxyEnable (REG_DWORD) = 00000001;
- ProxyServer (REG_SZ) = 10.0.40.50:9090;
- ProxyOverride (REG_SZ) = *.contoso.com;<localhost>
Computer proxy settings
All settings we talked about are user proxy settings. If you need to setup proxy to computer object and all users logging into that computer, you need to configure two additional GPO settings. First one is Make proxy settings per-machine (rather than per user). It is located at Computer Configuration > Administrative Templates > Windows Components > Internet Explorer. When you enable this policy all users using that computer will have same proxy settings. Second setting need to override any user GPO policies it has in place. You need to enable Configure user Group Policy loopback processing mode located at Computer Configuration > Policies > Administrative Templates > System > Group Policy.
Make proxy settings per machine policy can be turned on also by registry setting . You will need to add next key on location in script.
$reg = "HKLM\Software\Policies\Microsoft\Windows\CurrentVersion\Internet Settings"
New-ItemProperty -Path $reg -Name ProxySettingsPerUser  -Value 0
For non domain-joined computers you can also use Make proxy settings per-machine GP locally. What is interesting is that you need to setup proxy settings in that way that you run IE but Run as Administrator. After that go to internet options in IE and configure all settings needed. What happens is that from that moment on, any user of that PC can change proxy settings, but if she/he open that window again proxy settings you entered as administrator will remain.
I checked what is happening in registry settings and what I discovered that somehow all Internet settings for proxy are changed in registry with entered values, but I didn’t catch a process that is changing all the values in registry. In any case result of this setting is also that if you try to change proxy setting as normal user setting is not changed. Wathc the video
Proxy settings for WinHTTP API
As we already mentioned in part I there are two different API-s used for accessing Internet over proxy. One of them WinHTTP API need its own separate proxy settings . Settings we talked about in chapters before This service also has add-on WinHTTP WPAD service that is used for configuring proxy settings using wpad script.
For system-wide proxy settings that is using this API you can use netsh command. This setting will affect all applications including Windows services which use WinHTTP API with default proxy. For example Windows Update service will not work if you are behind proxy and didn’t set this up. Syntax of this command, that you run in command shell is:
netsh winhttp set proxy 10.90.112.50:9090 "*.contoso.com;<local>"
netsh winhttp show proxy
After you run this command you will see proxy settings with show proxy command and it will look like this.

<local>
this entry correspond to Bypass proxy server for local addresses setting
These settings will be saved in the WinHttpSettings parameter under the registry key HKEY_LOCAL_MACHINE\SOFTWARE\Microsoft\Windows\CurrentVersion\Internet Settings\Connections.

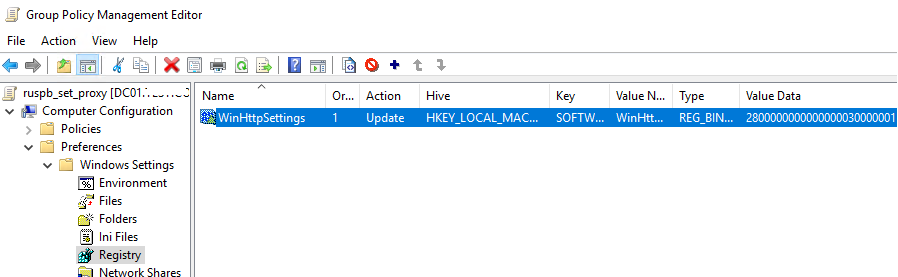
You can set this proxy setting with GPO using registry wizard. Open new GPO nad navigate to Computer Configuration > Preferences > Windows Settings > Registry > New > Registry Wizard.
Select Local computer and specify the path to the WinHttpSettings parameter. Select setting and click finish. It will copy registry binary setting from your local PC to group policy entry.

Just to clarify that there is also two same settings under Connections Key with differnet names DefaultConnectionSettings and SavedLegacySettings among different registry keys. On this link you can find more about using this keys, and some help in quickly changing binary for turning on or off some common proxy setting values . For example If “Manual proxy” is checked – 9th byte value is “03“

Setting proxy using system environment variables
With new .NET Core cross platform language and general Windows love Linux attitude, you can now use environment variables for setting proxy. I first discovered this possibility when i tried to debug why certain web application is using proxy when it shouldn’t. For all apps that are using Linux like http_proxy, https_proxy entries you can now set it up. This change came with .NETcore 3.0. You can check when it all started on this link . If I am wrong please correct me. I didn’t had to much time to investigate
The environment variables used for DefaultProxy initialization on Windows and Unix-based platforms are:
- HTTP_PROXY: the proxy server used on HTTP requests.
- HTTPS_PROXY: the proxy server used on HTTPS requests.
- ALL_PROXY: the proxy server used on HTTP and/or HTTPS requests in case HTTP_PROXY and/or HTTPS_PROXY are not defined.
- NO_PROXY: a comma-separated list of hostnames that should be excluded from proxying.
New apps are using these environment variables first, and if they don’t exist user proxy settings are used. Please check this link for more details. What is interesting that PowerShell 7 is also using this feature.
If you see entries on the picture in your Windows installation check with you development team 🙂

Prevent user from changing browser settings
Even if GPO is applied to IE, netsh or any other proxy settings, users can change any of the proxy settings. Whatever change is, GPO will still overwrite user changed settings, because GPO’s are applied on regular bases in every domain.
You can prevent users from changing user proxy settings utilizing GPO “Prevent changing proxy settings”. This parameter is present in both the user and computer GPO sections under next locations
- Computer Configuration > Policies > Administrative Templates > Windows Components – Internet Explorer
- User Configuration > Policies > Administrative Templates > Windows Components Internet Explorer
Settings in the Computer Configuration section take precedence over user settings.


Powershell and proxy settings
When using PowerShell there is some recommendation what proxy settings should be used/configure. This is table about recommended proxy settings taken form this Microsoft link
| Platform | Recommended Proxy Settings | Comment |
|---|---|---|
| Windows PowerShell 5.1 | System proxy settings | Do not suggest setting HTTP_PROXY/HTTPS_PROXY environment variables. |
| PowerShell 7 on Windows | System proxy settings | Proxy could be configured by setting both HTTP_PROXY and HTTPS_PROXY environment variables. |
| PowerShell 7 on macOS | System proxy settings | Proxy could be configured by setting both HTTP_PROXY and HTTPS_PROXY environment variables. |
| PowerShell 7 on Linux | Set both HTTP_PROXY and HTTPS_PROXY environment variables, plus optional NO_PROXY | The environment variables should be set before starting PowerShell, otherwise they may not be respected. |
To find out what proxy settings is using PowerShell you can use this command
[System.Net.WebProxy]::GetDefaultProxy()

For some more info please check this link
I next part I will cover configuring proxy settings using WPAD/PAC scripts. i hope it will not be long and daunting task like this one. See you
I needed to check the proxy settings on a Windows 8 system that appeared
to have been infected by malware that configured the system to use
a proxy server running on the system that was installed by the malware. If
you wish to view the proxy settings that will be used by Internet
Explorer or by any application that will rely upon the system proxy
settings for its own proxy use, the proxy server settings can be checked
in Internet Explorer 11, and by a similar process in recent versions before
it, by the following steps, either from within Internet Explorer or from
a command prompt:
From within Internet Explorer
-
Click on the gear icon in the upper, right-hand corner of the Internet Explorer
window. - Select Internet options.
-
Click on the Connections tab.

- Click on LAN settings.
-
If «Use a proxy server for your LAN» has a check in the checkbox, then a proxy
server has been set. Click on the Advanced button to see the details for
the proxy server.
In the example above, I can see that the proxy server in use is running
on the local loopback address for the system, i.e., 127.0.0.1, so the proxy
server software is running on the system itself and is handling both HTTP
and HTTPS connections. It is listening on port 55833.
From a command prompt
Alternatively, you can also view the proxy server settings by querying
the
Windows Registry
from a command prompt as shown below:
C:\>reg query "HKCU\Software\Microsoft\Windows\CurrentVersion\Internet Settings" /v ProxyEnable

HKEY_CURRENT_USER\Software\Microsoft\Windows\CurrentVersion\Internet Settings
    ProxyEnable    REG_DWORD    0x1

C:\>reg query "HKCU\Software\Microsoft\Windows\CurrentVersion\Internet Settings" /v ProxyServer

HKEY_CURRENT_USER\Software\Microsoft\Windows\CurrentVersion\Internet Settings
    ProxyServer    REG_SZ    http=127.0.0.1:55833;https=127.0.0.1:55833
The first reg query command shows that ProxyEnable
is set to 1, since 0x1 indicates that the value
is hexadecimal 1, which is the same as decimal 1, indicating a proxy
server is being used for the currently logged in user under whose
account the command was run. If the value was zero, then no system-wide
proxy server is in use. The second reg query command
shows the IP address for the proxy server. In this case the proxy server
has been set up by malware on the system to route HTTP and HTTPS traffic
through a proxy server it has installed on the system.
On another system configured to use
a SOCKS proxy server set up via a
PuTTY SSH connection, the same reg query command shows the following:
C:\>reg query "HKCU\Software\Microsoft\Windows\CurrentVersion\Internet Settings"
 /v ProxyServer

HKEY_CURRENT_USER\Software\Microsoft\Windows\CurrentVersion\Internet Settings
    ProxyServer    REG_SZ    socks=127.0.0.1:1080
Again, the 127.0.0.1 address indicates the SOCKS proxy server
is running on the system on which the command was issued. In this case
the SOCKS proxy server is listening on port 1080.
If I wanted to change the proxy server settings so that any browser using
the system-side proxy server setting would no longer use the proxy server,
I could change the value of ProxyEnable in the Windows registry
to be zero with the following reg add command:
reg add "HKCU\Software\Microsoft\Windows\CurrentVersion\Internet

Settings" /v ProxyEnable /t REG_DWORD /d 0 /f
The /d followed by a zero specifies that the data to assign to
the registry ValueName, which was specified as ProxyEnable
by the /v, is a zero. The /t specifies that the
data type for the registry value is REG_DWORD and the
/f forces an overwrite of the current value without a prompt
appearing asking if you are sure you want to overwrite it. Without the
/f, a window will open asking for confirmation of the replacement
of the current value in that registry location.
The value for ProxyServer in the registry
remains the same, but browsers will no longer use the proxy.
C:\>reg add "HKCU\Software\Microsoft\Windows\CurrentVersion\Internet Settings" /v ProxyEnable /t REG_DWORD /d 0 /f
The operation completed successfully.

C:\>reg query "HKCU\Software\Microsoft\Windows\CurrentVersion\Internet Settings" /v ProxyServer

HKEY_CURRENT_USER\Software\Microsoft\Windows\CurrentVersion\Internet Settings
    ProxyServer    REG_SZ    socks=127.0.0.1:1080


C:\>reg query "HKCU\Software\Microsoft\Windows\CurrentVersion\Internet Settings" /v ProxyEnable

HKEY_CURRENT_USER\Software\Microsoft\Windows\CurrentVersion\Internet Settings
    ProxyEnable    REG_DWORD    0x0
If you wished to enable the use of the proxy server agin, you could
issue the same reg add command, but with /d 1, instead
of /d 0.
Note: if you change the proxy server setting within Google Chrome and
leave Chrome open when you change the value of ProxyEnable to
zero or one with the reg add command, you will need to get Chrome
to check the setting again by going through the
steps to view the proxy
server setting in Chrome or close and reopen Chrome.
Running
show-firefox-proxy-setting.bat on the system that was configured to
use an HTTP and HTTPS proxy listening on port 55833, as noted in
Finding the
proxy setting for Firefox from a command line, showed the following,
since it was configured to use the system proxy settings:
C:\Users\Public\Documents>show-firefox-proxy-setting.bat

---------- C:\USERS\JDoe\APPDATA\ROAMING\MOZILLA\FIREFOX\PROFILES\L7FNKEJA.DEFAULT\PREFS.JS
I.e., no proxy information was displayed. If it had been configured for
«manual proxy configuration» with 127.0.0.1 for both the HTTP Proxy and
SSL Proxy setting with port 55833 for both, it would have shown the
following:
C:\Users\Public\Documents>show-firefox-proxy-setting.bat

---------- C:\USERS\JDoe\APPDATA\ROAMING\MOZILLA\FIREFOX\PROFILES\L7FNKEJA.DEFAULT\PREFS.JS
user_pref("network.proxy.http", "127.0.0.1");
user_pref("network.proxy.http_port", 55833);
user_pref("network.proxy.ssl", "127.0.0.1");
user_pref("network.proxy.ssl_port", 55833);
user_pref("network.proxy.type", 1);
I.e., the proxy server setting information displayed only applies to a
«manual proxy configuration» for Firefox.
Running the batch file on the system configured to use the SOCKS proxy where
Firefox was configured to use a «manual proxy configuration», showed the
following:
C:\>show-firefox-proxy-settings.bat

---------- C:\USERS\Joan\APPDATA\ROAMING\MOZILLA\FIREFOX\PROFILES\W9XPP5JC.D
EFAULT\PREFS.JS
user_pref("network.proxy.socks", "127.0.0.1");
user_pref("network.proxy.socks_port", 1080);
user_pref("network.proxy.type", 1);
When Firefox is configured for «No proxy», it will show something similar
to the following:
C:\>show-firefox-proxy-settings.bat

---------- C:\USERS\Joan\APPDATA\ROAMING\MOZILLA\FIREFOX\PROFILES\W9XPP5JC.D
EFAULT\PREFS.JS
user_pref("network.proxy.type", 0);
I.e., it will show user_pref("network.proxy.type", 0);.
If you wish to check the proxy server setting for an account on the
system other than the one under which you are currently logged in, you can
specify the Security Identifier (SID) for the account, instead of
HKCU as shown below.
C:\>reg query "HKEY_USERS\S-1-5-21-3084690208-3888753220-1328190815-1115\Software\Microsoft\Windows\CurrentVersion\Internet Settings" /v P
roxyEnable

HKEY_USERS\S-1-5-21-3084690208-3888753220-1328190815-1115\Software\Microsoft\Win
dows\CurrentVersion\Internet Settings
    ProxyEnable    REG_DWORD    0x1
You can determine the SID for an account from the command line by
using the VBScript determine-sid script as shown below:
C:\Users\Public\Documents>cscript /nologo determine-sid.vbs Sue Onda
Userid:               Sue
Computer Name/Domain: Onda
SID:                  S-1-5-21-2441191556-19154564-1365248798-1001
The script must be run from an administrator account. The user account
name and the name of the computer, since the script can also query remote
computers, can be specified on the command line. E.g., in the case above
the username is «Sue» and the computer name is «Onda». If they aren’t specified
on the command line, a window will appear prompting for both.