
Отключаем автоматическое определение параметров сети в домене без участия администратора
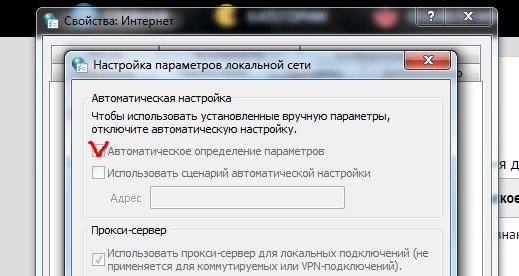
На доменной машине без учетной записи с правами администратора изменить параметры локальной сети не выйдет, так как доступ к форме «Настройка параметров локальной сети» ограничен у простого пользователя. Однако не все пользователи знают, что «галочку» в форме можно поставить или снять без учетной записи с правами админа и делается это через реестр.
Необходимо найти 9-й байт в ключе:
[HKEY_CURRENT_USER\Software\Microsoft\Windows\CurrentVersion\Internet Settings\Connections] "DefaultConnectionSettings"=hex:3c,00,00,00,1f,00,00,00,03,00,00,00,00,00,00, 00,00,00,00,00,00,00,00,00,01,00,00,00,1f,00,00,00,68,74,74,70,3a,2f,2f,31, 34,34,2e,31,33,31,2e,32,32,32,2e,31,36,37,2f,77,70,61,64,2e,64,61,74,90,0e, 1e,66,d3,88,c5,01,01,00,00,00,8d,a8,4e,9e,00,00,00,00,00,00,00,00
0x1: (Всегда 1)
0x2: Proxy установлен
0x4: «Использовать автоматическую конфигурацию» установлен
0x8: «Автоматическое определение настроек» checked
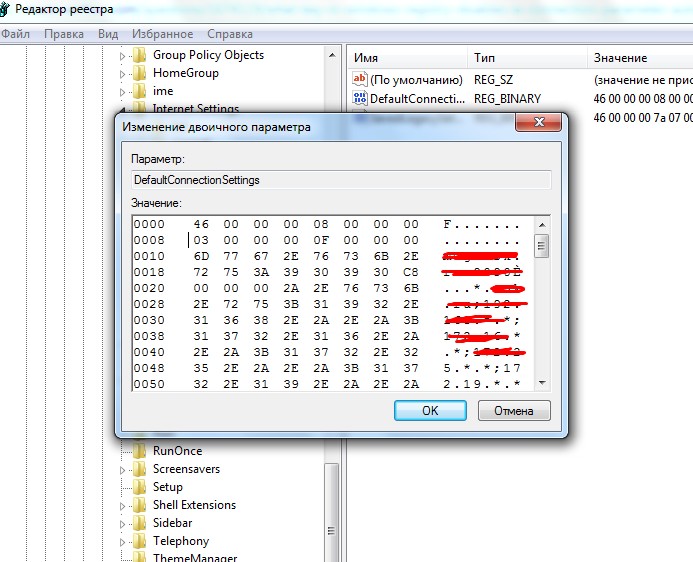
В итоге, что сделали? В параметрах DefaultConnectionSettings в 9-м байте поменяли значение на 03, этим самым сняв галочку без участия администратора
Software Microsoft Windows Currentversion Internet Settings Connections. This contains the following 2 binary registry keys which have the connections settings: For example, replace proxyservername:portnumber with.
This way all browsers and internet settings will provide you with administrator privileges. The automatic root certificates update component is designed to automatically check the list of trusted. You will now see in the ntuser.dat hive (in the registry, run refresh) new keys in hkey_users\ntuser.dat\software\microsoft\windows\currentversion\internet settings\connections.
It Is Actually The Value In Software\Microsoft\Windows\Currentversion\Internet Settings\Connections\Defaultconnectionsettings That Is Used.
This contains the following 2 binary registry keys which have the connections settings: Check the permissions on internet settings in registry. This way all browsers and internet settings will provide you with administrator privileges.
The Value Is Binary And Whilst Reading This With.
Replied on february 6, 2018. Manage connections from windows 10 and windows 11 operating system components to microsoft services. The same setting can be enabled through the registry:
I Want To Know What’s The Address Of This:
D) ensure that your user profile has full control. Computer configuration > administrative templates > windows components > internet explorer. Select the hive name under hkey_users then unload it by selecting from the file menu the option unload hive.
See Also Under The Registry Key Hklm\Software\Policies\Microsoft\Windows\Currentversion\Internet Settings If You Have An Item Named Proxysettingsperuser And Try To Toggle Its Value Between 1 And 0, Reboot If Changed.
Can you apply the 10 simultaneous connections increase to all users on the machine by setting it in the registry key here?: And going to internet settings. Important this section, method, or task contains steps that tell you.
“Defaultconnectionsettings” And “Savedlegacysettings” The Next Step Is To Open The Newly Exported.reg File And To Change The Path:
For example, replace proxyservername:portnumber with. If the localservice doesn’t have the correct proxy. 2.1 cortana and search group.
These are my notes about proxying Windows services. Being run from a different account (usually LocalSystem).
Proxy settings are usually configured per user and are not applicable to Windows services.
If you have to proxy a Windows service, here are some of the things you can try (and hope they work).
There are also some issues when using netsh to set WinHTTP proxies for 32-bit applications on Windows 7 64-bit.
- Some Background Knowledge
- Traditional Techniques or «Try These Anyways»
- WinINET or Internet Explorer Proxy Settings
- WinHTTP Proxy Settings
- netsh winhttp for 32-bit Processes on Windows 7 64-bit
- Run the Service Executable Manually
- Disable Per-User WinINET Proxy Settings
- .NET Config File
- .NET Framework Machine Configuration File
Some Background Knowledge
- Understanding Web Proxy Configuration — MSDN. This is a pretty useful read for Windows proxying. If you have to choose between this blog and that article, choose the MSDN article.
- Part 6 — How HTTP(s) Proxies Work
Traditional Techniques or «Try These Anyways»
These are things that usually work for most Windows applications.
WinINET or Internet Explorer Proxy Settings
Usually called the Internet Explorer proxy settings. These usually work for most proxy-aware applications.
Shortcut control inetcpl.cpl,,4.
WinHTTP Proxy Settings
WinHTTP is generally the proxy for Windows services. You can either set specific proxies or tell it to import IE proxy settings (see above).
Run in admin command prompt:
- Use IE:
netsh winhttp import proxy source=ie. Note: You need to set WinINET settings before this command. This command uses a snapshot of IE settings and imports them. If you change IE settings after, it will not get updated and you have to run it again. - Set proxy:
netsh winhttp set proxy proxy-server="http=localhost:8080;https=localhost:8443" bypass-list="*.whatever.com;localhost". - Reset proxy:
netsh winhttp reset proxy.
More info: MSDN — Netsh Commands for Windows Hypertext Transfer Protocol (WINHTTP)
Location in registry:
-
64-bit (note the line-broken «Internet Settings»):
-
HKLM\SOFTWARE\Microsoft\Windows\CurrentVersion\Internet Settings\Connections\WinHttpSetting- You will see something like this:
0000 28 00 00 00 00 00 00 00 03 00 00 00 28 00 00 00 |(...........(...| 0010 68 74 74 70 3d 6c 6f 63 61 6c 68 6f 73 74 3a 38 |http=localhost:8| 0020 30 38 30 3b 68 74 74 70 73 3d 6c 6f 63 61 6c 68 |080;https=localh| 0030 6f 73 74 3a 38 34 34 33 18 00 00 00 2a 2e 77 68 |ost:8443....*.wh| 0040 61 74 65 76 65 72 2e 63 6f 6d 3b 6c 6f 63 61 6c |atever.com;local| 0050 68 6f 73 74 |host| -
HKLM\SOFTWARE\Microsoft\Windows\CurrentVersion\Internet Settings\WinHttp
-
-
32-bit:
HKLM\SOFTWARE\Wow6432Node\Microsoft\Windows\CurrentVersion\Internet Settings\Connections\WinHttpSettingsHKLM\SOFTWARE\Wow6432Node\Microsoft\Windows\CurrentVersion\Internet Settings\WinHttp
netsh winhttp for 32-bit Processes on Windows 7 64-bit
Due to the way 32-bit emulation works, they have their own registry and «system32»:
- registry hive:
hive\Software\Wow6432Node. E.g.HKCU\Software\Wow6432Node\Microsoft\Windows - system32:
%WINDIR%\SysWOW64. E.g.C:\windows\SysWOW64
On Windows 7, when you use netsh to write WinHTTP proxy settings, only the 64-bit registry keys are changed. For 32-bit apps you need to explicitly run %WINDIR%\SysWOW64\netsh.exe.
# change winhttp proxy setting
C:\>netsh winhttp import proxy source=ie

Current WinHTTP proxy settings:

    Proxy Server(s) :  localhost:8100
    Bypass List     :  (none)

# not modified for 32-bit applications
C:\>c:\Windows\SysWOW64\netsh.exe winhttp show proxy

Current WinHTTP proxy settings:

    Direct access (no proxy server).
Presumably this has been fixed for later versions of Windows, but double-check to be sure.
Run the Service Executable Manually
This might help bring it under your «jurisdiction» and thus your proxy settings will apply. By default each user has their own proxy settings.
You can use Process Explorer or Process Monitor or other tools to discover the parameters to run the service (if any).
Disable Per-User WinINET Proxy Settings
By default they are per-user, you set the following registry key to 0:
HKLM\SOFTWARE\Policies\Microsoft\Windows\CurrentVersion\Internet Settings\ProxySettingsPerUser
But after this change you will need admin access to modify proxy settings.
.NET Config File
See detailed info in part 7
.NET applications can read settings from config files. This is an XML file named applicationName.exe.config.
Add these settings (configuration is already present in existing config files):
<configuration>
  <system.net>
    <defaultProxy>
      <proxy
        usesystemdefault="true"   // use IE proxy settings
        proxyaddress="http://192.168.1.10:3128"  // remember to keep "http://" here
        bypassonlocal="true"
      />
      <bypasslist>
        <add address="[a-z]+\.contoso\.com" />
      </bypasslist>
    </defaultProxy>
  </system.net>
</configuration>
Note usesystemdefault and proxyaddress are mutually exclusive.
- Keep
http://inproxy addresseven if you are using an HTTPS proxy like Burp, it will proxy TLS. - Often
usesystemdefaultdoes not work because your user and the user running the service are different and have their own proxy settings. Running the service binary manually may help.
Use tools like process monitor to detect if the application is looking for this or any other config file.
.NET Framework Machine Configuration File
You can use a similar config file for the entire machine. Meaning any application running via that .NET framework will use those settings.
Location is %WINDIR%\Microsoft.NET\Framework|Framework64\[version]\Config\machine.config.
Note that you need to change the config for both 32 and 64-bit frameworks (Framework|Framework64) and each version (e.g. 2, 3 or 4) separately.
For example for 64-bit .NET Framework 4.x (anything 4.x is under 4):
C:\Windows\Microsoft.NET\Framework64\v4.0.30319\Config
To learn more about the config file (which is really recommended) see file machine.config.comments in the same location. It has comments and examples.
Hi all,
I want to share the solution to clear all WPAD cache and settings on a Windows 10 or 11 machine.
Step 1: Regedit
Computer\HKEY_USERS\S-1-5-19\SOFTWARE\Microsoft\Windows\CurrentVersion\Internet Settings\Wpad: delete all underlying keys
Computer\HKEY_CURRENT_USER\SOFTWARE\Microsoft\Windows\CurrentVersion\Internet Settings\Connections: delete the keys «DefaultConnectionSettings» and «SaveLegacySettings»
Computer\HKEY_LOCAL_MACHINE\SYSTEM\CurrentControlSet\Services\WinHttpAutoProxySvc: in the value «start», change the data value from «3» to «4
Step 2: Internet Options
Advanced tab > Reset Internet Explorer Settings (incl Delete personal settings) > Reset
Step 3: CMD as admin
ipconfig /flushdns
Step 4: reboot the machine twice
Clearing the WPAD can be useful when getting this output from dsregcmd /status «Auto Detect PAC Status : Failed to auto detect the Proxy Auto-Configuration (PAC) script using WPAD. code: 0x80072f94» (Hybrid Azure AD Join Failure)
Для старых версий Internet Explorer в оснастке групповых политик существовал раздел IE Maintenance. Но в более новых версиях контроллеров и для IE версий 10+ этого раздела нет, а сохранившиеся настройки не работают или работают частично.
Особую головную боль вызывает галочка «Автоматическое определение параметров», которая никак через политики не настраивается:
Довольно долго пришлось копаться, пока не выяснилось, что за нее отвечают параметры:
HKEY_CURRENT_USER\Software\Microsoft\Windows\CurrentVersion\Internet Settings\Connections
DefaultConnectionSettings
SavedLegacySettings
Однако, эти параметры представляют собой значения типа reg_binary, то есть, некие числовые данные, причем очень длинные.
Первым (и довольно популярным, как ни странно) решением, которое мне попалось, было «скопируйте значения этих ключей с машины, где сделаны нужные настройки, и политикой добавляйте их в реестр на целевых машинах». Почти элегантно, если не считать того, что эти байтовые массивы действительно длинные и явно отвечают не только за одну эту галку.
Такая постановка вопроса смутила не меня одного и нашелся человек, который расковырял это дело и обнаружил, что управляет этой галкой один бит в одном байте этого массива. (дальше речь про DefaultConnectionSettings, а SavedLegacySettings не трогаем).
Этот человек сочинил скрипт, которым я и воспользовался.
Отвечает за галку бит со значением 0x8 в байте с номером 0x8 (нумерация с нуля!):
Для изменения этого бита воспользуемся старыми добрыми логическими функциями: И и ИЛИ.
Чтобы установить этот бит: байт(8) OR 8 (810=000010002)
Чтобы сбросить этот бит: байт(8) AND 247 (24710=111101112)
Осталось выдернуть этот байт из этого ключа, изменить его в зависимости от того, что нам нужно, и записать обратно. Этим занимается слегка модифицированная версия исходного скрипта на .vbs. Проверено, в GPO она отрабатывает нормально, хотя иногда требуется сделать gpupdate /force и перелогиниться под текущим пользователем больше одного раза.
Я сохранил большинство авторских комментариев и добавил пару своих.
RESET_IE_AUTOCONFIG.VBS
—
Option Explicit
On Error Resume Next
‘Create a constant for the HKEY_CURRENT_USER object
Const HKCU = &H80000001
‘Define variables
Dim strComputer
Dim strRegistryKey
Dim objRegistry
Dim strRegistryValue
DIm binValue
strComputer = «.»
strRegistryKey = «Software\Microsoft\Windows\CurrentVersion\Internet Settings\Connections»
strRegistryValue = «DefaultConnectionSettings»
‘Connect to the Registry
Set objRegistry = GetObject(«winmgmts:\\» & strComputer & «\root\default:StdRegProv»)
‘Retrieve the current settings.
objRegistry.GetBinaryValue HKCU, strRegistryKey, strRegistryValue, binValue
‘**********
‘Change the ‘Automatically detect settings’ box to unticked
‘**********
‘bit value=8 (not related to byte #8!!!)
rem 255 xor 8 = 247
rem set: binValue(8) or 8
rem reset: binValue(8) and 247
binValue(8) = binValue(8) and 247
‘Save the changes
objRegistry.SetBinaryValue HKCU, strRegistryKey, strRegistryValue, binValue
—
Разумеется, этот скрипт можно сделать более компактным и оптимальным, но смысл? Он действительно работает и довольно прост для адаптации под индивидуальные нужды. Три ключевых момента я выделил цветом: получаем значение, изменяем его в зависимости от, записываем значение обратно.
Настройка гарантированно работает как для IE8/xp, так и для IE11/win7/srv2008r2