
In this article, we will describe about software center and the steps to download and install it as well. It is part of Microsoft’s System Center Configuration Manager (SCCM), which allows you to distribute, manage, support and update computing and technology services (CTS). It also provides a scalable, efficient way to manage large groups of Windows computers. This feature set gives the Office of Information Technology (OIT) the ability to preform software distribution in line with industry standards and best practices to meet the needs of the University of Alaska Fairbanks (UAF) and Statewide Administration (SW).
Where is the software center on the computer?
Here we find the this application on the computer, for that follow these steps:
- First go to start menu.
- Then click on Microsoft System Center.
That’s where we get the software center.
Alternatively way:
- You can double-click the Software Center system tray icon.
- From the Software Center console, you can view the software provided for installation from your IT department under “Applications”
- If you want to update it then click under “Updates”.
Steps to download and install:
Here follow these steps to download and install:
- Visit the downloading site.
- Instructions for installation are given below:
- Click on the Start button.
- Click All Apps > Microsoft System Center > Configuration Manager > Software Center.
- When the it opens, you will have a list of available software under the Available Software tab. Click on it
- After selecting the desired software click the Install button.
- The Installation Status tab will show the progress of the application being installed.
- Once the install is complete the software will appear in the Installed Software tab.
- Now it will be installed
In this post, we’ll provide step-by-step instructions for using the Software Center in Windows 10 and Windows 11. First, we’ll cover how to access its features, and then we’ll explain how to install it if it’s not already on your device.
To begin with, here is a quick guide to using the Software Center in Windows 11 and Windows 10:
- Click the Start button.
- Type “Software Center” in the search bar.
- Select the Software Center app from the results.
- Once in the Software Center, you can:
- Browse featured apps
- Search for specific software
- View app details, ratings, and reviews
- Download and install apps with one click
However, this is just an overview of the steps. As you continue reading the blog, you’ll find more detailed instructions on how to use the Software Center in Windows for various purposes.
Therefore, we encourage you to keep reading for a comprehensive understanding of this useful tool.
How to use Software Center in Windows 11 ?
The Software Center’s in Windows 11 is a powerful tool for managing software installations, updates, and configurations. Here’s a detailed guide on how to access and use the Software Center’s effectively.
Accessing Software Center
Open the Start Menu:
- To begin, click the Start button (Windows icon) located on the taskbar or press the Windows key on your keyboard.
Search for Software Application:
- Next, in the search bar, type “Software Center.”
Launch the App:
- Then, from the search results, click on the Software Center’s app to open it.
Using Software Center
Once you have accessed the Software Cente’sr, you can perform various tasks:
Browse Featured and Recommended Apps
- First, the home page of the Software Center’s displays featured and recommended applications. You can scroll through this list to discover new software.
Search for Specific Software
- Alternatively, use the search bar at the top of the Software Center’s window. Type the name of the application you are looking for and press Enter. Subsequently, the results will display matching applications.
View App Details
- After finding an app of interest, click on any application to view its details. This includes:
- Description: Information about what the app does.
- Ratings and Reviews: User feedback that can help you decide whether to install the app.
Also Check: How to find and save Windows Spotlight Images ?
Install Applications
- When you’re ready to install an application, click the Install button next to the app. Subsequently, the Software Center’s will handle the download and installation process automatically. You may see a progress bar indicating the installation status.
Manage Installed Applications
To view and manage applications you have already installed:
- First, navigate to the Installed Software section, usually found in the left sidebar.
- Here, you can see a list of all installed applications.
- Then, click on an application to see options for updating or uninstalling it.
Check for Updates
- Periodically, the Software Center’s will often notify you of available updates for your installed applications. However, you can also manually check for updates by going to the Updates section, where you can see which apps have updates available and choose to install them.
Uninstall Applications
- If you want to remove an application, first go to the Installed Software section. Next, select the app you wish to uninstall, and then click the Uninstall button. Finally, follow any prompts to complete the uninstallation process.
Access Settings
- Lastly, you can access settings within the Software Center’s to customize your experience. Look for a gear icon or settings option, where you can adjust preferences related to notifications, installation behavior, and more.
How to use software Center in Windows 10 ?
The Software Center’s in Windows 10 is a centralized platform for managing software installations and updates. Here’s a comprehensive guide on how to effectively use it.
Accessing Software Center
Start Menu:
- To begin, click on the Start button located in the bottom left corner of your screen.
Search Function:
- Next, type “Software Center” into the search bar.
Open the Application:
- Then, select the Software Center from the search results to launch it.
Navigating Software Center
Home Page:
- First, upon opening, you will see the home page featuring a list of recommended and featured applications. This is a great place to discover new software.
Search for Applications:
- Additionally, use the search bar at the top of the window to find specific applications. Enter the name of the software and press Enter to see the results.
Managing Applications
Application Details:
- When you find an interesting app, click on it to view its details. This includes a description, system requirements, and user ratings. Consequently, this information can help you decide whether to install the app.
Also Check: How to fix ‘Underline Network Security Key Not Valid’ Issue ?
Installation Process:
- Once you’ve added, to install an application, click the Install button next to the desired app. After wards, the Software Center will begin downloading and installing the application automatically. Meanwhile, you can monitor the progress through a status bar.
Viewing Installed Software:
- To check your current software, navigate to the Installed Software section, typically found in the left sidebar. Here, you’ll find a list of all applications currently installed on your device.
Updating Applications:
- Periodically, check for updates by going to the Updates section. In this area, you can see which installed applications have available updates. Subsequently, click the Update button next to any app to install the latest version.
Uninstalling Applications:
- If you need to remove an application, first go to the Installed Software section. Then, select the app you want to uninstall, and click the Uninstall button. Finally, follow any prompts to complete the uninstallation.
Additional Features
Notifications:
- Furthermore, the Software Center’s may provide notifications for new software or updates. Therefore, pay attention to these alerts to keep your system up to date.
Settings:
- Lastly, access the settings menu, usually represented by a gear icon, to customize your Software Center’s experience. Hence, you can adjust preferences related to notifications and installation options.
How to install Software Center in Windows ?
To begin with, it’s important to understand that the Software Center’s in Windows must be part of a system management solution like Microsoft Endpoint Configuration Manager (formerly SCCM).
It is not a standalone application that can be downloaded independently; instead, it is deployed to client machines through these management systems.
To install Software Center in Windows, follow these steps:
Check if Software Center is pre-installed
- Initially, press the Windows key + R to open the Run dialog box.
- Next, type “appwiz.cpl” and press Enter.
- Then, look for “Software Center’s” in the list of installed programs. If it’s present, you don’t need to install it again.
Install Software Center (if not pre-installed)
However, if Software Center’s is not pre-installed, follow the steps:
- First, you’ll need to download and install it from a trusted source.
- Next, search for “Software Center” on your organization’s intranet or a reputable software repository.
- Then, download the appropriate installation file for your Windows version (e.g., .exe, .msi).
- After that, double-click the downloaded file to start the installation process.
- Finally, follow the on-screen instructions to complete the installation.
Verify installation
- After the installation is complete, open the Control Panel again and check if “Software Center” is listed in the installed programs.
Note:
- Additionally, be aware that the specific steps and sources for downloading Software Center’s may vary depending on your organization’s IT policies and the version of Windows you’re using.
- Furthermore, if you encounter any issues during the installation process, consult your organization’s IT department or refer to the Software Center’s documentation for assistance.
Also Check: How to Enable or Disable VRR in Windows 11 ?
Conclusion
To wrap up, the Software Center is a powerful tool for managing applications in Windows 10 and 11. Throughout this guide, we’ve covered how to access it, navigate its features, and use it effectively for installing, updating, and removing software.
First and foremost, remember that the Software Center’s may come pre-installed or require installation through your organization’s management system.
Moreover, whether you’re browsing featured apps, searching for specific software, or managing updates, the Software Center’s streamlines your software management experience.
By following the steps outlined in this guide, you can therefore take full advantage of this centralized platform to keep your Windows system up-to-date and running smoothly.
Finally, if you encounter any issues along the way, don’t hesitate to reach out to your IT department for assistance.
Source: [ microsoft, umassd.edu, prajwaldesai, cwu.teamdynamix ]
Frequently Asked Question’s (FAQ’s)
What does a software center do ?
A software center is a centralized platform that simplifies the process of managing software applications on a computer system. It provides a user-friendly interface for browsing, searching, installing, updating, and uninstalling software.
How do I access the software center ?
Search Bar: Type “Software Center” in your operating system’s search bar.
Applications Menu: Check for a “Software Center” or “Applications” menu.
Command Line: Use a specific command in the command-line interface to launch the Software Center if you’re familiar with it.
Is SCCM and software Center the same thing ?
SCCM (System Center Configuration Manager) and Software Center are related but distinct. SCCM is a comprehensive software management platform for managing devices, applications, and operating systems, while Software Center is the user interface within SCCM that enables users to browse, search, and install software packages.
Software Center is a component of Microsoft’s Endpoint Configuration Manager (ConfigMgr) which enables Information Technology Services (ITS) to deploy and update applications, security updates, and operating systems for computers in the Managed Workstation Service.
Faculty and staff who have a computer in the Managed Workstation Service can install Windows 10/11 updates using Software Center. Software Center enables faculty and staff to manually sync policy for their workstations to prompt the workstation to check for new software, thereby shortening the deployment time.
Accessing Windows 10/11 Upgrades within Software Center
Windows 11 may not be available on your workstation at this time
-
Open Software Center
-
Search for “Software Center” in Windows Search
-
Alternatively, Open the Start Menu, look for Microsoft Endpoint Manager, and click Software Center
-
-
On the left hand menu, click Operating Systems
-
You will see a list of operating system upgrades that are available for the machine
4. Click on the upgrade you want to perform or were instructed to perform and click Install
Your machine will likely prompt you to Restart to complete the upgrades
Windows 10/11 Upgrade Notifications
Windows 11 may not be available on your workstation at this time
-
When updates are available, there will be popups in the bottom right corner of the Desktop, as shown in the image below.
-
Click on this alert. A Software Update window will appear.
-
If the alert disappears before you have a chance to click on it, navigate to the Software Center via the Start menu. The «Restart your computer» window will appear.
-
On the left hand menu, click Updates
-
Select the appropriate radio button to indicate whether you wish to run the updates now or within a selectable delayed time. The «Restart your computer» window may display the latest date on which you can delay installing updates. If there is a date specified, you can delay the installation until the deadline.
Once the deadline passes, however, you will not be able to delay the updates. You will only be able to snooze the «Restart your computer» window and select time periods to receive update reminders.
The computer will also be susceptible to updates installing on their own once the deadline passes. These automatic installations generally occur in the evenings. Given this timing, refrain from leaving programs and documents open after work hours.
Once the machine restarts, the updates will be complete.
Related Articles
You can use the Software Center to install apps, updates, and printers on any University-owned PC running Windows 10.
In This Article…
- Opening the Software Center
- Installing Applications and Printers
- Installing Printers (additional info)
- Installing Updates
- Troubleshooting Software Center problems
Opening the Software Center
Begin by clicking the Windows search bar and search for Software Center. (#1 in screenshot below)
The Software Center app will appear in the search results. Click the app to open the Software Center. (#2 in the screenshot below).
- NOTE: If your computer is located off-campus, you must first connect to the GlobalProtect VPN.

After clicking the Software Center application, the Software Center opens.

Installing Applications and Printers
In order to begin installing new software, make sure the Applications tab at the left of the window is selected. This will give you a list of applications available for you to install.
You may browse the list of all available applications, or use the search bar (indicated by the green arrow) to find specific apps.
- Note: Printers are installed in the same way as software applications. They appear as applications in the list, and their name will begin with «Printer.»
- For more details on installing printers, see «Installing Printers» below.
- If you need to install an application or printer that is not listed in the Software Center, you can submit a support request

Select the software you would like to install by clicking it. Once you have chosen the software you would like to install, click the Install button.

Once you click the Install button the software will begin to download and install.
You can check the progress of an installation using the Installation Status on the left-hand navigation menu.
Once installed, the Installation Status tab will display the application as Installed.
If the installation fails, the Installation Status tab will say Failed and present the option to Retry. For best results, try rebooting your PC before retrying the installation. A reboot will solve many kinds of software installation problems.
Installing Printers
Printers are installed the same way as applications.
From inside the Applications tab, search for an application called Printer to see your available printers. The printers will be named for the building and room number they are located in. Simply click the printer you want and then click Install.
- Note: PS or UFR?
- The same Canon printer may appear twice in the software center, one with _PS at the end of its name and the other _UFR. You can install either printer or both.
- For best print quality results:
- Use UFR printing if you mostly intend to print office documents.
- Use PS printing when trying to print photos/pictures in high quality, especially with color.
In the example below, the application called Printer — bol225a_ps is used to add a printer located in Bolton hall room 225.

If you do not see the printer you want to map in Software Center, please submit a support request!
Installing Updates
Windows updates can be installed manually by clicking the Updates menu item in the Software Center.
New updates released by Microsoft will be appear as «available» in your Software Center starting on the 2nd Wednesday of each month.
Updates will be installed automatically one week after they become available. For more information, see: Windows Updates
Troubleshooting Software Center Problems
A list of frequent problems and solutions are described below:
Software Center can not be loaded error

If you receive this error message, make sure your computer is connected to the UWM network (wired or wireless).
If your computer is located off-campus, you must connect to the GlobalProtect VPN.
No available apps appear in Software Center
Make sure you are on a UWM network: wired connection on-campus, UWM WiFi, or the GlobalProtect VPN.
App installation fails
Try rebooting the PC and attempt the software installation again after the reboot. If problems persist, contact IT Support!
Cannot find Software Center
This can happen if the computer has been off the UWM network for a very long time. Connect to the VPN or take the computer to UWM.
Leave the computer powered on and connected to the network overnight so it can self-repair.
Click here if you’re looking for macOS Managed Software Center.
What is Software Center?
Software Center (also known as SCCM) is Winona State University’s (WSU) Windows application management framework. SCCM stands for System Center Configuration Manager. Only WSU computers will see WSU’s Software Center application. This applies to both Windows desktops, laptops, and any other Windows devices that WSU distributes to users.
What Should I Expect to See?
When Software Center has new software available, a standard notification may appear in the system tray at the lower-right of the screen.

Occasionally, not often, WSU will have to use Software Center to push updates that are time-sensitive, security-related, or that address other known problems. When or if these situations occur, the message notification may be more persistent.
How do I use Software Center?
To find Software Center on your WSU Windows computer, simply click your Start Menu at the lower-left of the screen and begin typing the words Software Center. Once you have it typed out, you should see something like this. Just click on it to begin.
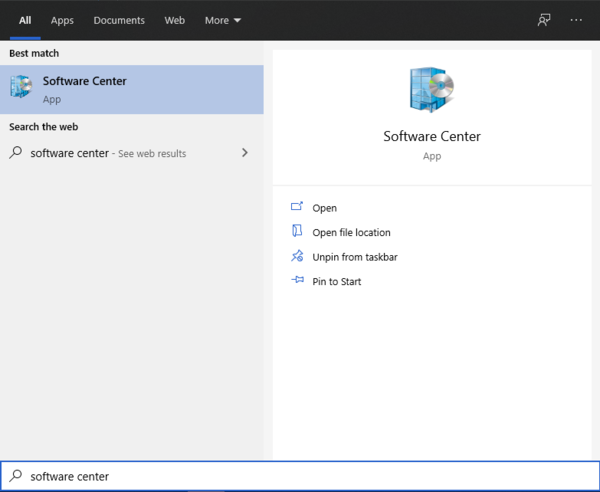
How is Software Center Used?
Software Center offers self-service software installs and can deliver important updates directly to your WSU computer. All students, staff, and faculty members can use this tool by searching for Software Center in their Windows 11 start menu (lower-left hand corner) or by interacting with the Software Center icon in the system tray (lower-right hand corner).
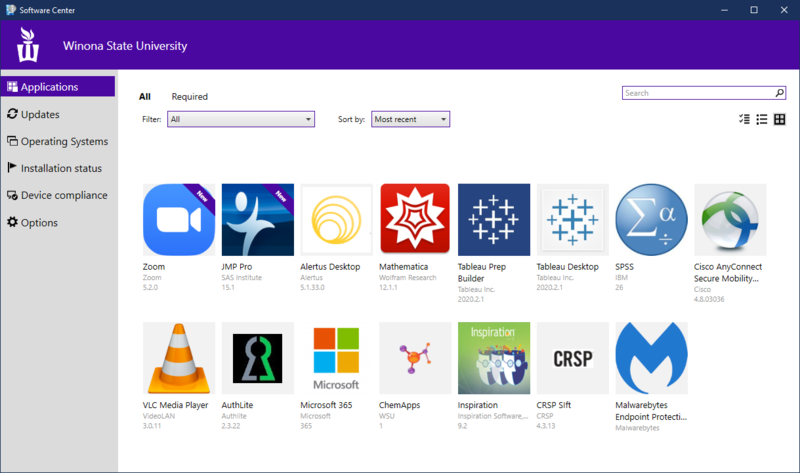
Software Installation
Certain licensed software that was previously made available via the classic Windows Control Panel is now available from Software Center. This includes software from Zoom, JMP, SPSS, Microsoft, and more.
Simply click the icon then click install to get what you need, when you need it.
Software Installation
To install apps via Software Center, follow these steps.
- Open your Start Menu at the lower left of your screen.
- Type “Software Center” then click on Software Center when it appears.
- Click Applications at the top left of the Software Center window.
- From here, click the icon of the app you want to install.
- Once you hit install, the application will begin downloading then will install silently.
- Please be patient during this process!
- Application installs may take anywhere from 2-20 minutes, depending on the speed of your network and the size of the app you are downloading.
- Control Panel Installations (PC)
- Installing Network Software Video — PC
- Backing up your PC laptop