
Свободный доступ ко всем файлам Windows
Когда Handy Backup используется как программа для восстановления файлов Windows, плагин «Computer» позволяет получить свободный доступ даже к файлам и папкам, открытым в других приложениях. Программа Handy Backup умеет также работать с библиотеками и реестром.
Универсальная программа для восстановления системы Windows
Плагины «Disk Image» и «System Recovery», а также утилита Disaster Recovery, позволяют выполнять восстановление Windows 10 и предыдущих версий на «голое железо» (новый или чистый диск), по сети или поверх старой копии ОС, сохраняя все данные.
Кросс-платформенное решение
Утилита Disaster Recovery и программа Handy Backup могут выполнять восстановление системы Windows 10 или ранних версий, а также использоваться для восстановления Windows в серверных решениях, образов диска Linux, FreeBSD и других ОС.
Восстановление Windows из резервной копии с помощью Handy Backup даёт ряд важных преимуществ как для индивидуальных пользователей, так и в сфере бизнеса, делающих это решение очень эффективным и удобным. К числу таких преимуществ относятся:
- Возможность запланировать автоматическое восстановление Windows и резервное копирование по расписанию или при наступлении системного события.
- Возможность просматривать и восстанавливать данные как отдельные файлы (когда Handy Backup используется как программа для восстановления файлов Windows).
- Автоматическое восстановление Windows из резервной копии на любое число машин (например, в массив виртуальных серверов).
Подробнее о всех функциях программы.
В данном видеоуроке показано, как создавать и восстанавливать систему Windows из резервной копии с помощью плагина Disk Image и утилиты Disaster Recovery.
Примечание: в приведённой видео-инструкции уже установлены программа Handy Backup на компьютер и утилита Disaster Recovery на USB-диск.
Попробовать бесплатно
Версия 8.6.2 от 17 апреля 2025. 118 MB
30-дневный полнофункциональный пробный период
Здесь приводится краткая инструкция по использованию утилиты Disaster Recovery. Если вам нужны подробные справки об этой утилите, пожалуйста, обратитесь к Руководству пользователя.
Перед восстановлением Windows вам понадобятся:
- USB-диск, с установленной утилитой Disaster Recovery.
- Бэкап образа диска, созданный с помощью утилиты Disaster Recovery, плагина Disk Image или System Recovery.
- А также компьютер, на который вы будете выполнять восстановление Windows.
- Перед началом работы сделайте резервную копию диска, на который вы будете выполнять восстановление системы Windows. Вы можете потерять важные данные, восстанавливая Windows на диск, уже содержащий информацию; в этом случае вам поможет предварительное копирование жёсткого диска.
- Загрузите ваш компьютер с USB-диска, содержащего копию Handy Backup Disaster Recovery. Образ системы, который вы восстанавливаете, может находиться при этом как на USB-диске, так и на любом диске, подключенном к компьютеру.
- На рабочем столе откройте утилиту Disaster Recovery, а в ней папку Tasks. Нажмите New Task на панели инструментов окна. Откроется диалог New Task. Укажите имя новой задачи восстановления Windows в поле Name и выберите тип задачи Restore. Нажмите ОК.
- Откроется окно новой задачи. Откройте на рабочем столе папку My Computer. Найдите файл с образом диска, из которого вы собираетесь выполнять восстановление системы Windows 10 (или любой другой). Перетащите этот файл в папку задачи What to Restore.
- Снова перейдите в окно My Computer и дважды щёлкните на имени диска, который программа для восстановления Windows будет использовать как место назначения. Для целого диска вам нужно использовать объект full drive image в папке Where to Restore.
Примечание: если программа восстановления Windows должна восстановить только один раздел диска, перейдите в папку Partitions и перетащите из неё нужный раздел в папку вашей задачи Where to Restore.
- Чтобы запустить задачу, нажмите Restore на панели управления задачей. Программа восстановления Windows начнёт автоматически выполнять вашу задачу. Дождитесь её завершения, выньте из компьютера USB-диск и перезагрузите компьютер.
Попробовать бесплатно
Версия 8.6.2 от 17 апреля 2025. 118 MB
30-дневный полнофункциональный пробный период
Решение Handy Backup — эффективная и удобная программа для восстановления Windows 10 и любых других ОС. Скачайте прямо сейчас 30-дневную бесплатную версию с полным набором плагинов и функций!
Рейтинг Google:
«Простая и эффективная программа, отличное решение для бэкапа»
Overview of Windows Recovery Tools
In the past, PCs would ship with a CD/DVD disc that included an image of the system. If the OS has problems someday, you could easily restore the OS to the factory settings. But nowadays, manufacturers start to simplify the way of restoring Windows. They just put an image of the system on a hidden partition of your main drive, so does a Windows recovery USB drive. In addition to letting you reinstall Windows, it includes several troubleshooting tools for emergency use, especially when your system won’t boot.
In Windows 10, for example, there are several Windows recovery tools (options) that solve different OS problems.
| Windows Recovery Tools (Options) | Solve What Kind of Problems |
|---|---|
| Reset your PC | Your PC isn’t working well and it’s been a while since you installed an app, driver, or update. |
| Windows recovery drive | Your PC won’t start and you’ve created a recovery drive. |
| Windows installation media | Your PC won’t start, you haven’t created a recovery drive, and resetting your PC didn’t work. |
What Windows 10 Recovery Tool Should I Use?
Windows 10 recovery tool is used to create a Windows 10 recovery USB or CD/DVD disc. You should make a Windows 10 recovery drive before your PC dies. Both Microsoft and third-party software manufacturers provide reliable recovery tools. Here we picked up two of the best Windows recovery tools for you regarding the effectiveness and ease of use. One is the Windows 10 built-in tool and the other is EaseUS Todo Backup, a third-party backup and recovery software.
Pros of EaseUS Todo Backup:
- With EaseUS Todo Backup, users can make a full/differential/incremental backup.
- The backup image created by EaseUS Todo Backup can be stored in the network, local, and cloud.
- The backup image created by TB is independent, which would not be affected by Windows updates and will not be damaged.
Next, you’ll learn how to create a Windows 10 recovery USB with both the built-in tool and third-party software. Each way is able to solve a none-bootable Windows OS issue and revert your OS back to a working system point.
How to Create a Windows 10 Recovery USB with 2 Built-in Tools
- Applies to: Windows 10 32-bit and 64-bit operating system
- Reference: Microsoft Official Support
- Notice:
- The recovery drive created this way can help you troubleshoot and fix problems with your PC, even if it won’t start. If you back up system files to this drive, you’ll also be able to use it to reinstall Windows. If you chose not to back up system files when you created your recovery drive, Reset this PC and Recover from a drive that won’t be available.
#1. To create a Windows 10 recovery drive, follow the below steps:
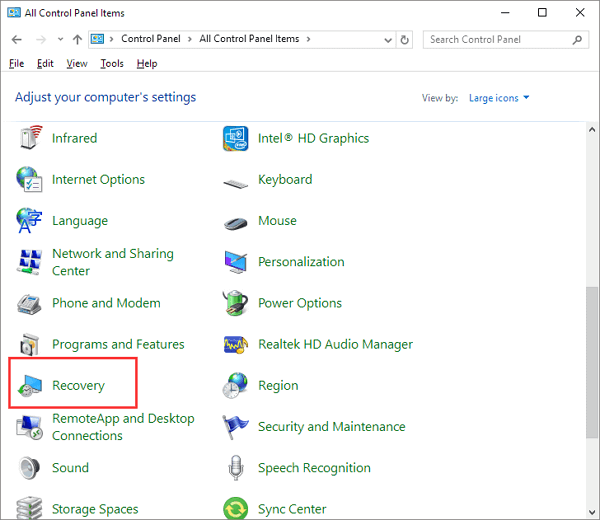
Step 1. Insert the USB drive into your computer. In Windows 10 Control Panel, click «Recovery».
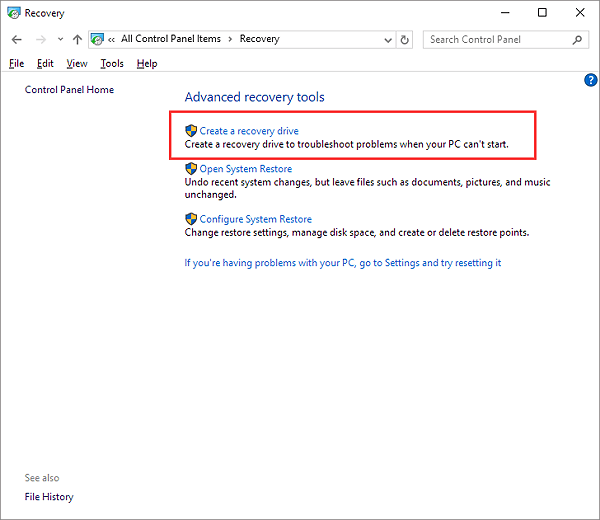
Step 2. You’ll arrive at the Advanced recovery tools area, choose «Create a recovery drive».
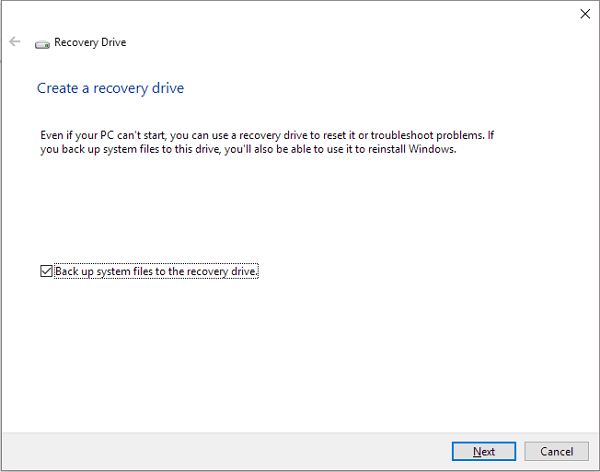
Step 3. Tick the option «Back up system files to the recovery drive» if you wish to use the drive to reinstall Windows or restore a previous version of Windows. Click «Next».
Step 4. Wait until the wizard prepares to copy files to your flash drive.
Step 5. Select your USB flash drive as the recovery drive and click Next.
Step 6. Confirm the warning message that «everything on the drive will be deleted. If you have any personal files on this drive, make sure you’ve backed up the files» and click «Create».
Step 7. When the final message «The recovery drive is ready» appears, click «Finish».
To Recover Windows 10 Using the Windows 10 Recovery Drive:
Step 1. Connect the recovery drive and turn on your PC.
Step 2. Select «Troubleshoot» and choose one recovery option.
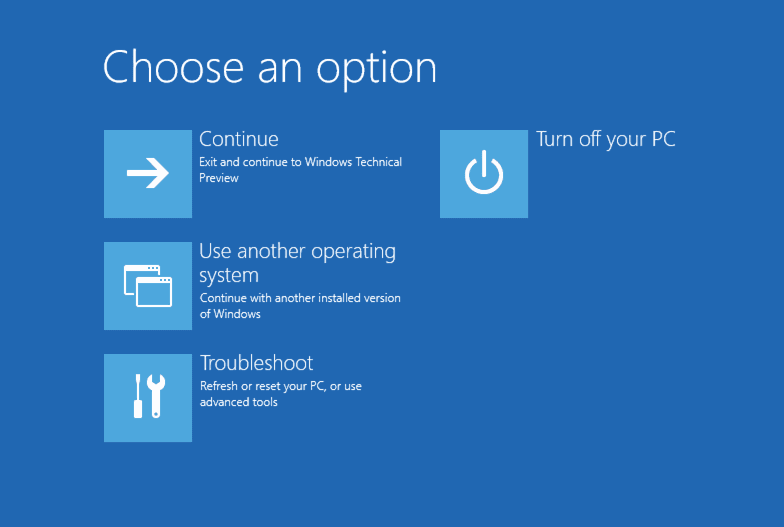
- Restore from a system restore point by selecting «Advanced Options» > «System Restore». This will remove recently installed apps, drivers, and updates that might be causing your PC problems, but it won’t affect your personal files.
- Select «Reset this PC» and then choose to keep or remove your files.
- Select «Recover from a drive». This will reinstall Windows 10, and it’ll also remove your personal files, apps, and drivers you installed, and changes you made to settings.
#2. To create a Windows 10 installation media recovery tool, follow several steps:
Step 1. On a working PC, go to the Microsoft software download website.
Step 2. Download the Windows 10 media creation tool and then run it.
Step 3. Select Create installation media for another PC.
Step 4. Choose a language, edition, and architecture (64-bit or 32-bit).
Step 5. Follow the steps to create installation media, and then select Finish.
How to Create a Windows 10 Recovery USB with Third-party Software
To use EaseUS Todo Backup to make a Windows 10 recovery drive for the purpose of restoring from the OS crash or corruption, you’ll first download the Windows backup software on a working PC. Then follow the below step-by-step guide to create a bootable USB drive. Don’t forget to proceed to create a Windows 10 system backup image for the future Windows 10 recovery to a working restore point.
In a word, the standard procedure of creating a third-party Windows 10 recovery drive includes:
- Create a bootable EaseUS Todo Backup USB drive
- Create a Windows 10 system image
- Boot from the recovery USB and perform a system recovery
- Notice:
- Create Emergency Disk is only for data & system restore when your PC can’t start properly and you wish to restore from a backup image. It’s not for any system repair purpose.
To create a Windows 10 recovery USB with EaseUS Todo Backup:
Step 1. Prepare a USB drive which can be written and read.

Step 2. Launch and install EaseUS Todo Backup on the Computer B.
Step 3. Find and click «Tools» and choose «Create Emergency Disk«.

Step 4. Choose the Boot disk location. You can create an ISO file, a bootable USB or CD/DVD disc.

Step 5. Then click «Create» to start.
Now you have created your own EaseUS Todo Backup bootable USB recovery disk. Go back to the main window of EaseUS Todo Backup. You need to create a backup image according to your demand. For example, system backup, file backup, etc.
Do you have the following issues while using EaseUS Todo Backup for backup and recovery? Start a live chat with an EaseUS Expert to tailor a professional backup solution specific to your requirements.
- Unable to back up
- Backup process stuck
- Recovery failed
To create a Windows 10 system image:
Step 1. On the main page, click «Select backup contents«.

Step 2. Among the four available categories, click OS.

Step 3. EaseUS Todo Backup will automatically select your system partition, you only need to select the backup destination.

Step 4. Both Local Drive and NAS are available for you to save the backup file.

Step 5. After finishing the backup process, you can check the backup status, recover, open, or delete the backup by right-clicking the backup task on the left.

To recover Windows 10 using the recovery drive:
Step 1. Connect the recovery drive and keep tapping «F2» while turning on your PC. Choose to boot from EaseUS Todo Backup.
Step 2. After accessing EaseUS Todo Backup, choose your system image or other backup images and click «Recovery».
Do you have the following issues while using EaseUS Todo Backup for backup and recovery? Start a live chat with an EaseUS Expert to tailor a professional backup solution specific to your requirements.
- Unable to back up
- Backup process stuck
- Recovery failed
Conclusions and FAQs About Windows Recovery Tools
Windows recovery tools are useful, and sometimes essential to have one when your operating system gets something wrong and crashes, freezes, gets stuck in the black screen of death and blue screen of death. As Windows 10 has occupied the largest market share nowadays, it’s good to know how to use the Windows 10 recovery tools within the OS or from third-party tools to create a risk-free recovery USB drive/disk.
Moreover, there are some other frequently asked questions that might arouse your interest. Read on and get the answers.
1. Can I download a Windows 10 recovery disk?
Go to the official download website (https://www.microsoft.com/en-us/software-download/windows10), and there you can download the Windows media creation tool on Windows 10, 8.1, 8, and 7 computers.
2. How do I use Windows 10 recovery USB?
To use the recovery USB drive, all you need to do is to change your boot drive to the bootable USB drive.
- Turn off the computer.
- Insert the recovery USB drive into a USB port on the computer and turn on the computer.
- Use the Down arrow key to select the USB drive, and then press the Enter key.
- Click the language for your keyboard.
- Click Troubleshoot.
3. Does Windows 10 have a repair tool?
Windows 10 uses troubleshooters as the general repair tool to help you solve problems with your PC. To run a Windows 10 repair troubleshooter, select Start > Settings > Update & Security > Troubleshoot.
Операционная система Windows далеко не идеальна и не отличается стабильной работой. Нередко после обновлений ОС ее загрузка становится невозможной. В этом случае необходимо знать, как восстановить Windows 10 без переустановки системы.
Владимир Пантелеев
Основатель PulsePC
Когда нужно восстановить ОС
Инструкция
Отключить автоматическое обновление
Ошибки при обновлении
Отменить восстановление
Мнение эксперта
Восстановить без потери данных
Когда нужно восстановить ОС
Инструкция
Отключить автоматическое обновление
Ошибки при обновлении
Отменить восстановление
Мнение эксперта
Восстановить без потери данных
Часто Windows может перестать загружаться из-за проблемной программы или повреждения критически важных файлов ОС. В этом случае также нужно знать, как восстановить Windows 10 с помощью средств самой системы.
Когда операционную систему нужно восстанавливать
Существуют различные причины, по которым вдруг может потребоваться восстановление операционной системы Windows 10. Рассмотрим их подробнее:
- Зависание ПК без видимых на то причин. Если компьютер работает нестабильно, постоянно перезагружается или зависает, то явно существует проблема в операционной системе, и ее нужно попробовать восстановить.
- Некорректная установка обновлений или проблемный пакет. Часто проблемы со стабильностью ОС появляются после установки обновлений от компании Microsoft. В них разработчики оперативно латают дыры в безопасности и исправляют некоторые баги, но в то же время ломают что-нибудь другое.
- Некорректная установка драйвера или программы. Иногда программное обеспечение и драйверы могут работать некорректно, негативно влияя на стабильность операционной системы. И не всегда переустановка драйверов помогает решить проблему. В этом случае потребуется восстановление ОС.
- Вирусы в операционной системе. Вредоносное ПО разного типа может существенно повредить файлы операционной системы, и в результате она будет работать неправильно. Восстановление ОС может помочь, но только после удаления всех вирусов.
- ОС перестала загружаться. Такое бывает, если оказался поврежден загрузчик Windows или прочие файлы, необходимые для запуска и работы ОС. Восстановление может помочь решить проблему, но потребуется установочная флешка с Windows. Если не запускается, есть 10 способов это исправить — об этом рассказали в нашем материале.
- Нужно было сбросить параметры Windows до заводских. Сброс параметров Windows до заводских требуется в тех случаях, если было заменено железо компьютера, хотя в таких случаях рекомендуют чистую установку ОС.
Пошаговая инструкция по восстановлению Windows 10 на компьютере или ноутбуке
Теперь рассмотрим подробнее способы восстановления работоспособности операционной системы Windows. Некоторые из них основаны на возможностях ОС, другие же требуют наличия дополнительных инструментов — например, установочного USB-накопителя с Windows.
1. С помощью командной строки
В составе ОС Windows есть функция, которая позволяет восстановить поврежденные системные файлы из-под работающей ОС. Для этого потребуется командная строка, терминал или Windows PowerShell. Алгоритм действий такой:
- Щелкните правой кнопкой мыши по кнопке «Пуск» и в появившемся меню выберите «Windows PowerShell (Администратор)».
»")
- В окне инструмента введите команду «sfc /scannow» и нажмите «Enter».

Эта команда запустит процесс проверки системных файлов на целостность и, если такие действительно найдутся, система попробует их восстановить — для этого по завершении проверки потребуется перезагрузить компьютер. Если этот способ не дал результатов, то нужно переходить к следующему варианту.
2. Сброс до заводских настроек
Это один из наиболее радикальных способов: во время его использования из ОС удаляются все пользовательские приложения и драйверы, и возвращается состояние только что установленной системы. Иногда такой вариант позволяет решить проблему с драйверами или криво установленными программами. Сделать же нужно следующее:
- Нажмите «Win+I» для запуска параметров Windows и щелкните по плитке «Обновление и безопасность».

- В столбце справа выберите «Восстановление» и в блоке «Вернуть компьютер в исходное состояние» нажмите «Начать».

- После этого нужно будет выбрать вариант восстановления: с сохранением пользовательских данных или без них. Мы рекомендуем выбрать «Удалить все».

После этого начнется процесс сброса Windows до заводских параметров. Во время сброса компьютер перезагрузится, и после рестарта вы получите полностью чистую операционную систему, которую нужно будет настраивать заново. Такой вариант помогает в большинстве случаев, поскольку удаляются и обновления ОС, но если он вам не помог — переходите к следующему.
3. Из точки восстановления системы
Восстановление системы с помощью чек-пойнта, или «точки восстановления», может вернуть ОС в то состояние, когда она работала нормально. Но важно, чтобы такие точки создавались перед установкой обновлений или драйверов. Сам процесс восстановления не особенно сложный, с ним справится даже новичок. Вот подробная инструкция:
- Нажмите сочетание клавиш «Win+R», введите в строке «control» и нажмите «ОК».

- В списке выберите раздел «Центр безопасности и обслуживания».

- Далее щелкните по пункту «Восстановление».

- Затем выберите «Запуск восстановления системы».

- Запустится мастер восстановления, в котором нужно будет щелкнуть «Далее».

- На следующем этапе выберите нужную точку восстановления и нажмите «Далее».

- Дальше просто щелкните «Готово».

После этого начнется процесс восстановления ОС из контрольной точки, причем компьютер перезагрузится. Учтите, что все программы, которые были установлены уже после создания контрольной точки, будут удалены. Но такой способ хорош, если ОС запускается, и у вас есть заранее созданные контрольные точки.
4. С загрузочной флешки
Этот метод позволяет выполнить восстановление Windows даже в том случае, если операционная система не запускается. Однако понадобится установочный USB-накопитель с системой и некоторое количество свободного времени. Инструкция по восстановлению Windows при помощи USB-накопителя такая:
- Вставьте USB-накопитель в порт компьютера и запустите его с зажатой клавишей F12, F11, F2 или F1 в зависимости от типа вашего BIOS.

- В появившемся окне в качестве диска для загрузки выберите USB-накопитель.

- Дождитесь загрузки окна с выбором параметров установки и зажмите комбинацию «Shift+F10» для вызова командной строки.

- В консоли последовательно введите команды «chkdsk /f /r C» (если система была установлена на диске «С»), «sfc /scannow /offbootdir=C:\ /offwindir=C:\windows». Не забывайте нажимать «Enter» после ввода каждой команды.
После этого попробуйте перезагрузить компьютер в стандартном режиме — система должна запуститься. Если этого не случилось, то, вероятно, вам поможет только полная переустановка операционной системы.
5. С установочного диска
Восстановление с установочного диска происходит по тому же сценарию, что и восстановление с USB-накопителя. С помощью такого способа можно восстановить работоспособность ОС Windows 10 на старом компьютере с DVD-приводом, однако такой вариант используется крайне редко.
Как отключить автоматическое обновление системы Windows 10
Львиная доля проблем возникает после установки обновлений в ОС Windows, поэтому многие пользователи считают, что их лучше отключить вовсе. Однако полностью выключить их средствами ОС невозможно и поэтому приходится использовать сторонний софт, например, небольшую утилиту Stop Windows 10 Updates.
Скачать программу можно на официальном сайте разработчика: есть как портативная версия, не требующая установки, так и классическая. Пользоваться программой достаточно просто. Мы рассмотрим весь процесс, начиная со скачивания Stop Windows 10 Updates.
- Перейдите по ссылке и нажмите кнопку «Download».

- Откройте каталог «Загрузки» и двойным кликом откройте только что скачанный архив.

- Скопируйте исполняемый файл из архива в любое место и запустите его двойным кликом.

- Запустится мастер установки — в нем сразу нажмите «Далее».

- Примите условия лицензионного соглашения и щелкните «Далее».

- На следующих этапах нажимайте «Далее», ничего не меняя, а затем кликните кнопку «Установить».

- По окончании установки нажмите «Завершить».

- Найдите установленную программу в списке и запустите ее стандартным способом.

- В окне программы нажмите на большую красную кнопку «Запрет обновлений Windows».

Осталось только дождаться, пока программа завершит работу. После этого обновления не будут устанавливаться автоматически. Стоит заметить, что Stop Windows 10 Updates не работает на последней версии Windows 11 24H2, но на 23Н3 работает нормально. Это нужно учитывать перед использованием утилиты.
Какие ошибки возникают при обновлении Windows 10
Во время обновления Windows 10 могут возникать разные ошибки, которые способны помешать установить конкретный пакет обновления, или же могут привести к тому, что операционная система будет работать нестабильно. Рассмотрим основные типы ошибок подробнее:
- Ошибка подключения к интернету. Нередко после установки очередного пакета обновления ОС встречает нас фразой «Нет подключения к интернету». Решить проблему можно только сбросив настройки сети при помощи командной строки и команд «netsh winsock reset catalog», «netsh int ipv4 reset reset.log» и «ipconfig /renew».
- Отказ периферийных устройств. Такое тоже часто случается после установки Windows 10. Для исправления ситуации можно переустановить драйверы устройств, а если не поможет — откатить систему при помощи точки восстановления, созданной заранее.
- Проблемы в работе видеокарты. Могут возникать по причине автоматического и не всегда удачного обновления драйверов системой. Нужно попытаться откатить драйверы или восстановить ОС. Можно также попробовать полную переустановку драйверов.
- Проблемы со звуком. Здесь все то же самое — проблемы со звуком могут наблюдаться по причине проблемных драйверов, которые были установлены вместе с обновлением. Нужно попробовать переустановить драйверы.
- Не работающий Microsoft Store. Магазин Microsoft часто ломается после очередного обновления Windows 10. Восстановить его можно, сбросив настройки магазина при помощи команды «-ExecutionPolicy Unrestricted Add-AppxPackage -DisableDevelopmentMode -Register $Env:SystemRoot\WinStore\AppxManifest.xml», которую нужно выполнять в Windows PowerShell.
Можно ли отменить восстановление Windows 10
В теории запустить процесс восстановления системы можно принудительной перезагрузкой компьютера. Но делать этого не рекомендуется, поскольку можно окончательно убить систему или даже повредить какое-либо железо. Поэтому лучше дождаться завершения процесса и уже после этого, если результаты не устроили, можно будет полностью переустановить Windows.
Мнение эксперта
На вопросы редакции Hi-Tech Mail о восстановлении системы Windows 10 ответил Владимир Пантелеев, основатель PulsePC.
Какие ошибки допускают пользователи при восстановлении Windows 10?
- Отсутствие резервной копии данных. Многие начинают восстановление системы, не сделав бэкап важных файлов. В результате после сброса или переустановки Windows данные теряются.
- Использование неподходящего образа или утилиты. Некоторые скачивают ISO с непроверенных источников, например, с торрент-треккеров, что может привести к установке поврежденной или зараженной версии системы.
- Удаление раздела восстановления. Пользователи в стремлении «очистить диск» могут случайно удалить скрытые разделы, содержащие заводской образ Windows, и лишиться штатных средств восстановления.
- Игнорирование драйверов и ключей. После восстановления Windows может не быть драйверов сетевого оборудования, а ключ активации не всегда подтягивается автоматически — особенно на старых устройствах.
- Выбор сброса «без удаления файлов», когда вирус уже в системе. Если заражение затронуло системные файлы, такой способ неэффективен — вредонос останется.
Расскажите о главных правилах, которые надо соблюдать при восстановлении Windows 10
- Сделайте резервную копию файлов. На внешний диск или облако — всё важное, особенно документы, фотографии, файлы с рабочего стола.
- Убедитесь в наличии установочной флешки или образа. Лучше заранее создать носитель с официальным инструментом Media Creation Tool от Microsoft.
- Заранее скачайте драйвера. Особенно для сетевых устройств (LAN/Wi-Fi), на случай если Windows после восстановления не увидит сеть.
- Запишите лицензионный ключ, если система не привязана к учетной записи Microsoft.
- Отключите все лишние внешние накопители. Это поможет избежать случайного форматирования не того диска.
- Если ПК нестабилен, начните с простых способов восстановления. Например, через «Вернуть компьютер в исходное состояние» или «Восстановление системы» до точки отката.
Какие есть лайфхаки, которые облегчают процесс восстановления Windows 10?
- Используйте встроенный образ Windows для быстрого восстановления. Сочетание Shift + Перезагрузка позволяет зайти в меню восстановления даже без рабочего рабочего стола.
- Создайте пользовательский образ системы после «чистой» установки. Это позволит в будущем восстановиться в один клик без переустановки и настройки всего с нуля.
- Установите Windows на SSD. Это не только ускоряет работу, но и сам процесс восстановления становится гораздо быстрее.
- Храните установочный образ на другом разделе или флешке с меткой и понятным названием, чтобы всегда была под рукой.
- Заведите учетную запись Microsoft. Это упростит активацию, синхронизацию настроек и даже вход в систему после восстановления.
Как восстановить Windows 10 без потери данных
Подведем итоги и выделим, что нужно запомнить о восстановлении операционной системы Windows 10.
- В ОС Windows есть встроенные инструменты, позволяющие выполнить восстановление системы.
- Самый простой способ — использовать восстановление из контрольных точек, которые создаются заранее.
- Если проблема не очень серьезная, то можно восстановить системные файлы при помощи командной строки и всего одной команды.
- Если система не загружается, можно выполнить восстановление из среды установки Windows при помощи той же командной строки, но потребуется загрузочный USB-накопитель с Windows.
- Если проблемы возникают регулярно после обновления системы, то рекомендуется отключить обновления — хотя бы на время.
If you are facing issues with Windows 10 on your PC or Laptop, there is no need to reinstall it or contact Microsoft every time you face system problems. To solve such issues, you have many Windows 10 repair tools available online.
But using a third-party repair tool is your choice. If you have already tried other ways to fix the problems, and are still facing them, then the only option is to use a third-party repair tool.
Repairing Windows is not easy; you cannot trust every repair tool because all will claim to solve the problem and fix Windows 10, but only a few will do so successfully.
You’ll find reviews of the top ten repair tools to help you choose the best Windows 10 repair tool to fix the problem. Once you go through them, you’ll be able to choose the best for you.
So, let’s get started with the main purpose of this article, which is to give you reviews of some Windows 10 repair tools.
Best Windows 10 Repair Tools – Our Top Pick 👌
1. FixWin 10 – Best Portable windows 10 repair tools
FixWin 10 (Download Here) is not only one of the best Windows 10 repair tools, but it’s also portable freeware. This repair tool can fix an array of issues within a matter of time.
It is divided into six sections to fix Windows-related problems, each representing a specific component. This includes File Explorer, Windows 10, Internet & Connectivity, System Tool, Troubleshooter, and other additional fixes.
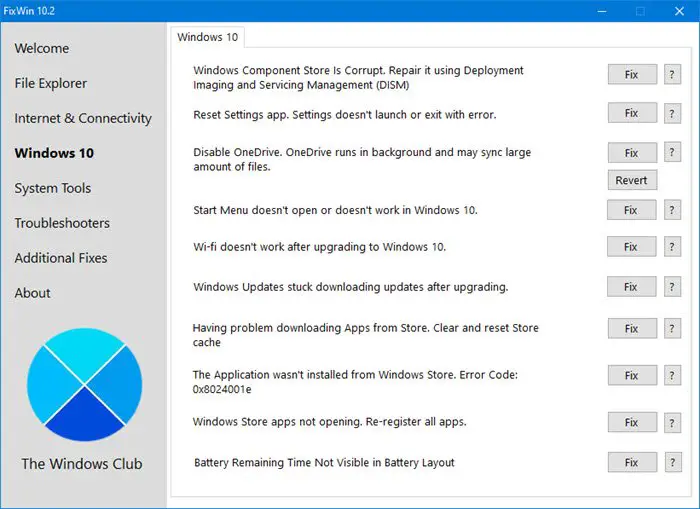
One fantastic thing about this tool is that it can fix around fifty Windows 10 problems making it one solution to almost all your problems.
Moreover, it doesn’t require any installation. You must download and run the tool on your PC to start using it.
Starting from some common problems like a corrupt recycle bin to more advanced fixes like restoring the access of the Registry Editor, this tool can perform such fixes, making it stand out among others.
But this tool may not run if the Windows Image is modified using any third-party software because some main components are removed, which are required by FixWin to work correctly.
Overall, this tools to repair windows 10 can use easily without any doubt if you have not modified your Windows Image.
Features:-
- Portable freeware
- Six different categories for fixing other problems
- Restoring sticky notes, registry
- Deleting warning boxes and fixing automatic updates
- One solution to many problems
2. Paragon Rescue Kit – Windows 10 repair tools To Quickly recover your system
Paragon (Download Here) is an excellent boot repair tool for Windows 10. It is a software solution that has good compatibility and usability features.
You can solve the maximum of your issues related to the disk. You can also conveniently restore a deleted partition and backup network drives, virtual drives, and external media.
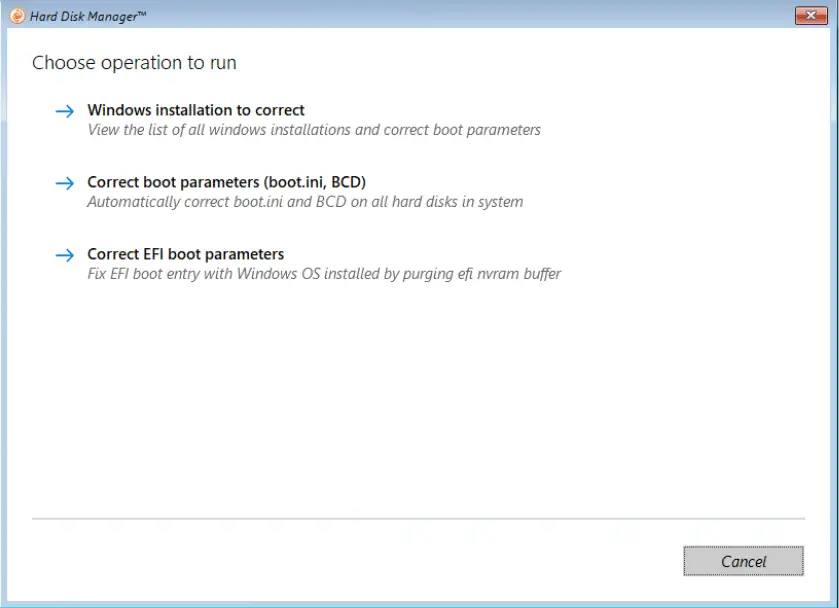
It has a user-friendly interface and is ideal for making a backup of your entire hard disk.
Using this tool, you can also solve network configuration issues. This windows repair tool helps you generate recovery quickly and easily.
Like many other boot repair tools, this can also create a system recovery using a CD/DVD or USB drive. One of the amazing things about this tool is that its boot correction wizard is a powerful feature.
Furthermore, it is free of cost, and this tool is a part of Paragon Hard Disk Manager, making you upgrade the Paragon Rescue Kit whenever required.
Features:-
- Boot repair tool for Windows 10
- Excellent compatibility and usability
- Solve all disk-related problems
- You can restore and backup the hard disk
- Free of cost
- User-friendly interface
- Sector backup
- Recover deleted partition wizard
3. Tweaking.com Windows Repair
Tweaking.com Windows Repair tool is, however, the best third-party software that you can use to fix the problems with Windows 10.
This tool can fix many issues, including ways to reset Registry permissions, repair Start menu icons, file permissions, repair icons, repair hosts file, repair file associations, repair print spooler, and many more.

Furthermore, it’s a freeware Windows repair tool and has a Pro version, which includes features like automatic updates, a memory cleaner, an enhanced drive cleaner, speed tweaks, and more.
So, depending on your requirements, you can also go for the Pro version of this tool.
However, the Pro version costs you $24.95 for 1 PC Yearly License, $44.95 for 3 PC Yearly License, and $64.95 for Individual Yearly Tech License. So, if you are comfortable affording the Pro version, you can choose this version, or else the free version is enough to solve the maximum of your problems efficiently.
Furthermore, this tool is available in a portable format, which means you can carry it on a USB drive.
Overall, this tool has an extensive ability to fix issues and boost PC performance, making it the right choice for a Windows repair tool.
Feature:-
- It is free of cost, but the Pro version is available
- Reset Registry permissions
- Repair start menu icons
- Repair icons and hosts file
- Repair print spooler
- The pro version includes
- Automatic updates and memory cleaner
- Enhanced driver cleaner
- Run speed tweaks
- Windows quick link menu
4. Windows Repair Toolbox
Windows Repair Toolbox (Download Here) is an excellent choice of Windows 10 repair tools because it offers you different tools required for advanced computer system repair.
These tools are divided into six categories depending on the various problems of Windows.
It gives you different tools for the hardware, repairs, backup and recovery, Windows, uninstallers, and other necessary tools.
The main advantage of this Windows repair tool is that you can run multiple tools simultaneously in the background.
Windows Repair Toolbox Tutorial
This also has a feature that sends emails, including logs, when the process is completed. It also has a significant function of AV Leftovers, which lets you know about previously installed antivirus on your PC.
You can also solve incomplete installation problems. It is free to install and use and is available for Windows XP to Windows 10.
All-inclusive, it is the perfect choice among other Windows 10 repair tools.
Features:-
- Advanced computer system repair
- Includes various useful tools
- You can run multiple tools at a time
- It has the facility to send an email when the process is done
- Identify previously installed antivirus
- Free to download and use
5. IOBit Driver Booster 7 – windows 10 repair tools To handle the driver updates
IOBit Driver Booster (Download Here) is the best Windows 10 driver update tool because there are chances that when Windows 10 attempts to handle the driver updates, it is not successful.
It can leave some essential driver updates behind and strikes a hardware issue.

One amazing thing about this tool is that it claims to fix and update over 1 million drivers. Moreover, it is the most advanced driver booster and boosts your PC’s performance.
This tool updates the internal drivers to resolve their issues and external drivers, to solve the problems you face with a printer, mouse, or Bluetooth.
This tool can easily solve the ‘device not working’ error in just a few seconds, as the driver updates are fast and can solve issues related to the Windows operating system.
Once you have downloaded this booster, it’ll automatically update and apply the drivers to your system. You may also be required to reboot your PC once the installations are finished.
This booster is the best tool to boost your PC’s performance by keeping the drivers up-to-date.
Features:-
- Updates internal and external drivers
- Fast driver updates
- Advanced drive booster
- Automatic updates
6. Windows Boot Genius – Windows 10 repair tools For Boot Issues
Windows Boot Genius (Download Here) is an excellent tool to help fix booting issues and repair corrupted or crashed Windows.
It is the best utility to back up and restores the Windows operating system, partitions, and hard disk.
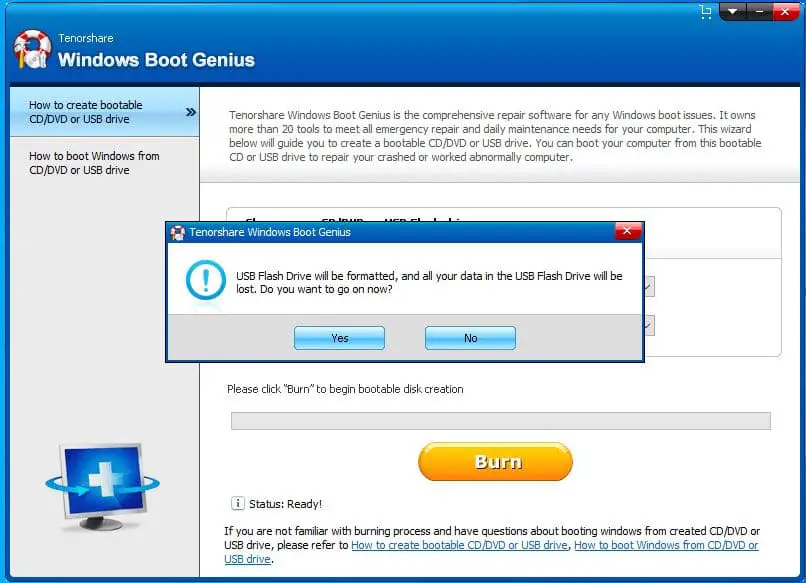
Moreover, you can create bootable USB drives or CDs/DVDs. You can also recover lost data and restore broken partitions.
This tool can also help you retrieve your Windows domain, local passwords, Microsoft product keys, and other deleted data. So, if you accidentally delete some data or lose it due to a system crash, you can easily recover them using this tool.
With this tool, you don’t have to worry about BSOD or Black Screen issues when you start your PC, as you can easily gain access after fixing it with a boot CD/DVD or USB disk.
Overall, it is a great Windows 10 repair tool to recover data and repair corrupted Windows.
Features:-
- Fix computer booting issues
- Repair corrupted or crashed Windows
- Recover lost data
- Create bootable CD/DVD or USB drives
- Backup and restore Windows OS, hard disk, and partitions.
7. O&O ShutUp10 – windows 10 repair tools For More control over your operating system
O&O ShutUp 10 (Download Here) is the best Windows tool with data gathering tendencies. Windows 10 has privacy issues, and privacy control has improved a bit, but the main problem of telemetry, tracking, and data gathering remains.
This tool allows you to stop the operating system from accessing some specific data.
Also, you can disable the features of O&O ShutUp 10 that you don’t want. This tool has nine sections that offer you different privacy settings.
It doesn’t require installation, so you can directly download and run it whenever needed. Moreover, it is free of cost, which is the most significant advantage of this tool.
O&O ShutUp10 — Free antispy tool for Windows 10
You can use this tool even if you don’t have adequate technical knowledge, as this tool has a very easy-to-use user interface.
Also, each tool option has a short description, making it easy for you to understand its function.
Overall, this tool is the best choice when you don’t want all the data you access from your Windows OS to pass on to the Windows developer.
Features:-
- Offers various privacy settings
- It has nine sections
- You can turn off the unwanted options
- It does not require installation and is free to use
- Easy-to-use user interface
8. Snappy Driver Installer
Snappy Driver installer (Download Here) is a free and open-source tool that helps keep your PC’s drivers up-to-date.
There are times when Windows 10 doesn’t successfully update the drivers, and outdated drivers can cause different issues.
To prevent this, you can use the Snappy Driver Installer because it ensures that the drivers will be updated on time.
If you install this tool, your entire system will be scanned to check for new driver updates to improve the performance of your PC.
Moreover, you can also choose the drivers you want to install from the list of all drivers. It can help you to locate and open the INF files for drivers.
This tool works on 32-bit and 64-bit Windows with any version of the operating system.
An excellent thing about this tool is that it offers you the option for offline driver updates using which you can download many drivers on multiple devices simultaneously.
So, this tool is among the best tools to offer you automatic driver updates to enhance the performance of your Windows 10.
Features:-
- Free and open-source software
- Updates drivers on time
- You can download multiple drivers at one time
- Works on 32-bit and 64-bit Windows
- It helps you to locate and open INF files
9. AVG TuneUp – windows 10 repair tools To Speed Up & Clean Up Your PC
AVG TuneUp (Download Here) is an excellent choice for full system optimization as it can easily perform all the tasks you need to optimize your Windows.
This tool automatically identifies and fixes your registry issues to avoid errors and crashes in your Windows Operating System.
It cleans up browser traces and cache files, tracks cookies, and programs leftovers automatically to make disk space.
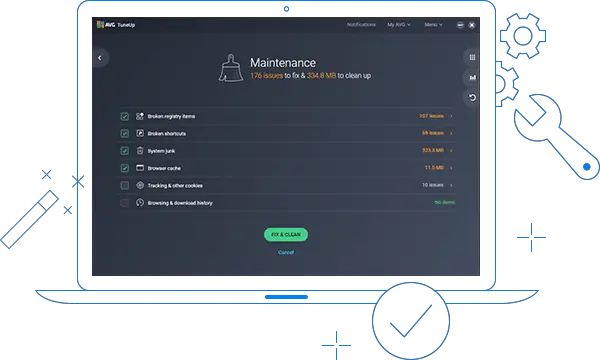
It has a sleep mode technology that optimizes the performance of your PC. This tool can detect and eliminate bloatware and allows you to remove unwanted software you have installed.
The software updater of this tool analyzes all the installed software and updates them automatically.
Although it is an excellent tool, it is relatively slow. It will also show you the scan’s progress and detected problems along with their solutions.
A free version is available, but to access all its features, you can go for the premium version for $39.99.
So, it is an excellent tool for your Windows and can perform several tasks that boost the performance of your Windows.
Features:-
- Restore registry
- Speed up your PC performance
- Automatically updates the software installed
- Cleanup junks
- Available in a free and premium version
10. System Mechanic Ultimate Defense
System Mechanic Ultimate Defense (Download Here) combines security, privacy, and performance features that you can find in one interface.
This tool optimizes your PC performance and protects online privacy as well. It gives you the functionality that manages your passwords securely. Also, it can easily remove or block malware.

Moreover, it recovers the deleted files as well. It can automatically boost speed, clean out clutter, repair problems, discover bloatware, unleash internet speed, and increase system stability.
This tool also prevents Windows Slowdown and improves the performance of CPU, RAM, and GPU. However, this tool’s cost is $79.95, but as a limited-time offer, you can get it for $32.98 as well.
This tool gives you many things and has proven to be an excellent Windows 10 repair tool.
Features:-
- It has all-new optimization features
- Provides security, privacy, and performance features
- Remove malware
- Recover deleted files
- Prevent Windows Slowdown
- Improve PC boot time
11. Ultimate Windows Tweaker 4
Ultimate Windows Tweaker 4 (Download Here) is the best tool to use when you are exhausted by searching Windows 10 settings, as this is an excellent tweaking tool.
This tool gives you all the Window settings in one place, making it easy because you don’t have to search a lot.
It is developed by the Windows Club, which has also developed FixWin 10. Both tools’ UI is similar and easy to use, with over 200 tweaks.
However, the Ultimate Windows Tweaker 4 eases your work to access different Windows components but does not help you repair Windows problems like FixWin 10.
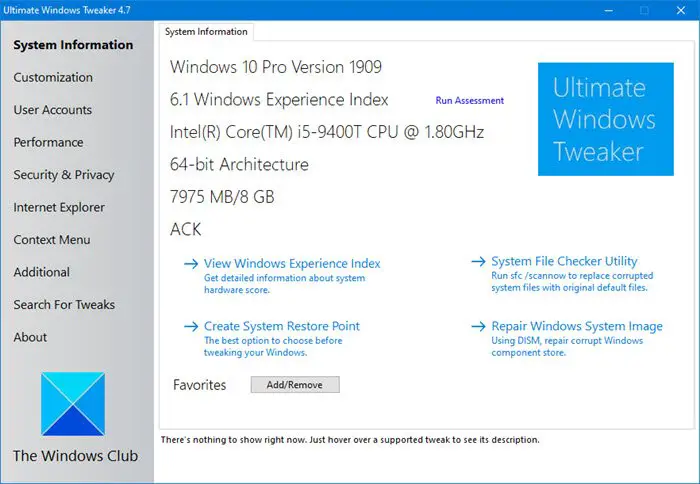
This tool can quickly find many settings like Windows 10 app, group policy editor, users and internet-related settings, and registry editor settings.
This tool enables disabling, hiding, or removing some features from your Windows.
Even this tweak is small, as it is only 750 KB. Also, it is portable, making you to carry and access it anywhere you want.
So, overall it is the best tweaking tool but not the best Windows 10 repair tool.
Features:-
- Tweaking tool
- It comes with over 200 tweaks
- Easy-to-use UI
- It gives you quick access to all Windows settings
- No ads feature present
Is Cleaning the Registry speed up your PC?🤔
Myth:- The Registry is where Windows stores all the settings required for the software to function properly.
Unfortunately, over time, the Registry gets filled up with obsolete entries, incorrect locations, empty keys, redundant shortcuts, and more. Giving the Registry a thorough clean will fix these problems and can be hugely beneficial.
Truth:- you haven’t had any care or attention for a very long time, then cleaning the Registry as part of a full maintenance service may be worth doing.
However, modern PCs are so fast that even hundreds of incorrect and outdated entries in the Registry won’t cause any problems. Cleaning and defragging the database will have a negligible effect.
Deleting a single important Registry entry in error can lead to many problems and might slow Windows down.
📗FAQs
Does Windows 10 have a built in repair tool?
Windows 10 indeed comes with a built-in repair tool called Startup Repair. This tool aims to diagnose and resolve problems that can make Windows start improperly.
You must boot your computer from Windows installation media, such as a USB drive or DVD, and then choose the “Repair your machine” option from the Windows setup screen to access the Startup Repair tool in Windows 10.
This will start the Windows Recovery Environment, which has several tools for maintaining and fixing Windows.
When in the Windows Recovery Environment, choose “Startup Repair” to launch the repair procedure. The Startup Repair utility will check your computer for any problems that might be stopping it from starting correctly and make an automatic effort to solve them.
Suppose the Startup Repair tool cannot resolve the problem. You might need to try further troubleshooting techniques, such as running a system restore or recovering your system from a previous restore point.
As an additional option, you can try utilizing the System Restore or System Image Recovery tools in the Windows Recovery Environment to see if that resolves the problem.
How do I repair corrupted Windows 10?
You can attempt to fix a corrupted Windows 10 installation in several ways:-
Run the Startup Repair tool:- As previously indicated, the Startup Repair tool is a built-in feature in Windows 10 that can assist in resolving problems that might be keeping your system from starting up properly.
To utilize the Startup Repair tool, you must start your computer from a Windows installation DVD and choose the “Repair your machine” option from the Windows setup screen.
Check for and install updates:– Missing or out-of-date system files can occasionally be the root of corrupted data or unstable systems. Click the “Check for updates” button under Settings > Update & Security > Windows Update to find and install updates.
Scan for and fix file system errors:- To check for and correct file system issues on your hard disk, utilize the built-in Disk Check program.
To accomplish this, use the Command Prompt as an administrator and type “chkdsk /f C:”. The drive letter where your copy of Windows 10 is installed should be used in place of “C:.”
Perform a system restore:- Restoring your system to a prior restore point might help you solve the problem if one of your system changes is to blame. To do this, select “System Restore” from the menu in Control Panel under System and Security > System > System Protection.
Perform a clean install of Windows 10:- You might need to perform a clean install of Windows 10 if none of the above fixes are successful. Please make a backup of your data before erasing all of your files and programs.
Launch Windows installation media on your computer and follow the instructions to install Windows 10 to complete a clean install.
It’s crucial to remember that not every corruption can be fixed by following these methods, and occasionally you may need to ask a technical support specialist for additional assistance.
How do I open repair tool in Windows 10?
You must boot your computer from Windows installation media, such as a USB drive or DVD, and then choose the “Repair your machine” option from the Windows setup screen to access the Startup Repair tool in Windows 10. This will start the Windows Recovery Environment, which has several tools for maintaining and fixing Windows.
When you are in the Windows Recovery Environment, choose “Startup Repair” to launch the repair procedure. The Startup Repair utility will check your computer for any problems that might be stopping it from starting correctly and make an automatic effort to solve them.
You can make your own Windows installation discs by following these procedures if you don’t already have any:
Step 1:- Download the utility for creating Windows 10 installation discs from the Microsoft website.
Step 2:- Launch the utility for creating installation media and follow the on-screen instructions to make a bootable USB drive or DVD.
Step 3:- Restart your computer after inserting the USB device or DVD.
Step 4:- Enter the boot menu by pressing the corresponding key (usually F12 or Esc).
Step 5:– Select the DVD or USB drive as the boot device from the boot menu.
Step 6:– To boot into the Windows Recovery Environment, follow the on-screen instructions and choose the “Repair your computer” option.
Step 7:- Select “Startup Repair” from the Windows Recovery Environment to launch the repair procedure.
Not all problems can be resolved using the Startup Repair tool; in certain circumstances, you may need to try additional troubleshooting techniques, such as restoring your system from a prior restore point or running a system restore.
How do I run Windows self repair?
On your Windows 10 computer, you can attempt to do a self-repair in a few different ways:
Run the Startup Repair tool:- Windows 10 comes with a built-in utility called Startup Repair that may be used to resolve problems preventing your system from starting up properly.
To utilize the Startup Repair tool, you must start your computer from a Windows installation DVD and choose the “Repair your machine” option from the Windows setup screen. When in the Windows Recovery Environment, choose “Startup Repair” to launch the repair procedure.
Use the System File Checker (SFC) tool:– The System File Checker (SFC) program is a command-line tool that may search your system for corrupted or missing system files and make an effort to fix them.
To use the SFC utility, use the Command Prompt as an administrator and enter the command “sfc /scannow”.
Use the Deployment Image Servicing and Management (DISM) tool:- System image files can be fixed and restored using the Deployment Image Servicing and Management (DISM) tool, a command-line application.
The DISM program can be launched by typing the “DISM /Online /Cleanup-Image /RestoreHealth” into the Command Prompt after being opened as an administrator.
It’s crucial to remember that these tools might not be able to resolve every problem. In some circumstances, you might need to try additional troubleshooting techniques, such as recovering your system from a prior restore point or carrying out a system restore.
Which are the Best Windows Repair Tools?
Several tools are available to fix and troubleshoot problems with a Windows 10 system. Some of the top tools are:-
Startup Repair:- With the help of this built-in function, Windows 10 users can resolve problems that might be keeping their system from starting up properly.
To utilize the Startup Repair tool, you must start your computer from a Windows installation DVD and choose the “Repair your machine” option from the Windows setup screen.
System File Checker (SFC):- Using the command-line tool System File Checker (SFC), you may search your computer for corrupted or missing system files and make an effort to repair them.
To use the SFC utility, use the Command Prompt as an administrator and enter the command “sfc /scannow”.
Deployment Image Servicing and Management (DISM):- System image files can be fixed and restored using the Deployment Image Servicing and Management (DISM) tool, a command-line application.
The DISM program can be launched by typing the “DISM /Online /Cleanup-Image /RestoreHealth” into the Command Prompt after being opened as an administrator.
Windows Memory Diagnostic:- This tool can test and identify memory-related problems with your computer.
Enter “memory” in the Start menu search bar to open the Windows Memory Diagnostic tool. Select “Windows Memory Diagnostic” in the search results to launch the utility, then follow the on-screen instructions.
Event Viewer:- Your system’s problems can be viewed and investigated using the Event Viewer application.
Enter “event viewer” in the search box on the Start menu to open the Event Viewer. Use the tool to view system logs and events by selecting “Event Viewer” from the search results.
It’s crucial to remember that these tools might not be able to solve every problem. In some circumstances, you might need to try alternative troubleshooting techniques or ask for assistance from a technical support specialist.
Is Windows 10 repair tool safe?
Use caution while utilizing third-party repair solutions for Windows 10 as some of these might not be as dependable or secure to use as the tools included by Microsoft.
Although some third-party repair programs could be useful for locating and resolving specific problems with your system, others might not be as trustworthy and even do more harm than good.
For instance, some third-party repair tools could remove crucial system files or alter your computer’s settings, which might lead to instability or other issues.
It’s always a good idea to research a third-party repair tool before using it to ensure that it is reliable and well-liked by other users. In addition, before using any repair tool, save your data in case something goes wrong.
What are the signs of corrupted Windows 10?
Your Windows 10 computer could be corrupt for several reasons:-
Your system crashes or freezes frequently:- It may indicate an issue with your operating system if it freezes or crashes more regularly than usual.
Your system is running slower than usual:- It can be annoying if your computer runs slower than usual due to a corrupt operating system.
You cannot install or update Windows:- It may indicate a problem with your operating system if you cannot install or update Windows.
You see error messages or blue screens:- When using your computer, error warnings or blue screens could indicate that your operating system is malfunctioning.
You are unable to start your system:- It may indicate a problem with your operating system if you cannot start your computer.
It’s a good idea to consider running a repair tool, such as the Startup Repair tool if you are experiencing any of these problems to see if it can resolve them.
You might need to attempt further troubleshooting techniques or ask a technical support expert for more assistance if the problem doesn’t go away.
(Q) How to fix Windows 10 problems?
Before using a Windows 10 repair tool, it is recommended first to use Windows 10 Automatic Repair. If this doesn’t help, you can choose any Windows 10 Repair tools.
There are some simple and best tools that you can use to fix almost every problem of Windows 10. Although you will find many free Windows 10 repair tools available for you to use, there are a few paid tools that can give you extra features to solve the problem.
(Q) What other ways to fix Windows 10 problems besides using a third-party tool?
If you don’t want to use any outside tool, then you can easily use Windows 10 Inbuilt repair tool and Windows Startup Repair to fix the problems of Windows 10.
(Q) How to use a third-party Windows 10 Repair tool?
It is easy to use a repair tool, but it depends on your tool. The first step is always to download the Windows 10 repair tool on your PC that you want to use and then install or run it to start working on the tool.
You can know the process to use the tool exactly on the official website from where you have downloaded the tool.
Conclusion on windows 10 repair tools
Now that you’re at the end of this article, you must know all the mentioned Windows 10 repair tools.
Once you know the best options available, you can try to use any of them and see whether it can fix the problem of your WIndows. Or else, you can directly use the one that you think is the most suitable and can fix your problem.
Using a repair tool to fix Windows is the best option rather than reinstalling it. So, it’s better to use a tool and try it.
Applies ToWindows 11 Windows 10
Поддержка Windows 10 прекратится в октябре 2025 г.
После 14 октября 2025 г. корпорация Майкрософт больше не будет предоставлять бесплатные обновления программного обеспечения из Центра обновления Windows, техническую помощь и исправления безопасности для Windows 10. Ваш компьютер по-прежнему будет работать, но мы рекомендуем перейти на Windows 11.
Подробнее
Среда восстановления Windows (Windows RE) — это набор средств, входящих в состав Windows, которые помогут устранить распространенные проблемы с компьютером. Если при запуске компьютера возникают проблемы, Windows RE может автоматически запуститься и попытаться устранить проблему. Windows RE также является отправной точкой для различных средств для восстановления системы вручную.
Доступ к среде восстановления Windows
Существует несколько способов доступа к Windows RE. Разверните каждый раздел, чтобы узнать больше:
Если windows не удается запустить несколько раз правильно, она автоматически введет Windows RE. Это может произойти, если возникли проблемы с процессом загрузки или если система обнаруживает проблему, препятствующую запуску Windows.
Вы также можете заставить Windows ввести автоматическое восстановление, прервав обычный процесс загрузки два раза. Это можно сделать, включив устройство и удерживая кнопку питания, чтобы принудительно завершить работу до завершения загрузки Windows. После этого два раза Windows должна автоматически загрузиться в Windows RE при третьей перезагрузке.
Ниже приведены шаги.
-
Запустите устройство и дождитесь появления логотипа Windows (или логотипа производителя)
-
Как только появится логотип Windows, нажмите и удерживайте кнопку питания, пока устройство не завершит работу.
-
Снова включите устройство и повторите шаг 2.
-
Включите устройство в третий раз. В Windows должен отобразиться экран автоматического восстановления
-
Выберите Дополнительные параметры

-
В приложении «Параметры» на устройстве с Windows выберите Восстановление системы > или используйте следующий ярлык:
Выздоровление
Примечание: В Windows 10 вы можете получить доступ к обновлению & Безопасность > Восстановление
-
В разделе Параметры восстановления рядом с пунктом Расширенный запуск выберите Перезапустить сейчас.
При перезагрузке компьютера нажмите и удерживайте клавишу SHIFT при выборе power > Перезапустить.
На некоторых устройствах есть выделенная кнопка восстановления или сочетание кнопок, которые можно нажать для загрузки Windows RE. Обычно это настраивается производителем устройства.
Если вы создали USB-накопитель восстановления, вы можете загрузить компьютер с диска восстановления. Это приведет вас непосредственно к Windows RE.
Если компьютер не запускается и у вас нет диска восстановления, скачайте установочный носитель и используйте его для доступа к Windows RE.
-
На рабочем компьютере перейдите на веб-сайт загрузки программного обеспечения Майкрософт.
-
Скачайте средство создания мультимедиа и запустите его
-
Выберите Создать установочный носитель для другого компьютера.
-
Выбор языка, выпуска и архитектуры
-
Выполните действия, чтобы создать установочный носитель, а затем нажмите кнопку Готово.
-
Подключите созданный установочный носитель к нефункциональному компьютеру, а затем включите его.
-
На экране начальной настройки выберите языковые и другие параметры, а затем нажмите кнопку Далее. Если экран настройки не отображается, возможно, на компьютере не настроена загрузка с диска. Ознакомьтесь с веб-сайтом изготовителя компьютера, чтобы узнать, как изменить порядок загрузки компьютера, а затем повторите попытку.
-
Выберите Восстановить компьютер.

-
Нажмите кнопку Далее, и вы получите доступ к Windows RE

средства Windows RE
Windows RE предоставляет набор средств для диагностики и устранения проблем, которые могут препятствовать правильному запуску Windows. К этим средствам относятся:
-
Сброс этого компьютера. Позволяет сбросить заводские параметры компьютера с параметрами хранения или удаления личных файлов. Дополнительные сведения см. в статье Сброс компьютера.
-
Восстановление при запуске. Это средство автоматически диагностирует и исправит распространенные проблемы, которые могут препятствовать запуску Windows. Дополнительные сведения см. в разделе Восстановление при запуске.
-
Параметры запуска. Позволяет изменять различные параметры запуска для устранения неполадок с Windows. Дополнительные сведения см. в разделе Параметры запуска Windows.
-
Командная строка: предоставляет доступ к интерфейсу командной строки для расширенного устранения неполадок.
-
Удаление Обновления: позволяет удалять недавно установленные обновления из Windows.
-
Параметры встроенного ПО UEFI. При использовании этого параметра устройство перезагружается и откроется экран параметров встроенного ПО UEFI, где можно настроить различные параметры оборудования, например порядок загрузки, безопасную загрузку и другие параметры на уровне системы. Это может быть полезно, если необходимо изменить параметры для устранения проблем совместимости оборудования или включения определенных функций.
-
Восстановление системы. Позволяет отменить изменения состояние компьютера до предыдущего момента времени, отменяя последние изменения системы, не затрагивая личные файлы. Дополнительные сведения см. в статье Восстановление системы.
-
Восстановление образа системы: позволяет восстановить компьютер с помощью резервной копии образа системы.
Примечание: Если вы зашифровали устройство, вам потребуется ключ восстановления BitLocker для использования определенных средств. Если вы не знаете ключ BitLocker, см. раздел Поиск ключа восстановления BitLocker.

Нужна дополнительная помощь?
Нужны дополнительные параметры?
Изучите преимущества подписки, просмотрите учебные курсы, узнайте, как защитить свое устройство и т. д.