
ShinySOCKS
Mission Statement
To create a small, ultra-fast SOCKS proxy server that just works.
Background
I sometimes use VPN. In one case, I had VPN access only
from a Windows 7 virtual machine trough some proprietary
«security by obscurity», obscenely expensive enterprise
VPN software. In order to work
efficiently, I needed to connect my Linux workstation to that
VPN. Network routing and IP forwarding seems not to work,
so the second best option in my case is SOCKS. Socks
trough Putty works, kind of. It’s slow and unreliable.
I tried a few free SOCKS servers. Neither of them worked, so
therefore I’m spending a few hours writing my own.
Blog posts mentioning the project
- My blog
Current State
The project has been in maintenance mode for ages. It just works.
However, these days I’m fixing some build issues to make it
simpler for you or other hackers to submit pull requests with new features 
I’m also in the process of updating the code from mostly C++11 to C++20. But
it’s not a very high priority — after all, the application work well as it is.
The SOCKS server works for SOCKS 4, 4a and 5 under
Linux, Windows and MacOS.
IPv6 and binding (reverse connections) are not yet supported.
How I use it
I start ShinySOCKS on the command-line (cmd.exe) in a Windows or Linux
VM with VPN. Then I ssh to whatever servers on the VPN network
I desire — using ShinySOCKS as a proxy.
From Linux:
$ ssh -o ProxyCommand=’nc -x 192.168.0.10:1080 %h %p’ jgaa@cool-server
For accessing intranet web pages over the VPN, I some times
used the Foxy Proxy Firefox plugin.
It simplifies things, and make my work-flow smooth. This also
improved my privacy, as the VPN host will only see the web traffic
going to the intranet sites.
How I test it
If it run locally, and I have curl installed, I can test it like this:
curl -L --socks5-hostname socks5://localhost:1080 https://raw.githubusercontent.com/jgaa/shinysocks/master/ci/test.txt
Docker
You can also pull a Docker image
with the server from Docker Hub.
docker pull jgaafromnorth/shinysocks
To run it.
docker run --rm --name shiny -p 1080:1080 -d jgaafromnorth/shinysocks
To test it on the command-line with curl:
# Let curl do the DNS lookup
curl -L -x socks5://localhost:1080 https://www.google.com/

# Let shinysocks do the DNS lookup

curl -L --socks5-hostname socks5://localhost:1080 https://www.google.com/
You can now set the socks 5 address to ip 127.0.0.1 port 1080 in your applications (for example Firefox’) proxy settings and test it.
Command line
You can download a zipfile with the binary and run in from the command line:
Linux
After you have extracted the zip archive:
chmod +x shinysocks

./shinysocks -l debug -c ""
Windows
shinysocks -l debug -c ""
MacOS
chmod +x shinysocks

./shinysocks -l debug -c ""
To disable logging, set the log level to none.
Supported platforms
- Linux
- Windows
- MacOS
License
ShinySOCKS is released under GPLv3.
It is Free. Free as in free speech — at least in imaginary countries, where free speech is still allowed
How to Install SOCKS5 Proxy Server on Windows 11
In this tutorial, we will guide you through the installation process of SOCKS5 proxy server on Windows 11 using the open source software from socks5-proxy-server»>https://github.com/nskondratev/socks5-proxy-server.
Prerequisites
Before you begin, make sure you have the following prerequisites:
- Windows 11 Operating System
- Command Prompt or Terminal
- Git (optional)
Step 1: Download and Install Git
Git is a version control system that allows you to manage your software development projects. Although not required, we recommend installing Git for Windows command prompt.
To download and install Git, follow these steps:
- Go to the Git website: https://git-scm.com/download/win
- Download the Git installer for Windows.
- Run the installer and follow the prompts to complete the installation.
Step 2: Clone the socks5-proxy-server Repository
Once Git is installed, you can clone the socks5-proxy-server repository with the following command:
git clone https://github.com/nskondratev/socks5-proxy-server.git
This will create a new directory called socks5-proxy-server on your local machine.
Step 3: Install Node.js
The SOCKS5 proxy server is built using Node.js, a popular JavaScript runtime. Follow these steps to install Node.js:
- Go to the Node.js website: https://nodejs.org/en/download/
- Download the latest version of Node.js for Windows.
- Run the installer and follow the prompts to complete the installation.
Step 4: Install Dependencies
Before you can start the SOCKS5 proxy server, you need to install its dependencies. Open a command prompt or terminal and navigate to the socks5-proxy-server directory. Then, run the following command:
npm install
This command will download and install all the dependencies required by the SOCKS5 proxy server.
Step 5: Start the SOCKS5 Proxy Server
Now that you have installed all the required software and dependencies, you can start the SOCKS5 proxy server. Open a command prompt or terminal and navigate to the socks5-proxy-server directory. Then, run the following command:
npm start
This will start the SOCKS5 proxy server on port 1080 by default.
Step 6: Configure Your Client
To use the SOCKS5 proxy server, you need to configure the client that you want to use it with. Depending on the client, the configuration settings may be different, but you will need to specify the proxy server address and port.
For example, if you are using Google Chrome, you can configure it to use the SOCKS5 proxy server by following these steps:
- Open Chrome and go to Settings > Advanced > System.
- Click on the «Open your computer’s proxy settings» link.
- In the «Internet Properties» window, click on the «Connections» tab.
- Click on the «LAN settings» button.
- Check the «Use a proxy server for your LAN» checkbox.
- In the «Address» field, enter the IP address of the computer running the SOCKS5 proxy server.
- In the «Port» field, enter the port number used by the SOCKS5 proxy server (default is 1080).
- Click «OK» to save the changes.
Conclusion
Congratulations! You have successfully installed and configured the SOCKS5 proxy server on Windows 11. You can now use it to help secure your Internet connection and protect your privacy.
If you want to self-host in an easy, hands free way, need an external IP address, or simply want your data in your own hands, give IPv6.rs a try!
Alternatively, for the best virtual desktop, try Shells!

Setting Up a Windows SOCKS5 Proxy Server: A Comprehensive Guide
If you are looking to set up a SOCKS5 proxy server on Windows, you’ve come to the right place. In this guide, we will walk you through the process of setting up and configuring a SOCKS5 proxy server on Windows 10. Whether you are looking for free SOCKS5 proxy servers or considering purchasing a premium service, we will cover all the essential aspects.
What is a SOCKS5 Proxy Server?
Before we dive into the setup process, let’s briefly discuss what a SOCKS5 proxy server is. SOCKS5 is a versatile proxy protocol that can handle a variety of tasks, including bypassing geo-restrictions, enhancing online privacy, and improving network performance. By setting up a SOCKS5 proxy server on your Windows machine, you can route your internet traffic through an intermediary server, adding an extra layer of security and anonymity.
Free SOCKS5 Proxy Servers
If you are looking for free SOCKS5 proxy servers, you can find several options available online. However, it’s essential to exercise caution when using free proxies, as they may not offer the same level of security and reliability as paid services. Additionally, free SOCKS5 proxy servers may have limitations on bandwidth and speed, which can impact your browsing experience.
Paid SOCKS5 Proxy Services
For users who require a higher level of performance and security, paid SOCKS5 proxy services are a viable option. Many providers offer dedicated SOCKS5 proxy server lists, allowing you to choose servers based on location and performance metrics. When selecting a paid SOCKS5 proxy service, consider factors such as server uptime, customer support, and encryption protocols to ensure a seamless and secure browsing experience.
Proxy Server Software for Windows
To set up a SOCKS5 proxy server on Windows, you’ll need suitable proxy server software. Fortunately, there are several robust options available, ranging from open-source solutions to commercial products. Some popular proxy server software for Windows includes [List of proxy server software for Windows].
Configuring a SOCKS5 Proxy Server on Windows 10
Once you have selected a SOCKS5 proxy server and obtained the necessary credentials, you can proceed with configuring the proxy settings on your Windows 10 machine. The exact steps may vary depending on the proxy client software you are using, but the general process involves entering the proxy server address, port number, and authentication details.
Conclusion
In conclusion, setting up a SOCKS5 proxy server on Windows can offer numerous benefits in terms of privacy, security, and access to geo-restricted content. Whether you opt for a free SOCKS5 proxy server or invest in a premium service, it’s crucial to prioritize security and reliability when routing your internet traffic through a proxy server. With the right proxy server software and configuration, you can enjoy a more secure and versatile browsing experience on your Windows device.

Setting Up a Windows Socks5 Proxy Server: A Comprehensive Guide
If you’re looking to enhance your online security and privacy, setting up a Windows Socks5 proxy server can be a great solution. In this comprehensive guide, we will walk you through the process of setting up and configuring a Windows Socks5 proxy server.
Windows Socks5 Proxy
First, let’s understand what a Socks5 proxy is. Socks5 is a versatile proxy protocol that can handle a wide range of internet traffic, making it a popular choice for users who want to mask their IP address and encrypt their internet connection. When it comes to setting up a Socks5 proxy server on Windows, there are several options available, and we will explore some of the most popular ones.
Windows 10 Proxy
If you’re using Windows 10, you can easily configure a Socks5 proxy server by accessing the network settings. By entering the IP address and port of the Socks5 proxy server, you can route your internet traffic through the proxy, adding an extra layer of security to your online activities.
Socks5 Server
Setting up your own Socks5 server on Windows can provide you with full control over your proxy configuration. By installing and configuring Socks5 server software on your Windows machine, you can create a private and secure proxy server for your personal use.
Socks5 Proxy Server List
If you’re looking for existing Socks5 proxy servers, there are many free and paid options available. By accessing a Socks5 proxy server list, you can choose a server that meets your specific requirements and easily configure it on your Windows device.
Socks5 Proxy Client Windows
To effectively utilize a Socks5 proxy server on Windows, you’ll need a compatible proxy client. There are several Socks5 proxy client options available for Windows, each offering different features and capabilities. By choosing the right client, you can seamlessly integrate the Socks5 proxy server into your browsing experience.
Setting Up a Proxy Server on Windows
In addition to Socks5 proxies, Windows also supports other types of proxy servers. Whether you’re looking to set up a HTTP, HTTPS, or Socks4 proxy server, Windows provides built-in tools and settings to facilitate the configuration process.
Proxy Server Software for Windows
For users who require advanced proxy server capabilities, there are various third-party proxy server software options available for Windows. These software solutions offer additional features such as user authentication, traffic monitoring, and advanced encryption, providing a comprehensive proxy server solution.
Conclusion
Setting up a Windows Socks5 proxy server can significantly enhance your online security and privacy. Whether you choose to configure your own Socks5 server or utilize an existing proxy server, implementing a Socks5 proxy on Windows can help protect your sensitive information and anonymize your internet activities.
Readers help support Windows Report. We may get a commission if you buy through our links.
Read our disclosure page to find out how can you help Windows Report sustain the editorial team. Read more
There are built-in Windows proxy settings, but you can also set it up through other methods. SOCKS5 is the latest version of this protocol, coming with better security.
With it, you can bypass restrictions, access blocked websites, and enjoy enhanced speed and reliability across various applications. Here’s how to use SOCKS5 proxy on your laptop or desktop:
How do I use SOCKS5 proxy settings on Windows?
1. Windows manual proxy setup for SOCKS5
- Go to Control Panel > Internet Options.
- Switch to the Connections tab.
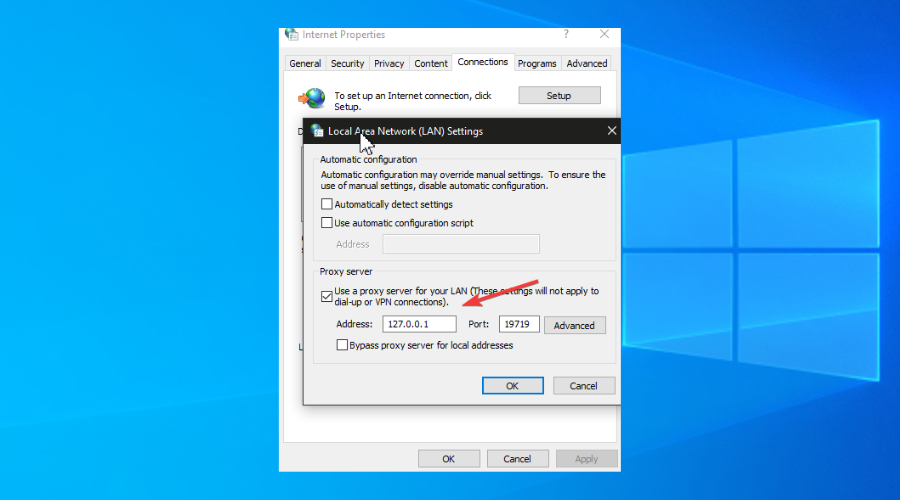
- Click LAN settings.
- Enable Use a proxy server for your LAN.

- Activate Bypass proxy server for local addresses.
- Click Advanced.
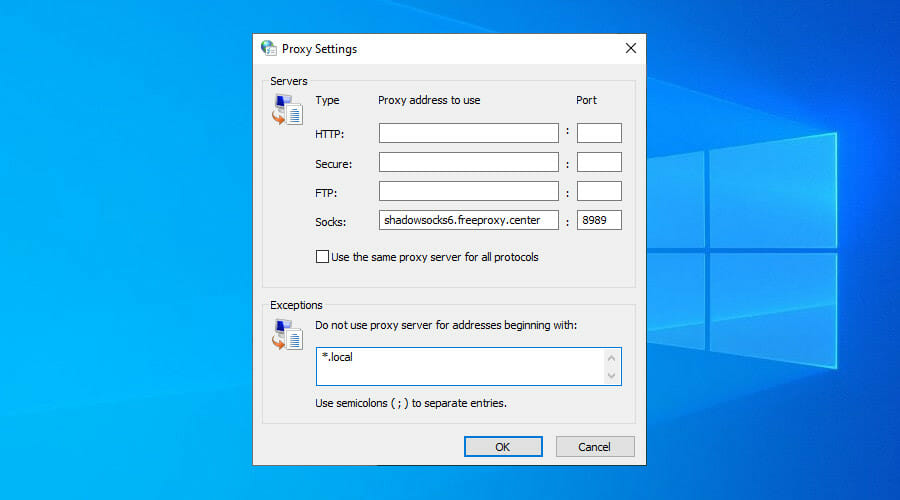
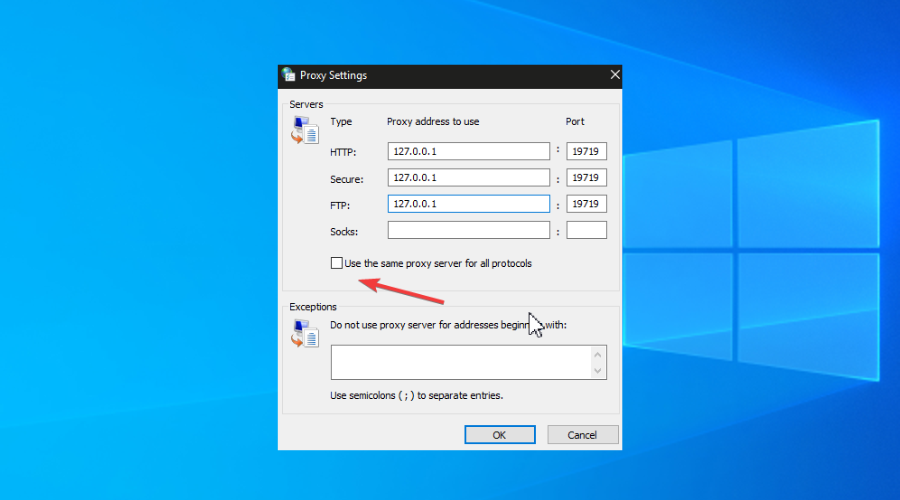
- Disable Use the same proxy server for all protocols.
- At Socks, specify the server address and port of the SOCKS5 proxy.
- Delete everything at HTTP, Secure, and FTP.
- Click OK > Apply.
You can configure SOCKS5 proxy settings in Windows 10 without having to install any additional software. Plus, the setup applies to all software applications with Internet access, not just your web browser.
2. From Mozilla Firefox
- Download Firefox and install it on Windows 10.
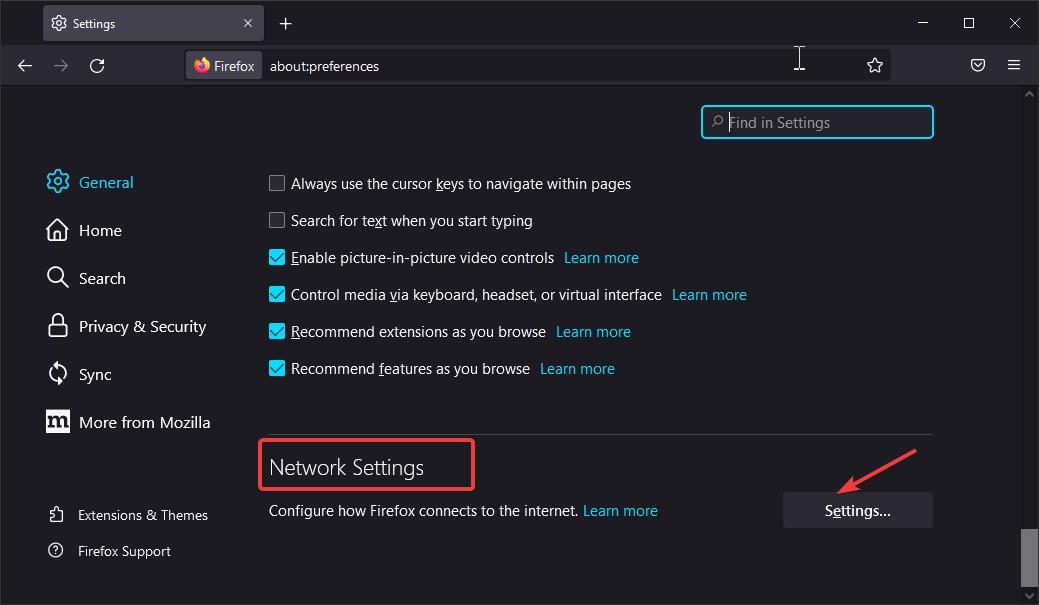
- Click the ≡ button and go to Options.
- In the General tab, scroll down to Network Settings.
- Click Settings.

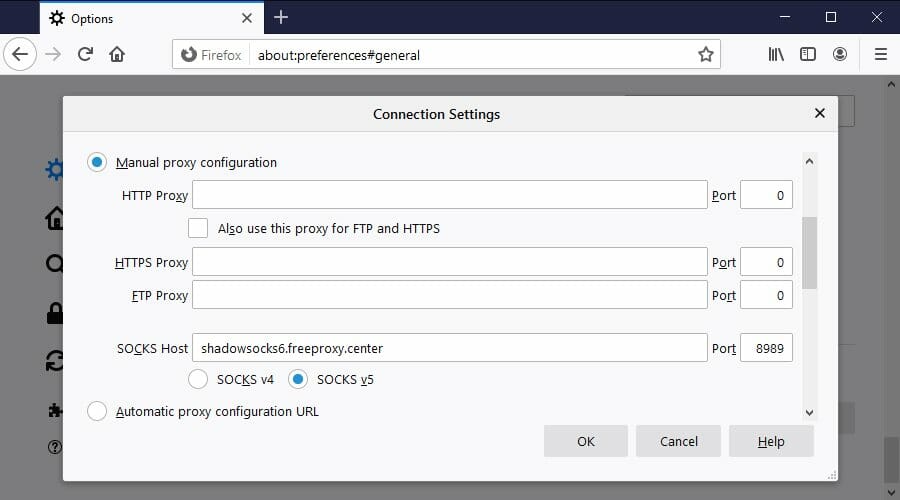
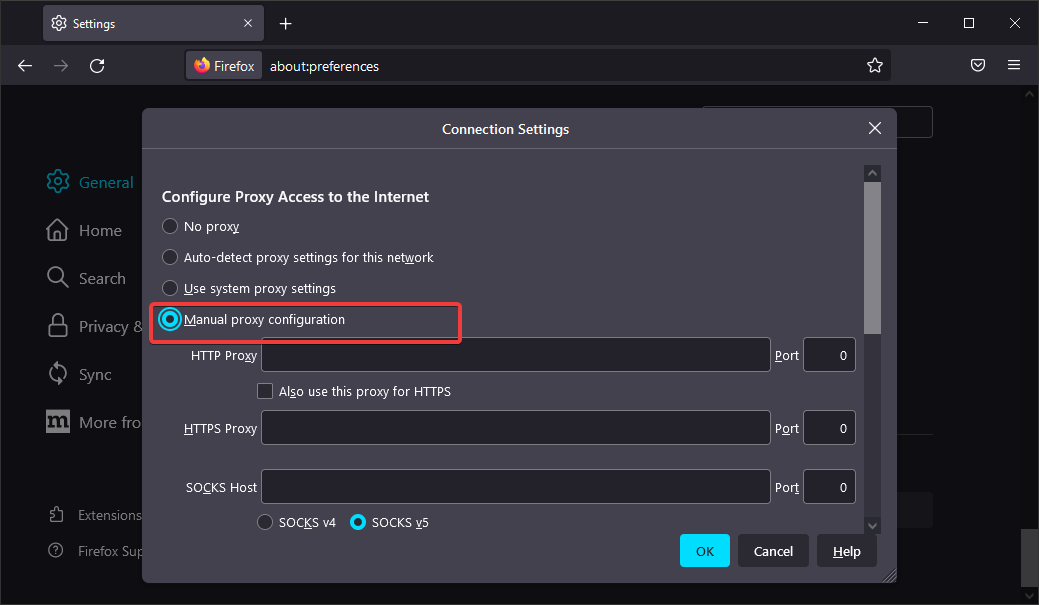
- Select Manual proxy configuration.
- Set SOCKS5 Host and Port to the server address and port of the SOCKS5 proxy.
- Select SOCKS5 v5.
- Click OK.
If you prefer using a web browser with a SOCKS5 proxy instead of the entire computer, Firefox is your best bet. While using Firefox for SOCKS5, you can use any other browser for direct Internet connections.
3. Using Google Chrome
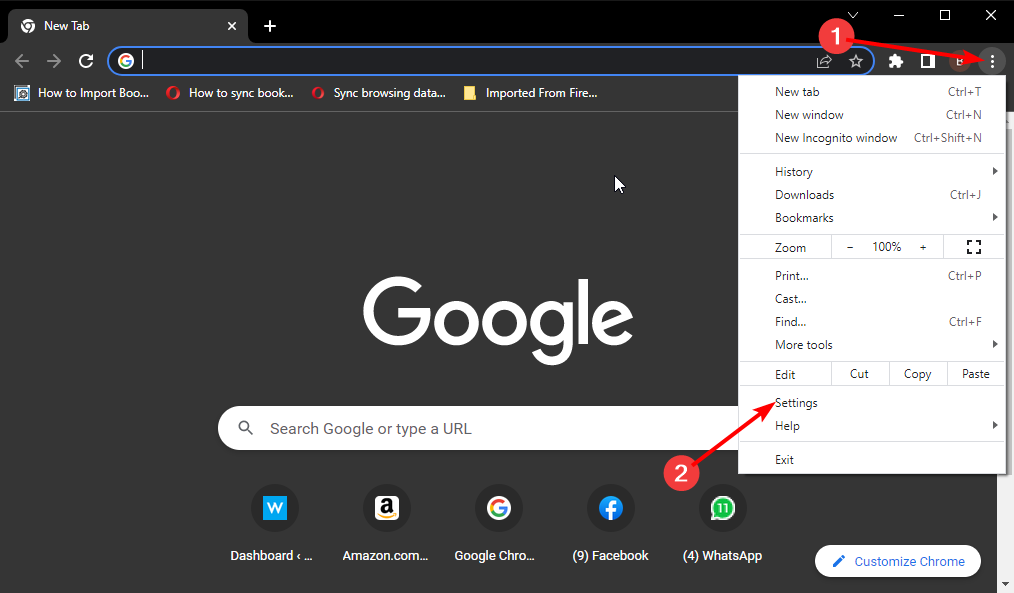
For Chrome, the process is very similar:
- Click on the menu button.
- Select settings.

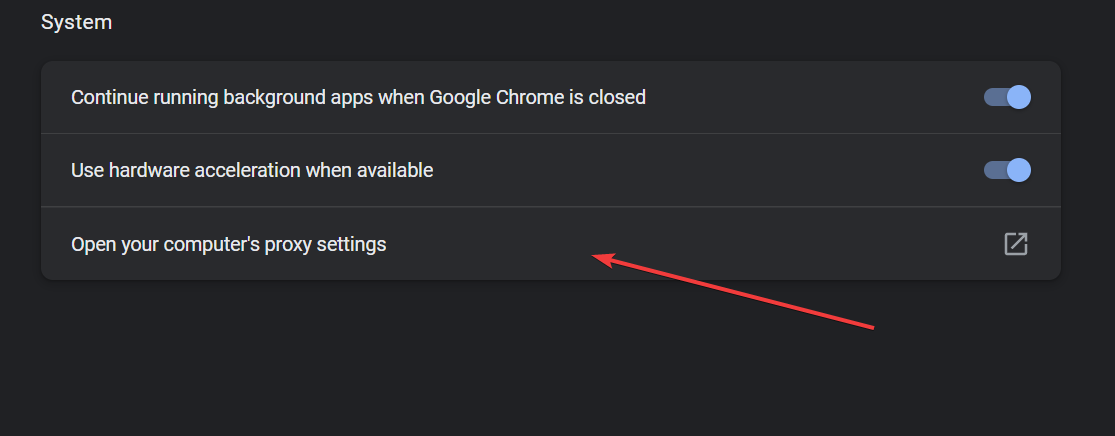
- Select the System section.
- Click on Open your computer’s proxy settings.

- Enter your Proxy server address as shown in the first solution.
If you wish to regularly switch SOCKS5 proxy servers, you can install an extension like Smartproxy.
Smartproxy
Switch your IP address for increased privacy and reduced website tracking or blocking chances.
4. Use VPN with SOCK5 features

- Sign up for a PIA subscription plan.
- Download and install PIA to your PC.
- Right-click PIA’s systray icon and go to Settings.
- Switch to the Proxy tab.
- Select Shadowsocks, click Configure and choose a location.
- Or, choose SOCKS5 Proxy, click Configure, and set the SOCKS5 proxy details.
- Left-click PIA’s systray icon.
- Press the big power button to connect to a VPN server.
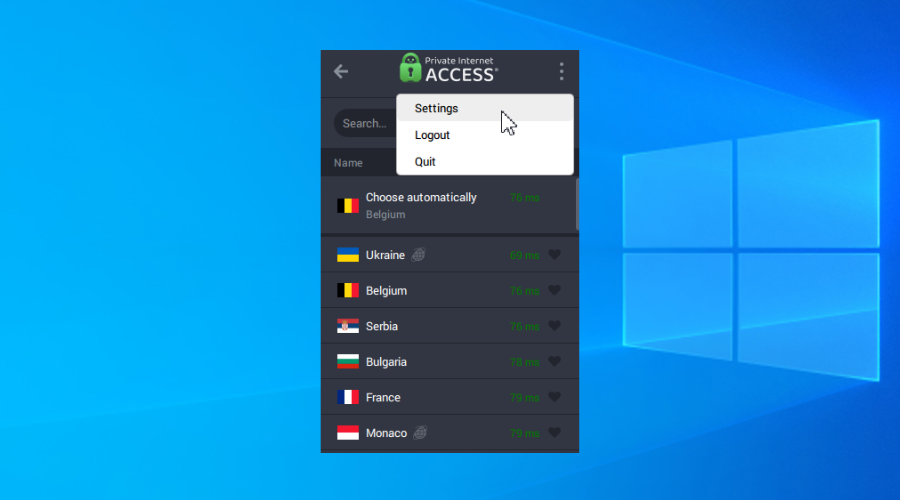
If you want to not only spoof your IP address but also encrypt your traffic, use PIA- A SOCKS5 client for Windows and a VPN at the same time.
In Shadowsocks mode, you can connect the VPN server to a second location for increased privacy and security. It’s similar to using a double VPN to stay connected to two VPN servers at once.
In SOCKS5 proxy mode, you simply specify the connection details of a SOCKS5 proxy server. It’s the custom alternative to Shadowsocks mode, but it’s a bit more complicated.
Private Internet Access
Get unlimited access to thousands of SOCKS5 servers with this reliable and fast tool!
5. Setup from Shadowsocks
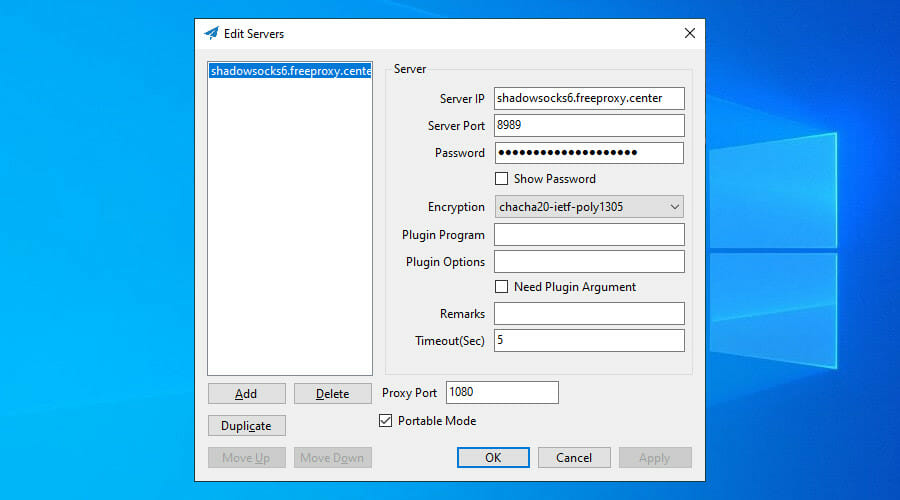
- Go to the Shadowsocks page.
- Download the latest version for Windows 10/11.
- Unzip the archive and run the executable file.
- Set the IP address, port, and password of the SOCKS5 proxy.
- Click OK.
- Right-click the Shadowsocks systray icon.
- Select System Proxy > Global.


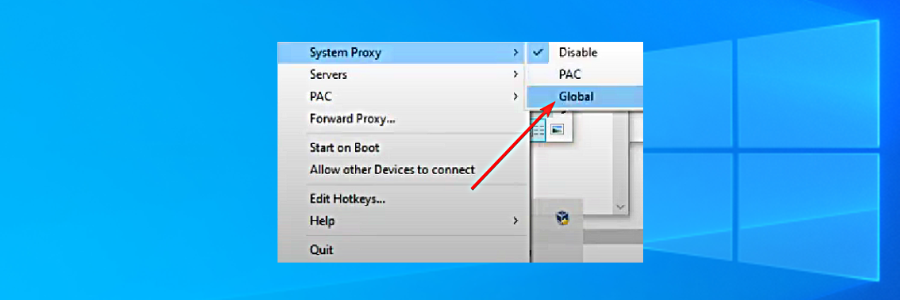
Shadowsocks is a SOCKS5 proxy client that can be easily installed on Windows 10 to use SOCKS5 proxy settings. It runs in the systray and can be quickly configured, enabled, and disabled.
Furthermore, Shadowsocks features several encryption methods to make up for the fact that SOCKS5 doesn’t have one, including 256-bit AES military-grade encryption.
In addition to security, a huge benefit of using Shadowsocks is that it applies the SOCKS5 proxy settings globally to Windows 10. As such, all Internet-enabled programs will use it.
6. Setup on uTorrent

- Download uTorrent on your Windows PC.
- Install the torrent client and launch it.
- Open the Options menu and select Preferences.
- Go to Connection.
- Set Proxy Server Type to Socks5.
- Set Proxy and Port to the server address and port of the SOCKS5 proxy.
- Click Apply.
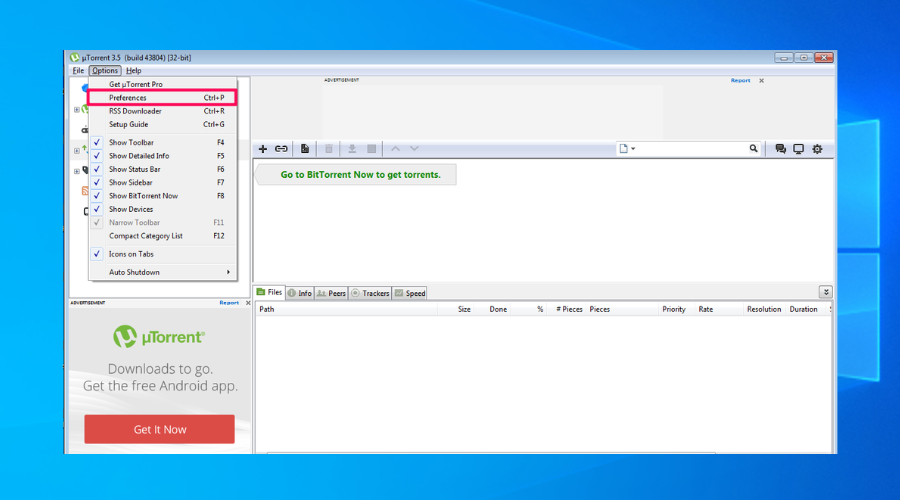

On Windows 10 and other operating systems, you can configure SOCKS5 proxy settings directly in a torrent client to make your IP address anonymous and protect your true identity in the torrent swarm.
Elena Constantinescu
Windows Software Expert
Elena started writing professionally in 2010 and hasn’t stopped exploring the tech world since. With a firm grasp of software reviewing and content editing, she is always trying new things to improve her skill set.
Once in a blue moon, she steps aside from the desk to play with her bunny and to water her probably dead plants.