
В осеннем обновлении Windows 10 версии 1809 появился новый инструмент для создания скриншотов экрана или его области и простого редактирования созданного снимка экрана. В разных местах системы этот инструмент называется слегка по-разному: Фрагмент экрана, Фрагмент и набросок, Набросок на фрагменте экрана, но имеется в виду одна и та же утилита.
В этой простой инструкции о том, как сделать скриншот Windows 10 с помощью новой функции, которая в будущем должна будет заменить собой встроенную утилиту «Ножницы». Остальные способы для создания снимков экрана продолжают работать так же, как и раньше: Как создать скриншот Windows 10.
Как запустить «Фрагмент и набросок»
Я нашел 5 способов запустить создание скриншотов с помощью «Фрагмент экрана», не уверен, что все они пригодятся вам, но поделюсь:
- Использовать горячие клавиши Win + Shift + S (Win — это клавиша с эмблемой Windows).
- В меню пуск или в поиске на панели задач найти приложение «Фрагмент и набросок» и запустить его.
- Запустить пункт «Фрагмент экрана» в области уведомлений Windows (может отсутствовать там по умолчанию).
- Запустить стандартное приложение «Ножницы», а уже из него — «Набросок на фрагменте экрана».
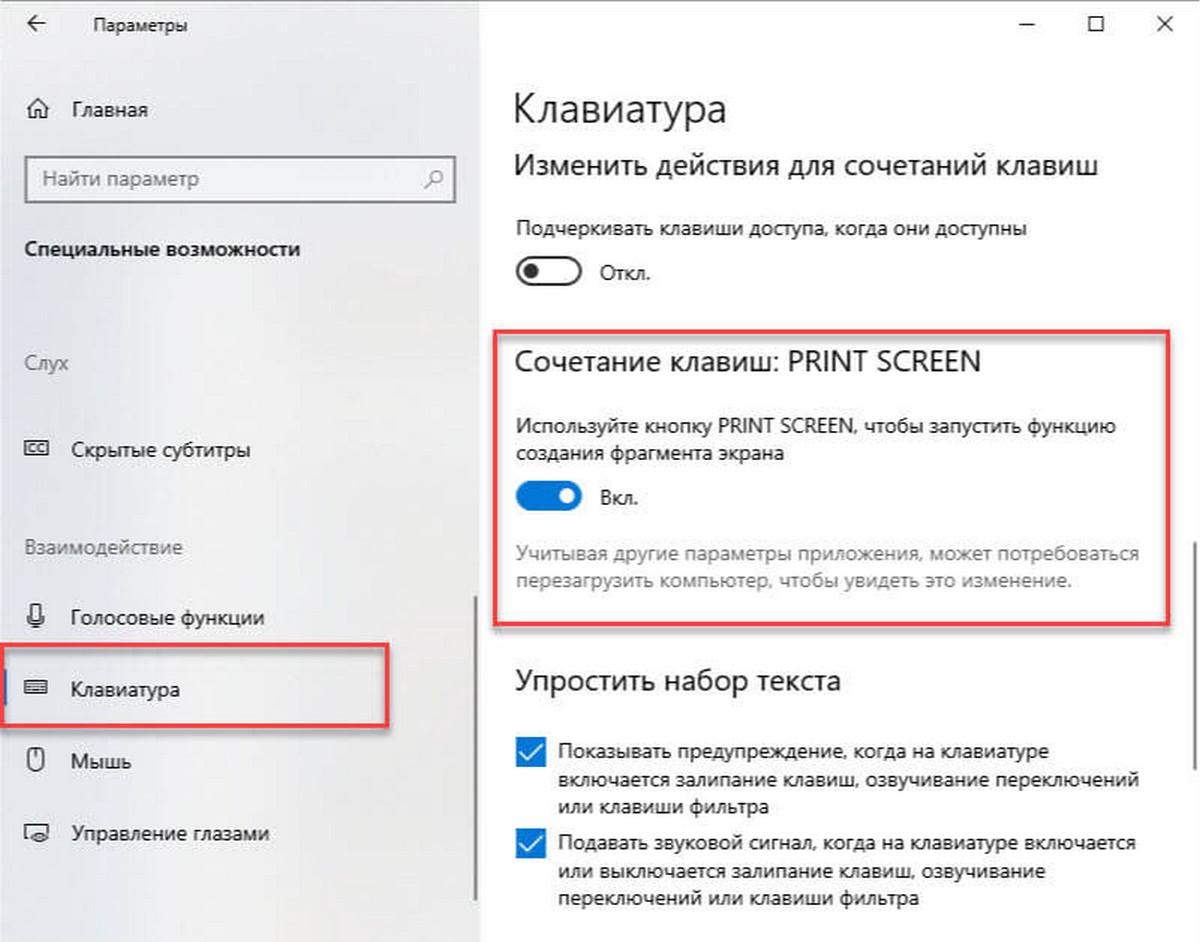
Также есть возможность назначить запуск утилиты на клавишу Print Screen: для этого зайдите в Параметры — Специальные возможности — Клавиатура.
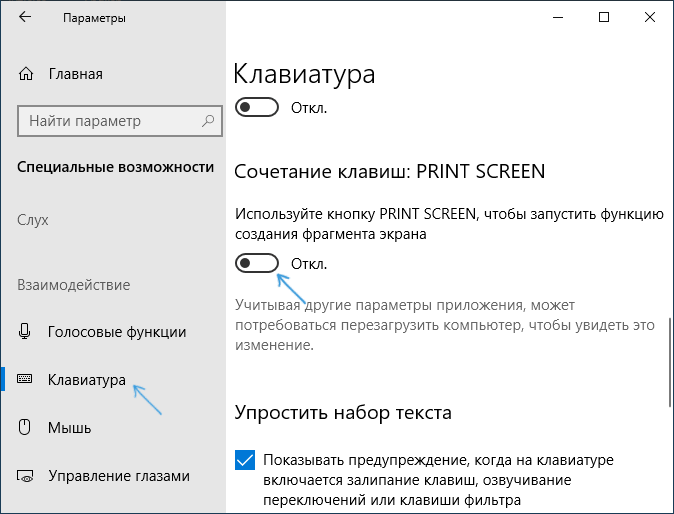
Включите пункт «Используйте кнопку Print Screen, чтобы запустить функцию создания фрагмента экрана».
Создание снимка экрана
Если запускать утилиту из меню Пуск, поиска или из «Ножницы», откроется редактор созданных скриншотов (где нужно нажать «Создать» для того, чтобы сделать снимок экрана), если же использовать остальные способы — сразу откроется создание скриншотов, работают они слегка отличающимся образом (будет отличаться второй шаг):
- Вверху экрана вы увидите три кнопки: для создания снимка прямоугольной области экрана, фрагмента экрана произвольной формы или скриншота всего экрана Windows 10 (четвертая кнопка — для выхода из инструмента). Нажмите по нужной кнопке и, если требуется выберите нужную область экрана.

- Если вы запускали создание скриншота в уже запущенном приложении «Фрагмент и набросок», вновь созданный снимок откроется в нём. Если с помощью горячих клавиш или из области уведомлений, скриншот будет помещен в буфер обмена с возможностью вставить в любую программу, а также появится уведомление, по нажатию на которых откроется «Фрагмент экрана» с этим изображением.

В приложении «Фрагмент и набросок» вы можете добавить надписи на созданный скриншот, удалить что-то с изображения, обрезать его, сохранить его на компьютер.

Здесь же присутствуют возможности для копирования отредактированного изображения в буфер обмена и стандартная для приложений Windows 10 кнопка «Поделиться», позволяющая отправить его через поддерживаемые приложения на компьютере.
Не берусь оценить, насколько новая возможность удобна, но, думаю, для начинающего пользователя будет полезна: большинство функций, которые могут потребоваться, присутствуют (кроме, разве что создания скриншота по таймеру, эту возможность вы можете найти в утилите «Ножницы»).
Опция «Фрагмент экрана» замена старого инструмента «Ножницы». В новых сборках Windows 10 можно с легкостью делать скриншоты, комментировать и делиться ими с вашими друзьями или коллегами.
Что касается функций, новый инструмент «Фрагмент экрана» более совершенен в сравнении с «Ножницами», и предлагает больше вариантов для удобства работы. Инструмент может, сделать снимок всего экрана, произвольной области и прямоугольный снимок, снимок активного окна.

Пользователи, которые часто делают скриншоты предпочитают для этого использовать сочетания клавиш. Если вы также любите делать снимки экрана с помощью сочетаний клавиш, вы будете рады узнать, что новый инструмент поддерживает сочетания клавиш для открытия и доступа к своим функциям.
Ниже приведены сочетания клавиш, доступные для инструмента «Фрагмент экрана».
Открыть функцию создания снимка экрана в Windows 10, можно нажав клавиши:
- Win + Shift + S – запуск функции создания фрагмента экрана
- или Print Screen (PrtScn)
Примечание: С настройками по умолчанию Windows 10 не открывает функцию, при нажатии клавиши PrtSc. Если вы хотите использовать клавишу PrtSc, необходимо перейти в «Параметры» → «Специальные возможности» → «Клавиатура» в разделе «Сочетание клавиш: Print Scren» — передвиньте ползунок переключателя в положение «Вкл.», это разрешит использовать клавишу для запуска функции создания фрагмента экрана.
После открытия, используйте клавишу Tab для перехода между доступными режимами, после чего нажмите клавишу Enter для выбора нужного режима.
Другие сочетания клавиш для функции создания снимка экрана Windows 10.
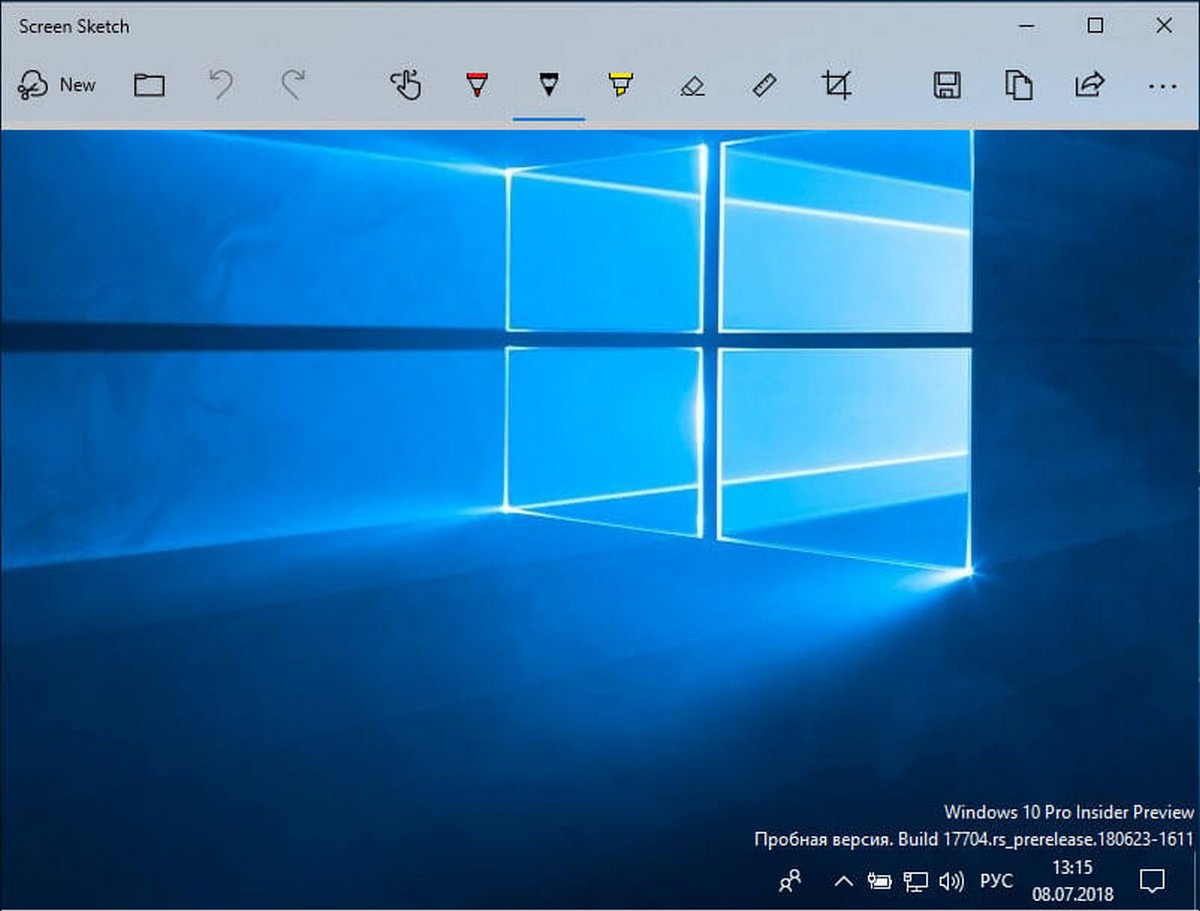
Alt + N – Вернутся из редактора Screen Sketch для создания нового снимка
ALT + O – Открыть файл для редактирования
Ctrl + O – Открыть файл (альтернатива)
ALT + U – Отменить
Ctrl + Z — Отменить
Ctrl + Y – Повторить
ALT + U – Отменить
Alt + D – Повтор
ALT + T – Touch writing
Alt + B – Шариковая ручка
Alt + P – Выбрать карандаш
ALT + H – Маркер
Alt + E – Ластик
ALT + R – Обрезка изображения
ALT + S— Сохранить
Alt + C— Копировать
Alt + A – Поделиться снимком
Alt + M – Открыть с помощью
Ctrl + P – Печать
Эти сочетания клавиш на данный момент, доступны для данного инструмента. Мы будем обновлять эту статью, если и когда Майкрософт добавит дополнительные сочетания клавиш.
Windows 10 унаследовала все особенности системы загрузки у Windows 8, предоставляя такую же графическую среду для выполнения задач восстановления системы. Предполагается, что операции восстановления системы после сбоев будут преимущественно выполняться системой автоматического восстановления. В том случае, если Windows 10 не загружается корректно, запускается система автоматического восстановления, которая без участия пользователя пытается найти и исправить проблемы, мешающие нормальной загрузке системы. Однако это не означает, что в Windows 10 отсутствует безопасный режим (Safe mode), просто по умолчанию этот режим загрузки скрыт от пользователей.
В некоторых случаях необходимо запустить систему в безопасном режиме, например чтобы отладить или удалить службу, драйвер или приложение. Посмотрим как включить безопасный режим в Windows 10.
Windows 10 можно загрузить в безопасном режиме несколькими разными способами.
Содержание:
- Утилита MSConfig (Конфигурация системы)
- Сочетание Shift + Restart
- Запуск режим диагностики из интерфейса новой Панели управления
- Запуск безопасного режима из командой строки
- Возвращаем старое текстовое меню загрузки
- Запуск Safe Mode из режима восстановления
Утилита MSConfig (Конфигурация системы)
Самый простой способ загрузить Windows 10 в безопасном режиме, как и в предыдущих версиях Windows, воспользоваться утилитой msconfig.exe. Для этого:
- Нажмите сочетание клавиш Win+R и наберите msconfig
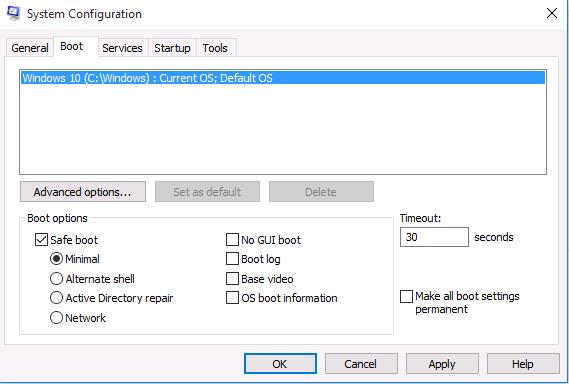
- В открывшемся окне перейдите на вкладку Boot
- В разделе Boot options поставьте флажок у пункта Safe boot

- Сохраните изменения (OK), согласитесь с предложением перезагрузить систему (Restart)
- После перезагрузки системы, Windows 10 загрузится в безопасном режиме (о чем свидетельствует надпись Safe Mode во всех углах экрана)

Совет. Отключить загрузку в безопасном режиме нужно также с помощью msconfig, сняв флажок у пункта Safe boot.
Сочетание Shift + Restart
В стартовом меню нажмите кнопку Power и, зажав Shift на клавиатуре, выберите пункт перезагрузки системы (Restart)
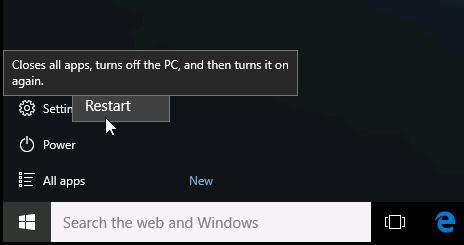
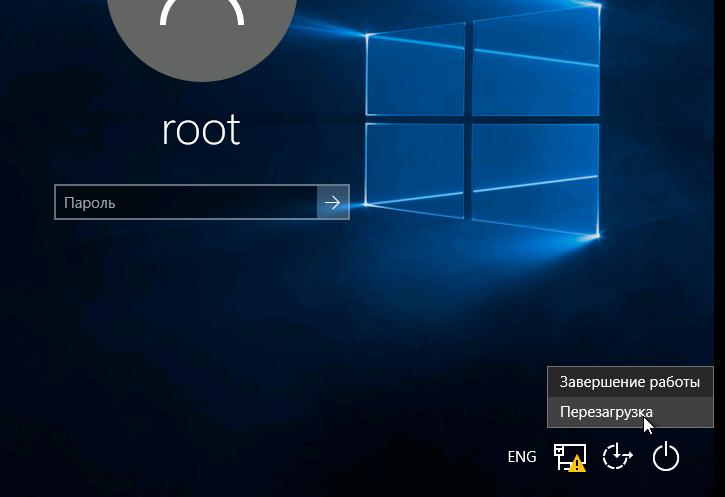
Примечание. Эту же комбинацию Shift+Перезагрузка можно использовать на экране входа в систему.
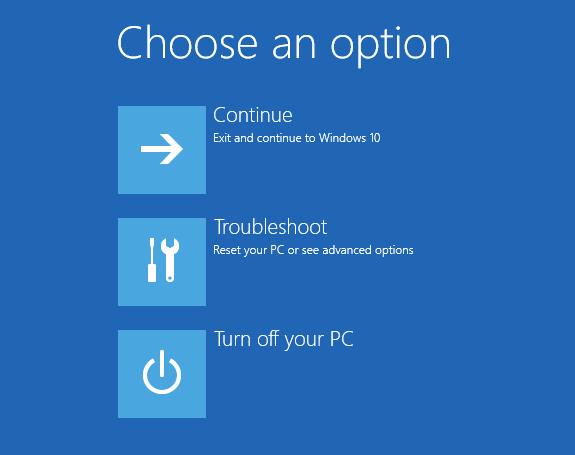
В появившемся диалоге последовательно выберите пункты Troubleshoot (Диагностика) -> Advanced options (Дополнительные параметры)-> Startup Settings (Параметры загрузки).
Перезагружаем компьютер, нажав кнопку Restart.
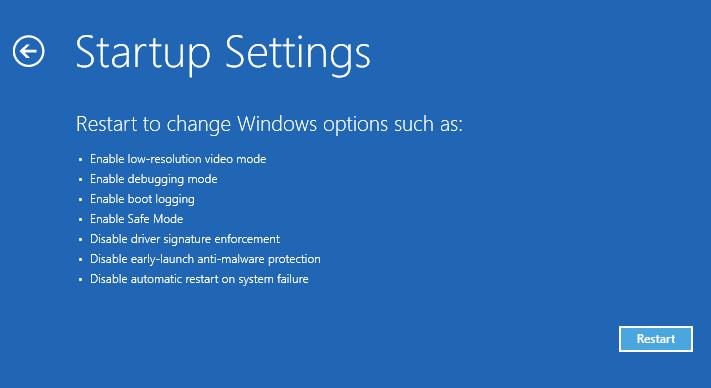
После перезагрузки появится окно с доступными опциями загрузки системы ( 9 вариантов, включая три вида безопасного режима). Для загрузки в безопасном режиме, нажмите клавишу F4 или 4 (или F5/F6 для загрузки в безопасном режиме с поддержкой сети или командной строки соответственно).
Запуск режим диагностики из интерфейса новой Панели управления
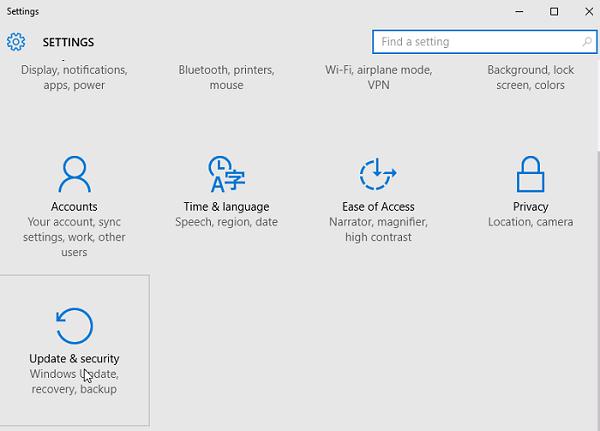
Для запуска новой современной Панели управления Windows 10, нажмите кнопку Start и выберите меню Settings. Затем перейдите в раздел Update & security.
Перейдите в раздел Recovery и в секции Advanced Startup нажмите Restart now.

Далее все аналогично предыдущему способу.
Запуск безопасного режима из командой строки
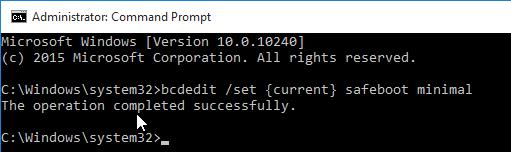
Возможно также настроить запуск Windows 10 в безопасном режиме и из командной строки. Для этого откройте командную строку (cmd) с правами администратора и выполните команду:
bcdedit /set {current} safeboot minimal
Затем перезагрузите компьютер командой:
Shutdown –f –r –t 0
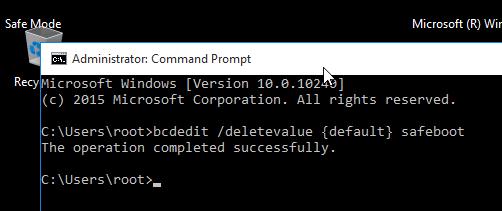
Теперь Windows 10 всегда будет загружаться в безопасном режиме. Чтобы вернуть обычный режим загрузки:
bcdedit /deletevalue {default} safeboot
Возвращаем старое текстовое меню загрузки
В Windows 10/8 возможно вернуться к старому текстовому загрузчику Windows, поддерживающего клавишу F8 (Shift+F8) и возможность выбора параметров запуска системы.
Примечание. Скорость загрузки системы с таким загрузчиком будет ниже.
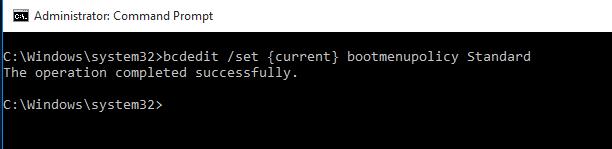
Чтобы вернуть тестовый загрузчик, выполните в командной строке с правами администратора:
bcdedit /set {default} bootmenupolicy legacy
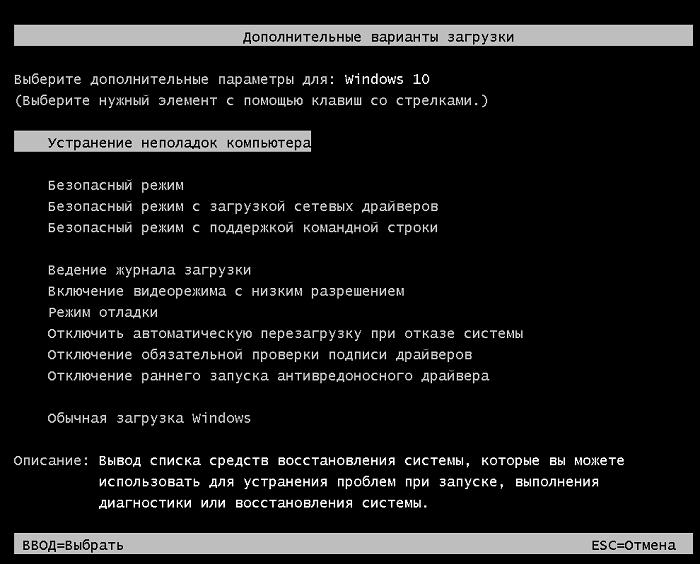
Теперь при загрузке компьютера после стадии самотестирования (POST) , нужно несколько раз нажать клавишу F8. Должно появится старое-доброе текстовое меню с параметрами загрузки системы.
Чтобы отключить текстовый режим загрузчика, и вернуться к быстрой загрузке, выполните:
bcdedit /set {default} bootmenupolicy standard
Запуск Safe Mode из режима восстановления
Мало кто знает, что, чтобы включить безопасный режим и прочие параметры восстановления в Windows 10, достаточно 3 раза подряд прервать загрузку системы кнопкой отключения питания.
На 4 раз запустится среда восстановления системы (Recovery mode), из которой можно выбрать загрузку в безопасном режиме или другие варианты загрузки системы.
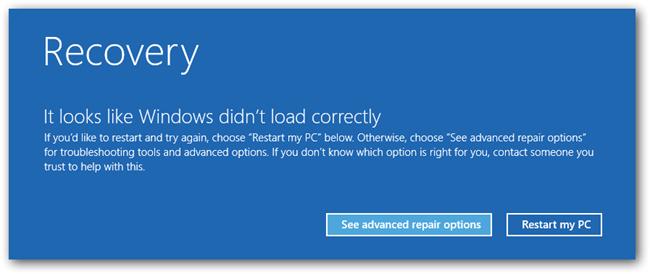
Выберите пункт See advanced repair options и следуйте инструкциям из второго пункта нашей статьи.
In the digital realm, troubleshooting is a skill that every Windows 10 user should have in their arsenal. One of the most powerful tools at your disposal is the Recovery Mode. This mode allows you to diagnose and repair issues that may be hindering your computer’s performance. However, some users may not be familiar with how to boot into the recovery mode in Windows 10. In this comprehensive guide, we will walk you through the steps to boot into Recovery Mode on Windows 10. Whether you’re dealing with a stubborn software problem or just want to perform some maintenance, this article has you covered.
Part 1: What is Windows recovery mode?
Windows recovery mode is a special environment that allows you to troubleshoot and repair common problems with your Windows operating system. It can also be used to reinstall Windows if necessary.
Windows recovery mode is based on the Windows Preinstallation Environment (Windows PE), and it includes a variety of tools that can be used to fix problems with your computer, such as:
-
Startup Repair: This tool can scan your computer for problems that are preventing it from booting up properly.
-
System Restore: This tool allows you to restore your computer to a previous state, which can be useful if you have recently installed an app or driver that is causing problems.
-
System Image Recovery: This tool allows you to restore your computer to a previous image, which is a complete backup of your system.
-
Reset This PC: This tool allows you to reinstall Windows while keeping your personal files or removing them completely.
Part 2: When to Use Windows Recovery Mode?
Windows 10 Recovery Mode proves invaluable in a variety of scenarios where your operating system faces critical challenges. Here are some instances when utilizing Windows Recovery Mode is particularly beneficial:
-
Startup Failures: When Windows encounters problems during startup, leading to error messages or an inability to boot into the system, Recovery Mode steps in to diagnose and resolve these issues.
-
Corrupted System Files: If essential system files become corrupted or damaged, Recovery Mode provides a controlled environment to repair or replace them, restoring system stability.
-
Malfunctioning Drivers: In cases where faulty or incompatible drivers are causing system instability or crashes, Recovery Mode facilitates driver updates or rollbacks to a known working state.
-
Virus or Malware Removal: When your antivirus software is unable to eliminate stubborn infections, Recovery Mode offers a secure environment to run scans and remove malware effectively.
-
System Restore: Use Recovery Mode to initiate a System Restore, which reverts your system to a previously saved state, undoing any recent changes that may have led to issues.
-
Registry Errors: If the Windows Registry becomes corrupted, it can lead to a range of problems. Recovery Mode allows for registry repairs and restores.
-
Recovery from Failed Updates: In the event of a failed Windows update that leaves your system unstable, Recovery Mode provides a means to troubleshoot and rectify the issue.
-
Hardware Diagnostics: Use Recovery Mode to run diagnostic tests, particularly the Windows Memory Diagnostic tool, to identify and address potential hardware failures.
By understanding the situations where Windows Recovery Mode proves most effective, users can confidently employ this feature to navigate through various system-related challenges and restore their computer’s functionality.
Part 3: Precautions for Using Recovery Mode on Windows 10:
While Windows Recovery Mode is a powerful tool for troubleshooting, it’s crucial to approach it with care and attention. Here are some important precautions to keep in mind when using Recovery Mode on Windows 10:
-
Backup your data. Before you use any of the tools in recovery mode, it is important to back up your data. This is because some of the tools, such as Reset This PC, can erase your personal files.
-
Be careful when using System Restore. System Restore can be a useful tool for restoring your computer to a previous state, but it is important to use it carefully. If you restore your computer to a point before you installed a particular app or driver, that app or driver will be uninstalled.
-
Do not interrupt the recovery process. Once you have started a recovery process, such as a Startup Repair or System Restore, do not interrupt it. Interrupting the process can cause further problems with your computer.
-
If you are unsure how to use a particular tool, consult the Windows Help documentation or contact a computer technician for assistance.
By observing these precautions, users can maximize the effectiveness of Windows Recovery Mode while minimizing the risk of unintended consequences.
Part 4: Steps to Enable Recovery Mode in Windows 10:
Windows Recovery Mode is a vital tool for troubleshooting various issues. Here are five methods to enable Recovery Mode on Windows 10, each with a step-by-step tutorial and accompanying images:
Method 1: Pressing F11 When Computer Starts
This is the most common and easiest way to enable recovery mode.
Step 1: Turn on your computer.
Step 2: As soon as you see the manufacturer’s logo, press and hold the F11 key.
Step 3: Keep holding the F11 key until you see the Choose an option screen.
This method is very easy and usually works on most computers. However, if you have a custom keyboard, the F11 key may be mapped to another function. In this case, you may need to consult your computer’s manual to find out how to enter recovery mode.
Method 2: Using Restart Option in Start Menu
This method is useful if your computer is able to boot into Windows normally.
Step 1: Click the Start button.
Step 2: Click the Power button.
Step 3: Hold down the Shift key and click Restart.
Step 4: Your computer will restart and you will see the Choose an option screen.
This method is also very easy and usually works on most computers. However, if you are having trouble booting into Windows normally, you may not be able to use this method.
Method 3: Using a Windows bootable USB
This method is useful if your computer is unable to boot into Windows normally or if you do not have access to the recovery partition.
Step 1: Create a Windows bootable USB. You can do this using the Windows Media Creation Tool.
Step 2: Insert the Windows bootable USB into your computer.
Step 3: Boot your computer from the Windows bootable USB.
Step 4: On the first screen of the Windows Setup wizard, click Repair your computer.
Step 5: On the Choose an option screen, select Troubleshoot.
This method is a bit more complicated than the previous two methods, but it is still relatively easy to follow. The most important thing is to make sure that you create a Windows bootable USB correctly.
Method 4: Using hard reboot
This method is useful if your computer is frozen or unresponsive.
Step 1: Press and hold the power button for at least 10 seconds to force your computer to shut down.
Step 2: Once your computer is completely shut down, turn it back on.
Step 3: As soon as you see the manufacturer’s logo, press and hold the F11 key.
Step 4: Keep holding the F11 key until you see the Choose an option screen.
This method is not ideal, but it can be useful if your computer is frozen or unresponsive. However, it is important to note that hard rebooting your computer can sometimes cause data loss.
Method 5: Using the Command Prompt
This method is useful if you have access to the Command Prompt.
Step 1: Open the Command Prompt with administrator privileges.
Step 2: Type the following command and press Enter:
shutdown /r /o
Step 3: Your computer will restart and you will see the Choose an option screen.
This method is the most advanced method, but it is also the most reliable. It is important to note that you need to type the command correctly and that you need to have administrator privileges to use the Command Prompt.
Once you are in the Windows Recovery Environment (WinRE), you can select the tool that you want to use to troubleshoot or repair your computer.
Part 5: Choose New Office Software After System Restoration — WPS Office
After successfully restoring your system, it’s crucial to select the right office software to ensure seamless productivity. One excellent option is WPS Office, a versatile suite that allows you to open, create, edit, and save Microsoft Office files, including Word, Excel, and PowerPoint. What sets WPS Office apart are its numerous advantages:
-
Free and Full-Featured: WPS Office offers free access to its Word, Excel, and PowerPoint equivalents, allowing you to perform a wide range of tasks without any cost.
-
Powerful PDF Toolkit: It comes with a robust set of tools for working with PDF documents, making it a valuable asset for handling various types of files.
-
Rich Template Store: The suite provides an extensive library of templates, making document creation a breeze. From professional reports to eye-catching presentations, you’ll find templates for every occasion.
-
Abundance of Functions: WPS Office is packed with features that rival even the most popular office suites. You’ll have everything you need to create professional documents.
-
Lightweight and Efficient: It’s designed to be light on system resources, ensuring smooth performance even on older machines.
-
Support for Online Documents: WPS Office seamlessly integrates with various cloud services, allowing you to access and edit your documents from anywhere, on any device.
-
Safety and Stability: WPS Office is known for its robust security features, ensuring that your documents remain safe and stable.
In my experience, using WPS Office has been a game-changer. Its intuitive interface and powerful feature set make it a standout choice for both personal and professional use. When compared to Microsoft Office, WPS Office offers a comparable experience, but with the added benefit of being free.
How to free download WPS Office:
Step 1: Go to the WPS Office website: https://www.wps.com/download/
Step 2: Click the Free Download button
Step 3: Select your operating system and click Download
Step 4: Once the download is complete, open the installer file and follow the instructions to install WPS Office
Once WPS Office is installed, you can start using it immediately. To open a Microsoft Office file, simply click the Open button and select the file that you want to open. WPS Office will automatically open the file in the appropriate application.
-
Use Word, Excel, and PPT for FREE, No Ads.
-
Edit PDF files with the powerful PDF toolkit.
-
Microsoft-like interface. Easy to learn. 100% Compatibility.
-
Boost your productivity with WPS’s abundant free Word, Excel, PPT, and CV templates.
Algirdas Jasaitis
FAQS:
1. How often should I use Recovery Mode?
Recovery Mode is typically used when you encounter issues with your Windows 10 system. There’s no set frequency for using it, but it’s wise to familiarize yourself with the process in case problems arise. It’s a valuable tool to have in your troubleshooting toolkit, especially if you encounter software conflicts, system errors, or other issues that may require advanced diagnostic and repair procedures.
2. Is Recovery Mode safe to use?
Yes, Recovery Mode is a safe and built-in feature of Windows 10 designed to help you fix problems with your system. It provides a controlled environment for diagnostic and repair operations. When used as instructed, Recovery Mode can help resolve a range of issues without causing harm to your files or system settings. However, it’s essential to follow the recommended procedures and precautions to ensure a safe and effective use of this feature.
Summary
This comprehensive guide provides five methods to access Recovery Mode in Windows 10, ensuring users have the tools to troubleshoot and restore their systems effectively. It emphasizes the benefits of using WPS Office as a versatile and free alternative to Microsoft Office. WPS Office offers powerful features, a rich template store, and seamless compatibility with Windows and Mac platforms. By integrating these solutions, users can enhance their computing experience and maintain productivity with confidence.
So, you have recently updated to Windows 10 and there have been some issues in your system. You are trying to boot Windows 10 into recovery mode, but the shortcut F8 key or Fn + F8 keys do not work. Are you in a pickle? Do not worry! There are several ways to do so which we will discuss today. But, What is Recovery Mode? Recovery Mode is a particular way in which Windows boots when it faces critical system issues. This helps the CPU understand the magnitude of the issue, and thus aid in troubleshooting. The primary uses of Recovery Mode are listed below:
- Allows to Troubleshoot – Since you can access Recovery mode even when there is malware or virus in the system, it allows you to diagnose the problem with the Troubleshoot option.
- Saves PC from Damage – Recovery Mode acts as a defender by restricting the damage to your system. It limits the usage of services and devices, and disable hardware-related drivers to solve the issue quickly. For example, services like the autoexec.bat or config.sys files do not run in recovery mode.
- Fixes Corrupt Programs – Windows 10 recovery mode plays a pivotal role in fixing defective or corrupt programs while rebooting the system.

Table of Contents
Before learning how to do so, it is important to note that Windows 10 can automatically boot into Recovery Mode when faced with a system-critical problem. In this case, boot the system a few times normally before attempting to boot into Recovery mode again. To learn more about Recovery options in Windows 8.1 or 10 and Windows 11, click here.
Method 1: Press F11 Key During System Startup
This is the easiest way to boot Windows 10 into recovery mode.
1. Click on Start menu. Click on Power icon > Restart option to restart your PC.
2. Once your Windows system begins to turn on, press the F11 key on the keyboard.
Also Read: What is Windows 10 Boot Manager?
Method 2: Press Shift Key While Restarting PC
There are multiple ways in which you can force your system to boot windows 10 recovery mode. Try to access the Recovery Mode from Start Menu using the steps given below.
1. Navigate to Start > Power icon as earlier.
2. Click on Restart while holding the Shift key.

You will be redirected to Windows 10 recovery boot menu. Now, you can choose the options as per your choice.
Note: Listed below are the steps to go to Advanced Recovery Settings.
3. Here, click on Troubleshoot, as shown.

4. Then, select Advanced options.

Method 3: Use Recovery Option in Settings
Here’s how to access Recovery Mode in Windows 10 using Settings app:
1. Search and launch Settings, as illustrated below.

2. Click on Update & Security, as shown.

3. Click on Recovery from the left panel and click on Restart Now under Advanced startup in the right panel.

4. You will be navigated to Windows Recovery Environment, as depicted below. Proceed as needed.
Also Read: How to Access Advanced Startup Options in Windows 10
Method 4: Run Command Prompt
You can use Command Prompt to boot Windows 10 into recovery mode, as follows:
1. Launch Command Prompt through the Windows Search bar, as shown.

2. Type the command: shutdown.exe /r /o and hit Enter to execute.

3. Confirm the prompt stating You’re about to be signed out to proceed into Windows RE.
Method 5: Create & Use Windows Installation USB Drive
If none of the above methods worked for you, then boot your computer using a Windows installation USB drive and access the repair setting as explained in this method.
Note: If you do not have Windows Installation USB Drive, then you need to create a bootable USB Drive on another computer. Read our guide on How to Create Windows 10 Installation Media with Media Creation Tool here.
1. Insert the Windows installation USB Drive in your device.
2. Select the following fields from the drop-down options given next to each:
- Language to install
- Time and currency format
- Keyboard or input method
3. Then, click on Next.
4. In the Windows Setup screen, click on Repair your computer.

5. You will be redirected to Windows 10 recovery boot menu blue screens as earlier.
Recommended:
- How Much RAM Is Enough
- How to Debloat Windows 11
- Fix Unknown USB Device in Windows 10
- How to Disable WiFi Direct in Windows 10
Recovery is essential and functionally viable. Furthermore, there are numerous routes that can be used to access the same. We hope that we provided comprehensive solutions on how to boot Windows 10 into Recovery Mode. If you have any queries or suggestions, drop them in the comments section below.