
При расследовании различных инцидентов администратору необходимо получить информацию кто и когда заходил на определенный компьютер Windows. Историю входов пользователя в доменной сети можно получить из журналов контроллеров домена. Но иногда проще получить информацию непосредсвенно из логов компьютера. В этой статье мы покажем, как получить и проанализировать историю входа пользователей на компьютер/сервер Windows. Такая статистика поможет вам ответить на вопрос “Как в Windows проверить кто и когда использовал этот компьютере”.
Содержание:
- Настройка политики аудита входа пользователей в Windows
- Поиск событий входа пользователей в журнале событий Windows
- Анализ событий входа пользователей в Windows с помощью PowerShell
Настройка политики аудита входа пользователей в Windows
Сначала нужно включить политик аудита входа пользователей. На отдельностоящем компьютере для настройки параметров локальной групповой политики используется оснастка gpedit.msc. Если вы хотите включить политику для компьютеров в домене Active Directorty, нужно использовать редактор доменных GPO (
gpmc.msc
).
- Запустите консоль GPMC, создайте новую GPO и назначьте ее на Organizational Units (OU) с компьютерами и / или серверами, для которых вы хотите включить политику аудита событий входа;
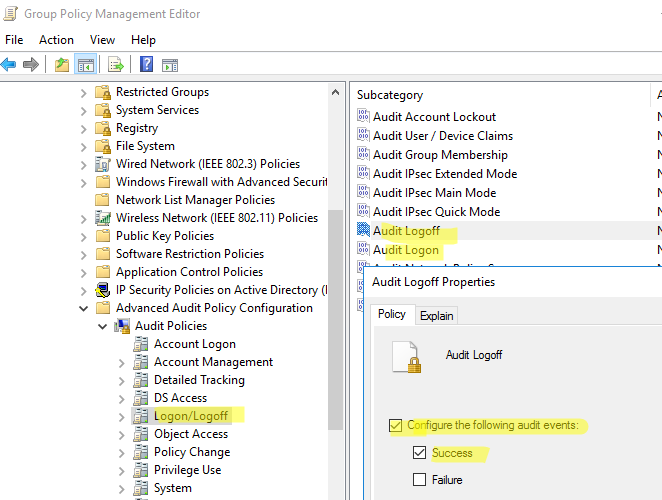
- Откройте объект GPO и перейдите в раздел Computer Configuration -> Policies -> Windows Settings -> Security Settings –> Advanced Audit Policy Configuration -> Audit Policies -> Logon/Logoff;
- Включите две политики аудита Audit Logon и Audit Logoff. Это позволит отслеживать как события входа, так и события выхода пользователей. Если вы хотите отслеживать только успешные события входа, включите в настройках политик только опцию Success;

- Закройте редактор GPO и обновите настройки политик на клиентах.
Поиск событий входа пользователей в журнале событий Windows
После того как вы включили политики аудита входа, при каждом входе пользователя в Windows в журнале Event Viewer будет появляться запись о входе. Посмотрим, как она выглядит.
- Откройте оснастку Event Viewer (
eventvwr.msc
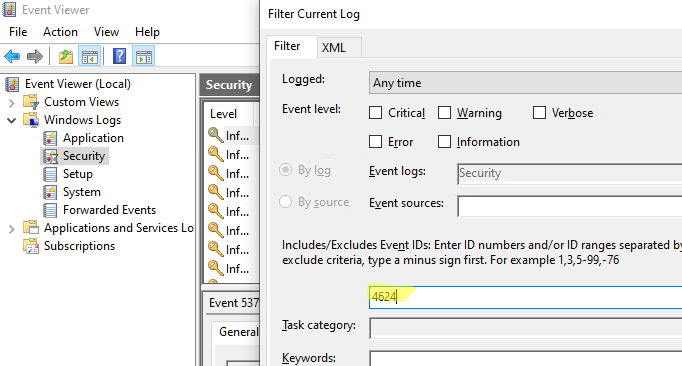
); - Разверните секцию Windows Logs и выберите журнал Security;
- Щелкните по нему правой клавишей и выберите пункт Filter Current Log;
- В поле укажите ID события 4624 и нажмите OK;
- В окне события останутся только события входа пользователей, системных служб с описанием
An account was successfully logged on
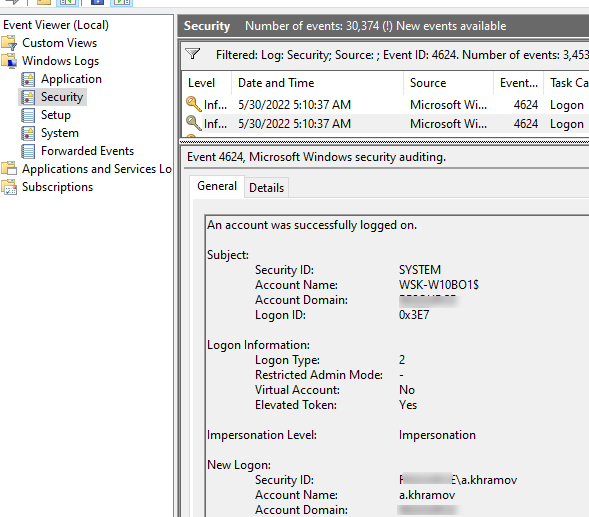
; - В описании события указано имя и домен пользователя, вошедшего в систему:
New Logon:
Security ID: WINITPRO\a.khramov
Account Name: a.khramov
Account Domain: WINITPRO
Ниже перечислены другие полезные EventID:
| Event ID | Описание |
| 4624 | A successful account logon event |
| 4625 | An account failed to log on |
| 4648 | A logon was attempted using explicit credentials |
| 4634 | An account was logged off |
| 4647 | User initiated logoff |
Если полистать журнал событий, можно заметить, что в нем присутствуют не только события входа пользователей на компьютер. Здесь также будут события сетевого доступа к этому компьютеру (при открытии по сети общих файлов или печати на сетевых принтерах), запуске различных служб и заданий планировщика и т.д. Т.е. очень много лишний событий, которые не относятся ко входу локального пользователя. Чтобы выбрать только события интерактивного входа пользователя на консоль компьютера, нужно дополнительно сделать выборку по значению параметра Logon Type. В таблице ниже перечислены коды Logon Type.
| Код Logon Type | Описание |
|---|---|
| 0 | System |
| 2 | Interactive |
| 3 | Network |
| 4 | Batch |
| 5 | Service |
| 6 | Proxy |
| 7 | Unlock |
| 8 | NetworkCleartext |
| 9 | NewCredentials |
| 10 | RemoteInteractive |
| 11 | CachedInteractive |
| 12 | CachedRemoteInteractive |
| 13 | CachedUnlock |
При удаленном подключении к рабочему столу компьютера по RDP, в журнале событий появится записи с Logon Type 10 или 3. Подробнее об анализе RDP логов в Windows.
В соответствии с этой таблицей событие локального входа пользователя на компьютер должно содержать Logon Type: 2.
Для фильтрации события входа по содержать Logon Type лучше использовать PowerShell.
Анализ событий входа пользователей в Windows с помощью PowerShell
Допустим, наша задача получить информацию о том, какие пользователи входили на этот компьютер за последнее время. Нам интересует именно события интерактивного входа (через консоль) с
LogonType =2
. Для выбора события из журналов Event Viewer мы воспользуемся командлетом Get-WinEvent.
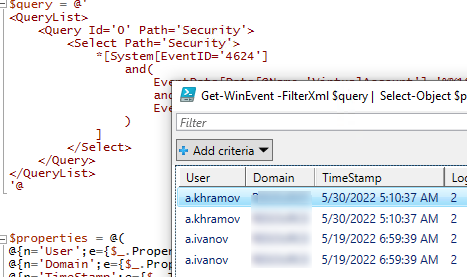
Следующий PowerShell скрипт выведет история входа пользователей на текущий компьютер и представит ее в виде графической таблицы Out-GridView.
$query = @'
<QueryList>
<Query Id='0' Path='Security'>
<Select Path='Security'>
*[System[EventID='4624']
and(
EventData[Data[@Name='VirtualAccount']='%%1843']
and
EventData[Data[@Name='LogonType']='2']
)
]
</Select>
</Query>
</QueryList>
'@
$properties = @(
@{n='User';e={$_.Properties[5].Value}},
@{n='Domain';e={$_.Properties[6].Value}},
@{n='TimeStamp';e={$_.TimeCreated}}
@{n='LogonType';e={$_.Properties[8].Value}}
)
Get-WinEvent -FilterXml $query | Select-Object $properties|Out-GridView
Если нужно выбрать события входа за последние несколько дней, можно добавить pipe с таким условием:
|Where-Object {$_.TimeStamp -gt '5/10/22'}
Командлет Get-WinEvent позволяет получить информацию с удаленных компьютеров. Например, чтобы получить историю входов с двух компьютеров, выполните следующий скрипт:
'msk-comp1', 'msk-comp2' |
ForEach-Object {
Get-WinEvent -ComputerName $_ -FilterXml $query | Select-Object $properties
}
Если протокол RPC закрыт между компьютерами, вы можете получить данные с удаленных компьютеров с помощью PowerShell Remoting командлета Invoke-Command:
Invoke-Command -ComputerName 'msk-comp1', 'msk-comp2' {Get-WinEvent -FilterXml $query | Select-Object $properties}
Уровень сложностиСредний
Время на прочтение5 мин
Количество просмотров22K

Журналирование событий информационной безопасности является важным элементом системы защиты информации. Нам необходимо знать какое событие когда произошло, когда какой пользователь пытался зайти в систему, с какого узла, удачно или нет, и так далее. Конечно, некоторые события ИБ сохраняются в журналах ОС при использовании настроек по умолчанию, например, не/удачные входы в систему, изменения прав доступа и т. д. Однако, настроек по умолчанию и локального хранения логов недостаточно для эффективного мониторинга и реагирования на события ИБ.
В этой статье мы посмотрим, как можно организовать эффективный аудит узлов под управлением ОС Windows, а в следующей статье настроим централизованный сбор событий с нескольких узлов и попробуем с помощью Powershell автоматизировать обработку собранных событий.
Зачем нужно централизованное хранение
Локальное хранение журналов событий имеет целый ряд недостатков, не позволяющих использовать этот механизм для мониторинга событий ИБ. С точки зрения безопасности локальные журналы хранят все события только на данной машине. Пока злоумышленник пытается получить доступ и поднять привилегии на данной машине, некоторые события обличающие его действия, возможно будут сохраняться в логах, но как только он получит необходимые права, он сможет почистить журнал событий, затем заполнить его фиктивными логами, в результате чего мы не увидим событий, связанных с компрометацией узла.
Да, при очистке лога будет создано событие ‘1102 Журнал аудита был очищен’, но от этого события тоже можно избавиться, просто заполнив лог большим количеством фиктивных событий.

Так как, обычно EventLog пишется по принципу циклической записи, более старые события удаляются, и их заменяют более новые.
Ну а создать поддельные события можно с помощью того же PowerShell, используя командлет Write-EventLog.
Таким образом, локальное хранение событий это не самый лучший вариант работы с логами с точки зрения безопасности. Ну а кроме того, нам не слишком удобно анализировать журналы событий, если они хранятся только локально. Тогда необходимо подключаться к журналам событий каждой локальной машины и работать с ними локально.
Гораздо удобнее пересылать логи на отдельный сервер, где их можно централизованно хранить и анализировать. В таком случае, в процессе выполнения атаки мы можем получать события от атакуемого узла, которые точно не будут потеряны. Кроме того, даже если злоумышленник сможет очистить лог на локальной машине, на удаленном сервере все события сохраняться. Ну и если события от нескольких узлов сохраняются централизованно на одном сервере, то с ними гораздо удобнее работать, что тоже не маловажно при анализе логов.
Эффективный аудит
Мы разобрались с необходимостью централизованного мониторинга событий. Однако, еще необходимо разобраться с тем, какие именно события должны присутствовать в наших логах. С одной стороны в логах должны присутствовать важные события с точки зрения ИБ, а с другой, в нем не должно быть слишком много неинтересных событий, например постоянных обращений к каким-либо файлам или сообщений о запуске каких-либо процессов, не представляющих никакого интереса для ИБ. Таким образом, чтоб нам не потонуть в большом объеме ненужных событий и не потерять что-то действительно важное, нам необходимо грамотно настроить политики аудита.
Для настройки откроем Политики аудита (Конфигурация компьютера / Конфигурация Windows / Параметры безопасности / Локальные политики / Политика аудита (Computer Configuration / Windows Settings / Security Settings / Local Policies / Audit Policy).

Также нам потребуются расширенные политики аудита, которые можно открыть здесь: Конфигурация компьютера / Конфигурация Windows / Параметры безопасности / Конфигурация расширенной политики аудита (Computer Configuration / Windows Settings / Security Settings / Advanced Audit Policy Configuration).

Отличием политики расширенного аудита является наличие подкатегорий и теперь мы можем управлять аудитом на уровне не только категорий, но и подкатегорий. Если сравнить Политики аудита и Расширенные политики аудита, то можно заметить, что разделы в обычных политиках в свою очередь разделены на подразделы в расширенных политиках, что позволяет нам настраивать более подробные категории аудита. Так, для группы Вход учётной записи (Account Logon) мы можем настроить четыре проверки -Аудит проверки учётных данных, Аудит службы проверки подлинности Kerberos, Аудит операций с билетами службы Kerberos, Аудит других событий входа учётных записей.
Для каждого типа аудита мы можем настроить аудит событий успеха или отказа. С событиями успеха нужно быть аккуратными. Так, для того же аудита входов в систему мы рискуем получить большое количество событий успешного входа, которые по факту не будут представлять никакой ценности. Также, не стоит включать в аудите доступа к объектам, аудит событий «платформы фильтрации Windows», потому что он генерирует крайне большое количество событий (всё сетевое взаимодействие хоста). В результате мы снова рискуем получить большое количество ненужных событий. В результате срабатывания настроек политик аудита, в журнале создаются события, каждое из которых имеет собственный код.
Для эффективного аудита нам необходим сбор следующих типов событий: 4624 (Успешный вход в систему), 4647 (Выход из системы), 4625 (Неудачный вход в систему), 4778/4779 (Соединение/разъединение по RDP), 4800/4801 (Блокировка/Разблокировка рабочей станции) и некоторые другие.
При анализе событий нам важно понимать, как именно был осуществлен вход в систему или с каким кодом мы получили событие о неудачном входе в систему.
Посмотрим типы входа в систему:
2 – интерактивный
3 – сетевой (через сетевой диск)
4 – запуск по расписанию
5 – запуск сервиса
7 – разблокировка экрана
8 – сетевой (Basic Authentication в IIS)
10 – подключение по RDP
11 – вход по закешированным учетным данным
В приведенном ниже скриншоте у нас представлен вход в систему при запуске сервиса

И посмотрим, как мы можем узнать причину неудачного входа в систему
0xC0000064 — такого пользователя не существует
0xC000006A — неверный пароль
0xC0000234 — пользователь заблокирован
0xC0000072 — пользователь отключен
0xC000006F — пользователь попытался войти в систему вне установленных для него ограничений по дням недели или времени суток
0xC0000070 — ограничение рабочей станции или нарушение изолированной политики аутентификации (найдите идентификатор события 4820 на контроллере домена)
0xC0000193 — срок действия учетной записи истек
0xC0000071 — истек пароль
0xC0000133 — часы между DC и другим компьютером слишком сильно рассинхронизированы
0xC0000224 — пользователю необходимо сменить пароль при следующем входе в систему
0xc000015b Пользователю не был предоставлен запрошенный тип входа в систему (он же право входа в систему) на этом компьютере
Таким образом, по значениям данных кодов в соответствующих событиях мы можем понять, что стало причиной неудачного входа в систему или каким образом пользователь или сервис осуществили вход.
На картинке ниже представлен неудачный интерактивный вход в систему, причиной которого стало указание неверного пароля.

В следующей статье мы посмотрим, как средствами PowerShell можно извлекать различные значения из событий и делать обработку логов более “человеко-удобной.
Заключение
В этой статье мы рассмотрели виды аудита в современных версиях ОС Windows, поговорили о том, какие именно события должны собираться в системе и что означают некоторые поля в этих событиях. В следующей статье мы настроим централизованный сбор событий с нескольких источников и попробуем с помощью PowerShell настроить автоматический анализ собираемых событий.
Напоследок приглашаю вас на бесплатный вебинар, где мы узнаем, зачем нужны бэкапы и как их организовать путем сервисов в Windows.
Logon/Logoff events in the Security log correspond to the Audit logon events policy category, which comprises nine subcategories. As the name implies, the Logon/Logoff category’s primary purpose is to
allow you to track all logon sessions for the local computer. As we discussed
earlier, there is a subtle difference between authentication events, which are
covered by the Account Logon events discussed in the previous chapter, and
logon events, which track access to a given computer. No matter which type of account (i.e., domain or local) or which type of logon session (e.g., interactive, network, remote desktop) the Logon/Logoff category generates a logon event and a logoff event at the beginning and end of each logon session. Those two events are logged by the Logon and Logoff subcategories.
As for the other seven subcategories, some of them have
nothing to do with logon or logoff activity. You’ll see some events that allow
you to track the use of Terminal Services, screensaver logons, and so forth. In
our opinion, the three IP Security (IPsec)-related subcategories and the
Network Policy Server subcategory belong somewhere else. Windows
provides IPsec support for authentication, encryption, and integrity at the
IP-packet level. Network Policy Server a role that can be added to Server 2008,
as well as the Microsoft’s RADIUS Server role. It includes what was previously
known as Internet Access Server (IAS) and Network Access Protection (NAP). Regardless,
Microsoft has done a lot to help you track every avenue that is used to access
the server.
|
Logon/Logoff Subcategories |
Comment |
|
Logon |
Use logon ID to correlate other events |
|
Logoff |
Not always present |
|
Account Lockout |
Not used (see Chapter 4 for lockout events) |
|
IPsec Main Mode |
Establish Internet Key Exchange (IKE) |
|
IPsec Quick Mode |
IPsec security associations |
|
IPsec Extended Mode |
Multiple authentications |
|
Special Logon |
Admin type logons |
|
Other Logon/Logoff Events |
Screensaver, Remote Desktop. etc. |
|
Network Policy Server |
Combination of IAS and NAP |
Logon Events
Whether a user tries to log on by using a local SAM
account or by using a domain account, the Logon subcategory records the attempt
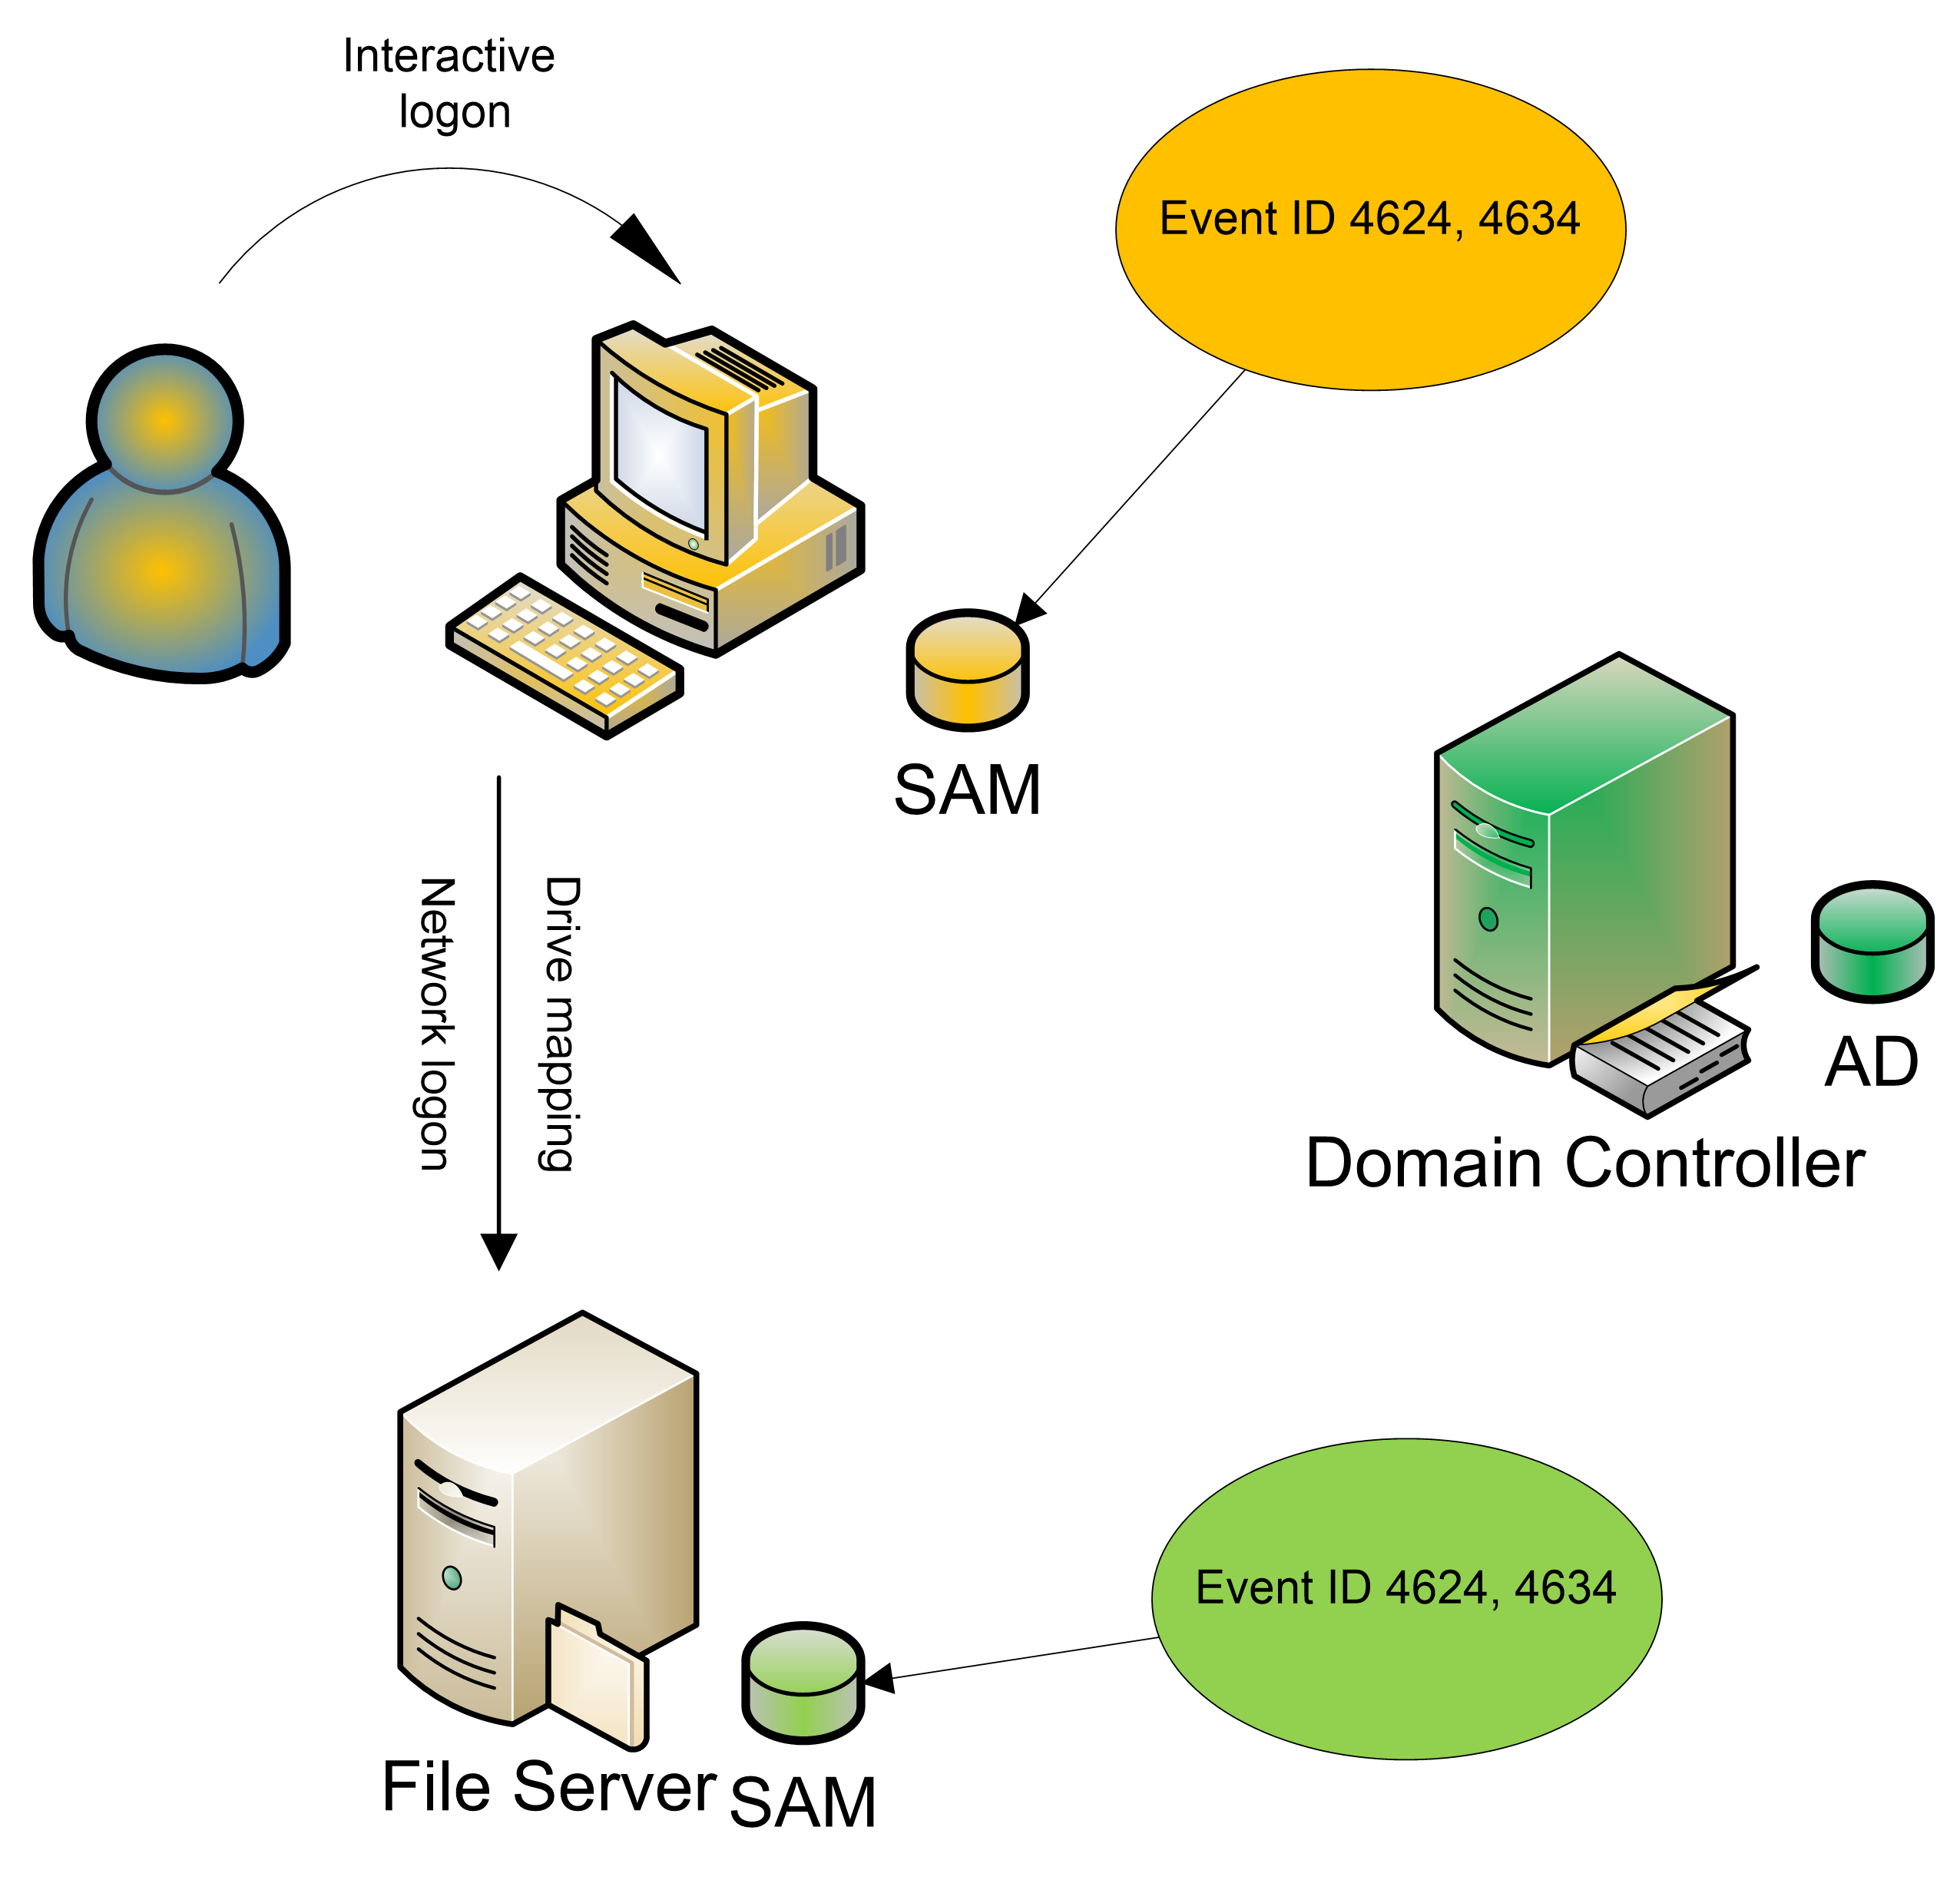
on the system to which the user tried to log on as shown below. When the user logs on to a workstation’s console, the workstation records
a Logon/Logoff event. When you access a Windows server on the network, the
relevant Logon/Logoff events appear in the server’s Security log. So, although
account logon events that are associated with domain accounts are centralized
on DCs, Logon/Logoff events are found on every system in the domain. The diagram below demonstrates the event IDs that are recorded when a user initially logs on
interactively to a workstation and accesses a shared folder on a file server.
These events are the same whether the user logs on with a local account or a
domain account.
How do you link a successful logon event to its
corresponding logoff event? You use the Logon ID field in the New Logon section.
Do not confuse this with the Logon ID field in the Subject section; the latter
displays the logon ID (0x3e7 in our example below) of the computer or server on which the event is recorded. The logon ID (0xe9cd0 in our example) is a
unique number between system restarts (on that system) that identifies a particular
logon session.
Log Name: Security
Source: Microsoft-Windows-Security-Auditing
Date: 11/3/2008 11:47:58 AM
Event ID: 4624
Task Category: Logon
Level: Information
Keywords: Audit Success
User: N/A
Computer: Lab2008.acme.ru
Description:
An account was successfully logged on.
Subject:
Security ID: SYSTEM
Account Name: LAB2008$
Account Domain: ACME
Logon ID: 0x3e7
Logon Type: 2
New Logon:
Security ID: ACME\Administrator
Account Name: Administrator
Account Domain: ACME
Logon ID: 0xe9cd0
Logon GUID: {b8efeca1-0319-d60e-91bb-f09a513d65bf}
Process Information:
Process ID: 0xbfc
Process Name: C:\Windows\System32\winlogon.exe
Network Information:
Workstation Name: LAB2008
Source Network Address: 127.0.0.1
Source Port: 0
Detailed Authentication Information:
Logon Process: User32
Authentication Package: Negotiate
Transited Services: —
Package Name (NTLM only): —
Key Length: 0
You might think by looking for a subsequent instance of
event ID 4634 that has the same logon ID as an instance of event ID 4624, you can
show when a user logged on and logged off. However, Windows doesn’t log event
ID 4634 in the way you’d expect, especially for network logons.
Let’s discuss interactive logons first. When Sue logs on
to her workstation, Windows logs event ID 4624 with logon type 2 and the logon
ID for the logon session. When Sue logs off, Windows logs event ID 4634 with
the same logon ID. But what if the system crashes or is unceremoniously powered
down before Sue logs off? When Windows restarts, it might reconstruct the fact
that Sue was logged on and record an instance of event ID 4634. Taken
literally, the event log won’t make sense because you’ll see a system restart
followed by a logoff. Logging that artificial instance of event ID 4634 is a
bit of a formality. At any rate, tracking user logoffs in a workstation’s
Security log is pretty easy.
Tracking network-session logoffs in a server’s Security
log is another story. When a user maps to a shared folder, the server logs
event ID 4624 with the logon ID of the logon session. However, if the user
opens no files and no other activity occurs on the network connection, the
server closes the logon session after a period of time to conserve
resources—even if the user remains connected to that share. This
server-initiated logoff is invisible to the user because when he or she finally
accesses a file, the server opens a new logon session.
DC Security logs contain many Logon/Logoff events that are
generated by computer accounts as opposed to user accounts. As with
computer-generated account logon events, you can recognize these logon and
logoff events because the Account Name field in the New Logon section will list
a computer name followed by a dollar sign ($). You can ignore
computer-generated Logon/Logoff events.
The Logon Process description field in the Detailed
Authentication Information section identifies the Windows process that
submitted the logon request. A logon process collects identification and
authentication information and then uses Local Security Authority services to
log on users. Because different logon processes handle specific logon types and
scenarios, the logon process name can help you fill in some gaps in the
information provided by Logon/Logoff events.
For instance, you might see event ID 4624 with logon type
3 and Bob’s username. Does that mean that Bob connected to a Windows resource
such as a shared folder or that he accessed a Web page on the server? If the
logon process is “advapi,” you can determine that the logon was a Web-based
logon: IIS processes logon requests through the advapi process. If the logon
was to a Windows resource and authenticated via Kerberos, the Logon Process
field would list “Kerberos.” Generally, the Logon Process field provides a hint
at how the user tried to access the system: at its console, through Server
Message Block (SMB) or Common Internet File System (CIFS) for shared-folder
access, or through IIS. Some logon processes are authentication-protocol
specific as shown in the chart below.
|
Process |
Explanation |
|
Winlogon |
Windows Logon Process |
|
Schannell |
Secure connection such as SSL |
|
KSecDD |
Kernel Security Device Driver |
|
Secondary Logon Service |
(runas) |
|
IKE |
Internet Key Exchange |
|
HTTP.SYS |
Kernel for Web server |
|
SspTest |
|
|
dsRole |
Directory Service function |
|
DS Replication |
Directory Service function |
|
CredProvConsent |
(user account control) |
|
NtLmSsp |
Might also be anonymous authentication |
The Authentication Package description field is closely
related to the Logon Process and Process Information fields. These fields
identify the DLL that was used to handle the actual authentication of the logon
attempt. Together, Logon Process and Authentication Package shown below provide valuable information about where and how a user attempted to log on
to the system. This information is important because there are so many ways to
access a Windows computer.
|
Package |
Explanation |
|
MICROSOFT_AUTHENTICATION_PACKAGE_V1_0 or NTLM |
NT LanManager, used for logon with local account and |
|
Wdigest |
Digest authentication, usually through IIS |
|
Microsoft Unified Security Protocol Provider or |
TLS/SSL authentication usually has to do with IIS Web |
|
Kerberos |
Kerberos (default authentication) |
|
Negotiate |
Kerberos or NTLM, depending |
Logon/Logoff events aren’t a good option for tracking
domain account authentication or for detecting attempts to use local SAM
accounts to access computers. However, they do provide some information that
would otherwise be unavailable.
First and foremost, Logon/Logoff events on a system give
you a complete record of all attempts to access that computer, regardless of
the type of account used. Second, these events reveal the type of logon, which
you can’t determine from Account Logon events. Logon/Logoff events also provide
the IP address of the client computer, which is useful information for
NTLM-based logons because NTLM Account Logon events don’t provide the IP
address. An example of the first part of a logon event is in
Error!
Reference source not found.
. (When you copy an event, Microsoft also
includes an attempt to explain parts of the event and presents the info in XML
format.) Both network and interactive logons are recorded by event ID 4624.
The logon type fields shown in the chart below are useful because they help you to identify how the user logged on. Logon type 2 indicates an
interactive logon at the console. Type 3 indicates a network logon. You’ll
likely see a lot of these two types; sessions can time out or be torn down and
be re-established by a server without the user being aware of it; most
connections to a server will be type 3.
|
Logon Type |
Description |
|
2 |
Interactive (logon at keyboard and screen of system) |
|
3 |
Network (i.e., connection to shared folder on this |
|
4 |
Batch (i.e., scheduled task) |
|
5 |
Service (service startup) |
|
7 |
Unlock (i.e., unattended workstation with password-protected |
|
8 |
NetworkCleartext (i.e., logon with credentials sent in |
|
9 |
NewCredentials (e.g., RunAs, mapping a network drive with |
|
10 |
RemoteInteractive (e.g., Terminal Services, Remote Desktop, |
|
11 |
CachedInteractive (logon with cached domain credentials |
So now you know who logged on and how. Knowing where the
user logged on would also be useful; you can use the identified workstation
name and IP address to track down that information. Keep in mind that in a Dynamic
Host Configuration Protocol (DHCP) environment, computer names and IP addresses
can change from time to time.
Two other events appear under the Logon subcategory. Logon
failures will appear as event ID 4625.
In earlier Windows versions, several different events were
used for failures. Event ID 4625 merges those events and indicates a failure
code that will help to identify the reason for the failure. Microsoft did a good thing by adding the Failure Reason section to Windows
Server 2008 events. This section provides some of the translation for you, but
you can still earn your salt by becoming familiar with all these codes which are shown below.
|
Status and Sub Status Codes |
Description |
|
0xC0000064 |
user name does not exist |
|
0xC000006A |
user name is correct but the password is wrong |
|
0xC0000234 |
user is currently locked out |
|
0xC0000072 |
account is currently disabled |
|
0xC000006D |
reason not specified (Sub status may provide more information) |
|
0xC000006F |
user tried to logon outside his day of week or time of day restrictions |
|
0xC0000070 |
workstation restriction |
|
0xC0000193 |
account expiration |
|
0xC0000071 |
expired password |
|
0xC0000133 |
clocks between DC and other computer too far out of sync |
|
0xC0000224 |
user is required to change password at next logon |
|
0xC0000225 |
evidently a bug in Windows and not a risk |
Finally, this subcategory includes event ID 4648 (A logon
was attempted using explicit credentials), which will appear in a variety of
situations, such as when RunAs is invoked or when a scheduled task runs.
Logoff Events
Ostensibly, the Logoff subcategory should also provide the
ability to track the logon session that relates to a logoff (event ID 4634).
Unfortunately, the value of the Logoff subcategory is questionable at best;
these events don’t always tell you exactly when a particular user logged off.
For example if a dirty shutdown occurs, a logoff event will appear only during
the subsequent startup, when the operating system realizes that the user is no
longer connected.
To compensate for the problems with using event ID 4634 to
accurately track logoffs, Windows also logs event ID 4647 (A user initiated a
logoff). This event indicates that the user (rather than the system) started
the logoff process. Event ID 4634 usually occurs a couple of seconds later.
Event ID 4647 is probably a better event to use for tracking the termination of
interactive logon sessions.
Account Lockout
No events are associated with the Account Lockout
subcategory. You’ll find lockout events under User Account Management
subcategory discussed in Chapter 8.
IPsec Main Mode, IPsec Quick Mode, IPsec Extended Mode
These three subcategories
will generate many events, so you might want to consider turning on this
auditing only for troubleshooting IPsec or firewall issues. IPsec uses packet
filtering and encryption to enhance security and provides authentication,
integrity checking, and optional encryption at the packet level. IPsec can
provide a defense against a network attack by untrusted computers. A security
association (SA) is first established with IPsec Main Mode (also known as Phase
1); if this subcategory is enabled, the events will appear in the audit log.
After Phase 1 is used, Quick Mode (aka Phase II) negotiation takes place. The
negotiation of Quick Mode is protected by the Main Mode encryption and
filtering rules. In Quick Mode, two SAs are used: one for incoming packets and
one for outgoing packets. With Extended Mode, another round of authentications
can be performed. Multiple authentication is part of IPsec support for Network
Access Protection (NAP). See the article
«IPsec
and Group Policy: A Stronger Defense»
for an in-depth description. The events tell you whether negotiation and
authentication is successful and SAs are established, or whether negotiation
fails.
Special Logon
The Special Logon subcategory contains only one event:
event ID 4672, which indicates that a highly privileged user has logged on. This
event lets you know whenever an account that is assigned any
«administrator-equivalent» user rights logs on. For instance, you
will see event ID 4672 in close proximity to logon events (event ID 4624) for
administrators because administrators have most of these administrator-equivalent
rights. This right is a useful for detecting any «super user» account
logons. The right also is logged for any server or application accounts that
log on as a batch job (scheduled task) or system service. See the Logon Type
field in event ID 4624. You can correlate event ID 4672 to event ID 4624 by matching
the Logon ID.
Note: «User rights» and «privileges»
are synonymous terms that are used interchangeably in Windows. Administrator-equivalent
rights are powerful authorities that allow you to circumvent other Windows
security controls. Most administrator-equivalent privileges are intended for
services and applications that interact closely with the operating system. With
just a few exceptions, most administrator-equivalent privileges neither need
nor should be granted to end user accounts.
Other Logon/Logoff Events
The Other Logon/Logoff Events subcategory contains events
that are associated with screensaver, console locking, and Remote Desktop
connections. If your organization has a lockout policy—and it should—these
events can enable an auditor to see whether interactive and remote Terminal
Server sessions are actually being locked out when unattended.
Network Policy Server
The Network Policy Server subcategory logs events
associated with Windows’s Network Policy Server, which provides
Network Access Policy functionality for Windows networks including IPsec,
802.1x, quarantine and more. You can configure granular auditing for this and
other subcategories by using Auditpol.
Bottom Line
Logon/Logoff events correspond to the Audit logon events
policy category and can help you track the local computer’s logon sessions.
Although not the best option for tracking domain account authentication, these
events can provide information you won’t be able to obtain elsewhere.
Login events play a crucial role in maintaining the security of a Windows Server. They provide valuable information about who accessed the server, when they accessed it, and whether any suspicious activity occurred. By reviewing login events, you can identify potential security threats, ensure that user accounts are being used appropriately, and maintain a secure server environment.
In this blog post, we will guide you through the steps of enabling logon event auditing, viewing and filtering login events, and interpreting and taking action on login events. By following these steps, you can strengthen your server’s security and protect your organization from cyber threats.
Enable Logon Event Auditing
Enabling logon event auditing is the first step in reviewing login events in a Windows Server. Windows Server includes a built-in feature called Event Auditing, which records security-related events, such as logon events, in a log file. However, by default, Windows Server does not audit logon events, so you need to enable it manually.
To enable logon event auditing, follow these simple steps:
- Open the Local Group Policy Editor by typing “gpedit.msc” in the search bar and pressing Enter.
- Navigate to Computer Configuration > Windows Settings > Security Settings > Local Policies > Audit Policy.
- Double-click the Audit logon events policy.
- Click OK after Selecting the Success and Failure check boxes.
- Close the Local Group Policy Editor.
Once you have enabled logon event auditing, Windows Server will start recording logon events in the Security log. You can access the Security log through the Windows Event Viewer. With this feature enabled, you can now review login events and identify potential security threats on your server.
Windows Event Viewer
The Windows Event Viewer is a powerful tool that enables you to view and manage event logs on your Windows Server. It is a built-in feature and can be accessed through the Control Panel or the Start menu.
To access the Windows Event Viewer, follow these simple steps:
- Click on the Start menu. In the search bar, type “Event Viewer”.
- In the search results, click on “Event Viewer”.
- Expand the “Windows Logs” folder.
- Click on the “Security” log.
By following these steps, you can access the Security log, which contains important information about login events on your Windows Server. The Windows Event Viewer provides an easy-to-use interface for reviewing login events, enabling you to quickly identify any suspicious activity and take action to prevent potential security threats.
Viewing Logon Events
Once you have enabled logon event auditing and accessed the Security log in the Windows Event Viewer, you can start reviewing the logon events that have been recorded. By default, the Security log displays all events, not just logon events. To filter the log and show only logon events, you need to follow these steps:
- In the Security log, click on the “Filter Current Log” button in the “Actions” pane on the right-hand side of the screen.
- In the “Filter Current Log” dialog box, click on the “Event sources” drop-down list, and choose “”.
- Select both the “Audit Success” and “Audit Failure” checkboxes in the “Keywords” field
- In the “User” field, enter the name of the user whose logon events you want to view, or leave it blank to view all users.
- Click “OK” to apply the filter.
Once you have applied the filter, the Security log will display only logon events that match your criteria. This makes it easier to review and analyze login activity on your Windows Server and identify any potential security threats. By regularly reviewing logon events and filtering the Security log, you can stay on top of your server’s security and prevent unauthorized access to your system.
Filter Only Logon Events
To filter the Security log to show only successful or failed logon events, you can use the Event IDs that are associated with these events. The Event ID for a successful logon event is 4624, and the Event ID for a failed logon event is 4625. Here are the steps to filter the log and view only successful logon events:
- Open the Security log in the Windows Event Viewer.
- Click the “Filter Current Log” button in the “Actions” pane on the right-hand side of the screen.
- Choose “Microsoft Windows security auditing” from the “Event sources” drop-down list in the “Filter Current Log” dialog box.
- In the “Keywords” field, select the “Audit Success” check box.
- In the “Event IDs” field, enter 4624.
- In the “User” field, enter the name of the user whose logon events you want to view, or leave it blank to view all users.
- Click “OK” to apply the filter.
To filter the log and view only failed logon events, follow the same steps as above, but in step 4, select the “Audit Failure” check box, and in step 5, enter 4625 in the “Event IDs” field. By filtering the log to show only successful or failed logon events, you can quickly identify any suspicious activity and take appropriate action.
Interpreting and Taking Action on Login Events
After filtering the log to show only the logon events that you want to investigate, you can interpret and take action on the information provided in the event log. There are several key pieces of information that are important to review when analyzing logon events:
- Event ID: The Event ID indicates whether the logon event was successful or failed. As noted earlier, Event ID 4624 is for a successful logon event, and Event ID 4625 is for a failed logon event.
- Date and Time: The date and time of the logon event can help you identify when the event occurred and whether it coincides with any other events or activities.
- User Account: The user account associated with the logon event can help you identify who accessed the server. This information can be used to determine whether the logon event is expected or not.
- Logon Type: The logon type indicates how the user logged on to the server. There are various logon types, such as interactive, remote, and service logons.
- Source Network Address: The source network address helps you identify where the user was when they accessed the server. This information can be used to determine whether the logon event is suspicious or not.
If you find a suspicious logon event, it’s essential to take immediate action. Depending on the severity of the event, you may need to disable the associated user account, change passwords, or investigate further. Additionally, it’s always a good idea to review your security policies and procedures to ensure that you’re taking all necessary precautions to prevent similar events in the future.
Conclusion
Monitoring login events in a Windows Server is crucial for maintaining a secure and protected server environment. By enabling logon event auditing, accessing the Security log in the Windows Event Viewer, filtering the log to show only logon events, and understanding and responding to the important information provided by these events, you can quickly identify potential security threats and take appropriate action. Additionally, it is important to regularly review and update your security policies and procedures to ensure that you are employing the best practices to safeguard your sensitive data and prevent cyberattacks.
IT administrators often need to know who logged on to their computers and when for security and compliance reasons. Although you can use the native auditing methods supplied through Windows to track user account logon and logoff events, you may end up having to sift through thousands of records to reach the required log. Once you’ve found the required log, getting the required information for compliance and security reports is not an easy process.
Below are the steps to check Active Directory user login history using logon Event IDs.
- Step 1- Enable Auditing for User Logon/Logoff Events
- Step 2- Search Relevant Event IDs such as 4624, 4648 etc. in Event Viewer
Step 1- Enable Auditing for User Logon/Logoff Events
You can do this through two GPO settings:
1. Audit Logon Events: This setting generates events for starting and ending logon sessions. These events happen on the machine where you log in.
2. Audit Account Logon Events: This setting generates events on the computer that validates logons. When a domain controller authenticates a domain user account, events are generated and stored on that domain controller.
Below are the steps to enable auditing of user Logon/Logoff events:
- Open the “Group Policy Management” console by running the “gpmc.msc” command.
- If you want to configure auditing for the entire domain, right-click on the domain and click “Create a GPO in this domain, and Link it here…”.
- Create a new GPO dialog box that appears on the screen. Enter a new GPO name.
- Go to the new GPO, right-click on it, and select “Edit” from the context menu.
- “Group Policy Management Editor” window appears on the screen.
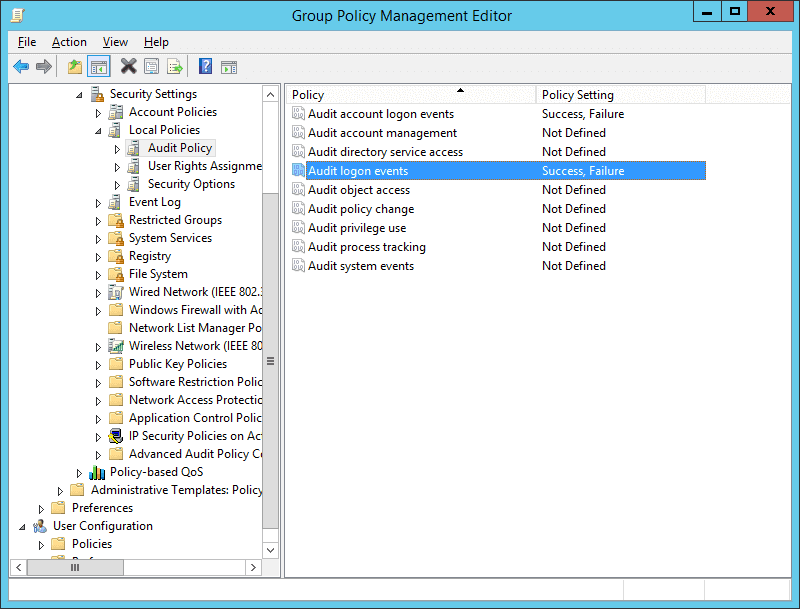
- In the navigation pane, go to “Computer Configuration” ➔ “Policies” ➔ “Windows Settings” ➔ “Security Settings” ➔ “Local Policies” ➔ “Audit Policy”.

Figure: Configuring audit logon events policy - In the right pane, double-click the “Audit logon events” policy to open its properties window.
- Select the “Success” and “Failure” checkboxes, and click “OK”.
- Similarly, you have to enable “Success” and “Failure” for “Audit Account Logon Events”.
- Close “Group Policy Management Editor”.
- Now, you have to configure this new Group Policy Object (containing this audit policy) on all Active Directory objects including all users and groups. Perform the following steps.
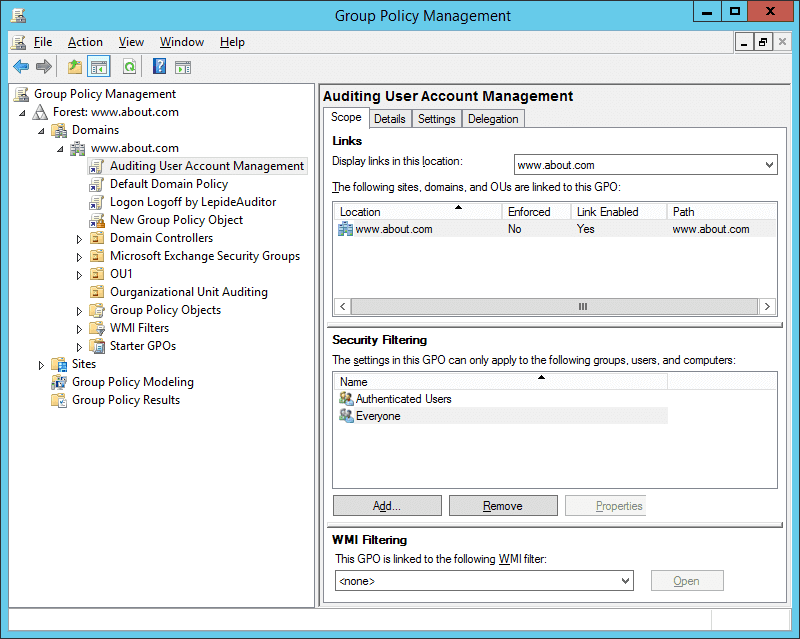
- In In “Group Policy Management Console”, select the new GPO (containing the above change).
- In the “Security Filtering” section in the right panel, click “Add” to access the “Select User, Computer or Group” dialog box.
- Type “Everyone”. Click “Check Names” to validate this entry. Click “OK” to add it and apply it to all objects.

Figure : Applied the Group Policy Object to everyone - Close “Group Policy Management Console”.
- Now, run the following command to update GPO.
- gpupdate /force
Don’t waste your time with Event Viewer. Track user login history easily with Lepide’s AD auditing free tool.
By submitting the form you agree to the terms in our privacy policy.
Step 2- Search Relevant Logon Event IDs in Windows Event Viewer
After you have configured log on auditing, whenever users logon into network systems, the event logs will be generated and stored. To find out the details, you have to use Windows Event Viewer. Follow the below steps to view logon audit events:
- Go to Start ➔ Type “Event Viewer” and click enter to open the “Event Viewer” window.
- In the left navigation pane of “Event Viewer”, open “Security” logs in “Windows Logs”.
- You will have to look for the following event IDs for the purposes mentioned herein below.
For user logon, you have to search for 4624 and 4648 logon event IDs. For failed logon, you have to search for 4625. For logoff events, you have to search for 4634 and 4647.
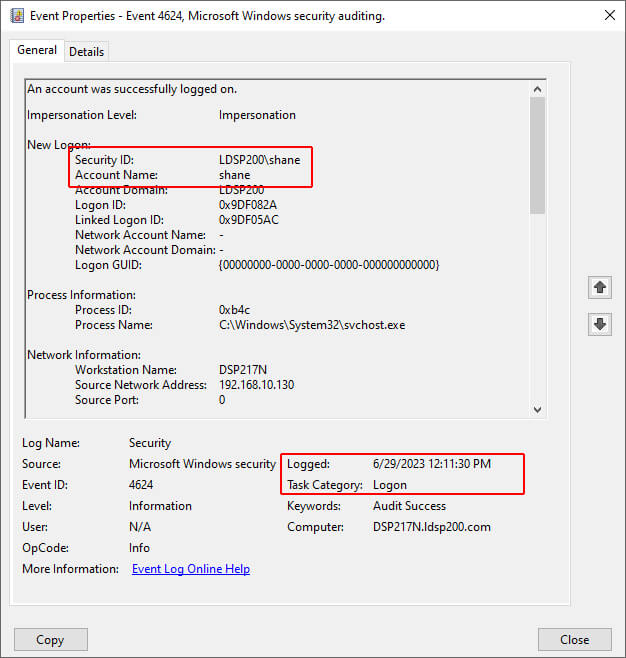
In this article, we are searching for logon event IDs 4624 and 4648. The following screenshot shows Windows Event ID 4648 for the user logon attempted using explicit credentials.
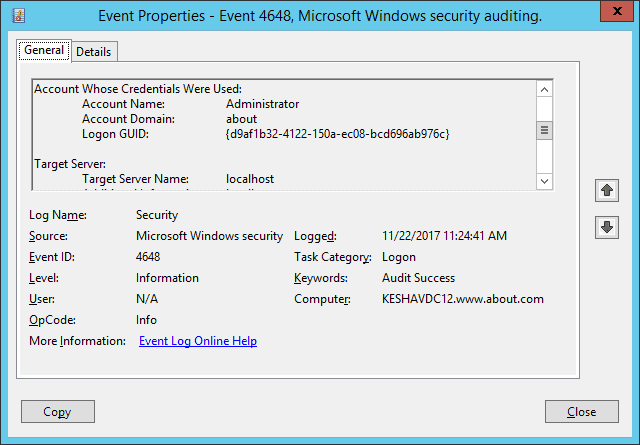
The following screenshot of Windows Event ID 4624 shows the session start time is displayed as Logged. In the Event Properties given below, a user, Shane, had logged in on 6/29/2023 at 12:11:30 PM.
Check User Login History with Lepide’s Free Tool for AD Auditing
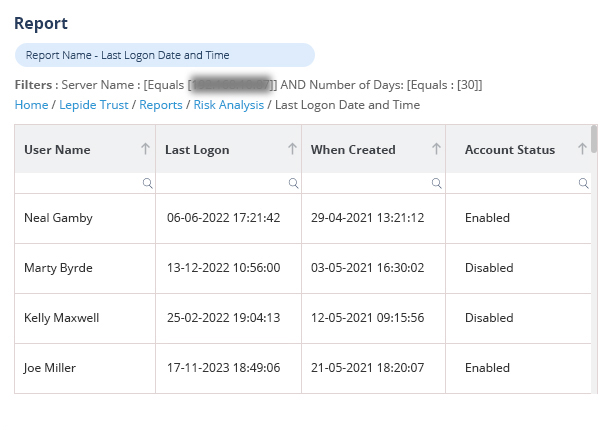
Using Lepide Change Reporter for AD, you can easily monitor AD users’ login history by tracking their logon and logoff activities in real-time. The solution collects log on information from all added domain controllers automatically. Its report contains details on logon or logoff events, including when users logged in, from which computer, and when. You get accurate and instant reports on the login details of users in the network. The following screenshot shows a successful user logon report event captured by Lepide’s free tool::
Lepide Change Reporter provides following reports related to logon/logoff:
Conclusion
In this article, the steps to audit the user logon and logoff events through native auditing are explained. However, much noise is generated for the logon or logoff events that make it complicated for the IT administrators to have a real-time view. The easiest and more efficient way to audit the same with Lepide’s Active Directory Auditing Free Tool has also been explained.